All these toys have the same principle of operation: when the Belchat planks are shifted with knobs, and the Goslings and Chickens hit the planks fixed on them with their beaks. upper slats. As you can see, a simple mechanism is used here too. Bogorodsk toy "Blacksmiths".
Before making a toy, carefully study the drawing, and only then proceed to marking the characters' figures on plywood. Usually, each figurine has weak points that can break even during the sawing process or during testing. For example, Squirrels have paws, ears; Goslings and Chickens have beaks. When marking, try, if possible, to place these elements along the fibers, and when cutting out, make sure that the jigsaw file moves from the outside of the marking (so that the dimensions and, consequently, strength do not decrease). Be especially careful when marking and cutting out elements that will experience shock loads during operation, for example, the front legs of Squirrels, the beaks of Goslings and Chickens. The result of incorrect marking and sawing can be seen in this photo as an example (Fig. 2.).

An inexperienced student did not take into account the direction of the fibers when marking, and even reduced the size of the beak when sawing. As a result, the gosling (right) broke off its beak during the first test.
Unfortunately, quality plywood acquisition is not always possible. You have to cut out what you have. Sometimes the veneer peels off, small elements fall out. This is especially true with wrong side. To prevent these cases, it is recommended to stick paper on this side, or apply a layer of PVA glue. These measures will significantly increase the strength of plywood.
To make any of these toys, you will need three-layer plywood, PVA glue, sandpaper, a saw table, a jigsaw, small cloves, an awl, a hammer, an electric burner, and wooden planks.
The sequence of manufacturing the toy "Squirrels" (Fig. 3.)

1. Using the drawing (Fig. 4), mark the figures of Belchat and the board, on which they will strike with their cones.
2. Cut out the marked parts with a jigsaw.
3. Decorate the figurines with burning or painting with paints.
4. In the paws of the figurines, pierce holes with an awl, into which the carnations should pass freely.
5. Fix the figures on the planks, as shown in Fig. 3. without hammering nails to the end.
6. Test the toy, adjust if necessary. Convinced of correct work, finish off the nails without pressing the figurines tightly against the planks.

The rest of the toys (goslings and chickens) are made in a similar sequence, using the appropriate drawings (Fig. 5, Fig. 6.).


In the manufacture of any toy, it is desirable to make your own changes that improve strength, finish, technology, etc. On Fig.7. options for making chicken toys are given.


Here, the figurines of chickens have false wings, eyes made of beads, instead of a plank there is a plate with millet. When finishing, stain and varnish were used.
Literature:
1. A.P. Zhuravleva, L.A. Bolotina. Initial technical modeling, Moscow, Education, 1982
2. Zhukariy mobile. "Boboche fun"
3. Website lobzik.pri.ee
Movable toy "Blacksmiths"

First of all, a few words about the history of this toy.
Back in the 17th century, in the village of Bogorodskoye near Moscow, a woman, a mother of two children, carved a human figure out of a wooden block with a knife. When the children played enough, the father took it to the market and sold it. He ordered a new one. So the wife began to carve toys for sale, and the husband to sell them. This is where Bogorodsk carving began, which to this day is famous for its craftswomen and craftsmen, surprising with its wonderful creativity.
For Bogorodsk carving characterized by a wide variety of genres. These are figurines of animals and birds, and entertaining everyday scenes, and all kinds of toys with movement. Mainly soft, easy-to-work linden is used. The skill and creative imagination of many generations of carvers are passed on in the art of Bogorodsk carving from generation to generation. Here, Bogorodsk skills of working with a chisel and a knife, an artistic system of the plastic structure of figures and features of their decorative cutting were formed. Creating toys where the characters move, the craftsmen also proved to be original designers. Simple tricks - the use of moving bars, moving parts attached to springs or ropes, simple button mechanisms are used in a variety of compositions, enhancing the brightness of the artistic imagery of the toy, making it truly alive.


The Bogorodsk toy "Blacksmiths" is very popular in many countries. When the planks are shifted to one side and the other, the figures of a man and a bear alternately strike with hammers on the anvil. There are many variations of this toy. Each master reflects this story in his own way. Make such a toy experienced master who has mastered the techniques of Bogorodsk carving, and I offer you a simplified version in which the principle of the mechanism is preserved, but the figures of a man and a bear are cut out of plywood with a jigsaw. Fifth graders, boys and girls make such a toy in my circle. Sketches of drawings for a man and a bear were made by my former student Lev Voloshin when he was in the 7th grade of a gymnasium and at the same time at an art school. A sample of such a toy is shown below in the photo.

To make this toy we need the following materials: three-layer plywood (about half the size of A4), two planks of rectangular section 20x15 mm 240 mm long from any wood species, six carnations 10-15 mm long and PVA glue.
Necessary tools and accessories: sawing table, jigsaw, hammer, awl, electric burner, medium grit sanding paper, soft pencil, carbon paper.

Sequence of work:
1. Print the drawing on the printer. If this is not possible, draw figures of a man and a bear in 10x10 mm cells.
2. Prepare plywood: check for knots, delamination, mechanical damage and other defects; sand the front surface with a sandpaper (you need to grind only along the fibers!).
3. Fix carbon paper on the plywood blank (with the side where the dye is applied - to the surface of the plywood!) And the drawing with two buttons or small studs, hammering their depth of 2-3 mm. Position buttons or studs so that you can lift the carbon paper along with the drawing and check the quality of the markup. Make sure that the thin elements of the pattern (in this case, the hammer handles) are located along the fibers, this will significantly increase the strength of the product.
4. Copy the drawing using a soft pencil or non-writing ballpoint pen.
5. Lifting the carbon paper along with the drawing, make sure the markup is correct and only then remove the buttons or carnations.
6. Using a jigsaw, cut out the figures of a man and a bear. When sawing, make sure that the jigsaw file does not move along the marking line, but next to it from the outside.
7. Sand side surfaces sawn figures, apply a pattern using an electric burner.
8. Mark and saw out the anvil. It can only be sanded, drawing - at will.
9. Fix the anvil, adhering to the dimensions of the drawing, using PVA glue and two nails on one of the planks.
10. Now lay the planks as shown in the drawing, with an offset of 30mm.
11. In the figurines, pierce the holes for the studs so that they enter freely (with a small gap).
12. Fasten the man figure so that the hammer touches the anvil. Do not drive the nails in completely yet, they may have to be pulled out during setup and hammered in another place.
13. Now set the bear figurine so that its hammer is raised above the anvil. Note! The lines mentally drawn through the centers of the carnation caps should be parallel. For control, you can attach two rulers.
14. If you did everything right, when the planks are moved, the bear and the man will strike the anvil with their hammers. And, only after making sure that the toy works correctly, hammer in nails, but not very tightly so as not to press the figures to the planks.
Literature:
1. Elkin. The tree tells stories. Moscow, Enlightenment, 1978.
2. Artistic crafts of the Moscow region. Moscow worker, 1982.
3. M.G. Chereiskaya. Album "Russian souvenir". Leningrad, "Aurora", 1978.
4. S.G. Rykhlitsky. Making toys in the classroom. Journal "School and production", No. 5, 2005.
Toy "Pecking chickens"
do it yourself
In my carefree childhood, there was such a favorite toy: by pressing the levers, you could set two hens in motion: they "pecked" grain by grain, in turn .... Nothing special, just pampering, but this simple toy fascinated, forced two poor pecking and pecking birds...
I have not seen such fun in children's stores for a long time. This master class will help you make it yourself.
You will need:
- thick cardboard or plywood (DVP) 2 mm thick;
- velvet paper;
copy paper;
two wooden slats 30 cm long, 1 cm wide;
4 self-tapping screws No. 10 (or wooden toothpicks);
as well as tools: scissors or a jigsaw;
drill;
crosshead screwdriver.
If you are already experienced enough, try to make a plywood toy by sawing the figures along the contour with a jigsaw.
From velvet paper, cut out the finishing elements and glue them according to the pattern.
Put the rails on flat surface and move them relative to each other by 1 cm. Mark the center on each rail. Set aside to the right and left of the center 6 cm.
Place the cockerel part on the rails in mark A and pierce it with an awl in the places marked with crosses in the figure, while marking the locations of the holes on the rails.
A drill drilled small holes in the rails. Attach the cockerel to the rails and, aligning the holes, screw it on the front side with screws. Tilt the cockerel to the center of the rails. Lay on the slats in mark B the part of the chicken and attach it in the same way. Instead of screws, you can use toothpicks - firmly insert them into the holes. Break off the ends of the toothpicks to 0.5-1 cm on each side. Fix the ends of the toothpicks with suitable beads or pieces of plastic tubes (it is necessary that they fit tightly on the toothpick).
Your chickens they will start pecking if you move the slats left and right relative to each other.
Helicopter
Airplane 


locomotive whistle 

Great moving toy! 
Motion animation http://www.uniqueprojects.com/projects/crawlingbug/crawlingbugintro.htm
Blueprint http://www.uniqueprojects.com/projects/crawlingbug/crawlingbug.pdf
Toy boat with rubber motor
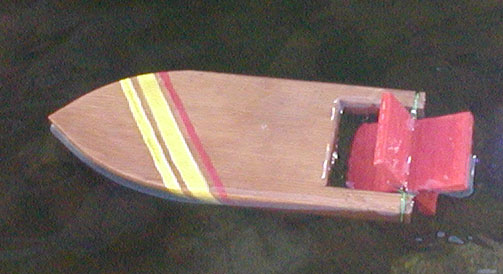
Cut a notch in the back for the paddle wheel. Leave enough wood on the sides of the neckline to support the elastic. Make a cutout 1/2" larger than wide. 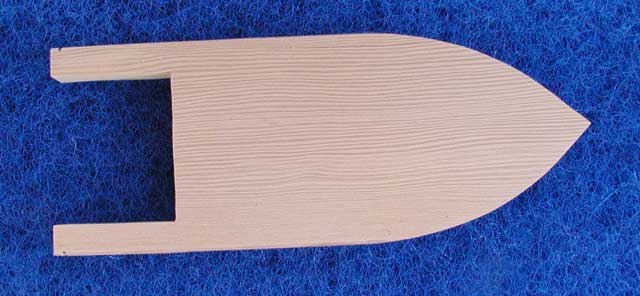
Make a paddle wheel out of 1/4" plywood or whatever thin wood you may encounter.
Cut two square pieces about 1/4" in a narrower circle than the cutout at the back of the boat.
Cut notches down the center of each piece as wide as the wood and 1/2 the width of the paddle. 
Put glue on the two parts of the paddle and slide them together.
Catamaran 

Use the chart to cut out all the pieces to your desired sizes. A rudder is not required, but it helps to steer the boat better. If you are making multiple boats, use cardboard, such as 2x4, for the body, then sawing it into several 1/2" thick pieces. Drill a 1/2" deep 1/4" diameter chimney hole, at the top of the cabin, as shown in the picture. Cut the groove into the paddle pieces. It should be as wide as the thickness of the paddle and go halfway through. Drill four pilot holes (slightly smaller than the nail width) for the nails. Chimney cut from 1/4" dowel.
Now all your Junior Woodcrafter needs are these six parts, one rubber band, seven 1" finishing nails (two per part), a hammer, some wood glue, one sheet of 150 sandpaper, and goggles.
Assembly.
A. Drive two trim nails, for the cab, to the bottom of the body where the black dots in the pictures indicate.
B. Drive the nails to the point they are going to go through or "just a little bit through" the wood.
C. Apply glue to the bottom of the cabin and place it on your upper body.
D. Hammer two nails all the way in.
E. Sand the cutting edge of the rudder is tapered, but not quite to sharp edges.
F. Drive two finishing nails, behind the wheel, to the upper body where the black dots in the pictures indicate.
G. Again, drive the nails to the point they are going to go right through or "just a little bit through" the wood.
H. Apply glue to the top of the handlebar and position it to the bottom of the body.
I. Hammer these two nails all the way in.
J. Place a drop of glue into the hole in the top of the cabin and glue the pipe into place.
K. Test fit two pieces of spatula together and sand to match if needed.
J. Assemble and glue the two parts of the shoulder blade together.
K. Sand all corners and round edges.
L. Place a rubber band over the paddle wheel and plug it into the grooves at the back of the body.
M. Allow all glue and paint to dry overnight.
N. Wind paddle wheel (back), then place it in the water and release.
Click on the image above to download a higher resolution image.
monkey
You can easily see how good the monkey rides that the tricycle is. The leg joints are all turned into a monkey.The front wheels are attached together on the dowel axle and both turn together.
Gun
The gun template you can find at href="http://www.runnerduck.com/images/toy_gun_handle.gif"> www.runnerduck.com 
/ photo /  on a piece of 1/2" to 3/4" wood.
Use the scroll saw, saw band or jigsaw to cut out the pattern.
Sand all the edges are smooth.
Drill 1" hole to run.
Cut a 5/8" piece of dowel 8". tapered i one end to fit the handle.
Cut a small notch in front of the dowel under the rubber band to allow the rest of the inch
Drill two holes in the handle, glue and dowel screw on the handle.
Drill two holes in the clothespin, blue, and screw it to the handle.
target;
Cut into 1/2 piece plywood 4" X 10".
drill 5/8" hole in the center of each end.
Cut two 5/8" dowel pieces 6" long. Drill a small hole large enough for a 1/2" wire clothes hanger from top to bottom in each dowel.
Glue dowels in plywood.Run the wire through the holes with small clothespins and balls for the gaps.
Bend the wires at both ends to hold in place.
Cut your targets out of paper.We already have for youwww.runnerduck.com / photo /  font> Parental controls are always recommended.
Once upon a time, wooden toys had practically no alternative for the vast majority of families with children. Nowadays, this niche is almost completely occupied by plastic products, and often not of the highest quality. Some vendors also offer factory-made wooden toys, but their prices are impressive. The way out of this situation can be. To make them, it is enough to have minimal skills in using simple woodworking tools.
Popular wooden toys
Wood is an excellent material for the manufacture of a wide variety of items and everyday items. Some of them will require high skill from you, but many DIY wooden toys simple enough. These primarily include educational items for children under the age of four:
Since children learn and grow quickly, such amusements catch their attention for a short time. Therefore, you should learn to do more complex DIY wooden toys. Among the most popular toys of this kind are:

Motivation for those who do DIY wooden toys, with rare exceptions, is unlikely to be associated with monetary gain. It is rather an expression of love for their children, as well as a source of pride for their skilled parents. For many of them, the manufacture of such toys becomes a real hobby in which you can reach great heights.
Materials and tools
First of all, the toy must be safe for the child. To the greatest extent it depends on the properties of the material and the quality of its processing. That's why DIY wooden toys recommended to be made from hardwood wood:
- lindens;
- aspens;
- poplars;
- alder.
Harder varieties (oak, birch, fruit trees) are also used in the manufacture of toys, but they are more difficult to process. conifers, whose wood is prone to the formation of long sharp chips, are not suitable for children's toys.
To do DIY wooden toys, one desire is not enough. You will need to acquire a minimum set of tools and Supplies. These include:
- hacksaw;
- jigsaw;
- drill;
- Sander;
- cutting tools - chisels, chisels;
- tools for marking blanks;
- wood glue, varnishes, etc.
In fact, the set of tools is determined individually, depending on which DIY wooden toys you are going to do. For example, for the manufacture of cylindrical parts, a desktop lathe will not interfere.
Manufacturing procedure
You can prepare the material for wooden toys yourself, but it is much easier to buy it in construction supermarkets, where there are special departments for the sale of illiquid assets. Cheap scraps, substandard wood and plywood are great to make DIY wooden toys. And the manufacturing order can be represented by the following algorithm:

To do DIY wooden toys as high as possible, for their manufacture, you should take well-dried wood. Since most of the details of such products are small in size, you will be required to be extremely careful when working with the material. The thinner and smaller wood detail the easier it is to split. Finishing the finished toy can be made in color, while preserving the natural texture and color of wood, using the burning technique. Remember that varnishes and paints for decorating surfaces should not contain volatile compounds and heavy metals.
Fastening rotating wheels is easiest to do with furniture (upholstery) nails. Their installation using metal studs (axles), for example, from bicycle spokes, will be much more reliable. It is even better to use special threaded studs, which allows you to fix the wheels with nuts and prevent them from falling off. Presence in a toy small parts significantly increases its value in the eyes of the child. For example, for a car, you can make a license plate, glue fenders over the wheels, etc.

Do you think that modern children cannot be interested in wooden products? That wooden toys are no longer sold? In vain. We have collected examples of products that have become popular in spite of fashion.
Great success with children are modular wooden toys that can be assembled like a designer. An excellent example is the Creative Wooden Creatures sets, designed by designer Hakan Gürsu and dedicated to land animals, sea creatures and amphibians. From 10 to 12 real animals, and an infinite number of fictional ones, you can assemble from one set of 72 parts.


You can create many different toys from wood, but catapults will not leave any child indifferent. E&M Labs, a California-based company, turns any kid's room into a war zone with its Trebuchette toys. And not only a children's room, but also a student hostel, classroom or office. You can assemble a toy trebuchet yourself, using the finished model and the recommended materials (birch plywood, delrin and leather). Once collected, the catapult is capable of launching a toy ball over a distance of more than 20 meters.

Like from regular board to make an item that will become a real family heirloom? The answer is simple: you just need to put length measures on it and attach it to the wall. The idea of a giant growth line called Wooden Ruler Measuring Stick came up with Lovestruck Interiors. Lines are made from different breeds wood, and the units are centimeters or feet.


Wooden souvenir beacons
An interesting topic for handmade souvenirs is lighthouses. Lighthouses are one of the leaders of the eternal theme of the sea and freedom, romance and adventure, which will always be in demand by the audience, including teenagers. There are several options for such a hobby business: creating exact copies of famous lighthouses, partially inspired by some elements, or making completely fantasy lighthouses from the world of dreams.


Wooden rocking chairs for children
Singaporean designer Chan Wai Lim creates designer wooden rocking chairs for children in the form of unusually shaped animals. Among her main works are barrel figures in the form of dogs, pigs and cats, located on giant springs. The girl admits that crafts for her, among other things, are a matter of the soul. The idea is inspired by childhood memories when she could play with real farm animals and wooden toys. Now Singapore is a solid metropolis, where there is no place for a tree or animals.


Kiko Kids has created Ashiato wooden sandals for children, which allow you to create unusual footprints in the sand. The molds on the sole are made in the form of paws of various animals. In the fun series, you can find sandals that allow you to make footprints of owls, monkeys, cats, geckos and walruses.


Slingshots can create a huge scope for creativity. Some masters follow the path of creating toy slingshots, for example, making them in the form of colored pencils, while others strive to turn a slingshot into a presentable souvenir. If the former are made for petty pranks, then the latter are for “satisfying the sense of beauty”. An example of the latter is the hickory wood slingshot called BCX, which was clearly designed not only for little boys but also for their dads. polished finish, unusual shape, comfortable handle - even holding such a weapon in your hands is already pleasant, and not just shooting. In addition, it is not required to hurt someone - a target is included with the slingshot, which, as it were, implies that you only need to shoot at it.


French freelance designer Todd Borka has come up with a series of wooden toys that allow children to create characters from different parts of the body. The child can make faces with unusual noses, lips and eyes, put people into cubes full height, changing their heads, legs and torsos and so on. In general, the game is rather not educational, but entertaining.


Very interesting wooden crafts are obtained if you work in the direction of “combine the incompatible”. Loulou & Tummie has created a series of wooden robots that aim to bridge the gap between modern and traditional toys. It turned out well - wooden robots look more alive and animated than their plastic and metal counterparts.


Craftsmen Atina and José from Greece specialize in making wooden tumbler toys self made. But not those tumblers that we are all used to, but those that need to be assembled into a turret so that they do not fall. For example, a child is invited to put together a composition with a boat on the waves, using rounded and not quite stable details. The authors sell their products under titled The Wandering Workshop via Etsy craft store.


Wooden toy Pecanpals Woodys is great example how to market your products today. The toy has a tail, ears and arms that it can move, and the head itself is able to rotate 360 degrees, nod and look in different directions. All the rest - beautiful pictures, video and marketing clean water, thanks to which the product is positioned as an "eco-friendly" toy, and even "premium class". The creators of Pecanpals Woodys from Melbourne earned more than almost $9,000 from it by presenting the project on the Kickstarter crowdfunding platform.


Another example from the “creative marketing” series is the Empathy Toy, designed to develop empathy. In addition to the constructor itself, the authors also took care of creating the rules of the game. He gathers collectively: one of those who gather is wearing a mask and does not see anything, and the second participant prompts him. As a result, victory is achieved by joint efforts, and in the process, children learn to hear each other and find mutual language. The creators raised more than 52 thousand Canadian dollars on their idea with the help of crowdfunding


An interesting way to play with the theme of the fairy tale about Pinocchio / Pinocchio came up with Mike He. A pencil inserted into the sharpening hole instantly turns into the nose of a fairy-tale hero. You can feel like Papa Carlo.


Designer furniture store owner Nicholas Holmes decided to expand his specialization and released a series of baby rattles, which at first glance slightly resemble pieces of a curtain rod. Rattles are made from three types of wood - cherry, black walnut and ash. A great and more stylish alternative to conventional plastic, and also made without the use of harmful adhesives.


Wicker beds for children
These handmade wicker beds are created by BERMBACH Handcrafted. A small manufactory from Frankfurt specializes in minimalistic rattan basket beds. A metal stand is used as a base, and the ends of the legs are made of oak, which do not scratch the floors. One such wicker bed costs 660 euros.
To date, the market for children's goods is oversaturated with toys made of low-quality, harmful materials. The main producer of such goods is China. This supplier has long supplanted competitors from other countries and has become almost a monopolist in the production of toys. Since China offers toys at a low price, Russian manufacturers forced to leave the battlefield. However, today the population is beginning to understand that children do not need cheap toys, but high-quality and environmentally friendly ones. That is why many come to the conclusion that you need to make wooden toys with your own hands. Or maybe not just make them for your children, but set up a small production?
Tools
What does it take to produce children's wooden toys, even in small batches?
First, you need space. It is desirable that there be at least three rooms: for woodworking, painting, assembly and packaging finished products. But this is ideal. In reality, the first time you can get by with a garage or cottage.
Secondly, you will have to acquire woodworking machines and some other equipment. At first, a chisel and drilling, milling, grinding and chisels are enough.
Thirdly, in order to make wooden toys with your own hands, you need equipment for painting. Here the choice is only for the master. The main thing is that all materials are environmentally friendly and do not harm children.
Fourth, you need equipment for packaging products. But that's in the future. So far, you can just buy boxes of suitable sizes and pack the products yourself.
Fifth, the staff. 2-3 people are enough to start production. Then, when the range and scale of production increase, additional workers can be hired.
Requirements for wooden toys
At self-manufacturing toys must follow a few rules:
- Toys should be easy to make. For example, a pyramid. Making such a toy is extremely simple, because they were invented a very long time ago. A rod is attached to the support, rings are put on it different sizes and colors with holes. The top of the pyramid is crowned with a ball. Everything, the toy is ready for sale.
- Toys should not have small parts that a child can put in his mouth. The consequences of violating this rule can be very sad for the manufacturer and fatal for the baby.
- All products must be bright, elegant and beautiful. Only such toys will be able to attract the attention of buyers and delight children.
Advantages of wooden toys

These items for games have their undeniable advantages:
Wooden toys are environmentally friendly and safe.
Wooden toys are strong and durable.
This is a traditional Russian wooden toy.
Range
First of all, pyramids, various wooden labyrinths for the smallest, cubes, rocking horses come to mind. It is advisable to make the cubes not too small so that children can build castles from them not for dolls, but for themselves. Of course, in this case, it is necessary to choose a lighter material, such as thin plywood, or even lighter. After all, large wooden toys will be too heavy and unsafe for the child.
You can make simple swords and shields for boys, cars, prefabricated houses for dolls.

Outdoor toys
If you decide to make wooden toys with your own hands, you should not forget about toys for the street. Various playgrounds, houses, slides, swings will be in steady demand. Although the market is full of plastic analogues, the buyer is not satisfied with the quality of such towns and corners. Wooden products will serve the child for more than one year, enabling the child to spend time outdoors with benefit and pleasure. Of course, outdoor playgrounds and towns are produced only to order, as different buyers need different configurations of these sets. Yes, and you can give the customer the opportunity to independently choose the color of the product - this will be a nice bonus.
Sports corners can be considered as outdoor toys. Of course, such children's wooden toys are bought not only for the street - they fit perfectly even in small apartments giving the child the opportunity to throw out the accumulated energy.

Drawings of toys
The master or business owner can draw drawings of wooden toys on his own. As long as no complicated things are being done, there is nothing difficult about it. More complex playgrounds for the street are made according to individual drawings, based on the age and height of future users.
If there is a need for a drawing, you can always contact a specialist who will make all the necessary calculations for a reasonable price.

Children love toys made of wood, especially if their parents created them, and the children also helped. In order to make wooden toys with your own hands, it is not necessary to be a carpenter. For example, anyone can make a wooden duck.
To do this, you need a piece of wood at least 2 cm thick, a template, a saw or a jigsaw, paints, a printer, nail files, a template, sandpaper.
Print on the printer an image of a silhouette of a duck.
Cut out the image, superimpose it on the tree and circle it with a pencil or pen.
Saw along the contour with a jigsaw. All sections must be carefully processed first with a rough nail file, then with sandpaper. This is done so that the child cannot get splinters.
Color the duck with your child. After the paint has dried, you can varnish the duck to make the color last longer.
You can leave the toy in this form, you can cut it into several parts to make a puzzle. In this case, all slices must be processed again.
You can drill holes and put the duck on the wheels, making a gurney for the baby.
Conclusion
Handmade wooden toys can bring joy not only to your children, but also to completely unfamiliar kids who can get reliable, safe and interesting toys. If you approach the matter with the mind and soul, then the work will bring not only moral satisfaction, but also quite tangible material profit. The main thing is to correctly calculate all the pros and cons of such an event. To minimize the risks, you can order a business project to a professional who will not only show the advantages and disadvantages, but also calculate the profitability and production.


