Wonderful material - polypropylene!
I use it to make various homemade items for myself and for friends.
Recently they asked me to make a small homemade project, or rather a stand. In total, it was necessary to solder six fittings and a couple of meters of pipe.
But here’s the problem: I just lent my soldering iron to friends, and I didn’t ask for it back so quickly.


I started thinking about what else I could use to solder polypropylene. I know they are soldering gas burner, but I don’t have it.
Materials and tools
But I have an old “bucket” soldering iron, which I haven’t needed for a long time. So I decided to make something out of it.
I needed a few more details.
Aluminum wire and plate;
Textolite sheet;
Thermostat and iron indicator lamp;
Ceramic insulators;
Thermal paste;
Thermal tape;
Poly Welding Attachment propylene pipes(25mm);
New electric plug;
Various bolts and nuts.


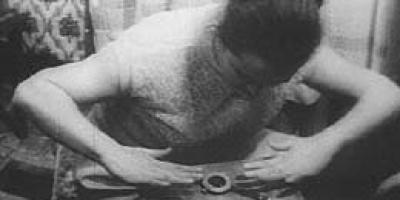
Making a soldering iron for polypropylene pipes
From aluminum plate two blanks were made: a substrate for the thermostat and a holder for the polypropylene nozzle.

The legs and parts of the body for the thermostat are made of PCB.


I connected an indicator light to the thermostat terminals. And connected the insulators using thermal tape.

I connected the top and bottom of the case with screws and nuts through insulators. The lower part of the body does not touch the boiler tubes.

To connect the thermostat in series, a break was made in the power cable. I soldered and insulated the wires with electrical tape along with the kettle handle.

I made the legs from aluminum with insulators from PCB plates at the end.

The 25 mm nozzle fits perfectly inside the boiler spiral. A U-shaped aluminum plate is already placed on top of the nozzle. The connection points are coated with thermal paste.


For soldering I needed a 20 mm nozzle. I connected it with a homemade screw made from an 8 mm bolt.

Al was also wound on top as an additional radiator. larger diameter wire.

Testing a homemade soldering iron

During the first test, one drawback was revealed, not counting the smoke and smell from the burning of the new “device” - not quite convenient work indicator. The light is on when the soldering iron is turned off and off when it is running. But this is not scary, it’s just a matter of habit. Perhaps I will upgrade it in the future.

Soldering pipes with a homemade soldering iron

The thermostat was set to low. Heating occurs quickly. I didn’t notice any difference in the quality of soldering, since the nozzle itself remained the same, only the heating element changed.

So I managed to make a couple of welding joints with my experimental soldering iron.

Plastic plumbing has come into our everyday life for a long time. An invariable attribute of the repair of the Soviet housing stock, along with metal-plastic windows, the water supply system was made of polypropylene pipes.
Advantages polypropylene water pipe before steel pipes are obvious:
- Cheapness and wide choose materials;
- Simplicity of work on marking and assembling the most intricate and complex options pipe routing;
- Environmental friendliness, resistance of the material to corrosion and salt deposits on the walls of polypropylene communications.
Those who have encountered the tedious and time-consuming procedure of installing water pipes from metal pipes, can be appreciated simple technique connecting plastic using a special soldering iron for polypropylene pipes.
If the time has come to renovate the apartment, the problem of replacing the water supply with plastic communications, depending on the availability of desire, money and free time, can be solved:
- Hiring a craftsman and a friend who has experience working with a device for soldering propylene pipes, who can help assemble pieces of plastic pipes marked and cut into a single whole using a soldering iron;
- Transferring the issue of turnkey repairs to a team of repairmen without any desire to understand the intricacies of assembly and soldering plastic assemblies;
- Doing all the work yourself.
The simplicity of assembling the soldering of plastic is so captivating that it is difficult to resist the temptation and solve the problem of plumbing in no other way than to choose and buy a soldering iron for polypropylene pipes.

The amount of money spent on purchasing the tool will be less than the cost of the specialist’s services, but provided that you really understand how to choose a soldering iron for polypropylene pipes. Essentially, the soldering iron for propylene parts and connecting fittings is a heating element with thermomechanical or electrical system heating control and indication. The heater has two attachments mounted on it, allowing you to simultaneously heat with a soldering iron. outer surface pipes and inner surface fitting. Heating lasts on average about 5 s, the parts are connected with slight manual pressure to set and form a strong connection within 2-3 s. If parts are overheated or connected lopsidedly, some of the molten plastic may get inside the pipe, and as a result, the flow area decreases.

Important ! Doing it yourself most soldering and assembly work, you are able to personally control the quality of soldering joints of polypropylene pipes.
For innovators and DIY enthusiasts, you can assemble a soldering iron for polypropylene pipes with your own hands. The strength and durability of the soldering depends on the perfection of the soldering iron and how high-quality the polypropylene pipes are.
What is good about a DIY soldering iron?
The operating principle of the soldering iron is simple and uses the principle of adhesion of the soldered surfaces of polypropylene parts heated to the softening temperature. There is not always a need to rewire or resolder half of the wiring water supply networks in the house. Sometimes you need to work with a soldering iron to make two or three connections. In this case, a homemade, do-it-yourself mini-soldering iron for polypropylene pipes from a handy heater can help out.
For someone with experience working with electrical wiring and using plumbing skills, making a small amateur version of a soldering iron for polypropylene pipes is a matter of two hours.
Usually, water pipes laid in channels and hidden from prying eyes by screens and decor, so you don’t have to worry about beauty and aesthetic appearance. Another thing is important - incorrect temperature adjustment and overheating of the pipe or fitting material, even under slight force, will lead to defects. In soldering, the first and main issue remains the quality of the connection of parts.
If, when working with a homemade soldering iron, you may fall slightly short of world standards appearance- no problem, for amateur cases this is allowed.
To assemble a homemade propylene pipe soldering iron you will need:
- The heating element is the soleplate of a regular electric iron, preferably in the form of a closed aluminum block with a thermostat and an electric cord with a plug;
- soldering iron attachments for polypropylene pipes and fittings of the required size for your pipes;
- nickel-plated M8 bolt-nut for attaching nozzles to the heater;
- digital multimeter with external thermocouple thermometer;
- a clamp or other fastening that allows you to securely fix the soldering iron on a utility surface.

In addition to temperature, the speed or power of heating the surface of the parts being joined is important. If you heat a polypropylene fitting or pipe for a long enough time, the parts will lose their shape and geometric dimensions under the influence of temperature.
Therefore, to quickly melt a surface with a diameter of 15-30 mm, a power of 700 - 900 W is required, which approximately corresponds to maximum power iron heater.

We assemble a homemade product for propylene couplings:
- At a distance of 30-40 m from the nose of the aluminum sole we drill through hole with a diameter of 8 mm and using a screw and nut we connect the nozzles for the pipe and fitting to the base of the heater;
- We install the iron handle on the heater sole so that it does not limit access to the attached attachments;
- We connect the wiring to the contacts of the iron heater;
- We turn it on and use a multimeter, a digital thermometer and a regulator on the iron to set the temperature to 265 o C.
We use a clamp to fix a homemade soldering iron of polypropylene pipes, which will allow you to solder parts yourself, without an assistant; the handle can also be made to suit you for the greatest convenience and minimal risk of getting burned.

Which soldering iron is better for polypropylene pipes
It has always been believed that the best tool is a professional option, designed for long-term use and with high parameters for soldering propylene pipes. Professional soldering iron for polyethylene pipes assumes:
- The use of materials for nozzles that are resistant to prolonged heating, with high thermal conductivity, and that do not stick to the heated surface of the polypropylene part; as a rule, brass or copper nozzles coated with Teflon or carbon are used;
- Easy and convenient change of nozzles on the heater flange; the kit includes a set for the main pipe sizes - from 16 to 160 mm;
- The metallized surface of the nozzles gives a high heating rate of polypropylene parts;
- The presence of a heater power supply stabilizer and automatic temperature regulation allows you to keep the soldering iron hot for as long as desired without the risk of failure of the heating element.
Mandatory attributes of professional models of soldering irons are an easily removable stand and a case for storing and carrying the device with accessories.
For your information ! For original models of soldering irons, unlike fakes, markings and information about the model are applied typographically to the body or to a metal substrate plate tightly sealed into the plastic. On fakes, the marking is pasted in the form of a metallized label and is easily separated from the soldering iron body.
For example, the widely known version of the soldering iron for polypropylene pipes is dytron or ditron - as you like. He is highly praised for his reliability and ease of use, unpretentiousness and robust construction. When soldering propylene parts, time passes by seconds; you have to quickly set up, drop or even throw the pin on the stand, and this practically does not affect its performance. There are three models in the DYTRON line:
- With a power of 850 W, the most popular in apartment renovations, it is used for polypropylene pipes with a diameter of up to 36 mm;
- Power 1200 W - for polypropylene pipes with a diameter of up to 160 mm;
- With a rod-shaped heater with a power of 650 W.

The soldering iron comes with a key for changing nozzles, which can be from 3 to 12 in a set, scissors for cutting polypropylene pipes, building level, gloves and stand. Despite all the advantages, it is worth noting one negative point - the clearly overpriced soldering iron.
Important ! Such devices are designed for many hours of operation, but in any case, they require careful care. non-stick coating on the nozzles. Teflon is very sensitive to scratches and chips, so you should not use hard or metal objects other than rags for cleaning.
But even specialists involved in soldering water pipes do not always strive to buy a soldering iron for polypropylene pipes in an expensive professional version. Many of the budget models, assembled from Chinese or Turkish components, work just as well as branded models.
Let’s take, for example, a typical repairman’s workhorse—the Soyuz soldering iron for polypropylene pipes:
- High heater power - up to 2 kW;
- The kit includes six standard nozzles with a diameter from 20 to 63 mm;
- In addition, the soldering iron is equipped with a hexagon wrench for changing the working tool, a stand for the device and a case.
The length of the power cord is only 130 cm, which is clearly not enough for work. But this size is typical for budget models, while professional soldering irons have a full 2.5-3.5 m. The Soyuz is equipped with a two-mode push-button heating control system and two color indicators - green and red, the latter lights up when the heating is turned on automatically.


The soldering iron is equipped with everything necessary for successful soldering of polypropylene pipes, so it is difficult to say whether it is worth overpaying for additional accessories, as is the case with expensive soldering iron models.
How to make a homemade soldering iron for polypropylene pipes? U good master always have high quality tools at hand. Even at home, there is always a tool, and if you don’t find a suitable one, you can assemble it yourself. If you have decided to change sewer, water, heating pipes, you will definitely need a soldering iron for polypropylene pipes.
To weld polypropylene pipes, a special soldering iron is used, which operates on the principle of an iron.
Nowadays it is very rare to find iron or cast iron pipes, plastic material has become very popular.
Which soldering iron is better?
There is a very large selection of this product. Sales consultants will offer you a variety of tools, but won't tell you which one is best. Therefore, first of all, you need to pay attention to the country of origin. Now in the ranking of the most popular soldering irons, the Czech Republic occupies first place, followed by Turkey, Russia in third place, and China in fourth place.
Such a device is used to heat the ends of polypropylene pipes and further connect them to each other. The device is made in such a way that it can work with different pipe diameters. To do everything right, you need to know temperature regime equipment. The configuration of the soldering iron consists of a base, two heating elements, nozzles of various diameters, which are attached to special holes.

The soldering iron allows you to easily connect the ends of polypropylene pipes of any size.
To understand the working principle of a soldering iron, it can be compared to the operation of an iron. But the iron is equipped with one heating element, and polypropylene soldering iron– two. It also has a thermostat and an additional built-in tool – a tape measure. The kit also includes an alcohol marker, a level, and a cutter for plastic pipes.
To start working with it correctly, you must first study soldering technology. The soldering iron should be installed on special legs (they are included in your kit), and only then plugged into the network.
Choose an element according to the size of the connector, which is intended for soldering itself. Heat until maximum temperature, connect the ends very quickly and evenly and press them together.
In order for everything to work out well the first time, the soldering iron must be heated to maximum temperature - about 20 minutes, then you need to wait 5 minutes for the tips themselves to warm up.
The soldering process itself will take about a minute, but it is better to read the instructions for the device. If there is a pause in the soldering process itself, do not try to reheat, since the pipes are plastic and the material itself stretches, which means that the seam may be damaged.
Return to contents
Homemade soldering iron for soldering polypropylene pipes

If you can’t afford the device or don’t have the extra money to purchase a soldering iron for polypropylene pipes, you need to make it yourself.
This technique can be made using an old iron.
You will need:
- iron 800 W;
- heater (not with a spiral, but with a heating element, preferably in an aluminum casing);
- Chromel-Copel thermocouple;
- two tips;
- two wires about 1 m long each;
- old tape recorder;
- asbestos wool;
- plexiglass;
- dichloroethane.
Return to contents
Stages of work completion

Homemade soldering iron for polypropylene pipes it is most convenient to make it from an old iron.
The temperature regulator is removed from the iron plate.
Remove all unnecessary protrusions and wiring, leaving only one bare slab.
Go to a turner and order two tips, one for the pipe, and the other for the fitting (for the fitting and nut). Take the dimensions yourself; to do this, measure the diameter of your pipe.
When the turner has done everything, use a drill to drill a hole with a diameter of about 6 mm, take the bolts and screw the ends.
On the opposite side from the nose of the iron, drill a hole of such a size that you can easily install a thermocouple.
All parts are connected and assembled into a casing.
Take a wire approximately 1 m long and connect it to a thermocouple.
Then they take another wire of the same length and connect it to the heating element. Exited out through the top of the handle.
The handle itself is attached to the outside of the casing.
At the next stage, it is necessary to create a space between the casing and the tile; it must be filled with a thermal insulator; you can take simple asbestos wool.

You should end up with two tips protruding beyond the casing; they need to be thermally insulated.
Now the thermostat itself is placed; it needs to be placed separately and preferably in a plastic case. You can use plexiglass and dichloroethane.
An old tape recorder can be useful for indication; there is an indicator there, and in it there are arrows and, most importantly, a zero mark. By all rules, this mark will be 270°.
If the arrow shows in the red sector, it means the temperature is above normal, and if it shows in the yellow sector, it means below.
Another important element is the resistor; it is located outside the thermostat housing.
It will show whether the heating element is working.
The process itself is as follows. As soon as you plug in the soldering iron, use the handle to set the temperature to 270°.
The LED will light up and give a signal that the soldering iron is starting to heat up to the desired temperature, and when it goes out, you can start working.
It’s up to you to decide what’s better – to assemble it yourself or buy it. A new soldering iron on the construction market will cost 15-18 thousand rubles. If you want to assemble it yourself, it will only cost about 2 thousand rubles. since any owner always has an old iron in the garage.
Plastic plumbing has come into our everyday life for a long time. An invariable attribute of the renovation of the Soviet housing stock, along with metal-plastic windows, was a water supply system made of polypropylene pipes.
The advantages of polypropylene water supply over steel pipes are obvious:
- Cheapness and wide selection of materials;
- Simplicity of work on marking and assembling the most intricate and complex pipe routing options;
- Environmental friendliness, resistance of the material to corrosion and salt deposits on the walls of polypropylene communications.
Those who have encountered the tedious and time-consuming procedure of installing a water supply system from metal pipes can appreciate the simple technique of joining plastic using a special soldering iron for polypropylene pipes.
If the time has come to renovate the apartment, the problem of replacing the water supply with plastic communications, depending on the availability of desire, money and free time, can be solved:
- Hiring a craftsman and a friend who has experience working with a device for soldering propylene pipes, who can help assemble pieces of plastic pipes marked and cut into a single whole using a soldering iron;
- Transferring the issue of turnkey repairs to a team of repairmen without any desire to understand the intricacies of assembling and soldering plastic components;
- Doing all the work yourself.
The simplicity of assembling the soldering of plastic is so captivating that it is difficult to resist the temptation and solve the problem of plumbing in no other way than to choose and buy a soldering iron for polypropylene pipes.

The amount of money spent on purchasing the tool will be less than the cost of the specialist’s services, but provided that you really understand how to choose a soldering iron for polypropylene pipes. Essentially, a soldering iron for propylene parts and connecting fittings is a heating element with a thermomechanical or electrical heating control and indication system. Two nozzles are mounted on the heater, allowing you to simultaneously heat the outer surface of the pipe and the inner surface of the fitting with a soldering iron. Heating lasts on average about 5 s, the parts are connected with slight manual pressure to set and form a strong connection within 2-3 s. If parts are overheated or connected lopsidedly, some of the molten plastic may get inside the pipe, and as a result, the flow area decreases.

Important! By performing most of the soldering and assembly work yourself, you are able to personally control the quality of soldering of polypropylene pipe joints.
For innovators and DIY enthusiasts, you can assemble a soldering iron for polypropylene pipes with your own hands. The strength and durability of the soldering depends on the perfection of the soldering iron and how high-quality the polypropylene pipes are.
What is good about a DIY soldering iron?
The operating principle of the soldering iron is simple and uses the principle of adhesion of the soldered surfaces of polypropylene parts heated to the softening temperature. There is not always a need to re-wire or re-solder half of the water supply wiring in the house. Sometimes you need to work with a soldering iron to make two or three connections. In this case, a homemade, do-it-yourself mini-soldering iron for polypropylene pipes from a handy heater can help out.
For a person with experience working with electrical wiring and plumbing skills, making a small amateur version of a soldering iron for polypropylene pipes is a matter of two hours.
As a rule, water pipes are laid in channels and hidden from prying eyes with screens and decor, so you don’t have to worry about beauty and aesthetic appearance. Another thing is important - incorrect temperature adjustment and overheating of the pipe or fitting material, even under slight force, will lead to defects. In soldering, the first and main issue remains the quality of the connection of parts.
If, when working with a homemade soldering iron, you may slightly fall short of world standards of appearance, it doesn’t matter; for amateur cases, this is acceptable.
To assemble a homemade propylene pipe soldering iron you will need:
- The heating element is the soleplate of a regular electric iron, preferably in the form of a closed aluminum block with a thermostat and an electric cord with a plug;
- soldering iron attachments for polypropylene pipes and fittings of the required size for your pipes;
- nickel-plated M8 bolt-nut for attaching nozzles to the heater;
- digital multimeter with external thermocouple thermometer;
- a clamp or other fastening that allows you to securely fix the soldering iron on a utility surface.

In addition to temperature, the speed or power of heating the surface of the parts being joined is important. If you heat a polypropylene fitting or pipe for a long enough time, the parts will lose their shape and geometric dimensions under the influence of temperature.
Therefore, to quickly melt a surface with a diameter of 15-30 mm, a power of 700 - 900 W is required, which approximately corresponds to the maximum power of the iron heater.

We assemble a homemade product for propylene couplings:
- At a distance of 30-40 m from the nose of the aluminum sole, we drill a through hole with a diameter of 8 mm and, using a screw and nut, connect the nozzles for the pipe and fitting to the base of the heater;
- We install the iron handle on the heater sole so that it does not limit access to the attached attachments;
- We connect the wiring to the contacts of the iron heater;
- We turn it on and use a multimeter, a digital thermometer and a regulator on the iron to set the temperature to 265°C.
We use a clamp to fix a homemade soldering iron of polypropylene pipes, which will allow you to solder parts yourself, without an assistant; the handle can also be made to suit you for the greatest convenience and minimal risk of getting burned.

Which soldering iron is better for polypropylene pipes
It has always been believed that the best tool is a professional version, designed for long-term use and with high parameters for soldering propylene pipes. A professional soldering iron for polyethylene pipes requires:
- The use of materials for nozzles that are resistant to prolonged heating, with high thermal conductivity, and that do not stick to the heated surface of the polypropylene part; as a rule, brass or copper nozzles coated with Teflon or carbon are used;
- Easy and convenient change of nozzles on the heater flange, the kit includes a set for the main pipe sizes - from 16 to 160 mm;
- The metallized surface of the nozzles gives a high heating rate of polypropylene parts;
- The presence of a heater power supply stabilizer and automatic temperature regulation allows you to keep the soldering iron hot for as long as desired without the risk of failure of the heating element.
Mandatory attributes of professional models of soldering irons are an easily removable stand and a case for storing and carrying the device with accessories.
For example, the widely known version of the soldering iron for polypropylene pipes is dytron or ditron - as you like. It is highly rated for its reliability and ease of use, unpretentiousness and robust construction. When soldering propylene parts, time passes by seconds; you have to quickly set up, drop or even throw the pin on the stand, and this practically does not affect its performance. There are three models in the DYTRON line:
- With a power of 850 W, the most popular in apartment renovations, it is used for polypropylene pipes with a diameter of up to 36 mm;
- Power 1200 W – for polypropylene pipes with a diameter of up to 160 mm;
- With a rod-shaped heater with a power of 650 W.

The soldering iron comes with a key for changing tips, which can be from 3 to 12 in a set, scissors for cutting polypropylene pipes, a building level, gloves and a stand. Despite all the advantages, it is worth noting one negative point - the clearly overpriced soldering iron.
Important! Such devices are designed for many hours of operation, but in any case, they require careful care of the non-stick coating on the nozzles. Teflon is very sensitive to scratches and chips, so you should not use hard or metal objects other than rags for cleaning.
But even specialists involved in soldering water pipes do not always strive to buy a soldering iron for polypropylene pipes in an expensive professional version. Many of the budget models, assembled from Chinese or Turkish components, work just as well as branded models.
Let's take, for example, a typical repairman's workhorse - the Soyuz soldering iron for polypropylene pipes:
- High heater power – up to 2 kW;
- The kit includes six standard nozzles with a diameter from 20 to 63 mm;
- In addition, the soldering iron is equipped with a hex key for changing the working tool, a stand for the device and a case.
The length of the power cord is only 130 cm, which is clearly not enough for work. But this size is typical for budget models, while professional soldering irons have a full 2.5-3.5 m. "Soyuz" is equipped with a two-mode push-button heating control system and two color indicators - green and red, the latter lights up when the heating is turned on automatically.


The soldering iron is equipped with everything necessary for successful soldering of polypropylene pipes, so it is difficult to say whether it is worth overpaying for additional accessories, as is the case with expensive models of soldering irons.
bouw.ru
Soldering iron for polypropylene pipes: instructions on how to use an electric soldering iron, what caliber of soldering nozzles to use, how to choose a soldering iron among manufacturers
Soldering iron for polypropylene pipes: instructions for use
A factory or even homemade soldering iron for polypropylene pipes is an almost irreplaceable thing if you decide to replace the pipelines in your apartment yourself.
The use of soldering equipment allows you to quickly and reliably connect polypropylene pipes, ensuring the tightness of such a connection.
Working principle of a pipe soldering iron
The device that we most often call a soldering iron for polypropylene pipes, from a technical point of view, is correctly called a “Apparatus for contact welding pipes with a heated tool."

Soldering iron for polypropylene pipes
Principle of operation of this device simple enough:
- The soldering iron is connected to the mains
- Soldering iron nozzles for polypropylene pipes are installed in special sockets, the diameter of which corresponds to the diameter of the pipes being connected
- We put the pipe sections to be welded onto nozzles, which gradually heat up
- Remove the pipes heated until the polypropylene begins to melt from the nozzles and join them together.

Thus, a soldering iron for soldering polypropylene pipes allows you to quickly create a reliable and hermetically sealed (though one-piece, i.e. permanent) connection of pipes.
At the same time, the cost of soldering irons and ease of operation allow you to use soldering irons for polypropylene pipes yourself, without involving outside specialists.
As you can see, a soldering iron for polypropylene is very useful tool. And so that you do not make a mistake when choosing a soldering iron, below we provide several recommendations for selecting models.
Key parameters that determine the choice of soldering machine will be:
- Soldering iron power
- Availability of replaceable nozzles (as well as their range)
- Manufacturer country
Soldering iron power for polypropylene pipes
The first - and, perhaps, key characteristic soldering iron is its power. The power of a soldering iron for polypropylene pipes determines the maximum diameter of the pipe that the soldering iron can weld.
Moreover, the greater the power, the larger pipes you can weld with a soldering iron. For example, a cobra soldering iron for polypropylene pipes, with a power of 1.5 kW, allows you to weld polypropylene pipes. the diameter of which ranges from 20 to 50 mm, and the more powerful energy machine (1700 W) makes it possible to connect pipes up to 63 mm in diameter.
This dependence is not linear, i.e. The high power of a soldering iron does not always mean that it is suitable for working with pipes large diameter.
For example, a Ditron soldering iron (model TraceWeld PROFI blue), with a “modest” power of 850 W, is capable of high-quality welding of pipes with a diameter of up to 63 mm, which other models of soldering irons whose power is significantly higher (for example, fora or already mentioned here) are not capable of Cobra).
Another aspect that is affected by the power of a soldering iron is the speed of operation - the more powerful the device, the faster you can connect pipes (less time it takes to warm up).
And here you need to choose: if you need to make only a few connections, then the low-power caliber SVA-750T (750 W) is quite suitable. And if you need to solder a lot, then it is better to take a model with more power, for example Valtec 1500 W.
Quite often they say that when choosing an electric soldering iron for polypropylene pipes, its required power can be calculated by multiplying the maximum diameter of the pipe being welded by 10. This rule is partly true, but only partly - it must be used with caution.
We indicated above the reasons why it is necessary to select a soldering iron for polypropylene pipes by analyzing all the manufacturer’s recommendations.
Soldering iron attachments
When selecting a soldering iron for polypropylene pipes in accordance with the specified needs, it is very important to take into account the presence of various nozzles included in the soldering iron kit. If you purchase a soldering iron equipped with various attachments, it will be much easier for you to weld polypropylene pipes of different diameters.
Another advantage (though it is more relevant for professionals who weld a large number of pipes regularly) is the possibility of parallel installation of several nozzles. This opportunity is provided, for example, by the candan soldering iron for polypropylene pipes.

Teflon coated tips
When purchasing a soldering machine, also pay attention to the coating of the nozzles. The most functional are soldering nozzles with Teflon coating, as well as nozzles coated with metallized Teflon.
Such nozzles not only heat up more evenly, but also last much longer. The already mentioned soldering irons candan, dytron and others are equipped with Teflon-coated nozzles.
Equipment

In addition to the soldering iron itself and nozzles, the soldering machine may also include additional tools and accessories, ranging from scissors for cutting polypropylene pipes to special gloves that will protect your hands from burns when welding polypropylene pipes with your own hands: advice from the experts.
Most manufacturers pack soldering irons in special carrying cases - plastic or metal.
Manufacturer country
An important role is also played by the fact where the polypropylene pipe soldering iron you have chosen is manufactured.
And although today the “pedigree” of a soldering iron is not so important (globalization, after all), some patterns in geography are still present:
- Czech soldering irons for polypropylene pipes rightfully occupy a leading place in the informal rating of these devices. Despite not the lowest cost, Czech soldering irons (such as Daytron, which has been mentioned many times today) are in steady demand. So if the quality of the instrument comes first for you, the Czech Republic has no alternatives.

- Turkish soldering irons are in some way a compromise option. Turkey produces both excellent models that can outshine other Czech ones - and models of frankly low quality.
That is why, having decided to purchase a Turkish soldering iron, you need to be very careful when choosing specific model by reading reviews online.
Soldering iron ENERGOMASH (STURM)
Chinese soldering irons occupy a separate niche in this market. On the one hand, China was and remains China, on its permanent features: democratic and completely affordable price and unpredictable quality. On the other hand, in fact, many European and domestic (if you believe the sticker) soldering irons are also produced at the production facilities of the Middle Kingdom - and quality control at such enterprises ensures the output of quite competitive products.
Such devices include the Energomash soldering iron for polypropylene pipes (it is also produced under another brand – sturm).
- Well, completely different are homemade soldering irons for polypropylene, made by “traditional craftsmen” using a variety of technical solutions (most often - spirals from irons). Such devices operate unpredictably, so we will not take the liberty of recommending their use. And from the point of view of electrical safety, such homemade products are most often flawed (to put it mildly!)
In fact, the modern electrical equipment market demonstrates a fairly direct relationship between “soldering iron price and quality.” Thus, if you purchase an inexpensive Chinese device, then, most likely, it will not last long for you.
But if you plan to work with pipes for quite a long time, then it is better to immediately purchase a more expensive soldering iron - polypropylene pipes will be easier to weld, and the weld will be more reliable. Moreover, the range of soldering irons for polypropylene pipes, available in construction supermarkets and online stores, allows you to choose a model for almost any requirement and “for any budget.”
Guided by the above considerations, you can choose the best soldering iron for polypropylene pipes: the instructions for such a device, included in the kit or available on the manufacturer’s website, will allow you to choose optimal mode work. And literally after a couple of attempts, you will be able to efficiently connect the pipes in your apartment when replacing them!
More information
Polypropylene pipes are intended mainly for organizing water supply and heating in non-fire hazardous areas. Such a pipeline is easy and quick to install and lasts about 50 years, but it has a significant drawback: when heated, polypropylene softens and is easily deformed. This parameter is important for heating and hot water supply systems, since they undergo dynamic temperature changes, as a result of which plastic pipes change their design position.
Such phenomena are absent when operating a water supply system for cold water. Based on the above, reinforced polypropylene pipes are used for hot water supply. Plastic is strengthened by using aluminum foil, fiberglass or increasing the wall thickness of the product. Aluminum integrated into polypropylene, which can be placed inside the thickness of the plastic (non-stripping pipe) or outside (stripping pipe), significantly reduces the linear expansion of the pipeline.
Fiberglass gives a similar effect, which allows this type of pipeline to be used for heating. A pipe with thicker walls is used for hot water.
Basic rules for soldering polypropylene pipes
To obtain quality indicators such as the tightness of the welded assembly, maintaining the internal diameter at the junction of parts, aesthetic appearance, etc., the following rules must be taken into account.
The connection area must be dry and free of dirt
Often, in practice, a situation arises when you need to solder a fitting into an existing plastic wiring. Although the pipeline is equipped with a common tap, due to wear and tear, it cannot fully fulfill its purpose. In such situations, water flow instead of connection is inevitable. To eliminate the leak while soldering the elements, you can take the following steps:
Step 1. Shut off the general water supply valve, drain the remaining water into the sewer through the mixer, cut off the pipeline at the junction taking into account the immersion depth, drain the water, drain the area and weld the components. In this case, it is advisable to replace the faulty shut-off valve.
Step 2. You can temporarily stop the flow of liquid by displacing or draining the water column from the pipeline, if the water supply stops for some time (30 seconds is enough). If the leak cannot be stopped, then the internal cavity of the water pipe is sealed with bread pulp, and after welding it is removed through the nearest mixer, but before that, the filter is unscrewed from its drain tube. It is not recommended to use it as a stopper toilet paper, it doesn't come out of the pipeline well.
Do not overheat the connections
Due to excessive overheating, the cross-section of the pipeline decreases, and accordingly the intensity of the water or coolant supply decreases. Overheating can occur as a result of non-compliance with the welding temperature and holding time of the parts in the nozzle. Table 1 presents data on obtaining a high-quality seam for some pipe sizes.

The soldering iron nozzle must be securely fixed
A loose cue ball while working with parts damages the heating surface of the soldering iron and contributes to the formation of misaligned joints.
After connecting the elements, do not rotate or move them more than 5 degrees
To obtain uniform diffusion, it is advisable after joining not to rotate or align the welded elements during the hardening time of the seam.
The movement of the workpiece in the cue ball must be straight
Other movements may reduce the strength of the seam. The junction will, of course, withstand the water pressure in the central line, which is usually in the range of 2 - 3 bar, but at nominal pressure (10, 20, 25 bar), it will probably allow liquid to pass through.
Features of the stripping pipe connection
Before connecting the stripping pipe, you need to remove the foil layer from it with a special shavings (shaver) to the size of the soldering depth. In the absence of a shaver, the reinforcing layer is carefully cut off with a stationery knife evenly over the entire area where the pipe is immersed in the fitting. This method looks unprofessional, but when carefully removed it does not reduce the outer diameter of the polypropylene.
What is needed for soldering
To join pipes and transition elements, you will need the following tools:
- set for soldering pipes (soldering iron, 20 mm nozzle, stand);
- scissors for plastic pipes;
- a simple pencil;
- pipe lever wrenches;
- roulette.
Do-it-yourself soldering of polypropylene pipes using an example

Let's look at the soldering technique and the sequence of installation of additional shut-off valves and a pressure gauge into the existing plumbing system.
These elements participate in the apartment’s backup water supply circuit (water storage tank with pump).
The water tap is installed to switch the water supply position from the central line to the reserve position. The pressure gauge signals the appearance of water in the riser. The unit is quite difficult to integrate into the existing wiring due to limited space when connecting pipes by soldering.
To create such a unit, which is made of polypropylene pipes and transitions with a cross-section of 20 mm, the following material is needed:
- Angle at 45 degrees. in the amount of 2 pcs.
- Angle at 90 degrees. -1 PC.
- Tee - 2 pcs.
- Connecting coupling - 1 pc.
- Pipe for cold water - 1 meter.
- Coupling, internal thread (MRV) 1/2 inch.
- Bronze transition with external thread 1/2" and internal thread - 3/8".
- Pressure gauge 10 bar.
- Walk-through tap.
- Tow and FUM tape.

Tool for soldering polypropylene pipes.
Work order
Using tow and FUM tape, ensure hermetic connection between the pressure gauge, bronze adapter and MRE.
On a soldering iron with a nozzle, set the temperature to 250-260 degrees and turn it on to heat.
After the cue ball heats up, immediately lean the tee against the convex part, and the pipe against the other, with the recess, and begin to feed the parts linearly until it stops.

Mentally count down 7 seconds. During this time, the surface of the parts should melt evenly. At the seventh second, pull the parts out of the nozzle and accurately insert each other into each other until it stops. Hold in this position for four seconds, this is the time when the soldering area remains plastic. Therefore, it is possible to rotate the parts being welded no more than five degrees only in this range.
From the soldered tee, mark a distance of 13 mm on the pipe.

This size corresponds to the depth of immersion of the pipe into the fitting.
Use scissors to cut the pipe according to the mark.

Solder the corner and the pass-through valve so that on the water supply it is placed to a horizontal plane at an angle of about 45 degrees.


Connect the other end of the pass-through valve to a tee, as shown in photo 9.

To the tee, which is located closer to the meter, weld a tube with a 90-degree angle for the pressure sensor.

At the wiring, in the approximate places where parts are soldered, cut the pipes and drain the residual water.

Lean the assembled unit against the installation site and calculate the joining of pipes.
Use scissors to remove excess elements.


At one end of the removed element, which will be connected back to the pipeline, consisting of a pipe and two corners at 90 degrees, we solder coupling. We weld the other part at a certain angle into the tee.
We are calculating how the pipeline will be connected to another section. Based on these data, we assemble a unit from two angles at 45 degrees and pipes. We weld it into the other side of the workpiece tee.
We first connect the resulting product to a pipe located near the sewer.

Then with a flow meter.

Lastly with the mixer pipe and tank supply line.

This sequence is due to the ability to use a soldering iron in places that can be moved after joining adjacent nodes.
We determine the length of the pipe for the pressure gauge, solder it into the MVR and put on the fastener. We apply the resulting product to the corner and mark the location of the fastening on the wall. We remove the pressure gauge and mount it to the wall.

We solder the corner and pressure sensor. We check the tightness of the entire system.
Sometimes soldering polypropylene pipes with your own hands cannot be done by one worker due to inconvenient placement of parts. In this case, it is advisable to solder such nodes together.