When the toilet tank does not hold water, it is very unpleasant. Firstly, the sound of water is constantly heard. Secondly, the consumption on the meter increases, that is, it turns out that money flows into the sewer. But the situation can be improved.
Tools and materials
If it is already clear that the toilet tank does not hold water, then you need to start repairing it. But it is impossible to say in advance what specific details may be required. Therefore, it is best to start with diagnostics and only then, having all the information, go to a plumbing store.
![]()
Sequence of work
Most often the problem lies in the exhaust valve. Manufacturers use rubber to produce its main gasket, which “ages” and wears out over time. The solution to the problem is to replace the old part with a new one. In this case, it is better to look for a silicone gasket, which has more long term service due to high ductility.
Also, the toilet tank does not hold water when the location of the float is disturbed. Then the water begins to reach the overflow level, and, accordingly, flows down. Carrying out adjustment work will solve this problem:
- For older models correct installation the float is carried out manually. To do this, simply bend the rocker until the float drops to the required level. It is considered correct when the water does not reach 1-2 cm before overflowing.
- Modern equipment regulated differently. In order to return the float to its place, you must use the adjusting screw.
As another reason, you can consider the option when the float itself becomes unusable. Its damage leads to the fact that it ceases to act as a regulatory element. It happens that you have to change the entire trigger system, which does not present much difficulty, due to the fact that the design does not feature particularly sophisticated circuits.
So, if you have problems with water flowing from the toilet, first check all the sealing gaskets. And if they are working properly, test the main working units and replace those that are faulty.
Video on replacing the toilet cistern fill valve
When the toilet flush mechanism at home is working, no one pays attention to it. After all, this is how it should be. But as soon as we hear the sound of gurgling or dripping water from the toilet, as a rule, we all become wary.
A water leak can create not only household problems for us, but also considerable financial problems in our apartment and especially among our neighbors. Meanwhile, if you at least occasionally pay attention to the flush tank, then the question of how to repair the toilet flush mechanism will not arise soon and will be quick and cheap. And most importantly, you don’t have to worry about leaks.
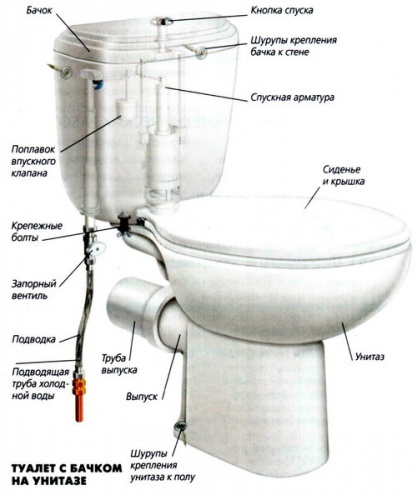
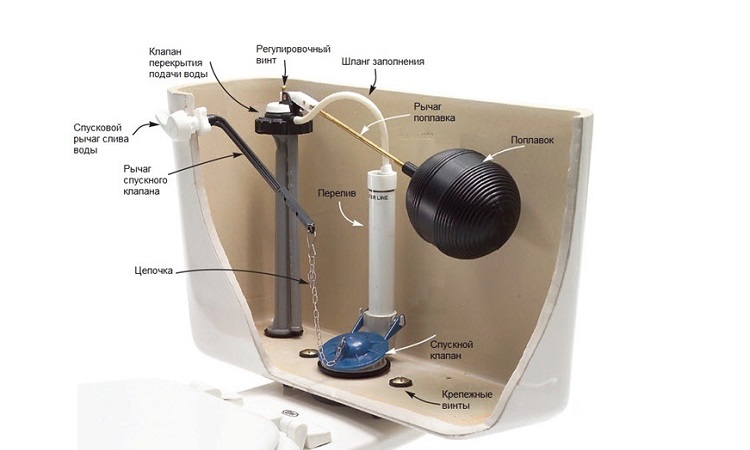
The operation of home toilets, namely toilets, is based on the simple principle of comfortable flushing of our waste products with water through a water seal. The toilet operates through a system of levers, a float and a seal. The design of any toilet must ensure the supply, accumulation and drainage of water. This is ensured through the supply hose cold water to the tank and a shut-off valve that shuts off the water when it reaches a specified volume.
The toilet consists of two containers, one for water - a flush cistern (in ordinary toilets it is located on top) and a bowl standing on the floor (there are attachments to the wall).
By pressing the drain button or lever, we release a large stream of water into the bowl. Gravity drives a stream of water, which flushes the toilet bowl and, through a kind of channel, flushes all waste into the riser.
Locking device for the toilet flush mechanism
This basic device drain mechanism The toilet may vary slightly from manufacturer to manufacturer.
There are toilets that are not gravity-driven, but operate under water pressure; many toilets have two buttons (one for draining a smaller volume of water, the other for a larger volume) - this is to save water. Toilet bowls can be flushed into the floor or into the riser.
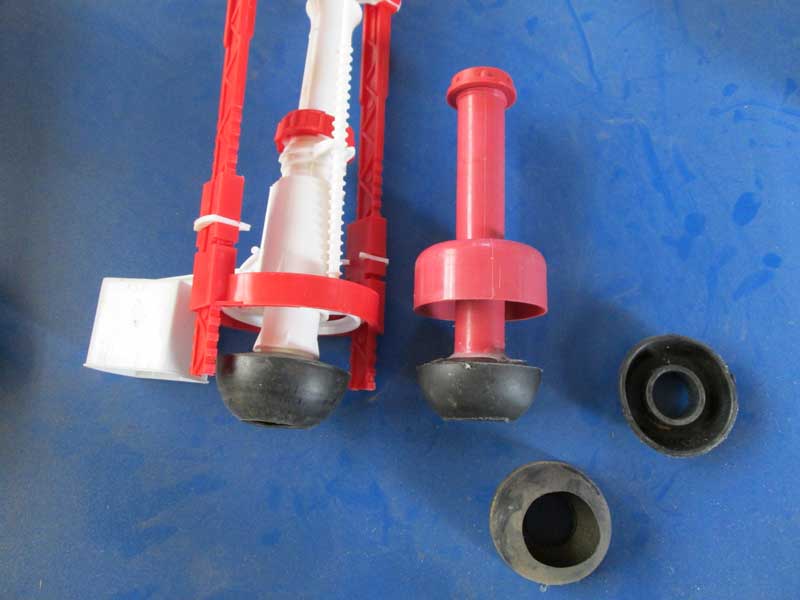
Photos of domestically produced toilet flush mechanisms.
You can see in the photo stop valve made of black rubber, the so-called pear. On the left is a drain mechanism with a float, on the right is the simplest one.
It works like this (we are not currently considering how water is supplied to the drain tank). We are interested in the operation of the drain mechanism. Moreover, the mechanism itself practically does not break. For example, there is nothing to break in the right valve at all. A rubber valve closes the water. So, this rubber band is the very weak link in drain mechanisms of this type.
It often happens that the toilet works, water flows and drains normally, but it constantly leaks. Not only is such leakage not good according to Feng Shui (they say that when there is a leak, money flows away), but now, with the universal accounting of water, money will flow away in the literal sense of the word. If previously such leakage was only bothered by the constant round-the-clock gurgling and a coating of rye on the toilet, now it is already wasteful.
Over time, the rubber becomes tanned or crumbs of rust or sand from the pipes may get under it. In such cases, you won’t immediately understand what’s going on. This is usually checked like this. We fill the drain tank with water as usual and press slightly on the valve, i.e. press and tighten the rubber band. If water stops flowing into the toilet and the water supply valve closes, then it is 100% a rubber valve. We take off ours and go with him to look for the same one.
If you were unable to choose the same flush mechanism for your toilet, then you can find a suitable one at any construction market or hypermarket. It’s easier in the market, where sellers often have more choice.

Photo of the toilet flush mechanism - a more modern mechanism with adjustment.
Here everything still depends on the rubber valve, only here it is of a different shape. Its work is checked in the same way.
Faced with the problem of leaking toilet flush mechanisms at the dacha, I had to go to a plumbing store and to the construction market. For example, the author has two drainage tanks at his dacha and their drainage mechanisms are shown in the photo. For the top one, I was able to easily buy a pear, but for the second one, the purchased elastic band did not fit and there were no others. The first drain mechanism was repaired easily and quickly, but for the second, the sellers recommended buying fittings cistern included. According to them, manufacturers are constantly making minor changes to the design of drain mechanisms. This is how they promote technological progress and increase their profits. After all, simply replacing the rubber valve is not enough. To preserve the properties of rubber longer, various gels are also offered.
Most often, questions about the operation of the toilet flush mechanism arise at the most unexpected moments and take us by surprise. Usually there are minor breakdowns that you can fix yourself.
Typical malfunctions of flush mechanisms for standard toilets
- water flows and flows without filling the tank. What happens:
- a) the simplest thing is float misalignment. In such cases, the float lies at the bottom of the tank. It can be easily eliminated - a simple adjustment of the toilet flush mechanism is required. Often it is enough to simply move it in different directions.
- b) but the water continues to flow into the bowl, which means shut-off valve or seal it is not kept in the tank. Well, the valve also sometimes warps, let’s fix that too.
As a rule, these small problems, which occur in 9 cases out of 10, can be eliminated without any tools at all - just remove the drain tank cap and adjust either the valve or the float by hand.
But even with such simple operations, you need to pay attention so as not to break the shut-off valve of the flush mechanism in the toilet. It happens that it is completely worn out and easily breaks off and produces an uncontrollable flow of water under pressure. To avoid this problem, you need to turn off the water supply valve to the toilet tank.
This is done differently in each apartment. Some have a separate valve for each plumbing fixture, and some have one for everything. .
TANK COVERS ARE NOT SOLD SEPARATELY! TAKE CARE OF THEM!
The next group of problems with toilet flush mechanisms is wear of the levers and gaskets of the flush tank.
Typical problems again -
- Worn shut-off valve such as mechanism or abrasion, tearing of rubber gaskets and seals. "Incontinence" of the float mechanism– water fills the tank until it overflows, but the valve does not work. It is easy to check - carefully lift the valve up and the water pressure should decrease until it stops completely - this means the float mechanism is working.
- “incontinence” of the drain mechanism and water drain valve in it - this is somewhat more difficult to diagnose, but if you slightly press the valve with your hand and water begins to fill, then it is to blame (see above).
- When we have such a problem, we send the toilet flush mechanism for repair. If we do it ourselves, then we turn off the water and, if possible, remove the float mechanism or shut-off valve, and if we have a typical common toilet, then taking parts of our toilet, we go to the nearest construction market, and if the toilet is a unique work (although, as a rule, there is an ordinary one inside) toilet fittings) make an appointment with the dealer.
Or you can not go anywhere and not buy anything, for example:
The second version of the toilet flush mechanism
These are the most common problems that a toilet flush mechanism can cause us. Continuation of the article and consideration of issues
When the toilet tank does not hold water, this is an unpleasant breakdown, as water consumption increases, which is associated with additional costs, and there is also a constant unpleasant noise. Therefore, when the first signs of this malfunction occur, it must be immediately eliminated. Below we will look at how to do this yourself.
General information
Many people are afraid to “touch” the plumbing with their own hands and call specialists in the event of any breakdowns. However, the device of the drain tank is quite simple and understandable, thanks to which everyone can repair it without having any social knowledge. To do this, you only need the ability to handle basic tools.
Some breakdowns may require replacement of failed parts. In this case, it is necessary to dismantle the faulty elements and come with them to the plumbing store in order to select the appropriate repair kit.
Separately, it should be said about the repair of the wall-hung toilet cistern, which is a much more complicated procedure. This is due to the fact that the container is hidden in the installation, as a result of which it will be necessary to break the decoration of the room. The tank itself in this case may differ in shape from the traditional one, however, the principle of its operation is the same.
Advice!
Many people don't know how much weight it can bear wall hung toilet, so they are afraid to install it.
However, if you look in the characteristics of this device how many kg the hanging toilet can withstand, it turns out that it is designed for Weight Limit at 450 kg, respectively, can withstand a person of any build and at the same time will have a significant margin of safety.

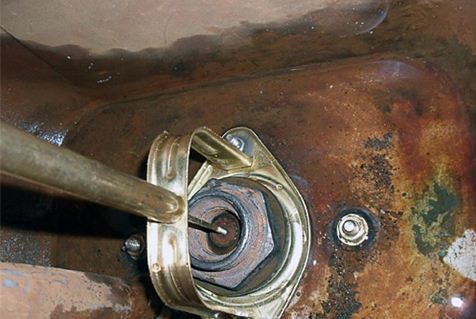
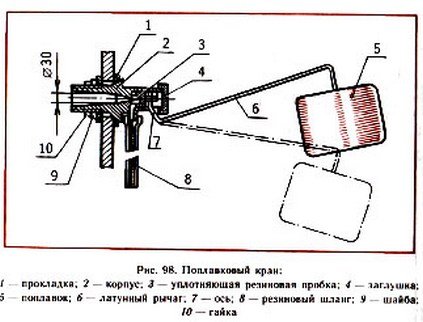
Shut-off valve device
The drain mechanism of the tank in the professional world of plumbers is called a shut-off valve. Before you start self-repair, you need to figure out how it works.
So, if an uninformed person opens the lid of the container, he will see only two details there:
- Float mechanism;
Below we will take a closer look at their device.
Note!
Device shut-off valves in your tank may differ slightly from what is described in this article.
But, in any case, this is a fairly simple mechanism, which is not difficult to understand.
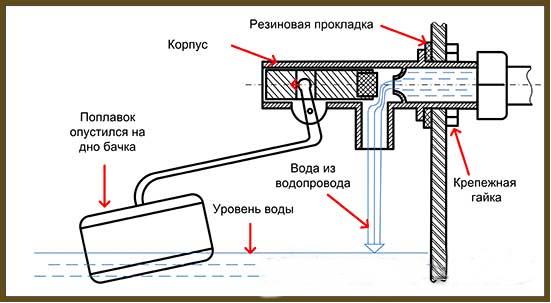
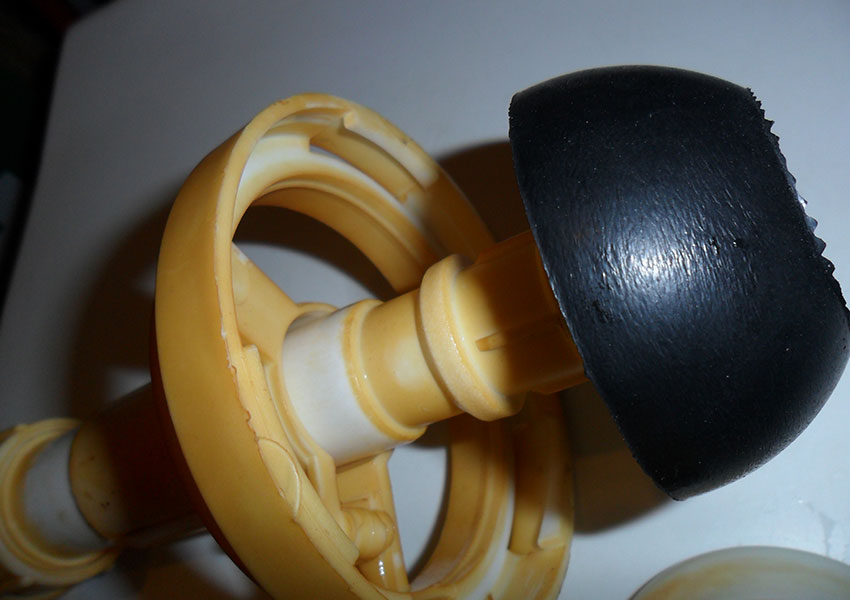
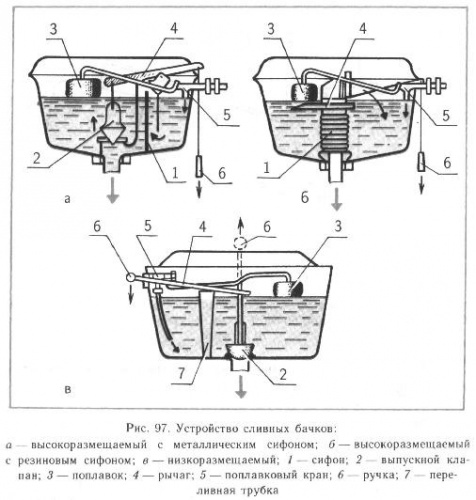
Float mechanism
The float mechanism consists of two parts:
- A housing with a membrane that shuts off the water supply;
- A float with a lever that regulates the position of the membrane in the housing.
The water filling level can be adjusted by the position of the float.
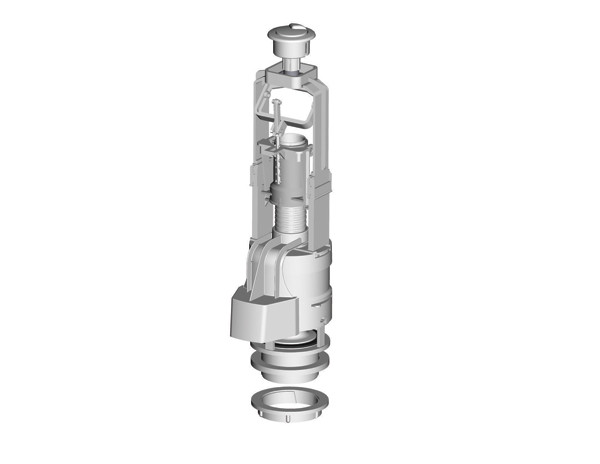
The drain mechanism usually includes three main parts:
- Valve;
- Frame;
- Drain button with lever system.
Principle of operation of this device quite simple - the position of the movable valve, located in a plastic case, is changed using a system of levers by pressing a button. In addition, the tank has an overflow that directs excess water into the toilet bypassing the valve, which helps prevent it from overflowing and, as a result, flooding of the apartment.
Causes of tank leaks and their elimination
If water does not hold in the toilet bowl, then this can be caused by two reasons:
Below we will take a closer look at the possible causes of malfunctions in these mechanisms and their correction.
Tank overflow
The tank may overflow for the following reasons:
- The float position is incorrectly adjusted– adjustments can be made different ways, depending on the design of the reinforcement. For example, if the lever is metal, then you just need to carefully bend it. Plastic levers may have a ratchet or an adjusting screw.
- Hole in the float– in this case, the part can be temporarily sealed and then replaced.
- The float is covered in dirt– as you might guess, the part just needs to be cleaned of dirt.
- Diaphragm failure- if the water does not shut off in any position of the float mechanism lever, then there is only one way out - to replace the shut-off valve. The price of the membrane is low and it is not difficult to find it on the market or in specialized stores.
Dismantling the parts is not at all difficult. In some models, all fasteners are plastic, so dismantling can be done even without tools.
Doesn't hold valve
If the water supply is shut off, but the flow does not stop, then the valve does not hold in the toilet bowl.
There can be two reasons for this malfunction:
- The rubber valve has dried out;
- Debris got under the valve.
In any case, to eliminate the malfunction you will need to dismantle it. Design drain device may be different, and accordingly, dismantling can also be carried out differently. Most often, the mechanism is disassembled into two parts, as a result of which you can get the valve.
The instructions for fixing this problem are extremely simple:
- First of all, you need to clean the valve and drain hole from dirt;
- Then the device must be assembled and installed in place;
- If the toilet still does not hold water, you need to disassemble the mechanism again and replace the valve.
Other faults
In addition to those described above, some other malfunctions may occur in the drain system, the following are the most common:
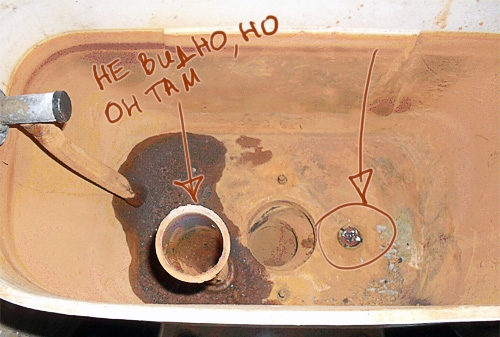
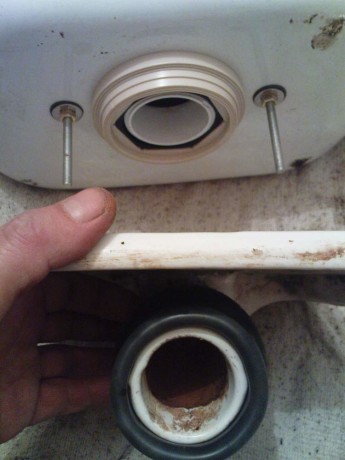
- The connection between the cistern and the toilet is leaking - in this case, it is necessary to completely dismantle the cistern and replace all existing gaskets, including screw seals.

In the photo - dismantling the drain tank
- Mechanical failure of any elements of valves - this problem can only be solved by replacing broken parts.
Note!
The ceramic drain container can be quite heavy, so you need to handle it carefully so that it does not break.
That's actually all the information that you need to know in order to independently eliminate such water breakdowns.
Conclusion
Leaking cistern is one of the most common problems. As we found out, you can eliminate it yourself without special costs time and effort. Moreover, in most cases you don’t even have to disassemble the mechanism, since it is enough to adjust the position of the float.
The video in this article can provide some additional information on this topic.
When the toilet starts leaking, there is no reason to feel joy: the noise causes irritation; the counter is winding up big numbers, which will have to be paid; traces of rust appear on the toilet itself; Condensation appears on pipes and walls, which in the near future threatens to turn into corrosion, mold and rot. And in order to avoid negative consequences both for your nerves and home, and for your wallet, you should begin to solve the problem as quickly as possible. Fortunately, most cases where there is a leak from the cistern into the toilet are easily corrected, and you can deal with them on your own. You can see a simple solution to the problem of leakage from the tank into the toilet, cheap and cheerful in the video (in its own way it shows ingenuity in correcting problems):
Why does water flow from the tank into the toilet?
It cannot be said that there is only one reason for the leak and that this is the solution to the leak problem. Possible reason can be special for each special design. But nevertheless, the “classical” design has become widespread in our country, and consideration of leakage problems, as well as their elimination, will be considered on it. I also suggest watching an informational video that will allow you to understand design feature the functioning of the toilet cistern to better understand the nature of the leak:
Why does the tank leak #1?
The most popular reason is very obvious - the toilet tank simply overflows, and all excess water leaves through the overflow. And this reason has several reasons that lead to it:
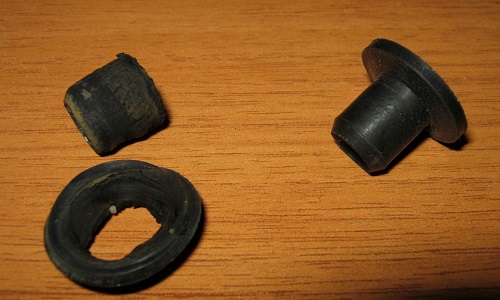
- Deformation of the rubber gasket during operation, when the rubber loses its elasticity and, due to loose shutoff, begins to let water through.
- Insufficient level of gasket pressing to the outlet hole drain valve. It was not deformed and did not lose its elasticity - the gasket is simply weakly pressed against the toilet part and because of this, water flows.
- The pin holding the float in the valve body has become rusty or worn out during operation.
- There is a crack in the body of the flush valve inside the toilet tank, through which there is a leak.
Attention! If a brass valve is used in the tank, then point No. 4 should not be taken into account, since cracks are plastic parts, brass ones are too reliable.
Brass valves look like in the photo:
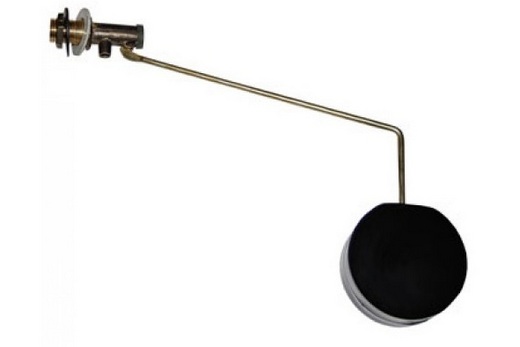
Why does the tank leak No. 2
If the tank does not overflow, but there is a leak, then what is the reason for the toilet tank leaking? The second popular cause of leakage is a problem with the bolt connecting the tank and the toilet itself. Steel bolts rust and leak, plastic bolts burst and water begins to leak.
Why does the tank leak No. 3
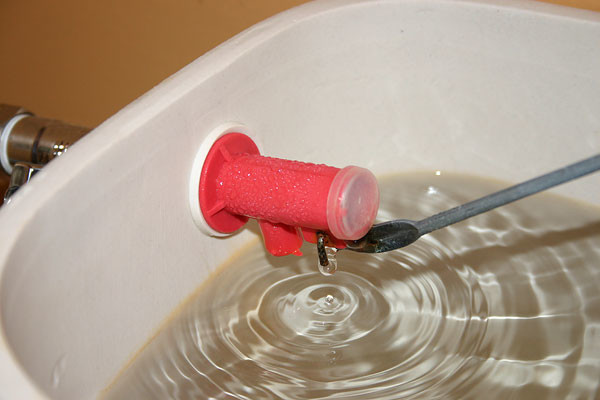
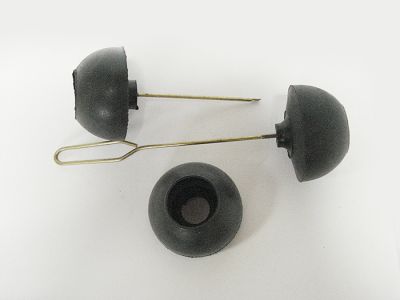
Another popular cause of leakage is a problem with a rubber bulb. The fact is that the pear, like any rubber part of the toilet bowl, loses its elasticity over time, becomes stiffer and no longer takes the required shape, as a result of which water begins to leak. You can recognize it by looking at this photo:
Why does the tank leak No. 4
It may also be that the drain tank is malfunctioning due to a skew or displacement of the float lever. There are quite a few reasons for skew: there may be a hole in it, due to which water flows into the float, or it simply shifted during active operation. Or the purchase of plumbing parts, the quality and service life of which, as well as the possibility of a leak from the tank, is out of the question.
Ways to eliminate a leak from a toilet tank
But if there are reasons why water flows from the tank to the toilet, then there must be ways to prevent this unpleasant and disadvantageous action for the wallet. Now you can familiarize yourself with in optimal ways overcoming the trouble when water flows from the tank into the toilet.
Solving the Problem Caused by Cause #1
It is quite easy to solve the problem when water leaks, if you only know which root cause is to blame for the flow of water from the tank to the toilet. You need to do a little experiment:
- Remove the toilet lid;
- Raise the float one centimeter. If the water stops flowing, the goal has been achieved. The problem is a slightly bent float arm, which now does not shut off the water, and it continues to flow. To fix a leak, it is enough to bend it a little so that the lever closes the water more accurately when approaching the edge of the filling.
- If the flow from the tank into the toilet has not stopped, then the valve itself should be inspected. Make sure the retaining pin is in place, intact and secures the float arm exactly in the valve when used. You should also check the hole on which the pin is held: is everything normal and as it should be?
- If the pin does break, it can be replaced with a piece of thick copper wire. If the hole for it is deformed, then you should go to the store for a new valve.
- Are you reading this paragraph because others didn’t work? Okay, you need to press the gasket into the valve hole. If, when pressed, the water stops flowing, it means that the gasket is not being pressed well and needs to be adjusted. If your toilet continues to leak, you will need a new seal.
When examining the cause and ways to solve the problem, it was believed that the toilet cistern has a classic design that has been in use for 30-40 years. But given the continuous emergence of new designs of toilets and their cisterns, we can recommend familiarizing yourself with the principle of their functioning.
Eliminating cause No. 2
First, carefully inspect the fittings. Just a few bolts may need to be replaced. But just in case, it would be better to purchase a new toilet kit, since it is quite cheap. In any case, you should completely disassemble the toilet tank to understand why it is leaking and why it is leaking. So, if you discover problems that go unnoticed by the naked eye, you will be glad that you bought a full set of bolts. Replacement process:
- Turn off the water supply to the toilet tank;
- Empty the tank;
- Disconnect flexible liner from the toilet tank;
- Unscrew the bolts. If they are covered with rust, it is better to cut them down with a hacksaw. Purchasing bolts is always cheaper than buying a broken toilet due to large quantity effort;
- After moving the toilet tank back, you must remove the shelf from the cuff that connects it to the toilet;
- Drain the remaining water and remove rust from all places where you find it;
- Repeat all the steps in reverse order, only with new bolts and it is advisable to replace them with new rubber gaskets, even if they are not yet deformed enough to allow water to pass through.
Warning ! When tightening the bolts, try to avoid even the slightest distortion, and also avoid applying significant force. It is very easy to crush the earthenware from which the toilet is made, or leave a crack in it.
Work and elimination reason No. 3
Since the pear has already lost its shape, repairing it does not make sense to eliminate the problem from an economic point of view. The solution is to buy a new pear. In the store, you should ask for several pears at once, and choose the softest one, because over time they become harder and harder (you can see this from the example of your own pear). The bulb is attached using a thread, and if you look at it from above, to unscrew it you need to turn it clockwise to remove it, and counterclockwise to screw in a new one. A temporary solution to the problem with the pear can be a weight suspended on the rod, which will press the pear to the saddle. The function of such a load can be performed by any weighty nut. I suggest looking at the photo where a similar solution is played out:
Solution to problem #4
If you buy a low-quality float, there is only one solution - buy a new float of better quality. If a small hole has formed, it can be repaired using ordinary polyethylene or plastic heated with a lighter. To be honest, such repairs can only be considered as a temporary measure. After a certain time, you will still have to buy a new float.
Conclusion
While studying the article, you could familiarize yourself with the most popular cistern problems that arise during the operation of the toilet. But this is not the end - there is still a small piece of information left for you. Finally, I suggest watching a full video tutorial on how to repair a leaking tank:
If you notice that water is constantly leaking from the tank into the toilet, you need to immediately find a solution to this problem, since the noise will interfere with sleep at night, and rust will soon form on the toilet itself. In addition, the water meter readings will also not be particularly encouraging.
Let's try to figure out the reasons why water flows, because further actions depend on this. Next, we’ll look at several possible options for how to fix a toilet leak with your own hands.
Breakdown detection
Experts do not risk saying for sure that the toilet is leaking for one reason and the solution to the problem is also the same. Each reason may have its own characteristics depending on the design. However, the “classical” design is still most widespread, so it is better to consider defining the current problem using it.
The first place without a doubt can be assigned to the overflow of the toilet, which is due to the fact that excess water leaves through the overflow. The problem in this case is this:
- Over time, the rubber gasket can become deformed, that is, the rubber loses its former elasticity, resulting in a loose seal and the toilet tank leaking.
- Poorly pressed gasket to the outlet of the drain valve also does not hold water. It is not necessary that the gasket has become deformed or lost its elasticity - it is simply not pressed against the toilet part enough - that is why water is leaking.
- The pin that holds the float in the valve body may rust or wear away.
- The tank often leaks due to a crack in the body.
If the toilet tank does not leak, but the problem still occurs, it may be the bolts that hold the tank and the toilet together. During the operation of the structure, quite often the bolts rust and the plastic ones burst, which is why water leaks.
In third place in terms of prevalence is the reason associated with the rubber bulb. The problem is that over time, this toilet part may lose its elasticity, becoming more rigid. As a result, the bulb cannot take the necessary shape to retain water after flushing.
Another problem may lie in a malfunction of the drain tank itself due to the displacement of the float lever or its skew. The reasons for these factors are as follows:
- a hole has formed through which water flows into the float;
- after using the toilet for a long time, the lever itself may move;
- Low-quality parts were used during repairs.
The reasons why water constantly flows in the toilet can be eliminated if you put some effort into it.
Fixing Toilet Overflow and Bolt Problems
The most common problem that causes water to flow in the toilet is an overflow of the tank. So let's start with a simple experiment.
Remove the cover. After this, you should slightly raise the float. If this helps and the tank does not overfill, then look for the problem at this stage completed. It is enough to pull the float lever a little so that the water stops flowing earlier.
Another option is that water continues to leak. The problem may be in the valve, so it should be carefully inspected. Initially, pay attention to the pin that secures the float lever in the valve - it should be in place and intact. Otherwise, you will have to replace it with a piece of thick copper wire. At this stage, you need to inspect the hole into which it is attached, because if its size increases, the entire valve will have to be replaced.
And last possible variant when, after the above inspections and even actions, water still flows in the toilet, this is a worn valve gasket. It cannot be purchased separately, so the question regarding whether a cracked valve or gasket is to blame loses its practical value.
What to do if the water in the tank is less than the overflow level, but the toilet itself is leaking? Quite often, this description is due to the problem of the unusable bolt that holds the shelf and toilet together. This is usually characteristic of older models of structures, where manufacturers still used steel bolts. Of course, over time, bolts deteriorate when exposed to water, so they should be replaced periodically.
The process itself involves the following:
- Shutting off the water supply.
- Removing the cover.
- Emptying the tank.
- Disconnecting the flexible hose.
- Unscrewing the bolts.
- We tilt the tank to remove the shelf from the cuff.
- Remove excess liquid and place the tank on a flat surface.
Upon completion of the repair, the structure must be reassembled. It is important to not tighten the new bolts too tightly, since the material of the toilet bowl is quite fragile.
Replacing or repairing a bulb or float
If the toilet is leaking due to the loss of elasticity of the rubber bulb, which controls the water supply with a button, you should either replace it or try to repair it. To do this, you will first need to unscrew this part (counterclockwise, but when viewed from above, the position changes to the opposite) and disconnect it from the rod. When purchasing a new such part, you should choose the softest one, otherwise this problem will arise again, and quite soon.
If it is not possible to buy a new rubber bulb, it can be temporarily repaired. To do this, simply attach a small weight to the rod, which will pull the bulb to the saddle, so that after flushing the water will not drain. Any weighty nut or washer will do as a load.
When water constantly drains due to a malfunction of the float in the tank, it can also be replaced with a new one. If a small hole in the float is found that is allowing liquid to pass through, an alternative, more economical option is to seal the hole with polyethylene or fused plastic. It is worth considering that such renovation work will not eliminate the breakdown itself, but will only postpone its solution for a while. Therefore, it is better to do everything right right away.


