When working in a workshop or at home with a grinding tool, when processing parts and preparing surfaces, the need arises to remove fine dust. And, of course, it is advisable to reduce its concentration even during work by organizing local constant air purification at the workplace.
At enterprises, this problem is solved by installing filter units with a cyclone, which collects and sediments dust with the required efficiency.
In our case it is enough make a vacuum cleaner with a cyclone, thereby saving on the purchase of a construction vacuum cleaner, where such a function is provided by the manufacturer.
The principle of operation of a homemade construction vacuum cleaner with a cyclone filter
There are several options for making a cyclone for domestic needs. To determine the most effective operating scheme for the equipment, you should know the operating principle of this filter.
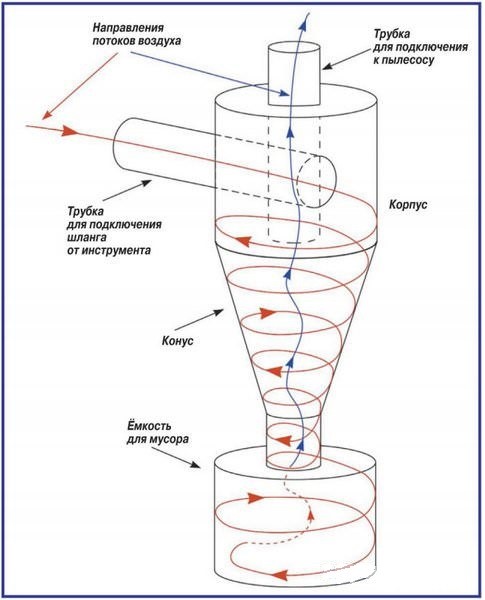
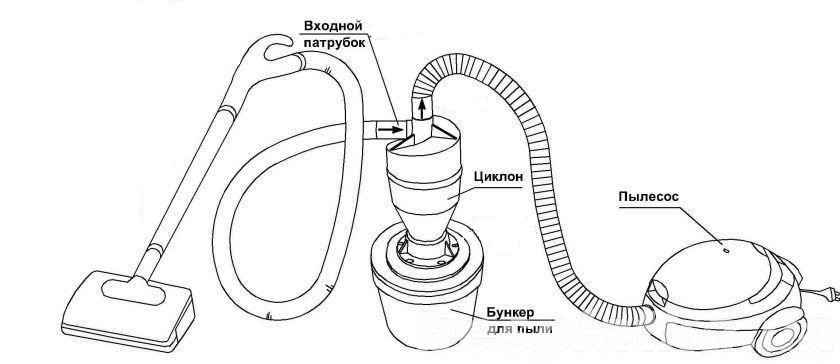
Cyclone in classic version It is a cylinder and a cone, in the upper part of which there is an inlet for polluted air and an outlet for purified air.
The inlet is made so that the air enters the filter tangentially, forming a rotating flow directed towards the equipment cone (down).
Inertial forces act on pollutant particles and carry them out of the flow to the walls of the apparatus, where dust settles.
Under the influence of gravity and secondary flow, the mass deposited on the walls moves towards the cone and is removed into the receiving hopper. The purified air rises up along the central axis and is discharged through a pipe located strictly in the center of the upper platform of the cyclone.
A prerequisite for effective air purification is the accurate design of the apparatus and the tightness of the cyclone, including in relation to the receiving hopper.
Otherwise, the principle of operation is disrupted and chaotic air movement occurs, preventing dust from settling normally.
In addition, it is necessary to select an engine that sucks in contaminated air, which will ensure optimal parameters equipment operation.
Homemade filter for a construction vacuum cleaner, the variants of which are offered on the Internet cannot be called a full-fledged cyclone.
The most simple circuit Such equipment is a plastic barrel with an embedded inlet pipe tangentially, a built-in filter from a car inside the “cyclone” body, through which purified air is removed and to which a household vacuum cleaner is connected.
The disadvantages of the equipment are the absence of a formed flow swirling along the walls of the barrel and a laminar return flow.
In essence, we get an additional capacity for settling large particles (sawdust, shavings), and fine dust will clog the filter at the outlet, and will require constant cleaning.
To improve the design, we suggest supplementing the plastic barrel with a homemade cyclone made from a traffic cone. It is best to install a stationary version of equipment for removing dust from the workplace if work is carried out over several hours.
In this case, we need a radial household fan. And with a one-time connection of the cyclone, it is enough to use a regular vacuum cleaner with adjustable suction power.
Sometimes an additional rheostat is installed to reduce the rotation speed of the vacuum cleaner engine, thereby selecting the parameters necessary for the normal functioning of the filter.
In the following sections of the article we will present you with two options for a cyclone for domestic use.
Selection of equipment - what is needed for work
For the first design option for a permanent installation, you will need the following components:
- Plastic barrel;
- Gray plastic sewer pipe with a diameter of 50 mm;
- Traffic cone;
- Corrugated hoses, reinforced with steel wire or metallized hoses;
- Adhesive for plastic;
- Radial household fan with the ability to change the engine speed and performance equal to six times the exchange of air in the room;
- Plywood 10-12 mm thick.
The second version of the product is the most successful, since in this case the product approaches the functionality of a real cyclone.
To make a filter you will need to purchase:
- Ready-made plastic cyclone made in China;
- A barrel, bucket or other container for making a dust bin;
- Corrugated hoses.
A plastic cyclone is inexpensive, approximately 1500-2500 rubles, and is designed to collect medium and heavy dust. Works great with shavings and sawdust.
Step-by-step instructions for the cyclone assembly process
Our first option is stationary design for workshops with large amounts of dust of various origins.
 Assembling a cyclone filter for a vacuum cleaner
 - First we make the cyclone itself. We make a hole in the plastic cone for passage sewer pipe on a tangent.
- For better connection of the pipe with the cone body, we matt the mating surfaces emery cloth. We glue the seams using a mounting gun.
- In the upper part of the cone we install a vertical pipe, the lower end of which should be below the inlet. In this way we can achieve vortex air movement. The pipe is fixed in a plywood sheet in the shape of a circle with a diameter equal to the size of the base of the cone.
- The prepared cyclone is secured to the barrel lid using a round plywood sheet.
- To plastic barrel when the inlet pipe is clogged with debris, it does not deform under the influence of vacuum; inside the container we install a spacer - a frame made of plywood sheet. External dimensions the frames follow the inner diameter of the barrel. To strengthen the structure, we attach the construction cone to the lid of the container using metal pins.
- Next, we connect the cyclone to the corrugated hoses at the inlet and outlet. We install a radial household fan outdoors under a canopy.
The second version of the construction vacuum cleaner is based on a Chinese plastic cyclone, which is also attached to any of the selected containers. The result is a reliable and efficient design.
The cyclone is attached to the container using a metal clamping flange.
VIDEO INSTRUCTION
When starting the vacuum cleaner and further operation, do not forget to clean the inlet pipe and stop the internal spacers on the containers to prevent deformation of the receiving hopper.
If finer air purification is required, the design is supplemented with a car filter in the housing at the outlet of the product.
Very often after repair and construction work A lot of debris and dust remains, which can only be removed with a powerful vacuum cleaner. Since an ordinary home appliance is not suitable for these purposes, a filter for which can be homemade is used. How to make a cyclone for a vacuum cleaner with your own hands so that the unit effectively copes with the removal of construction dust?
Those whose work is constantly associated with repairs, construction and carpentry are familiar firsthand with the problem of cleaning the room after completion of the actual work. Construction wood dust, crumbling plaster, tiny grains of polystyrene foam and drywall usually settle in a dense layer on all horizontal surfaces of the room. It is not always possible to wipe such a mess by hand or sweep it with a broom, because with a large area of the room such cleaning will take a long time. Wet cleaning is also often impractical: a mixture of water and thick dust is even more difficult to wipe off.
In this case, the optimal solution is using a vacuum cleaner. The standard vacuum cleaner that we are used to using in everyday life will not work. Firstly, because large quantity garbage, the dust collector will instantly become clogged, and you will need to clean it at least once every 15-20 minutes. Secondly, the entry of large particles, such as splinters, sawdust or wood chips, can cause blockage or complete malfunction of the device.
A construction vacuum cleaner has a much higher efficiency than a household one. The features of its engine provide long work, and the presence of a long hose (3-4 m or more) allows you to clean a wide area.
However, industrial and construction vacuum cleaners are large in size, not very convenient to use, clean and move, and are not affordable for everyone. Therefore, many craftsmen increase the capabilities of a household vacuum cleaner by equipping it with a special cyclone filter. Similar dust collectors can be purchased in finished form, and assemble your own version yourself.
We make a cyclone ourselves
On the World Wide Web you can find many detailed diagrams and drawings of cyclones. Let's give an example of making a simple filter that can be assembled at home, having necessary materials, patience and a little skill. To work you will need:
- Any oil filter for small debris (these can be purchased at auto supply stores).
- 20-25 liter container with a tightly screwed lid.
- Polypropylene elbow with 45° and 90° angles.
- The pipe is about a meter long.
- Corrugated hose 2 meters long.
- Make a hole in the lid of the main container. The width of the hole is adjusted to the polypropylene elbow with an angle of 90°.
- Seal existing cracks with sealant.
- Make another hole on the side wall of the container and attach a 45° angle.
- Connect the corrugated hose and the elbow using a pipe. Tilt the outlet hose towards the bottom so that the air with debris is directed along the required path.
- The filter can be covered with material made of nylon or other permeable fabric with a fine mesh. This will prevent large particles from entering the filter.
- Next, connect the elbow on the lid and the filter outlet.
Of course, this is only a brief and approximate scheme for creating a cyclone. We present to your attention a video where in detail and on clear example shows how to make a filter from scrap materials.
We check the made filter for tightness, as well as for the quality of suction. Garbage should be collected at the bottom of the container or settle on the walls.
If everything is assembled correctly, suction will occur efficiently and at high speed.
Large debris in the workshop can always be swept away and taken to a landfill in bags. But what to do with dust, metal or wood shavings, and numerous other microscopic industrial wastes? The purchase can take a toll on your wallet. But a regular vacuum cleaner will not cope with such a job. But if you make your own cyclone for a vacuum cleaner or even your own construction vacuum cleaner, you can save yourself from a number of problems!
Why do you need a cyclone filter?
Construction, metal or wood dust appears to be completely harmless. But this is only at first glance. Working in a room where a lot of dust has accumulated can harm the respiratory system and cause serious illness. And the instruments will deteriorate from the endless stream of garbage. There may be several reasons:
- Dust gets into the tool and onto the lubricant inside it. As a result, it overheats and fails.
- If the device has moving parts, then dust may well hinder their operation and also lead to breakdowns in the future.
- Dust can clog special ventilation holes, which are designed to cool the instrument. The result is overheating and breakdown again.
The cyclone filter will ensure the collection of any waste in production without harm to the vacuum cleaner.
Principle of operation
Using an aerodynamic air flow, the filter will bind dust particles together. In turn, centrifugal force begins to act, pressing them against the walls of the container. And then gravity causes the debris to settle to the bottom.
There are many diagrams showing the operation of cyclone filters. One of them can be seen below.
Cyclone filter device
You can make this or a similar filter yourself. There are a huge variety of design options, but they all have one thing in common – the principle of operation. Any design will consist of:
- A regular vacuum cleaner (preferably a powerful one);
- Cyclone filter;
- Containers that collect garbage.
Throughout the entire structure. In normal condition, it is designed for cleaning the house, sucking up small debris and dust. In this case, it appears cyclone filter, which means the length of the air duct will be increased almost three times, and accordingly the load on the device will be greater. The design turns out to be quite massive, unlike a conventional vacuum cleaner, so this trick is necessary to ensure that the hose is long enough for comfortable cleaning.
DIY construction vacuum cleaner: what you need
As mentioned above, you can use a regular household vacuum cleaner. But many masters are not attracted to this option, so the best solution becomes a homemade unit.
In order to make such a device, even if it has survived from the distant Soviet past. This is the advantage that homemade vacuum cleaners can be made from unnecessary old units.
So, from the vacuum cleaner we extract the following elements:
- Motor;
- Cord connecting the device to the network;
- Power control device;
- Suction corrugation.
For the body, prepare:
- Plastic pipe with a diameter of 5 cm;
- Container with lid;
- A sheet of plywood about 0.5 cm thick;
- 14 nuts and bolts M6 each;
- Galvanized sheet metal strip;
- Car filter (from a minibus);
- Switch – 220 V;
- Sealant;
- Sandpaper;
- Glue gun sticks;
- Corrugated hose (can be from a washing machine);
- Threaded rod with nuts and washers;
- Electrical corrugation PND32.
It’s worth preparing the tools right away:
- Drill;
- Glue gun;
- Sealant gun;
- Locksmith keys;
- Screwdrivers;
- Jigsaw;
- Wire cutters.
Manufacturing
At a distance of approximately 10 centimeters from the top of the container, we make a hole into which we connect the pipe. The hole should be an oval, even shape. The pipe is placed in it at a slightly downward angle, tightly adjacent to the wall. Use a glue gun to secure the result, as in image 2.
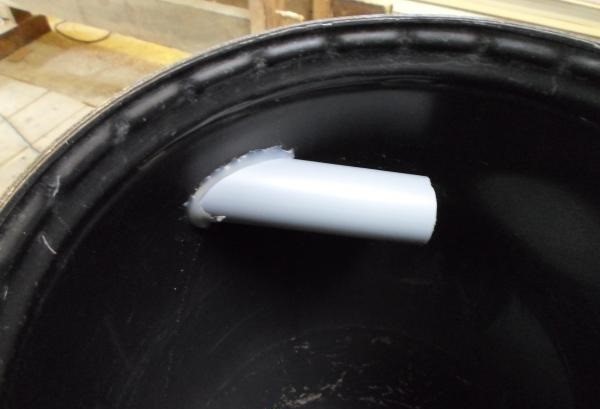
A pipe inserted into a pre-made hole in a barrel
We attach an adapter from the inside to connect the suction hose.
We cut out two circles approximately half the size of the lid, and drill holes for the bolts. The parts are attached on both sides. Afterwards, other circles are drilled, and their surface is cleared of burrs using sandpaper. We cover the perimeter of the product with sealant, after which they are installed and finally secured. The hole for the pin is made in the center. A little to the left there will be a larger hole for air intake.

Location of the stud and air vent hole
We will need an air filter without a mesh (it will become clogged with debris, which is extremely unprofitable) in which it is placed. It must be removed with pliers. One side of the cylinder should be closed with a plywood plug. The filter is secured to the stud with a nut.
By the way, the filter will help not only get rid of dust, but also prevent the inhalation of dangerous small particles, such as toner. If you use a regular vacuum cleaner in this case, the bags easily become clogged with toner dust. In this case, all particles will settle in the collection container.
To make it more convenient to attach, you can cut it together with the plastic parts. To secure it to the lid, you will need a clamp, which can be made from a strip of tin.
The switch and regulator are located nearby. After this, all parts are connected to each other with wires, and the wire and plug are connected.
Make sure that everything is connected correctly and there are no exposed wires, and only then check the operation of the device.
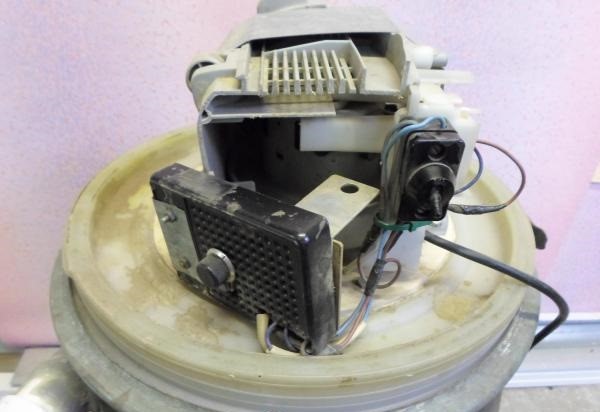
Location of the motor, switch and power regulator
The length of the suction hose is usually not enough, so it is extended using a corrugated pipe.
Standard vacuum cleaner attachments will help bring order to any workshop. They can also be used to connect to equipment for direct waste collection, using simple adapters.
So, your homemade cyclone-type construction vacuum cleaner is ready!
What to do if you can’t make a vacuum cleaner yourself?
Of course, not everyone wants to make a vacuum cleaner from scratch, and necessary details may not be. In this case, a regular household vacuum cleaner is perfect, preferably with high power. Next, you just need to make a cyclone filter for it, which will not require much expense. Most often it is made from a traffic cone or bucket. Let's consider both options.
A drawing of a homemade cyclone can be seen below.
Cyclone drawing
Traffic cone cyclone
Simple and in a fast way To build a cyclone for a vacuum cleaner directly with your own hands is to make it from a traffic cone.
What is needed for the job?
Once the production of the cyclone will be carried out with my own hands, need to prepare necessary tools And Consumables. So we prepare:
- Traffic cone;
- Plastic pipes (approximately 40 mm)
- Angle 45 degrees;
- Plywood;
- Pieces of laminated chipboard;
- Glue gun and sticks;
- A container with a lid, possibly for paint.
Let's start making
First, we take plywood to make a lid to cover the cone. We cut out a circle of the required diameter and cut two holes in it. One will be in the middle, the second parallel to the edge, as in Figure 6.

Circle made of plywood with holes for air inlet and outlet

A pipe inserted into one of the holes
A pipe must also be inserted into the second hole, but a 45-degree angle is placed on top of it. It is as the air moves through it that it will spin into a vortex. The angle is located inside the cone.
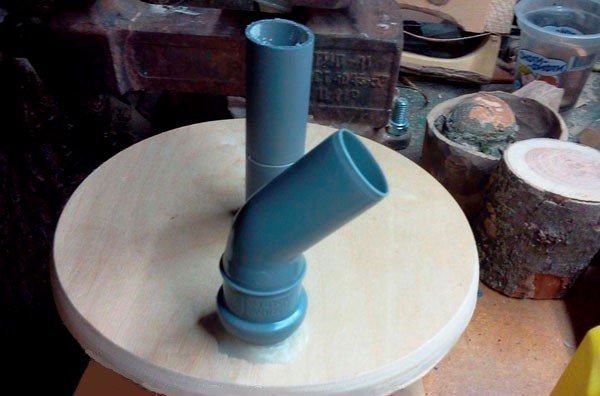
Angle position for proper air circulation in the cyclone
Afterwards the pipe is glued as in the case of the first one. The lid is ready. Next it is glued into the cone.
The tip of the cone must be cut off. Afterwards, it is inserted into the lid of the bucket in the center into a pre-prepared hole. The attachment point is glued. WITH inside the lid must be reinforced with pieces of chipboard. Afterwards they are tightened together with self-tapping screws.
The result is a product like in Figure 9.

Ready product
Cyclone filter from a bucket
One more simple material To make a cyclone filter, you can use an ordinary bucket, you can even use one from under paint. The volume must be calculated based on the power of the vacuum cleaner - this is approximately 1 liter of capacity for every 80-100 W.
The bucket must have a hermetically sealed lid, and the shape of the container itself must be round!
To make it you will need:
- Bucket with a lid (can be made from construction mixtures);
- Compass;
- 2 elbows 90 and 45 degrees;
- Plastic pipe;
- Silicone;
- Rubber or O-rings;
- Stationery knife;
- Glue gun.
Manufacturing
We make holes in the lid. You can use a factory compass, or you can use a homemade one. Screw two self-tapping screws into the wooden strip at a distance of exactly 2.7 centimeters from each other.
The center of each hole is marked 4 cm from the edge. Next, circles for the pipes are cut out at the marked locations.
We insert the elbow tightly into the socket, having previously applied silicone to its side. On the inside of the product, a seal is pulled onto the socket. If necessary, crimp with a clamp. It will look like in Figure 10.

Insert the pipes into the bucket lid, turning the angle correctly
From the outside, the inlet pipe is almost flush with the lid. On the reverse side, the knee is directed by the rotating part to the center of the bucket. But for desired effect it is equipped with a 45-degree turn, which is directed obliquely downward as in Figure 11.

Back view
The second pipe, which will draw air, is located in the opposite direction. An elbow is inserted into it so that air is drawn in from the wall of the bucket. It is necessary in each case to use o-rings; they will securely secure the pipes and prevent them from rotating.
We conclude that you can make a cyclone for a vacuum cleaner with your own hands quickly and easily, using available tools. The output should be something like the one in the figure below.
Cyclone filter connected to a household vacuum cleaner
Difficulties that you may encounter during work
Create your own cyclone filter, or even homemade vacuum cleaner, as we have seen, is not difficult, if you have the necessary materials.
In some cases, it is recommended to take metal containers for collecting garbage, as they are considered more durable. If you have a vacuum cleaner with enormous power, the plastic bucket can “collapse,” so to speak. It is drawn inward due to the strong flow of intake air. This happens extremely rarely, but it is better to immediately provide for this option. It can be leveled, but the damage to the product will be obvious. So you always need to take into account the quality of the plastic and the power of the device. In the case of a traffic cone, this problem does not arise.
Making a cyclone for a vacuum cleaner with your own hands will not be difficult if you have experience working with tools. The installation, called a cyclone, acts as an effective air purifier from small debris and dust. Many woodworking machines are equipped with nozzles for chip removal. Homemade cyclone connected to this pipe.
People who were on the territory industrial enterprises, paid attention to the conical structures with their apex facing downwards. These are industrial cyclones designed to clean polluted air. The problem of creating a cyclone filter with your own hands worries owners of home workshops.
The operation of a cyclone is as follows:
- The contaminated air flow flows through a hose from the machine nozzle into a separate chamber;
- Air enters the container through a side pipe installed at the top of the cyclone body;
- At the top of the body, a flexible hose is connected to the vertical air duct and connected to the vacuum cleaner;
- The vacuum cleaner provides traction to the air flow inside the device;
- A vortex flow is created in the chamber, moving spirally along the walls of the chamber - from top to bottom;
- Solid particles fall down into the chamber opening and then end up in the waste bin;
- The purified air rushes upward, passing through the filter, and enters the vacuum cleaner hose;
- At the end of the work, the accumulated debris (chips and dust) is removed from the storage tank.
Can be purchased ready product to clean the air from contaminants (sawdust, dust and debris), but the simplicity of the device attracts many minds to making a cyclone with their own hands. Variety of auxiliary materials, as well as availability universal tools allows you to create cyclones of various models.
A self-made filter does not take much time and saves cash. Let's present several options for making cyclone filters with your own hands.
Cyclone made of plastic buckets

As the body of the device, you can use 10 liter plastic buckets from water-based paint. Prepare the following tools and materials.
Tools
- construction knife;
- marker or pencil;
- compass;
- jigsaw;
- screwdriver;
- hacksaw;
- awl;
- glue gun
Materials
- two plastic 10 liter buckets;
- PVC water pipe and angle ø 32 mm;
- car air filter;
- glue stick;
- construction plywood;
- roofing iron;
- self-tapping screws;
- vacuum cleaner hoses;
- wood glue;
- sealant.
Step-by-step instructions for assembling a cyclone
- Remove the lids from the buckets. One of them is cut in half lengthwise.
- The pipe section is enclosed in a box-shaped plywood structure.
- Plywood boards are glued together with wood glue so that the pipe fits tightly inside the box.
- The space between the pipe and the plywood is filled with sealant.
- Make a template from cardboard or thick paper, which follows the bend of the side surface of the bucket in its upper part (70 - 100 mm from the lid of the container).
- Having attached the template to the box, draw a bend line with a pencil or marker.
- Using a jigsaw, cut the box along with the pipe, following the intended line.
- The structure is leaned against the bucket.
- From the inside of the container, use a pencil to mark the contours of the pipe opening. This is done in such a way that the pipe enters the hole at an angle downwards (20 - 300 from the horizontal)
- An opening is cut out with a knife.
- Holes are pierced with an awl along the perimeter of the leaning plywood from the inside of the container.
- Using a screwdriver and self-tapping screws, attach the plywood frame of the pipe to the bucket through the holes.
- After checking the reliability of the box, from the outside glue gun seal the contact perimeter.
- From roofing iron cut out a circle with a diameter equal to the inner circumference of the bucket - at a height of 70 mm from the bottom. Marking is done with a compass.
- The tin circle is cut in half from the center to the edge.
- The outer edges of the cut are spread at an angle of 300.
- The shaped insert is installed in the bucket by surprise.
- A screw-shaped tin insert will promote the swirling of sawdust, shavings and dust, which will quickly be sent to the storage tank (1/2 of the second bucket).
- The bottom of the top bucket is cut off.
- The cyclone chamber is tightly inserted into the storage tank.
- A hole ø 32 mm is cut in the lid of the top bucket. This can be done with an appropriate reamer or knife.
- A pipe 300 mm long is lowered into the hole so that a pipe 70 mm high remains outside.
- The joint is treated with a glue gun.
- The side pipe is connected with a hose to the nozzle of a woodworking machine or waste collector.
- The protruding pipe from the bucket lid is connected to the vacuum cleaner hose.
- In order for completely purified air to enter the vacuum cleaner, a cylindrical air filter is placed on the lower end of the pipe.
- A patch is cut out of tin along the outer diameter of the filter. The patch (plug) is cut out with three tongues.
- Three strips of tin are attached to the tongues of the plug with screws or rivets, the upper ends of which are bent.
- The bends are attached to the back surface of the bucket lid with screws.
- The connection between the plug and the lower hole of the filter is sealed with a glue gun.
The cyclone filter is ready for use. As needed, the upper part of the cyclone is removed from the storage tank and its debris is emptied. The filter is periodically cleaned with a toothbrush, moving the bristles into the folds of the corrugation.
You don’t have to make a box-shaped frame for the side pipe, but cut and bend its outer edges. Then fasten the bent sides to the edges of the bucket hole with screws or rivets. But such a connection will be less reliable than the fastening described above.
Cyclone with figured insert
Take two plastic buckets - 5 and 10 liters. The cyclone is assembled as follows:
- The top side of a 5 liter bucket is cut off with a knife.
- The container is turned over and placed on a sheet of plywood. Draw a pencil around the bucket.
- Using a compass, mark another circle, with a radius 30 mm larger.
- Inside the ring, two holes are cut with a crown and the contour of the figured insert is applied.
- The jigsaw blade is inserted one by one into these holes and a shaped insert and a fixing ring are cut out. The insert is an unfinished circle with an expanded base (100 mm).
- The ring is applied to the back of the lid of a large bucket and outlined with a pencil.
- The middle of the lid is cut out with a knife.
- Use a drill to drill holes at the top of the small container.
- The fixing ring is placed on the bucket. Using a screwdriver, screw the screws through the holes in the bucket into the ring.
- A circle of lid from a 10 liter bucket is placed on the fixing belt with the side up.
- The circle from the lid is secured with self-tapping screws to the fixing ring.
- In the cyclone body, 2 holes ø 40 mm are made with a crown - on the side and on the top.
- A square is cut out of plywood, in which an opening of the same diameter is made with a crown. The frame is placed on the cyclone body cover, aligning the holes. The frame is secured with self-tapping screws from inside the lid.
- I install the shaped insert just below the fixing ring. Self-tapping screws are screwed into the outside of the container and go into the body of the insert.
- Insert into frame PVC pipe, whose lower end does not reach the figured insert by 40 mm. At the top, the pipe should protrude 40 mm above the surface of the lid.
- The side opening of the cyclone body is expanded in the shape of a horizontal drop.
- A corner PVC pipe is glued into the opening with hot glue.
- I put the chip ejector housing on a large bucket (storage) and snap the lid on.
- A vacuum cleaner hose is inserted into the upper outlet. The side pipe is connected with a hose to the waste collection nozzle.
- All joint seams are sealed with a glue gun or a syringe with sealant. The device is ready for use.
Many may have a question: what is a curly insert for? The insert forms the correct direction of air flow inside the cyclone. At the same time, the horizontal platform repels the air pressure upward and allows sawdust and other debris to gradually settle in the storage tank.

Chip extraction from the sewer riser
To make a chip extractor from plastic sewer fittings, you will need the following tools and materials.
Tools
- angle machine;
- drill;
- glue gun;
- riveter;
- jigsaw;
- construction knife.
Materials
- PVC Sewer pipe ø 100 mm;
- PVC pipe ø 40 mm;
- hose;
- rivets;
- glue stick;
- fixing rings - clamps;
- two 2-liter bottles;
- 5 liter eggplant.
Step-by-step instructions for assembling a chip ejector
- From sewer riser cut off the neck, leaving a piece 1 m long.
- The plastic bottle is cut, leaving a part of the cylinder with a cone, neck and stopper.
- Holes are drilled in both plugs. The plugs are glued together with a gun and tightened with a clamp.
- The cut bottle is inserted into the lower hole of the riser. The connection is sealed with hot glue and tightened with a clamp.
- A hole ø 40 mm is cut into the side of the PVC pipe. A pipe 70 mm long is inserted into it. The joints are sealed.
- 3 circles ø 100 mm are cut out of tin using a jigsaw.
- A hole ø 40 mm is cut in the center of each circle.
- The resulting disks are cut in half.
- The halves are sequentially connected to each other with rivets, resulting in a screw.
- A PVC pipe ø 40 mm is threaded inside the spiral. The pipe is connected to the screw with hot melt adhesive.
- The entire structure is pulled into the riser so that the upper part of the pipe protrudes 100 mm above the riser opening. In this case, the auger must remain inside the cyclone body.
- The neck and bottom of a 5-liter eggplant are cut off so that the lower part of the cone fits tightly onto the upper end of the sewer pipe. The outer diameter of the connection is glued with a gun.
- The upper hole of the neck is glued to the outlet of the inner pipe.
- A storage bottle is screwed into the bottom cap.
- IN horizontal pipe insert a hose pipe, the second end of which is connected to the nozzle of the shavings and sawdust collector of a woodworking machine (circuit saw, router or other equipment).
- The vertical outlet is connected to the branch pipe by the hoses of the vacuum cleaner. The chip ejector is ready for use.
The debris “flows” down the surface of the auger and ends up in a bottle (garbage container). The air, freed from solid inclusions, goes up the inner pipe. To clean the drive, just unscrew plastic bottle from the cork and shake out all its contents.
Cyclone from a road token

The original method of making a cyclone from a road chip attracts many homemade enthusiasts. The shape of the chip is a cone made of fairly thick plastic.
Proceed as follows:
- The bottom and top of the cone are cut off with a hacksaw or circular saw.
- The chip is turned over and inserted into a suitable container, which will serve as a garbage container.
- Measure the diameter of the upper opening and cut it out of dense material round lid appropriate size.
- A hole is cut in the lid with a crown into which a PVC pipe ø 40 mm is inserted.
- Cut out a teardrop-shaped side hole into which a corner PVC pipe is glued.
- All connections are treated with a hot glue gun.
- The chip ejector is connected by hoses to a vacuum cleaner and a chip collection nozzle.
Upon completion of the work, the device is ready for use.
Do-it-yourself snail for chip removal

The power of a household vacuum cleaner for some types of processing of wooden workpieces may be insufficient. To clean large volumes of air, they make a snail-type chip extractor with their own hands. The body of the device resembles a snail shell in its shape.
Craftsmen make the snail body from two types of materials – metal and wood. Creating a metal case will require the use of welding machine and ability to operate this equipment. There is another way - making a snail from construction plywood.
To work with plywood in a home workshop, you need to have a jigsaw, drill and other woodworking tools. The most important detail exhaust fan is the air intake wheel. It is made from lightweight materials such as wood, plastic and the like. The impeller is assembled so that the blades are curved or rotated inner edge in relation to the wheel radius line by 450.
The outlet hole is connected to the cyclone filter using adapter couplings and hoses. The axis of the air intake wheel is connected directly to the electric motor shaft or a belt drive is installed, which is preferable to coaxial joining. Firstly, the pulley on the wheel axle is easier to isolate from the side opening of the volute, which increases the performance of the device. Secondly, the removal of the electric motor contributes to its necessary cooling.
The feasibility of using snails is due to large production volumes. The engine power is selected in accordance with the operating mode of the exhaust fan. Usually it is enough to install a motor with a power of 5 kW to 30 kW asynchronous type. It is advisable to connect the power unit through a shaft speed control device.
Conclusion
A do-it-yourself cyclone filter not only ensures cleanliness in your home workshop or living space, but also protects the respiratory tract and lungs of the people around you. The existence of various “recipes” for making a cyclone with your own hands confirms that, if desired, every lover of making homemade products can do this.
About filters.
The cyclone filter does not retain more than 97% of dust. Therefore, additional filters are often added to them. From English “HEPA” is translated as “High Efficiency Particulate Air” - a filter for particles contained in the air. 
Agree that even you cannot imagine your life without such necessary equipment like a vacuum cleaner? They cope not only with dust, but also with dirt.
Of course, vacuum cleaners can be used not only at home, but they also come in different types: battery-powered, washing, and pneumatic. As well as automobile, low-voltage industrial, backpack, gasoline, etc.
Operating principle of a cyclone vacuum cleaner
James Dyson is the first creator of the cyclone vacuum cleaner. His first creation was G-Force in 1986.
A little later in the 1990s, he submitted a request to manufacture cyclone devices and had already assembled his own center for the creation of vacuum cleaners. In 1993, his first vacuum cleaner, known as the Dayson DC01, went on sale.
So, how does this cyclone-type miracle work?
It appears that the creator, James Dyson, was a remarkable physicist. Thanks to centrifugal force, it is involved in collecting dust.
The device has two chambers and is divided into two types - external and internal. The air that spins inside the dust collector moves upward, as if in a spiral. 
According to the law, large dust particles fall into the outer chamber, and everything else remains in the inner chamber. And the purified air leaves the dust collector through filters. Here's how cyclone filter vacuum cleaners work.
Vacuum cleaners with a cyclone filter, features
Do not opt for those models that require little power. You will definitely not like this kind of cleaning and most likely, you will want to throw away such a device.
Don't waste your money, but take a more serious approach to buying a vacuum cleaner. You just have to contact the sales consultant and he will help you with choosing a particular vacuum cleaner.
You should choose a device that is 20-30% more powerful than a bagged vacuum cleaner. It is best to take the one with a power of 1800 W. Almost all vacuum cleaner manufacturers produce models with this filter, which is good news.
Advantages of cyclone dust collectors
1. This has probably happened to everyone, when an item you accidentally needed ended up in the dust collector? Now this is not a problem because it is transparent! And you will always be able to notice objects that need to be pulled out of there as soon as possible.
This is one of the most important advantages.
2. The power of such vacuum cleaners is maximum and does not reduce speed and power, even when the container is clogged. Cleaning is much more enjoyable, power does not drop, cleaning is cleaner.
This vacuum cleaner is capable of holding much more than you imagine. Up to 97%!!! Not likely, right? Although some are dissatisfied with this result, as they prefer vacuum cleaners with a water filter.
3. By buying a cyclone vacuum cleaner, you are not only making a good purchase, but also saving space for storing it, since its weight is quite light. You won't have to carry heavy weights. 
4. There is no need to constantly change paper bags for the vacuum cleaner.
5. Power. She is not lost from fullness.
6. It can be washed thoroughly with water and dried.
Disadvantages of cyclone dust collectors
1. One of the disadvantages of these vacuum cleaners is not very pleasant. This is washing and cleaning the filter. Of course, you won’t have to clean the container with a brush every day, but still, this is one of the disadvantages. Laziness is present in every person. Yes, of course it’s unpleasant to face the fact that you need to get your hands dirty.
2. Noise. The noise from this type of vacuum cleaner is much greater than from a regular one.
3. Energy consumption. It is also much higher than that of a conventional vacuum cleaner. It's a small tornado.
It's up to you to decide whether to buy this little miracle or not. In fact, all its advantages outweigh its few shortcomings. A clean house is much nicer than a half-finished tidy, wouldn’t you agree?
Personal impressions
Compared to an old vacuum cleaner, the cyclonic dust collector looks quite modest in size. It is impossible to believe that such a little thing is capable of something serious. Now old vacuum cleaner Can only be used for wet cleaning.
When I use it for the first time, I take out the accessories, insert a small diameter pipe, turn on the device, and what’s really surprising is that the brush cleans the carpets much better than my previous assistant.
He cleans everything. Dirt, hair from our pets. Previously, you had to make a lot of effort to cope with such “now little things”.
I have laminated flooring in my hallway and it was just as easy to clean. The fact is that I have another brush in stock, tougher than the previous one for carpets, so I coped with this task so easily. You know, the sound of this vacuum cleaner is not as loud as they wrote about it on the Internet. ![]()
I am pleased with this device because it is light and not so loud. I also liked the compartment for storing all the necessary attachments; it is very convenient that it is built into the vacuum cleaner itself.
Once I knew what this little tornado could do, it was time to clean out the container. Thank God, when I started emptying the dust collector, it fell in dense, large clumps.
Since the debris was compacted by the air flow. No clouds of dust were visible, and it did not rise into the air! So I finished my first cleaning with my cyclone vacuum cleaner. I rinsed the container and that was the end of the cleaning!
Cyclone for vacuum cleaner photo


All vacuum cleaners are designed for one purpose - cleanliness. This applies to all vacuum cleaners.
Industrial and construction vacuum cleaners are usually used on machines or for cleaning any premises. These vacuum cleaners are quite expensive, since the operating principle of the cyclone filter vacuum cleaner must be selected carefully.
You should also know that industrial devices are most often used during repairs and construction. Leave yours workplace needs to be clean.
DIY cyclone, made of transparent plastic video
Construction work is carried out after preparing it and cleaning the surface. As you understand, General cleaning impossible to do with a regular vacuum cleaner. In other words, this is fraught with damage to the device.
Even small debris such as sand, oil, dry mixtures, powdered abrasives and wood shavings are designed only for an industrial vacuum cleaner.
If you suddenly go to choose a vacuum cleaner for construction work, be sure to check the types of contaminants that it will encounter.
Are you planning to use a vacuum cleaner in a repair environment? Then consider the DIY cyclone vacuum cleaner option. There are many examples of how you can make this kind of vacuum cleaner.
DIY cyclone for vacuum cleaner
1. In order to make such a vacuum cleaner yourself, you will need a Ural PN-600 Vacuum Cleaner, a plastic bucket (even suitable for paint), a pipe 20 cm long and 4 cm in diameter.
2. The nameplate is also unscrewed, and the holes need to be sealed.
3. The pipe is quite thick and will not fit into the hole, so you need to grind off the rivets using a grinder and remove the pipe fastenings. Before doing this, remove the springs with clamps. Wrap electrical tape around the plug and insert it onto the plug.
4. At the bottom, make a hole in the middle with a drill. Then expand it to 43 mm with a special tool.
5. To seal it, cut out gaskets with a diameter of 4 mm.
6. Then you need to put everything together, the bucket lid, gasket, centering pipe.
7. Now we need self-tapping screws 10 mm long and 4.2 mm in diameter. You will need 20 self-tapping screws.
8. Cut a hole from the side of the bucket along the suction pipe. The cutout angle should be 10-15 degrees.
9. We try on and edit the shape of the hole using special scissors that cut for metal.
10. Don’t forget that you need to try on the inside too. Also leave strips on the inside for self-tapping screws.
11. Using a marker, mark the hole in the bucket and trim off the excess material with scissors. Attach the pipe to the outside of the bucket.
12. To seal everything you need to use a 30x bandage. From an ordinary first aid kit and glue like “titanium” for polystyrene foam. Wrap a bandage around the pipe and soak it with glue. Preferably more than once!
13. While the glue is drying, you can check how this vacuum cleaner will work. Turn on the vacuum cleaner and load it, blocking the nozzle with your palm. When checking the operation of the vacuum cleaner, the process of sealing and connection with the pipe is improved. It is unlikely that he will soon become obsolete.
14. It is best to store the vacuum cleaner in a case.


