Tongue-and-groove blocks are a building material that is used for installing interior partitions. They are made from gypsum by low-temperature processing of natural gypsum, which is why their second name is gypsum slabs. This building material is characterized by high dimensional accuracy.
Types of tongue-and-groove blocks
There are ordinary and moisture-resistant gypsum boards. The gypsum board groove can have a trapezoidal or rectangular shape. There are solid and hollow plasterboards. For the construction of walls indoors with dry or normal humidity conditions (apartments, hotels, offices, schools, industrial building) use ordinary gypsum boards, and for rooms with high humidity - moisture-resistant gypsum boards. Moisture-resistant gypsum boards contain hydrophobic additives.
Gypsum slabs are a very affordable building material. And thanks to the high quality of their front surface, there is no need to spend a lot of money on Finishing work. A plasterboard wall can be covered with wallpaper, painted or tiled with ceramic tiles.
Installation from gypsum is very simple and easy. And thanks to the low price, the use of gypsum boards provides a significant advantage over construction interior walls made of brick in apartments or dachas. Another advantage of gypsum boards is their resistance to fire.
How to install tongue-and-groove blocks
In order to build one square meter of partition, you will need 5.5 gypsum blocks and approximately 1.5 kg of glue. In order to enhance sound insulation in the place where the partition adjoins the wall, use a cork gasket. If there are no strict requirements for sound insulation, then the blocks can be mounted to the enclosing structures directly on the adhesive mortar.
First, the surface on which the partition from tongue-and-groove blocks will be built is cleaned of dust and dirt. It is built before the finished floor is installed. Then markings are made - using a cord or laser level. The marks are transferred to the walls using a plumb line. If the floor is uneven, you need to apply a leveling layer. Styling can be done no earlier than in a day.
Before starting installation, you need to prepare an adhesive solution, which was recommended by the gypsum board manufacturer (usually it is quite affordable). To do this, pour the dry mixture into a bucket with required quantity water. Then mix thoroughly and leave for 2-3 minutes. It is necessary to take into account that the viability of the composition is only 1 hour, and the glue consumption per 1 m2 of masonry is only 1.5 kg.
Foreman's advice: When mixing glue, use only a clean container and clean cold water.
In order for the blocks in the masonry to adhere better, they must be laid with the groove facing up. To do this, the ridge is removed from the tongue-and-groove blocks of the lowest row of masonry. The laying of the first row is done according to the level and carefully leveled in one plane. When laying the next rows, the glue is applied and distributed along the grooves of the already laid row. The vertical seam of each tongue-and-groove masonry block also needs to be filled with an adhesive solution. The thickness of the seams should not exceed 2 mm. During installation, the gypsum blocks in the masonry are settled using a rubber hammer. Laying is done in staggered steps - at least a third of the length. Additional elements are easily obtained using a manual stove. The elements of the last row of masonry are sawn at an angle so that there are no voids left between the partition and the ceiling.


Foreman's advice: if there are potholes on the tongue-and-groove blocks, they need to be filled with putty.
If you need to make an opening in the partition, the width of which does not exceed 800 mm, and above which there is only one row of masonry, then it is not necessary to install a lintel. In this case, it will be enough to install and leave the support in the opening until the glue dries.
If the width of the opening exceeds 800 mm, then a metal or wooden lintel must be installed above the opening. To give outside corners structures have additional rigidity, they need to be strengthened metal profile. Internal corners can be strengthened with reinforcing tape.

Installation of gypsum boards can be carried out not only by a professional, but also by a novice builder. At the same time, an experienced worker can make 20 m2 of wall per shift.
Foreman's advice: when fastening to a wall of tongue-and-groove blocks of objects that exert a slight load (mirrors or bookshelves), you can use wedging corrosion-resistant dowels. When installing hanging cabinets or sanitary ware, corrosion-resistant bolts must be used that penetrate the wall through.
Gypsum boards are an affordable, profitable building material for building walls indoors. To build a wall of gypsum boards, you do not need special knowledge, you just need to look detailed video laying gypsum blocks.
Video
Installing tongue-and-groove slabs for installing partitions has its advantages. This material has a convenient configuration and relatively low weight, which greatly simplifies carrying out installation work. The plates are also equipped with a special lock, which ensures their secure fastening.
Important! The arrangement of interior partitions using tongue-and-groove slabs occurs very quickly (almost in a matter of hours). To achieve such installation speed, you need to have extensive experience and perfect command of the technology.


The cost of erecting walls from tongue-and-groove slabs in the company San Sanych
If you are looking for craftsmen to install walls made of tongue-and-groove blocks, pay attention to our company. We have been working in Moscow for a long time and have received many positive reviews. This happened due to a responsible approach to all operations. We carefully listen to the customer’s wishes and implement them taking into account the requirements of regulatory documentation. Delivery building materials Only trusted companies that provide best quality at low price. The cost of installation work will definitely pleasantly surprise you. Prices primarily depend on the amount of labor and materials used.
Preparatory stage
Preparing the room for installation of tongue-and-groove blocks occurs as follows:
- the floor and walls in the areas where the future partition is adjacent must be perfectly flat. Otherwise, the desired quality cannot be achieved;
- all existing irregularities are eliminated by filling the screed and grinding. It is also mandatory to seal cracks on the base;
- the surface of the walls, ceiling and floor is primed;
- markings are applied that reflect the location of the future wall.
Laying blocks
Before installing the first row of slabs that are intended for this purpose, the legs are cut off. This will ensure they fit snugly to the floor. To fix tongue-and-groove slabs, a special adhesive composition is used. It is applied to all their ends to securely fasten them together. Also, a special lock is used for this, which implies the presence of grooves on the surface of the blocks. After installing the first row, it is secured to the wall and floor using dowels. Then the installation continues according to the same scheme.
Installation of tongue-and-groove slabs is carried out using technology that is used in Lately professional builders and home craftsmen increasingly. These products have low weight, reliable locking connections and convenient sizes. All this allows you to install them without much effort, remodeling the premises as required by personal preferences.
Types and features of tongue-and-groove products
Before you begin installing tongue-and-groove slabs, you need to understand what types of these products are on the market today. They are silicate and gypsum, the latter are made from the material of the same name, to which a plasticizing admixture is added. For the production of silicate sand, lump and quartz sand are used, which are pressed and kept in an autoclave.
Which slabs to choose
If you want to give your walls heat-insulating qualities, it is better to prefer gypsum boards; they do not allow sound to pass through. However, silicate ones are able to withstand higher mechanical loads and also absorb less moisture. Tongue-and-groove slabs, which can be easily installed with your own hands, are environmentally friendly, so they can be used for furnishing residential premises. The materials are not flammable, do not rot, and do not emit into the atmosphere harmful substances and are not deformed. On sale you can find solid ones that can reduce the weight of masonry by 25%. If we talk about the dimensions of the gypsum boards, they are 500 x 667 x 80 mm. But silicate ones are more compact: 250 x 500 x 70 mm. Once you have dealt with all the supporting structures, you can begin laying tongue-and-groove products, but this must be done before laying the finishing coating on the floor and carrying out finishing work.

Preparation of tools and materials
Installation of tongue-and-groove slabs is carried out after preparing a certain set of tools and materials. These products can be installed in the center of the room, as well as against a wall that goes outside the building or into a cold room. By forming double partitions, you can hide wiring, other systems and communications.
To divide a room into separate zones, you can use partitions, the height of which starts from 80 cm. For installation you will need:
- building level;
- adhesive composition;
- anchor dowels;
- gypsum mortar;
- putty knife;
- screwdriver;
- cement-sand mortar;
- Staples;
- felt seal;
- primer;
- hacksaw;
- rubber mallet.

Preparing the site
Installation of tongue-and-groove slabs begins with site preparation. To do this, you should check the evenness of the walls and floor where the products will fit. If there are defects such as sagging, then they should be removed by grinding. The walls and floor should also be freed from cracks and depressions, filling the errors with a cement-sand mixture.
As soon as the bases are dry, they should be coated with a primer. If you decide to install a partition during the process of ongoing repairs, then the contact lines should be marked on the floor and walls. After finishing coat cut along the markup so that you can see the base. For paint, wallpaper, decorative plaster it is impossible to install plates, this applies to laminate, parquet and linoleum. If the surfaces have decorative coating as ceramic tiles, then it does not need to be removed, but the surface is first checked for strength.
The tongue-and-groove slab must be installed correctly; to do this, a cord should be pulled between the walls over the entire area, moving it 30 cm from the floor surface. This will allow you to control the vertical placement of the products. Along the contact line it is necessary to stick a sealant, the width of which must correspond to the thickness of the slab. In the role of this material bitumen-impregnated felt or cork backing can be used.

Working on the first row
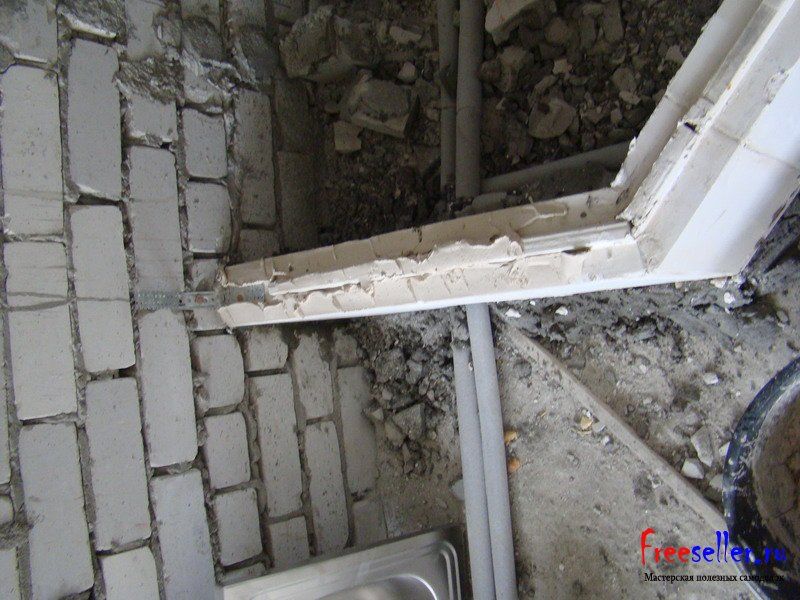
Installation of the tongue-and-groove plate cannot be called difficult work However, this issue needs to be approached with the utmost care. To install the starting row of plates, it is necessary to cut off the lower ridges using a hacksaw. Glue is applied to the seal, which must be on a vertical and horizontal surface. The first plate is installed on the side where it will adjoin the wall. The perforated bracket is inserted into the groove. For a few centimeters, the bracket should protrude above the plate part. It is fixed to the wall with self-tapping screws, or which is true when you are working with a concrete base.
The plate should be turned with the groove up, it is leveled and pressed against the bases, tapping with a mallet. In the place where the second plate will adjoin, it is necessary to install a piece of the bracket and fix it with dowels to the floor. If it turns out that this product is installed unevenly, then the rest will repeat the angle of inclination. In this situation, it will not be possible to level the masonry; the interlocking connections will interfere. This explains the need to align the first slab of the bottom row. The composition is applied to the side grooves and ridges so that the seams between the plates are not thicker than 2 mm. Excess mixture should be removed with a spatula, checking the masonry building level. A bracket is installed in the lower part and fixed to the floor with anchor dowels. Each subsequent product must be installed after the adhesive composition has set on the previous one.

Installation of the following rows
Installation of walls made of tongue-and-groove slabs involves displacement of the seams in the second and subsequent rows. To ensure this condition, the slab must be cut in half. At the end and beginning of the row, staples should be fixed on the cuts. This must be done in the place where the sections adjoin the wall. The glue should be more liquid; it should be applied to the bottom and side grooves of each product. It is important at this stage to check the vertical and horizontal of the masonry. The next row is installed only after the glue has set in the second row.

Formation of the last row
Usually not accompanied by difficulties. However, it is important to pay attention to the entire process Special attention. For example, the top row should not be adjacent to the ceiling. Approximately 1.5 cm should be left between the plates and the horizontal surface. To do this, staples are installed in the upper grooves of the final row using glue and screwed to the ceiling with dowels. After installation is complete, the gap can be filled with foam, the excess of which is cut off after hardening.
Features of installation of Knauf brand slabs
Knauf tongue-and-groove slabs, the installation of which requires compliance with certain nuances, can be installed by a home craftsman independently. For example, when preparing, it is important to ensure that the subfloor where work will be carried out is stationary, level and stable. If there are unevennesses that exceed more than 10 mm, then it is necessary to form a leveling layer; this can only be done under the partition.
Before starting manipulations, the surface is cleaned of dirt and construction debris, as well as oil stains. To prepare the mixture, pour the dry composition into a clean plastic container with water. The liquid must have room temperature. The composition is mixed with a drill with a nozzle or an electric mixer. The solution is left for a few minutes, and then mixed again. It is recommended to cook it in portions, one of which you can work out in the next half hour.
Such a gypsum tongue-and-groove slab, the installation of which is carried out quite often independently, can be installed in one of two ways. The first involves the use of glue, which is applied to concrete base. This method allows you to get a rigid mount. The composition is applied to the floor and walls in an even layer, and the average consumption for an 80 mm slab will be approximately 2 kg per square meter. If the thickness of the partition increases to 100 mm, then the consumption of glue will be 2.5 kg.
The second method involves fastening to walls, ceilings and floors through a cork elastic gasket. This method allows to achieve a higher sound insulation, especially for impact noise, such as slamming doors and knocking. Such products are stacked with a ridge or groove up. It is more practical to mount it from above with a groove, since in this case it is more convenient to lay the glue than to try to spread it on a comb. If the comb is located on top, then it should be removed with a hacksaw with large teeth. Sometimes the elements are removed with a peeling planer until a smooth surface can be obtained.

Features of installation of tongue-and-groove plates of the brand "Volma"
The tongue-and-groove plate "Volma", the installation of which is carried out according to the same technology as described above, is a product with a total area of \u200b\u200b0.33 m 2. The plate is made from hydrophobic and plasticizing additives, which are supplemented in the manufacturing process using lithium technology. The products are intended for the formation of partitions in rooms and buildings for various purposes with a normal and dry microclimate.
You can control the resulting plane by applying a rule or a regular strip to the wall at different angles. If necessary, the plane can be adjusted until the glue sets. It is important to ensure that the slabs are glued together at four ends. The excess of the composition that has come out must be rubbed with a spatula until the seam is sealed. You should not begin laying the second row until you have measured the remaining gap for which the section is being prepared. The additional element will be the beginning of a new row. This will allow you to achieve a run-up of vertical seams.
You will be able to install tongue-and-groove slabs with your own hands; the tips presented in the article will help you with this. From them you can learn that the slabs must be laid down from the sides and from above; they must be used for this only so as not to damage the blocks. This rule should not be neglected, since otherwise it will not be possible to achieve a tight connection between the tongue and groove.
Glue for tongue-and-groove plates "Fugen"
If you decide to purchase glue for installing tongue-and-groove slabs, then you can pay attention to the “Fugen” mixture, which is offered by the Knauf company. Approximately 1.5 kg should go per square meter. If joints between sheets of drywall are sealed, the consumption will be 0.25 kg. This mixture is a dry composition, which is made on the basis of gypsum and polymer additives.
The solution is intended for sealing seams and cracks. For preparation, the dry mixture is poured into a container with cold water. For 1.9 liters of water you will need 2.5 kg of the composition. After evenly distributing the dry mixture, it is necessary to hold it for 3 minutes and mix until a homogeneous mass is obtained. Its consistency should resemble thick sour cream.
Conclusion
If, when laying a partition, you plan to make a window or doorway, then you need to think about the technology for attaching the slabs above it. If the opening has a width not exceeding 80 cm, then the product can be installed on a box or temporary support. This is true on the condition that there will be one row of blocks per opening. If the width is greater than the specified value or there are several rows, then it is necessary to form a strong jumper.
Grooved slabs in Russia are produced by 3 enterprises: KNAUF, Volma, and Samara Forman.
The tongue-and-groove plates themselves can be:
Full-bodied and empty.
Regular white for the construction of interior partitions), and with water-repellent additives (green for the construction of partitions in bathrooms and other rooms with high humidity).
The main dimensions of tongue-and-groove plates:
Forman produces slabs in the following sizes:
600x300x100 mm;
- 600x300x80 mm.
Volma and Knauf:
667*500*80;
- 667*500*10.
For the installation of tongue-and-groove plates you will need
Necessary materials:
Tongue-and-groove slabs;
- Straight hangers for drywall;
- Dowel nails or anchor wedges;
- Assembly adhesive for gypsum boards or tongue-and-groove boards, for example fugenfuller, forman41 or any other;
- Cement mortar, you can use a ready-made mixture or mix cement with sand in a ratio of 1 to 3;
- Pistol mounting foam.
Required tools:
Level;
- Mallet or hammer;
- Hacksaw;
- Rotary hammer with drill bit 6;
- Roulette;
- 2 spatulas;
- Foam gun.
Installation technology of tongue-and-groove slabs
Tie and mark the future partition, and lay the first row of slabs on a cement cushion sand mortar, the side joints are glued together using gypsum glue, while we must control the verticality and horizontality.
In general, laying out the first row of slabs is the most labor-intensive task.

Starting from the first row, we fasten the slab to the wall using a direct hanger, and then shoot direct hangers across the row.

On the second and subsequent rows, apply gypsum glue to the horizontal and vertical parts of the block, place the slab, and press it against the previous slab and row using a hammer with a block or a rubber mallet, do not forget to control the horizontal and vertical.
We cut the slabs using a hacksaw.


So, row by row, we build a partition from tongue-and-groove slabs to the top (At the same time, do not forget to bandage the seams, as on a regular brickwork, preferably at least 1/3 of the slab.
To install the last row, the tongue-and-groove slab must be cut into several centimeters so that it fits into the groove and can be pressed against the previous rows. the resulting void is subsequently filled polyurethane foam.
Also, the slabs of the last row are attached with direct hangers to the ceiling through 1 block.


In some cases, a slab partition can be assembled without using lintels, but in our case we used a lintel. making it from a board from an old pallet.
Tongue-and-groove slabs are used to construct walls and partitions for both new construction and redevelopment. Gypsum and silicate tongue-and-groove boards are versatile, reliable and affordable.
The standard dimensions of tongue-and-groove slabs (GGP) are 667*500 (width*height) with thicknesses of 80 mm or 100 mm. In one square meter partitions – exactly three GGP. The connection of the slabs, as their name implies, is a tongue-and-groove locking system. It is technologically possible to install 4 m2 of partition in one hour by one worker.
The surface of the PGP does not require additional leveling with plaster; wallpaper can be glued onto them immediately. There are restrictions on dimensions - partitions should not exceed 3.6 m in height and 6 m in length.

For rooms with a normal humidity regime, conventional GWPs are applied. For bathrooms, showers, toilets, baths and laundries there are moisture-resistant PGP. The introduction of hydrophobic additives into the composition of moisture-resistant boards makes it possible to use them both at normal and at an increased level of humidity. Moisture-resistant GWPs have a greenish tint.

Material for tongue-and-groove plates
PGP material - gypsum or silicate mixtures. Silicate GWPs are denser, stronger and more resistant to moisture. Just like gypsum boards, silicate boards have refractory qualities and good vapor permeability. Sound insulation, strength and heat-shielding properties of silicate GWP are an order of magnitude higher than those of gypsum. The disadvantage is significant weight, one block weighs about 16 kg.

Construction of tongue-and-groove slabs
By design, tongue-and-groove slabs can be solid or hollow. The diameter of the through voids is 40 mm, the voids are located horizontally. Hollow slabs PGP have better thermal protection and less weight than solid ones, but their sound insulation is lower than that of dense ones. The voids are located in a special way, with no less than 80% alignment. Technical channels are used for laying power and lighting wiring in cases, and piping engineering systems. Hollow GWPs are also convenient for zoning rooms, but solid slabs should be used for arranging walls with good sound insulation and the possibility of using partitions for hinged light shelves and other lightweight pieces of furniture and decor.

Masonry of tongue-and-groove slabs
The PGP masonry technology allows the partition to be single or double. Double partitions are mounted to increase sound insulation or to hold in the internal cavity engineering Communication. As a rule, indoor and interior partitions They are performed as single, if there are no other instructions in the project, and inter-apartment - as double. The gap between the slabs of the double partition is 40 mm. Sound protection is increased by placing soundproofing material in the air gap, securing it adhesive composition.

Conditions for installation of tongue-and-groove slabs
The main and only condition is for the supporting surface of the partitions made of PGP. The base must be flat and horizontal. The tolerance is only 4 mm on a two-meter rail. If the floors in the rooms have height differences greater than permissible, leveling screeds are used. The surface for PGP slabs is prepared by cleaning, dust removal and impregnation with a primer or primers with increased penetrating ability. After the surface has completely dried after coating with a primer, damper pads for the slabs can be glued.

GGP boards are universal building materials. They can be installed under any construction conditions, all year round. Due to their light weight, PGPs do not exert any significant pressure on the base, and are suitable for installation directly on a floor screed or on a floor made of wooden materials. The “foundation” of the GGP is not needed. It is advisable to install partitions made of PGP before plastering the load-bearing walls. In this case, it is easier to make connections to the walls and finish the PGP and the surface will be solid.
Thermal expansion coefficients PGP slabs, made on the basis of gypsum, and the structures to which the partitions are adjacent can differ significantly. Therefore, a damper gasket is required along all contours of the partitions made of PGP. Laying tapes made of elastic materials along the perimeter of the junction of the PGP with the floors and walls ensures that the partitions do not deform during temperature fluctuations in linear dimensions and during settlement of house structures. The material of damper tapes must be highly porous - silicone, rubber, cork or polystyrene. Felt impregnated with bitumen composition. The width of the tape must be at least 75 mm; tapes are possible both with the existing adhesive layer and glued with compounds used for PGP. Installation of the slabs begins after the glue has completely dried.

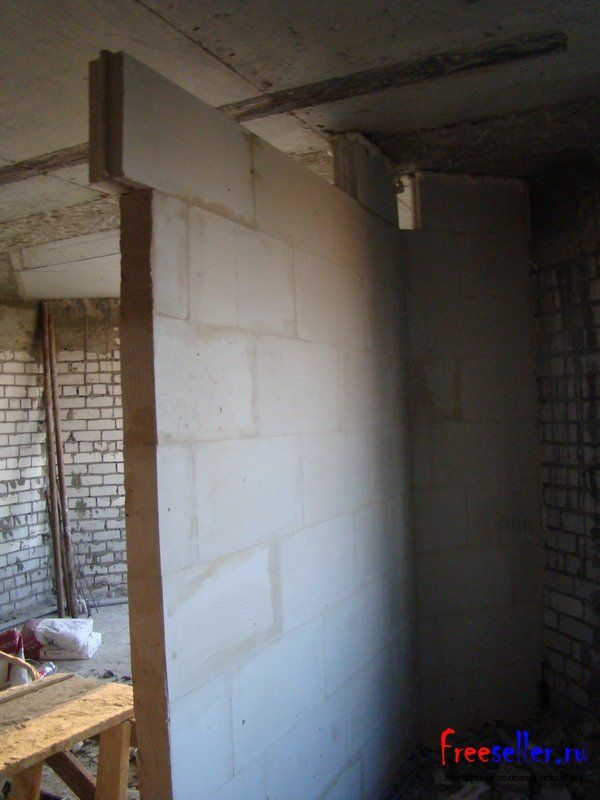
The bottom row is very important for the correct construction of the PGP partition. Install the first row of slabs with horizontal and vertical alignment, using a building level and plumb line or laser level. The bottom row determines the correct orientation of the partition. When connecting the slab locks, you should not allow the slightest displacement, this will lead to the partition being wavy. Each slab is mounted, checking the plane with a rule strip or laser level.

Before installing the slabs, markings for partitions with marks are made on the walls, floor and ceiling doorways. You can use a cord for marking, but a laser level is much more helpful in the work and contributes to accuracy.

Start installing the slabs from the corners. The contact surface of the slab with the walls and floor must be coated with an adhesive composition for PGP. The slabs are placed with the groove down, the ridge up and their position is checked. The slabs need to be “straightened” soft rubber mallets. All contour slabs are fixed to the walls and floor. Fastening the plates to load-bearing walls performed with anchors from reinforcing bars with a diameter of 8 mm, on mounting angles or direct hangers. The fittings must be protected from corrosion with oil or special anti-corrosion compounds.
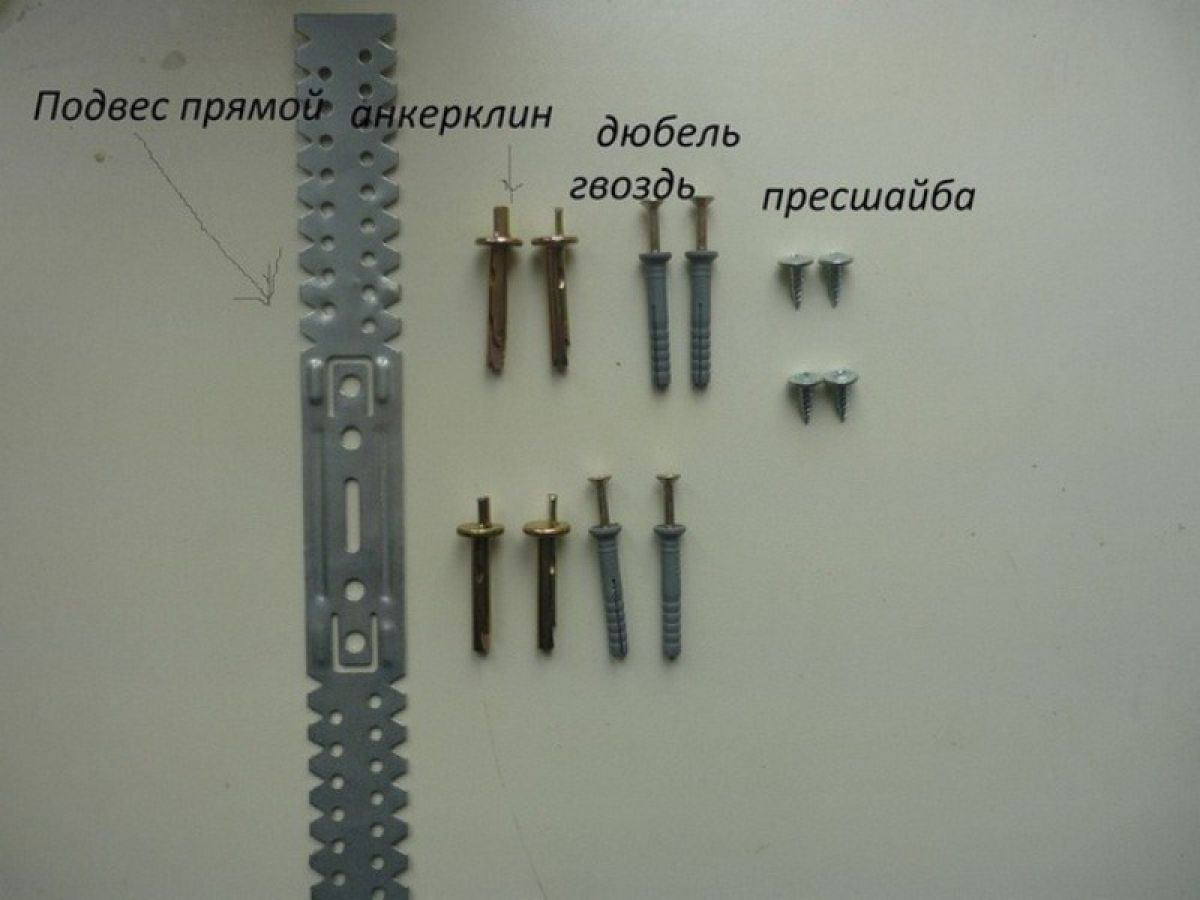
You can use special fasteners for PGP, plates L-shaped. But more often they use direct suspensions used for the device plasterboard partitions. To fasten the slab using a direct hanger, it is modified to the required size - the toothed ridge is cut off. Fastening elements are attached to the walls and floor with 80 mm dowels, and attached to the PGP slab using self-tapping screws no shorter than 60 mm.


The pitch of dowel-nails or screws vertically should be no more than 1000 mm, horizontally - 1320 mm.
The second and all subsequent slabs are fixed in a checkerboard pattern, the first to the floor, the next to the first slab, coating the joint with adhesive. Fix the slabs with glue, pressing firmly.
The displacement of the seams in the second and subsequent rows of PGP slabs must be at least 150 mm. Installation of the slab in the plane of the partition is guaranteed due to its precision lock connection groove-ridge, subject to tight fixation without displacements or gaps. A displacement of even a few millimeters can cause a wave, since the error accumulates with the installation of each subsequent slab. Tight joining of the slabs will give the correct vertical position in the plane, and the horizontal installation and the absence of lateral “roll” of the slabs are checked when installing each slab.

To move the joints of the slabs and bring the partition under right size, the slabs have to be cut. For pruning, use wood hacksaws with set teeth and a thick blade. In the case where the partition is located without abutting one or both walls, the ends of the partition can be leveled with an adhesive composition, which can be applied in vertical joints up to 8 mm thick.
To construct a doorway, or any required opening more than 900 mm wide, in the partitions of the PGP, jumpers will be required. The vertical edges of the PGP slab do not require any additional fastenings. For opening widths up to 900 mm, PGP slabs are installed using an auxiliary temporary structure made of wooden block, ensuring the fixation of the slabs until the glue completely hardens. The block is installed above the opening and removed after the slabs are fixed with glue. To install the door frame, frame dowels are used, installing them at the level of the horizontal joints of the slabs. The gaps above the top of the box are filled to the level of the slabs with polyurethane foam.

In the case when the opening width is more than 900 mm, 40 mm thick boards, reinforcing bars with a diameter of 8-10 mm or reinforced ones are used as lintels aluminum profiles 70 - 80 mm wide. The support of the lintel in each direction must be at least 500 mm. This requirement is due to the strength of the GGP gypsum boards, the load on which must be distributed evenly. When using reinforcing bars as lintels, they must first be protected from corrosion. The number of rods is at least two.

Reinforce attachment points door frames brackets made from straight hangers. The staples are secured with self-tapping screws into pre-made recesses and sealed with putty according to the GGP.

When installing the last row of PGP, it is necessary to leave a compensation gap of at least 15 mm to the top of the floor slab. This is due to the likelihood of floor slabs bending during operation. The gap is filled with polyurethane foam, the excess is cut off and the joint is smoothed with putty.

The corners of PGP partitions must be protected from damage. They use special perforated profiles to protect the corners and attach them to the corners with putty. Apply putty to the corner and press it into it corner profile and level the putty layer. The internal corners with the walls are secured by gluing with sickle tape.

Pros and cons of partitions made of tongue-and-groove slabs
- The partitions are environmentally friendly, since neither the composition of the slabs nor the technology contain any harmful substances.
- They have good vapor permeability, which helps create a normal microclimate in the house.
- Simplicity of installation and processing, simple technology, light weight of the slabs.
- The slabs are classified as fireproof; their scope of application is not limited.
- Compared to brick partitions, PGPs do not place any significant load on the base and take up less useful volume.
- PGPs have a smooth, high-quality front surface, eliminating the need for leveling with plaster.
- GWPs are available, including at a cost.

Sound protection is sufficient only with double masonry of solid slabs with an additional layer of soundproofing material.
Without fastening to the ceiling, a partition made of PGP may lose stability and “sway”. Fastening must be carried out with a gap to the floor slab of at least 15 mm, in order to avoid deformation of the partition in case of possible deflection of the slab.
It is not possible to install hanging furniture and household appliances. The weight of decorative elements, shelves, etc. that can be mounted on a partition is very limited.


