Many people want to learn how to make crafts for giving their own hands. The dacha is a place not only for work, but also for recreation. Here you can enjoy the fresh air, the beauty of nature.
Today we will talk about how to make interesting garden decorations from scrap boards. To make beautiful and durable crafts, you don’t need to be smart with the material: you can take ordinary boards, or rather, their trimmings, and make something like that. Eg, windmill, which will delight the eye even with a slight breeze.
Making a rotating windmill
In the barn or in the attic, you can conduct an “audit” and find required amount material. When making a mill with your own hands, you need Special attention devote to the manufacture of blades. They should be of the same size and fastened at a slope of approximately 15 degrees.

In order for the blades to rotate, it is necessary to install a mechanism that is easy to find in old spare parts. The manufactured mill needs to be processed protective materials or paint for outdoor use, this will help protect the product from moisture.
Crafts from cutting boards in the country with their own hands for children
The summer period should bring joy not only for adults, but also for children. We must not forget that children in the country are not very interested. No internet or TV at all.

In order for time in nature to bring benefits and pleasure, you can equip children's Corner. This is where cutting boards come in handy.
Sandbox and other DIY crafts for giving
There are several options for crafts that can be done for children in the country, among them a sandbox, which must be tightly closed. Tree huts are especially popular. But these are great buildings.
If you ask the idea, then for the boys you can build a multi-level race track. And for girls, equip a house for dolls, which can be decorated with the remnants of wallpaper, fabric, etc.
DIY board beds
Children love to make their own mini gardens. You can use boards to equip small beds of boards. Turn on your imagination and decorate your site with a variety of crafts from improvised materials.
Summer cottage furniture
From the remnants of boards and branches, you can make wonderful, and most importantly, exclusive summer furniture. A variety of tables, cabinets, benches, stools will always be in demand.
You can make a cozy bench for two and put it in a shady corner, where it will be so nice to relax in the evening and enjoy the silence.
Very interesting video tutorials of various country crafts
See what beauty you can do with your own hands:
Didn't you forget about the birdhouse?
Such necessary boxes:
Jurassic park made of wood:
There is no doubt that in the store you can buy almost everything you need for a summer residence, home and family. However, there are things that the industry has not yet thought of doing. It is especially pleasant to solve the problem with your own hands, and even from all the good that it is a pity to throw away, for example, after construction is completed. We have tried to find the most necessary and interesting for you.
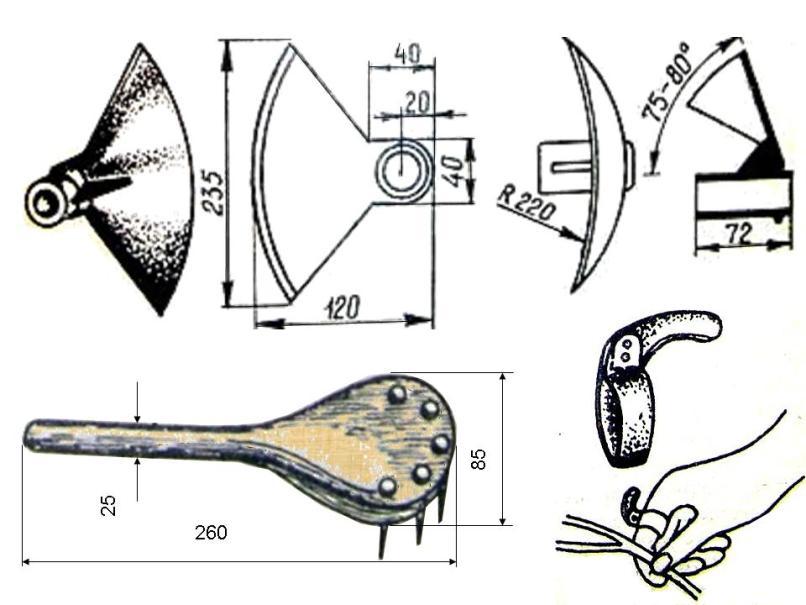
Do-it-yourself miracle shovel
A wonderful tool that you can make yourself is a miracle shovel. The device allows you to loosen the ground without lifting the soil, that is, with minimal physical exertion.
The speed of digging also increases significantly.
The idea is that a pitchfork is driven into the ground, and then a person presses on the handle. The special stop is the fulcrum for the lever. As a result, the earth is loosened between the movable and fixed forks.

We have chosen more simple design forks with an open frame, because in this case it is possible to bend the frame using an ordinary vice, without using a pipe bender. We also opted for a five tine variant on movable forks with a total tool width of 350mm.
The miracle shovel can have 6 or 7 fork elements and reach a width of 500-700mm, however, such a tool can work on relatively soft ground and large areas. The ripper allows you to work the land next to the paths, however, for digging in the corners better fit design shown in the photo below.

For the manufacture of a ripper, you will need a profile pipe 20x20mm with a thick wall, a piece of a round pipe with an inner diameter of 40mm - for the handle, an alloyed rod with a diameter of 6-8mm and a little sheet metal 3mm thick - for eyelets. From the tool you will need welding machine, drill and grinder.
The design is assembled in accordance with the drawings. The fork pins are inserted into through holes in a profile pipe and welded on both sides.

The pins of the movable forks must be sharpened and bent by 10-15 degrees. Both parts of the structure are connected by an axle, which must have a cotter pin to prevent twisting of the nut.
Painted miracle pitchfork from profile pipe last longer and make an additional impression on the neighbors.
Tools for home and garden
There are other tools that people have come up with to facilitate and speed up work on their site, garden cottage. You can make them according to the following sketches.
 Your attention is invited to ten home-made country tools:
- A shovel with special teeth, which can be made from conventional tool. Such a device is indispensable when it is necessary to dig up the ground for a vegetable garden, in which there are many roots.
- Option number 2 - the tool is also made from a standard shovel. Such a device will make it easy to cut down the growth of trees and shrubs.
- If you tie a bow saw to a handle, you get a tool for cutting branches at a great height. You don't need a stepladder, and you won't have to fall off it.

- So it happens that the spring breaks on the secateurs. The tool can be "cured" with a piece of rubber tubing. The latter is tied to the pruner handles, for example, with electrical tape, and you can work until you purchase a new tool.
- A special garden knife will help in trimming stems and whiskers. An ordinary pruner cuts them badly, clamps between the blades instead of cutting. It is better to choose alloy steel so that the blade does not dull quickly or use an old chef's knife as a workpiece.
- The unusual hoe has a curved conical shape. Such a tool is much more effective than a conventional chopper. From the materials you will need a piece of pipe for the handle and a piece of sheet metal for the blade. You also need a welding machine, angle grinder and hammer. You will have to tinker a bit, but the convenience of working with a new tool will quickly justify the time spent on its manufacture.
- A miniature hoe made of wood with nails is used by many summer residents. Convenient for planting seeds and loosening.
- A homemade ring with a miniature knife has nothing to do with a wedding or jewelry. Its purpose is the ability to quickly cut the twine when performing numerous garters in the garden.

- A scoop shovel can be quickly finalized with a grinder. The tool with holes is very convenient when mixing mortar or other bulk materials. Mixing is easier and faster.
- It is sometimes also useful to cut a bayonet shovel with an angle grinder. A tool with a sharp blade is useful when digging hard and dry soil.
Useful crafts from improvised materials
Any thing made by one's own hands is the pride of its author. Craft made from waste material, - the reason to be doubly proud. Creation that benefits is worthy of triple praise. Here are a few dozen such products.

Unusual and reliable crafts are obtained from metal. Each farm has a variety of leftovers. metal products. As a result, one can compose a lizard and a couple of lovers, an owl and giant ants from them.

From natural stone with their own hands, people create fabulous miracles. More detailed story about crafts made of stone and metal in the article

Homemade wood: boards, beams, logs are very popular. From the boards left after the construction, you will get a retro-style car for children, you can cut a simple craft for the garden from a bar, a cut log easily turns into a fungus, thin logs will serve as the walls of a house for children. In the article we have prepared for you a whole set useful homemade from logs, timber and boards.
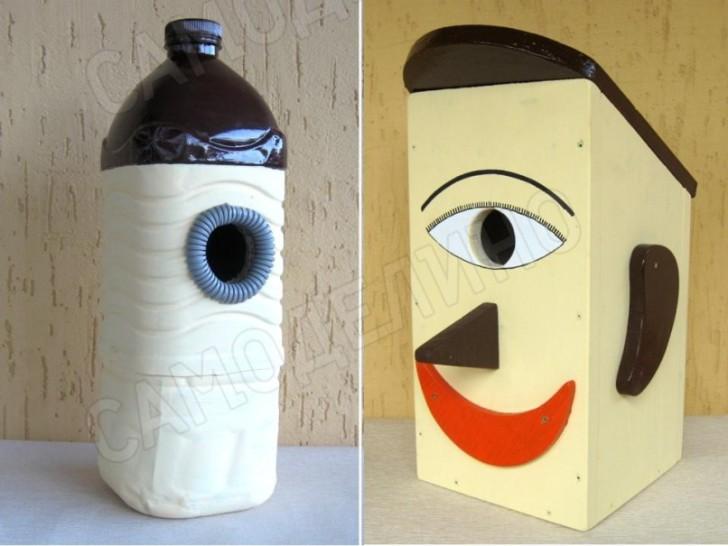
Of course, from the scraps of the boards you will get a wonderful birdhouse. If there is no tree, you can compose a birdhouse from plastic bottles and cardboard. See the drawings of these and other birdhouses in the material.

Homemade feeders are already creativity in which adults and children compete. How to build a feeder from plastic bottles, you will find many other options for bird canteens in the article.

It happens that there is no washbasin, but there are plastic bottles. You will see several options for homemade washbasins in the article.

It happens that large plastic kegs fall into our hands. Here is an example of a fun train model made of such material. In general, you can make the same homemade products from kegs as from bottles, only in larger sizes.

It is difficult to list all the useful things that people have learned to make from plastic bottles. Before you is a photo from the master classes in the article.

All presented homemade products are made of plastic containers. Master class on making palm trees different sizes You will find in the material. A description of the manufacture of a cheerful native is in the article. How to make a mole repeller, including in the form of an airplane, you will see in the material.

In the picture above, we have already seen how the donkey desperately drags a cart with flowers from a plastic box. Containers for vegetables are a fairly affordable material, and do-it-yourselfers have found many uses for plastic boxes.
Depending on the circumstances, containers can be made into a neat garden fence, quick-to-build shelving, unusual chairs, and a fun train-shaped flower bed. We will definitely find a place to publish what you come up with from plastic boxes!
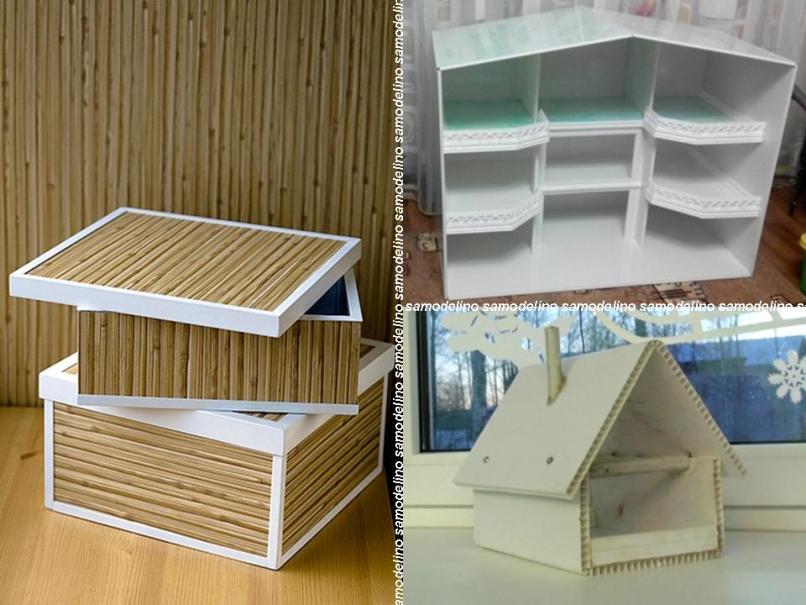
After finishing work, they must remain pvc trimmings panels. You don't want to throw away those cute little pieces of plastic. From leftovers plastic panels easy to build boxes, bird feeder and toy rack. The connection can be made with plastic adhesive or self-tapping screws. Show your imagination!

Of course so many plastic pipes after the installation of the plumbing will not remain. However, furniture made from scraps looks impressive and modern. In any case, it is quite possible to compose a high chair for a summer residence from plastic pipes. When installing, glue for plastic is required.

From the old tree you can make a garden path, steps, country furniture, firewood. See how to use waste boards for gardening tools.
Many are familiar with such a picture, when you enter the country barn, the shovel strives to fall, and the rake, if you step on them, hit on the head. Sometimes it's so hard to find right tool, therefore, it is necessary to make an organizer for summer cottage inventory. Here is another problem regarding where to put the old tree, or rather, the boards, will be resolved.
Organizer for garden tools from scraps of PVC pipes
It is convenient when every garden tool is in its place. In addition, it’s good when the organizer looks beautiful for him, but is made from the remnants of old material.

If you made water supply for a summer residence, there were probably PVC pipe trimmings left. They will come in handy for the next idea. For such an organizer, take:
- narrow thick planks;
- self-tapping screws;
- pvc pipes or their trimmings;
- hacksaw;
- screwdriver;
- level;
- saw for wood.
To saw off PVC, use a hacksaw, miter saw, plastic pipe cutter or special cutter.
Make a markup, helping yourself with a level, draw three horizontal lines on the wall on which the boards will be fixed. Measure the length of the boards, saw them off. Attach two to the wall using self-tapping screws. The lower one is needed for support so that garden tools do not touch the ground. We fix it with a small bar.

On other boards, make markings at the same distance. Attach PVC pipes cut side up.
If you have a straight wall in the barn, then look at what other crafts for giving are designed to store hand garden tools in them.

For this organizer you will need:
- PVC pipes;
- double-sided mounting tape;
- hacksaw;
- scissors;
- roulette;
- pencil;
- soft cloth.
Use a tape measure and a pencil to mark the wall. Cut pieces of mounting tape desired length. After removing the protective layer on one side, attach it to the PVC, then remove the second protective layer to attach to the wall.
In order for the tape to adhere more firmly, avoid getting dust, dirt on it during installation, do not touch the sticky surface with your hands.

After you have fixed the PVC pieces on the wall, clean in sections gardening equipment for easy storage.
Attach a board painted with wood varnish to the wall, pvc pipe trimmings. Thus, you solve the problem of storing extension cords. And brushes can be hung on nails nailed to another wooden board.

If you have pallets in the country, they can also be adapted for storage garden tools by attaching those to the wall.

Boards and small glass jars turn into a storage system for nails, screws and other small metal items that are needed in the country.

To implement this interesting idea, take:
- a small board;
- nail;
- hammer;
- self-tapping screws;
- screwdriver
- small jars with screw caps.
- First you need to make holes in the lids. To do this, turn them over, putting them on the board. Make three holes at the same distance using a nail and a hammer.
- Attach the cover to the bottom wooden shelf, attach with self-tapping screws.
- Put in a jar every little thing for needlework in the country. All you have to do is screw it to the lid.

Old wood shoe organizer
Another problem faced in the country concerns shoes. There is not always enough space to accommodate rubber boots, slates, slippers of all households. Interesting ideas will help with this.

if you have old hanger with hooks, don't throw this item away. It is enough to paint it, nail it at the right height, after which the problem of storing shoes will be solved.
If you have a wooden pallet, this can be done like this: saw it into several parts so that each remains cross bar. The bottom of such sections does not need to be done. It is enough to cover the shelves with wood varnish, place shoes in them. Teenagers and adults will hold up well.

If desired, the wooden boxes in which fruits and vegetables are stored will turn into original crafts for giving, for example, an organizer for shoes.

To create this, take:
- wooden boxes;
- wood impregnation;
- self-tapping screws;
- boards.
On the small sidewalls, find the middle, attach here the bars that hold the shelf. Now connect the sections together as shown in the photo. That is, at first, they are fixed in pairs, then in rows, slightly shifting them one way or the other.
But what else interesting ideas can be implemented using such boxes.

For the first, you first need to paint them, when dry, arrange them vertically and horizontally. For the second, you don’t even need to spend money on paint. Between themselves, these elements are connected using large paper clips.

On such a ladder, many pairs of shoes will be placed at once. It is only necessary to nail planks horizontally to the steps. If desired, you can fill the corner space by attaching rectangular shelves here with self-tapping screws.

Beautifully stacked firewood in the country
It is easy to clean up not only in the barn, in country house but also on the street. Such firewood sheds will not only become a place for firewood, but also add zest to the site. It is good to melt the stove with brushwood. Make bundles, put in a firewood rack. To make it, you need so little:
- boards;
- self-tapping screws;
- wood paint.

It is not difficult to create such a building. The basis is four vertical pillars, which can be made from narrow wide boards or bars. They are fastened with horizontal boards, which are also the bottom shelf. Make another one in the center. The roof is double pitched. Do not forget to cover all elements with antiseptic impregnation.
If you have an old shelving unit, stacked firewood can also be placed on it. But first you need to paint that one with an antiseptic to wooden elements lasted as long as possible. Put the firewood rack near the wall, then it will take up little space, and atmospheric precipitation will not get here.

The following firewood racks will decorate the old fence if placed in front of it.

For one such building you will need:
- four bars with a section of 50 or 40 cm;
- nails;
- self-tapping screws;
- boards of the same width;
- metal skate;
- impregnation for wood;
- saw;
- roulette.
- Knock down the bars in pairs in the form of the letter L, attaching to the transverse bar.
- Measure the distance between the two posts, cut the boards to that length. Nail them down starting from the bottom. In this case, each top should go a little on the bottom.
- From below, nail two bars horizontally across, attach boards to them, on which beautifully stacked firewood will lie. Attach the horse.

If you want to decorate the woodshed, then nail a board under the top “leg” of the pallet. Put a film in the resulting box, fill it with earth, plant flowers or greenery.
A place for beautifully stacked firewood can also become a bench for relaxing, see how easy it is to make one. This idea will also tell you how to save space.

Place the firewood near the outdoor hearth, under the bench. When the weather is dry, put on it decorative pillows which are so comfortable to sit on.

Sawn birch firewood can be designed in an original way. Place thick and thin branches of this tree in the center, fragments of trunks around, fix everything with a rope rope. A pair of flower pots and a lantern complete the natural picture.
Where to put the old tree?
If you got a plot on which several trees grow or, perhaps, there are those that were broken by a storm. So that you do not spend money on the export of this natural material, look how many interesting things can be done from it.

For a device like this garden path you will need:
- old tree;
- electric or chainsaw;
- antiseptic;
- geotextile;
- brush;
- gravel;
- sand.
Choose a high density geotextile so that it lasts as long as possible and weeds cannot grow through it.
Saw the tree into round pieces 4-5 cm thick. Cover them with an antiseptic on all sides. If you want to give these elements shine, then after the last coat of impregnation has dried, paint with wood varnish intended for outdoor use.

First, put wide chocks on the marked and prepared site, place those that are smaller between them. You can help yourself with a wooden or rubber mallet, tapping on the blanks for a better fit to the surface.
If you do not have enough of these elements, place them less often or pour a layer of gravel on the soil, and put wooden chocks on top in the form of a pattern.

If you have a hilly area, turn an old tree, but in good condition, into steps. To do this, the chocks should be 10–15 cm high.
photo 27 photo 28
Another idea to use a log.

Place two logs at such a distance from each other that you can make holes in them, put a board here, fix it, and use this bench for its intended purpose.

She may be like that.

For her you will need:
- tree;
- saw;
- bit;
- corners;
- self-tapping screws;
- screwdriver;
- boards.
Using the same technology, fix the second board at the top so that when sitting, you can lean on it with your back.
If you own the work of an electric or chainsaw, then you can make such an outdoor chair.

If you are looking for more simple ideas where you can put the old tree, then pay attention to these.

Churbachki need to be treated with varnish for wood, they will become planters or other items of room decor.
An old tree, its branches can turn into such a stylish mirror, for this you will need:
- plywood;
- dye;
- primer;
- tree;
- jigsaw;
- round mirror;
- liquid Nails;
- wood glue.

Attach a mirror to plywood, outline it. Step back from this mark on all sides by 10 cm, outline this outer circle already, cut it out according to this markup.
Apply a primer to the frame, when it dries, paint this place. Glue a mirror to the center, "planting" it on liquid nails. Apply glue to the wooden circles, fix them on the frame. You can pre-coat them with wood varnish, then glue them to plywood.

That's how many useful things you can make from wood, PVC pipe remnants. If you are interested in ideas on how to make a shoe organizer, watch the following video.
The second plot will teach you how to make a bench from a log without a single nail.
![]()
Things made by hand are distinguished by their beauty and decorativeness. They add a piece of warmth and comfort to the interior space. Wooden crafts for home and garden have an aesthetic appearance and allow you to reveal your inner potential. They help to decorate the residential interior and add a kind of zest for personal plot.
Both adults and children can make such products. Modern drawings wood crafts will help to cope with the task. A good imagination and a little patience allow you to get the desired result.

Original wood decor ideas
Since ancient times natural array wood has been widely used as finishing material. The beautiful texture and unusual coloring amaze the human imagination. From wood, luxurious furniture and decor items are obtained.

DIY wood crafts add a piece of warmth and conciseness to the environment. For example, beautiful photo frame with carved patterns will be a wonderful decoration in the reception area for guests and loved ones. To do this, you can use different types of tree crops. Special stains and impregnations will help to add colors and emphasize the texture.

For suburban area original solution there will be animal figures. To do this, you need flat wooden elements. For example, thin saw cuts are used to create an owl.


The design consists of five main parts: head, torso and eyes, tail wings. The head and body are made from round cuts. For wings, you will need bark or vine, previously fixed to each other.

Crafts from saw cuts of a tree will become a real decoration of a personal plot. Thin parts of wood are used for the manufacture of many tiered racks and shelves, which will later be located flower arrangements. The surface of the array can be processed sandpaper or leave it as it is.

Wooden saw cuts are widely used as a basis on which various decorative trifles are subsequently located. For example, crafts in the form of a picture. In the foreground there will be flat pebbles. They will help to imitate the torso and head of little men.

From gift paper, you can make nice clothes. Draw other small elements with a thin marker.


Natural landscapes are made using the same technique. Marble or granite chips will help add luxury. For these purposes, you can use small amber. To fix the result will help the paintwork. The photo of wood crafts shows exclusive decoration options. They add sophistication to the environment.

Master class on creating a three-dimensional wooden appliqué
Wooden appliqué impresses with its beauty. Modern technologies allow you to create a complex pattern made of thin wood. We bring to your attention detailed master class to create an application from a natural array.

Before starting the workflow, you need to prepare the following tools and materials:
- thin wood;
- simple pencil;
- image based on which we will create an application;
- paper;
- thin plywood;
- glue for wood;
- impregnation. It will be needed to give color to future crafts.


The workflow is divided into several stages:
- On a piece of paper we draw a future sketch. The weight of the part is signed and numbered.
- Next, we cut the whole drawing into separate parts;
- Cut sharp corners carefully.
- We grind every detail with sandpaper.
- After the surface is prepared, each element of the application begins to tint. To do this, you need a thin brush and a water-based stain.
- When all the details have dried, you can start making a wooden panel.
- Each element is covered with glue.
- After that, we fix them on a sheet of plywood.
- When all the elements are in place, leave our panel to dry completely.
- You can give a clear outline with a thin marker.

As you can see create beautiful thing simple enough. The main thing in this matter will show a little imagination and perseverance.
More more instructions how to make crafts can be found on our friends website.


Photo of wood crafts


