The stores offer a huge range of lighting fixtures for any room. But a do-it-yourself chandelier in the kitchen or in another room will become a truly exclusive option. home decor. You won’t be able to find another one exactly like this, and the process itself will bring pleasure.
Materials and safety
In the process of working on one or another model of a home-made chandelier, improvised materials will be used, which means that the total cost of the device will be minimal, but the exclusivity of the product will be maximum. When choosing a material, the following points should be considered:
- It must be incombustible. Still, it is used to create an electrical device, and there is a risk of fire.
- Determine what type of lamp will be used. So, fluorescent and LED sources practically do not heat up, but incandescent and halogen lamps - on the contrary.
- Appropriateness of use. It is worth remembering that it is not always possible to make a homemade product the first time, the material must be chosen so that its damage is not a problem.
- Since the chandelier will be used in the kitchen, the material of the lampshade and shades should be easy to clean, and the elements of the lamp should be removable.
- A homemade chandelier cannot be hung on an electric cable, no matter how light it may be. For hanging, chains, special tubes (soft or hard) should be used.
Majority homemade chandeliers made in the form of a single ceiling or a closed lampshade. Therefore, it is not worth counting on too much luminous flux. Such a lighting device will definitely become a central element in the kitchen and attract attention, but additional light sources must be provided for it.
Homemade chandeliers provide little light, although they can be very themed.From threads
This material, which is at hand or can be bought quite inexpensively, will help create an original light chandelier. If you choose white threads, then you can easily paint the chandelier in any color. The size of the chandelier can be anything, it depends on your desire. Appearance products are simple, which will allow you to fit it into the interior of any kitchen, but at the same time original.
Important! The basis of the lamp is threads, you can use thick cotton, but not wool.
In the work you need: threads, PVA glue, a brush, a round inflatable ball of the required size. Creation order:
- Inflate the balloon, draw a circle at its base.
- Pour the glue into a container into which it will be convenient to immerse the threads.
- Wind the threads pre-soaked in glue on the ball in a chaotic manner, bypassing the circle area that was drawn in the first step. To simplify the process, you can pierce the bottle of glue closer to the bottom and thread the thread there. So it will be evenly wetted with glue.
- When the winding is completed, the ball should be hung up and the threads dried. Depending on the size and layer of winding, this will take about 24-48 hours.
- When the future lampshade is completely dry, it is tedious to remove the ball, after blowing it off.
- It remains only to choose the size of the cartridge and connect the wires to it.
 Step by step manufacturing thread chandeliers
 Advice! On big kitchen looks good 2-3, or even more of these lamps small size. They can allocate certain zones. It is difficult to obtain a powerful luminous flux from them, but their effectiveness is at a high level.
Using the same algorithm, you can create an original openwork chandelier. The main material is ready-made knitted napkins. They are soaked in glue for 10 minutes, after which they are glued to the ball. They dry longer, about 3-4 days. A similar chandelier can be made from one large round napkin, or from individual elements any form. The second option looks very original.
from wood
Such chandeliers are extremely simple to create, but their appearance is extremely non-standard. They are not suitable for every interior. It will be possible to fit without problems into the kitchen, decorated in country style, in oriental style. The kitchen must be large, so how to embrace the beauty of this chandelier in small kitchen will not work.
In the process, you can use both massive bars and a vine and even bamboo sticks. Options for homemade wood chandeliers:
- Knock down 2 bars in the shape of a cross and place cartridges on them. This is the easiest option to implement, even without special skills in working with wood.
- An old wooden wheel from a spinning wheel will come in handy. If there is such a rarity, then the chandelier can be created very original. The wheel needs to be sanded, varnished or painted and suitable shades attached, cartridges mounted.
- Ceiling lamp made of raw branches. Very modern version, which can complement any eco-interior. The algorithm of work in this case is similar to the process of creating a chandelier from threads. Only yarn is not wound on the base-ball, but branches are glued. This should be done in such a way that each new branch has a fulcrum on the ball and on those already glued.
- Another option from the branches. Need thin, different lengths. Holes are drilled in them through which the wire passes, with its help fastening to the round base is carried out. A cartridge is installed in the center.
 Original chandelier made of branches for country style
 Important! Any wooden elements, whether it be branches or timber, it is necessary to varnish or paint before or after creating the chandelier.
From glass jars
These chandeliers are original look and absolutely safe. Glass is heat-resistant, so even incandescent lamps can be used in such chandeliers. To work, you need jars with screw lids. Step-by-step creation algorithm:
- On the cover, make a hole that is suitable in size for the cartridge that will be used.
- Insert a bulb holder into the hole and screw on the cap.
- Connect.
For such a lamp, a suspension must be provided, it can be a chain or a rod. A chandelier created according to this algorithm can be:
- With one canopy. Such models are located on the ceiling in the amount of several pieces.
- With several shades. The basis for their consolidation is wooden plank or plywood. They can also be assembled in a "bundle", which will look even more unusual.
- Glass is easy to decorate. In the process, you can use: twine, special heat-resistant decorative composition, paint. The last option will help create an imitation of stained glass.
 Simplicity and originality - a chandelier from cans
 According to a similar algorithm, you can make a chandelier from:
- glass bottles. In them, the cartridge is launched through the neck, the fixing element is a cork stopper. The bottom must be removed and treated with sandpaper so that the edges are not sharp.
- Decanters. The process is similar to the previous one.
- Cups and saucers, plates. For the kitchen, such a themed chandelier is a real find. Do not forget that ceramic cups are quite heavy, so you need to provide a suitable base and fix the chandelier itself to the ceiling.
- Forks, spoons. Holes are drilled in their handle, a wire is threaded through them, which is attached around the perimeter to a wooden rectangular or square bar of wood. The cartridges are mounted in the center of the structure.
- Colander, pots, graters, metal bowls, and in general any kitchen utensils that are not in use.
From fabric
Textile - comfortable material, from which it is possible to create original and intricate chandeliers. The procedure for creating a fabric lampshade for a chandelier is approximately the same, more specifically:
- You need a foundation. It can be an old lampshade, any object of a suitable shape. If the base is metal, then it must be examined for rust spots. If they are, then clean them up. If this is not done, the imprint on the fabric cannot be removed or painted over.
- Make glue. We need a composition that is used for gluing non-woven wallpaper. The powder should be diluted according to the instructions, when the glue is ready to immerse the fabric in it, leave for 10 minutes.
- Remove the fabric and place on the base. It is desirable to make folds on the surface, so the texture of the finished product will look more original.
- Leave until completely dry room temperature. Depending on the density of the material, this will take 1-5 days.
- The next step is coloring. If there are a lot of folds, then it will be inconvenient to paint over with a brush, it is better to use a sponge. Apply several layers if necessary.
- It remains only to create the desired decor. The process can be used: artificial flowers, leaves, branches, ribbons, rhinestones, sparkles. Here, the main thing is not to overdo it, because in the kitchen a too decorative chandelier is useless.
 Fabric chandelier can be like this
 Important! Such chandeliers give little light, as their lampshade is dense. It is convenient to place them on the dining area, this will help to highlight this area. Creating additional lighting is a must.
Making a fabric chandelier can be much easier. Ready-made frames of lampshades, rings, hoops of their metal will come to the rescue. Covering them with fabric is no more difficult than wrapping a gift. Using light tulle, it will be possible to create an original effect and light dispersion.
From beads or beads
From ordinary wooden beads or beads, you can create beautiful chandelier. Order:
- Prepare a frame made of metal or other material. In this case, you can even use a frame from an old lampshade. Its condition does not matter, as it can be easily decorated.
- Beads or beads are strung on a fishing line or a dense strong thread. If beads are used, then it is better to take multi-colored and various forms, so the lampshade will come out more interesting.
- It remains to fix the threads on the base and attach the cartridge. The threads are fixed with tension or with free sagging, depending on the idea.
Such chandeliers that imitate large crystal ones of the last century look very original. Such chandeliers are suspended, a chain is used as a connecting element with the ceiling.
 Beaded chandelier in the interior
 From plastic bottles
If you have accumulated a lot of plastic bottles, they can be used very usefully.
The first option is weaving. In a bottle, cut off the neck and bottom, cut the middle into thin strips. The more colors of the bottles, the better, they can also be painted. Now the base is taken - metal carcass, pull tight fishing line or pieces of plastic with rims and fix. Further, the creative process is weaving according to the principle of creating wattle. You need to weave tightly so that the lampshade keeps its shape.
The second option: a decorative chandelier. Creation order:
- Prepare the bottles in the same way as in the previous version.
- Cut leaves, flowers or any geometric figures different size.
- Finish the edges with a soldering iron so that they are slightly twisted. You can draw veins, so they will look more natural.
- From copper wire make branches, fix leaves on it.
- Fasten the branches to the frame.
- The light of the bulb will make its way through the foliage, which will create an interesting effect.
 The process of creating a chandelier from a plastic bottle
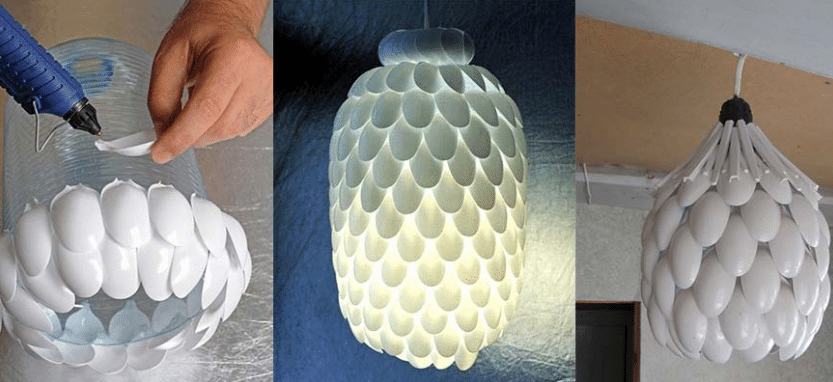
 The third option: from a plastic bottle and disposable spoons. In the process you need: a 5 liter plastic bottle, disposable spoons, a glue gun. Process of creation:
- Cut off the bottom of the bottle.
- Cut off the handles of the spoons, only “scoops” are needed.
- Apply glue to the bottle and glue the spoons in rows, starting from the bottom. Spoons are placed with the convex side out.
The result is such a scaly chandelier. It can be dyed or left white.
From barbecue sticks
An original country-style chandelier can be created from wooden sticks for barbecue. In addition to them, you will need glue and organza tape. What form can you choose yourself. The easiest option is square, when the skewers are folded into a “house”. Secure each stick with glue. Alternatively, you can make a star, a hexagon, or come up with another shape.
In the process, it is important that the sticks lie exactly on top of each other, otherwise the chandelier will look sloppy. The size of the structure can be any. After the glue has dried, you can decorate the chandelier with ribbon. It is passed through sticks in any suitable place. over wooden structure It is recommended to varnish or paint.
 Ready-made chandelier made of wooden sticks for shish kebab
 From laser discs
From this material it will be possible to create an original chandelier with a lively light effect. You can make it in the form of a ball, according to the principle as with a thread chandelier. Another option is to cut small elements and string them on threads that are fixed on the frame.
Discs are a convenient and easy-to-use material, so you should turn on your imagination with them and then you can create an original decor element.
Important! Whatever idea comes to mind, it is worth remembering that it will be possible to fit such a chandelier not into any kitchen interior, but perhaps created in high-tech style.
From cardboard, paper
Oddly enough, but even from such materials you can make a very beautiful and original chandelier. It is easiest to make it out of cardboard, for this you need:
- Find the right stencil. The outlines of the chandeliers look beautiful in classical style. Make 2 identical parts out of it, cut them so that when connected they create a three-dimensional structure.
- Color the cardboard if necessary.
- Assemble the parts, strengthen with wire or thread. To do this, first make holes.
- It is hung on chains, a cord is threaded through it. The cartridge is fixed at the bottom.
Using the same algorithm, it will be possible to make a chandelier from plastic or hardboard. Such materials are much stronger and more durable. In addition, the operation of such a chandelier in the kitchen is more convenient. Chandelier elements will have to be cut with a jigsaw.
Master class for creating a paper chandelier:
- You will need a base, it can be an old ceiling chandelier, a circle of plywood or wood.
- Cut out butterflies from thick white paper. In this case, it is convenient to use a cardboard template. IN finished product butterflies of different sizes look original.
- On a dense white thread or fishing line, fix butterflies. It is convenient to do this with glue, you can also string them through 2 holes on the workpiece.
- Attach threads with butterflies to the frame. Moreover, these threads can be of different lengths, which creates the effect of movement.
- If desired, the chandelier can be additionally decorated with beads, rhinestones, individual butterflies can be painted.
 Paper chandeliers: options
 Advice! You can cut out not intricate butterflies, but circles, they look just as good.
Lamp and socket selection
When making a chandelier, it is important to use suitable electrical materials. The first essential element is the cartridge. In most cases, you need one that has a ring to fix the lampshade.
For some of the presented models, a cartridge is suitable, which is rigidly fixed to the base with two self-tapping screws. It will be possible to fix it on any surface. As for the type of cartridge according to the size of the base for it, it is better to use standard ones. This will get rid of the problem of finding non-standard light bulbs.
Regarding light bulbs, it is better not to use incandescent bulbs, they heat up too much and consume a lot of electricity. LED and luminescent products are the optimal solution both in terms of performance and economy.
How to choose the right chandeliers for stretch ceilings
Handmade items fill the house with special warmth and comfort. Plus, they are exclusive. We offer an overview of lamps that will completely change the atmosphere in the room, turning into an object of envy from the groans of friends and relatives. Moreover, they are made from everyday items that are usually thrown away.


A cardboard bag for juices or other drinks is a common thing in most homes. Most of the time it gets thrown away. But the Malay designer Edward Chu spent a lot of time to cut them into hundreds of strips and build amazing lamps from them without a drop of glue, a simple origami principle.

Yaroslav Olenev proposed to make lamps from disposable plastic spoons and became the winner in the nomination "Ecology and Design" from the magazine "Future Now".

Not less than original application found and Natalie Simpson for ordinary wooden hangers. But they look amazing in the form of a chandelier.
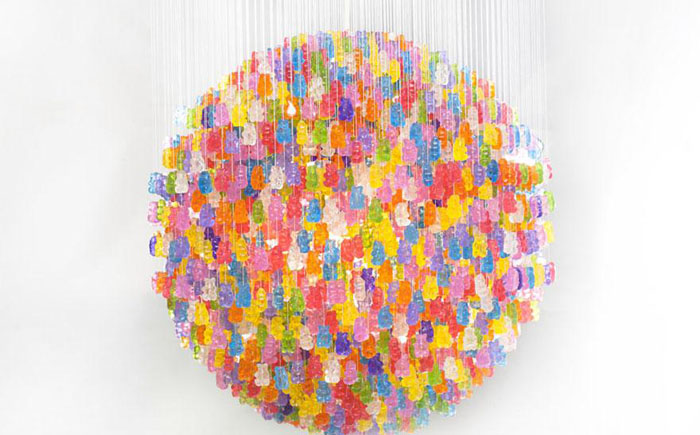

Kevin Chempeny must be given credit, not everyone has the strength and patience to string 14 thousand bears to get a chandelier.

Tira Hilden and Pio Diaz have their own vision on the problem of housing lighting. Thanks to their lamps, the room becomes like a forest. All walls come to life and turn into trees.

Talented welder Matt Ludwig was also an excellent designer. For the JJ's Red Hots restaurant, he made an incredibly original chandelier from an old drum set.

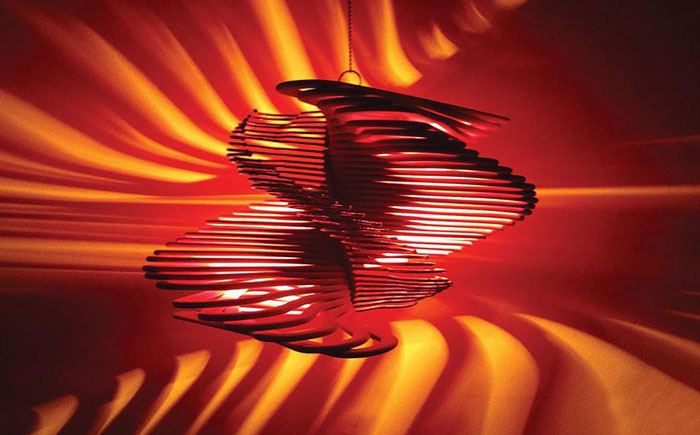
Texan artists Joe O'Connell and Blessing Hancock made stunning lamps from old bike parts and hung them in a tunnel under the highway.

It will probably be difficult to find a more original chandelier than a pumpkin from a Polish artist. It carves stunning patterns on the peel that do not repeat.

Lampshades from felt hats by Jeeves & Wooster.

Once Heather Jennings saw an amazing Rhododendron chandelier in the store, only it cost more than $ 800. Then the designer decided that she could do just as well with her own hands. To do this, she needed paper molds for cupcakes.
11. Chandelier in the kitchen

A chandelier made of ordinary metal tetrahedral graters will look incredibly beautiful.

Still fresh in my memory are vases and candy bowls made from openwork napkins. Now it's time to knit chandeliers.

A strange option is offered by Fansois Lego, he believes that the most The best way cutlery storage is a chandelier.

A large cloud is cut out of wood, but the rest and the switch are made of cardboard.

A few globes can make a wonderful cascading chandelier, a great way to light up a flight of stairs.
Every woman wants to bring originality and comfort to her home. One of the most important elements of decor - a chandelier, can transform any interior, and created with your own hands, will give it an atmosphere home warmth and comfort. In this article we will tell you how to create a chandelier at home, original ideas with photos and videos - to help beginners.
Materials for creating a chandelier with your own hands
As materials for the manufacture of a chandelier, almost any material at hand is suitable:
- paper, gift wrapping and cardboard;
- textiles and knitwear;
- ropes, ribbons and threads;
- wood and glass;
- wire, feathers and beads.

As a frame, you can use an old chandelier or buy suitable rings and stands in stores that sell materials and tools for manual creativity.
Advice! It is very important to choose the right color solution materials for the future chandelier. Lampshades made of light and transparent materials, suitable for dark room, and for light, you can use denser materials. Using materials in yellow, orange and red shades will give the room warmth, while blue and green materials will make the room feel colder.
Option 1 - Shabby chic chandelier
An original chandelier is easy to make from an ordinary metal paper basket.
Materials used:
- metal basket for papers;
- spray paint in delicate or pastel shades: pink, peach, beige, cream, lilac, mint, jade;
- a strip of linen textile in a contrasting or matching color;
- glue gun;
- scissors;
- bulb socket.

Performance:
- Drill a hole in the bottom of the basket for the electrical wire.
- By using spray paint paint the basket inside and out.
- Then pass the electrical wire with the cartridge at the end into the hole.
- Lay a strip of fabric 8 cm wide in folds, and then secure with glue gun around the top of the basket lampshade.
- Decorate the textile border with a bow and fabric roses.
Advice! If desired, the border can be decorated with beads, decorative glass pebbles, shells.
Option 2 - DIY art deco chandelier
For a living room or bedroom, you can make a simple and spectacular chandelier from silk fringe in the form of a cascade.
Materials used:
- 2 wooden hoops of different diameters
- white silk braid with long thick fringe
- white acrylic paint
- fishing line
- glue gun
- scissors
- socket with light bulb

Performance:
- Paint the hoops.
- Cut 3 identical pieces of fishing line about 50 cm long each, then use them to attach the smaller hoop to the larger one in 3 places, so that the distance between them is 5 cm less than the length of the fringe. The remaining ends of the fishing line will then be used to attach the chandelier to the electric cord.
- Using a glue gun, glue the fringed silk braid first around the perimeter of the smaller hoop, and then around the perimeter of the larger one. Do not apply hot glue directly from the gun to the line attachment points, as this may melt the line. It is better to first apply a little glue to the paper, and then, after cooling, carefully glue the attachment points of the fishing line.
- Fasten the chandelier to the power cord with a cartridge using the free ends of the fishing line.
Advice! The upper edge of the chandelier can be decorated with pearl or transparent beads using a glue gun. Instead of white fringe, you can use silver. If the fringe is not thick enough, it can be laid along the hoops in 2 layers. A cascading chandelier will look very interesting if the fringe is attached to a wooden base in the shape of a square.
Option 3 - DIY chandelier in country style
Using the frame of an old lampshade, you can make a beautiful chandelier by simply covering it with lace or guipure.

Materials used:
- metal frame from a lampshade of arbitrary shape;
- a strip of lace, guipure;
- threads to match the fabric, a needle;
- cord;
- scissors;
- bulb socket.
Performance:
- Measure the circumference of the lampshade at its widest point.
- Cut off a rectangle with a length of 4-5 cm more than the circumference of the lampshade and a width of 8-10 cm more than the height of the lampshade.
- Connect the part into a ring, stitching along the short ends.
- Pull the part onto the frame.
- Hem, bending, the bottom edge.
- Gather the free upper edge of the new lampshade, neatly distributing the folds and securing them with a cord.
- Attach the lampshade to the power cord with a cartridge.
Advice! If necessary, the frame can be refreshed by painting from an aerosol can in a suitable shade. Instead of a lace fabric, you can use openwork knitwear or tight knitwear in light colors with stripes or with a pattern of braids, bumps.
Option 4 - DIY Tiffany style chandelier
American designer Louis Tiffany used stained glass technology to make his modernist lamps. With the help of simple materials and tools, you can independently make an exclusive Tiffany-style chandelier.

Tiffany-style lamp from a plastic bottle
Materials used:
- 5 liter plastic bottle;
- sealant;
- silver or gold paint;
- paint on glass 5-7 matching shades;
- marker;
- scissors;
- bulb socket.
Performance:
- Cut a plastic bottle in half. To create a chandelier lampshade, use the top of the bottle along with the neck.
- Using a marker, mark the surface of the plastic lampshade into 6 equal segments, drawing vertical lines from the neck to the bottom edge.
- Each segment is symmetrically painted in Art Nouveau style: you can depict flowers, leaves, grapes, dragonflies, drops, taking any image of the Tiffany lamp as a basis.
- Cut the bottom edge of the bottle along the contour of the pattern applied to the surface.
- Draw the entire surface of the lampshade, including the lower edge, along the contour of the pattern with sealant, making sure that the lines are neat and not thick. Give him time to dry.
- Gently, using a thin brush or ear stick, cover the surface of the contours applied with sealant with silver or gold paint.
- Fill in the voids of the picture with paint on glass, arbitrarily combining color shades.
- Carefully cut off the neck of the bottle.
- Insert power cord with cartridge.
To make chandeliers with your own hands, turning on your imagination, you can use any materials, creating unique lamps in different styles. For safety reasons, use energy-saving light bulbs for their operation.
DIY thread chandelier - video
DIY chandeliers - photo


The ceiling chandelier is not only a source of light in the room, but also its worthy decoration. Particularly valued products handmade. They emphasize the taste preferences of the residents of the house or apartment, as well as their individuality. Of course, this work is quite complicated and painstaking, but it is interesting and entertaining.
This article presents several detailed instructions for manufacturing original chandeliers with your own hands. Each of them is simple and understandable, even a child can repeat it at home.
For the manufacture of ceiling lights use various materials: paper, wooden skewers, glass bottles and jars, tree branches, cardboard, straw, etc. The choice of base depends on the desire of the household, as well as on the interior of a particular room.
Original chandelier made of plastic spoons, photo
Plastic spoons are the easiest and available material for the manufacture of a ceiling chandelier. They have a low cost, a variety of colors and long term services. To create such a product, you will need to spend quite a bit of time, effort and finance.

Materials and tools. To create a chandelier you will need:
- plastic spoons;
- glue (for plastic);
- empty eggplant from drinking water (volume - 5 l);
- old unnecessary ceiling chandelier;
- sharp knife.
detailed instructions
- Prepare a plastic container for further work: remove the label, cut off its bottom, and dry.
- Plastic spoons are taken out of the package. With a sharp knife, carefully cut off the handles, leaving a small protrusion (about 2-3 mm) above the scoop.
- Prepared spoons are glued to the container: glue is abundantly applied to the ledge above the scoop, pressed against a plastic bottle (with a scoop to the material). The procedure is repeated until the entire perimeter of the bottle is covered with plastic spoons.
Advice! To create a semblance of a lampshade, the spoons are staggered, slightly pushing each other.
- So old chandelier remove the cartridge, place it in a glued bottle, fix it on a frame base.
- A decorative bowl is made from plastic spoons: scoops are glued around the perimeter of the neck of the eggplant.

- The chandelier is installed, connected, checked for performance.
Advice. Spoons can be painted in any desired color, so the chandelier will look even more unusual and beautiful!
Do-it-yourself ceiling chandelier made of threads
Threads are another material that is used to make ceiling chandeliers. Products from them are very stylish and sophisticated (most often they are mounted in living rooms or bedrooms).
Materials and tools. In the process of work you will need:
- threads (suitable for a chandelier - jute, linen, nylon or cord);
- glue (furniture PVA);
- scissors;
- brush for glue;
- ball of the desired diameter;
- light bulb (housekeeper or LED);
- electric wire;
- cartridge with a skirt under the ceiling.

Instruction for the master
- To create a chandelier, you need to take a ball of the desired diameter.
- On the ball with a pencil or pen, put a mark in the place where the cartridge with the bulb will be located.
- The edge of the thread is attached to the ball and wound, creating the desired pattern when winding.
- The threads are periodically coated with PVA glue (it cannot be saved).
- When the ball is completely wrapped, the threads are abundantly smeared with glue again.
- The finished product is hung for quick drying.
- The ball is blown off when the material is completely dry. It is carefully removed through the hole so as not to damage the ceiling made.
- A cartridge is inserted into a ball of threads, a light bulb is screwed in, the chandelier is connected to electricity, and its performance is checked.
Beautiful chandelier for the kitchen from glass bottles
This lighting fixture is perfect for a kitchen or dining room. It will be harmoniously combined with the interior of these rooms, giving it a "zest".
All necessary materials can be found in the basement, kitchen or garage. For work you will need:
- a few light glass bottles from wine (can be replaced with beautiful jars);
- cartridge;
- bulb;
- electrical wire.

detailed instructions
- Labels are removed from bottles.
- Carefully cut off the bottom, grind the edges so as not to cut your hands.
- An electric cable is pulled through the necks, cartridges are attached and light bulbs are screwed in.
- The finished chandelier is connected to the network.
- Check for functionality.
Fabric ceiling chandelier
Woven chandeliers complement the interior of the room, give it sophistication, comfort and individuality. They are made in a short period of time without much effort.
For work, the craftsmen use rags of fabric of the same color, as well as the material is completely different shades and invoices. Finished ceiling lighting from fabric they are fixed in the kitchen, in the corridor or in the bedroom.
Materials for work:
- bending wire;
- hoop different sizes(they will serve as a frame);
- pieces of fabric ( suitable color and invoices)
- glue;
- scissors.

Manufacturing technology
To make such a chandelier, you will need to spend very little effort and a minimum of finance, since almost all the materials are in the arsenal of householders.
- Do frame base from hoops or hoops (they are repainted in the desired color if they do not match the selected color scheme): fasten them together with a wire.
- The fabric is cut into shreds or strips right size and forms.
- They are attached to the frame with glue (the fabric is smeared with glue mixture so that it is better attached to the frame).
- The finished ceiling is dried in the fresh air (until the glue completely hardens).
- In the form of decorating elements, artificial flowers, beads, rhinestones, products made of felt or polymer clay are used.
- Insert and fix the cartridge with a light bulb.
- The finished chandelier is connected to electrical network are checked for functionality.
A chandelier made according to one of the proposed instructions will become the pride of the master. It will decorate the room, make it unique, beautiful and cozy.
DIY decorative chandelier: video
DIY chandelier: photo


When the kitchen renovation is completed, installed New furniture and appliances hanging on the window stylish curtains, and the purchase of such an interior component as a lampshade was not planned - do not despair. With your own hands, you can make an exclusive model that can in many ways surpass factory counterparts and create original design, because originality is set, as a rule, by small accessories or decorative elements.


The design of a future product largely depends on the materials for its manufacture. Lampshades for the kitchen can be made by yourself from any materials at hand. To make a kitchen lampshade with your own hands, you can use:
- Metal, plastic and ceramic dishes;
- Cutlery;
- Newspapers, wallpaper and paper;
- Threads;
- Ribbons, lace, textiles;
- Chinese or barbecue sticks;
- Milk bags;
- Foil;
- Clothespins;
- Old audio cassettes;
- Vinyl records;
- CDs;
- glass and plastic bottles;
- Molds for cupcakes;
- Knitted napkins;
- Wire and beads;
- Tennis balls;
- Old light bulbs and more.
lampshade for kitchen chandelier can be done in any style that will best suit the design of the kitchen, and in any technique, be it crochet, embossing or papier-mâché.
Before you get down to business, you should pay attention to the advice of more experienced people. First of all, do not forget that the kitchen is a room with high moisture content and pollution. And if you want a hand-made product to last a little longer than a disposable trinket, you should take the choice of material more seriously.

The basic rules that should be followed when choosing the material and technique for making this or that lampshade with your own hands:
- An energy-saving lamp is a safe solution. If flammable materials are chosen for the manufacture of the lampshade, it is strongly not recommended to use ordinary incandescent lamps in them. It is better to opt for energy-saving lamps that do not heat up to dangerous temperatures.
- Imposing simplicity. Even if such inexpensive materials, like paper or plastic bottles, this does not give the product the right to be made vulgarly.
- Accuracy at work. When working with any materials or objects, you should be as careful as possible, as the slightest awkward movement can lead to damage to the product or injury.
- Light is the symbol of the sun. The light, the source of which will be a lamp covered by a manufactured lampshade, is a symbol of the sun. It is this rule that is recommended to be guided by when choosing the image of a future product, since the lamp should scatter light, exaggerating it, and not hiding it.
- Dust. The accumulation of dust on the lampshade can reduce the light by several times, moreover, even a slight layer of dust on the lamp looks like a huge accumulation of dirt. It is this limitation that is a significant obstacle in the choice of materials. However, if the lampshade is needed for the festive decoration of the room, it can be made disposable.


A few creative ideas
In order to make a lampshade for the kitchen with your own hands, it is important to know exactly the manufacturing technology of the model you like. Here are a few key ideas that can help you make your own lampshade:
Lampshade from napkins
If you are fond of crocheting or you inherited a lot of knitted napkins from your grandmother, do not rush to throw them away. You can take as a basis a balloon inflated to the desired size and lay out overlapped napkins moistened with PVA glue on it in any chosen order. At the same time, napkins do not have to be the same size, single ornament or color. After the glue is completely dry, the product is removed from the base, a wire is inserted into the central hole of the main napkin and a cartridge with a lamp is attached. As a result, you can get something like this original lampshade, which will decorate the kitchen in your apartment or country house.


In the same way, you can make a lampshade from threads, lace or pieces of fabric.
Fabric lampshade
If we take the wire frame as a basis, according to the pattern to match the curtains, you can sew an elegant lampshade that will fill the kitchen with comfort, harmoniously fit into the interior and give the room a special charm. You can decorate such a cute product with lace, ruffles, bows, ready-made decorative elements.
Also on a wire frame, you can make a lampshade from ribbons, threads, lace or wallpaper.


Lampshade from dishes
If you have a souvenir cup and saucer in your collection large sizes, having drilled holes for the wire exactly in the center of the products, you get a finished lampshade. Also, for these purposes, you can use ceramic flower pot. However, based on old beliefs, there is an opinion that an inverted vessel in the house is not a good sign for his well-being, but remember that all signs are true exactly as much as you believe in them. An analogue can be a kitchen lampshade in the style of "heavy" from kitchen graters.


Cutlery lampshade
Often, as a wedding gift, we get a lot of cutlery that has been in the package for many years and remains unclaimed. Turning on the fantasy and using design ideas, you can get a truly original lampshade for your kitchen, which, moreover, will be resistant and durable.

Acceptable in narrow circles, the "heavy" style gives rise to truly exquisite accessories


In similar ways, you can make a lampshade from disposable tableware with your own hands.
Even if you take exactly any of the ideas and you do not have the desire or opportunity, you can partially use them, taking the manufacturing method or the material itself as a basis and make something special yourself. Here are collected the main, most common ideas that can become a fundamental factor in choosing a model and making a lamp. Good luck!
Lampshades for a chandelier in the kitchen: photos of original ideas


.jpg)


