This article will help you figure out how to embed a latch handle into a door leaf. By adhering to the work algorithm described in the article, you can easily perform this operation yourself, with a minimum set of tools and very quickly.
No door can do without a handle. The most popular type of handle for interior doors today is the latch handle.
The design of handles of this type is such that, regardless of appearance, they are all installed in the door leaf in the same way. This article will tell you how to do it yourself.
Latch handle design
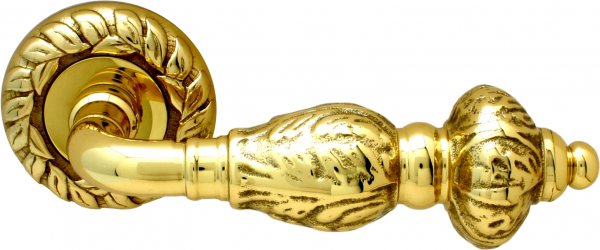
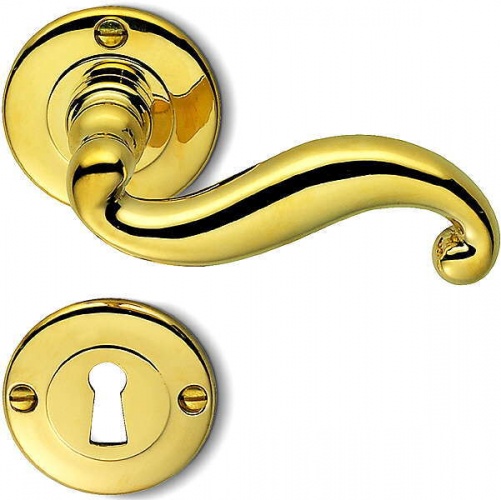
The pen itself, that is, the visible part of it, may look completely different. So:

or like this:

All these latch handles consist, in fact, of two parts - the handle itself:

and the latch mechanism:

Both parts of the latch handle require a separate insert into the door leaf.
Latch handles come without a latch - a door with such handles cannot be locked from the inside, but with an additional latch rotating mechanism, installed on the handle and allowing you to lock the door from the inside, and with a key - on one side of the handle there is a key holder that allows you to lock the door from the outside, on the other there is a lock. All handles have design differences that do not affect the tapping process. Interior(latch) is also the same, that is, it cuts in the same way for all types of latch handles.
So let's get started.
Necessary tool
To make the installation of the latch handle as easy as possible, you will need:
- Hand drill or screwdriver.
- Crown on a tree with a diameter of 50 mm.
- Wood drill with a diameter of 23-24 mm.
- Chisel.
- Hammer.
- Pencil.
The crown and drill can be purchased separately, or in the form of a set, which is called “Kit for inserting latch handles.”
Installing the latch handle
1. We begin the installation process by marking the door leaf for drilling. The marking diagram, as a rule, comes complete with the handle.

If there is no diagram, you can mark it manually. To do this, place a mark at a distance of 60 mm from the edge of the door.

2. On the side edge of the door, along the center marking line, mark the center for drilling.

3. Using a chisel, hollow out a three-millimeter recess under the face plate of the latch. It makes sense to first mark the center with an awl so that you don’t have to mark it again.

4. Drill using a crown with a diameter of 50 mm through hole. It is better to do this on both sides of the door to avoid damage to the door covering at the exit of the crown when drilling.


5. As a result, we get the following hole:

6. Move on to the side edge. Using a wood drill with a diameter of 23-24 mm, drill a hole for the latch into the marked center. You shouldn’t make it too deep, otherwise you risk drilling through the door all the way to the panel.

7. We now have two holes.

8. Install a latch in the side hole and screw it with self-tapping screws.

9. Remove the upper part of the handle. To do this, look for a hole on the side.

Using the included key or any other thin flat object:

press the tongue inside the hole:

and remove the handle itself:

10. Remove the decorative trim and thereby open the mounting holes.

11. Insert the outer half of the handle.

12. Insert the inner half. We tighten both with the screws included in the kit.

13. Put on the decorative trim and handle body. Don't forget to press the inner tongue with the key.

14. With the door closed, mark the place where the door jamb latch tongue touches, and then hollow out a recess for the latch tongue in the resulting location.

15. Insert a decorative plastic pocket.

16. Screw on the metal plate.

17. The handle is installed.

If you don’t have a drill, then all the holes can be made using a suitable chisel, however, in this case, installing the handle will require more serious repair and construction skills and may turn out to be an overwhelming task for an untrained person.
To figure out how to install the handle on your own interior door, you should have an idea about different types fittings used for such structures. Then the entire installation process will go without problems.
Almost everything is now sold without accessories. This means that the buyer of such products has to install the handles either independently or seek help from specialists. The services of the latter must be paid for. A thrifty owner, of course, will not spend money on services that he can easily perform with his own hands. Installing handles does not cause any real difficulties for home craftsmen. You just need to understand what types of fittings are currently available, and taking into account what features devices are installed for opening and closing doors of different types.
Kinds door handles
All pens are usually divided into two large categories. The first includes mortise mechanisms, the second - overhead ones. The first of these are further divided into:
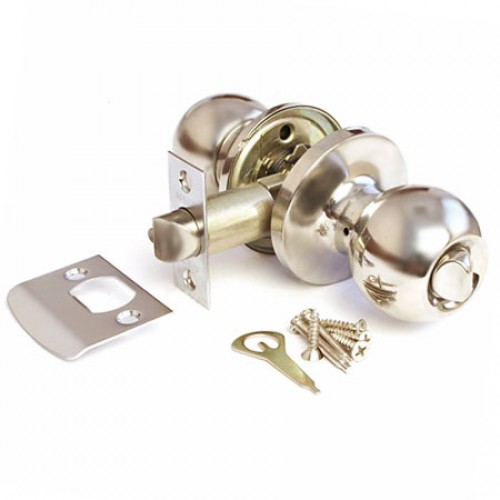
- Rotary (knobs). These handles close or open the latch when the handle is turned. They are made in the form of a disk or ball.
- Push-type (with socket and ring, latching handles). The principle of their functioning is similar to knobs. But in this case, the opening and closing of the interior door is carried out by pressing the handle handle. Typically, such mechanisms are initially equipped with a special lock or a special device - a latch.
To install a mortise device, you must first prepare a large hole in the door leaf where the mechanism will be placed.
Installing overhead handles on interior doors with your own hands is much easier. For installation, it is enough to make a small hole in the canvas, corresponding in diameter to the mechanism rod. There are no differences in terms of functionality and durability of overhead and mortise handles. Choose the device that suits you best. The main thing is that the mechanism you like matches the design of the door itself and the entire room where it is installed.
If there are several door structures in the room, it is advisable to install the same handles on them.
To quickly and efficiently mount a latch handle or a more difficult-to-install mortise mechanism, you will need the following tools - a tape measure, a screwdriver, a square, an electric drill, self-tapping screws, a chisel, a hammer, bits of various sections and a set, a simple pencil. It is also advisable to stock up on a conductor. It is a template that greatly simplifies the operation of marking holes on the door leaf and their subsequent drilling.

Mortise mechanism
Having prepared the specified devices, decide on the installation height of the fittings that interest us. Experts say that the handle should be about 0.8–1 m away from the floor. In principle, you can choose a different height, taking into account your own height. The main thing is that you and your family members feel comfortable using the handle. Now you can markup. If you purchased a conductor, this process will take a minimum of time. Just screw it from the end to door design. Subsequently, the holes on the jig will completely coincide with the tongue lining of the handle being used.
If you do not have such a template, mark the installation location of the fittings using a simple pencil and a square:
- Measure the required height from the floor, draw a horizontal line on the canvas (first on one of its sides), and then transfer it to the other side of the door and to the end.
- Place a mark in the middle of the drawn line at the end of the interior structure. It indicates the location where you will drill the hole for the tongue.
- On the drawn line you also mark areas for mounting the handle itself (marks must be placed on both sides of the canvas).
This completes the preparation for installation. You can begin the main activity.
Let's see how to install the simplest type of door handle - overhead. The first step is to make a through hole in the canvas. To avoid damaging the door, use crowns and an electric drill to perform this operation. After this you need to drill interior design from the end. In this case, you need to use a smaller crown or a special pen drill. Then everything is simple:
- Insert the locking mechanism with the tongue into the hole made. Check whether the system is functioning or not.
- Outline the overlay. Be sure to remove a small layer of material from the outlined area with a chisel.. Then, when installing the overlay, you will not worry about it damaging appearance doors. After processing the specified area, you can easily mount this part of the handle flush.
- Screw the cover with universal self-tapping screws.
- Insert its rod inside the already installed mechanism. Place the handle with the ring on the last one. Sometimes the ring begins to rub against the canvas after installation. In such situations, you should grind off a thin layer of material around the hole circumference (do the work with a chisel). And then simply drown the ring. The friction will disappear!
- Fix the handle with tightening pins or fasten it with self-tapping screws (depending on the design of the mechanism you purchased).
- Install the decorative overlay and enjoy the results of your labor.
Now let's see how to install a latch on an interior door without the help of specialists. You will need to drill an additional hole in the door leaf so that the position of the latch mechanism completely coincides with it. Then you thread the axle through the lock and place the cap on it. Place the rotary latch indoors, and install the key lock or plug on the back side.

Handle with lock
Next, you need to fix established mechanism(all its elements) with self-tapping screws and using caps to decorate the used hardware. Note! Some pens do not have caps. They are simply not included in the design of the latch. One more nuance. When the handle has a tongue lock, no other action needs to be performed. If the mechanism only has a tongue, you will have to additionally drill a hole to install it on the door frame.
You will have to tinker a little longer with the mortise mechanisms. As noted earlier, in such a case it will be necessary to make a special, sufficiently capacious hole for the lock.

Door handle installation
In this case, the handle installation diagram itself will remain the same:
- mark the door structure;
- draw a contour;
- drill several holes in the marked area, and then, using a chisel, gouge out the required area to accommodate the mechanism;
- remove 2–3 mm of the door covering to install the decorative trim flush;
- install the lock and secure its elements.
After that, insert the handle and fix it. Place the nozzle in the recess on the frame and secure it with self-tapping screws. In cases where the handle gives a slight play, its axis needs to be filed with a grinder to a suitable length. This completes the work. Use an interior door that you yourself have equipped with a convenient and functional handle!
Materials and tools:
- hammer;
- chisel;
- self-tapping screws;
- screwdriver;
- a simple pencil;
- conductor;
- electric drill with a set of crowns and drills;
- square;
- roulette.
When purchasing interior doors, you need to be prepared for the fact that the fittings may not come with them. You receive the canvas and posts from which the doors are made. And in this canvas there will not even be a hole drilled for the handle. The thing is that the product can be very different, have a unique design and size. And the handle, which will be installed in advance, may not be liked by residents. In this case, you need to install a door handle on the interior door. You can do this work yourself. You just need to buy a suitable handle and install it.
What types of pens are there? What is the difference? How to install a handle on an interior door? You will learn all this by reading our article.
Handle for interior doors
First, let's look at what such a pen actually is. We are all familiar with them, but it is unlikely that most have thought about it. design features. It is important for us that she helps open the door. However, during installation it would be nice to become familiar with its design. Here's what's included in a standard door handle:
- Handle for opening doors (2 pcs.).
- Decorative rings that cover the bolts and fastenings of the handle.
- One rod or bar of metal that connects one handle to the other.
- The socket is the body of the mechanical part of the structure, which cannot do without locks, springs and a tongue.
- Stoppers that limit the movement of the tongue and handle.

But, in addition to the standard configuration, all handles for interior doors differ in the installation method, their shape, operating principle, material and the presence of a lock. If we talk about the installation method, there are two types of door handles:
- overhead or stationary;
- mortise
Invoices - quite simple products, which just need to be attached to door leaf. The work is simple and fast. But mortise door handles are installed in the door leaf in mortise holes. Here you will have to work hard.

As for the way door handles work, they are divided into the following types:

If we talk about the materials from which they are made, then there is plenty to choose from. Some are made of wood, others are made of metal (aluminum, brass), there are even glass, plastic and stone interior handles. The most popular are metal products coated with chrome, nickel, etc. The material guarantees wear resistance and service life of the handle.
Note! Products may be equipped with a lock or sold without it. This is selected based on the user's needs. When you have to close the doors often when necessary, it is better to choose models with a latch and install it.
Nuances before installing the handle
Have you ever wondered how high the handle is? This is very important because if placed incorrectly, it will be inconvenient for users to use. If it is high, it will be difficult to reach, and if it is low, you will bend over. In fact, there is no single standard that is used to guide the installation of handles with or without a latch. However, there are some recommendations.

During operation, it was noticed that the optimal option for placing the handle for interior doors regarding height is a distance of 1 m from the floor. But, each owner can raise or lower this value, based on his own preferences and the growth of family members. It is important to remember one more point - be guided by the height of the handles that you already have in your home. Then it will be easier to choose best option. Having all the handles at the same level will make them easier to use.
Tools for getting the job done
Before installing handles on the door, it is important to ensure that all necessary tools for work. They are simple and can be found in everyone’s home. Here is the list:
- chisel;
- pencil or marker, square and tape measure;
- drill;
- drill, crown;
- screwdriver

Thanks to this set of tools, the job will be much easier. It is clear that you can embed the handle fittings without a crown with a screwdriver, but this will take more time and effort. A crown is a nozzle for a drill, thanks to which you can make perfect smooth hole in just a few moments.

It is more convenient to do the work when the door is removed from its hinges. It’s much more convenient to work this way. Therefore, do not rush to install it in its place immediately after purchase. When it is impossible to remove it, then you need to properly fix it so that the canvas does not move during operation. This is how you can clearly and correctly mark and embed the lock.

Another important point- Read the instructions for the pen. We are used to resorting to it only after wrong actions. However, to avoid them, you just need to read the instructions first. It will indicate all the dimensions, thanks to which it will be possible, ideally, to choose the diameter of the pen and the crown.
Now you can review the installation instructions, which will help you complete the task quickly, easily and without errors. And for those who are taking on such work for the first time, a visual video will be provided.
What to do
Let's look at the list of steps after which the door handle will be installed in its place. All work consists in performing 6 steps. Here they are:
- Marking the canvas.
- Creating a hole for the lock.
- Lock installation.
- Handle insert.
- Applying markings on the loot.
- Creating a groove in the loot.

This is how the handle is installed on the interior door. So as not to miss important details, let's look at each step separately.
Stage 1 - marking the door leaf
Have you already decided on the height of the handle? If not, then it's time to do it. After all, marking will be performed based on this indicator. To correctly mark, you will need a square, tape measure and pencil. With their help, you need to mark on the canvas the places for the holes for the handle. You should measure the distance from the floor and draw a horizontal line with a marker. They move on from there, transferring the markings to the end of the canvas and to the opposite part.
Now you need to mark the place on the end where exactly the hole for the lock tongue will be placed. Along the same line on each side of the door, at an equal distance from the beginning (approximately 60 mm), a place is marked for installing the handle itself.

Stage 2 - creating a hole for the lock and handle
Using a drill and a hole saw, a hole is created for the handle. You will need to drill the leaf on each side, going exactly half the thickness of the door. To make the job more convenient, experienced craftsmen It is recommended to make a mark on the crown with a marker. Why can't you drill a hole on one side only? This way the crown can move to the side and the hole will be uneven. In addition, on the opposite side, the door trim may be spoiled and damaged. The drill is held strictly at an angle of 90 degrees. It is important not to allow deviations in any direction. And with a chisel after work you can remove and smooth out all the irregularities.

As for the hole for the lock, it is made with a drill with a feather of the required diameter. The work is done carefully, because the distance between the corner of the end and the feather itself is not very large. There is an opinion that better first The first step is to make a hole for the latch, and then work on the handle. But in what sequence to carry out the process is everyone’s business.
Stage 3 - installation of the door lock
This is an easy task once the lock hole is completely ready. All that remains is to insert the lock into it. The lock pad is applied on top and traced around the edges with a pencil. Next comes the chisel. With its help, a layer of wood equal to the width of the overlay is removed using the marks. Then it can be recessed at the end of the door. To simplify the task, use chisels of different widths.

The overlay is fixed in the prepared place with screws. It is recommended to make holes for them in advance using a thin drill. It is enough to place the overlay in its place and mark the attachment points with a pencil.

Stage 4 - handle insertion
It's time to get to grips with the pen. They come with screws located on the outside. There is no need to disassemble this type of handle. You only need to stop one part in place, getting into the hole of the latch with its two guides. They have threads for bolts. After which the second half is attached and the two parts are tightened together using bolts. Tightening is carried out evenly so that the handle works without problems and the latch has a simple movement.
If the handle has hidden screws, then it will need to be disassembled. How to disassemble the door handle of an interior door? Often these handles come with instructions for assembly and disassembly, as well as keys for this. Based on it, we disassemble the structure, fasten the collapsible part with bolts and install the handle in its place. You should not use brute force; if everything is done correctly, the assembly will be easy.

Stage 5 - marking on the loot
At this point, the door handle is ready. It remains only to complete some details regarding the loot. It will need to cut a hole for the tongue and lock (if any). If you want the door to open and close easily, you will have to make high-quality markings.

To do this, you will need to close the interior door and mark the location of the tongue and lock on the front part, marking their top and bottom. The squares determine the exact middle of the lock and the markings are transferred to the end of the lock. Now everything is ready for the final step.
Stage 6 - creating a groove in the loot
Based on the markings, using a drill and a pen, a hole is made for the tongue and lock. All excess is removed with a chisel. Next, the overlay is installed. But, before installing it, it is important to check the functionality of the handle for interior doors. You will have to close the door and check whether the handle tab and the lock fit. Don't be surprised if closed door there will be a little play or wobble. The thing is that the groove is not yet equipped with an overlay.

Now it's time to attach the bar. It is fixed flush so as not to interfere with the smooth movement of the door. In essence, the work is no different from fixing the lining on reverse side. Use a chisel to remove all excess, drill holes, and fix the cover with the bolts included in the kit.
To help inexperienced people cope with the task, we have prepared a visual video that will show how to install door handles on interior doors.
Conclusion
Don't be upset when the door you bought doesn't have handles. This, on the contrary, is good, since you can choose a product that will be convenient in your case. And since there are so many options, there will be plenty to choose from. There should be no problems installing the handle on the interior door. Thanks to step by step instructions it will be standing in just a few hours.
Interior doors are sold without fittings; the delivery set includes only the door leaf and the racks from which to assemble door frame. There are no factory-made holes in the canvas for installing locks and handles. This is due to the fact that handles, being standardized, have various designs and sizes. In addition, the choice of accessories depends entirely on the preferences of the buyer. Therefore, a person who has started a renovation and replacement of interior doors is faced with the problem of choosing whether to invite a professional or install the handles himself. It should be noted that if you decide to install the doors yourself, you will definitely be able to handle the installation of door handles.
Types of handles for interior doors
Door handles for interior doors can be classified according to installation method, method of operation, shape, material, and the presence of a lock.
Based on the installation method, there are stationary (overhead) and mortise models. Overlays are attached to the door leaf, and for mortise ones you need to drill holes in it.
By way of work there are:
One of the most popular materials for the production of door handles is brass. In addition to its excellent aesthetic properties, brass is practical and durable.

As a rule, complex locking systems are not installed on interior doors. The exception is a plumbing lock installed in bathrooms and toilets.

Installing a handle on an interior door
Let's look at the installation features of the most popular model for interior doors - knob handles. Handles are usually installed on a hung door, but many experts recommend removing the door leaf for installation. True, this cannot always be done easily.

Advice. If the door leaf is not removed from the hinges and the installation is carried out with the door in a suspended position, move a chair or some object towards it so that the door remains motionless while you work.
Installation tool
You will need the most common tool, which is found in every home:

A marking diagram is included with the door latch, but it is easy to make marks for the holes without it. 1.0 meters are measured from the bottom edge of the canvas on both sides. You need to measure 6 cm from each edge of the door and make a mark. Using a square, draw a strictly horizontal line that will connect these two points. At the end of the canvas, a mark with a pencil and an awl is placed on this line in the center. The latch strip is applied and the veneer is cut with a sharp knife. We remember that the strip must be recessed into the door leaf so that it forms a single surface with the leaf.
Some experts advise starting drilling from the end of the blade feather drill. With this sequence of work, when drilling with a crown, the chips will fly into the hole already made, and not clog the teeth of the crown.

The feather drill should go to the depth of the shoulder blade, no more. The drill is pressed to a point at the end of the blade and a hole is drilled. Then, using a crown, holes are drilled alternately on each side of the canvas; there is no need to make them through. As soon as the tip of the crown appears on the opposite side, you must stop the drill and start drilling on the other side. This way the veneer will not be damaged when the crown comes out.

After the holes are ready, using a chisel and hammer, we make a selection along the line cut with a knife under the latch bar. Install the latch and tighten it with two self-tapping screws. It is better to take not the “standard” self-tapping screws that come with the latch (they are usually soft metal), but high-quality ones.

Using the key included in the kit, we disassemble the handle into two parts so that it can be installed. To do this, one mounting screw must be loosened and the other unscrewed. The central rod is inserted into the hole and the fastening screw is tightened tightly on one side. Then the second half of the knob handle is put on the rod, and the second screw is tightened. Self-tapping screws are screwed on both sides, which will cover the decorative trims and the screws will not be visible.

After installing the knob handle, all that remains is to install the “return” on the box. The door is closed, but not completely, and the upper and lower edges of the tongue are marked with a pencil. Using a square, the distance from the edge of the leaf to the center of the latch strip is determined, and this dimension is transferred to the door frame. Then a “return” strip is applied to the box, the veneer is cut with a knife, and a chisel is used to cut out the strip and tongue. The door is closed and the latch is checked.
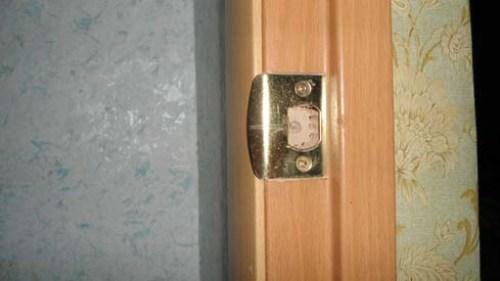
Then the strip is installed on the box. Special “pockets” for recesses under the tongue are sold; they are made of plastic or metal. The screws that secure the return strip can be covered with self-adhesive plugs. After this, the installation is complete.
How to disassemble and reassemble an interior door handle?
An installed knob handle can be disassembled in two ways, depending on its design. Unfortunately, most of these models are of rather low quality and often fail.
Disassembling one structure begins with carefully prying and removing the decorative trim. The lining has a special groove, usually it faces down. The ball-shaped handle will interfere with unscrewing the screws, so you need to press out the locking pin and at the same time, with a little force, remove the handle from the central rod. Once the handle ball is removed, it will be very easy to unscrew the screws.

To disassemble the second structure, which does not have a locking pin, you need to press the spring-loaded pin through the technological hole with the key supplied and remove the handle ball. If the key is not long enough (this happens), use a simple nail. Then the decorative trim and screws are unscrewed. If you cannot find the spring pin through the access hole, it means that the knob handle was not assembled correctly. Rotate the decorative trim 180° and the problem will be solved.
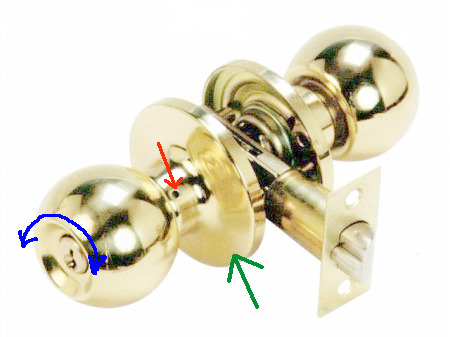

The handle is assembled in the reverse order.

Master of Architecture, graduated from Samara State University of Architecture and Civil Engineering. 11 years of experience in design and construction.
Can you imagine ordinary doors without a handle? It would seem like such a simple design, but in fact it is a very important attribute. Installing a door handle on an interior door is a task that consumers face when purchasing and installing a new door leaf. It is quite possible to solve the problem on your own. It is only important not to make a mistake with the choice of design.
Types of Door Handles
There are various types of handles that are different from each other in color, shape, material, mechanism and installation method. If we take the last feature as the basis for the classification, then there are two types of pens:
- Invoices.
- Mortise.
Installation of first class products is simple and does not cause any serious trouble. They are simply fixed to the surface of the canvas, unlike other types of products. Installation of mortise handles involves pre-drilling a hole in the door leaf.
Mortise devices are divided, in turn, into two more types:

When purchasing accessories, pay Special attention on what raw materials it is made from. Products can be made of metal, wood, glass or natural stone. They should be selected according to the color and model of the canvas, as well as the style of the interior.
 For sliding systems Hidden handles can be installed
 It is worth noting that the handles are of a hidden type. They are designed for sliding systems such as sliding doors. When the sashes move, the products do not interfere or damage wallpaper or walls.
Installation height
At what height to mount the handle is not clearly stated anywhere. Behind the scenes it is installed in products made from MDF and timber at a distance of one meter from flooring. It can be lowered or raised a little - it all depends on the taste of the owner of the living space.
 The installation height of the door handle is approximately 1 m
 The installation height of the product is affected by the height of the residents. As practice shows, a handle at a distance of 1 m is the best option for adults and children. When installing, also take into account the level of the handles on other doors. Products must be at the same height.
Required Tools
To install the handle, arm yourself with tools, without which it will not be easy to do this:
- a simple pencil;
- square;
- roulette;
- chisel;
- screwdriver;
- drill;
- drill;
- crown.
The crown and screwdriver can be replaced with other available tools, but the quality of the work will suffer and it will take a lot of time.
Before starting installation, read the instructions for the product. It indicates all the dimensions, which will help you choose the right drill bit and crown according to the radius.
Step-by-step installation instructions
If you have not encountered a similar question before, do not be afraid. Even those who are not involved in construction can handle the installation of the handle. You just need to follow the detailed diagram step by step. 
Marking the canvas
 Installation of the handle begins with markings on the doors
 Marking is where the whole process begins. Having calculated at what height the handle will be located, place marks on the door in the places where the holes will be made.
Take advantage with a simple pencil, tape measure and corner and draw on flat surface canvas line horizontally. Then transfer it to the end and opposite side of the sash.
Place a mark on the end of the product in the center of the drawn line. It points to the place intended for the recess under the tongue. From the edge of the door at a distance of 0.6 cm, draw a point on both surfaces of the door. This place is intended for the handle.
Drilling holes for handle and lock
It doesn’t matter at all in what order you make the holes: first for the handle, and then for the lock, or vice versa. Just remember that things don’t like to be rushed.
For the handle, the opening is drilled with a drill and a crown. To make it smooth and neat, you need to drill from the inside and outside of the door to a depth equal to ½ the thickness of the leaf.
For greater accuracy, craftsmen advise marking this depth on the crown with a felt-tip pen. By adhering to this rule, you will definitely not damage the product. To ensure a straight hole, keep the drill straight and do not allow it to deviate to either side.
 When drilling a hole for the handle, the drill must be held level
 To install a latch into an interior door with your own hands, arm yourself with a drill and a pen. In this case, you need to be extremely careful, since the gap between the pen drill and the end angle is small.
Lock installation
The mechanism must be inserted into the hole drilled under it. Press the overlay to the end of the product and outline it with a pencil on all sides.

Then use a chisel to clear the top layer of the canvas and make a depression the size of the thickness of the overlay. This is done in order to press it into the doors.

The cover is fixed with screws. Recesses for them are made even before the fastening is carried out.
 The lining is fixed with self-tapping screws
 Handle insert
Products with screws located outward do not require disassembly. When installing one component of the structure in place, you must try to get into the latch hole with 2 guides equipped with threads for bolts.
 Door handle installation diagram
 After this, the second component of the device is inserted and tightened with bolts. Screwing must be done evenly in order for the handle to function properly.
Products with hidden screws must be disassembled. There will be instructions and a special key to help you. The handle can be removed without problems by pressing the stopper with a key. The handle is installed in place after the collapsible part is bolted.
Marking the loot
After installing the handle, make a recess in the tray for the tongue. To do this you need to take the measurements correctly. Precisely executed markings guarantee good operation of the lock and the door itself.
To make marks, cover the canvas and mark the distance from the top to the bottom of the tongue on the loot. Use a square to find the middle of the castle and put a “cross” in the loot. At the marking site, we will drill a recess with tools and get rid of excess material with a chisel.
Cutting a groove in the loot
Before screwing the cover, watch how the canvas closes. If there is no friction or other problems, this means that the groove for the tongue was made correctly.
Close the door and try to tug it slightly. If it wobbles, then this indicates the presence of a slight backlash. Don't be alarmed, this is normal. When a counter plate is added to the groove, everything will fall into place.
The answer is attached flush with the loot. Just like when installing a lock, it should be sunk into the hole.
 The strike plate is attached flush with the loot
 Sometimes, after installing the trim, the play does not disappear and the doors continue to wobble. This defect can be corrected by using a screwdriver to bend the tab with a small hole on the answer.
Caring for door hardware
In order for a thing to last for many years, it needs to be looked after. It's the same with fittings. Over the years, it ages and wears out, which negatively affects the product as a whole. To slow down this process, do not forget to take care of the fittings.
To care for your hands you need:
- Wipe them from dust with water by special means for cleaning. Avoid products that contain acids, alkalis or abrasive particles. They can damage the outer coating of the product, leading to rust. After washing, the product should be wiped with a dry cloth.
- Tighten the loose handle. If this is not done, the mechanism will break.
- Protect the product from rough mechanical influences.
In addition to the handle, it also needs your care door lock. Basic care in this case means regular lubrication of the mechanism with special means.. Sometimes sunflower or other vegetable oil is used as a replacement.
Considering that many parts of the mechanism are not easy to reach, a special nozzle in the form of a thin tube is used for lubrication. Often, for these purposes, the cover is removed or the handle is dismantled.
 For lubrication hard to reach places handles use a tube attachment
 Thus, having studied the basic intricacies of installing the handle, you are able to master this task without outside help. The main thing is to believe in yourself and then the reward in the form of quality installed handle won't keep you waiting long.


