The article describes how to get rid of the malfunction of faucets with ceramic faucets with your own hands and ensure their trouble-free operation. To replace worm and ball models water taps cranes with ceramic crane boxes came. They are reliable, small overall dimensions, low tap opening force and smooth water regulation. But even in these cranes there is a malfunction incorporated in the design of the crane by the manufacturer.
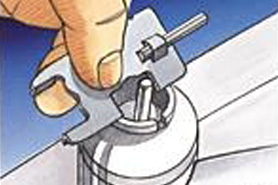
It all started with the fact that after eight months of operation, the valve dripped in the closed position. At first it just dripped, and then a thin trickle appeared. To find out the cause of the malfunction, the crane must be disassembled. Before removing the faucet box, do not forget to turn off the water supply to the faucet. To remove the flywheel, you need to unscrew the decorative plug and unscrew the screw securing the flywheel with a Phillips screwdriver. Pull the handwheel towards you and remove it from the spline connection with the stem.

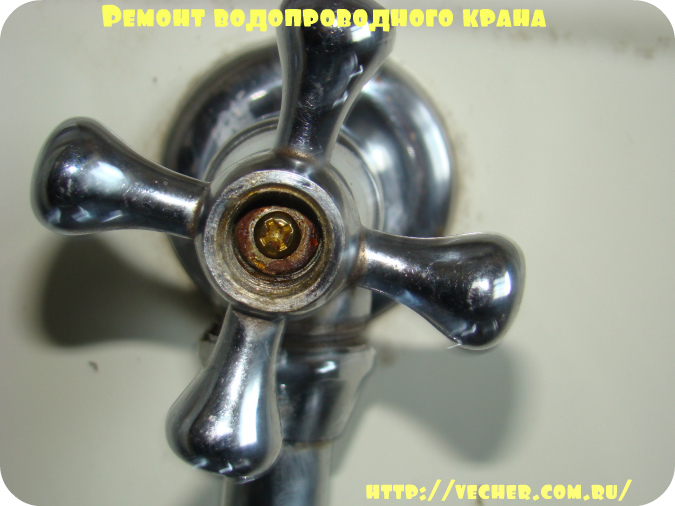
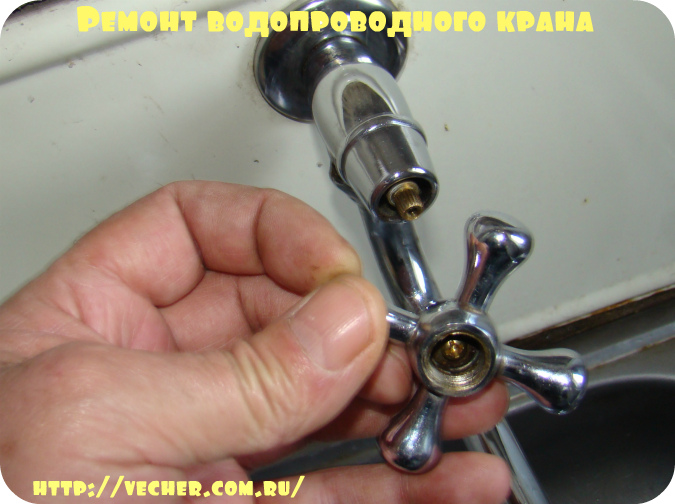
Next, you need to unscrew the decorative sleeve.
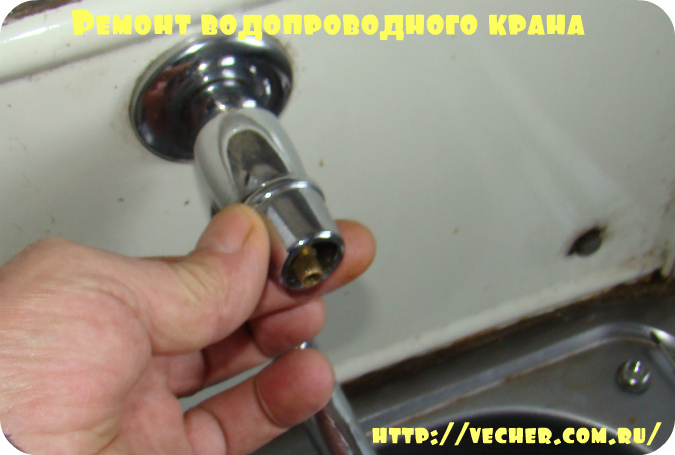

It is advisable to unscrew the crane box with a ring wrench or socket head. If it is very tight, you should not make great efforts - you can break the edges or break the crane body. It is necessary to spill the threaded connection with boiling water and try to unscrew it again.

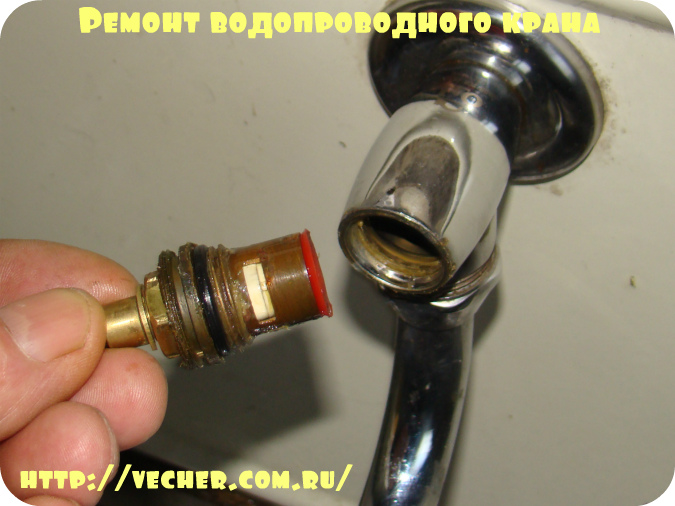
After removing the crane box, you need to carefully remove the red silicone gasket from its end. If the gasket contains white lime deposits, place the gasket in warm water With citric acid or vinegar. Carefully remove (shake out) the two ceramic plates of the shut-off and control element. With a narrow screwdriver, remove the stem retaining gasket.

When removing the fixing gasket, it can be seen that the rod is extended by 1.0 mm from the plane of the body of the crane box. This should not be the case, the stem should be slightly recessed into the body or be in the same plane with the body.
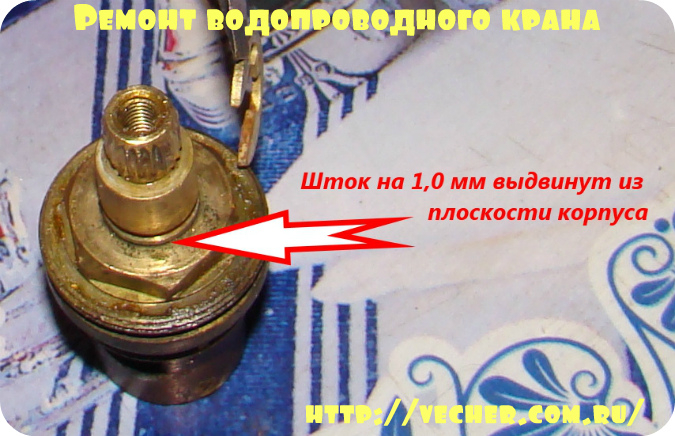

We remove the stem from the body of the crane box and see the remnants of the plastic gasket on the stem. This gasket is the cause of the failure of the crane. In the normal state, it should be 1.0 mm thick, and when it is worn, a gap is obtained between the ceramic plates of the shut-off and control element. The greater the wear, the greater the gap, which means more leakage of the tap.


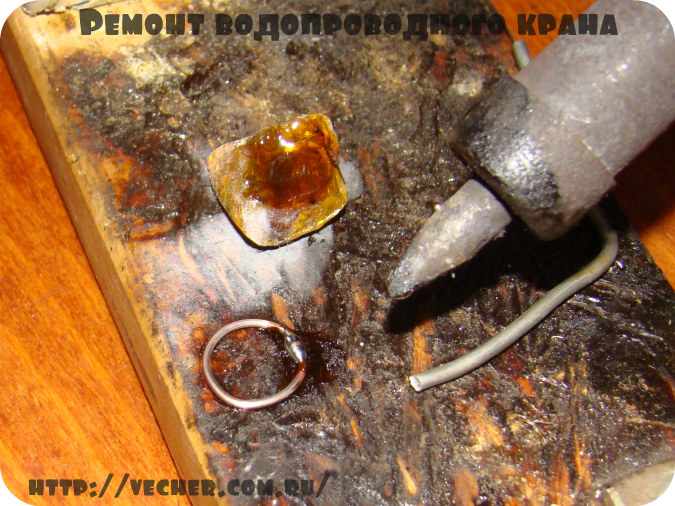
To fix the problem, you need to find a piece of copper wire with a diameter of 1.0 mm. You can use any copper electrical solid wire with a cross section of 0.75 mm 2. It is necessary to tightly wind several turns of wire on the base of the stem, remove and bite with sharp side cutters. We'll get some rings. We select one ring, solder the joint and clean it with a file or sandpaper.


We put the ring on the stem and also check the rubber rings in the grooves of the stem. The rings should protrude slightly from the surface of the stem. If they do not protrude, then they must be removed, wound under them by 1.5 - 2 turns of the FUM cord or strips of the FUM tape and set back. Lubricate the rubber bands and the copper ring with grease for oil seals washing machines and place the rod in the body of the crane box.


We fix with a fixing washer. Now it is clearly seen that the stem does not protrude beyond the plane of the housing. We insert the upper ceramic plate, which looks like an hourglass, into the protrusions of the stem.
The lower ceramic plate must be placed carefully so as not to turn it over to the other side. Its working side is lighter, polished, the holes on it are small with clear edges. This side should meet the top plate.

After installing the bottom plate, we put a silicone gasket - a cup. The stem should turn freely, without jamming, the upper ceramic plate should open and close the through holes.
Before installing the crane box in place, it is necessary to lubricate all threaded connections with Litol 24 grease or another waterproof one. We assemble in the reverse order.


We open the water and check the results of the work done by ourselves. After such an alteration, you will not have problems with the crane for a very long time. And the factory gasket is the fastest trick of the manufacturers. It is not profitable for them to have cranes working for decades.
Each of us should probably know how to fix a faucet. Moreover, in most cases, the malfunction can be fixed fairly quickly and without extra costs, but the call of the master must be expected for more than one hour, and he will take a lot of money for the work.
In our article, we will talk about the most common breakdowns of water taps, after which we will give repair algorithms for most models.
Main malfunctions
Before repair faucet mixer tap take the time to analyze the situation. So we can understand exactly what actions should be taken, thereby saving a lot of time.

The list of breakdowns includes the following items:
| Breaking | Description |
| When the valve is closed, drops of water flow out of the faucet | The locking mechanism fails. To fix the problem, you must either replace the element responsible for blocking the tube clearance, or install new sealing gaskets. |
| Water dripping at spout, hose or valve connection | Connection tightness broken. You can restore it either by replacing the gasket, or by installing plumbing winding on the thread. |
| Flywheel spinning | The flywheel housing has come off the stem or the stem has failed. In the first case, it is enough to install the part in place, in the second, you will have to replace the locking element. |
| The faucet makes a humming noise while operating. | The gasket has worn out and its edges begin to vibrate under the pressure of the water. Usually, to eliminate extraneous sounds, it is enough to replace the gasket. |
| Leakage on body or spout | The integrity of the product is broken. Temporarily can be sealed with " cold welding”, but at the first opportunity it is worth replacing the tap. |
| Splashes fly from the aerator, the flow of water is difficult. | The aerator grate is clogged and needs to be cleaned. |
In principle, this table describes the main faults. Other situations that may arise during the operation of the crane are derived from those already analyzed, and therefore they need to be repaired according to a similar algorithm.

Also, before starting work, you should carefully familiarize yourself with the design features of the model you have installed. Usually, Assembly drawing faucet is included with the product itself, therefore, when installing a new faucet, this document should be kept.
Note!
If you couldn’t find the diagram, then you should enter the query “assembly drawing method for specifying a water tap” in the search engine and select your model.
Most manufacturers put technical documentation online, so the chance of finding what you need is very high.
Now we will try to figure out what to do in each case. And let's start with the most common situation, namely, with the elimination of the causes of leakage of the locking element.

Box models
Bushing replacement
Cranes with stop valves the axle box protrudes, they are the easiest to repair.
The algorithm of actions here is as follows:
- Before disassembling the faucet, be sure to turn off the water on the riser.
- Remove cover from flywheel under which the fixing screw is located.
- using a screwdriver, then remove the flywheel from the guides.
- We dismantle decorative cones, covering the place of attachment of the axle box.
- Using an adjustable wrench, we unscrew the worn-out axle box from the socket. We clean the cavity of sediment and blot it with a rag, removing residual water.

- Putting the new box in place screwing it along the thread. In this case, it is not necessary to exert excessive force so as not to damage the structure.
- Next, we need to check the faucet for leaks.. We turn on the water on the riser and inspect the installation site of the box.
- Grabbing the rod with pliers, turn it several times. The water flow must turn on and off quickly and clearly.
- Perform assembly in reverse order, installing decorative cones and fixing the handwheel on the crane.
axle box repair
In some cases, the axle boxes can be repaired. It all depends on their design.

Products with a rubber gasket are more maintainable:
- Using a screwdriver, unscrew the screw that secures the gasket at the end.
- We dismantle the sealing element and install a new one of the appropriate size in its place.
- We fix the gasket with a screw, clamping it hard enough, but without deformation.
WITH ceramic boxes will be a little more difficult:
- We remove the rubber sealing gasket from the end, and then remove the end cap.
- We dismantle the ceramic plates, if necessary, unscrewing the fixing element.
- We clean the internal cavity of the axle box, removing contaminants that can lead to leaks.

- We return the plates to their place, observing correct position: when the stem is turned, they must completely cover the hole, interrupting the flow of water.
- We complete the assembly by installing the dismantled elements in place.
Note!
Often the cause of leakage is the wear of the ceramic plates themselves, so they may need to be completely replaced.
And finding these parts is quite difficult, and the price of a repair kit will not be much less than the cost of a new axle box.
Ball and cartridge models
Crane disassembly
The device of a water tap and a mixer, which is controlled by one lever, differs from the box design.
Accordingly, the dismantling of such a product for repair must be carried out according to a different scheme:

- First, lift the red-blue trim on the front panel.
- Under the overlay there is usually a screw for a Phillips screwdriver or a hexagon - we unscrew it.
- Next, remove the handle, carefully disconnecting it from the stem of the ball or cartridge locking mechanism.
- The next step is to provide access to the armature itself. To do this, unscrew one or two nuts.
Note!
Very often, manufacturers make an internal, fixing nut with grooves for a special tool.
You can either purchase a similar wrench, or try to unscrew the part with your own hands using improvised tools.
By removing the nut, we get access to either the cartridge or the ball valve. They are dismantled quite simply, and replacement will not cause difficulties.
Replacement of locking and sealing elements

To restore functionality single lever mixer, most often you need to completely change the functional element.
- We remove the cartridge from the socket by pulling it vertically up along the guides. If the part is skewed, you can correct its position with a slight side impact.
- We clean the cavity under the cartridge from rust and debris, which can cause leakage.
- We install a new cartridge, fix it with one nut and check how well it blocks the water. If there are no leaks, and the adjustment works properly, we assemble the mixer.

Ball valves have their own characteristics. Their main advantage is that the ball itself breaks extremely rarely, so the repair usually consists in replacing the gaskets. We act like this:
- Grasping the rod, we take the ball out of the nest.
- Using tweezers or small pliers, remove the spring-loaded spacers that press the ball against the body.

- We replace the gaskets, after which we install the ball in place.
- We put a new sealing ring on top and clamp the valve.
- As in previous cases, it is better to check the tightness of the structure before complete assembly.
Other repair work
Troubleshooting
In addition to actually repairing the locking mechanism, it is sometimes necessary to carry out other measures to restore the operability of the crane.
For example, in case of problems with the aerator, we act like this:

- Using an adjustable wrench with plastic pads, carefully grab the aerator and unscrew it from the spout.
- We take out the installed mesh and thoroughly rinse it, removing all contaminants.
- In parallel with a flexible brush, trying to remove layers from the inner walls as much as possible.
- We wind the aerator onto the spout, making sure that the thread does not warp.
If a leak occurs at the place where the swivel spout is fixed, proceed as follows:
- Carefully twist the union nut using an adjustable wrench. We're filming a goose.
- We remove the rubber gasket from the socket.
- We install a new one in its place. The diameter and thickness of both elements must match.
- We return the spout to its place, fixing it with a union nut.

Cover restoration
Some malfunctions do not affect the operation of the mixer, but significantly worsen it appearance. As a rule, these include scratches, coating chips, abrasions, etc. And although the full restoration of chrome plating or nickel plating by galvanizing is quite expensive, throwing away the tap and buying a new one is not at all necessary.
You can return an attractive appearance to the product by painting:

Note!
If the scratches are minor, then this polishing can be applied without painting: it restores the factory chrome / nickel plating well.
- After polishing is completed, we assemble the crane and install it in place.
Conclusion
Repair of a water tap and mixer can be carried out according to different schemes. It all depends on how well we analyze the breakdown and what decision we make at the planning stage. You can learn the troubleshooting steps themselves by watching the video in this article.
This is about the fact that you can fix some problems occurring in the apartment with your own hands.
In the comments on the article, of course, there were statements like: “Let's see what happens!?”.
It is really difficult to write to help women about solving everyday technical problems, which, in general, should be solved by men. But such are the realities of life that there are different situations.
For example, my friends' wife herself produces in the house water faucet repair without allowing her husband to reach them.
Now let's look at the repair of hot and cold water faucets.
Such repairs are very subject to skillful hands. But - only skillful.
At the same time, it must be remembered that experiments with water can lead to a fountain of water in the apartment and a disaster.
If something does not open, flows, does not close, then of course it is better to pick up the phone and call the control room of the DEZ asking to send a locksmith. Sometimes it is worth taking a closer look at his manipulations, because for you they will not be a secret, and if you understand the meaning of their actions, then you can try to cope with some malfunctions on your own.
So let's roll up our sleeves.
faucet leaking
This is the most common fault. And most of the time it's easy to fix. The rubber seal needs to be replaced. Here it can be noted in passing that metal parts rarely fail. Weak spots and parts in plumbing are plastics and rubber. So the first attention is on gaskets, sealing parts.
From metal, it wears out mainly, the thread on the stem. AND the best remedy while changing the stem.
It's easy to say: change the gasket. But how to carry out this operation? At any water supply network there are stopcocks. Most often they are located in the toilet. With their help, we will turn off the water. The cross section looks like this:
The configuration of the crane can be very different and it can be made of different materials, but its required attributes are:
1-rod, 2-gland, 3-valve, 4-body.
And the principle of operation is the same: the hole for draining the water closes the valve when the handle is rotated.
Unscrew the faucet head with a sliding key and change the gasket. That's all there is to it.
It happens that water seeps along the stem - it's all about the stuffing box. You need to unscrew the stem with a key. An oiled cord is usually wound on the stuffing box. Perhaps he was frayed or weakened. It needs to be changed. If the cord is not at hand, then the gland can be wrapped with a twisted bandage, which is lubricated with pork fat. And then twist it tight.
It sometimes happens that when you open the faucet, it starts to make a trumpet sound, from which everything around vibrates. In order to fix this, you need to grind the gasket in the form of a cone, and the buzz will disappear.
Water faucet repair in with ceramic discs
Such taps do not require maintenance, but problems with them happen. These faucets do not have gaskets that can be changed, so if the faucet is leaking, you will have to change the entire
internal module, otherwise the crane box. Before replacement crane box you need to check the integrity of the lower valve seat. Easier: are there any cracks and mechanical scoring on the faucet.
To replace the faucet box, it is necessary to turn off the water with shut-off valves in the apartment's water supply system. Then, using a wrench, you need to unscrew and remove the faucet box from the faucet body.
In general, it is better to replace the axle box with a new one, remembering that they work in different directions: the right ones are for cold water and left for hot water.
At the same time, inspect the rubber gasket from the bottom of the crane box. If it is damaged, the faucet will drip, so replace it.
Repair of single-lever water taps
In my practice, it happened in such taps to change cartridges. Fortunately, in a plumbing store they are sold for taps of different sizes.
To replace such a cartridge, you need to shut off the water with shut-off valves.
valves in the water supply system of the apartment. Then you need to unscrew the plastic eye on the tap and unscrew the clamping screw with a thin screwdriver. Then, with a little effort, remove the rotary lever of the crane. It remains only to unscrew the upper decorative nut from the tap to get the cartridge. It is not difficult to buy a replacement cartridge of this size in a store and assemble the faucet in reverse order.
If water flows along the gander of the crane
To eliminate this malfunction, you need to use a wrench to unscrew the nut that secures the gander to the crane body.
There you will see that the connection consists of an expanding ring and a rubber gasket.
The gasket and, if necessary, the expanding ring must be changed. Then assemble the structure in the reverse order.
If water flows from the shower hose
With such a malfunction, the entire hose must be replaced. It is necessary with the mixer valves closed, unscrew the nut securing the shower hose with a wrench and replace it with a new one. It is necessary to pay attention to the presence of a rubber gasket at the junction of the hose with the mixer body.
All these tips may come in handy if the faucet malfunctions occurred unexpectedly for you and there is no hope for a plumber to appear in the near future to repair it. Although, of course, it is better to turn off the water with shut-off valves in the apartment’s water supply system and still wait for it ...
Therefore, pay some attention to the condition and operation of the equipment, in order to make timelywater faucet repair
Good day dear readers!
The main reason why mixer taps and conventional taps repair is required - this is a water leak from the tap itself (it is impossible to close it), or from the seals in any place where they are present.
Also, it is not uncommon for the plastic handles of old-design faucets to burst at the landing site on the square or splined end of the faucet stem.
In this case, the rigid connection between the handle and the valve stem is broken, and the handle simply turns without turning the stem. In this case, you can neither open nor close the tap.
Often there is such a misfortune - when the tap is opened, the pipes vibrate and buzz, the pipes begin to “sing” with a rather unpleasant “voice” that affects the psyche of sensitive people.
Most of these "accidents" are repairable. with my own hands However, you need to understand that not everything can be repaired.
For example, a bursting tap or mixer body cannot be reliably repaired with improvised means. Or a faucet handle bursting from excessive effort can only be replaced.

If you try to repair broken parts (by twisting with wire, soldering or gluing), then their work after that will be short-lived.
Regarding the "hum" of pipes, we add that it can be caused, in addition to a deformed elastic valve gasket, by many reasons: pollution and rust inside old pipes, poor pipe fastening, high pressure in the water supply network, etc.
That is, with our own hands, we can only eliminate the buzz from the deformation of the valve gasket, in all other cases, either the replacement of pipes or the installation of "mufflers" will be required, for which it is better to call specialists.
In any case, when starting to repair a crane, you need to tune in in advance to the search and purchase of spare parts.
And if earlier, in the days of the USSR, the country's industry did not indulge in a variety of design and technical solutions for taps and mixers, but at that time there were standards, and all parts could be easily found and replaced - they were interchangeable, today there is a huge variety of types of taps and mixers from different manufacturers, often looking for any part is like looking for a needle in a haystack.
Therefore, you need to make it a rule - when going in search of a spare part for a faucet or mixer, take this part with you. Not to buy something that later does not fit.
Before repair, you need to understand design features your faucet or faucet. Modern taps and mixers can be divided into the so-called "ball" and with a locking element in the form of a crane box.
1. Ball Valves.
These are modern cranes, characterized by high reliability and durability. Their difference is that the full opening from the “closed” position occurs by turning the handle 90 degrees or so.
And if you look from the side of the holes for the passage of water, you can see a shiny spherical surface. Ball valves are also made double at the same time - for hot and cold water, with one handle control with two degrees of freedom.
Up-down - the flow strength is regulated, left-right - the degree of mixing of hot and cold water.
These taps are good in every sense, reliable, long-lasting and do not leak, but they "do not like" water contaminated with solid particles (sand). In front of such taps, it is desirable to install simple and inexpensive strainers, which will increase their service life.
Repairing them “with your own hands” is much more difficult than old screw cranes, and they practically do not need repair for quite a long time.
They go out of order due to pollution lime deposits and the appearance of a leak. Since they serve without any maintenance for a long time - 5 - 10 years or more, it is more expedient not to repair them, but simply to replace them with new ones.
By the way, this fits into the framework of the modern concept of market production - to make goods not repairable, one-time use, with subsequent replacement entirely. Stimulation of demand, so to speak.

These cranes consist of three main parts:
a) The first part.
Made of molded body with threaded holes for attaching a valve to water pipe, a threaded hole for installing a faucet - bushings, and a hole for water outlet, and it can be threaded for attaching a rotary "gander", or made in the form of a drain tube.
Frame kitchen faucet made for the installation of two faucet boxes (for hot and cold water) with one common drain.
The body of the bath faucet has two outlets (for a swivel tubular drain into the sink and bath, and for connecting a flexible hose) with a shower-basin tap-switch.
At the bottom of the hole for connecting the crane box, there is a hole for the passage of water and a “seat” is machined for a snug fit of the valve.
b) The second part.
From a node called a crane box. These nodes are of two types:
1) With a threaded stem that moves along the body on a special (non-metric) lead thread, locking the body seat. Thanks to the thread, the locking force is many times greater than the force on the faucet handle, which ensures tight closure.
On one side of the stem, a “cup” for an elastic gasket is freely installed (with some play for the possibility of rocking) to it.
This gasket closes the saddle, preventing the flow of water. On the other hand, either a square or a slotted "asterisk" is molded on the stem for connection with the handle, the handle is fixed with a screw, which is screwed into a blind threaded hole from the end of the stem.
The nut of the running screw pair is the body of the crane box, in which a special thread for the stem is cut.
There is also a cavity for the stuffing box seal of the stem and body, the stuffing box for sealing is clamped with a hollow nut. Outside, on the body of the crane box, a thread is cut and a seat for the sealing ring is machined.
On this thread, the axle box is screwed into the valve body. It is not difficult to determine a screw faucet box, if several turns of the handle (usually 2-4) are required from fully opening the faucet to completely closing it, then you have a screw faucet box.
2) With locking mechanism made of ceramic discs. These are modern (new generation) crane boxes, which appeared relatively recently.
Their working mechanism consists of two or three ceramic-metal (abrasion-resistant) disks, well ground to each other. One (or two) disk(s) is attached to the axle box body, the other movable disk is connected to the rotary stem.
All disks have coaxial and identical holes located approximately on half of the disk. When the holes are fully aligned, the valve is fully open.
When the movable disk is displaced at a certain angle, a visible decrease in the opening for the flow of water occurs, and the flow decreases. Half a turn of the handle is enough to completely close the tap.

The mechanism is convenient (small angle of rotation and ease of rotation), reliable, but just like the ball mechanism, “does not like water with sand.
And just as unsuitable for repair. As a rule, it is more profitable to replace the entire crane box. It is also advisable to put a filter in front of the tap to purify water from mechanical impurities.
c) The third part.
An important part of the faucet is the handle. Handles come in different shapes and are made from different materials. In faucets with a screw clamp on the gasket to the seat, the handles often broke for a psychological reason.
An inexperienced consumer, without going into the causes of a leaking faucet, usually for some reason decides that the faucet is leaking because it simply is not tightened to the end. And the fact that the gasket there is possibly severely deformed or worn to the metal, for some reason does not occur to him.
As a result - the strongest efforts on the handle in order to "tighten" the valve well, and as a result - a broken handle at the junction with the stem, or a "torn off" running thread.
Breaking it is not so difficult, as a rule, taps and mixers are made of brass alloys that can resist corrosion (rusting steel would not last even half a year), relatively cheap, but also quite soft and capable of abrasion.
Ball and butterfly valves are devoid of such shortcomings, and the handles in them serve for a long time.
When choosing to replace the handle to a screw tap, preference should be given to handles made of metal or ceramic (porcelain) with a metal insert attached to the stem.
A good pen is made with large embossed finger rests. Handles made of ordinary polystyrene or polyethylene have proven to be poor in operation. Over time, polystyrene and polyethylene become brittle like glass and break quickly.
When replacing the handle, you need to pay attention to the stem shank. What shape does it have - slotted "asterisks" or square? Accordingly, this form and you need to buy a new pen. In order not to be mistaken, it is advisable to have a crane box with you and try it on the handle during the purchase.
There is another factor to keep in mind. Crane box in decorative purposes usually covered with either a nickel-plated union nut or a special "skirt" on the handle.
Having chosen a new handle without such a “skirt”, we can get an absurd look when a cast, yellow-gray, surface of the axle box body comes out among the decorative nickel.
The handle, mounted on the stem shank, is fixed with a screw, which is screwed into the end of the stem. Since the handle rotates when the tap is opened, the fastening screw tends to constantly unscrew spontaneously.
To prevent this, it is desirable to put under the screw head lock washer Grover washer type. The screw, like all faucet parts, must be stainless (brass). You most likely will not be able to unscrew the usual (steel) one later.
The screw that secures the handle is usually closed with a blue (for cold water) or red (for hot water) plastic plug. To remove the handle, you must first remove the plug by slightly prying it with a small screwdriver or a knife blade. You need to know this when disassembling the crane.
3) Tools.
What tools and materials do you need to repair faucets and faucets?
From wrenches - an adjustable wrench with a mouth of up to 24-27 mm. And spanners medium and large (22 - 36) sizes. Because in household such keys are rare, you need to take care of them in advance.
In case of unscrewing the tap from the pipe, you may need a medium-sized pipe (clamping) wrench (up to 32 mm) to support the pipe so that it does not collapse.
You will need a set of screwdrivers and other tools available from home master- pliers, hammer. They may not be useful, but you need to have them.
From materials and spare parts - rubber or plastic gaskets, for sealing the stuffing box - sealing material. In the last century, plumbers used flax hemp, flax fibers were wound on a sealed thread or stem.
Sometimes the hemp was covered oil paint. Today the best application is modern materials- fluoroplastic tape (FUM tape), plastic fluoroplastic cords and threads, as well as silicone gels. All this can be found on sale.
1) Before starting work, ALWAYS turn off the water supply to this area with special (emergency) taps, which must be available. These faucets stand idle for a long time, therefore, by closing the emergency faucet, be sure to make sure that it actually turned off the water?
Having opened the tap to be repaired, we make sure that the water is shut off. If it flows, as if nothing had happened, you will have to turn off the taps for more high level, perhaps at the entrance to the basement. If emergency faucets are malfunctioning, call plumbers to replace them.
And yet, keep in mind that when the emergency valve is closed, water remains in the pipes. And if you don’t want to see it on the floor, take care of some kind of vessel, to collect water, substitute it under the dismantled tap.
2) Start disassembling the taps by removing the handle. To do this, remove the colored blue, red or blue-red plug, prying it with a screwdriver or a knife blade, the plug will easily pop out. Under it you will see a screw that secures the handle.
3) If there is a leak from under the handle stem, try tightening the stuffing box nut first, it is located in the place where the stem enters the body. Often times this seal helps.
4) Remove the bushing by unscrewing the body (and not the stuffing box nut). An adjustable wrench is best suited for this, which can be precisely adjusted to the size of the bosses or edges on the body.
If the unscrewing force is strong, hold the pipe with a pipe wrench if necessary to avoid its deformation.
5) Ring rubber gaskets are best replaced with new ones. Because during the installation process, the gaskets are deformed according to the shape of the compressing parts. When reinstalling, the deformation of the gasket may not coincide with the surface and a leak will appear.
True, in such cases, lubricating the gasket with silicone gel helps. Sometimes one gel works, without any gasket (if the gaps are small). Only when using the gel, you need to give it time to solidify, do not use the tap for a while.
6) Gaskets are the best to buy. Today they are on sale in the required assortment. It is possible to cut down the die-cutting from sheet rubber only in the most extreme case.
Because hand-cut gaskets are often wrong shape, - cylindrical from thick rubber, they look like a truncated cone. And ring gaskets "suffer" from misalignment of the outer and inner diameters, and the non-ideal shape of the circle.
7) Do not forget that gaskets for hot water faucets should be made of a heat-resistant material - heat-resistant rubber or plastic, or paronite (a material such as cardboard filled with asbestos fibers).
8) When installing a new (water-shut-off) gasket for screw faucets, after installation, make a small bevel on the outside of the gasket at an angle of 45 degrees. Or round off the sharp edge with a needle file. It is convenient to cut the chamfer with sharp small scissors. This will eliminate one of the causes of the "buzz" of the pipes.
9) Leak anywhere threaded connections eliminate by replacing the gaskets and sealing the threads with FUM tape (linen fibers).
Do not forget that the winding of the seals on the thread must be done with a right-hand thread counterclockwise. So that when screwing the winding is compacted, and not loosened.
10) Do-it-yourself repair by simply replacing the gaskets is only possible for cranes with a screw clamp. Disc crane boxes must be replaced as a whole.
Considering that such replacements are required much less frequently than the replacement of gaskets in screw valves, it is more economically justified than individual adjustment of the disks. The same applies to ball valves.
If the screw tap thread is broken, replace the entire axle box.
11) A few words about the shower-basin switches on bathtub faucets. They are different types. They can be with two valves on a stem moving up and down. The rubber bands in them are replaced in the same way as in screw taps.
There are types of "samovar crane" with conical self-sealing surfaces. When switching is difficult, it is recommended to lubricate the conical surfaces with grease.
There are other designs of switches, but ... as Kozma Prutkov said: “You can’t embrace the immensity ...” Within the framework of one article.
Modern valve taps and faucets are quite reliable and durable devices, however, work in difficult conditions often leads to their malfunctions. The main cause of the breakdown is the wear of parts of the crane box - the main assembly of household valves. Although this device can be easily found in the distribution network today, you should not rush to spend money. Crane box has simple design, which allows you to repair the mixer on your own.
1 Crane axle boxes: device features and typical malfunctions
A faucet box is the most important and critical unit of any valve mixer, thanks to which it is possible to quickly turn on or shut off the water supply. It is this simple mechanism that allows you to adjust the amount of flow and thereby set the temperature and pressure we need. The basis of the locking device is a rod with sealing elements installed inside a metal case with a threaded part.
Depending on the size of the threaded part, there are crane boxes with a diameter of 1/2 and 3/8 inches
The following malfunctions indicate breakdowns of the crane box:
- leaking from a faucet when the valve is closed;
- water leakage from under the flywheel;
- weakening of the force of the jet;
- "jerks" and "bumps" when the pressure is turned on;
- lack of fixation of the valve in the extreme positions.
And even if the crane is working normally, but after turning on the pressure, the pipes begin to make noise and rumble - the crane box may also be to blame.
Varieties and design of locking devices
Today, the plumbing equipment market offers household plumbing fittings with crane boxes of two types:
- with rubber cuff
- with ceramic inserts.
To understand what kind of mixer you are dealing with, just unscrew the flywheel. Valves of the first type involve repeated rotation of the valve, while the latter open in half a turn.
Crane boxes with rubber seal
Devices with a rubber insert are also called worm gears due to the presence of a worm pair in them. The assembly with a rubber seal works very simply. When the flywheel rotates, the threaded gear moves the stem with an elastic washer, due to which the valve disc is pressed tightly against the seat installed in the mixer body - the water flow stops. When the flywheel is turned to the other side, a gap appears between the valve parts through which the fluid escapes.

The crane box works thanks to a worm gear and an elastic sealing cuff
The amount of flow is regulated by the width of the gap between the plate and the seat. The worm gear was not chosen by chance - thanks to it, it is possible to achieve a movement of the rod by fractions of a millimeter, which allows you to very accurately set the required pressure. Breakdowns of a crane box with a rubber washer most often occur due to wear of the elastic seal. The second malfunction most often occurs due to excessive forces applied to the flywheel, and much less often due to natural wear of the threaded part. Usually, a worm gear failure occurs shortly after the failure of the rubber cuff - in order to turn off the tap, you have to turn the valve with great zeal.
The advantage of devices with a rubber seal is their low price. In addition, a leaky gasket can be easily replaced if necessary. As for the shortcomings, it is one - sooner or later, but a leak will happen. It all depends on the density and wear resistance of the rubber from which the sealing washer is made.
Crane boxes with ceramic pair
Today, faucets with rubber gaskets have been replaced by locking units with ceramic inserts. It is thanks to more wear-resistant parts that such devices are more reliable and durable.

Ceramic crane bushings are reliable and durable devices
The design of a ceramic valve box is based on a body with a fixed ceramic disc, in which there are several holes. The second wear-resistant disk has the same openings and is mounted on a rotary rod. Turning the valve half a turn, align the holes on both plates and open the water. Due to the fact that the discs are tightly pressed against each other, the liquid passes only through the channel intended for this. To adjust or shut off the flow, just turn the handwheel a little. In this case, the holes overlap partially or mutually overlap.
The advantages of a faucet box with ceramic parts are their durability and convenience, because to turn on the water "to the full" it does not require repeated rotation of the valve. Minus - relatively high cost and sensitivity to the presence of impurities. The last factor forces you to install a water purification filter.
2 All about repairing a ceramic faucet for a mixer
Breakdowns of locking mechanisms with ceramic inserts happen for several reasons:
- Damage sealing elements. Even the most modern faucet uses rubber and silicone rings for sealing, which wear out or lose elasticity over time. For this reason, leaks from under the valve or water flow from the tap occur.
- Debris caught between ceramic discs. Due to third-party objects, the surfaces of the working plates are loosely adjacent to each other. Water penetrates into the gap, so it is not possible to completely shut off the tap. If such a nuisance is not eliminated in time, then risks and scratches appear on the disks, which further aggravate the situation.
- Development in a pair of rod-body. It happens due to natural wear and tear and happens infrequently. This malfunction is unrecoverable, so you will have to replace the axle box assembly.
- Wear of ceramic plates. Such a breakdown is rare and occurs most often due to poor quality tap water. To restore the working capacity of the crane box, you will need a repair kit, which includes wear-resistant discs of the same type and size.
To find out the cause of the malfunction, the mixer must be dismantled and disassembled. But before that, you need to prepare the tool and turn off the water supply.
Crane box design with ceramic discs
Before starting work, you should familiarize yourself with the design of the culprit of the trouble.

performance ceramic faucet box provides a pair of ceramic plates with holes
A conventional locking assembly with ceramic plates is shown in the figure and consists of the following parts:
- frame;
- swivel rod with sealing rings;
- bracket or retaining ring;
- upper (adjusting) ceramic disc;
- lower (inlet) ceramic disk;
- sealing gasket.
In addition, some models of faucet boxes are equipped with sliding washers, a silencer and other parts that facilitate operation and make the use of the mixer more comfortable. For the manufacture of metal elements, brass is most often used, which has high corrosion resistance and wear resistance.
What will be needed at work
To disassemble the valve and replace worn parts, you will need:
- keys - gas and adjustable;
- pliers;
- a set of screwdrivers with a flat sting;
- ring wrench - size "17".
You may also need fum-tape, which is used to seal threaded connections, and a waterproof grease. As for the parts for repair, it is most likely that it will not work to prepare everything necessary for replacement in advance. This can only be done if there is complete certainty that repair kit suitable for this faucet. In most cases, it is possible to determine what is causing the leaks only after disassembling the valve.
Removing the locking mechanism
Removing the faulty assembly from the mixer is performed in the following order:

After dismantling, all threaded parts of the mixer are cleaned with a metal brush and washed. After that, they begin to inspect and identify faulty parts. If the device cannot be repaired, then a decision is made to completely replace the valve. Assembly is carried out in the reverse order, with a delicate puff. It is best to turn the axle box to the maximum with your hands, and start tightening with a wrench by slightly unscrewing the water supply tap. As soon as the flow from under the valve stops, the installation is considered complete. In this case, the gasket is not completely compressed, so if necessary, it becomes possible to tighten the connection again.
To prevent the formation of scale on the threaded parts, they are protected with a waterproof grease. This will make it easy to disassemble the faucet next time.
Valve repair
As with lip seals, devices with ceramic inserts use several types of gaskets. In most cases, leaks occur precisely because of their wear.
Replacing the gasket in the valve seat
A dense rubber ring installed on the body of the valve part is necessary for sealing the crane box. Over time, this gasket "shrinks" or loses elasticity, which leads to leakage. In some cases, the loss of tightness is associated with a retaining ring holding the gasket. Under the action of moisture, it collapses and damages the rubber element. In any case, damaged parts will have to be replaced.

The gasket in the valve seat serves to eliminate leakage between the valve box and the mixer body
Disassembly of the locking device is not required, just pull it out of the saddle. Before putting a new gasket in place, it should be coated with a thin layer of waterproof grease.. If a suitable sealing element was not at hand, then a plumbing technician will help temporarily solve the problem. silicone sealant. It is applied in a thin layer on the old gasket and allowed to dry.
After disassembling the mixer, you should carefully inspect the valve seat. The reason for the loss of tightness can be cracks or large shells on the valve body - in this case, a simple replacement of the gasket is not enough, you will have to change the mixer assembly.
Replacing the pressure washer
The second gasket, which is made of materials such as fluoroplastic, polypropylene or caprolon, compensates for possible gaps between the ceramic plates. During operation, the pressure washer is subjected to constant loads, which contribute to its wear. As a result, the part becomes thinner and cannot press the bypass elements with the same force, which leads to a gap, and, as a result, water seepage.

Fluoroplastic washer eliminates the gap between the ceramic plates
To replace a damaged part, the crane box must be disassembled. To do this, remove the retaining ring, remove the stem from the body and dismantle the plastic washer and wear plates. Before assembly, the surface of the parts is cleaned and covered with a thin layer of grease.

To fix the stem in the body of the valve box, a retaining ring or spring clip is used.
If a new washer of the same size could not be found, then to eliminate the malfunction, increase the thickness of the old part. To do this, a layer of electrical tape is glued to its surface or a gasket cut from a transparent plastic package is placed.
Removal of foreign particles
Sometimes leaks are caused by foreign elements between the plates, such as grains of sand or rust particles. In this case, to restore the efficiency of the mixer, the crane box is removed and disassembled. After that, it is necessary to clean and thoroughly rinse all parts. Ceramic plates are thoroughly inspected. If the debris left deep risks on their surface, then it is better to replace the parts with new ones, otherwise water may penetrate into the gap between the discs.

Limestone deposits and foreign particles contribute to increased wear of ceramic plates
If there is nowhere to buy the same ceramic plates, then you can try to grind their surface. To do this, you need a fine abrasive powder, which is used when lapping valves. cars or for tool sharpening. Most often, aluminum oxide or silicon carbide with a grain size of not more than 1200 is used as it. The abrasive is mixed with machine oil and applied in a thin layer to a piece of glass. Grinding is carried out by repeated circular movements of the disk over the surface, if necessary, adding the prepared paste. After the damage is removed, the plates are rubbed together, washed, and, having been lubricated with a waterproof lubricant, are installed in place.
Leaks in mixers with worm axle boxes happen for several reasons:
- wear of threaded parts;
- damage to rubber gaskets;
- defects associated with mechanical damage.
If the worm gear wears excessively or cracks appear on the body and stem, the locking device is completely changed.
When water seeps between the body of the crane box and the mixer, the sealing ring should be replaced - the work is carried out in full accordance with the algorithm described above. If the faucet itself began to flow, then the rubber cuff, which serves as a valve seal, should be replaced.

Most often, it is possible to restore the operability of a worm-drive crane box by replacing the sealing gasket
The replacement procedure is as follows:

Before assembling the mixer, it will be useful to change the sealing ring and replenish the lubricant in the worm pair. This will extend the life of the valves and delay the next service.
Video: fixing leaks in a mixer with a worm gear box
https://www.youtube.com/embed/UCT0sc1CNuk
As you can see, there is absolutely no reason to panic if a faucet faucet in the bathroom or in the kitchen is leaking. It is enough to repair or replace the crane box, and the device will work like new. Of course, in this case, extreme care should be taken, otherwise the scratched sides of the once brilliant device will cause not joy, but chagrin.


