Mixer breakdowns occur quite often. One of the most common is the failure of the valve axle box, which is the main (shut-off and control) unit of the product. Depending on the type of unit, the main repair methods are presented:
Reciprocating valve type product
This type is the progenitor of all mixers. It consists of a screw, on the rod of which a valve rotation handle is attached. By rotating, the screw pushes the elongated nut, pressing the valve against the seat of the mixer body.
Thus, the water is regulated (locked). For sealing, a seal is provided in the body (on the rod).
Elimination of oil seal leaks between the rod and the body of the valve axlebox. If the rod passes through the nut on the valve body of the axle box, then the oil seal can be repaired by replacing the stuffing box. First, you can try to tighten up the old one. When carefully tightening the nut, you need to catch the end of the thread, otherwise it will break.
To replace the oil seal, you need to close this valve - you don’t have to close it general water; Unscrew the screw holding the handle. Usually it is closed with a plug, then remove the handle, unscrew the nut through which the rod passes. There is an oil seal under the nut. It is advisable to remove the old one. But if the nut is long enough, you can simply add a new one.
To repair oil seals, there are special packings - braided cords made of linen, impregnated graphite lubricant, threads, or polytetrafluoroethylene (PTFE) ropes. As a stuffing box, you can use FUM tape, which is cut into rings and laid around the rod. It is then clamped with the gland nut. The second option: loosely wind the flax thread, having previously soaked it with any lubricant (for example, graphite).
If, instead of a nut, the rod is kept from falling out by a bracket, a rubber ring is used as an oil seal.
To replace it, we take out the bracket, disassemble the valve axlebox and replace the rubber ring (of which there may be several) with a new one of a suitable size. Such rings can be purchased at plumbing or auto stores. Moreover, in a car store the choice of sizes is much larger.
Ceramic products
It's more modern version. They are produced with the possibility of installing valve-type axle boxes with matching installation dimensions instead of a crane. Operating principle: two round plates with cut-out holes in the form of a sector, one of them is stationary. Rotating, water passes when the holes coincide.
From below, these plates are pressed against each other with a rubber gasket, which also serves for hermetically sealed installation of the faucet - axle box in the mixer body.
Malfunctions: in case of oil seal leakage, the repair steps are the same as with a valve-type valve axle box. Failures associated with damage to the plates are resolved by replacing them. If the rubber gasket wears out, it is restored by applying a thin layer of silicone to it.
Single lever mixer
There are only ceramic ones, they are structurally more complex, their repair is not provided, only replacement with a new one. The operating principle is the same: the flow of water is adjusted by aligning the holes of the plates.
To remove the crane axle box single lever mixer you need to remove the handle, remove the plug and unscrew the screw holding it. To do this, use a set of hexagons or a flat-head screwdriver. Then remove the protective cap and unscrew the nut.
A special feature of faucets with ceramic faucet axle boxes is that to completely shut off the water, you need to turn the handle to an angle of less than 90 degrees, while valve-type models turn several turns.
When trying to adjust the water temperature, the knob must be turned with an accuracy of several degrees, which can create inconvenience. But this is due to the fact that in houses with old communications, the supply pipes are clogged unevenly. Pipe with cold water it becomes more clogged and the water pressure in it is less.
You need to either install a pressure regulator or replace the mixer with a thermostatic one. In such mixers, the temperature is set by a separate knob and is very precisely regulated by internal automation.
Surely, every person at some time in his life has had to deal with such a problem as a leaking faucet. You can fix it yourself. The main working part of any faucet or mixer is the faucet axle. There are two main types of products: worm-type (with rubber gaskets) and, almost replacing them, modern, ceramic. Let's talk about the latter.
Benefits of ceramics
Unlike the usual faucet axle box with a rubber gasket, the ceramic locking element is a pair of ceramic plates. The material is very hard, so it does not scratch. The plates fit tightly together, can be rotated and have holes. Due to the convergence and divergence of the holes when the plates are rotated relative to each other, the water flow opens, closes and is regulated.
On the “worm” faucet with rubber gaskets, it is necessary to make several turns before it completely blocks the flow of water. With ceramics the situation is somewhat simpler - half a turn and the water is closed!
Due to the fact that taps with gaskets have to be tightened with force, the rubber quickly wears out and begins to let water through. Therefore, rubber gaskets have to be changed quite often.
The operating principle of a standard ceramic crane axle box is as follows. One of the two plates is fixed in the mechanism body itself, while the other, with notches, engages the rod to which the mixer flywheel is attached.
When the flywheel is turned, the top plate moves, opening the passage for the flow of water. This design can last a very long time, but costs a little more than the previous model. This mechanism is quite bad at dealing with dirty and hard water, so it is recommended to install at least a simple filter in front of the tap.
Taps with ceramic plates open easily, simply and, most importantly, completely silently. It is enough to turn the mixer handwheel 90 degrees to ensure full water pressure.
In order to better see all the advantages of this model, let's look at what parts it consists of and what they are intended for.
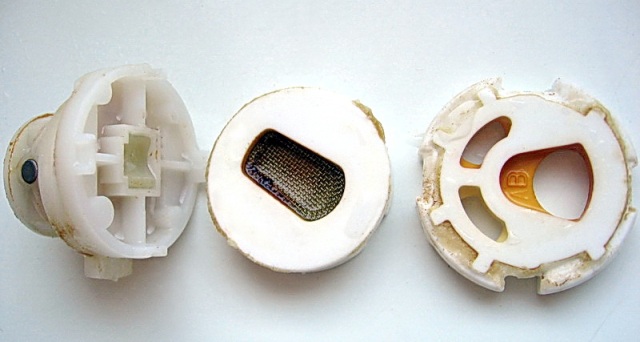
So, the ceramic faucet box consists of:

The body, as a rule, is made of various alloys of non-ferrous metals. It has a sealing gasket, so there is no need for additional insulation (flax, FUM tape, etc.).
There are slits on the sides for water to enter. When purchasing such a crane axle box in a store, you need to pay attention to the length of its body. It may differ from the length of the axle box body that was in your mixer.
The rod is held on the body using a clamp. It is usually made of steel and is pulled out using a regular flathead screwdriver. The turn signal is the part that is responsible for the movements of the handle. It is quite fragile and breaks easily if excess force is applied.
The top ceramic plate connects to the turn signal. Previously, this plate rotated a certain distance. In new models, manufacturers have removed this limitation.
The second plate must perfectly coincide with the top one, otherwise the water will flow poorly. For this purpose, there are additional protrusions on the bottom plate, due to which it is securely fixed in the case. For best work The plates must be treated with silicone grease before assembly.
The gasket is responsible for the tightness of the structure. Its task is to make sure that water flows in only one direction - between the plates. It does not participate in work or friction, so it lives quite a long time. The service life depends mainly on the quality of the water that runs from the tap.
When we turn the mixer lever with our own hands, the rod with the turn signal moves the upper ceramic plate relative to the lower one, opening the passage for the flow of water. We turn it back, the plate snaps into place, the hole closes, and the flow of water into the mixing chamber stops.
Selection rules
What should you first of all pay attention to when buying a crane axle box? Ideal option It would be better to take the old part with you and ask the seller to find you the same one.
If for some reason the seller is unable to help you, pay attention to:
- Length of the body and stem (the difference can be significant);
- Thread pitch (sometimes different);
- Rod head for the flywheel (square or star-shaped).
As for the manufacturer, good crane axle boxes are produced by German, Italian and Russian manufacturers.
Possible malfunctions and their elimination
Common malfunctions
The main malfunctions in the operation of ceramic crane axle boxes are:
- Chip or wear of ceramic plates;
- Wear of the sealing washer on the rod;
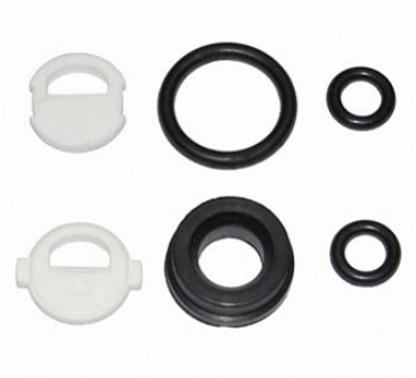
- Worn sealing rings on the rod.
These are cases in which we can try to save our part and save money on buying a new one.
Repair
Let's look at all the breakdown options and repairs in each specific case in order. But first, let's look at the detail itself:
Now we carefully study everything that we have sorted out. If the whole point is damage to the plates, then the only option is to replace the plates themselves.
Perhaps you have some other crane axle box with suitable plates or a set of plates (these are also sometimes sold in stores). So, we throw out the broken plates, insert new ones in their place and put our part back together.
When you take the rod out of the body, you will see a flat ring on it. Over time, this washer wears out and the rod rises higher. It no longer provides proper compression between the plates, and water begins to leak. There may be several ways out in this situation. Firstly, you can replace the washer itself (if you find the same one). Some people use a wire with a cross-section of 0.75 mm instead, put it on and insert the rod into place.
Another way is to stick a strip of electrical tape in the place where the top plate connects to the turn signal. If one piece is not enough, you can stick two or three. Thus, you can extend the life of the crane axlebox for several more months.
Due to the described breakdowns, the water in the mixer constantly drips or does not close at all. If the o-rings on the stem are worn out, water can flow directly through the body. This happens rarely, but it does happen. You just need to replace these rings with new ones. If such rubber bands are not at hand, we carry out the following procedure. Carefully pull the ring out of the groove, wind a little FUM tape and put it in place.
It would be a good idea to wash all parts with diluted citric acid(it removes limescale) and lubricate with silicone grease.

Replacing the crane axle box
Before making a replacement, make sure that the water is turned off, otherwise you will have to make repairs to your neighbors:
- Remove the plug from the flywheel (knob) of the mixer. It can be inserted and then simply pry off with a screwdriver or knife, or it can have a thread;
- Using a Phillips screwdriver, unscrew the fixing bolt. and remove the flywheel from the mixer;
- Unscrew the reflector cap(if there is one);
- Using an adjustable wrench, unscrew the valve axle from the mixer body. If the axlebox has a lock nut, first loosen the nut, then use a wrench to carefully unscrew the axlebox using the rod.
After the part is removed, we take it to the store and select exactly the same one. It’s better to take the lamb from the mixer with you too.
There is a rubber sealing ring on the outside of the axle box housing, so there is no need for additional insulation means such as flax or FUM tape. We twist with effort, but without much zeal. While screwing in, make sure that the ring does not tear or come out (this happens).
In the case of a locknut, carefully tighten it. Before screwing on the reflector and flywheel, we turn on the water and check the functionality of our axlebox. If everything is in order, we collect everything else.
- Ceramic crane axle boxes are quite durable and reliable, but are very sensitive to sand and dirt. Before installing them in your apartment, do not be lazy to install a water filter.
- Ceramics are very durable, but at the same time quite fragile. Closing the tap with too much force can easily break the turn signal.
- When assembling the faucet, clean and lubricate all parts. And lastly, since you’ve already disassembled the faucet, don’t be lazy and replace all the rubber rings. This will significantly extend the life of your mixer, and save yourself time and nerves.
One of the most common troubles associated with the operation of water supply systems in a house or apartment is water taps. Sooner or later this happens in every home, no matter how expensive the faucets have been installed.
It is impossible to ignore this problem, and even dangerous - it can lead to serious leaks and flooding of neighbors. Therefore, as soon as the faucet drips, it is necessary to immediately take measures to eliminate the problem.
Most often, the problem is that the faucet axle, the part of the mixer “responsible” for shutting off the flow of water, has failed.
- replace the part with a new one;
- repair it yourself.
But to do this you need to know what kind of crane axle box is in yours.
Currently, two types of crane boxes are widely used:

- Worm-type – the principle of their operation is as follows: the water flow is blocked by means of a retractable rod, which, when the tap rotates, blocks the passage through which water flows.
- Ceramic. This does not mean that the entire device is made of ceramics, it just has 2 ceramic disks in its design, which play the role.
Currently, ceramic crane axle boxes are increasingly used.

- greater ease of use of the mixer - in order to open or close the water, you need to turn the tap only 90 degrees, while a worm-type faucet requires 3-4 full turns.
- Ceramic discs wear out very slowly, so problems with water leakage are rare.
True, ceramic crane axle boxes are somewhat more expensive than worm-type ones, but they also last much longer.
How does a crane axle box with ceramic discs work?
The design of the crane axlebox contains the following elements:
- Housing made of non-ferrous metal alloy;
- A rod that may have a head various shapes- “square” or “slot”. You definitely need to pay attention to this, because if you make a mistake, you simply won’t be able to put the faucet flywheel on this rod.
- Locking washer.
- Adapter - necessary for rigid connection of the rotary rod with the upper ceramic disk.
- The upper ceramic disc rotates simultaneously with the rod. It has two holes for water passage.
- The lower disk is stationary and also has two holes for water.
- A rubber seal is necessary to ensure a tight fit of the faucet axlebox to the mixer seat.
The axle-box tap is simple: when you turn the mixer handwheel, the holes in the ceramic discs align and water begins to flow. When the faucet is turned back, the holes in the movable plate shift 90 degrees, blocking the flow of water.
Due to high-quality grinding of ceramic discs, a very tight fit to each other is achieved, which ensures high tightness of the valve axle box.
If the mixer starts to leak, it is better to immediately purchase new faucet axle boxes, since it is not always possible to repair old ones.
 The most common reason for faucet failure is a loose fit of the rubber gasket to the faucet seat. If this is the reason, then there is no problem - you just need to replace the seal and install the valve axle in place.
The valve axle seal is also easy to replace - it only has 2 gaskets. One presses the upper movable ceramic element to the lower one, and the second seals the axle box itself in the mixer seat. If they are the only reason, then the repair will be quick and simple.
But the cause of failure of a ceramic crane axlebox can also be wear of the ceramic discs, which occurs when mechanical particles get between them. Therefore, if the water entering a house or apartment often contains water, then it is worth installing a water purification filter in front of the mixer. Exactly dirty water is the main cause of failure of ceramic faucet axle boxes.
 Ceramic plates can also be replaced, but to do this you need to find exactly the same elements on sale, which is quite difficult to do. In addition, ceramics are quite fragile and can break if handled carelessly. Therefore most often ceramic axle boxes They just replace them with new ones.
Procedure for replacing the crane axle box:
- The first step is to turn off the water using the valve. If we are talking about a tap, then you can turn off only the line from which water flows to it. If it’s a mixer, then turn off all the water – both cold and...
- Remove the faucet flywheel. To do this, carefully remove the protective cap with a screwdriver and unscrew the flywheel fixing screw. After this, the screw itself inner surface The flywheel must be cleaned of debris and rust. If the screw does not unscrew, then its head can be drilled out, and then replace the screw with a new one.
- Then use a wrench to unscrew the axle box. If the axle box is difficult to unscrew, then the threads can be lubricated with rust solvent, wait 15 minutes, and then remove the part.
- After this, the threads of the mixer must be cleaned of lime deposits and rust, otherwise the new faucet will not fit tightly to it.
- We screw in the new axle box, trying not to overtighten, but tightly enough.
- We open it, and only then open the valve and check whether the valve box is leaking. The tap must be opened in advance so that all the air that has accumulated in the pipe during repairs is immediately released.
The new crane axlebox will fit perfectly into the socket only if its size exactly matches the old part. Therefore, if you are not very well versed in plumbing, it is better to unscrew the old axle box and go get a new one, having it with you. Then the store will definitely pick up an identical one for you.
If, after replacing the axle box, the faucet still leaks, then the cause may be significant wear on the mounting socket of the mixer itself.
Then you can try installing a thicker gasket, but this is a temporary measure. It will constantly sag and wear out, and the faucet will start dripping again. So it’s better to take a look and buy a new faucet right away.
When deciding to use ceramic crane axle boxes, the following circumstances must be taken into account:

- If your water is not clean, and you don’t want to install a filter or for some reason you can’t, then it’s better to use worm-type valve axle boxes. They are not so picky about water quality and have high maintainability, which consists of replacing rubber gaskets.
- If you want to replace constantly leaking worm inserts with ceramic ones, then the question arises: will the mixer itself need to be replaced or will it be possible to use the old one. To do this, you need to focus on the mounting hole of the part of the axle box that is screwed into the mixer - the new one must fit exactly into the old socket.
- Pay attention to the head of the faucet box - it must exactly match the mixer flywheel. If the flywheel is designed to fit on a square rod, then the new axlebox should also have a square. Having purchased an axle box with a splined head, you will have to purchase other flywheels for the mixer.
- Although the length of the crane axle boxes is usually standard, sometimes you can find parts on sale that differ in length. Therefore, either measure the length of the old axle box, or take it with you when going to the store.
Thus, replacing an old crane axlebox with a new one is not difficult. The only condition is to work slowly, carefully and conscientiously clean all threads and sockets from plaque and rust. Then the new axlebox will fit tightly into place and will not cause you problems for a long time.
Modern shut-off plumbing elements, namely the ceramic valve axle, are a precise and well-adjustable system. In this system, each element occupies a strictly designated position and ensures timely water supply. But in some situations the axle box valve begins to fail. How to properly repair or replace?
What a true Master is not afraid to do
Real House master not afraid of work. Even if he finds it difficult to repair an unfamiliar plumbing or locking part called an “axlebox valve,” the first thing he does is disassemble it to find out the “close-up” design.
How, have you never repaired a crane axlebox? It can’t be, either you live on Mars, or the plumbing in your apartment is in excellent condition. There is nothing complicated in repairing an axle box; the main thing is to understand its design. Having enriched your knowledge, you can safely begin repairing the ceramic faucet axlebox or replacing it.
Crane axle box design
Unlike the antediluvian axleboxes with rubber gaskets, the shut-off element of the axlebox valve practically does not require seals made of elastic materials. The parts of the locking element fit tightly to each other. This fit is ensured due to the cleanliness of the surface of aluminum oxide from which the shut-off and control element is made.
These are two disks or two flat ceramic plates with holes. The presence of a shut-off and control element responsible for the water supply gives a complete picture of the faucet and answers the question: “How to repair a ceramic axle-box faucet.”
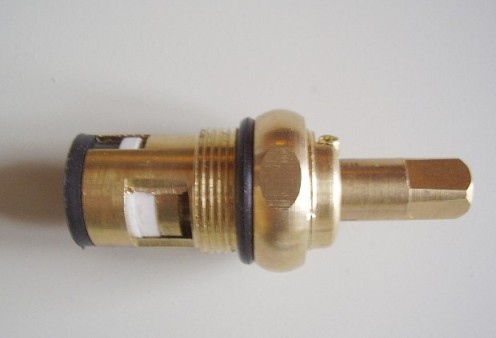
A classic ceramic axle-box faucet consists of the following elements:
housing
rotary rod
fixing washer
adapter
sealing gasket
ceramic plates upper and lower.
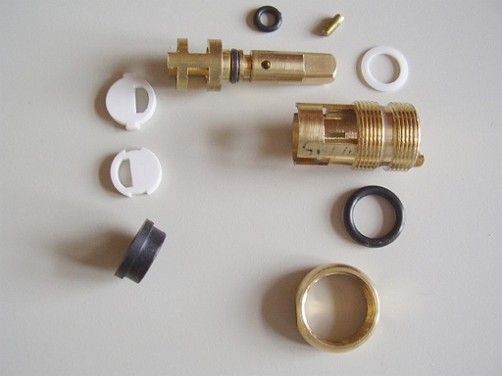
The body of the ceramic faucet axlebox is designed in such a way that installation and installation into the body of a bathroom faucet or faucet is carried out by screwing in and out using a traditional adjustable wrench. A tight connection is ensured by a sealing gasket.
The main working link is the rotary rod, consisting of three parts.
At the top of the rod there is a faucet handle, which is screwed to the rotary rod with a screw. The middle part is fixed due to the expansion ring. The lower part of the rod is responsible for adhesion to the ceramic plate.
The adapter is responsible for the rigid connection of the rod with the upper ceramic plate. The most weak link» are sealing gaskets, due to a loose fit of which leaks are possible.
Useful tips from the master
When replacing or repairing a faucet axlebox in the process, when you “lock the nut” against the gasket clamp, it is recommended to keep the faucet itself from possible turning. The twisting process should be easy, without significant mechanical effort. This distinctive feature constructive.
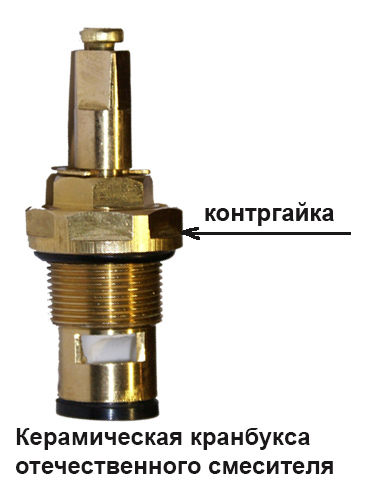
If the tightening is tight and you have to apply force, it means there is a defect somewhere (a sink washed with hard water or a seat crack). In this case, it is necessary to disassemble the crane and adjust the crane axlebox with your own hands.
Possible emergency situations when operating a crane axle box
If there is a significant amount of suspended particles in tap water, wear of the working parts of the crane axlebox occurs faster. To be gentle on the working surfaces of the faucet, it is recommended to use cleaning filters. If there are no cleaning filters, in practice, water leaks are emergency situations.
What design details of the axle box valve must ensure tightness?
Ceramic plates provide the necessary tightness of the faucet. The surfaces of the upper and lower ceramic plates should fit tightly. If this condition is not met, the ceramic axlebox tap drips. The cause of constantly leaking water may be a poorly milled faucet or faucet seat.
In addition to the wear of the ceramic plates, the plastic gasket is also affected. It is not difficult to determine the condition of the plastic gasket.
The presence of play in the stem in the valve axlebox or loss of the copper clip will signal a problem with the plastic gasket. This means it’s time to change this significant element.
Useful tips from the master
Any home master knows perfectly well what to provide for all options emergency situations, these “ifs” are impossible.
Numerous models of faucet axle boxes and cartridges have specific elements and may differ:
in diameter (35-40 mm)
the presence or absence of a leg
diameter of the sealing gasket.
Of course, in order to save material resources, you can begin to grind or shorten the gaskets and plates, adjusting them to the “original” elements. But in practice, replacing or repairing individual parts of the axle box is impractical due to labor-intensive and not always justified costs.
How to replace ceramic faucet DIY axle box, presented in this video.
Of all the plumbing fixtures and devices installed in an apartment or house, the most frequently used category is probably the kitchen faucet. Cooking food, washing dishes, fruits or vegetables, taking water for drinking or boiling, carrying out wet cleaning in the kitchen, a lot of other small household needs - and all this falls on him. It is not surprising that sooner or later a moment comes when the intended operational resources of even the highest quality mixer are exhausted, and certain problems appear in its operation. The likelihood of such a situation will be even higher if at one time, for reasons of economy, an inexpensive mixer of dubious quality was purchased, and the water coming from the mains is not clean, or the condition water pipes does not stand up to any criticism.
A faucet malfunction immediately causes a lot of unpleasant problems that significantly complicate the normal functioning of the kitchen. What to do - call a plumber or run out and buy a new appliance? Do not rush - these are extreme measures, but first you can try to repair the faucet in the kitchen with your own hands. As practice shows, the overwhelming majority of the most common faults can be repaired. And in the process of restoring the mixer itself, there are usually no such operations high level difficulties that they would be inaccessible to self-execution to the average apartment owner.
IN What are the symptoms of mixer malfunctions?
What obvious and not so obvious signs will tell the owner that the condition kitchen faucet should we get serious?
- There are always traces of dampness under the kitchen sink, and sometimes even a puddle accumulates. Such problems are the most dangerous, since they are often not noticed immediately, and the “signal” often comes from neighbors below who have a wet spot on their stream.
Dampness under the sink is a clear sign of some kind of malfunction
Of course, more likely the cause lies in a malfunction drain system or poor sealing of the sink in the countertop.
The weak point is the connection of the flexible line with old steel pipes
If this is really the case, then optimal choice will be the reconstruction of the home water supply network– replacing it with polypropylene or metal plastic. But this is a large-scale undertaking, and in order to quickly eliminate the leak, you need to bring this connecting node into relative order.
By the way, the figure above shows a fundamentally incorrect connection of the flexible hose with steel pipe. “Packaging” using FUM tape or tow is completely unnecessary. The hose nut must have a gasket that, when tightly fitted to the end of the pipe, completely prevents water from escaping. But winding can even seriously interfere with the normal sealing of this connection.
It is necessary to check whether the nut is tightened tightly and whether it is loose. However, great efforts should not be made when tightening it - you can squeeze the gasket, and the leak will become even worse.
If tightening does not help, close the general water supply tap to the apartment, unscrew the nut completely, drain the remaining water into a substitute basin and inspect the end of the pipe. If its edge is uneven and corroded, then there will not be a good seal with the hose. In this case, the best solution is to pack a factory-made extension adapter onto the thread (naturally, using FUM, or better yet, tow with a special paste like “Unipac”), the edge of which will ideally fit to the hose gasket.
The sealing material is tightly wound around the threaded part of the pipe in a clockwise direction. Then the adapter is screwed on and tightened tightly with an open-end or gas wrench. Now you can reconnect the hose, tighten the nut with moderate force, open the water supply and check for leaks. Most likely, everything will be fine.
- The second option is that everything is dry at the connections, but you can clearly feel the appearance of water on the hose braid. Cause pretty widespread– alas, the quality of the hoses is very often low. It happens that the rubber tube located inside the braid breaks, and sometimes the metal ends give rise to cracks, especially if they are made of silumin.
In this case, you should not wait for the problem to develop, but immediately change the eyeliner to a new one. A small leak can suddenly turn into a complete rupture of the hose with all the understandable catastrophic consequences.
To replace the liner, most likely, you will have to temporarily remove the mixer - remove the old hoses and carefully tighten the fittings of the new ones into nests located on the lower end of the device body without dismantling it is extremely difficult, and in many models, simply impossible.
To dismantle the mixer, of course, first turn off the supply taps from the cold and hot water, the pressure is released, then both flexible hoses are disconnected from the pipes. Further actions depend on the type of faucet mounting. It's not difficult to figure this out.
— A very common fastening scheme is with studs (one or two), which are screwed into the body from the bottom of the mixer, and nuts that press a horseshoe-shaped plate with a rubber or polymer lining to the underside of the sink.
It is necessary to loosen and twist the nuts from the studs (sometimes during dismantling the stud itself is unscrewed - no big deal), and then pull the mixer up. For nuts, a 10mm wrench is usually used, but you need to be prepared for the fact that in practice you will find 11mm or even 9mm nuts.
After removing the mixer, you can immediately check the condition of the gasket ring between the body and the sink. Its unsatisfactory condition often causes leakage from the surface of the sink down through the mounting hole for the mixer. If the gasket is deformed, you should purchase a new one (it is shown with an arrow in the picture).
The studs usually have slots for a straight or shaped screwdriver. But you don’t have to rely on them too much when dismantling - it will still take effort to unscrew the fastener wrench. You can use a screwdriver when reassembling the mixer - this will make it easier to fix the studs themselves into the body from the mixer.
— Another type of fastening - the lower part of the mixer itself has a cylindrical threaded part, which is inserted into the mounting hole of the sink, and then a powerful nut is screwed from below, securely fixing the device.
By the way, this design of the mixer sometimes allows you to unscrew the hoses without even dismantling the device itself. But this will not be easy to accomplish.
Imagine working in a very cramped space - under kitchen sink, where it is almost impossible to take a comfortable position to wind the tool and apply sufficient force. And if there was also a leak at the place where the hoses were connected, then you can often find a generally sad picture when all the nuts are covered with a layer of oxides and limescale, and do not immediately yield to the force of the key.
Therefore, many craftsmen advise removing the sink to dismantle and reinstall the kitchen faucet. This is usually not difficult - just remember to disconnect corrugated pipe drain from the sewer pipe.
Another “advantage” of this approach is that it becomes possible to “refresh” the seal between the sink and the countertop with a new sealant in order to completely eliminate the possibility of moisture getting downwards upon completion of the work. Well, the process of dismantling and installing the mixer will be easier and much better.
Failed hoses cannot be repaired or restored in any way - only replacement! And when choosing a new eyeliner, there may be several options:
— The same, but only high-quality hoses in a flexible metal braid. Be sure to measure the required length so that they are not “tight”, but also do not hang with unnecessary loops. On a pair of hoses, the fittings for connecting to the mixer should be of different lengths - this will facilitate installation.
— A more reliable option is modern corrugated stainless steel hoses. They are tougher and somewhat more difficult to work with. But in terms of durability and reliability, they significantly benefit.
More reliable - corrugated stainless steel hoses
— Some artists prefer hard eyeliner made from metal-plastic pipes. For this, there are special fittings with fittings for transition to the corresponding pipe. You'll have to tinker a little longer, but you won't have to worry about this section in the future.
The procedure for reinstalling the mixer depends on its design.
— If it is fixed with studs, then the hoses are passed through the mounting hole of the sink, first a ring-shaped gasket is put on them, burying the joint between the mixer and the sink, and then the fittings are screwed into nests housings. It will be more convenient to tighten the short fitting first, and then the long one. The fittings have their own sealing rings, but still experts advise making a small winding on the thread - for reliability.
Then the studs are attached, the mixer is installed in the socket, and a gasket and a horseshoe-shaped strip are put on underneath. Now all that remains is to tighten the nuts tightly, while not forgetting to monitor the centering of the device in the center of the mounting hole and how the gasket ring fits.
— If the design of the mixer involves installing it on a nut, then it is better to insert and screw the fittings after fixing the device on the sink.
— The same is done if a rigid metal-plastic liner is planned. In this case, the curved fitting with the fitting is screwed in first, and then the straight one.
If everything is connected, then you can install the sink in place, not forgetting to seal the gap between it and the countertop.
Aqua-stop valve
If suddenly the hose Sun If it “explodes”, the valve will immediately shut off the water supply and prevent a flood. It's probably worth spending a little more to ensure safety.
Well, now let’s move on to considering problems with the mixer itself.
Problems from above - troubleshooting faucets
If it is obvious that the mixer is not working as required, water is oozing from it, it does not regulate pressure and temperature, the flywheels or lever turn with difficulty or, conversely, too easily, without blocking the current water, then problems should be looked for in the device itself.
General problems - water leaking through the faucet
The first reason is a housing defect.
— If the taps are working normally, but constant water leaks are visible on the body of the mixer, then with a high degree of probability we can assume that the body has cracked. It may be almost invisible to the eye, but for water it is enough. The reason may lie in the poor quality of the product, in the use of a fragile and corroding metal - silumin - in the manufacture, in excessive tightening of nuts or taps - this can cause the seat to burst, in mechanical damage device.
You need to carefully examine the body with a magnifying glass - this usually gives results. And if a crack is detected, then such a mixer can be considered practically unsuitable for use. further use. Sealing cracks with any compositions, including “ cold welding“If it does give a result, it will be for a very short time and without a guarantee that a more serious accident will not happen at a time when the owners are not at home. The best thing is not to take risks, but to go for a new mixer.
Carefully, so as not to damage the outer coating, use an adjustable wrench to loosen the nut, unscrew it, and the spout (or, as it is also called, the gander) is carefully gradually pulled out upward.
On the lower cylindrical part, in special grooves, there are rubber gasket rings - one or two (shown by red arrows). Above, directly under the nut, there is usually another ring - plastic (blue arrows). It is usually split, and does not take a direct part in the process of sealing the hinge - it rather acts as a centering, locking element, and to a certain extent also performs the function of a “sliding bearing”.
If there were leaks in this part, and the spout itself was loose, then all the gaskets should be changed, since they are definitely worn out. The plastic split ring also needs to be replaced.
These spare parts are literally “penny”, and they are easy to find in any plumbing store. It is recommended to take the removed spout with you in order to accurately select gaskets of the required diameter.
Before reassembling the parts, they must be cleaned of any traces of limescale or rust. When placing the rubber rings on the spout shank, be careful not to tear them. To make work easier, you can lightly coat the surface with silicone grease. The rings should fit snugly into their grooves. Place the split plastic ring and not difficult at all.
Once the new gaskets are on, the spout can be put back in place. But first you need to thoroughly wipe the inside of the seat with a soft cloth - there may be limescale or corrosion build-ups there. After cleaning, the shank is progressively, with a certain force, but carefully lowered into the socket until it stops, and then the nut is tightened. Then you can check the flow of the spout from left to right, and the absence of leaks when starting the water.
The situation is somewhat more complicated if the leakage comes from the joints of the swivel spout block in single-lever mixers (a typical leak location is shown by arrows in the figure).
Eliminating such a defect will require disassembling the entire device, which will be discussed below.
Problems in the mixer valve mechanism
The most common problems occur in the operation of the valves that regulate the flow of water into the mixing chamber. These breakdowns make themselves felt by leakage through the valves or the top of the mixer, the inability to completely shut off the water, the difficulty of rotating the flywheels or moving the lever, and unsatisfactory mixing of hot and cold flows. Elimination of defects depends entirely on the design of the mixer - there are many options.
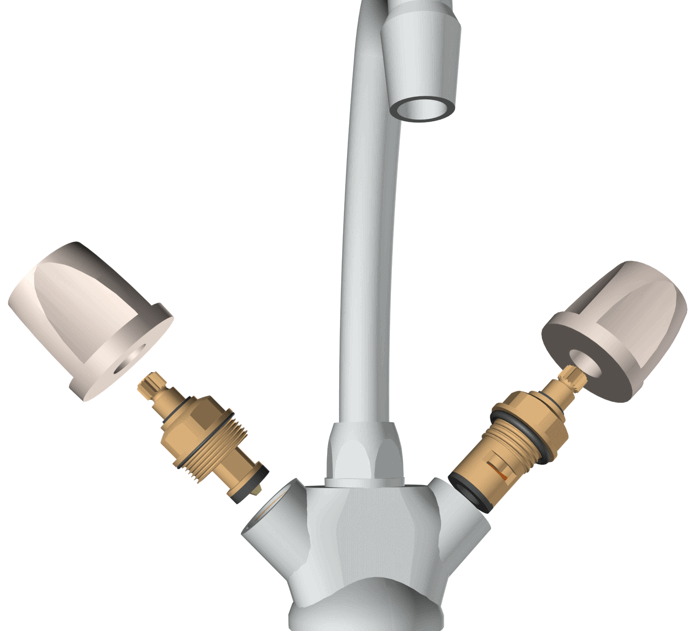
Repair work with a two-valve mixer
The figure shows circuit diagram devices of most two-valve mixers.
The housing (item 1) has three socket holes. A spout-gander (item 2), which we have already dealt with above, is installed in the central one. Left and right in nests faucet axle boxes (item 3) of one design or another are screwed in - they are responsible for supplying and shutting off water to the mixing chamber. Rotation is transmitted to them through decorative flywheels (item 4). These flywheels (“wings”) are fixed to the tap stem with a screw (pos. 5), the head of which is closed with a protective cap (pos. 6), which also serves as a color indicator of cold or hot water.
If there are no cracks on the body of the mixers, then all the problems that arise are related to the fact or other defect of the axle-box crane. Some of them you can try to eliminate on your own, while others will require replacing this assembly.
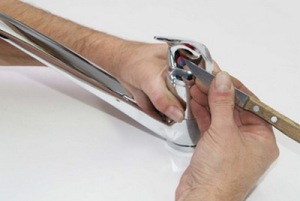
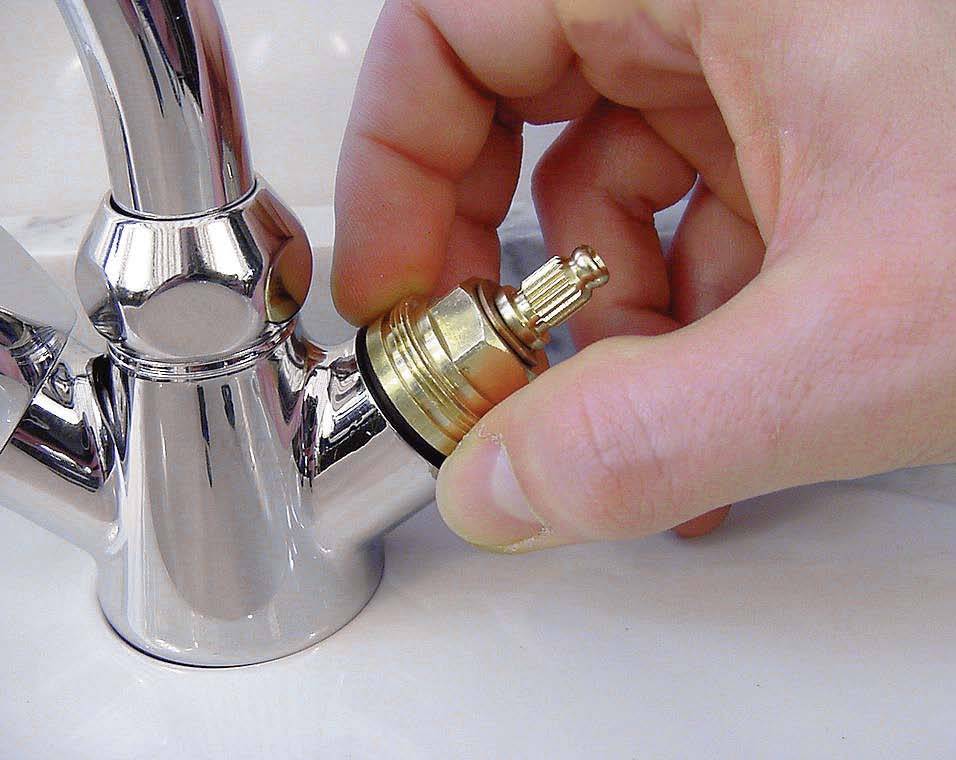
First of all, you need to unscrew the valve axle boxes to determine their type.
To do this, first carefully pry off the protective plastic cap with a knife (for some models it may be on a thread - then it is carefully unscrewed).
Then use a screwdriver to unscrew the screw and, using a progressive movement, carefully remove the handwheel from the splines of the valve stem.
This allows access to hexagon of the valve, through which it will be possible to unscrew it from its socket. Sometimes behind the handwheel there is also a decorative cap that completely hides the tap. It must be carefully unscrewed - usually a hand is enough for this.
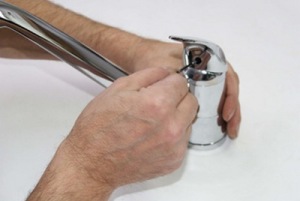
After this, the crane axle box itself is unscrewed with an adjustable wrench. Now it should be subject to revision.
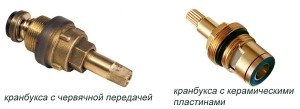
Axle-box valves can be of two types - with a progressively moving rubber gasket-latch, or with ceramic plates. It is not difficult to distinguish them even with the mixer assembled - the first type requires several revolutions of the flywheel from the closed position to the closed position, and the second is limited to one revolution, a half, and sometimes even a quarter.
And axleboxes of both types can have both general problems and specific malfunctions. Let's look at it one by one.
- The figure shows a box with a rubber valve, which is given translational motion when the handwheel rotates. Moving down, the valve closes the channel of water flow from the supply to the mixing chamber. And vice versa, the higher the gasket rises, the larger the “window” for the passage of water.
The arrows show the most vulnerable places where leaks most often occur.
1 – wear of the gasket on the valve itself makes it impossible to completely shut off the flow of water into the spout. This usually happens either from prolonged use or when the water is heavily polluted. Solid particles do not allow the gasket to completely block the channel; the user, naturally, tries to tighten the tap even more, thereby pressing these solid inclusions into the rubber. Eventually, from from Faucet leak - constant leakage. The solution in this case is simple - replace the gasket with a new one.
The rubber band itself is held on the rod with a screw (for a screwdriver or, as in the picture, with a hex head), and is protected around the circumference from bursting by a metal shell.
— It is necessary to unscrew the locking screw.
— Then the rubber gasket is pryed off with a thin screwdriver or knife and removed from the shell.
— A new gasket purchased according to the sample is installed in place and secured with a screw.
— After this, you can install the crane axle box in place.
2 – wear of the rubber sealing ring leads to water leakage through threaded connection mixer body and valve axle box at high pressure open water. This happens infrequently, but it can be eliminated quite easily - by replacing the ring. Etc There is no need to listen to anyone, and in no case should you “pack” the tap with FUM tape or tow - most often this extreme leads to the fact that the nest is damaged T t crack, and after that the entire mixer can only be thrown away.
3 and 4– wear of the internal seals of the valve axlebox. This is accompanied by water leakage in the area of the rod, near the flywheel. In this case, the kinematic mechanism of the crane usually suffers - it begins to jam, it is difficult to turn, etc. The optimal solution is a complete replacement of the axle box crane. There are, of course, certain restoration technologies - packing a new oil seal, boring and lapping the screw drive. However, this, firstly, is not possible on all models, and secondly, even the highest quality crane axle boxes are not so expensive to resort to such complex restoration work.
Flaw 2 is equally inherent in axle boxes with a ceramic plate valve, which will now be discussed.
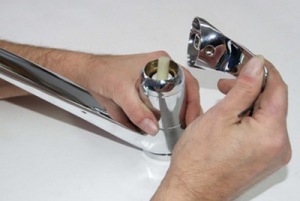
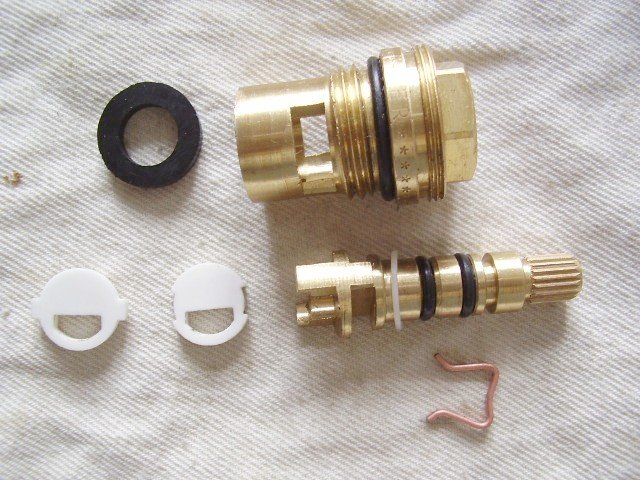
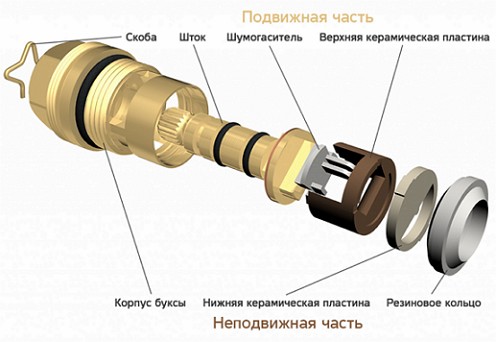
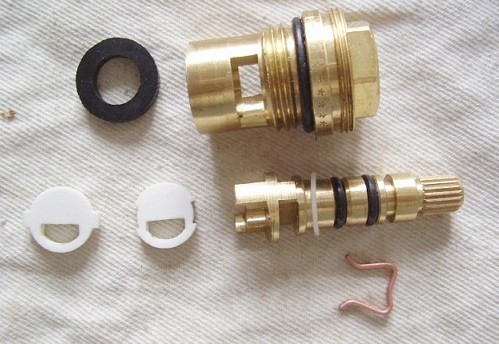
- Axleboxes with a ceramic valve are designed differently.
Blue arrows show stationary parts, green arrows show moving parts.
1- housing in which the entire mechanism is assembled. It has a threaded part for screwing into the mixer socket.
2 – rotary rod with its own sealing rings. Rotation from the rod is transmitted to the movable ceramic plate (item 3). On given It is not visible in the figure, but when assembled, a fluoroplastic gasket is placed in the upper part between the rod and the body, which plays the role of a thrust sliding bearing.
A second ceramic plate (item 4) is fixedly installed in the lower part of the housing. When assembled, it is tightly ground to the movable one. Turning the rod leads to the alignment of the figured cutouts (windows) on the plates - this opens the flow of water. Depending on the combined area, the pressure becomes greater or less. The tap is closed. the windows are diametrically opposite position.
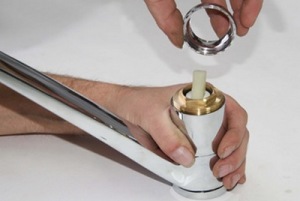
When installed in the mixer, the axle box fits tightly with the bottom part round channel supply due to the ring silicone gasket (item 5).
When assembled, the axle box is held in place by a locking bracket (item 6) or a washer (depending on the model - a special groove is made in the rotating rod for this clamp. There are clamps in the form of a small threaded rod with a slot for a screwdriver.
To repair axle-box cranes of a similar design, you can find special repair kits - the main thing is that they fit specific model. What could be the reasons for the crane axle box not working properly:
A– wear or deformation of the silicone gasket on the bottom. When the tap is closed, water continues to flow into the spout. Must be replaced.
b– wear of the sealing ring at the junction of the tap and mixer (exactly Also, as on a tap with a rubber valve).
V- one of the most common reasons– production of a fluoroplastic plate. The tight fit of the rubbing parts (ceramic plates) to each other is disrupted, and when closed, the water does not completely shut off. The defect is easily checked - if you press the axlebox rod from above while water is oozing, the flow stops. Eliminated by replacement fluoroplastic rings for new ones.
G– two sealing rings on the rod prevent water from flowing upward from the body. Wear will make itself felt by leaking water in the flywheel area. To be replaced.
d– abrasive wear of adjacent surfaces of ceramic plates. This doesn’t happen often – plumbers claim that ceramic parts are “the last to go.” Possible reason– heavily polluted water with solid inclusions. The faucet does not hold water and rotates unevenly and with force. If the repair kit contains plates, then they are also easy to change.
The process of overhauling and repairing the crane axle box is shown in detail in the video:
Video: how to repair a ceramic faucet axle box
Well, if it was not possible to find the required kit, you will have to change the crane axlebox completely.
If you need to replace a crane axle box, then to purchase a new one it is best to take the dismantled one with you to the store. What is important here is the diameter of the landing thread, the installation length of the entire assembly, and other design features (for example, threads for installing a decorative cap on top) and so on . If desired, you can replace taps with rubber valves with “ceramics” and vice versa. And one more thing - to select an axle box, it is advisable to take the handwheel (lamb) to the store. It happens that the splines of the new axlebox rod do not coincide with the old flywheel.
Before reverse installation tap, you must carefully wipe the seat with a clean cloth - there shouldn't be small debris, limescale - anything that can interfere with the normal screwing and tight fit of the gaskets.
When installing a new axlebox, do not use excessive force - you can damage the body from the mixer or compress the gaskets. It is best to do this - with the water supply closed, the tap is screwed into the socket until it stops by hand. Then the supply is opened, and the tap is carefully turned with a key until water stops coming out from under it.
After this, you can put the decorative cap (if provided), the flywheel in place, fix it with a screw and close the hole with a plug of the corresponding color.
After carrying out these steps, the two-valve mixer should work normally.
Repair of a single-lever mixer with a ceramic cartridge
If problems arise with a single-lever mixer, then there may be two completely different options. Thus, the device may have a valve device in the form of a cylindrical cartridge with ceramic plates inside, or a spherical water flow switch.
First, let's look at the cartridge option.
The problem makes itself felt by the impossibility of blocking the flow from from leakage when the lever is completely lowered, water seeping through the top of the mixer, excessively light or, conversely, difficult movement of the lever with unsatisfactory mixing quality.
The best solution is to replace the cartridge with a new one. Doing it yourself is not as difficult as it might initially seem.
The schematic diagram of a mixer with a cartridge is shown in the figure:
1- metal body with mixer.
2 – cartridge.
3 – clamping fixing nut that holds the cartridge in a tightly pressed position in the body. Usually it is buried on top with a decorative cap (item 4).
5 – mixer handle, fixed on the plastic lever of the cartridge with a screw (item 6)
7 – swivel spout. The tightness of this moving unit is ensured by two o-ring gaskets (item 8), and the smooth running is ensured by fluoroplastic rings (item 9) acting as sliding bearings.
10 – flow aerator located at the end of the spout. To seal its installation, a gasket (pos. 11) is used.
In order to replace the cartridge, work is performed in the following sequence:
Illustration Brief description of the operation performed The picture shows a set of tools that may be needed to replace the cartridge. The first step is to carefully pry up and remove the plug that covers the hole for access to the screw securing the handle. Sometimes the plug and screw, in some models, are located at the top of the handle - this is easy to determine.
If repairs are made without removing the mixer from the sink, it is recommended to close the drain hole - small parts they really “love” to fall into it.Try shining a flashlight into the opened hole to determine which head has the retaining screw. There may be a straight screwdriver, a curved screwdriver, or a hexagon screwdriver.
Use a suitable wrench or screwdriver to loosen this screw.
There may be surprises here - it does not always give in immediately, especially if water has leaked through the top of the mixer. Using brute force is not recommended, as you can tear off the splines, and removal can become a really big problem.
It's best to try spraying the screw with WD-40 and letting it "go away."After the screw is loosened or unscrewed, the handle is carefully removed from the cartridge lever upwards. The next task is to unscrew the decorative cap.
It usually yields to hand force. If not, then you can try to move it out of place with a gas wrench or pliers, but only very “gently”, trying not to scratch the coating or deform the thin metal.After removing the cap, the retaining clamp nut will open. Before installing a new cartridge, you must clean it thoroughly. soft cloth a cylindrical cavity inside the body - there should be no rust residue left there, lime deposits, small particles.
Installing a new cartridge correctly is not difficult, since almost all models have centering protrusions that must coincide with the corresponding recesses in the body.Assembly is carried out in reverse order. Again, it is necessary to warn you that you should not use excessive force when screwing the fixing nut, as this can deform the cartridge body or the rubber seals located underneath. It's best to give it a short puff, then turn on the water and check to see if it's coming into the sides of the cartridge. If a leak is detected, slowly tighten the nut until the leak stops.
You can immediately focus on the already mentioned leak in the swivel spout block. The cartridge is here - absolutely nothing how, and the problem is caused by wear of the sealing rings (in the diagram above - item 8). Some models use cuffs instead of rings - this will be visible after disassembly.
To replace the seals, the mixer will have to be disassembled even further in order to remove the rotating spout block from the body. Options may vary depending on the mixer model. So, it happens that this unit is removed upwards - locked with a special cylindrical coupling. But still, more often it is removed in the direction of connecting the supply hoses. In this case, disassembly cannot be avoided. complete dismantling faucet from the sink (how this is done is already described above).
- A ring-shaped lock nut will be visible from below. Unscrew it - a fluoroplastic ring will be revealed under it.
Option when cuffs are used for sealing
- These seals will have to be replaced by purchasing new ones based on the sample in the store. At the same time, you can check the condition of the fluoroplastic rings at the top and bottom - perhaps they are also already very worn.
Some craftsmen practice winding to restore the sealing properties of these seals. But still, the optimal solution would be to completely replace them.
Assembly is carried out in reverse order. At the same time, do not forget to install fluoroplastic rings on top and bottom of the rotating block.
Repair of a single-lever mixer with a ball switch block
Diagram of a mixer with a ball adjustment mechanism
Top down:
The mixer handle (pos. 1), fixed with a screw (pos. 2), which is covered with a cap (pos. 3).
Below is a metal cap (item 4), which secures the entire valve mechanism in the mixer body. Under it there is a plastic cam with a shaped washer (item 5) - they limit the movement of the ball lever in a certain range. The washer has a dome-shaped bottom and a rubber seal around the circumference for a tight fit to the ball.
The mixing ball itself (item 6), hollow inside, has holes for the passage of water from the liner and exit into the rotary spout block.
From below, rubber valve seats (pos. 7) fit tightly to the ball, which are constantly pressed against its surface by springs (pos. 8).
The design of the mixer below is no longer fundamentally different from that discussed above - a rotary spout block (item 9) with grooves (item 10) for sealing rings (item 11). The entire structure is assembled in a brass body (item 12). An additional aerator (item 13) can also be located inside, providing better mixing of water before being supplied to the spout.
We will not consider problems with spouting - they are practically no different from what has already been stated above. Let's just focus on repairing the valve mechanism.
- Removing the mixer handle is almost the same. The only difference is that the lever on which the handle is attached not rectangular polymer, like a cartridge, but in the form of a metal pin with a groove for a fixing screw.
- To disassemble, you first need to carefully unscrew the top cap. It may have slots on the outside for gripping with a key, or four grooves on the top inside. Of course, it would be better to use a special key. But if it is not there, then the cap is removed from its place, carefully knocking it counterclockwise against the groove with a screwdriver. Another
Where can there be problems in the valve mechanism?
- The upper dome washer is dirty or worn (orange arrow). Occurs infrequently, usually eliminated by simply cleaning the surface. The spherical seat for the ball in the body itself is checked in the same way - it also needs to be cleaned.
- Wear of the ball itself (green arrow) - cracks, grooves, etc. It can only be eliminated by replacing it with a new one.
- Wear or deformation of the valve seats (blue arrows) - they do not fit tightly to the surface of the ball and begin to leak water. Eliminated by replacing with new ones.
- Weakening and sagging of springs (red arrows) - do not provide tight compression saddles
Removing valve seats and springs
- After thoroughly cleaning the mixer cavity, begin assembly in the reverse order.
- Springs are inserted into the new seats, and then this assembly is carefully placed in the socket until it stops.
- A thin layer is applied to the cleaned surface of the ball. silicone grease. Then it is installed in the body so that the limiting protrusion on the body fits into the figured groove on the ball.
- Next is installed plastic knot– figured dome washer and cam. It’s difficult to make a mistake here, since there is a groove in the body, and a corresponding protrusion on the cam.
- The upper metal cap is attached and screwed on.
- The mixer handle is placed on the stem and secured with a screw.
At this point, the repair of the faucet with a ball valve can be considered complete.
For greater clarity - disassembly and assembly of a mixer with a ball valve in the video:
Video: disassembling a mixer with a ball valve mechanism
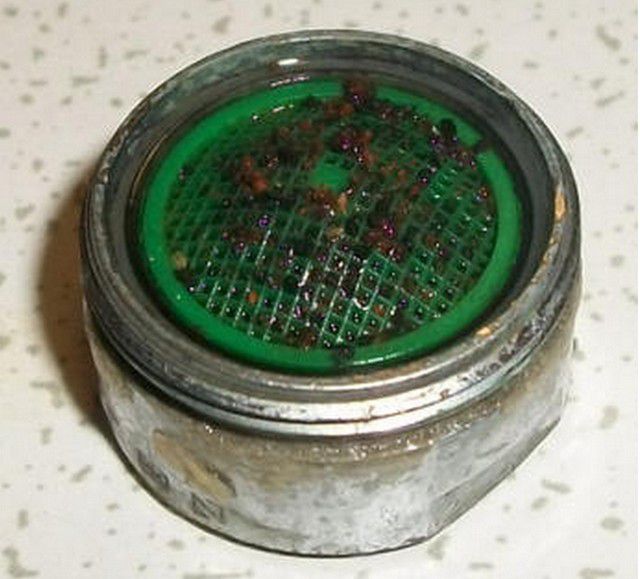
Aerator clogged
Another common problem with the operation of the mixer is poor pressure when the taps are fully open. The problem is usually a clogged flow aerator located at the end of the spout.
Fixing such a problem is very simple.
First you need to unscrew the aerator itself. He can even succumb to the force of his hand. If not, don't worry, him
If this measure does not help, then you can disassemble the aerator by carefully lifting the plastic mesh upwards. Small particles may have entered the cavity of the device and clogged the holes. You will have to work with a needle or toothpick to clean them.
It often happens that the blockage becomes “fatal” and cannot be removed. mechanical cleaning. There is nothing to do - take the removed aerator for a sample and purchase a new one.
They are not that expensive, and you can easily afford periodic replacement. But if such a situation occurs often, then it is worth thinking about the fact that the quality tap water extremely low, it is oversaturated with solid inclusions, and requires the mandatory installation of at least mechanical filters.
This preventative measure will ensure longer operation of the entire mixer as a whole - suspended particles will not have an abrasive effect on rubber and silicone seals and on the ceramic plates of the valve mechanism.