Not a single building of any scale can do without a high-quality concrete mixer. The device is not cheap, but periodically necessary in the country or in the household, so many people think about buying it even in cases where the question of global construction is not worth it. You can get out of the situation by building a high-quality concrete mixer yourself. Today we will consider several options for how to make it easier and cheaper.
Concrete mixer. Why is she needed
A do-it-yourself homemade concrete mixer reveals a lot of prospects for working with concrete and not only with it, but with all building mixtures. After spending some time building a device of any level of complexity, you can get robust design, which more than once will help out not only its owner, but also neighbors.
It is useful for preparing mortar when laying bricks, foam blocks, stone, for building foundations. different type, for the manufacture of decorative elements and landscape design, For example, garden paths. The price of the most inexpensive concrete mixer is about 8 thousand rubles.
Prices for concrete mixers
It will have an average of 20-25 liters of batch, and the power can be from 150 watts. Not the best choice even for occasional use, especially for construction. The mixing drum in such concrete mixers is belt driven by an electric motor, and this is the most simple design which can be bought.
More advanced and productive models are in a more serious price category. Approximately 22,000 piglets for a concrete mixer with a mixing drum crown drive. Its volume will be from 120 to 140 liters, which is approximately 80 kg of the finished mixture. This is not yet a professional model, but this one can already be used for not very large-scale construction. Now that we are guided by the prices and characteristics of ready-made concrete mixers, we can consider options for building it ourselves, and the design can be chosen depending on how many cubes we need in the ready-mix concrete mixer.
Choice of concrete mixer design
For a dacha or a personal plot, everyone will be able to choose a device of such productivity, which there is a need for, and not overpay for extra cubic meters of ground air. This is the main plus of building a concrete mixer yourself. The second advantage is that you can use literally everything that is at hand and build a concrete mixing plant with minimal cost by money and time.
That is why the choice of the concept of the device remains with the owner. We publish photos of the most interesting and simple devices, but you can always complicate the design.
Mandatory design elements
Be that as it may, any concrete mixer must have the following elements in its design so that it can minimally perform its functions:

How to make a frame and choose an electric motor
The bed and frame of the concrete mixer can be made of wood, but there are many questions about the practicality of such a design. As a temporary option, you can use a 15x15 beam, but is there any point in this, to judge each individually. The optimal option in terms of durability and strength is a welded frame from a corner or rolled metal of any profile. We presented several drawings in the photo for example.
If a decision is made to install an electric motor, they usually use a motor from a household washing machine. Empirically, it has long been calculated that 25-30 revolutions per minute at the outlet of the gearbox is quite enough for high-quality mixing of any mixture. The electric motor from the washing machine can provide good torque, the motor is quite durable, especially if it is used in a gentle mode of operation. For more productive and voluminous concrete mixers, three-phase electric motors are used.
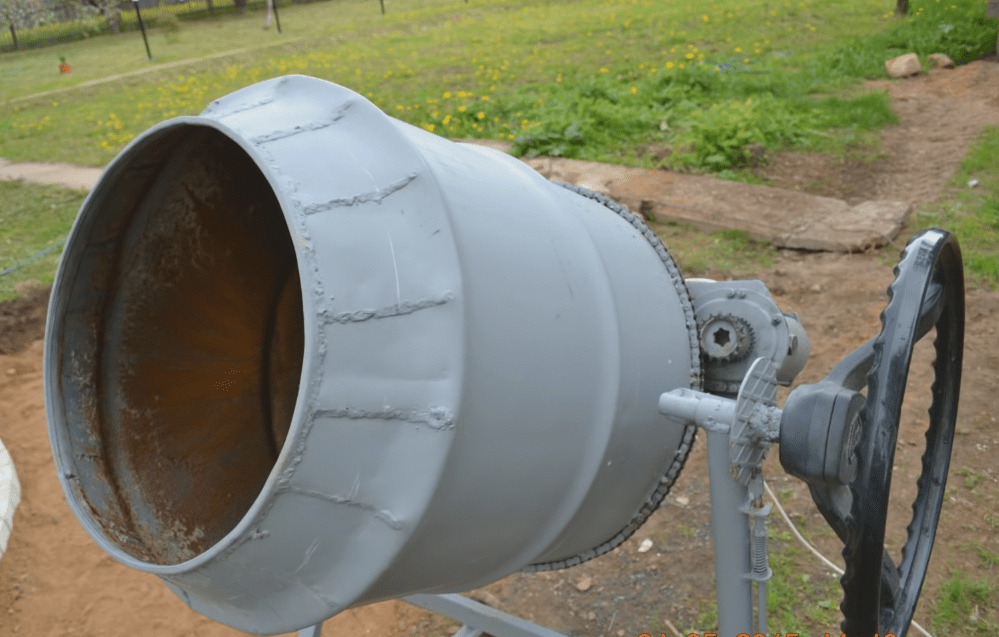
Mandatory geometric parameters for a concrete mixer of a cylindrical type - the angle of inclination of the main axis is about 40-45 degrees. In this case, a folding mechanism is needed to unload the finished mixture. There are options for home-made concrete mixers from a barrel with a horizontal mixing drum. In this case, a hinged hatch is arranged in the barrel, which during cooking concrete mix closes tightly, and opens during unloading, while the finished mixture falls into a container prepared in advance.
There are a lot of designs and types of homemade concrete mixers. The main thing in its design and construction is patience and the ability to use elementary tools and welding, which we wish you. Successful work to all!
When performing heavy construction works a manual concrete mixer will become an indispensable and sought-after assistant. The possibilities of this useful device are not limited to concrete itself, with no less success it is possible to knead any cement-sand mortar in it.
Mechanical concrete mixer - pros and cons
Determine the scope of the concrete mixer own production pretty easy. It should be based on the personal ability for heavy construction work. Because it is relatively easy to knead the mortar in a mechanized 200-liter barrel, but this cement-gravel mixture still needs to be delivered to its destination, poured into a mold and subjected to vibration compaction (if such is provided by the technology). The solution that has not been worked out during the day will harden into a shapeless pile, as a monument to your mismanagement.
The other extreme is to try to concrete the foundation 10x20 meters with homemade solution. No mechanical concrete mixer can handle such volumes of work, and its owner even more so. It is more reasonable to order a concrete dump truck with a volume of several cubes and scatter its contents over a pre-set formwork - this will be optimal both in terms of financial and physical costs.
The website site masters have prepared a special calculator for you. You can easily calculate the required amount of concrete.
Therefore, a personal concrete mixer is used for work such as building a porch with your own hands, creating a screed in one room, or when installing piles for a fence. The volume of concreting should correspond to your physical capabilities and the hardware capacity of the device itself.
Concrete mixer - electric or mechanical?
Essentially no big difference in the complexity of manufacturing between electric and mechanical concrete mixer. Another thing is that the complexity of the electric version is much higher, but it can be used alone. Manual option necessarily involves working together, but someone needs to “turn the drum”, as the permanent host says in one famous show.
But! Mechanical manual concrete mixer can be made mobile, that is, mobile. The electric version is difficult to pile up on wheels and drag around the backyard - it is complex, bulky and needs a stronger frame and chassis. The vibration from the electric motor is also very high. If necessary, electrical mobile concrete mixer it is better to buy in a store than to strive for the laurels of a great designer. Such a desire can end with a break in the drive belt (at best) or a breakdown of voltage on the metal case (but from such embarrassment the consequences are the most deplorable).
Manual concrete mixer - we make a mechanical assistant with our own hands
The sequence of manufacturing a handicraft device for mixing a solution consists of several stages:
Do-it-yourself manual concrete mixer - step by step diagram
Step 1: calculated
It is connected not with work on the apparatus, but with the assessment of the metal belongings available on the farm. We will get to the drawings a little later. The basis of any concrete mixer is a voluminous metal container. As such, a barrel of 150-250 liters is best suited, you can use it. If the desired barrel is not found on the farm, you can look for something similar from neighbors or acquaintances. You can captivate them with the prospect of forgetting about manual mixing of concrete and taking a barrel mutually, with the condition of subsequent rent of a concrete mixer. Yes, for our barrel we definitely need a "native" lid, which we will weld on seat.
In addition, you will need to make a supporting frame using a welding rectifier or inverter. To do this, you will need pipes or corners made of ferrous metal (the frame will turn out to be heavy from reinforcement) and the welding machine itself. It is quite reasonable to buy it - modern models they are inexpensive, operate from household 220 volts, are relatively easy to master and greatly facilitate household chores in the bosom of nature.
Step 2: marking and checking
We mark the contours of the frame, based on the dimensions of the barrel - it will be the center of our man-made composition. If frame base make up the corners, then the size of their shelves should be at least 50x50 mm. If pipes, then ordinary plumbing pipes, 25 mm in outer diameter, are well suited (again, you can use them, if only they are not rusty). Reinforcement for the frame and handle is needed with a diameter of at least 15 mm, preferably corrugated. The shaft needs thick and smooth reinforcement large diameter, not less than 40 mm.
We test the barrel for tightness and strength. You should tap its walls and find out if there are any rusted areas. If any are found, they will need to be brewed. sheet metal outside and check the tightness again. We stock up on two bearings, two door hinges, check the functionality welding machine and Bulgarians.
Step 3: Welding
In the geometric center of the bottom of the barrel, a hole is made for the shaft. The same hole is drilled in the cover (it is not welded yet!). A flange with a shaft is welded to the center of the bottom, a bearing is placed on it from the outside. It will be more difficult with the lid - a movable flange with blades is welded to it, which will stir the solution when the handle is rotated.
You will need at least three blades, their dimensions should reach the middle of the barrel, but not scrape along its walls. That is, we show the skill of artistic welding and create an internal iron flower - the flywheel of the concrete mixing process. The side racks of the frame are welded in the shape of the letter A, their size is identical. If the concrete mixer is self-propelled, then the side racks are welded to each other with long reinforcing bars, and metal wheels are attached to the ends of the legs of both letters A - wide and durable.
The bottom is seated on the shaft with a bearing, the cover with the blades is inserted into the seat and welded around the perimeter. The second support with a handle slides in and is also installed on the bearing - the main part of the work is completed.
Step 4: finishing
In the side part of the barrel, a hole of at least 30x30 cm is cut in the center for loading the mortar components and unloading the finished concrete. The work is carried out with the help of a grinder, and be careful - you can not damage the main part of the wall. The cut out part is planted on two loops, with sealing of the bolt holes with cement-resistant compounds ( silicone sealant and etc.). What will be cutting disc grinders - the better, this will ensure a tight pairing of the man-made hatch and the wall. Therefore, the final part of the cuts is made with a sharp hacksaw for metal.
A long and strong handle is welded to the side of the barrel where the blades are located. To mix standard concrete, it is enough to load sand, gravel, cement and water through the door, close it well, turn the handle 15-20 full turns and you can substitute a wheelbarrow to unload the finished solution.
Manual concrete mixer made by hand! Fill it with water "to the eyeballs" to check the tightness and you can knead a test batch of the solution. When your own stages of heavy construction are a thing of the past, your mechanical assistant will become a sought-after guest with neighbors who are just about to do fundamental work.
A concrete mixer is required when construction takes place. Saving on material leads to bad consequences, so it should be carefully chosen.
Concrete is used both in the construction of large buildings and for the foundation of a small room.

Varieties of manufacturing concrete mixers
The simplest option is a concrete mixer that works with the help of human effort. In more difficult variant an electric motor is used. But it is also created from improvised devices.

When making a concrete mixer with your own hands, you should consider a few points:
- The product must be harmless. Particular attention is paid to the converter, which is powered by electricity.
- Investments in the production of concrete mixers should be kept to a minimum.
- Opt for an automatic product, it is easier to use.

Material selection
What is required for the production of a manual concrete mixer? We will need:
- fastening;
- a tube;
- welding device;
- profile;
- grinder;
- bearings;
- flanges;
- barrel of 200 liters;
- metal corners 50 by 50 mm;
- card loops.

To make a concrete mixer with an electric motor, you will need to add several corners, a cut pipe in parts, nodal fittings and the electric motor itself to the list.


Step by step instructions
- Make cuts from the end parts of the barrel. Flanges and a shaft are fixed to them.
- Holes are made on the sides for filling the barrel with concrete and attaching the hatch.
- Card loops will be needed to open the hatch
- Pull the shaft through the slots on the sides of the drum.
- Flanges are attached to the shaft, which will strengthen the walls.
- Corners are required to make a comb. Thanks to her, the mixture cooks faster. Corners are placed with inside barrels, and pins are attached to them.
- Channel, corners and struts are needed for props.
- The parts are docked, and the resulting supports are placed next to the end sides of the barrel.
- Props are dug into the ground for strength with a depth of about 30 cm.
The shaft is fixed on the sides with levers. The size of the handles is chosen so that you can rotate the drum with two hands.

Choose a place for the concrete mixer and place the structure there, next to the hatch there should be an area for storing concrete elements. They are stacked through the hatch and mixed.

Electric motor assembly
For the manufacture of concrete mixers with electric engine fit single phase motor.

If you have engines from old washing machines at home, you can use them as an electric motor for a concrete mixer. average speed rotation should be 20 - 30 rpm.

A motor from gasoline motorcycles is also suitable. It will be convenient in that there is no dependence on electricity.

It must be remembered: For ease of operation of the concrete mixer, you should consider the presence of a mechanism for overturning (it is made from corners) and for movement.

The shaft must rotate through the bearings. The solution is used in a maximum of 7 buckets.

Be smart, consider your own preferences, and you will achieve the desired result and ease of use.

Schemes for creating a concrete mixer
It's pretty easy to put together. For the most simple mechanism take electric drill, bucket and support. At the same time, there will not be much concrete, but this option is suitable for laying a path in the yard or for pouring the floor in the house.

Next, we design the base. The drawing must also contain it. The base must be such that it can withstand both concrete and the concrete mixer itself. It must be strong and stable. An easy option would be a section of timber, a metal base would be stronger.

To control the rotation of the engine, use a gearbox that can be made from belts.

Do not exclude the design stage from the production of a concrete mixer. The process becomes much easier.

We draw conclusions: a concrete mixer is an integral part of construction work, and with little effort it can be done with your own hands, both manual and with an electric motor. Most importantly, do not forget about the drawings, and then the work itself will be done without errors and in a short time!

Photo of concrete mixers made at home


Starting construction, anyone at least once had a question: how to make a manual concrete mixer with your own hands? It's quite a tedious task to knead in a bucket.
- Tub for combination agitator- is not the best option. In the corners, the solution does not mix properly, and for a better solution, you need to rotate for a very long time, consuming electricity. For small portions of the solution, a good tub is obtained from two identical basins. If the stirrer will be used occasionally, you can also take plastic basins fastened around the rim with a metal tape. One of the basins needs to cut the bottom. This bucket will only be tiltable: side discharge is not possible. The neck of this bucket with top unloading must be reinforced with two transverse strips.
- The drive is used in factory-made mixers, it is expensive and you cannot do it yourself: special equipment is needed. For a quality replacement, the following elements will be needed: a flywheel (even an old one from any car engine will do); gear (take in the same place as the previous option); wheel hub - from the same car.
- Wrong choice of tub. It is necessary to choose round, high and not very wide: the distance from the edges of the vibrator to its walls should be equal to its radius.
- Flat vibrator. If you make it from a metal sheet, then this will not excite a certain system of internal waves in the solution. An excellent vibrator will turn out from two folded metal plates or saucers.
- big vibrator. Typically, the vibrator diameter is 20 cm/kW. A wider one will not be able to mix the solution qualitatively.
- Incorrect position of the vibrator. In general, the vibrator should be located along the axis of the tub at a distance equal to its diameter from the bottom. The solution above the vibrator must also be equal to its diameter. Under these conditions, the quality of the solution will be excellent.
- Controlling the duration of the concrete mix. If the mixture has stopped gurgling and stirring, this means the solution is ready. In this case, at least 10 minutes will be enough.
Concrete mixer drawings


People who plan to build their own house make a list necessary fixtures. And it turns out that you can’t do without a concrete mixer. The acquisition of such a device is associated with large cash outlays, so the craftsmen have developed instructions on how to independently assemble such a device. An important factor is the fact that this product is designed for a long and repeated service.
You can be sure that if you carefully follow the instructions, the assembly of the concrete mixer will not take much time. Here are the benefits you get:
- the design involves the use of economical materials (i.e. you do not have to spend a lot).
- even a person without special skills can assemble this product.
- the component parts are not particularly rare. They are easy to find, but be prepared that if they are not in your possession, you will either have to ask friends or buy them.
A homemade concrete mixer includes the following parts: a handle for ejecting concrete, a motor, a frame, a container for concrete. If you intend to transport the concrete mixer from place to place, then you should also assemble an appropriate mobile structure based on a trolley with wheels.
First you need to consider a plan for the upcoming work, namely, draw a drawing of a concrete mixer, decide what components it will consist of.
There is no doubt that a bucket will be part of the concrete mixer. You will have to find a container or vessel of large volume.
“Perhaps it will be one of those barrels that often stand on household plots(suitable for both metal and plastic).
- Sometimes there are also very large, multi-liter pots, which are also suitable for concrete.
- Round capacious tanks, like the "titans" used to make tea on trains.
If you could not find such a container at home or with friends, then you will have to work hard - to make it yourself. At the same time, save a lot of money, because in the store such products are not cheap.
It should be noted right away that for comfortable work concrete mixers will need a capacity of 200 liters. and more. Then you do not have to unload and unload it, but immediately prepare the right amount of the mixture.
 In particularly unfavorable conditions, people manage to make concrete by persistently mixing the mixture with a shovel. But it's hard, exhausting work. After all, the composition of the mixture includes cement, sand and water - the substance turns out to be viscous, and the end result can be worse than if you use a concrete mixer. But some old container (for example, a 200-liter barrel) will become an essential part of the concrete mixer and save you from torment.
Consider two options for making such useful device. So, in the first case, you will rotate the concrete mixer with your own hands. Which, however, is much easier than doing it without this device at all, with a shovel. The second option is more “advanced”, it uses an engine (electric or gasoline), but, accordingly, more costs will have to be applied.
If you decide to make a concrete mixer without additional traction, then you will need a shaft and a barrel. Handles are fixed on both sides of the shaft. You turn these knobs, and the shaft rotates with the barrel of mixture that is skewered on it.
The assembly sequence is as follows:
Now consider the option if you decide to use the engine. 
In this case, the engine torque will go through the belt to the pulley, and from the pulley, fixed instead of the handle, to the shaft. The rest of the details are the same as when using manual traction.
Maybe you'll like it better vertical version this design. To do this, do the following:
- Place the frame with the motor on the base. It will provide turns.
- The barrel turns due to the shaft and special rollers on which it rests.
- In order not to make it difficult to turn the device over, a handle is welded to the axis of the frame, and the frame itself is displayed.
Typically, such an advanced model of a concrete mixer is stored and used for its intended purpose in a special protected place. It can be a garage, a shed, a spacious utility room - the main thing is that there should be electrical wiring.
Not everyone has welding equipment, and not everyone knows the skills of this craft. In this case, the frame is made of an iron corner, and the concrete mixer itself is bolted. If you have an old washing machine, then the engine from it will fit this device. Also, if you find an unnecessary drill with a working 1.3 kW motor, you can use it. A regular petrol engine will do just fine.
frame
The greatest load of our structure will be taken by its frame. After all, when the bucket rotates, a load is formed, which significantly supplements the mass of concrete. At the base of the frame, a steel angle with parameters of about 110-130 mm is required.
If welding equipment is not available, you will have to get by with 27 mm bolts (or better, even larger ones). Using bolts with a smaller caliber is highly discouraged, because. they may not withstand the upcoming heavy loads. But in any case, frame welding remains a more reliable option.
Try to find a 1.3 kW motor. Some craftsmen who do not have such a device manage to connect two motors with identical speeds and torque. But a small failure of one of them can lead to a total breakdown.
Reducer
Rapid mixing of concrete is unacceptable. It is recommended to do about 35 revolutions per minute. Most engines are designed for great speed. Slow engines are extremely rare in specialized stores. So it would be optimal to use a fast engine, supplemented by a gearbox.
Belting
 This is the most economical and easiest way to manufacture a gearbox. You will need pulleys and belts.
If you need to reduce the speed from 1000 to 35 per minute, then you need to divide the actual number by the desired one. So, 1000/35 = 28. Therefore, the diameter of one pulley must exceed the diameter of the second by 28 times.
Suppose the diameter of the small pulley is 3 cm, then 3 * 28. It turns out 84 cm - this should be a large pulley.
chain drive
If you decide to apply chain drive, then the principle of its device is the same as with a belt. The only difference will be that the calculations take into account not the diameter, but how many teeth in the small gear.
Gear
If you have a ring gear from an engine old car, or better - a gearbox, then it can be used for gearing.
The sequence of actions is as follows:
- Flip the barrel.
- Place a hardened steel disc (crown) in the middle of the bottom
- Mark the places you need.
- Set aside the crown and use a drill to make holes in the marked places.
- Fasten the crown with bolts as tightly as possible.
But if it is possible to weld a crown, this will be the best option.
If you have already installed the crown, then to install the gearbox, you must perform the same steps. Those. you make marks, make holes, fasten as tightly as possible with suitable bolts.
The next step: mounting the barrel, inside which the blades are already welded or screwed. Use for this metal corners or sheets.
For reliability, it is required to replace the last pulley or gear wheel with a special gear located on the starter (bendix) of the car. If you have not done this before and do not want to make a mistake, delve into the documentation. It is this gear that is designed to accept and withstand the greatest load when the bucket loaded with concrete rotates.
Steering wheel
If you are making a vertical concrete mixer, then to unload concrete from it, you need to make a steering wheel
Your choice of the following options for its creation
- use a pulley or wheels (you can use old ones)
- a piece of pipe with thick walls will do.
If we have selected a suitable pulley or wheel, then we drill several holes along their circumference (your choice - 6 or 8). The minimum diameter is 6 mm, but it is better to do more. The holes are threaded. Even long bolts can act as handles (but in this case it is necessary to cut their heads and cut threads of more than 10 mm), but threaded rods or metal handles are better suited. They must be screwed into the holes on the wheel or pulley.
The manufacture of a handwheel from a thick-walled pipe is almost the same as in the case of a pulley and a wheel. Sometimes, if the pipe diameter is too small, some handles are set with an offset.
In the event that it is not at all possible to make a steering wheel, then the concrete is removed with a shovel. This is a more time-consuming, but also effective way.
The most important part of the concrete mixer will be the tub. She needs to give Special attention. Well, if you have a suitable container. And if not, you have to do it yourself. It will take a metal sheet 2 mm thick. A development of a large truncated cone is drawn on the back of this sheet, and a development of a small truncated cone is drawn on the back. You also need to draw a circle for the bottom.
Then you need to cut this scan, bend and connect all the components of the tub. Before the final welding, it is necessary to study how accurately the parts fit together.
Machine frame
 You need to determine whether you are counting on long term concrete mixer service or one season will be enough. In the first case, you can assemble a frame from wood, but for a durable construction it is necessary to make it from metal.
If you chose the option with a tree, then prepare the screws - they will be needed during assembly. In addition, you need to find a beam (its parameters to choose from are 10 × 10 or 15 × 15 cm). The joints are carefully glued at the joints.
A concrete mixer that will serve you for many years should have a metal frame. For production, you will need a 45 × 45 mm corner or a channel. As with other operations, welding the base will be a more reliable method of fastening, but in last resort riveting or bolting is suitable.
concrete mixer frame
Whatever type of construction you choose, it is imperative to drill holes in the frame of the concrete mixer for all the devices that provide work.
Engine
As you know, Soviet washing machines, like refrigerators, despite long operation, serve faithfully. Therefore, as an engine for homemade concrete mixer may well serve as a motor taken out of the old washing machine. To ensure an acceptable speed for a concrete mixer, a gearbox is used.
You can also connect a gasoline engine. This option is more mobile, because. does not require electrical wiring. The engine can be taken from a moped. The transmission is carried out using a chain, which can also be taken from a moped or scooter.
Despite providing more mobility, the use gasoline engine associated with risk. If sparks or other accidents hit, an explosion is possible. But also the use electric motor poses a potential hazard.
 To protect yourself and others, remember the following rules:
- because work in a humid environment, it is necessary to check the insulation of the cord.
on the contrary, you cannot check the solution when the tub is rotating. - because the concrete mixer will vibrate during operation, it is necessary to install a reliable stop under the wheels (if we are talking about a mobile version). Otherwise, she may suddenly move out of place, injuring someone.
- the same vibration weakens the tightening of the nuts. Therefore, check them regularly and tighten if necessary.
- Mittens will also come in handy. They will protect you from the solution and the occurrence of allergic irritations.
- do not leave a working concrete mixer unattended. It is unacceptable for children to approach her.
From all this it follows that even such a seemingly difficult unit as a concrete mixer can be made by hand. The main thing is to carefully and responsibly follow the instructions. And since no construction is complete without a concrete mixer, then it can be rented out, which will not only recoup the costs, but also earn.


