No construction project of any scale is complete without a high-quality concrete mixer. The device is not cheap, but it is periodically necessary at the dacha or in the homestead, so many people think about buying it even in cases where the question of global construction is not at issue. You can get out of this situation by building a high-quality concrete mixer yourself. Today we’ll look at several options on how to make this easier and cheaper.
Concrete mixer. Why is it needed?
A homemade concrete mixer with your own hands opens up a lot of prospects for working with concrete and not only with it, but with all building mixtures. By spending some time constructing a device of any level of complexity, you can get a reliable design that will help out not only its owner, but also its neighbors more than once.
It is useful for preparing mortar when laying brick, foam block, stone, and for building foundations different types, for the manufacture of decorative elements and landscape design, For example, garden paths. The price of the most inexpensive concrete mixer is about 8 thousand rubles.
Prices for concrete mixers
On average it will have 20-25 liters of batch, and the power can be from 150 W. Not the best choice even for periodic use, especially for construction. The mixing drum in such concrete mixers is belt driven by an electric motor, and this is the most simple design, which you can buy.
More advanced and productive models are in a more serious price category. About 22 thousand piglets for a concrete mixer with a rim driven mixing drum. Its volume will be from 120 to 140 liters, which is approximately 80 kg of the finished mixture. This is not yet a professional model, but it can already be used for small-scale construction. Now that we are guided by the prices and characteristics of ready-made concrete mixers, we can consider options for building it ourselves, and the design can be chosen depending on how many cubes we need in a ready-mixed concrete mixer.
Choosing a concrete mixer design
For a dacha or personal plot, everyone will be able to choose a device of such productivity that they need it, and not overpay for extra cubic meters of ground air. This is the main advantage of building a concrete mixer yourself. The second advantage is that you can use literally everything you have at hand and build a concrete mixing plant with minimal costs in terms of money and time.
That is why the choice of the device concept remains with the owner. We publish photos of the most interesting and simple devices, but you can always complicate the design.
Required design elements
Be that as it may, any concrete mixer must have the following elements in its design so that it can minimally perform its functions:

How to make a frame and select an electric motor
The frame and frame of a concrete mixer can be made of wood, but there are many questions about the practicality of such a design. As a temporary option, you can use 15x15 timber, but whether this makes sense is up to each individual to judge. The optimal option for durability and strength is a welded frame made from angle or rolled steel of any profile. We have presented several drawings in the photo as an example.
If you decide to install an electric motor, usually you use a motor from a household washing machine. Empirically, it has long been calculated that 25-30 revolutions per minute at the outlet of the gearbox is quite sufficient for high-quality mixing of any mixture. The electric motor from a washing machine can provide good torque, the motor is quite durable, especially if it is used in a gentle operating mode. For more productive and high-volume concrete mixers, three-phase electric motors are used.
Mandatory geometric parameters for a cylindrical type concrete mixer are the inclination angle of the main axis of about 40-45 degrees. In this case, a folding mechanism is needed to unload the finished mixture. There are options for homemade concrete mixers made from a barrel with a horizontal mixing drum. In this case, a hinged hatch is installed in the barrel, which during cooking concrete mixture It closes tightly, and during unloading it opens, and the finished mixture falls into a container prepared in advance.
There are many designs and types of homemade concrete mixers. The main thing when designing and building it is patience and the ability to use basic tools and welding, which is what we wish for you. Good luck to everyone!
Anyone who has even installed a fence on posts has had a question: how to make a concrete mixer with your own hands? It’s a painfully boring and tedious task to shovel the solution in a bucket or trough. And if you need to form a floor screed, then you won’t be able to do it with your hands at all: the “dry”, very viscous solution will begin to set before you “puncture” it to the desired homogeneity. Buying a factory-made one, especially if you build irregularly, is expensive; the equipment is not cheap. Renting will also cost a lot: concrete work does not continue for an hour or two, and you need to give a deposit in the amount of the full cost of a new one.
Meanwhile, a homemade concrete mixer is not God knows what kind of device, and for minor work, including pouring the foundation of a country house, it is quite possible to make it yourself. The time spent will more than pay off by speeding up mixing and improving the quality of work in general: the next portion of ready-made concrete will have time to prepare and be poured before irreversible changes occur in the previous one, reducing the strength of the monolith.
Why can't you use a drill?
Almost everyone has at least once seen how a solution is mixed in a bucket with a drill with a mixer attachment. It would seem that this is the solution! I pulled the drill with the mixer with a clamp to the bracket, and know, change bucket by bucket.
Firstly, the drill is not designed to long work and in this mode it will not last long. But this is not the main obstacle. Anyone who has mixed a solution in this way knows: when mixing, the tool must be moved back and forth and in a circle. Otherwise, when dumping the solution, you will see lumps of sand, and this is an unacceptable defect. Therefore, mechanical forced mixing in a stationary tub is not used in industrial conditions either - the mechanism for moving the mixer turns out to be complex, expensive and unreliable.
How do concrete mixers work?
Since we are talking about mixing methods, it doesn’t hurt to figure out how a concrete mixer generally works. And it will also be useful for a complete understanding of what follows.
There are mainly four methods of mixing cement-sand mortar:
- gravitational;
- forced mechanical;
- forced vibration;
- combined gravitational-mechanical.
With gravity mixing the container with the solution components is tipped over, the solution plops down on itself and is mixed at the same time. You can’t mix a large volume this way; the quality of the finished concrete is only satisfactory, so this method is not used in industry. But you can quickly and easily make a quite decent gravity concrete mixer for yourself, see below.
With vibration mixing the tub remains motionless, and the mixer-kneader excites compression waves in the mass of the initial mixture, which mix and compact the solution very well. The disadvantage of this method is high energy consumption: for 20 liters of solution a 1.3 kW mixer-vibrator drive is required. But the quality of the concrete is exceptional, so vibromixing is used for especially critical structures: hydroelectric dams, etc. In this case, to save energy, the pre-mixed solution is poured into the formwork and “finished” with vibrators on site. But you can make a small vibrating mixer yourself; this will be discussed later.
Forced mechanical mixing not used in its pure form; why - stated above. In the vast majority of cases, mechanical mixing is combined with gravitational mixing: a mixer rotates in a horizontal or inclined tub, or the tub itself rotates with protrusions inside. It is quite possible to make this kind of concrete mixer yourself, and much faster and easier than it seems at first glance. Drawings, if necessary, are at your service via the link, and here we will look at the principles of operation and features of various designs.
It couldn't be simpler

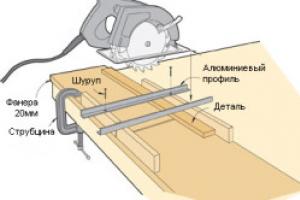
Take a look at the picture. This is the simplest gravity concrete mixer. You can even mix dry mortar on a screed in it: the pipe-axis will cut the mortar when transferring, so some forced mixing also takes place in this machine. And this contraption can be further simplified and reduced in price to the point that an average amateur master who knows the basics welding work, can make one in literally an hour and a half to two.
There is no need to make holes in a rather expensive milk can: leaky milk can will do. We weld the fistula or crack, and fasten the lid like this: we thread a piece of pipe or just a stick into the handle of the lid and pull it tightly to the handles of the tub with a rope or a thick rubber cord; will go torn for attaching cargo to the top trunk of a car.
Turned axles for attaching the tub to the axle are also not needed: we simply weld the weld-in, and for aluminum we weld a couple of suitable pieces of metal to the axle - a rod, strips 6-8 mm thick, and fasten the tub to them with bolts. And you can do without couplings from pieces of pipe, not to mention bearing ones: we cut out U-shaped recesses in the frame posts by welding, the axle will simply lie in them. It will rotate with creaking and jerking, but it will knead properly.
There is only one drawback to such a mixer: it is difficult to rotate, and the kneading lasts from 5 to 15 minutes. depending on the viscosity of the solution. But labor productivity increases at least three times compared to a bucket and shovel, and the quality of concrete for independent construction such as a simple manual concrete mixer produces is quite acceptable.
Forced kneading: parts and components

Proper tub design homemade concrete mixer
The design described above allows you to quickly and with acceptable quality pour the foundation for country house or a barn. If you are planning a larger construction project, you will need forced concrete mixer. They are also available for self-production; there are simpler and more complex designs. Let's look at the individual nodes first.
Tub
A cylindrical tub for a mechanical or combination mixer is, generally speaking, not good. The solution in the corners will not mix properly, or you will have to rotate for a very long time, straining or consuming electricity. An exception is the concrete mixer with a rotating horizontal bucket and comb mixers, described below.
A tub from a barrel, the most accessible one, should be at least slightly rounded: cut by welding and boiled into an “egg” or “pear”, as shown in the figure. For small portions of solution, an excellent tub is made from two basins; galvanized or enameled - it doesn’t matter. If the mixer is used from time to time, plastic ones will also work, fastened along the rim with a curved trough with a metal strip secured with a bolt. The bottom of one of the basins is cut out, and such a tub can only be tilted: it is impossible to arrange a side unloading.
The neck of a tilting top-discharge bucket must be reinforced in any case cross bar; better - two, welded crosswise.
Drive unit
 The ring gear used in factory-made mixers is expensive and you cannot make it yourself: you need special equipment. For a complete replacement, the following parts are needed:
- A flywheel from a car engine, an old one from any car will do.
- The bending gear (with which the starter is connected to the flywheel) comes from the same place.
- Wheel hub from the same car.
What such an assembled drive looks like can be seen in the figure on the right. The axis on which the flywheel and the bucket rotate with it, the root end enters the coupling with ball bearing No. 208, located inside the hub.
This is one option; the second is to weld the hub to the flywheel, and attach a bucket to the hub with bolts behind the bottom. In this case, the bearing coupling is attached to the flywheel, and a second coupling is needed to reinforce the neck of the tub. With a tilting tub with a top discharge, the solution will always get on the bearing of the upper coupling, so this solution is justified only with a horizontal tub with a side discharge and solid bottoms.
If you find a mechanical gearbox with the desired gear ratio, great - just connect it to the axle. For an inclined tub, a direct gearbox is preferable; for horizontal - angular, but here the master is afraid, see for yourself how it will be more convenient for you.
The rotation speed of the tub is 30-50 rpm. At a higher speed, the solution will begin to splash, and at a lower speed it will not mix well. To ensure the required speed, the gear drive is, if necessary, supplemented with a belt drive, as shown in the same figure.
The engine power is taken at the rate of 20 W/l for an inclined rotating tub, 15 W/l for a horizontal rotating one and 12 W/l for a stationary tub and a mixer rotating on an axis. The indicated power is the minimum; a big one, of course, won't hurt. Volume refers to the volume of solution of normal viscosity, not the entire volume of the bucket. That is, if you have a 1.2 kW engine, then in a tub of 200 liters of barrel you can load only 60 liters of regular solution, and 45 liters of dry screed. Therefore, when choosing a vessel for a tub, you should not chase volume; you must first decide on the motor and go from there.
Mixer
The design of the mixer for a homemade mixer is not particularly important. Its design is important for large volume industrial mixers. But location matters.
In homemade mixers, especially with a tub made from a barrel, it is better to weld the mixer to the axis: alternating loads on a thin-walled vessel will not benefit its durability. The exception is that in everything except the complexity of manufacturing, the comb mixer is an excellent one.
Designs of homemade concrete mixers
Simple mechanical

Concrete mixer open type
A simple concrete mixer with forced mechanical mixing is shown in the figure. Its advantage compared to the one described above is its larger volume. The drive is not necessarily electric; it can also be manual. Unloading - lateral tilt of the tub.
The main drawback is common to mixers with a cylindrical bucket: poor mixing in the corners. The second drawback is the spraying of the solution at speeds of more than 35/min. It can be eliminated by welding the cut part of the barrel into place after assembling the mixer and cutting a hatch in it.
The duration of mixing the usual solution is 5 minutes; dry – 12 min.
Video: horizontal mortar mixer from a barrel
Combined horizontal with combs

This stirrer can also be manual or electric. There are two advantages, and very significant ones: high homogeneity and, accordingly, quality of concrete and speed of mixing. This DIY concrete mixer from a barrel produces concrete of excellent quality, not inferior to the best industrial designs, and the mixing speed is determined not by time, but by the number of revolutions: turn it 3-4 times, and the solution is ready.
There is only one drawback: the complexity of the design. Even a manual one consists of several dozen items of parts. Names, not pieces. The unloading hatch requires special attention during manufacturing: the card loops, latches and seal for it must be very strong and reliable. However, for cases where it is necessary to perform a significant amount of work in a limited time in places without power supply, this is perhaps an indispensable option. Concrete mixers of this type are produced by industry.

Construction of a concrete mixer with a tilting bucket
"Real Electric"
The electric concrete mixer of the most common design, which is most often copied by amateur craftsmen, does not require any special explanation. Its diagram is shown in the figure. Many designs differing in details are described, and detailed drawings are also easily available, so we will only give some explanations:
- The bottom and neck of the tub must be reinforced with cross-welded strips.
- It is better to make the tub rotating along with the axis: this complicates the design of the frame, but eliminates the need to seal the shaft in the bottom of the tub, which is why homemade mixers most often do not last long.
- The best mixer for such a mixer is a frame type, welded to the axle.
Video: homemade “electric mixer” for 180 liters
Vibrating
Many home craftsmen who have a 1-1.3 kW hammer drill with manual forced (not requiring the working element to be pressed against the wall) activation of the impact mechanism tried to make vibrating concrete mixers, but most often the design turned out to be unsuccessful.
Typical errors are as follows:

Design of vibrating concrete mixer
- Wrong choice of tub. It must be round, high enough and not very wide: the optimal distance from the edges of the vibrator to the walls is approximately equal to its radius.
- Flat vibrator. A metal sheet vibrator will not excite in solution the desired system internal waves. The vibrator profile should at least approximately correspond to that shown in the figure. A good vibrator is made from two plates or saucers put together; preferably metal ones.
- The vibrator is too big. Vibrator diameter – 15-20 cm/kW. That is, a 1.3 kW preforator will pull a vibrator from 25 cm plates. A wider one, even if it twitches with the eye, will not “rock” the solution.
- Incorrect placement of the vibrator. The vibrator should be located along the axis of the tub at a distance of approximately its diameter from the bottom. The level of the solution above the vibrator should also be approximately equal to its diameter.
If the specified conditions are met, the quality of the solution is excellent. Control the duration of the kneading - on the surface of the solution. It stopped gurgling and moving, waves began to appear - the solution is ready. Not so great good cement or sand, it may not reach the waves. In this case - 10 minutes minimum.
Conclusion
It is not difficult to make a concrete mixer with your own hands, and the speed of work increases much even with the simplest mixer. And, of course, it’s more pleasant to sip tea from a thermos while kneading than to strain yourself with a shovel. Not from a seagull or from a thermos - it is categorically not recommended: the quality of work falls catastrophically even with the most advanced technology.
(No ratings yet)
This article is suitable for any amateur builder who, in his free time from his main job, is trying to arrange a home for himself. summer cottage. In construction you cannot do without concrete. Even if you make a house out of wooden beams, you will definitely need a reinforced concrete foundation or piles. And after kneading the concrete solution in a bucket or trough with your hands a couple of times using a drill or shovel, an inquisitive mind begins to look for less labor-intensive methods.
The easiest way to have a beautiful front lawn
Of course you saw perfect lawn in the cinema, on the alley, and perhaps on the neighbor’s lawn. Those who have ever tried to grow a green area on their site will no doubt say that it is a huge amount of work. The lawn requires careful planting, care, fertilization, and watering. However, only inexperienced gardeners think this way; professionals have long known about the innovative product - liquid lawn AquaGrazz.
There are several options. You can order home delivery and the concrete mixer truck will deliver it the next day required amount cubic meters Perhaps this option is not entirely economical. More industrious owners can buy a concrete mixer; it is compact and equipped with an electric motor for mixing the solution. Throw cement, sand, water and crushed stone into it in the required proportions, and only have time to empty the concrete mixer by pouring the solution out of it. It's cheaper, but you still have to buy such a concrete mixer.
But there is another option: make a concrete mixer with your own hands. Yes, this is possible if there are drawings. You will spend time on this, but it will more than pay off for you. Moreover, the device is not as complicated as it seems at first glance. The concrete mixer has a simple principle:
- there is a tub or something like a flask in which the solution is mixed;
- drive, that is, the mechanism due to which the tub rotates and mixing occurs;
- the frame that holds it all together.
The concrete mixer has additional small parts, which will be discussed below, but these three are the main ones. Now let's delve into the nuances of making a homemade concrete mixer.
What types of concrete mixer are there?
Based on the mixing method, concrete mixers are mainly divided into four types: gravity, mechanical, vibration and combined. Let's tell you a little about each one so that you have a little idea about it and so that you can choose the one that suits you. After all, it can be used for absolutely different needs: basically this is the foundation (of a house, a fence and much more), but various building materials can be cast from it into shape. Blocks made of cement, wood concrete and other things.
Gravitational
A unit of this type is the simplest option both to manufacture and to use. Do-it-yourself manual concrete mixer, the tub of which simply rotates along an axis, and the components of the solution are mixed under the influence of gravity. This option is not suitable for large volumes because it does not provide good mixing. But if you have always mixed the solution in small quantities and did not need more, then this option may well be suitable.

Mechanical
Such a homemade forced-action concrete mixer in its pure form is rarely used because it has a number of disadvantages. It looks like this: a barrel in a horizontal position with a hole at the top along its entire length. The axis runs through the center of the barrel, and metal parts are welded to it, which mix the solution. The hole does not allow the barrel to be rotated in only one direction and you have to swing it from side to side. Compared to gravity, it has a larger volume, which is a plus. The disadvantages are: poor mixing in the corners and splashing of the solution with high vibrations.
Sometimes mechanical concrete mixers are made absolutely motionless; only the axis inside it moves, to which metal dividers are welded. This design is well suited for the manufacture of wood concrete blocks. We'll talk about this below.

Vibrating
Making this type of manual concrete mixer with your own hands is not such a simple matter. The basic principle is that the solution remains stationary and all the work of mixing is assigned to the vibrator. There are many nuances here, which, if not taken into account, will only lead to wasted time.
The tub must be round, not wide, but high, similar to the Soviet shape washing machine. The vibrator must be of a strictly defined shape, similar to two low plates placed together. Actually, at home, two metal plates - the best option. The vibrator should not be too large; its size depends on the volume of the mixing vessel. If you overdo it in choosing the size, then even with visible work it will still not mix. And the last thing: the location of the vibrator inside the vessel is strictly along the axis, the distance to the bottom of the barrel is equal to the diameter of the vibrator.
If all these conditions are met, the ideal solution from your barrel is guaranteed. But if the quality of sand or cement is poor, you will have to mix it a little longer. One drawback: high power consumption. And under no circumstances try to use a hammer drill as a drum vibrator. Many craftsmen have tried to make a concrete mixer, but most often they fail.

Combined concrete mixer
This type of concrete mixer is a combination of gravity and mechanical installation. The solution rotates in a horizontal or inclined plane, and protrusions are made inside the vessel itself, which further help to mix the components. They are usually made from metal plates of various shapes, which are welded to inside flasks. This type of concrete mixer allows you to mix a large volume of solution, and the mixing quality is also good. It will not be possible to weld the plates into a concrete mixer a lot of work, therefore this type is the most widely used. In the future, we will talk specifically about this type of concrete mixers.
We make a concrete mixer
The theory is over. Let's start practicing. Now we’ll take a closer look at how to make a concrete mixer with your own hands. This process must be divided into several stages. We know that a concrete mixer consists of three main components: the mixer bucket, the drive and the frame. If everything is clear with the drive, it can be either manual or mechanical, when a concrete mixer uses a gearbox and an electric motor, then we will dwell on the manufacture of the bucket and frame in more detail. If you have drawings at hand when working, that will be great.
Making a tub
The most popular item used as a mixing vessel is standard 200 liter barrels. With some reservations, it is suitable for any type of homemade concrete mixer. You can use the washing machine body if it is strong enough. But that would be too simple; our goal is to make the tub ourselves.
Firstly, the material. For walls we take metal with a thickness of at least 2 mm, for the bottom - at least 5 mm. Secondly, the form. It is cylindrical, but at the top in the neck area it should taper into a cone.
Let us describe the sequence of actions point by point:
- We make a hub flange. You can find its drawings and make it yourself, but it is better to buy a ready-made one. The part is important, but not easy to manufacture.
- We make the bottom from sheet steel with a thickness of at least 5 mm. We drill holes in the very center and attach the hub flange.
- We cut out five main parts of the body from metal 2 mm thick - the shell (it is rolled up to form a cylinder) and four petals, which are then fastened together to form a cone.
- We connect the bottom, shell and cone using welding machine and get the base of the barrel for mixing.
- We strengthen the neck so that it does not become deformed later. To do this, we weld a 10 mm reinforcing rod to its circumference.
- We weld cutters crosswise inside the barrel. Usually two or three are enough. They are also made from reinforcement, but more durable, or from metal plates. The main thing is to bend them at a right angle. They will mix the solution. In addition, due to them, a homemade concrete mixer will be stronger.

When the mixer tub is ready, you can begin making the frame.
Frame making
The frame is the support of the entire structure. The tub, drive and gearbox are attached to it. For good stability, the support legs are welded, and to make it easy to move the concrete mixer, even when filled with mortar, wheels are installed. The design of the frame itself can be different, the main thing is that stability is maintained during operation of the entire device. For this purpose, many craftsmen adapt various unnecessary metal parts collected from the corners of their summer cottage.

- The concrete mixer is based on a T-shaped structure, due to which the homemade concrete mixer will stand stably on the surface. The first post is welded vertically to it.
- Welded to the second rack cross beam, along the edges of which wheels are attached.
- Both racks are fastened together at the bottom with a beam (this makes the structure more stable) and at the top with a subframe, which will subsequently serve as the basis for attaching the tub.
- The frame is reinforced with an inclined stand, to which the capacitor box and starter are attached. These two devices are used to turn on the rotation mechanism.
- The subframe is made of two pipes and a corner. It looks like a double frame held together by lintels.
- The electric motor and gearbox are installed on the subframe.
- The hub flange, which is already attached to the tub, is placed on the gearbox. To fix the mixer, a key is used and it is finally secured with a bolt through the hole on the shaft.
- A handle is attached to the stretcher, which allows you to tilt the mixer tub at different angles.
- Finally, the frame is protected from scale and coated with metal paint. The tub can also be painted, but only on the outside, there is no need to paint the inside of the barrel.
Now your DIY concrete mixer is ready to use! You can pour a foundation, install pillars, fill molds for wood concrete building blocks, and much more.

Drive for a homemade concrete mixer
In practice, it often happens that the master already has an electric drive and gearbox of a certain power, and the concrete mixer and its parameters are selected based on this. The ratio of the volume of mixed components and the power of the electric motor should be approximately: 20 W per 1 liter of solution.
That is, if you have a 1 kW engine at your disposal, then the maximum volume of the mixture should be 50 liters. Considering that the tub needs to be loaded at 30-40%, its approximate volume can be from 125 to 160 liters. For standard 200 liter barrel A gearbox with a 1.2 kW electric motor is suitable; the load will be equal to 60 liters of solution.

The number of revolutions is also important. Optimal value: from 30 to 50 rpm. If you do more, the solution may splash. You can do less, of course, but then the mixing process will be long and excess electricity will be consumed.
If there is no electricity
There are times when you need to start construction on a site where electricity has not yet been installed. Then we don’t need the engine, but we will use manual force. The sequence of actions during manufacturing remains absolutely the same, only the drive is replaced by two handles - on one side and the other. The disadvantage is that you have to put more effort into mixing and it will take longer. But for short and small jobs this option can be considered quite acceptable.
Washing machine tub
You can make a tub from a washing machine if you have one lying around from Soviet times. Moreover, the body of almost any washing machine is suitable for this. You just need to solder all the holes in the drum of the old washing machine. A machine with both horizontal and vertical loading is suitable for this. There is one more feature of this option. If the amount of mortar that you are going to mix in the future concrete mixer is not too large, then the washing machine engine will be quite suitable as a drive.

Using a concrete mixer
The concrete mixer is rarely used in one place. Often you have to carry it or roll it around the entire area, so prepare an extension cord of sufficient length in advance. The components are loaded into a tub with an inclination of 20-40 degrees in the following order: water, cement, sand, and lastly crushed stone, gravel, and expanded clay are poured.
For complete mixing concrete mortar or a mixture of wood concrete, 3 to 5 minutes is enough, then the tub is tilted with the help of a handle, and the solution is poured into the place prepared for this. You can immediately add a new portion of components and continue working.
After a day of work, the device, all its connections and seams must be thoroughly washed. Usually this happens in the evening, when there is not much strength left and you want to leave everything, because the next day you will have to get it dirty again. Don't be lazy. Even in such a situation, it is better to wash the concrete mixer, this will increase its service life.
Wood concrete blocks consist mainly of two components. In addition to various chemical additives, this sawdust and wood chips, as well as the hydraulic binder Portland cement. Such blocks are valuable because houses made from them retain heat well. Therefore, wood concrete blocks - perfect solution for wall construction warm home. As for the properties of wood concrete, it is low thermal conductivity, increased bending strength, does not support combustion, and is easy to process.

Imagine that everything worked out for you and now you are the owner of a very useful thing in construction - a concrete mixer. But so that its service life does not end with just a foundation or a fence, and the thing serves you for a long, long time, you will have to follow safety rules and take care of it:
- Pay close attention to cables and contact connections. They must be securely insulated. The work takes place in conditions of high humidity and splashing water, so the requirements of electrical safety rules come first;
- The vibration that accompanies the work of a concrete mixer relaxes threaded connections your makeshift tub. Therefore, periodically check them and tighten them. And don’t forget about welds, they can also break;

- Before turning on the device, make sure it is stable. All standard stands should rest firmly on the ground, and it is advisable to install wheel chocks under the wheels;
- It is impossible to check the quality of the solution while the concrete mixer is operating; cases of serious industrial injuries are not uncommon;
- Use skin and eye protection;
- Never leave a running concrete mixer unattended.
Conclusion
In conditions of total economy, when the budget for construction work is limited, and this is no wonder these days, many save on quality building materials or using the services of third-party masters. But there are craftsmen who also save on construction equipment. Of course, do a drill or electric plane- a dubious occupation. But the concrete mixer, despite its apparent complexity and bulkiness, is ideal for this, even for home production wood concrete blocks. You could see this in our article.

Let's summarize. A small number of parts, some of which can be found right on your site. A homemade concrete mixer has simple diagram, drawings and manufacturing sequence. You also need a few tools: a grinder, welding, work with a drill, and possibly a soldering iron. From Supplies: bolts, nuts, washers, a metal sheet and a corner. The main thing is to clearly define in advance why you need it and what you want to see as a result of your work. Then your concrete mixer will not be inferior to any industrial production, even if it is made from the body of a washing machine.
With a limited budget, buying equipment that will only be needed for one construction project is unprofitable. If companies offering tool rental have not yet opened in the neighborhood, a DIY concrete mixer will be a great way to save money! If you approach homemade device with care, it will last for many years.
Types of concrete mixers
Having previously studied the mechanism of operation of concrete mixers and their characteristics, it will be possible to select a design suitable for the needs of a specific construction. After all, why complicate your work if you can get by with a simple mechanical device?

On the other hand, by loading the concrete mixer to capacity, it will not be possible to finish pouring the foundation faster - this will lead to a banal overload of the engine and its rapid failure.
Mechanical or electrical?
When choosing the design of the future “assistant”, you should immediately decide on the way it will work:
- mechanical concrete mixers - work from a manual drive, when mixing large quantity concrete, it takes two people to turn the gate;
- electric concrete mixers - work from the network, but connecting the motor requires good knowledge of auto mechanics.
If several strong and hardy people are involved in a construction site, you can get by manual concrete mixer. The mixture ingredients are loaded either simultaneously or alternately. The only inconvenience is that designs with a movable barrel, rather than an internal shaft, do not allow adding water during the mixing process. You must stop the barrel, open the hatch and fill it with water. The hatch closes and the mixture is stirred again.

Electric concrete mixers allow you to mix large volumes of concrete in the shortest possible time, and one person can do the job perfectly. Please note that high power motors require three-phase network, therefore, when choosing the tank volume, you should calculate the motor power in advance. If only a 220 V line is connected to the yard, you will have to forget about heavy solutions.

Forced, gravitational or vibration?
Its design will also depend on the operating principle of the concrete mixer:
- forced-action concrete mixers are distinguished by a stationary container in which blades mounted on a shaft rotate;
- gravity concrete mixers mix concrete by rotating the container itself, in which the blades are rigidly fixed to the walls;
- Vibrating concrete mixers cannot boast of great productivity, but they provide a high-quality and homogeneous mixture without bubbles.
At the same time, both gravitational and forced-action concrete mixers can be either mechanical or electrical. The whole difference is that a mechanical forced-action concrete mixer has a horizontal axis, while an electric one can have a vertical one.

To make them you will need a metal container. The most basic option is metal barrel with walls with a thickness of 2.5 mm.
Vibrating homemade concrete mixers are available to every hammer drill owner. And although it won’t be possible to fill the foundation with their help, it is quite possible to make a poured floor in the bathroom or mix mortar for tiles. At the same time, the design couldn’t be simpler and does not require direct human participation. So even a woman can handle the job.
Concrete mixer volume
An important selection criterion is the capacity of the future concrete mixer. For example, for pouring a foundation, a minimum capacity of 200 liters will be required. It should be taken into account that the finished mixture will be 15-25% less - depending on the loading capabilities.

This volume of concrete can be mixed manually, although it is quite difficult - your hand will get tired.
The homemade device has another significant drawback - the mixture is often discharged in full. Therefore, it is better to take care of a wheelbarrow of appropriate capacity in advance. If it is possible to make a partial reset mechanism, it is better to take the time to create it. This will significantly simplify the operation of capacious electric concrete mixers and will allow two people to work, loading two wheelbarrows at a time.
Drawings and design of simple concrete mixers
If the construction volumes are small, you can get by with simple concrete mixers, the creation of which will not require serious labor and financial costs.
Vibrating concrete mixer from a hammer drill
The presence of a mixer attachment is mandatory for any construction work. But holding the drill while it mixes the solution in the bucket is difficult and time is wasted. If you have a hammer drill with manual activation of the impact mechanism, you can quickly make a vibrating concrete mixer:

- You will need a hammer drill with a power of 1-1.3 kW. Less powerful ones will be ineffective.
- A vibrator is being manufactured - the main operating part of the concrete mixer. An incorrectly made vibrator simply will not mix concrete. Its shape should resemble a biconvex lens - flat edges and a convex middle. For example, these could be metal plates folded together and fixed. The diameter of the disk is calculated based on 20 cm per 1 kW. For a 1.3 kW hammer drill you will need a vibrator with a diameter of 25 cm.
- A round container is selected. The distance from its walls to the vibrator should be equal to its radius. So, for a vibrator with a diameter of 25 cm, you will need a container with a diameter of 50 cm.
- The bracket for the hammer drill is installed. The position of the vibrator is calculated so that its distance to the bottom is equal to its diameter, in this example it is 25 cm. The amount of solution above the vibrator should be the same.
The readiness of the solution when operating such a concrete mixer is determined by the absence of rising bubbles and the formation of small waves on the surface. If the cement or sand is of poor quality, the solution may not form waves. Then the mixture is ready when it stops moving and gurgling.
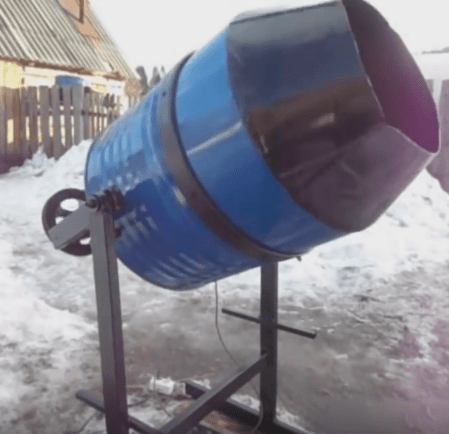
Manual concrete mixer made from a barrel

You will need a two-hundred-liter metal barrel itself, metal pipe 2-3 cm in diameter, flanges, grinder and welding machine:
- A loading hole and two opposite holes for the pipe, which will be the axis, are cut in the barrel. The axle can be threaded either through the center of the barrel or diagonally. In the second case, the mixture will be mixed more efficiently.
- From the inside of the barrel, 2-3 blades are welded to the walls so that the mixture does not stick to the walls and mixes better. The blades should run along the entire barrel, but not lie close to the walls - otherwise the solution will constantly accumulate in the seams.
- A pipe is threaded through, its ends are welded and secured with flanges.
- A stand for a concrete mixer is being manufactured. Its height should be such that it is convenient to load the ingredients of the mixture without raising them too high, but also so that you do not have to get in the way by bending over. On the supports under the axle you need to make oarlocks that will allow the axle to rotate freely. Can be used as a hollow tube larger diameter, and bearings.
- It is imperative to provide a wide, strong and stable base connecting the legs of the supports. This will prevent the concrete mixer from wobbling during operation.
- The levers are welded to the axle. Do not forget that they should be located opposite each other. The longer the lever, the easier it is to move the barrel. But a lever that is too long is not convenient to use, so you should stick to the golden mean.
- The loading hatch lid must be tightly closed so that the mixture does not leak out. You can cut out the cover bigger size from the same barrel and glue it around the perimeter with thick rubber. Or you can use part of the same barrel, left over from cutting out the loading hole. To do this, you just need to weld a centimeter-long metal strip along the edge and also seal it with rubber.


The open type concrete mixer has a similar design. Only instead of a moving barrel, blades rotate inside, which are also driven by human effort. To make it, you will need the barrel itself, and pipes of round and rectangular cross-section. The barrel is laid on its side and the top is cut off. It is better to leave as much of the barrel as possible so that more concrete can be mixed.
Holes for the shaft are cut on the sides. But, unlike a gravity concrete mixer, the blades are welded onto the shaft itself. You can use any parts, even blades from a combine!

The mixture is also unloaded by turning the entire barrel over.
Such concrete mixers are very a budget option, but requires the constant participation of two workers. If you have to work alone, you will need a device with an electric motor. For example, the open type option can be quickly improved by connecting a motor to it.

Electrically driven “factory” concrete mixers
Without having confident welding skills, it is better not to try to replicate factory models of concrete mixers yourself. But if you have an experienced neighbor, you can make excellent equipment from almost nothing! Moreover, such a concrete mixer will serve for more than 10 years, helping in the construction of the entire holiday village.

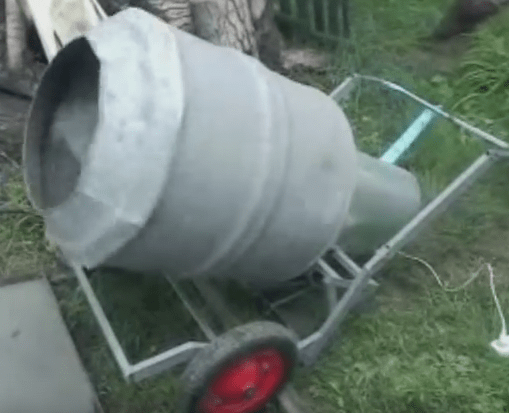
Homemade gravity concrete mixer made from scrap metal

After this, you will have to travel to recycling collection points and auto dismantling yards in search of the necessary parts:
- metal sheets with a thickness of 2.5 mm for the walls and 5 mm for the bottom of the pear;
- a flywheel from a car, for example, from a Volga or MAZ, a hub and a bendix - for the pear rotation mechanism;
- bearings for tipping the pear (you can get by with the “pipe-to-pipe” system, generously lubricating the rowlock);
- metal pipes of square section and different diameters - for the base, seat and a swivel wheel.
When all the materials have been collected, you can proceed directly to the manufacture of a concrete mixer:
- The body elements are bent and welded together. You can bend steel with a sledgehammer, even if the individual parts do not turn out perfectly even, when welded together they will take the desired shape.
- While the bulb is not welded together, a rotation mechanism is attached to the lower part, cut from 5mm steel. It is advisable to make it removable - it is easier to transport a collapsible concrete mixer.
- The parts of the pear are welded together. First, the central and lower parts are combined. To do this, the edges of the central rim are cut and bent inward to limit the exit of the lower part. The lower part is inserted through the top into the central rim and, using tapping with a sledgehammer, is pressed all the way down. Once the edges are aligned, they can be welded.
- The upper part of the pear is lowered into the central one, the edges of the central rim are also trimmed and bent inward. Using a nail puller, the top is also “picked out” until it stops and is also welded.
- Blades are welded inside the pear to help mix the mixture. To prevent the solution from accumulating in the seams, the blades are attached at a short distance from the walls.
- You can start making a seat that will ensure the pear is tipped over. Considering the large weight of even an empty container, you need to take care of the high reliability and strength of the frame.
- The tipping mechanism must be done on a flywheel with a gear - so even one person can tip over a full container. You can weld a hex wheel or fit any other one.
- A gearbox is made that will transmit torque from the engine to the pear. The pulleys on the shaft and motor are designed to produce up to 25 revolutions of the pear per minute.
- To prevent large parts of the mixture from getting into the rotation mechanism, a strip can be welded over the crown, but this step is not necessary.


In principle, the concrete mixer is ready. If desired, it can be painted to protect the metal from corrosion, although during operation it will still acquire a classic gray color.
Forced type concrete mixer made from a tin pan

If you don’t have it, you can order a pan with a diameter of 60 cm and a depth of 50 cm from a familiar tinsmith. After this, all that remains is to fit the mechanism, blades and make a hatch:
- The center of the container is marked - this is where the shaft will be located. A hatch is cut for unloading the mixture. It’s easier to cut a rectangular one, but then the whole mixture will break into a wheelbarrow. It is better to make a rotating semicircular hatch.
- To do this, a rod is welded in the center of the cut out semicircle, on which the hatch will rotate. To prevent the mixture from leaking out, a strip is welded above the cut of the hatch, under which the curtain will move.
- In an inverted state, a motor with a gearbox is attached to the installed bearing. To securely fix the engine and ensure the required belt tension, the engine is installed on slats welded to the bottom of the container.
- To strengthen the frame of a container made of 2 mm thick steel, a rim of steel rod or pipe must be welded along the upper edge. You can also make stiffening ribs on the sides and bottom of the container.
- Once the wheels, support and rotation mechanism are installed, the entire structure can be turned over. The blades are attached to the shaft and everything is fixed with one bolt - so that the structure can be easily disassembled. It is important to correctly think through the position of the paddle blades - one should remove the solution from the walls, the second should separate it from the bottom, and several more should mix the middle.
- You can get by with a construction made from scrap and a cross from a plumbing flange. If the blades are made movable, their position can be adjusted depending on the type of mixture.


The forced action concrete mixer is ready! You can mix almost any mixture in it, make them liquid or dense, add crushed stone of large and small fractions. The same concrete mixer, but horizontal type, can be done based on the drawing.

The process of assembling a concrete mixer from a steel barrel is clearly shown in the video:
This is one of the simplest ways to make the necessary construction equipment with a minimum of cost!
People who are planning to build a house for themselves make a list necessary equipment. And it turns out that you can’t do without a concrete mixer. Purchasing such a device involves a lot of money, so craftsmen have developed instructions on how to assemble such a device yourself. An important factor is that this product is designed for long and repeated service.
You can be sure that if you follow the instructions carefully, assembling the concrete mixer will not take much time. Here's a list of the benefits you get:
- the design involves the use of economical materials (i.e. you won’t have to spend a lot).
- even a person without special skills can assemble this product.
- the component parts are not particularly rare. They are not difficult to find, but be prepared that if you don’t have them in your possession, you will have to either ask friends or buy them.
A homemade concrete mixer includes the following parts: a handle for throwing concrete, a motor, a frame, and a container for concrete. If you intend to transport a concrete mixer from place to place, then you should also assemble a corresponding mobile structure based on a cart with wheels.
First, you need to think about the plan for the upcoming work, namely, draw a drawing of a concrete mixer, decide what components it will consist of.
There is no doubt that part of the concrete mixer will be a bucket. You will have to find a container or vessel of large volume.
— Perhaps it will be one of those barrels that often sit on personal plots(both metal and plastic will do).
— Sometimes there are very large, multi-liter pans that are also suitable for concrete.
— Round, capacious tanks, like the “titans” used for making tea on trains.
If you couldn’t find a similar container at home or with your friends, then you’ll have to work hard to make it yourself. At the same time, you will save a lot of money, because such products are not cheap in the store.
It is immediately worth noting that for comfortable work concrete mixers will require a capacity of 200 liters. and more. Then you don’t have to unload and unload it, but immediately prepare the required amount of the mixture.
 In particularly unfavorable conditions, people manage to make concrete by persistently mixing the mixture with a shovel. But this is hard, exhausting work. After all, the mixture contains cement, sand and water - the substance turns out viscous, and the end result may be worse than if you use a concrete mixer. But some old container (for example, a 200-liter barrel) will become an essential part of the concrete mixer and will save you from suffering.
Let's consider two options for making such useful device. So, in the first case, you will rotate the concrete mixer with your own hands. Which, however, is much easier than doing it without this device at all, with a shovel. The second option is more “advanced”; it uses an engine (electric or gasoline), but, accordingly, more costs will have to be incurred.
If you decide to make a concrete mixer without additional traction, then you will need a shaft and a barrel. Handles are attached to both sides of the shaft. You rotate these knobs, and the shaft rotates along with the barrel of mixture mounted on it.
The assembly sequence is as follows:
Now consider the option if you decide to use an engine. 
In this case, the engine torque will go through the belt to the pulley, and from the pulley, fixed instead of the handle, to the shaft. The rest of the details are the same as when using manual traction.
You might like it better vertical version this design. To do this you need to do the following:
- Place the frame with the motor on the base. It will provide turns.
- The rotation of the barrel occurs thanks to the shaft and special rollers on which it rests.
- To avoid the difficulty of turning the device over, a handle is welded to the axis of the frame, and the frame itself is removed.
Typically, such an advanced model of concrete mixer is stored and used for its intended purpose in a special protected place. It could be a garage, a barn, a spacious utility room - the main thing is that there is electrical wiring there.
Not everyone has it welding equipment, and not everyone knows the skills of this craft. In this case, the frame is made of an iron angle, and the concrete mixer itself is bolted. If you have an old washing machine, then the motor from it will fit this device. Also, if you find an unnecessary drill with a 1.3 kW working motor, you can use it. A regular gasoline engine will also work.
Frame
 The greatest loads of our structure will be borne by its frame. After all, when the tub rotates, a load is generated that significantly supplements the mass of concrete. At the base of the frame, a steel angle with parameters of about 110-130 mm is required.
If welding equipment is not available, you will have to make do with 27 mm bolts (or better yet, even larger ones). It is highly not recommended to use bolts of a smaller caliber, because... they may not be able to withstand the heavy loads ahead. But in any case, welding the frame remains a more reliable option.
Try to find a 1.3 kW motor. Some craftsmen who do not have such a device manage to connect two motors with identical speeds and torque. But a small failure of one of them can lead to a general breakdown.
Gearbox
Rapid mixing of concrete is unacceptable. It is recommended to do about 35 revolutions per minute. Most engines are designed for higher speed. Slow engines are extremely rare in specialized stores. So it would be optimal to use a fast motor complemented by a gearbox.
Belting
 This is the most economical and simplest way to manufacture a gearbox. You will need pulleys and belts.
If you need to reduce the speed from 1000 to 35 per minute, then you need to divide the actual number by the desired one. So, 1000/35 = 28. Therefore, the diameter of one pulley should be 28 times greater than the diameter of the second.
Suppose the diameter of a small pulley is 3 cm, then 3*28. It turns out 84 cm - this is what a large pulley should be.
Chain transmission
If you decide to use chain transmission, then the principle of its design is the same as with a belt one. The only difference is that the calculations take into account not the diameter, but the number of teeth in the small gear.
Gear
If you have a ring gear from an engine old car, or better yet, a gearbox, then it can be used for a gear drive device.
The sequence of actions is as follows:
- Turn the barrel over.
- Place a hardened steel disk (crown) in the middle of the bottom
- Mark the required places.
- Set the crown aside and use a drill to make holes in the marked places.
- Screw the crown as tightly as possible with bolts.
But if it is possible to weld the crown, this would be the best option.
If you have already installed the crown, then to install the gearbox you need to carry out the same steps. Those. you make marks, make holes as tightly as possible and secure with suitable bolts.
The next step: installation of the barrel, inside of which the blades are already welded or screwed. Metal corners or sheets are used for this.
For reliability, it is necessary to replace the last pulley or gear with a special gear located on the starter (Bendix) of the car. If you haven’t done this before and don’t want to make a mistake, dig into the documentation. It is this gear that is designed to take and withstand the greatest load when the bucket loaded with concrete rotates.
Steering wheel
If you are making a vertical concrete mixer, then to unload concrete from it you need to make a steering wheel
You have the following options to create it:
- use a pulley or wheels (you can use old ones)
- A piece of pipe with thick walls will do.
If you have selected a suitable pulley or wheel, then drill several holes around their circumference (your choice - 6 or 8). The minimum diameter is 6 mm, but it is better to do more. The holes are threaded. Even long bolts can act as handles (but in this case you need to cut off their heads and cut threads of more than 10 mm), but threaded rods or metal handles are better suited. They must be screwed into the holes on the wheel or pulley.
Making a steering wheel from a thick-walled pipe is almost the same as in the case of a pulley and wheel. Sometimes, if the pipe diameter is too small, some handles are installed offset.
If it is not possible to make a steering wheel at all, then the concrete is removed with a shovel. This is a more labor-intensive, but also effective method.
The most important part of the concrete mixer will be the tub. She needs some attention Special attention. It's good if you have a suitable container. And if not, you have to do it yourself. You will need a metal sheet 2 mm thick. On the back of this sheet a development of a large truncated cone is drawn, and on the back - a development of a small truncated cone. You also need to draw a circle for the bottom.
Then you need to cut out this development, bend it and connect all the components of the tub. Before final welding, it is necessary to study how accurately the parts fit together.
Unit frame
 You need to determine: do you count on long term concrete mixer service or one season will be enough. In the first case, you can assemble a frame from wood, but for a durable structure it is necessary to make it from metal.
If you choose the option with wood, then prepare self-tapping screws - they will be needed during assembly. In addition, you need to find a beam (its parameters can be chosen from 10×10 or 15×15 cm). The connections are carefully glued at the joints.
A concrete mixer that will serve you for many years should have a metal frame. For production you will need a 45x45 mm corner or channel. As with other operations, welding the base will be a more reliable method of fastening, but in as a last resort Riveting or bolting is suitable.
Concrete mixer frame
Whatever type of construction you choose, you must drill holes in the frame of the concrete mixer for all devices that ensure operation.
Engine
As you know, Soviet washing machines, like refrigerators, despite their long operation, serve faithfully. Therefore, a motor removed from an old washing machine can serve as a motor for a homemade concrete mixer. To ensure an acceptable speed for the concrete mixer, a gearbox is used.
You can also connect a gasoline engine. This option is more mobile, because does not require electrical wiring. The engine can be taken from a moped. The transmission is carried out using a chain, which can also be taken from a moped or scooter.
Despite providing more mobility, the use gasoline engine involves risk. If there is a spark or other accidents, an explosion is possible. But using an electric motor also carries potential dangers.
 To protect yourself and others, remember the following rules:
- because If you are going to work in a damp environment, you need to check the insulation of the cord.
on the contrary, you cannot check the solution when the tub is rotating. - because The concrete mixer will vibrate during operation; it is necessary to install a reliable support for the wheels (if we are talking about a mobile version). Otherwise, she may unexpectedly move away, causing injury to someone.
- the same vibration weakens the tightening of the nuts. Therefore, check them regularly and tighten them if necessary.
- Mittens would also come in handy. They will protect you from getting the solution and causing allergic irritations.
- Do not leave a running concrete mixer unattended. It is unacceptable for children to approach her.
From all this it follows that even such a seemingly complicated unit as a concrete mixer can be made with your own hands. The main thing is to follow the instructions carefully and responsibly. And because Since no construction is complete without a concrete mixer, it can be rented out, which will not only recoup costs, but also make money.