In the process of organizing a sewing workshop or atelier, a cutting table is needed. Moreover, you don’t have to buy it; you can make it yourself.
The cutting table is one of the main places of work in a cutting shop or simply in a sewing workshop.
That is why it is necessary for this design to be reliable and safe.
There are several basic requirements and each of them deserves separate consideration.
First of all, you need to decide on the sizes. The length of the cutting table cannot be less than five meters, height 80-90 cm and width 175 cm. The surface must be flat and smooth. If possible, it is better to make the cut table longer. Why is this necessary? The point is that what longer table, the less fabric will be used for sewing, since the cutting will be optimal in size. All this cannot but affect the cost.
 Mind map: Cutting table
 In some sewing industries, for example, curtain making, the length of the table is about 20 meters. Width should be at least 170 cm. If we are talking, for example, about a shop for sewing bags, then the width of the fabric there is 150 cm. After the flooring is made, there should be free space at the edges of the table where you can put a cutting knife. In height, the cutting table should be such that the cutter can easily reach 3/4 of its width.
Now, a few words about what they are made of Cutting tables. The most commonly used material is chipboard. There are several reasons for this. The first of these is the appropriate sheet width. The second is that it is very convenient to choose the length; 2 sheets will be enough for this. The base of the table can be made from metal corners. To make the table more stable, a frame is made from the same corners at the bottom. This way you will have an extra shelf to store your rolls and cut.
The chipboard sheet is laid on metal structure and is fastened with bolts, but there is a nuance here; after fastening, the bolts must be “recessed” so that they do not interfere with the cutting knife moving freely along the surface.
After assembly cutting table, it is necessary to cover it (and preferably twice) with a layer of drying oil; the shelf at the bottom of the table should also be drying oil. If desired, the table can be covered with plastic, but only with one sheet. An indispensable requirement for the surface of the cutting table is ideal smoothness. Otherwise, the panel joints will interfere with the cutting knife.
One more important point, when organizing a sewing workshop, a cutting ruler is used. At the initial stage, you don’t have to buy it; it’s enough to make two metal stands to hang the rolls. Two hooks (more are possible) are welded at different levels. The racks must be stable, since the weight of the roll can be about 30 kg.
For those who sew a lot at home using a sewing machine, it is very important proper organization workplace. It is important that all required material was at hand and there was enough space for comfortable cutting and sewing. In such conditions, doing what you love is much more pleasant, so you need to take the choice of a sewing table very seriously.
Criterias of choice
Not everyone can afford to allocate a lot of space in their apartment to organize their own work area. Therefore, it is often necessary to select options that will save space while doing business in comfort. For small rooms, a transforming sewing table is ideal. The designs of transformers vary, so you need to choose such a table based on several aspects.
![]()
The determining factor is the size of the room in which the sewing corner will be organized. Folding table It is perfect for a small room, since when folded it takes up little space and does not look bulky. Some designs also include wheels for easier movement.
![]()
![]()
The size of the sewing machine or overlocker itself is also of great importance. For larger sizes you need a larger one working surface so that in addition to the tools themselves, it is possible to conveniently arrange fabric and other necessary accessories.
![]()
![]()
The reliability of the table and its durability are directly related to the quality of the material from which it is made. The best raw materials are considered natural wood, but it significantly increases the cost finished product. Options made from chipboard are much cheaper and lighter in weight, and, accordingly, if they need to be moved frequently, they are more advantageous.
A folding transforming table must be made using high-quality furniture fittings so that it can last longer if folded frequently.
![]()
Kinds
In addition to standard sewing tables, there are various transformable models that are very convenient to use, take up little space and perform many functions.
Table-book
Among the budget and most simple models you can highlight a folding table-book. As a rule, it includes three sections. The central one is stationary, and on the sides there are two wings, which, when unfolded, allow you to get a fairly large working space for sewing.
Such a “book” can have three wings. When unfolded, they rest on swivel legs. Models of this type can be equipped with wheels, which makes them easier to move.
![]()
![]()
![]()
But keep in mind that this is the simplest option. folding table, which does not provide for the presence of additional departments and shelves for storing materials. Moreover, in conventional models sewing machine located quite high.
The improved model of the table-book assumes the presence of a special compartment for a sewing machine. It can be equipped with an additional mechanism that allows you to adjust the height of the machine.
![]()
![]()
When the compartment is completely lowered, the machine is not visible on the table. This allows you to conveniently store it when not in use. The presence of this mechanism increases the cost of the design.
![]()
![]()
![]()
Side table
Another type of transformable table is a cabinet table. It can be regular or angular. Its folding compartment rests on a door that swings open. The main advantage over a book table is the presence of additional shelves for storing sewing accessories. The sewing machine itself is also hidden in a special compartment with an elevator, which, if necessary, raises it to the desired height.
![]()
![]()
The large cabinet also has enough space to store an overlocker and other necessary tools. Cabinet tables are also equipped with wheels and can have from one to three wings.
![]()
![]()
Corner table
Corner designs take up a little more space in the room, but at the same time provide an impressive work surface. Inside corner cabinets enough storage space large quantity tools and accessories, and the working surface itself allows you to conveniently cut, sew and carry out all necessary work without changing position.
![]()
![]()
![]()
It is very convenient to use a folding cutting table from Ikea, which looks very stylish and functional.
Series "Comfort"
Tables for sewing machines“Comfort” is represented by a wide variety of folding models. They differ from each other in size and the presence of additional shelves and accessories. Many designs provide storage for both the machine and the overlocker.
![]()
![]()
For example, the design of the Comfort-3 table is a roll-out cabinet, which when fully unfolded forms a large work surface. This sewing table is convenient to work with both a machine and an overlocker. He has lifting mechanism with three positions. This model is also equipped with a sectional container and pull-out drawers. When folded, this cabinet is very compact and takes up little space.
Some sewing tables also have a door locking system to prevent small children from reaching sewing supplies. This system allows you to lock all elements that can be opened.
![]()
![]()
![]()
DIY furniture
To save on buying a sewing table, you can make one yourself. You can use a plain old one as a base. computer desk. You can use it to make a sliding transformer, which is convenient for sewing and does not take up much space.
You can take ready-made drawings with the dimensions of all the necessary parts or calculate everything yourself, provided you have at least some experience in making furniture. This table can be equipped hinged lid, under which compartments with sewing accessories will be hidden.
pros self-made sewing tables is that they can be designed to suit personal needs with the necessary departments and the required dimensions. For your workshop, you can design a table that is also suitable for felting.
![]()
![]()
Having a specially equipped sewing table in your home will greatly facilitate the sewing process and make it more comfortable. The most suitable option for transformable desks will help you organize your workspace correctly without cluttering small room. The process of sewing at such a table will only bring pleasure.
Watch the video to see how you can make such a table with your own hands.
In the process of organizing a sewing workshop or atelier, a cutting table is needed. Moreover, you don’t have to buy it; you can make it yourself.
The cutting table is one of the main places of work in a cutting shop or simply in a sewing workshop.
That is why it is necessary for this design to be reliable and safe.
There are several basic requirements and each of them deserves separate consideration.
First of all, you need to decide on the sizes. The length of the cutting table cannot be less than five meters, height 80-90 cm and width 175 cm. The surface must be flat and smooth. If possible, it is better to make the cut table longer. Why is this necessary? The fact is that the longer the table, the less fabric will be used for sewing, since the cutting will be optimal in size. All this cannot but affect the cost.
In some sewing industries, for example, curtain making, the length of the table is about 20 meters. Width should be at least 170 cm. If we are talking, for example, about a shop for sewing bags, then the width of the fabric there is 150 cm. After the flooring is made, there should be free space at the edges of the table where you can put a cutting knife. In height, the cutting table should be such that the cutter can easily reach 3/4 of its width.
Now, a few words about what they are made of Cutting tables. The most commonly used material is chipboard. There are several reasons for this. The first of these is the appropriate sheet width. The second is that it is very convenient to choose the length; 2 sheets will be enough for this. The base of the table can be made from metal corners. To make the table more stable, a frame is made from the same corners at the bottom. This way you will have an extra shelf to store your rolls and cut.
The chipboard sheet is laid on a metal structure and secured with bolts, but there is a nuance here; after fastening, the bolts must be “recessed” so that they do not interfere with the cutting knife moving freely along the surface.
After assembly cutting table, it is necessary to cover it (and preferably twice) with a layer of drying oil; the shelf at the bottom of the table should also be drying oil. If desired, the table can be covered with plastic, but only with one sheet. An indispensable requirement for the surface of the cutting table is ideal smoothness. Otherwise, the panel joints will interfere with the cutting knife.
Another important point when organizing a sewing workshop is the cutting ruler. At the initial stage, you don’t have to buy it; it’s enough to make two metal stands to hang the rolls. Two hooks (more are possible) are welded at different levels. The racks must be stable, since the weight of the roll can be about 30 kg.
View in full
Hello, friends!
I have planned this publication for a long time. Finally, I got there!
Anyone who loves to sew knows the importance of such a thing as sewing cutting table.
A special dream of a tailor “at home” is for the table to take up little space!
There are, of course, transformable tables on sale that fold up conveniently and compactly... But, as a rule, such furniture has:
- high price,
- it may not suit your interior at all
- and to be honest, I don’t really want to unfold and fold the table every time, especially if I need to sew/hem something quickly.
In the conditions of not very large areas of many apartments, a universal solution is needed.
I, like many of my colleagues who love sewing, have long been thinking about how to make a transforming cutting table for sewing.
There were many options - a folding table-cabinet, a table-cabinet, etc.
I forgot to say, even before creating the blog “!” I had an idea to make furniture with my own hands. I was lucky, though – my husband has “golden hands”.
We have such a division of labor - I come up with a thing (having previously persuaded my husband to come up with another idea), make a sketch, do the calculations, order cutting, search for accessories, and my husband brings and assembles everything.
Thus, we have already created a computer desk, a hallway and a kitchen area.
Oh, here’s another transforming cutting table.
We didn’t learn this right away, until we spoiled a single thing. Only once, the box was dropped, but fortunately they knew how to redo it. By the way, if you're interested, it all started with information on the Internet.
Then, I think in 2009 quality material there was very little on this topic, but I found this guy’s website and even bought a course from him (this was my first purchase online).
I got distracted... from the table.
So, thinking through the options, I settled on a functional and “light” one - the table should easily move apart, not clutter up the area, fit into the interior and be always “at hand”.
That is, if you suddenly had free time or suddenly wanted to sew/handicraft, you could do it right away.
My favorite makeover came to the rescue!
We had an old computer desk that we repurposed.
Here it is. (By the way, I also redid the chair in the photo - I painted it and reupholstered the seat...)

Unusual table legs on casters were used.
First a small drawing with dimensions:

Then the calculations, for those who are interested, I give the figures:
- Main table top – 1600mm x 580mm – 1 piece
- The second upper part of the table – 1600mm x 250mm – 1 piece
- Bottom of the table – 1600mm x 480mm – 1 piece
- Racks – 432 mm x 100 mm – 4 parts
- Lower support – 1400 mm x 200 mm – 1 piece
- Bottom of the drawer – 367 mm x 440 mm – 2 pieces.
- Back wall of the drawer – 367 mm x 60 mm – 2 children
- Facade – 393 mm x 96 mm – 2 parts.
Accessories:
- Piano hinge – 2 pcs.
- Gas play – 2 pcs.
- Magnets – 2 pcs.
- Rollers – 4 pcs.
- Guides for drawers – 2 pcs.
- Self-tapping screws - packaging
- Confirmats (special screws) - about 10, I think
- Corners – 10 pcs.
We sawed, made edges on the parts, bought fittings, took the parts and...
...We went on vacation, after which it turned out that we had not taken the small parts of the boxes - facades, walls, etc.
A month has already passed since sawing, and they haven’t started looking for parts.
We got out of the situation by making one big facade - the lid. It snaps on with magnets.
We started from the remaining material, so it turned out like this.

Of course, it would have been more beautiful with drawers, but I really wanted a table, and my husband had so little time to assemble it, that we did without them.
In general, it’s also convenient, the lid folds back and three compartments open at once.

I used leftover pizza boxes to store everything. I covered them with self-adhesive film, and they “fit” perfectly into the niches in size - again a rework!

Sometimes you don’t even need to open the lid to hide your spoolie or scissors.
When assembled, the table rolls under the window sill and looks out about 45 cm - compact.

When disassembled, due to the gas play and the system that the husband came up with from a chain, a hook and some two parts, the table extends up to 80 cm.
That is, I have a working surface of 160 cm by 80 cm - quite enough for cutting.
Legs and rollers painted suitable color spray paint.
By the way, the chair was also remade - from an old office chair. The backrest was removed, the leg was painted, the seat was upholstered and a suitable swivel and move chair was ready.
I keep the sewing machine and all sorts of handicrafts in the closet nearby. It seems to me that it’s more convenient than in a table or cabinet. Now I’m also planning to equip a closet so that everything is at hand. I'll do it and tell you.
This is how you can make a transforming cutting table with your own hands.
Take a closer look at your old things - maybe they can also be turned into something useful?
I wish you good luck, Elena Krasovskaya!
§ 1. Equipment
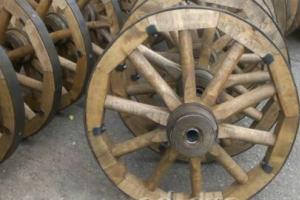
To manually cut leather, you must have a cutting table, an end board, cutting knives and models (Fig. 33).
Cutting table. Table height - 100 cm, lid size - 140x80 cm, height of the sides of the lid - 7 cm. An oval cutout is made in the front of the table.
The drawers in the table (size 100x50x23 cm) are used to store tools obtained for cutting leather and unfinished batches of cuts. IN drawer On the right side of the table during work, a small flap is dropped. 
There is a stand to adjust the height of the table.
The cutting boards are glued together from cubes of good quality, well-seasoned, not old, dry linden (end to end). When cutting leather on such a board, the tip of the knife pushes the wood fibers apart, and the board does not wear out too quickly. Board area for cutting leather 60x60 cm. The dimensions of the board for cutting textiles should be equal to the width of the fabric. The board is made square so that all four edges can be used, after which it is turned over to the other side.
Cutting knives Made from good tool steel. Knife width - from 5 to 10 mm, length - 150 mm, thickness - 1 mm. Each cutter should have at least 3-5 knives.  The cutting knife is inserted into a special handle.
Models, on which the cut details are cut, are made of dense, well-glued cardboard - electric cardboard, 2 - 2.5 thick mm. To protect against rapid wear, the models are edged at the edges.  metal tape.
Each model of the set must have a stamp indicating the style, model number, article, size and fullness of the shoes.
Organization of the workplace. Tools, leathers and cutting details must be placed in a certain order at the workplace.
 The cutting board is usually placed closer to the left side of the table (Fig. 33), and the cutting details are placed on the right side, with the ankle boots and heels located closer to the board, and the vamps and socks further away. Paired parts and sets of parts selected for a pair of workpieces are placed on the table in the rear right corner.
Pieces cut from colored leathers must be placed in matched pairs.
The knife should be placed on the right side of the table, and the whetstone, whetstone, steel - on the left side in the front corner or in a retractable tray located in the table.
§ 2. Preparation for work
Before starting work, the cutter prepares the cutting board (block), knives, work table, models and leathers.
The surface of the cutting board must be completely flat. Having discovered potholes on it, the cutter must send the board to planing. Once every five days, the surface of the board should be lubricated with drying oil. The board should lie on the table with some inclination towards the cutter, for which there is a backing block. The cutter's arms, bent at the elbows, should be slightly higher than the board, for which there is a footrest.
Having taken the leathers from the table, the cutter hangs them on a bracket. When receiving a new pack of leathers, he checks their quantity and the total area of all leathers (decimetre) and compares the counting results with the entries in the cutting documents. Then he checks the quality of the leather and sorts it by density, grain pattern and color. Colored leathers should also be sorted by shade. The skins should be hung on the bracket in such an order that the best ones hang on top.
The cutter must check the condition of the models especially carefully. If they are edged, make sure that the edges are in good condition; if they are not edged, check that they are not worn out and that they correspond to the originals.
§ 3. Cutting techniques
Open the leather. When starting to cut, the cutter places the model and presses it tightly to the skin with his left hand. With his right hand, he begins cutting on the left side of the model from the place adjacent to the edge of the skin. In this case, the model sometimes shifts. If the opposite side of the model has not yet been cut, then by slightly moving the model to the right, the cutter can cut out the part correctly; if the cutting starts from the top, then there is nowhere to move the shifted model and the part turns out to be smaller than it should be.
As the cut progresses, the cutter moves the fingers of his left hand along the model, evenly pressing on those parts of it at the edges of which this moment the cutting knife passes.
Putting your right hand under your left (Fig. 34, A), the cutter presses the tip of the knife onto the skin. Having cut through it, he quickly moves the knife along the edge of the model to the right side until it stops. After this, quickly raising the knife, he brings it through left hand(Fig. 34, b) and from the starting point of cutting leads the knife along the edge of the model from left to right to the end point. When cutting along straight lines, the knife should be inclined towards the cutting line (Fig. 34, V), and when cutting along curved lines it is installed more vertically (Fig. 34, G).
The knife should be kept at a distance of 1-2 cm from the tip, grasping it from the sides with your thumb and middle finger, and pressing it on top with your index finger. The remaining fingers should glide over the skin. The edge of the knife while cutting the part should not deviate to the side or go under the model, otherwise the part will be cut with a slant.
 Having finished cutting out the parts, the cutter quickly moves his thumb right hand raises the knife to the upper joints of the index and thumb and, without letting go of his hands, he lifts the model with his left hand, and with his right hand he puts the cut piece aside.
When cutting out parts, the pressure of the right hand on the knife should be calculated so that the skin is cut through and at the same time the knife does not cut too deeply into the board.
Open textiles. Having straightened the textile and fastened it with clamps, the cutter rolls it up like an accordion and lowers it onto the table between the cutting board and the back edge of the table, while the end from which cutting begins is placed on the cutting board.
Depending on how the cutter holds the knife, you can start cutting from the right or left side. It is better to start on the right side, since this condition reduces the number of undercuts at the beginning of cutting parts and when cutting corners.
When cutting fabric in 1-4 layers, the knife should be held in the same way as when cutting leather. If you are cutting a flooring that has more than four layers, the knife should be held with all fingers of your right hand.
By pressing the knife on the material, you must first cut it so that the tip enters the board, and then quickly move the knife along the contour of the model.
The flooring should be moved only after the entire strip of it lying on the board has been cut. Having finished cutting the strip, the cutter must take hold of the edges with both hands and, pulling the material towards himself, rearrange the clamps.