My family and I often go out into nature. To spend time comfortably on a picnic, I made a compact folding table.
As a base I used a metal frame with legs from an old crib. According to its size, I cut out a tabletop from multi-layer plywood with an allowance of 15 mm on the sides and secured it with self-tapping screws to the frame. On the protruding edges of the tabletop from below, I fixed a frame made of strips with a cross-section of 20x15 mm.
Important!
The size of the tabletop allowance must be selected based on the thickness of the available planks.
To make it comfortable to sit at the table, I increased the height of the legs. To do this, I cut the tubular racks in half, placed a rod of a suitable diameter between each and welded it on both sides (photo 1, item 1)
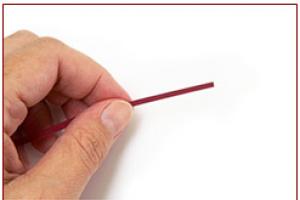
To ensure stability of the structure, I welded stops with screws at the attachment point of each rack (photo 2), which fix the legs when unfolded. The lower jumper of one of the supports was extended by 10 mm, so that when folding the table, the legs would fit into one another. To do this, I cut it in the middle, inserted a small rod and scalded it (photo 1, item 2)

On a note
Select the length of the rods so that the folded leg does not protrude beyond the tabletop.
The tabletop was decorated with decoupage. Using PVA glue diluted 1:1 with water. I pasted newspaper clippings onto the surface. After drying, I applied a layer of colorless wood varnish. The frame of the table was painted with waterproof metal paint.

Maxim Abramchuk, Kobrin.
Photo by Irina Savosina
Take note
The kebab won't get cold
To ensure that the shish kebab, freshly cooked on the grill, remained hot and juicy throughout the entire feast, my husband made a convenient warmer.
From a metal rod with a cross-section of 10x10 mm, I assembled two shaped (can be ordinary) tripod stands with rings according to the size of bowls from of stainless steel(bought at a hardware store).
I installed both structures on top of each other and welded them (I processed the welding points with a file). I primed the entire surface of the stand and coated it with gold spray paint in two layers.
During rest, I put the finished shish kebab in the upper bowl, and pour coals into the lower one. The heat coming from them does not allow the meat to cool down during the entire resting time. If necessary, coals can be added.
By the way
The height of each tripod is arbitrary and depends on the dimensions of the bowls or other containers used.
The desire to escape into the vastness of nature increasingly overcomes residents of large and small cities. One-day trips to the nearest body of water or multi-day fishing trips to other regions of vast Russia require careful preparation and organization. One of the essential elements of camping life is a table. Wherein the best option will serve as a folding table, occupying as much space as possible less space in the trunk of a car and easy to transport. You can easily make a wonderful version of a camping table with your own hands.

The design is so simple that it can be made by any home craftsman with experience in owning various instruments. The following tools will be needed for work:
- carpentry saw with small tooth for sawing parts;
- sandpaper (sandpaper) of various grain sizes for finishing the edges of parts and the entire product;
- tape measure for measuring the lengths of parts;
- carpenter's square for checking the squareness of the edges of flat parts;
- construction stapler with a supply of staples;
- drill with a drill of a suitable diameter;
- flat screwdriver.
In addition to tools, you need to prepare the following materials:
- a round rod with a diameter of about thirty millimeters and a length of one hundred and sixty centimeters;
- lath of hardwood with a cross section of fifteen by forty-five millimeters - six meters;
- two slats of the same section, each fifty-four centimeters long;
- two pieces of nylon belt twenty-five to thirty millimeters wide, fifty-four centimeters each;
- threaded inserts made of brass, having internal thread ten millimeters;
- four M10x70 bolts.
Let's start the description of the manufacturing technology with the legs of the camping table. The best material They can use two birch cuttings for rakes, which can be easily purchased at any hardware store. Choose straight-line pieces to keep the table looking tidy. Saw off four pieces of forty centimeters each with a hacksaw, clean sandpaper The ends and lower edges are slightly rounded. It would not be a bad idea to sand the surface of the parts.

The next stage of making the table is sawing birch slats into ten pieces of sixty centimeters each. According to preliminary markings using a tape measure and a square with a carpenter's hacksaw, cut the workpieces. To give smoothness, flatness and ends, sand emery cloth. Next, you need to sand two pre-prepared parts, each fifty-four centimeters long.

Then comes the work of manufacturing a flexible tabletop, which is a slatted rolled mat. Its basis is those ten slats of sixty centimeters each. To connect the slats we use nylon straps and construction stapler. Lay the tabletop elements on a flat, smooth surface, with the back side facing you, aligning their ends.

To maintain straightness, lay planed, even timber along the ends. It is better to calibrate the distance between these parts using small elements with a cross-section of one centimeter. Put the straps on reverse side slats, retreating an equal distance from the ends. Pre-melt the edges of the belts in the flame of a lighter.

Using a stapler, attach the belt to the slats as shown in the attached photos. Watch the distance between the slats.

If the stapler does not finish the staples slightly, use a hammer to fit them more tightly into the material. In this way, attach all the tabletop slats to the belts. Next, we move on to installing the threaded bushings in the legs of the camping table.

To do this, drill blind holes about 40 mm deep from one of the ends with a drill of the required diameter, then carefully screw in the bushings with a screwdriver, trying to maintain their alignment with the hole.
Now, having laid out the tabletop front side down, lay the slats prepared in advance at an equal distance from the ends of the tabletop elements and drill one hole in each slat (as shown below).

The diameter of the holes must be such that the bolts pass through them freely.

Now for complete set I decided to make a simple tourist table - a folding bed. When folded, this table looks like a small plywood suitcase. The table design project involves making a plywood table top. This material has sufficient strength and specific gravity It is quite acceptable for use as the main material for this type of portable furniture. The plywood suitcase is easy to carry and takes up little space in the trunk of the car.
To make it, I prepared the tools and purchased necessary materials.
Tool
Just as the furniture assembly scheme is based on plywood and wooden beam, then you need the appropriate tool:
- drill;
- jigsaw;
- screwdriver;
- wrench by 6 mm;
- chisel;
- level;
- tape measure, square, ruler, pencil.
Materials
I purchased materials according to the list I compiled:
- plywood sheet 140 x 70 x 1 cm;
- timber 800 x 4 x 4 cm – 1 pc.;
- plastic handle – 1 pc.;
- suitcase locks – 2 pcs.;
- fastening screw-screw 100 x 6 mm with a wrench grip – 4 pcs.;
- wing nut ø 6 mm – 4 pcs.;
- furniture hinges – 2 pcs.;
- screws 30 mm – 30 pcs.
I decided to make camp furniture from two folding tabletops measuring 70 x 70 cm each. I determined the height of the legs to be 60 cm so that they fit freely inside the suitcase. At the same time, this height of the legs should ensure a comfortable position for a person sitting at a table on a regular chair.
After preparations for assembling a homemade camping table with your own hands were completed, I began step-by-step implementation of the points in these instructions.
Step-by-step instructions on how to make a tourist table
- A sheet of plywood was cut with a jigsaw into two parts measuring 70 x 70 cm.
- The timber was cut into pieces for the subframe: 70 cm - 4 pieces, 620 - pieces, and for legs 600 mm - 4 pieces.
- From pieces of timber 70 cm and 62 cm, I assembled 2 subframes, connecting them with screws at the junction points.
- I laid plywood on top of the frames.
- Using a screwdriver, I secured the sheets of plywood with screws around the perimeter of the frames.
- Using a chisel, I made 2 mm indentations in the back side of the junction of the frames to each other for furniture hinges.
- The hinges were placed in the recesses and secured with screws.
- In the corners of the frames I made 4 through holes ø 6 mm with a drill.
- I screwed 4 screws into the upper ends of the legs with a wrench.
- On one side of the frame I secured a plastic handle with screws.
- In the places where the tabletops meet, I attached suitcase locks to the frames with screws.
- I inserted the screws of the legs with their threaded ends into the corner holes of the frames.
- On the outside, the threaded ends of the fasteners were secured with wing nuts.
- I placed the table on its legs and checked the horizontality of the tabletops with a level.
- Then he removed the legs and placed them inside the table tops of the folding furniture.
- I folded the tabletops and locked the locks. The table took a stowed position.

To once again make sure that the tourism furniture was assembled correctly, I reassembled it and checked all the fasteners. This is what happened in the end.

Cost of materials
At the end of the work, I calculated the costs of materials to make folding furniture:
- sheet of plywood 140 x 70 x 0.9 cm = 150 rubles;
- timber 800 x 4 x 4 cm = 8 m x 110 rub. = 880 rub.;
- plastic handle – 1 pc. = 15 rub.;
- suitcase locks – 2 pcs. = 20 rub.;
- fastening screw-screw 100 x 8 mm with wrench grip – 4 pcs. = 20 rub.;
- wing nut ø 8 mm – 4 pcs. x 2 rub. = 8 rub.;
- furniture hinges – 2 pcs. – 10 rub.;
- screws 30 mm – 30 pcs. in stock.
Total: 1103 rub.
Labor costs
For cutting plywood sheet and cutting the timber with a jigsaw took 1 hour. Assembling the table took 2 hours. Total time for making it yourself sliding table 3 hours were spent. During the work, he used a respirator and safety glasses.
For those who have little experience in assembling furniture, it will be useful to watch the corresponding video, and then get to work. Such furniture will be indispensable for a tourist going on a hike for a picnic in nature.
The need for a table that you can bring to a picnic and then quickly assemble and disassemble with your own hands can be great. Making a picnic table with your own hands is not too difficult and does not take much time. This skill will be useful later in life, as the ability to work with wood and knowledge of basic tools are important for a comfortable life. It is best to choose wood for making a table, since this material is light, durable and environmentally friendly if all stages of its processing have been completed. Working with wood is easier than working with plastic, and it’s good to learn basic woodworking skills on such simple household items.
Diagram with dimensions of a folding table with removable legs.
Picnic table - varieties
The appearance of picnic tables differs in the shape of the tabletops - it is most often rectangular, but there are also models with round or square, and sometimes figured surface. The legs can be made of steel, aluminum or wood.

Most often, folding picnic tables are rectangular in shape, but there are also round ones.
If the legs are placed parallel, it will be comfortable to sit at such a table, but the structure will become less durable. If the legs are arranged crosswise, they are very stable, but sitting at such a table is not very comfortable. For uneven surfaces It is desirable to provide removable legs that could be adjusted in height. When choosing tables of this kind, you need to focus not on appearance and size, but on design features.
For picnics and other outdoor trips good option The tabletop is made of varnished plywood, since this material is moisture resistant and will last for many years. This type of material is one that is easy to clean and does not absorb odors. It is convenient to provide a hole for an awning in the center of the tabletop to make outdoor recreation even more comfortable, but the relationship between the table and the awning must be well thought out so that the entire structure does not tip over from the wind.
DIY collapsible table
Made from wood or laminated chipboard tables with parallel legs look very neat. The materials and tools needed to make a picnic table with your own hands are classified as common, and you can find them in almost every hardware store. For a folding table you will need:

Drawing with dimensions of a folding rectangular table.
- board made of glued natural wood;
- beam;
- reinforced washers;
- furniture corners;
- furniture hinges;
- wing nuts;
- rivets;
- screws;
- hacksaw;
- electric drill;
- screwdriver or screwdriver;
- pencil or marker.
A picnic table, depending on its functionality, can have different sizes, but one detail is common to all folding tables.
The legs, namely the folding part, must be shorter than its height, otherwise the table will not be able to fold.
You cannot stand with your feet on such tables, since the folding design of the legs can support less weight than the permanent one. Having made the table with your own hands, you can then decorate its tabletop with paints or using decoupage.
Table manufacturing procedure

Scheme of a folding square table.
The purchased timber must be cut to the size of the table; the legs and crossbars between them will be made from it. You will need 4 identical pieces for the legs and 4 identical crossbars that will fasten the legs together at the bottom and top. You will also need a cross beam that will prevent the table from folding and its legs from skewing.
Pairs of legs are laid out parallel to each other on a table or workbench in accordance with the width of the table and crossbar. Place two crossbars at the top of the legs and screw the structure into the corners with screws. The diagonals of the resulting rectangle should be equal - this will ensure stability for the picnic table. After checking, the structure is screwed tightly, adding metal corners. The second rack is created in a similar way.
The racks made with furniture hinges are attached to the tabletop. Indentations from the edges are made 3-5 cm. Then a keeper tape is attached to the picnic table. It is needed to fix the legs-stands in relation to the tabletop. The tape is secured to the tabletop with screws, then, with the racks in a vertical position, the tape is cut to the optimal length. The ends are fixed on the stand with rivets in such a way that they can be disconnected at any time.
Folding picnic table
This design is quite lightweight and is therefore used for hiking, gardening and fishing. To begin work, cut out the bars, with a prudent reserve of diameter. It is very convenient to cut this kind of materials into circular saw. You can choose any material for the tabletop, but varnished plywood or wood coated with several layers of varnish is preferable. The cuts should be covered with edge tape, and the timber prepared for the legs should be rounded with a jigsaw or grinder.
First of all, start assembling the legs and supports. The legs are fastened crosswise to each other using a large bolt 3-3.5 cm long. With a marker or pencil, markings for fastening are applied to the tabletop with inside. All parts are installed using wood screws. The parts are numbered and preliminary assembly occurs, after which the structure is disassembled again and all parts are varnished. After a day, during which the varnish should dry, you can begin final assembly.
With its help, you can change the location of the feast, as well as take the structure into nature. Such a product will not take up much space in the interior, because when you are not using it, the table can be folded and placed behind the door.
Preparing tools
A folding table with your own hands can be made by any home craftsman who has dealt with wood at least once in his life. However, to carry out this work you will need a certain set of tools and materials. You should prepare a screwdriver with a quick-release chuck and a set of bits, a hand grinder, a tape measure, a pencil, building level and a right angle.
If not grinding machine, then there is no need to purchase it for one time; it is best to use sandpaper, and you can finish making the table, making its surface smooth. Some modern stores offer consumers to rent such equipment.
Preparation of materials
You can make a folding table with your own hands in one evening if you have all the necessary materials at hand. You will need two types of slats, one of them should have a cross-section equal to 30 mm, while the other should have a cross-section of 20 x 40 millimeters. In the first case, you need to prepare four elements, the length of each of which will be 1200 millimeters. The total length of the latter should be 5 meters.
To make a tabletop, you can use laminated veneer lumber, which is made from pine. A reliable and durable option would be a tabletop, the thickness of which varies from 30 to 40 millimeters. A part with the following dimensions is cut from the workpiece: 1300 x 650 millimeters. Each component is well processed with sandpaper and then varnished, which should be done before assembling the structure. The slats that will form the basis of the legs must be rounded at the top and then sanded well.

Additional preparation of elements
The do-it-yourself folding table is made to dimensions that will suit the future owner. But the technology remains the same as described in the article. Thus, in the legs that have not yet been cut to length, it is necessary to drill through holes; they will be needed for the frame strips and axial bolts. The diameter for the fasteners should be 8 millimeters, and the two holes for the strips should have a diameter of 5 millimeters.
In the central part of the strip, you should drill a hole for the axial bolts, stepping back 430 millimeters from above. The frame strips are marked by eye, but symmetry should be maintained.

Nuances of the work
A do-it-yourself folding table is made using a certain technology, it involves the creation of trestles and a table top; these components should not be fastened together. It is necessary to make grooves in the tabletop where the legs will be installed and then wedged. Special sockets must be made in such a way that they are fastened to the tabletop using 4 x 50 mm self-tapping screws.
At the next stage, you can proceed to assembling the structure. If you decide to make a folding table with your own hands, then the trestles should look like a folding bed; such a system will save space in the house or the trunk of your car.

Initially, the legs should not be sawed off from the bottom, but they should be approximately the same. The axle bolts are also not fully tightened to allow the legs to be extended. Lock nuts should be used to secure the tolerance. The master can purchase absolutely any bolts, but their length and diameter must be suitable. For the legs, for example, 8 x 70 millimeter bolts should be used. In the grooves of the table top, limit bolts should be used, the parameters of which are 8 x 120 millimeters.
When built with your own hands, at the next stage you can install the upper ends of the legs in the unfolded state into the grooves of the tabletop. An unfinished structure must be installed on any flat surface to determine how much to cut the legs to eliminate the error in length. Be sure to use a building level. When adjusting the length, you should not be particularly zealous; to carry out these manipulations you will need a jigsaw. If the table will be used only outdoors, then the generally accepted height of 750 millimeters should be reduced, since you will have to sit at such a structure literally on the ground.

Making a coffee folding table
Folding coffee table You can also make it yourself, photos of it are presented in the article. The frame is assembled into confirmations, and you need to use a special drill. Marking on the surface of laminated chipboard can be done using stickers, since the pencil will not be visible, its lines glare. A transformation mechanism should be installed in the frame, which has the shape of a rectangle, but before this, springs are installed to help unfold the structure. The mechanism is fixed through the end-to-end method, because the weight of the table will be impressive.
Folding legs should hide all technical fastenings and holes. Markings for fastenings can be done in the same way. Through holes for the bolts should be prepared at the next stage, then a drill is used to mark the place for installing the bolt head. This fastener will allow you to fix the mechanism, but do not be alarmed by the fact that the number of fasteners is quite large. The legs have the shape of a rectangle and must be as strong as possible, since the weight of the entire structure is approximately 45 kilograms. These components should be secured together with ties.

A folding table with your own hands, the drawings of which are presented in the article, can be completed by you in one evening. The next step is to screw the legs to the structure itself; for this, the fasteners are first marked. You can drill locally if you have enough experience. It is recommended to install on metal bushings. For this fastener, holes are drilled in the legs. Legs are installed on four sides, which will allow you to hide the technical holes in the frame.
Assembling the tabletop
The tabletop must be assembled with extreme precision, since the hinged folding is quite strong and ensures smooth sliding of the elements. It will be quite difficult to hold the hinge in the sockets, and the screws cannot cope with this task. Therefore, you can purchase other hinges. A tabletop of this design is divided into two parts, first the small one is installed, then the large one. At this point we can assume that the table is ready for use.

A do-it-yourself folding picnic table, drawings of which are presented in the article, can be made according to custom sizes. You can make the design according to the book-table principle, which has an attractive appearance. To do this, you need to prepare two legs, a drawer, a base, 4 horizontal and two vertical beams, movable leg and All cuts should first be edged. Afterwards the central part is fastened. The next step is to assemble the tabletop and fix the lid to the ends of the legs. The movable element with the frame is installed on the piano hinges, only after this the table can be completely assembled and, if necessary, varnished.
Conclusion
When making a folding camp table with your own hands or any other type of structure for eating, the particular difficulty lies in preparing the parts. It is better to entrust their cutting to professionals if you do not have special skills and tools. But each master can do the assembly independently.