Not big pond able to decorate and diversify any suburban area. And it will be even more pleasant if you build such a pond with your own hands. This may seem difficult, but with good instructions there shouldn't be any problems.
 Floating school of decorative fish - best decoration pond
 Traditionally, work begins with preparatory activities.
Stage 1. Decide on the location and size
First, we decide on the place where the decorative pond will be located. To do this, we take into account the following points:
- there should be no trees nearby, as their roots can damage the bottom of the structure, and their leaves can clog the water;
- the place should be open and illuminated by the sun for at least 6 hours a day (this will increase the intensity of algae reproduction without infringing on terrestrial plants);
- if possible, it is advisable to leave space for future expansion of the pond;
- The area of the reservoir should not exceed 3% of the entire site.

In a word, than smaller area, the easier it is to carry out construction works. In terms of depth, we divide the reservoir into three levels:
- for plants near the shore;
- shallow water for winter-hardy water lily;
- a recess in which fish will winter (if we breed them).
Note! It is undesirable to make the reservoir too deep - it is enough to make a depth of 1.6-1.8 meters (that is, below the soil freezing level). The burial area should not exceed a fifth of the entire pond.

Stage 2. Deciding on the material
There are quite a lot of materials that can serve as the basis for a decorative pond, but the most popular of them are the options below.

Due to the fact that the construction of a decorative pond from a mold is unlikely to cause any difficulties, we will consider in more detail the second construction option.
Prices for ready-made ponds and bowls for ponds and fountains
Ready-made ponds and bowls for ponds and fountains
Stage 3. Prepare consumables
The work will require:
- PVC film;
- roofing felt;
- round stones;
- rope;
- stone slabs;
- shovel;
- sand;
- bricks;
- fine gravel.
Having prepared everything you need, we proceed to the next stage.

Stage 4. Digging a pit
Step 1. First, we create a scale sketch of the future reservoir, indicating the size and width of the curtains (shelves for plants, that is, the upper stage of the structure). This will help avoid possible difficulties not only during construction, but also when planting.
We also think about the accent of the composition - a large original stone, for example, a sculpture or just a tree.
Step 2. Using a rope or sand, we outline the expected contour of the reservoir. We make sure to check that all the banks are at the same level, and then use a shovel to cut the turf along the perimeter of the pond.


Step 3. Now let's get started earthworks. First, we dig a pit to the depth of the first level (about 30-40 cm) and mark a line from which we will dig down to the second level (90 cm). Next, we create the deepest level (up to 1.8 meters, if we plan to breed fish), and extract the last portion of soil.
Note! It is recommended to regularly check the level of the banks while digging a pit. If there is no water level of the appropriate length, you can take a simple long board and attach a 50-centimeter device to it.
Step 4. To dig a reservoir, it is advisable to use the services of specialists in this kind of work, accompanied by a small excavator, because this work is quite difficult. But if you decided to do this stage of the work yourself, then you should be prepared for the fact that moisture will accumulate in the pit and you will have to dig in dirty slurry. To remove water, you can use a pump (but only one specifically designed for pumping liquid with solid particles). You can dig another hole nearby to dump water into.


Step 5. Carefully inspect the bottom of the finished pit for branches, sharp stones and anything that could damage the film. We check the horizontality of the banks and, if necessary, level them.

Step 6. We dig a ditch 20 cm deep along the perimeter of the pond to fix the film. Then, using a rope, we measure the dimensions to determine the required size of the film, add 0.5 m on each side.
When carrying out excavation work, you may encounter the problem of where to put the earth from the hole. An excellent solution to this problem is to raise the level of the site by evenly distributing the soil over the entire area of the garden. Another option is possible - to use the land to build an alpine slide.
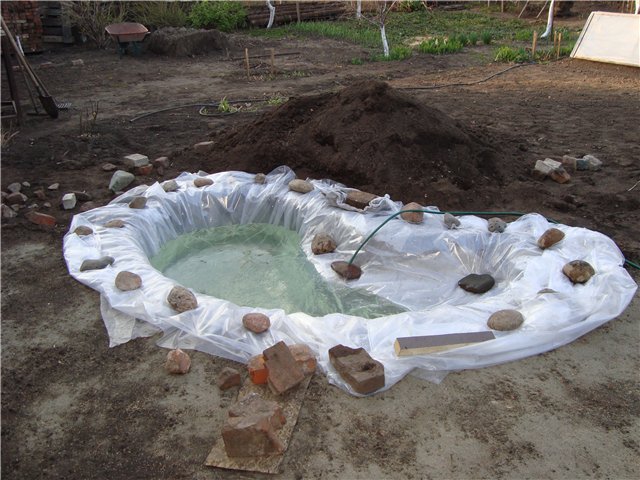
Stage 5. Lay the film

Step 1. Cover the bottom of the pit with a 15-centimeter sand “cushion” and compact it thoroughly.
Step 2. To protect the PVC film from damage, lay a layer of roofing felt (laying is done with an overlap).
Step 3. Cover the bowl of the reservoir with film. We do this freely, with a small margin along the banks. We press the ends of the film with bricks.

Note! To increase the elasticity of the film, it is advisable to lay it on a sunny day - under the influence of temperature, the film will stretch better and easily bend around all the protrusions of the pit.
Step 4. Fill the pond with water, but do not rush to cut off the excess film. It is necessary to wait approximately 24 hours for the PVC coating to take on its final volume. Then we cut the film, place its edges in a previously made trench, tuck it in and fill it with crushed stone.


Note! Often the width of the film is not enough for the whole pond. In such cases, several pieces are connected to each other by soldering.
Prices for different types of pond films
Pond film
Stage 6. Setting up a decorative pond
Step 1. In order to prevent the earth from falling into the bowl of the reservoir, we strengthen the edge. This can be done using:
- stone blocks;
- plastic pipes nailed to pegs.
We line the edge with natural stone (although you can also use brick, tile, and other materials), decorate it with a group of boulders or one large block.
Step 2. We lay out the bottom of the reservoir with crushed stones or stones. Then we place the pre-prepared plants in plastic containers and arrange them in clumps. It is advisable to use plants that saturate with oxygen (such as hornwort, water lily, swamp grass, etc.). After this, the pond can be completely filled with water.
Note! For correct selection hydrochemical preparations and a pump, it is necessary to measure the volume of the reservoir. To do this, when replacing water, take water meter readings before/after the filling procedure.
Step 3. We can make a small stream for permanent circulation of water - this will prevent the latter from stagnation. To do this, we raise the source slightly above the level of the reservoir and install it to supply water from a bowl. We are planning to decorate the mouth of the stream, for which we can use:
- stones;
- containers made of glass or clay;
- planting.
Step 4. We install at the bottom of the reservoir, stretch the pipes to the source and connect them to the cleaning filter. The latter must be pressure, that is, with reverse cleaning provided, since it is much more efficient than usual.


All, ready! All that remains is to regularly clean it from dirt and use special means, revitalizing the water and preventing the excessive spread of algae, as well as removing plants from winter time.
When building a pond, it is difficult to avoid some mistakes, especially in the compositional plan. For this reason, you need to be aware of common mistakes that gardeners make.
| Plant growing zones | Plants |
|---|---|
| Coastal zone | Conifers, elderberries, ferns, meadowsweet, lilies of the valley, bergenia, etc. |
| Coastline | Lipstick, fluffy, marigold, speedwell, snake knotweed, forget-me-not, etc. |
| Plants for decorating shallow waters (up to a depth of 5-20 cm) | Calamus, reed, parasol, cattail, arrowhead, etc. |
| Deep-sea plants 30-150 cm | Water lily, water lily |
| Plants to decorate the surface of the water (floating on the surface of the water) | Duckweed, water paint, telores |


Finally, having planned self-construction pond, practice first - make, for example, a miniature pond, and only then move on to larger compositions. This will significantly increase the chances of success.


Good luck with your work!
Video - Creating a pond at the dacha
Every person loves to relax on ponds various types, be it a river, a lake or an ordinary pond. In summer, it is pleasant to feel the cool air and relax to the sound of the murmur of water. Imagine how great it would be to have something like this in constant and personal use? For example, having a small plot of land and a holiday house, bask by the pond. In addition, a small pond made with your own hands will always please the eye with its aesthetics and cleanliness. If you think about it, this idea is quite feasible.
Tools and materials:
1) a pair of hands and a shovel.
2) cement mixture.
3) pegs and hammer.
4) pond mold or rubber film.
As usual, we start with the choice suitable place. The main enemies of such an invention will be the sun and trees. Warm rays will cause the water to bloom, and the root system of the tree can damage the structure of the reservoir. Avoiding these factors, we are looking for a large area for the pond. You can think in advance that in the future you will want to decorate or expand the boundaries of the reservoir. Install all kinds of decor: bridges, fountains, etc.
We decide on the material that we will need.
1) If the boundaries of the pond are quite extensive, then it is best to choose a special film made of butyl rubber. PVC film is also suitable. Long term service, durability, will help to easily transfer the pond to the ownership of the next generation (from 10-35 years). This method will allow you to make a pond of any shape that the summer resident wants. There are no special restrictions on further work.

2) If we have a small territory, then it is advisable to choose a ready-made form. Polyvinyl chloride or more durable plastic. Everything will depend on the financial capabilities of the buyer. One thing: the pond will be limited by the size of the purchased form. At the same time, there is one very significant plus: the speed of work will increase significantly. It is enough just to dig a pit of the desired shape and install it inside.

In our case, the pond was dug under the film, so we will consider this method in detail.
Construction stages:
1) Pit.
The initial stage is the creation of a pit. We didn’t have the opportunity to use an excavator, so we had to make do on our own. The size of the pond was not so huge that a shovel would make your palms bleed. Initially, by driving pegs into the ground to mark the contours of the reservoir, terraces were dug. Their depth was approximately 30 cm and width - 20 cm. After this is finished, we proceed to the main bowl. The slope of the bank should be approximately 45 degrees, and the minimum depth should be 60 cm. If these rules are not taken into account, the artificial reservoir will completely freeze in the winter and become excessively hot in the summer. This is in case some flora and fauna are released into the pond for special connoisseurs. All living things cannot survive sudden temperature changes. To secure the purchased film, a ditch almost 20 cm deep is dug along the perimeter of the reservoir.

2) Alignment.
After the pit is ready, the bottom of our reservoir must be leveled. All stones are removed, whether they are barely noticeable small things or large cobblestones. We can use them for decorative framing. However, they can damage the coating we are laying from the inside. The surface of the film is covered with washed sand to a depth of 5 cm. Fulfilling this condition will protect the film coating from damage and will extend its life, and, consequently, the life of our product.
3) Covering.
The next step is to lay (in our case) butyl rubber. We take the length and width of the covering depending on the size of the pond. For its length and depth. We take the latter in double size. It’s better to have a little left over than not have enough at the most crucial moment. To attach the film along the edges of the reservoir, we measure out a half-meter margin. We lay the canvas inside completely freely, working only with its edges, securing them with cobblestones. You can just take something heavy.

4) Water.
We fill the resulting structure with water, slowly remove the stones and trim the edges of the film. We wait 24 hours so that the water, with its weight and volume, helps the coating take the required shape along the pit we have dug. After waiting, we cut off the remains, leaving a quarter of a meter for decoration. More is possible, here everyone is guided by their own imagination. The blind area should be laid on cement mortar, be it brick, stone or simple tiles. In the future, you can install a fountain or bench around the perimeter and plant moisture-loving plants. This completes the production.
One of the brightest tools in landscape design is decorative pond. Of course, most suburban areas are limited to the traditional six hundred square meters, and the owners simply cannot build a large pond, but because of this you should not give up the dream of acquiring an artificial pond. As for the technical part, it will not be an obstacle, but only if you have good instructions and desire. So, today we will find out how to make a pond at the dacha with our own hands step by step.
First you should find out what purpose the construction of a pond on the site will serve. From this point of view, reservoirs can be divided into four large groups.
Table No. 1. Classification of artificial reservoirs by functionality
| Group name | Short description |
|---|---|
| They are an element landscape composition and are intended, first of all, to decorate one or another area of the garden. Active recreation is not provided near such bodies of water. |
| They are deeper and are often decorated with fountains, bridges, and sometimes equipped with lighting. Such ponds are built near a house or gazebo, and benches with canopies are placed nearby. Therefore, it is quite obvious that such reservoirs are the heart of the recreation area for the residents of the house. |
| This option is suitable not only for avid fishermen, but also for families with children - the latter will enjoy watching colorful fish while relaxing in nature. |
| They are also artificial country ponds and not only perform an aesthetic function, but also provide an opportunity to freshen up or even swim (it all depends on the size). |


Then, based on the goal and our capabilities, we proceed to choosing the style, location, dimensions and shape.
Second phase. Deciding on a style
An artificial pond can be made in one of two ways possible options, and each of them also has a great many modifications.
Table No. 2. Artificial pond styles
| Name | Short description |
|---|---|
| This name exactly reflects the essence - these are structures that are distinguished by clearly defined outlines. The correct shape of the pond in terms of geometry is suitable for those areas that are decorated in the style of minimalism, high-tech, modern or classic. But, characteristically, the shape can be not only rectangular, but also square, round, oval, and broken. |
| They are more popular because they are characterized by naturalness and irregular contours of the banks, which means they bring people closer to nature. The shape of the reservoir here depends only on personal preferences, but the more complex it is, the more difficult it will be to lay the film (more on this later). |


The topography of the site also plays a big role when choosing a style. So, if the surface is fairly flat, then the shape of the pond can be any. If there are unevenness and differences on the site, then they need to be given Special attention, but they make it possible to additionally arrange a cascade or waterfall. In addition, against the backdrop of all this, say, an artificial slide will look great.
Also, the reservoir can be raised slightly above the ground. In this case, the construction technology will differ only in the arrangement of the foundation, which will prevent possible distortions of the bowl.

When creating such a reservoir, excavation work is minimized, and caring for it will be much easier.

Note! If the reservoir is built with a fountain, then preference should be given to a tall structure.
Third stage. Choosing a place
Let's start with the fact that we place the reservoir in the most favorable place, so that you can admire your creation from anywhere on the site. That is why we take into account several important factors when choosing.
- Land area. Not only the size of the pond, but also its shape directly depends on it.
- Illumination. It is preferable to place an artificial pond in a shaded place where exposure to direct sunlight does not exceed five to six hours a day, otherwise some of the water may simply evaporate. Moreover, in sunlight, biological activity may develop, which is unlikely to beautify the pond. Therefore, having chosen a specific place on the site, we observe the solar regime for several days.
- Relief. The shape of the pond depends on it, and it also simplifies the design additional elements(for example, fountains).
- Layer level groundwater, soil composition. These indicators affect not only the depth of the reservoir, but also the complexity of the work and the need for additional consumables.
Note! The greater the depth of the pond, the more illuminated place it should be located. If the reservoir is intended for fish, then we take the location even more seriously, since the oxygen content in highly heated water decreases.
- Expandable. Don't forget about perspective, so we leave some free space on one side.
- Visibility. It is advisable to position the pond so that it can be seen from home and recreation areas.
- Electricity supply. If a fountain or lighting is additionally equipped, then we will think about electrification in advance. It is better to lay the wires during development, underground and in a reliable protective corrugation. There should be small access hatches at the connections.
- Reflection. The pond will look more attractive if the surface reflects the sky or beautiful buildings, and not some kind of utility building.
- Landscaping. Vegetation near the pond is, of course, beautiful, but the leaves will pollute it and form silt. Moreover, tree root systems can damage the waterproofing layer.
- Compatible with general design and other objects.
We begin work in the spring - this way we will have enough time for the reservoir to “take root” on the site.

Fourth stage. Deciding on the sizes
It’s hard to say that a large pond will cost more than a small one, since there are a lot of nuances here. Therefore, let's look at the key points.
1. Dimensions. They depend on the location of the reservoir. Many say that the pond should account for an average of 3-10% of the total area of the site, although there cannot be any clear recommendations in this case. As for the specific length and width, they depend not only on the area land plot, but also from our capabilities. After all, we will dig a hole under the pond manually.

2. Depth. It depends on the purpose of creating the reservoir, as well as its size.
3. Difficulty of content. The larger the pond, the easier (no matter how paradoxical it may sound) to care for it.

4. Zoning. The reservoir is divided into the following zones:
- coastal (from 10 cm to 40 cm), which will serve as an entrance and for planting;
- shallow water (from 40 cm to 100 cm), where crops that grow deeper (for example, winter-hardy water lily) will be planted;
- deep-sea (more than 100 cm) - it is required only in those reservoirs where fish breeding is planned; the area of this zone depends, first of all, on the number of fish, but on average it should be more than 20% of the total area of the reservoir.

5. Biological balance. In any case, living creatures will inhabit the pond, which means that conditions must be provided so that it can clean itself. No oxygenation or chlorination of water is provided here. It is worth remembering: no more than ½ of the entire area can be allocated for plants.
Note! The lowest point should be lowered below the soil freezing line, especially if you plan to breed fish - this way they can survive the winter in non-freezing water.
Fifth stage. Selecting materials
The next question to deal with is choice. Supplies. There are many options on the modern market that can be used to create an artificial reservoir. Let's look at them.
concrete pond

The most expensive option, which, nevertheless, allows you to operate the reservoir for quite a long time. Although concrete pouring is more suitable for arranging a swimming pool.
Finished plastic container

This option is more suitable. The mold, made of fiberglass or PVC, allows you to build a pond in record time and use it for up to 30 years (the specific period depends on the quality of the container).
The procedure itself will consist of only four steps:
- digging a pit;
- set the form;
- fill the remaining voids with sand;
- We plant plants and fill the pond with water.

The disadvantage of this method is the difficulty of transportation (if the volume is large) and the need for basic installation knowledge (otherwise the bowl may be damaged). Moreover, plastic containers degrade over time when exposed to UV radiation.
Note! It is preferable to use a fiberglass bowl that is reinforced with rubber - this design is more reliable and repairable.

Polymer film
In terms of pond shape, this option provides simply unlimited possibilities. The most available material is polyethylene film, although it will not last long.
PVC film has a longer service life; with proper installation, it can last up to ten years.

Perhaps the most reliable option. For ponds with a rocky bottom and great depth, it is recommended to use a butyl rubber membrane (EPDM), which has a service life of up to 50 years. In addition, this material can withstand repeated frosts.

There are a few folk ways making a reservoir using available materials. Let's take a look at the most popular of these methods.
Pond from an old bathtub

Great option, because a bathtub is a container that was originally intended to hold liquid. The bathtub can be painted in bright colors and placed in a picturesque corner of the site or, alternatively, buried in the ground.
Tire pond
A simple way to create a mini-reservoir on your site. The manufacturing procedure is shown in the photo below.

Pond from a basin
An even simpler way. The basin is able to hold water well, so it can be installed in the same way as a bathtub. With proper decoration, such a mini-pond will become an excellent decoration for the yard.

Note! Not only the aesthetic characteristics of the pond, but also its service life depend on the choice of material. It is desirable that the selected material is environmentally friendly.
Sixth stage. We prepare the equipment
To create a simple artificial pond, we will need a level, a cart with a shovel, a cord, a hose that is used for watering, and pegs.
If the pond is more technologically advanced, then the following equipment will be needed:
- cleaning filter;
- sterilizer (this will remove algae to keep the water clear);
- pump for pumping/draining water;
- aerator for oxygen saturation (especially important when breeding fish).

Seventh stage. We create an artificial pond
There are plenty of materials that can be used to create a pond, but we will focus on polyvinyl chloride film. The fact is that it is cheaper and receives better the required form, it can be repaired, and operation does not require specific knowledge or skills.
Step 1. First, choose the color of the film. There are several possible options here.
- Black film – it will turn the bottom into a mirror (plants, clouds, etc. will be reflected).
- Cream, blue- this way the pond will look more like a swimming pool, and the fish will be more clearly visible against a light background.
- Brown– will imitate the soil of natural reservoirs. An excellent option for a landscape pond.

Also, when choosing a film, pay attention to the composition (PVC is more durable than PE) and thickness (for a pond you will need material thicker than 0.5 mm). Moreover, the greater the depth of the reservoir, the greater the film thickness should be. Equally important is resistance to UV radiation and mechanical damage.
Note! If the depth of the pond exceeds 1.5 m, then we use butyl rubber. This film is resistant to stretching, deformation and UV, moreover, it can withstand temperatures of 40-80°C.
- pond width + (depth x 2) + stock (55-60 cm) = material width;
- pond length + (depth x 2) + reserve (55-60 cm) = material length.
For gluing we will use special glue (for example, “Tagnit”) or adhesive tape (Quick Seam 3).

Step 3. The next step is to create a diagram.

First, we draw it on paper, and then transfer it to the ground. We indicate the sizes of steps or “shelves” for plants - this will avoid possible problems. To apply markings we use sand or flexible garden hose(preferably bright color).

After this, we cover the marked area with a piece of light film and examine it from different angles. We make adjustments if necessary.
Step 4. Digging a pit. To do this, perform the following steps.
- First we remove the turf.
- Then we dig the pit itself. At the same time, we move from the edges to the center, going deeper in the required places - it’s more convenient. To lay out the stone and decorate it, we arrange a ledge 60-70 cm deep.
- We remove the soil, and along with it roots, stones, debris and anything that can damage the film. By the way, you can make an alpine slide from excavated soil.

When carrying out excavation work, we pay attention to ensuring that the banks of the future pond are located on the same line. If a waterfall is created, then we maintain the required height difference.
Note! If a large level is required, we can make it ourselves. To do this, place a regular level on a long, flat board.
Step 5. We lay the substrate. We carefully compact the bottom of the finished pit, after which we proceed to the waterproofing layer, which will prevent water from penetrating into the soil.
The substrate can be made in several ways:
- we cover the bottom with stones and fill it with sand (this kind of waterproofing will lose its properties in just a few years);
- we lay a layer of geotextiles, which we fill with sand (this will cost a large amount);
- laying down PVC film(the most reliable method, so we’ll focus on it).
Step 6. Next, we lay the film, preferably on a sandy “cushion” (the latter will prevent damage from stones and other dangerous objects). It is advisable to install on a hot day - as the film heats up, it becomes more pliable.

This may cause difficulty in forming folds. We try to make one large fold, and not a large number of small ones, then glue it or press it down with stones. The film should be loose and loose.
To secure it with a swarm there is an additional trench around the perimeter. We lay the film there, and then fill it with crushed stone. Next, fill the trench with large stones with a flat bottom (so that the film does not tear). We lay the walls with round stones (flat ones will slide). At the end, we fill the pond with water - we supply it without pressure, directing it to the center of the pit. After two days, cut off the excess film.
Step 7. We strengthen the banks. Their slope depends on the type of soil: if it is sandy, then the walls should be sloped, if we are talking about clay or black soil, then vertical. The optimal slope angle should be approximately 45°.
The strengthening itself depends on the type of banks.
If they are flat, then you can use:
- geomat;
- geogrid;
- polymer geogrid.

You can also use a regular chain-link mesh, filling its cells with soil and seeds. perennial grass(for example, clover). There is another option - to strengthen the banks with shrubs or plants.
If the coast is steep, then we can use:
- piles;
- gabions;
- retaining walls.

It can also be effectively strengthened using biological methods (planting). Ideally, biological methods reinforcements should be combined with engineering ones.
Eighth stage. We design an artificial pond

There are several ways decorative finishing reservoir To make it a full-fledged design element, we use one or more of the methods below.

As a conclusion. Features of care
Finally, a few words about further care behind an artificial pond.

Video - Creating a pond from film
How nice in hot weather summer time spend a few hours by a shady pond or lake! Of course, it's great if there is one in the neighborhood. However, most often we spend our free summer days at the dacha, and not everyone has the funds for a large Vacation home and landscape designer services. In this case, there is nothing left but to make a pond with your own hands, especially since it is not so difficult.
It all depends on your imagination, the size of the area and what you have on hand. If you put in a little effort and Money, then the country pond will not only delight you, but also cause burning envy among your neighbors.
The size and shape of yours primarily depend on the area of the plot allocated for these purposes. But the larger the pond area, the easier it is to care for - a small one needs to be cleaned more often. If you are planning to get fish and plant a lot aquatic plants, then a small reservoir will also not suit you, because it is very difficult to maintain the correct eco-balance in it.
The most best place for a home pond there will be an open part of the site, at the same time protected from strong winds. You should not place the pond in a well-lit place: the location should be such that Sun rays do not fall into the water for more than 6 hours in a row, otherwise it will bloom and only frogs will be able to live there. A dubious prospect, right? At the same time, if the lighting is insufficient, the plants will develop slowly, and you won’t get a beautiful place to relax.
If you decide to build a small fountain, you will definitely need a pond diagram in order to properly connect the pump and other equipment. With a little effort, you can draw up a plan yourself. Of course, you will also need to consider the proximity of the power supply network.
You should not locate your home pond under the canopy of trees. Firstly, this will lead to additional contamination of the water with fallen leaves, and the pond will have to be cleaned much more often, and secondly, the roots of the tree can damage the bed of the tank, and it will quickly dry out.

And, of course, the whole idea will become useless if you cannot enjoy beautiful view from a window or from a terrace, so when planning to make a pond on your property with your own hands, do not forget about the aesthetic side of the issue.
Home pond on a rigid base
If you are a supporter of solid, durable construction, then you can approach the process on a grand scale: dig a foundation pit of sufficient size and use metal fittings and cement to cast a reinforced concrete bowl of the pond. Such a design will certainly cost a lot, but it will last for many years (at least 30). If you are not a follower of the global approach, you can get by with a simpler and cheaper option.
So, how to do it One of the most basic ways to make your dream come true is a ready-made “bowl”, which can be purchased in a store. Perhaps the main disadvantage of this option is that you have to come up with your own original form reservoir will not be possible, you will have to be content with the offered assortment.
The most inexpensive solution is a small plastic pond, from 4 to 8 m2. Of course, there are larger molds, but they already belong to the category of pools and are much more expensive. When choosing a container, you should definitely pay attention to its depth - it should be at least 0.8-1 meters. In summer, the water in such a pond will warm up completely, and all its inhabitants will be comfortable, but in winter, such a pond will not freeze to the bottom, which is also very important.

If you decide to organize a pond on your site with your own hands and want to use a ready-made base for this, then first of all you need to study the materials from which the forms are made - there are also several nuances here.
The simplest and cheapest option may be a regular plastic container, but it has its drawbacks. First of all, you need to be very careful when transporting and installing - such a tank can crack even with slight bending. Plastic also tends to break down from sunlight, which means that the service life of such a product is not too long - 5-10 years.
If you want your pond to last longer, choose forms made of special reinforced plastic - they have a much longer service life (up to 20 years). Such tanks are more flexible and less susceptible to ultraviolet radiation.
The highest quality and, of course, most expensive are products made from fiberglass on a rubber base. This form is resistant to temperature changes, does not deteriorate from exposure to sunlight and does not release into water harmful substances, which is very important for the inhabitants of the reservoir. Such a tank will last more than 30 years, in addition, it can be repaired, which extends the time of use for an almost unlimited period.
Constructing ponds from a fiberglass bathtub is a simple process, and the result is quite aesthetic, since these forms come in different colors, and some are even coated with a coating that imitates stones, sand or small pebbles. This allows you to beautifully disguise the edges of the pond and give it the most natural look.
We build it ourselves
So, in order to build a pond on the site with your own hands, first of all you need to decide on the location and shape of the reservoir. Have you decided? Let's start construction work:
- First, we mark the outline of the pit. This is very simple to do - place the shape in the desired place and outline its silhouette using a regular bayonet shovel, pressing the handle tightly against the edge of the bath.
- Add about 20 cm to the resulting outline to fill the plastic pond with sand.
- If you purchased a form with ledges, then each level needs to be marked and dug separately, from largest to smallest, and do not forget to add 10-15 cm on each floor for a sand base.
- When the pit is ready, its edges should be thoroughly leveled and compacted, all glass, stones and tree roots should be removed. If this is not done, the mold may be damaged. Then you need to pour and carefully compact sand in a layer of at least 10 cm - this will protect your pond from subsidence.
- Install plastic mold and make sure that it is level, you can use the rule for this. Then carefully fill the pond by about a third with water, being careful not to move it.
- Carefully fill the gaps between the edge of the pit and the mold with sand. In this case, you need to make sure that there are no voids left. Why periodically water the soil with water, but try not to let the pressure be too strong.
During the week after installation, regularly water the soil around the pond and add sand as needed. After the soil subsidence stops, you can completely fill the reservoir, decorate the edges of the pond bowl with stones, flagstone and plant ornamental plants.

Country pond made of flexible materials
Now let's talk about how to make a pond on your site if it is not possible to purchase a ready-made container or you want to arrange a large pond of a bizarre shape.
The most budget option in this case, the use of ordinary polyethylene with a thickness of at least 500 microns will be used. However, despite the fact that it is quite inexpensive, this coating has quite a lot of disadvantages. The fact is that polyethylene is a fairly thin material, it is very easy to damage, and under the influence of sunlight it becomes brittle and quickly collapses. A pond on a polyethylene backing will last you a maximum of 2-3 years.
PVC film for a pond is also not a very expensive material, but much more durable; such a coating can withstand 8-10 years. Polyvinyl chloride coating can be regular or two-layer, in which a woven mesh is laid for strength. Of course, PVC has the same disadvantages as polyethylene - it is destroyed by ultraviolet radiation, it is easily cut and torn, but, unlike the latter, it can be repaired. Special kits are sold for this. Besides, PVC is better stretches, and after filling the pond with water, most folds stretch and straighten over time.
The most expensive, but at the same time the highest quality coating is made from butyl rubber: the service life of such material is about 50 years, and it does not mind the sun's rays. Plus, butyl rubber is resistant to low temperatures, so you won't have to drain your pond in the winter. This is a very flexible and plastic material that can withstand significant loads, so if you decide to equip a spacious pond unusual shape, you simply cannot do without it.
Marking the pit
To build a pond on your site with your own hands, you will need:
- pegs;
- rope;
- film coating;
- geotextile or felt;
- sand;
- crushed stone or large pebbles;
- shovel;
- special kit for film coating repair;
- bricks;
- garden hose for watering;

Using string and pegs, you need to mark the desired shape of the pit and begin excavation work. If you are planning to make a pond quite large sizes, you can use an excavator. During the work, it is necessary to ensure that ledges and slopes alternate; this will make the banks of the pond more stable. It is also necessary to provide terraces (at least 30 cm wide) for planting. Descents from one level to another must be made fairly flat, with an inclination angle of up to 45˚.
It is worth remembering that the depth of the pond should not be less than 80 cm, otherwise in winter the water in it will freeze to the bottom and its inhabitants will die. Thus, you need to dig a pit approximately 15-20 centimeters larger than the expected size of the reservoir. This is necessary in order to be able to fill the terraces and the bottom of the pond with sand, in order to avoid subsidence and damage to the film. The sand cushion must be carefully leveled and compacted, after removing all pebbles, sharp sticks and plant roots from the bottom.
Drainage and waterproofing
When the sand drainage pad is ready, we move on to the next stage of work. In order for the pond film to remain intact for as long as possible, you need to lay geotextiles on a layer of sand, preferably in 2 layers. Next, we straighten the film itself and secure it to the banks using bricks or large stones. Don’t try to necessarily straighten and spread out all the folds - let the water do it for you.

We place the flexible one so that its end is in the center of the future reservoir, and we begin to supply water, making sure that the pressure is not too strong. As the pond fills with water, partially release the edges of the film and spread it along the slopes of the pit. After the reservoir is filled to the brim, leave it for 1-2 days. During this time, under the weight of water, the film will expand and fill all the voids.
After it has completely subsided, you need to cut off the excess parts, leaving at least 40-50 cm for arranging the banks. The edges are secured with pegs or special metal arches, and then masked with flagstone, large stones and pebbles. It's time to install the pump, decorate the hoses from the fountains and start planting plants.
Pond above ground at the dacha
When there are kids in the family, one of the main problems when building a pond is how to make the pond safe. It is best if such a reservoir is slightly raised above the soil surface. Firstly, this makes caring for it much easier, and secondly, the risk of small children or pets accidentally falling into it is significantly reduced.

In this case, you cannot do without a reinforced concrete foundation. Dig a pit for the pond in its deepest part, form terraces for plants, just as in the previous case. Along the banks of the reservoir, using wooden formwork, pour a concrete foundation of the required height; for strength, it can be reinforced with metal mesh. After the foundation has completely dried and settled (this will take at least two days), the formwork can be removed and the inner walls can be plastered until smooth. This will help prevent the film from tearing. We line the bottom of the pit with it and fill the bowl with water. In this case, we secure the edges of the material so that they are behind the concrete fence. After the pond is filled, let the water settle, cut off the excess film, secure it and decorate the edges of the bowl.
Inventory: what you will need
Of course, building ponds is not an easy task, but what can you do for your loved one, because if everything is organized correctly, the result will please the eye for many years.
However, it is not enough to build a home pond - you also need to take care of it. Here are some technical devices that will be very useful to you:

Rules for caring for a country pond
A pond in the garden is, of course, very beautiful, but if you do not want to become the happy owner of a personal swamp in which frogs croak in the evenings, then you need to properly care for it. First of all, you need to make sure that the water in it does not bloom. Of course, it is best to purchase a special cleansing system, but, unfortunately, this is not a cheap pleasure. However, there is something else, more accessible remedy: take a canvas bag and fill it. Place this “surprise” under water, and there will be practically no algae left at the bottom of the pond.
It is also necessary to carefully monitor the cleanliness of the reservoir - regularly remove debris from the surface and add water as it evaporates. If your pond has small sizes, then in winter it is recommended to drain it completely, and for large tanks it is necessary complete cleaning at least 2-3 times a year, the water must be completely pumped out.
From what's at hand
But what should those whose plot size does not allow them to place even a small pond? Don’t be upset: a small pond can also be arranged in the front garden by adapting a trimmed piece of water for this purpose. metal barrel or just a big basin. Such a mini-pond can even be placed on the balcony of a city apartment by decorating the container with glued pebbles or mosaics. Of course, you won’t hear the gurgling of a fountain near such a “reservoir,” but you are guaranteed coolness and lush greenery of aquatic plants.
An artificial pond on a private plot can become a source of not only aesthetic, but also gastronomic pleasure. By making some efforts to breed fish, you can get good help in providing yourself and your loved ones with valuable fresh product. And if you approach the matter on a grand scale, you will make money. After all, doing everything with your own hands in the country at home is not so difficult.
Fish species are selected in accordance with breeding conditions. The determining factors are air temperature and water composition. The type of pond is important - flowing or standing. When selecting varieties, one should take into account the compatibility of breeds and competition for food. The most unpretentious and productive are considered:
- Carp or carp- heat-loving, but resistant to temperature fluctuations. Diet: plant foods and mixed feed. Enters sexual maturity at 1-3 years of age depending on temperature environment. Varieties - scaly, mirror and leathery.
- - a large relative of the carp. Reaches a weight of 50 kg or more. Homeland - Far East. Eats large amounts of plant food and is used to clean overgrown reservoirs.
- Black cupid- similar to white, but feeds on shellfish. The scales are dark in color. It sanitizes ponds well from other types of pests.
- White and bighead carp- very similar up to 3 summer age. Then the motley develops spots on its scales. Reach 50 kg. Silver carp feeds only on plants. Motley is more unpretentious.
- Buffalo- looks like carp, native to America. According to the growing conditions, it is similar to carp, but the meat taste qualities much more valuable.
- Channel catfish- omnivorous, large, heat-loving. Homeland America. When fed correctly, it has a very pleasant taste of meat.
Less productive, but amenable to cultivation in a man-made pond, are:
Gold and silver crucian carp are unpretentious and fast-growing. Can interbreed with other fish breeds. Gains weight up to 5 kg. Feels good even with unfavorable water composition.
Trout, pike, tench, and sturgeon are also bred in artificial reservoirs.
Grass carp is one of the freshwater fish species suitable for pond farming.
Advantages and disadvantages of raising fish at home
An important advantage of backyard farming is the ability to obtain for personal consumption or sell all year round products in great demand.
Fish meat contains a lot of valuable substances and vitamins. The fresh catch has excellent taste.
The capital investment required to start fish farming is not very large. The labor intensity of cultivation is from 3 to 5 hours a day. Weather conditions when using an artificial reservoir have little effect on the growth of individuals.
Major investments take place on initial stage. It is necessary to build a pool or dig a pond.
 The main expenses during breeding are at the initial stage when making a pond
 Their type and size are determined by the financial capabilities of the owner and the area of the plot. The minimum depth of an artificial reservoir is 1-1.5 m. The volume is calculated from the estimated number of individuals populated in the pond. One fish 10-15 cm long should have at least 50 liters of water, i.e. in one cubic meter In a reservoir, no more than 20 specimens can coexist peacefully.
Types of breeding pools
Water quality in a mini pond, its chemical composition depend on the source of filling the pond. It also determines the temperature, availability of food and oxygen supply of the aquatic environment.
What type of reservoir filling exists:
- Stream or river. Water enters the reservoir from natural sources through an inflow channel. Excess is removed by a drain channel. The oxygen and plankton content in a pond with such filling is favorable for breeding, because closest to natural conditions.
- Rodnikovoe. Pure water with a high oxygen content is most favorable for fish breeding different breeds. For a source of food, daphnia pits are set up in the area adjacent to the reservoir - shallow small depressions for the reproduction of plankton. They communicate with the main body of water. Daphnia move into the pond and serve as food for the fish.
- Atmospheric. In the absence of rivers, streams and springs, the source of moisture is rain and melt water. Well-heated water is favorable for the development of vegetation and living organisms.
- Closed water supply. Using ponds without external sources water production became possible thanks to the use of special equipment: pumps, filters, ultraviolet sterilizers, etc. When constructing a reservoir, special attention should be paid to waterproofing the bottom.
 Fish pond with stream filling
 How to make a pond with your own hands
Having decided to build a fish pond on the site, you need to determine its location, area and method of construction. If there are no natural sources of filling, the reservoir is built using a closed water supply.
How to choose the right site
The location for the pond must meet the following conditions:
- be away from noisy places and highways,
- be shaded by trees, but not under them, because falling leaves pollute the water,
- do not be located in a lowland, because there is a risk of contamination from run-off rainwater,
- have a source of electricity for equipment with filters for water purification and oxygen enrichment plants.

Required tools and materials
The most durable is a pond with a concrete bottom. Its device requires significant material and labor costs, which will more than pay off during long-term operation.
To build a pond you will need:
- crushed stone,
- sand,
- cement,
- mesh made of reinforcement with a diameter of 3-4 mm and a cell of 30x30 cm,
- board formwork,
- roofing felt or other material for waterproofing the bottom and walls,
- tubes for inlet and drain holes,
- waterproofing additive for plaster bottom and walls.
Technology for creating an artificial reservoir at the dacha
- Mark the dimensions of the pond on the ground. To do this, use pegs and cord. For fish farming, the shape of the pond does not matter.
- Digging a pit by hand or using an excavator. The optimal depth is 1.5-1.8 m, wall angles are 20°.
- Before concreting, preparation is made of sand and crushed stone with the bottom compacted.
- Waterproofing is laid from roofing felt or film and brought to the surface of the ground.
- Pour the first layer of concrete onto the bottom 10 cm thick, compact and embed reinforcing mesh all over the bottom.
- The second layer of concrete is poured.
- Install formwork for the walls of the pond. IN finished form they should be 10-12 cm thick.
- The walls of the reservoir are reinforced and filled with concrete.
- Concrete surfaces are covered with plaster with a waterproofing additive or liquid glass. The material for treating walls must be safe for fish.
- Install necessary equipment: pumps, filters, oxygen enrichers of water.

For a safe wintering of fish, a wintering well should be provided. It is made from asbestos-cement pipes with a diameter of 80 cm or ordinary reinforced concrete rings. In a well buried to the level of 2.7 m, covered wooden shield, the fish will not freeze and die from lack of oxygen.
Even a beginner can build a pond with his own hands. Fish farming does not take much time if the process of stocking, feeding and catching is established. Even if the purpose of fish farming is not to generate income, this activity will bring benefits and pleasure.