Make machines for cold forging possible from scrap materials.
Since universal devices from manufacturers have a fairly high cost, a self-made machine for cold forging of metal will become great solution for people involved in the manufacture of forged products.
Today metal structures with unique design and bold architectural forms are used for furnishing houses in cottage villages.
Figuratively curved forged elements of gates, fences and gates bring an unusual image to landscape design estates.
In the proposed photos you can see what an unusual artistic look metal structures create.
What parts can be made on a cold forging machine?
Cold forging, unlike hot technology, is simple and safe. This process does not require the use of hot metal and precise adherence to operating temperature.
You can make a cold forging machine with your own hands specifically for the production of a certain type of part.


Also, a homemade machine will allow you to solve a wide variety of problems, so it will be simply universal.
With the help of a homemade machine, it will be possible to achieve the ideal geometry of metal elements for individual design idea and make original parts with a pattern yourself.
In the process of cold decorative forging, as a rule, soft metal is used - this can be nickel and magnesium alloys, steel, copper or brass.
Otherwise, the range of products produced on the machine will be limited only by the imagination and ability of the master.
If desired, you can make openwork elements for stairs, gates and fences with your own hands.
The use of decorative details will allow you to decorate fireplaces and barbecues, beautifully decorate the outer walls of the house and gazebo, and make original tripods for flowers, as in the photo.


Types of cold forging equipment
Existing types of machines can be operated with the participation electric motor or manual force.
The first version of the device makes it possible to perform work faster than manual ones, but at the same time requires certain skills from the master.
Forging machines are divided into types:
- snail - a machine with separate removable parts or solid cast - it is used when making spiral-shaped individual parts;
- universal device - used for cutting, riveting and adding volume to the product;
- bender - with its help you can perform arc bending of metal or bending parts at a certain angle;
- device for forming rings;
- twister - allows you to bend the product along the axis;
- press – to form a matrix imprint on the product;
- wave – for producing wave-like elements from metal rods.
Making the “Snail” machine
Using the list of tools and metal parts below, you can assemble a solid snail machine.
To work you will need:
- metal rods;
- steel sheets and strips;
- profile steel pipe;
- welding, pliers, grinder.

Drawings and step by step diagram, as well as watching a thematic video, will allow you to get a high-quality device with the necessary parameters:
- Using a piece of paper, draw on it an image of a spiral with three turns. Next, check the dimensions so that a reinforced rod with a diameter of 10 mm fits into the thread;
- Using a grinder, cut two plates from a steel sheet. The first should have parameters of 100x100 mm, the second - 130x130 mm;
- Take a 3 cm rod and three steel strips. The cut edges of all used parts must be sanded to remove burrs;
- Using pliers, bend the steel strips according to the template, as a result you will have three spiral parts with different lengths;
- Using welding, all elements of the machine are welded according to the diagram, welding work It is recommended to carry out it qualitatively, since the service life of the tool will depend on them;
- The steel pipe is welded last from the bottom in the center of the machine.
As a result of the work carried out, equipment for cold forging of metal should be obtained, as in the photo.

If, when decorating any interior elements with cutting profile pipes no one experiences difficulties, then if it is necessary to bend them, on the contrary, everything becomes more complicated.
Special bending machines for pipes, which you can do yourself in advance, will allow you to carry out such work efficiently and quickly.
Different drawings for the manufacture of this type of equipment can be used, depending on what materials will be used in the work.
At first glance, assembling a production-type machine for cold forging of metal, as in the photo, is difficult.

But if a master has already gained experience working with metal, nothing is impossible for him. The main thing is to choose a solid, stable foundation for the future structure.
For example, it could be a massive metal table made from pipes or profiles.
Since bending of the metal will occur due to the shafts present in the structure, it is necessary to select three such elements.
Each of them is a metal cylinder with thick walls and an axis of rotation. Two cylinders are fixed slightly above the table, and the third, central, is placed above them.
The distance of the two outer cylinders determines the angle at which the pipe will be bent.
In order to be able to change the position of the cylinders if necessary, it is necessary to make additions to the design drawings in the form of stoppers and rollers, which will make this part adjustable.
After the cylinders are fixed, it is necessary to organize a rotation transmission system for them.
For this purpose, they use a chain mechanism from an old car, which can be found on the spare parts market.
It is better if the mechanism is equipped with gears; if not, then they will have to be purchased separately.
The gears are mounted on the two outer cylinders and the tensioner is placed below the shafts in the center. Then one of the outer cylinders is equipped with a handle in order to create a rotating force.
The machine for cold forging of metal products is ready. The following video will help supplement the above material with details.
How to make a torsion bar machine
A machine for cold forging of torsion bar type products is used for twisting metal spirals in the form of a snake.
It is difficult to work with such a device manually, therefore, most often for the manufacture of a torsion bar, drawings with electrical versions of machines are used.
In order to properly assemble the torsion bar, we suggest watching the video and reading the instructions below.
Tools and materials for assembling the machine:
- steel sheet;
- I-beam;
- vices and fasteners;
- gearbox, electric motor, chain;
- Bulgarian;
- welding.
Action sequence diagram:
- The basis will be an I-beam, to one side of which a steel sheet must be welded;
- Then a vice is attached to the steel, welded and secured with bolts and nuts;
- To prevent the metal product from jumping out of the machine when tensioned, plates are attached to the vice from below and above;
- The other side of the I-beam is equipped with rollers, on which the platform is subsequently mounted;
- Another vice with movable main elements is attached to the surface of the resulting structure. In this case, both structures located along the edges of the I-beam will have to be located on the same level;
- Next, the structure is equipped with a steel handle made of rod; due to its rotation, the product will be bent;
- Using bolts, connect the reduction gearbox and the engine. The steering wheel rim is equipped with a chain;
- The structure is covered with a steel casing.
As a result of these actions, a machine with two blocks is obtained - movable and stationary.
Any master, setting up a home forge, acquires a minimum set of tools and accessories. But, as a rule, the simplest technological operations with metal blanks are done only at the first stage.
With the acquisition of experience in working with “iron”, both the desire and the need to engage in artistic forging appears - this is both home decoration and additional income. Unfortunately, a machine for giving samples a spiral shape - a snail - is practically not found on sale. One way or another, home craftsmen, as a rule, make it with their own hands. Features of independent design and assembly of a snail for cold forging are the topic of this article.
Features of the snail
The author specifically decided to draw the reader's attention to a number of points. This will help you avoid some mistakes in the future. For example, having understood the structure of the snail and the principle of its functioning, someone will want to assemble their own device, different from those whose drawings will be presented below.
Such a device (if we are talking about equipment made by hand) will allow bending samples with a cross-section (square side) of no more than 10 - 12 mm. This implies a snail model with " manual control" Almost no one has anything to do with larger samples in everyday life. The machine can be improved by installing a drive and an electric motor.
But how rational is this for a small home forge?
- Cold forging is carried out at low speeds. A sharp change in the geometry of the metal leads to the appearance of cracks (ruptures).
- You will have to not only select the power of the electric motor, but also gear ratio gearbox Plus, you need to mount the automation circuit with the installation of the corresponding elements (buttons, starter, and so on). All this significantly complicates the manufacture of the machine.
Conclusion - for a home forge, a snail is enough, with which you can bend metal products by hand. Anyone who understands all the nuances of its design and understands at least something about electrical engineering will be able to independently install an electric drive on it.
Making a snail
Several devices are shown in the figure. This is roughly how it should turn out (basically).

Assembling a snail with your own hands is one of the options for independent design, when you give recommendations indicating the exact parameters of all components doesn't make sense. Here you need to focus on your own idea of what will bend and how (radii, number of spiral turns, and so on). But if the essence of the manufacturing process becomes clear, then the assembly itself will not cause any difficulties.

Desktop device
The cold forging process requires a lot of effort. If you already have a ready-made workbench, you may have to strengthen it. When making a snail from scratch, the table frame is made only of metal - a channel, a corner, a thick-walled pipe.

It is clear that the tabletop should also be metal. During the operation of the snail, it will be subjected to both static and dynamic loads. Therefore, ordinary iron sheet is not suitable. Only a plate, and not less than 4 mm.

Marking and installation of “attached” equipment
Perhaps the most creative stage of work. You can do everything with your own hands. But how, taking into account the future or limiting ourselves to the production of similar samples?
Option 1. The simplest. The meaning of the operation is that the outline of a spiral is drawn on the tabletop.

Essentially, this is a sketch of future shaped parts, for example, from a rod. After this, it is enough to cut out several segments from a thick strip of iron, bent along a radius. They are welded to the tabletop, and the bending mechanism is basically ready.

Some may find this design more attractive – with a solid stripe.

But practice shows that it is more difficult to work with such a snail. For example, when removing from it finished product certain difficulties will arise.
Option 2. The same, but several contours are drawn. Holes are drilled along each one and threads are cut into them. All that remains is to prepare the templates for the stop segments. They are usually made with your own hands from thick cardboard or plywood.
Overlays are made from metal, in which, after the next marking, holes are also drilled, coinciding with the landing “sockets” in the slab. This design will make it possible to organize the production of spiral-shaped workpieces with different radii on one table. You will only have to, depending on the shape of the bend, install the appropriate segments in certain places. Their fastening to the base is bolted. You can do it differently. Instead of such stops, install cylindrical ones.

For fixation, they are attached with bolts (from the bottom of the slab) or are made immediately with legs (+ thread) and screwed into the tabletop. It's much more convenient with them. And if you have your own, then turning it with your own hands will take a couple of hours.
Option 3. Prepare several removable modules that can be changed as needed.

Snail assembly
The ploughshare is installed, the levers and the side stop are attached. All this is clearly visible in the pictures.

Everything that is in the shed (garage, attic) will be used - cuttings of pipes, rods, corners, and the like. If the principle of the snail’s operation is clear, then no further hints are required.
Functionality check
This is always implied, so no comment.
In principle, making a snail for cold forging is not so difficult. Moreover, there is no single standard for such devices. Someone will say - isn’t it easier to buy factory model? Firstly, as already said, you will have to search for a long time. Secondly, it is not a fact that her capabilities will coincide with the fantasies of the master. Thirdly, you will have to lighten your wallet by about 19,000 (manual) and 62,000 (electric model) rubles, at a minimum.
Good luck in making your own snail!
One way to decorate areas is to use forged items. Fences, benches, gazebos, stair railings and other similar structures look very decorative. Moreover, in most cases, these products are not forging in its traditional sense. Most often, this is done not in a forge or with a hammer and an anvil, but with the help of some devices that allow you to create a wide variety of patterns and products from metal strips and square rods. To make such products you will need cold forging machines. Some of them you can make with your own hands, others are easier to buy.
Fences, railings for stairs and balconies can also be made with your own hands. Railings for a porch are a decoration, and not a purely utilitarian device.
What kind of devices are used?
Cold forging is characterized by various curls, bends, twisted rods, etc. Almost every type is made on a separate device - a specific machine. They can be driven manually or electrically. For small volumes “for yourself”, manual cold forging machines are used. Although they are not particularly productive, they are much easier to manufacture. If it is necessary to put production on stream, similar devices are made, but with electric motors. In this case, there is almost no need to physically work, but the complexity of making the device increases significantly. In our material we will talk about manual machines for cold forging.
What devices are used:
- Torsion bars. With their help, tetrahedral rods or strips of metal are twisted in the longitudinal direction. The result is twisted columns, which are also called torsion bars.

- Flashlight. On this device, the rod is also twisted in the longitudinal direction, but it is also additionally bent in the transverse direction. It turns out something similar to a flashlight. Hence the name of the device.

This is how they make a flashlight
- Twisters or snails. Form flat curls of different diameters.

Device for cold forging snail - for forming curls
- Bending machines or benders. Allows you to bend rods or reinforcement at the required angle anywhere.

For bending anywhere and at any angle - bending machines (bending machines)
- Wave. In fact, this is also a gitik, but more complex design- it allows you to change the direction of bending, obtaining wavy details.

Machine "Volna" - for the formation of the appropriate relief
- Devices for processing the ends of parts - inertial stamping machines or other home-made devices.

Machines for shaping the ends of rods. In this case - crow's foot
For a beginning craftsman, the most relevant machine for cold forging is a snail. Only with its help you can make many interesting things - from a fence and gate to a bench and others similar products. In second place in terms of necessity is a torsion bar machine. It adds variety to the details. All the rest can be purchased or made as you improve and gain skill.
Homemade “Snails”
Essentially this is a modernized one), but these improvements make it easy to make curls from fairly thick rods (up to 10-12 mm cross-section) and repeat them with a high degree of accuracy.

These cold forging machines have several designs, but the easiest to implement is the option with round table, having a central leg. A lever with rollers on bearings at the end is movably attached to the leg. They make the bending process easier.
The table surface can be made of steel sheet with a thickness of 10 mm or more. For the leg, you can use any thick-walled round pipe. It is important to make the structure stable, since lateral forces will be applied, so side posts, spacers, and a stable base are needed.

Drawing of a cold forging machine “Snail”
It is easier to make a lever from a square pipe with a thick wall - at least 2-3 mm. The cross-section of the pipe is 25*40 mm or so. The lever can be attached to the leg using a bearing, or you can simply take a small piece of thick-walled pipe larger diameter, put it on the leg, and weld a stop strip on the bottom so that the lever does not fall down. The option with a bearing gives easier movement, but if there is lubrication, the second option also works.

The shape of the lever is also important. The lever is double, the upper part is working, the lower part is supporting. Wherever there are connections, it is advisable to add reinforcement, since the efforts are significant.

A mandrel or jig is fixed on the table - the shape along which the curls are bent. They are made in different diameters so that you can make curls of different diameters. Such mandrels can be prefabricated to form a larger number of bends. Each such sample must have rods that are installed in holes in the table. This is how this template is fixed. Also, its shape must be designed in such a way that the end of the rod is well fixed in it.

Often, mandrels are machined from a metal circle of a suitable diameter using a grinder, but there are options made of metal with steel plates welded onto it, curved accordingly.
How to make a similar machine for cold forging is in the next video. There is also a good description of how to bring the ends of the workpiece to a decent state - ordinary raw edges look very rough. There is special equipment for processing them, but, as it turns out, you can do it without it.
Torsion bar machine
As already mentioned, these cold forging machines allow you to make longitudinal bends on the rod. This is a relatively simple design. The main task is to fix one end of the rod motionless, attach a lever to the second, with which you can twist the workpiece.
A piece of profiled pipe with a thick wall (at least 3 mm) is suitable as a base. The retainer can be welded from the same rods, leaving a square gap of the required diameter. You can use a properly sized cable clamp (available at a rigging store). Any of these stops is welded to the base.

Cable holder - great for holding rods
Next, you need to somehow ensure grip and torsion of the second part of the workpiece. This can be done using two bearing units. A pipe of a suitable diameter is inserted inside, and a handle is welded to it on one side - the design resembles the letter “T”. On the other hand, a clamp is made in the pipe: four holes are drilled, nuts for 12 or 14 bolts are welded into them. The result is a good clamp - the bolts are tightened after the rod has been inserted.
An even simpler machine for making torsion bars using cold forging is in the next video.
Video about homemade devices and machines for cold forging
Forging machines are good tool for artistic and creative people who have a desire to create something beautiful and individual in their home, to highlight the interior, or to make a nice DIY gift for important people. There are two ways to forge metal. To forge something using the hot forging method, you need to make a lot of preparations and actions, so at home the easiest way to forge by hand is using the cold forging method. The learning curve for this process does not take much time, and there is a real opportunity to design a machine with your own hands.
The beginning of cold forging with homemade machines.
Cold forging with your own hands requires two mandatory actions - pressing and bending. To perform all these actions, it is not necessary to apply a certain temperature to the metal, but it is still necessary to carry out heat treatment.
To design something with your own hands, it is no longer necessary to have special machines for artistic forging; now you can create machines for forging metal at home. But you still can’t cope with such tools without experience. For all the work to be successful, you need to use metals of a certain thickness.
Homemade machine for cold forging can easily be used to create structures that will be much stronger than those made by stamping. Do-it-yourself forged products will turn out to be of high quality when everything is done correctly and without errors, because it is very difficult to correct them. After a few jobs, with the experience gained, you can begin to make excellent designs using homemade cold forging machines and fixtures.
During production large quantity For identical metal structures, it is best to use drawings prepared in advance. Drawings for do-it-yourself cold forging machines are prepared in advance. In some cases, it will be better to warm up the part in order to get rid of defects in the future. Those who have recently started using homemade machines for cold forging should first think through a work plan, as well as acquire the necessary skills. Help would be helpful here various videos lessons on the Internet, as well as special courses.
Machine components and necessary tools.
A do-it-yourself forging machine consists of certain devices. Among which must be:
- gnutik;
- snail;
- wave;
- globe;
- twister;
- flashlight;
These devices are best to use. You will need a do-it-yourself cold forging snail to weave steel rods. You can look at the photo to better see the design and an example of parts. Forging equipment for cold forging of metal plays an important role in the work. The main tool during the work will be a bender. This is a very simple element.

To process pipes with hexagonal and round cross-sections, a “wave” is used. A “flashlight” is used to bend metal rods, and a twister is somewhat similar to it, a very convenient device. A globe is made into a large arc of profile rods.
Cold forging machines are most profitable to do yourself, because not everything can be processed with hand tools, and the price for an artistic forging machine is very high. When a master, using his skills and equipment, creates a design, it will be unique and special, even if in some ways it will not be as high quality as the factory one. When manufacturing a large number of parts, it would be correct to create a coductor on an electric motor. This makes the work process easier.
A do-it-yourself cold forging machine must be suitable for types of work such as bending, twisting and drawing.
During the drawing process, the structure takes on a certain shape. Therefore, it must pass through the press, after which the cross-section of the primary material will become smaller. By flexible we mean creating a bend at the desired angle. For this you will need templates. Photos of drawings of forged products with your own hands are prepared in advance from which the template will be made. The curl is attached to the steel plate, and the sheet itself is secured in the machine holder. A slot is placed at the end of the workpiece, and the other end is secured in place. Using a lever, the end of the structure is influenced, which must be carried out along each bend of the plate, which is used as a template.
Video of a homemade machine for bending balusters.
Many experienced manufacturers assemble simple mechanisms with their own hands, which allow them to create unique designs. This is influenced by work experience. Drawings for do-it-yourself cold forging machines can be found in sufficient quantities on the Internet, as well as photos of cold forging products that can be obtained in the end. A photograph of such equipment allows the master to complete the drawing from scratch, if he has experience.
You can consider the “Snail” machine. Using it you can create various spirals or waves. To create such a machine, you need to have drawings for a do-it-yourself cold forging machine of this type, and also do everything in accordance with the technology. The working surface must consist of sheet metal. 4 mm thickness will be enough. Dimensions are set based on the size of the part. To give the shape, sheet metal 3 mm thick and in the form of strips is required. It is bent according to the template with pliers and a spiral is obtained.
To create a normal work process, you need to firmly fix one of the ends of the part. A rod equal to the width of the strips will help with this. To secure the work platform you will need to use a workbench. The main goal of everything is to give maximum immobility to the part, because during cold forging you need to put in a lot of effort.
Before starting the manufacture of any cold forging machine, tools for self made you need templates, sketches and various drawings, including a drawing for do-it-yourself cold forging equipment.
You can make your markings more accurate by using graph paper. You need to draw a spiral on it, where the turns in the radius will increase. Equal distance must be properly maintained between them. This condition will be mandatory only for creating symmetrical patterns.

Machine design.
To create any machine, you can use several options to choose from - collapsible, monolithic or solid. It is recommended to weld small rods along the entire length of the machine. For this purpose, it is worth drilling special holes at the work site. It is necessary to securely secure the ends of the parts that will bend.
This forging method is very popular among blacksmith beginners.
Using a machine for cold forging of metal made by hand, an inexperienced craftsman will be able to make forged balcony canopies, handrails for stairs, various window grilles, fences, numerous home furniture, fences, various forged accessories and decorative items that complement the interior of the premises, on similar to grates for fireplaces. This is a good option for beginners.
Collection of drawings of cold forging machines.
Drawing for a snail with a ploughshare.
The drawing shows the device of a bending scroll with a plowshare and the rules for working with it.

Detailed drawing of a snail machine.

Drawing of a device for bending the “Clamp”.


Drawing of the Gnutik device.


Video of cold forging equipment for small businesses.
- Advantages of cold forging
- Forging machine “Snail”
- Assembling the device
Making a cold forging machine with your own hands may be necessary if you love to tinker and don’t mind making something beautiful for your home interior, country estate, gifts for family and friends, or just for fun.

Cold forging allows you to make beautiful and high-quality metal products with your own hands.
The majestic beauty of products made using the forging method captivates the eye and attracts with elegant lines. In all the best houses one could certainly find such decorations as openwork metal curls. And in our time, when a considerable number of different technologies and materials have been developed, forged products have not lost their relevance.
Products obtained using forging are used in design along with plastic, glass and other decorative elements. Metal forging is done using hot or cold methods. To perform work using the hot method, it is necessary to fulfill a lot of special conditions, so it is not so easy to do it at home. A more accessible method is cold. It is easier to learn, and you can make equipment and forging machines yourself if you wish.
Advantages of cold forging

With the cold forging method, the main working processes are bending and pressing. To carry out such activities, you do not need to provide the metal with a certain temperature. But some heat treatment must still be carried out between stages of the operation.
It is not necessary to have full-fledged equipment for artistic forging at your disposal; many amateurs make some tools on their own. Using homemade devices, you can give products various fancy shapes. You just need to acquire some working skills. Be prepared for the fact that it will take some effort to bend the desired shape. Work can only be carried out using raw materials of a certain thickness.
Products produced using cold forging equipment are stronger than those that are cast or stamped. This happens because the metal rods passing through the equipment are pressed at the same time as giving them the desired shape. With this forging method, it is necessary to avoid mistakes, because they are almost impossible to correct. With experience, you will be able to create wonderful and attractive products at home.
Using equipment for cold metal forging, you can create the following products:

- window grilles;
- elements such as handrails for stairs, balcony canopies;
- home furniture - beds, chairs, tables;
- fences and fences;
- elements used in apartment design: tripods for flowers, fireplace mantels.
When hot forging, the master will need not only a special room, but also forging equipment, as well as some special conditions. With the cold working method, there is no need to preheat the workpiece, and the process itself is more economical. When processing a whole batch of similar elements at home, you can do everything using stencils. This makes it possible to significantly reduce production time and reduce labor costs. Sometimes the products have to be heated, heating is carried out at the joints to avoid unevenness. Beginning craftsmen are recommended to think carefully about the implementation plan before starting work; it would be useful to make a sketch of the desired product.
Return to contents
Forging equipment and tools
Manual equipment for performing cold forging operations includes several elements. Basic equipment that may be needed for work:
- snail;
- twister;
- wave;
- gnutik;
- flashlight;
- globe.

Some names may seem funny, but these are quite convenient for home use devices.
The main tool for work is a bender; it is designed to change the shape of metal. It is used to bend the product under the right angle or bending arcs with different radii.
The snail is used more often for twisting metal rods into spirals. It represents equipment for bending strips, rods, squares no larger than 12 mm, tubes and profiles to spiral shapes, products with different radii and shapes. When using such a tool, you can not limit the formed spiral within the radius and make it as large as necessary.
Fork – two conductors for bending currencies, used for hot and cold forging. The thickness of the raw material can be a maximum of 16 mm with the hot method, and 10 mm with the cold method.
A tool called a "flashlight" is used to bend metal elements. It is used to process metal rods with a diameter of 30 mm or less, or square profiles with a thickness of 16 mm or less.

Using a device such as a wave, wavy curved elements are made. It is also used for processing tubes with a round or hexagonal cross-section, and for tubes made of profiles.
A twister is somewhat reminiscent of a flashlight; with the help of both tools you can twist the rods around the longitudinal axis.
The globe helps to make a large arc from a square profile up to 12 mm thick. At the same time, the ends of the workpiece are also smoothly bent. This is how various convex decorative elements are created.
This kind of tool for cold forging is not at all complicated, so you can often find homemade ones. It is practically in no way inferior to the purchased one.
Return to contents
DIY forging equipment
Often, when working, it seems more appropriate to make homemade machines for cold forging. Not every element can be fully processed using only hand forging tools. And the cost of such equipment is quite high, even if we are talking about a simple snail machine.
If a home craftsman makes any product using a self-made jig, the thing will turn out to be unique, although in some characteristics it will be inferior to that made in an industrial environment. When you plan to produce a considerable number of parts using cold forging, it is more advisable to make a conductor with an electric motor. This way you can make your work tasks easier.

It would be useful to provide for the execution of basic types of work on the machine - twisting, bending, drawing. These devices can be combined when creating a conductor with your own hands.
During the drawing operation, the workpiece is given a certain shape. To do this, it must be passed through a press or rollers, while the cross-section of the source material will decrease.
The bending process involves bending the workpiece to the desired angle. This operation can be performed using templates. They must be done as follows: a sketch of the part is prepared, according to which a template is then made. Weld a curl onto a metal plate, then such a sheet is fixed on the machine in a holder. The end of the workpiece is inserted into the slot, the second is fixed (in some cases you can simply hold it). Using a lever, an impact is exerted on one end of the workpiece, which should be pulled along all the bends along the plate used as a template.
When creating a template, the welding seam must be carried out from the outside, otherwise it will interfere with further use products.
Many craftsmen independently assemble not very complex devices, with the help of which they can make quite intricate products. It all depends on the working skills of the master. You can consider one of these homemade models to understand the very principle of operation.
A homemade cold forging machine can come in handy if you like to tinker and don’t mind making something beautiful with your own hands for a country estate, home interior, gifts for loved ones, or just for the soul.
The majestic appearance of products made by forging attracts with graceful lines and captivates the eye. Since ancient times, in all best houses, one could certainly see such decorations as metal openwork curls. And even today, when a huge number of various materials and technologies have been developed, Forged Products have not lost their relevance.
Products made using forging are used in design along with glass, plastic and other decorative elements. Metal forging occurs in a cold or hot way. To perform hot forging process there are a lot of things to do special conditions , because it is very difficult for her to study at home. More in an accessible way is artistic cold forging. It is much easier to learn, and if you wish, you can make homemade cold forging machines with your own hands.
Cold forging requires two main processes:
- press;
- bending
 To carry out these activities, you do not need to impart any temperature to the metal. But a certain heat treatment must still occur between stages of work.
It is not necessary to have full-fledged artistic forging machines at your disposal; amateurs often make tools with their own hands. With the help of homemade equipment, you can give all sorts of fancy shapes to the workpieces. You just need to acquire certain work skills. Therefore, prepare for the fact that in order to bend the required figure, drawings and considerable effort will be needed. Work can only be carried out using raw materials of the required thickness.
Products that are produced using a homemade cold forging machine are much stronger than those that are made or cast using stamping. This happens due to the fact that the metal rods that pass through the equipment are pressed together to give them the required shape. With this forging method you need don't make mistakes, since they are practically uncorrectable. With the acquisition of skills, you will be able to create attractive and wonderful products with your own hands.
Using a homemade cold forging machine, you can make products such as:
- elements such as balcony canopies, handrails for stairs;
- bars on windows;
- fences and fences;
- home furniture - tables, chairs, beds;
- elements that are used in home design: fireplace mantels, tripods for flowers.
 During hot forging, the master needs not only a separate room, but also equipment for blacksmithing, as well as special conditions. With the cold method, there is no need to preheat the workpiece, and the process itself is much more economical.
When processing a large batch of similar products with your own hands, everything can be done using stencils and a drawing. This makes it possible to significantly reduce labor costs and reduce production time. Sometimes parts need to be heated; heating is done at the joints so that there is no curvature. For beginners It is recommended to carefully consider the manufacturing plan before carrying out work, it would be useful to have a video lesson and make a drawing of the future product.
Tools and equipment
A manual cold forging machine includes a number of elements. Necessary equipment that will be needed for work:
- twister;
- snail;
- gnutik;
- wave;
- globe;
- flashlight.
 Many names will seem funny, but these are quite convenient for homemade use devices.
The main tool for the work will be a bender, which is used to change the shape of the metal. Its function is to bend a part at the required angle or bend arcs with different radii.
The snail is used, as a rule, for twisting steel rods into spirals. This is equipment for bending rods, strips, tubes, squares and profiles to a spiral shape, products with various forms and radius. While using this tool there is no need to limit the radius of the created spiral and make the amount that is required.
The flashlight tool is necessary for bending metal parts. It is used to process metal rods with a cross-section of less than 30 mm, or square profiles with a cross-section of less than 16 mm.
Using a device such as a wave, wavy curved elements are made. They apply it and for pipe processing, which have a hexagonal or round cross-section.
Twister is somewhat similar to a flashlight. Using these two tools you can twist the rods around the axis.
Using a globe you can make a large arc from a profile rod up to 12 mm thick. Moreover, the ends of the workpiece also bend smoothly.
This tool for cold forging is absolutely not complicated, so you can often see homemade ones. It is almost in no way inferior to the factory one.
Forging machines
 Often, when working, it seems much more expedient to make cold forging machines with your own hands. Since not every element can be fully processed using only manual forging equipment. Yes and the price of this equipment is quite high, even when it comes to the simplest snail machine.
If a home craftsman makes a product using a self-made jig, the product will be unique, although in some respects it will be inferior to the one made in a factory. If you plan to make a large number of parts using cold forging, then it is best to make a conductor with an electric motor. This will make your work process easier.
It will be useful to provide for the production of basic types of work on the machine - drawing, bending and twisting. These devices can be combined when creating a conductor with your own hands.
During drawing, the product is given a certain shape. To do this, it needs to be passed through rollers or a press, and the cross-section of the feedstock will decrease.
The bending process consists of bending the part to the required angle. You can perform this operation using templates. They are made in this way: a drawing of the product is prepared, according to which a template is then made. Weld a curl onto the steel plate, then this sheet is mounted on the machine in a holder. The end of the workpiece is installed in the slot, the second end is fixed. Using a lever, one end of the product is applied, which must be pulled along all the bends of the plate used as a template.
When making a template, the welding seam must be carried out from the outside, otherwise it will interfere with the further operation of the product.
Often craftsmen themselves assemble simple devices with which they can make quite original products. It all depends on the experience of the master. Let's look at one of these homemade models to understand the principle itself.
Do-it-yourself “Snail” forging machine
 Using this machine, home craftsmen make all kinds of rings and spirals, curls, and waves. To make this kind of machine, you need to act according to drawings and technology, which includes a number of stages.
Before making any devices, hand tools or machines for artistic forging, it is necessary to complete graphic images, templates, sketches, and drawings of the future device.
To make markings more accurately, it is best to use graph paper. Draw a spiral on it, the radius of its turns gradually increasing. The same pitch must be observed between turns. It must be said that this condition must be observed only in cases where symmetry of patterns is required; as a rule, no more than 4 pieces are made.
Also take into account what kind of workpieces you need to work with. The distance between the turns must be made so that it is slightly larger than the diameter of the metal rods, otherwise it will be difficult to remove the finished product from the machine.
 For work surface Sheet iron will be needed. A thickness of four millimeters is quite enough. Sizing is determined based on dimensions necessary details. To make the mold, you will need sheet metal in the form of strips three millimeters thick. You can work with this material using hand tools. It is simply bent into a spiral using a template using pliers.
To create a full-fledged work process, it is necessary to securely fix one end of the product. Here you will need a piece of rod that is equal to the width of the strips. To fix the working platform you will need a workbench. Often a piece of thick-walled pipe is used as a stand. Main - provide maximum fixation, since during cold forging the forces applied are quite large.
Machine assembly
 To make any cold forging machine, there are many options. It can be made collapsible, monolithic or solid. With a monolithic design, the entire device or parts of the “Snail” are welded to the site.
Along the length of the structure you can weld small pieces of rods with a distance of 5-6 cm, special holes must be made for them in the working area. Do not forget to carefully secure the ends of the products that you will bend.
Cold forging is especially popular among beginners in blacksmithing. To manufacture products using this method, you do not need a well-equipped workshop (you can get by with a garage or shed), nor much experience, nor do you need special knowledge about the behavior of metals. As for the devices, All necessary machines and tools can be made with your own hands at home.
Let's look at the types of devices and the figures that can be obtained with their help. We have prepared drawings and thematic videos for you. We will also consider the sequence of making a cold forging machine with your own hands.
If you are just going to organize a cold forging workshop and want to avoid large expenses, then making your own machines and fixtures will help you create your own small business without excessive costs.
Basic devices and machines
Cold forging machines are mainly designed for arc or angle bending, as well as twisting. They can be manual or electrically driven.
The main types of machines and devices for cold forging:
- "Gnutik"
- "Twister"
- "Snail"
- "Globe"
- "Wave"
- "Flashlight"
Device "Gnutik"
Purchased or made independently, the “Gnutik” is a universal device that allows you to obtain an arc or angle from a rod. It consists of a base with a slider, on which a stop with an angle (90° or another as necessary) and two cylindrical fixed stops are fixed. By moving the slider and the angle stop, the rod bends at an angle. To obtain an arc, a third cylinder is provided, rotating on the side opposite to the angle stop.
The device can be made on a horizontal or vertical platform.
Axonometry of the device "Gnutik" - vertical arrangement
To scale the dimensions, here is a drawing of the bottom bar of this “Gnutik”.
Bottom bar
This device is universal. With the help of attachments you can not only bend, but also cut and punch holes. But this will be the next step.

Getting an arc on "Gnutik"

Getting an angle on "Gnutik"
This is what a homemade “Gnutik” looks like:

Twister device
“Twister” is a tool for twisting rods, mostly square, along the longitudinal axis. This simple device can be manual or electric. Operating principle: both ends of the rod are secured, then one fastening begins to rotate, twisting the metal to the required shape.

Appearance of a purchased manual “Twister”
Look at the photo of a homemade “Twister” with an electric drive, assembled using used electrical equipment:


There is a special machine for making “Lanterns” and “Cones”, but for starters you can also use a “Twister”, as shown in the video (English, but everything is very clear).
Video 1. How to make a blank for “Flashlight” on “Twister”
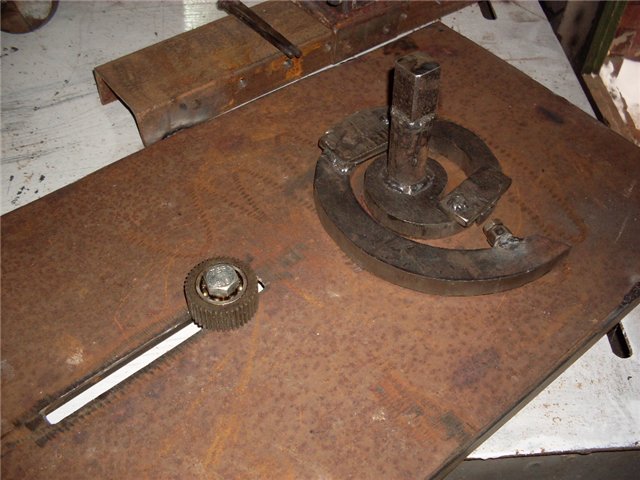
Device "Snail"
The Snail Tool is designed to create curls (or spirals) and “currencies” (S-shaped pieces). There are various designs.

One of the design options: 1 - snail ploughshare; 2 - base of the machine; 3 - pressure roller; 4 - lever for controlling the pressure roller; 5 - fastening the base; 6 - finger for fixing the plowshares; 7 - groove for the pressure roller; 8 - control lever axis; 9 - spring for pressing the roller; 10 - clamp for the workpiece; 11 - driving ploughshare of the snail; 12 - main axis; 13 - levers
The result should be something like this:

Another one lightweight design to bend rolled products with a cross-section up to 12 mm:

1 - cochlear segment; 2 - eccentric; 3 - handle; 4 - base; 5 - guide runners; 6 - axis; 7 - slider; 8 - axle nut; 9 - roller fastening axis; 10 - roller; 11 - drive axis; 12 - eccentric guide; 13 - central segment of the cochlea; 14 - eccentric wing; 15 - main leg; 16 - connecting pin of cochlea segments; 17 - adjustment screw; 18 - connecting ear of cochlear segments
Often the “Snail” device is made on a support, especially if you need to bend thick rolled products.

Several useful videos on homemade “Snail” machines.
Option with a massive base on a support:
Video 2. Making the base
Video 3. Making a snail
Video 4. Machine operation
Tabletop option:
Video 5. Part 1
Video 5. Part 2
We will talk more about such designs below.
"Globe" device
Such a device is similar in appearance to a school protractor and is designed for making arcs with a large bending radius from a strip, square, circle or hexagon. First, one end of the workpiece is fixed with a bend, then it is bent along its entire length according to the template. The principle of operation is somewhat similar to the operation of a canning machine.

Appearance of the device
Video 6. Working at Globus
Using exclusively muscular strength, arc large diameter can be made on a template screwed or welded to a workbench. It is good for bending strips, thin-walled pipes, etc.

Device "Wave"
You can produce wavy products from a round, square, hexagonal cross-section or tube using the “Wave” device. The deformation of the workpiece occurs between vertical rolls by scrolling.

Wave device and resulting products
Video 7. Device in action
Flashlight device
This machine produces blanks for “Lanterns” or “Pine Cones” elements, which can consist of 4, 6, 8 or more rods. According to the principle of operation, the machine is similar to the “Twister”, but here the workpieces are bent around the guide shaft, which forms a more correct and accurate configuration of the product.

Flashlight device
Video 8. Operation of the device for making “Flashlight”
Device for cold forging of the “Clamp” element
The cold forging element “Clamp” is designed to fix other structural elements together.

The device for bending the “Clamp” can be made according to the attached drawings.
Devices for making crow's feet
“Crow's foot” - flattening with the application of beautiful notches at the ends of the workpieces to make the structure more elegant or to reduce the thickness for various joints.

The ends of the elements are decorated with “houndstooth”
This operation can be performed using a machine with a die or fixture and a heavy forging hammer on an anvil. We provide both options in the form of videos.
Video 9. Machine for making " crow's foot»
Video 10. Devices for forging crow's feet
Video 11. Detailed Process stamp making
Below is a rolling machine to perform the same operation.

Machine for rolling "crow's feet" (the distance between the rollers is adjustable). Materials for a rolling machine: gears and shafts - spare parts from a used combine

Operating principle
Making a "Snail" with a drive
The electrically driven "snail" facilitates the production of curls and "currencies". This is especially valuable when the work is not “for the soul”, but for the production of a large number of similar products on stream when working to order.
Below are the stages of assembling a machine for bending a rod with a maximum cross-section of 10x10 mm. The 0.5 kW/1000 rpm engine operates at the limit of its capabilities. Performs 6 shaft revolutions per minute. The snail segments are machined from a round blank St.45 without heat treatment, 25 mm high and 20 mm thick. The snail is mounted on a shaft on bearings from the rear wheel of a motorcycle - 7204. The support roller is firmly fixed in the groove. Pulleys are installed between the engine and the gearbox.


Below are drawings of the cochlea segments.

Snail element 1

Snail element 2

Snail element 3

Snail centerpiece
For a more massive rod (from 12 mm), the motor power should be more than a kilowatt. The photographs below show a machine with a 2.2 kW, 1000 rpm motor, giving a shaft output of about 10 rpm. This is already a machine for professional use. A used gearbox was used, the matrix was cut from a workpiece 30 mm thick - the most labor-intensive process.

![]()

For cold forging you will also need an anvil and a hammer. A forge is not needed, it is only required for hot forging.
Advice! Before starting work, draw a full-size sketch of the future structure. This will help you adjust the elements and not get confused during assembly.
You can make machines for cold forging from scrap materials.
Since universal devices from manufacturers have a fairly high cost, a self-made machine for cold forging of metal will be an excellent solution for people involved in the manufacture of forged products.
Today, metal structures with a unique design and bold architectural forms are used to furnish houses in cottage villages.
Figuratively curved forged elements of gates, fences and wickets bring an unusual image to the landscape design of the estate.
In the proposed photos you can see what an unusual artistic look metal structures create.
What parts can be made on a cold forging machine?
Cold forging, unlike hot technology, is simple and safe. This process does not require the use of hot metal and precise adherence to operating temperature.
You can make a cold forging machine with your own hands specifically for the production of a certain type of part.


Also, a homemade machine will allow you to solve a wide variety of problems, so it will be simply universal.
With the help of a homemade machine, you will be able to achieve the ideal geometry of metal elements for an individual design idea and make your own original parts with a pattern.
In the process of cold decorative forging, as a rule, soft metal is used - this can be nickel and magnesium alloys, steel, copper or brass.
Otherwise, the range of products produced on the machine will be limited only by the imagination and ability of the master.
If desired, you can make openwork elements for stairs, gates and fences with your own hands.
The use of decorative details will allow you to decorate fireplaces and barbecues, beautifully decorate the outer walls of the house and gazebo, and make original tripods for flowers, as in the photo.


Types of cold forging equipment
Existing types of machines can be operated using an electric motor or manual force.
The first version of the device makes it possible to perform work faster than manual machines, but at the same time requires certain skills from the master.
Forging machines are divided into types:
- snail - a machine with separate removable parts or solid cast - it is used when making spiral-shaped individual parts;
- universal device - used for cutting, riveting and adding volume to the product;
- bender - with its help you can perform arc bending of metal or bending parts at a certain angle;
- device for forming rings;
- twister - allows you to bend the product along the axis;
- press – to form a matrix imprint on the product;
- wave – for producing wave-like elements from metal rods.
Making the “Snail” machine
Using the list of tools and metal parts below, you can assemble a solid snail machine.
To work you will need:
- metal rods;
- steel sheets and strips;
- profile steel pipe;
- welding, pliers, grinder.

Drawings and a step-by-step diagram, as well as watching a thematic video, will allow you to get a high-quality device with the necessary parameters:
- Using a piece of paper, draw on it an image of a spiral with three turns. Next, check the dimensions so that a reinforced rod with a diameter of 10 mm fits into the thread;
- Using a grinder, cut two plates from a steel sheet. The first should have parameters of 100x100 mm, the second - 130x130 mm;
- Take a 3 cm rod and three steel strips. The cut edges of all used parts must be sanded to remove burrs;
- Using pliers, bend the steel strips according to the template, as a result you will have three spiral parts with different lengths;
- Using welding, all elements of the machine are welded according to the scheme; it is recommended to carry out welding work efficiently, since the service life of the tool will depend on them;
- The steel pipe is welded last from the bottom in the center of the machine.
As a result of the work carried out, equipment for cold forging of metal should be obtained, as in the photo.

If no one experiences any difficulties when decorating any interior elements with cutting profile pipes, then if it is necessary to bend them, on the contrary, everything becomes more complicated.
Special bending machines for pipes, which you can do yourself in advance, will allow you to carry out such work efficiently and quickly.
Different drawings for the manufacture of this type of equipment can be used, depending on what materials will be used in the work.
At first glance, assembling a production-type machine for cold forging of metal, as in the photo, is difficult.

But if a master has already gained experience working with metal, nothing is impossible for him. The main thing is to choose a solid, stable foundation for the future structure.
For example, it could be a massive metal table made from pipes or profiles.
Since bending of the metal will occur due to the shafts present in the structure, it is necessary to select three such elements.
Each of them is a metal cylinder with thick walls and an axis of rotation. Two cylinders are fixed slightly above the table, and the third, central, is placed above them.
The distance of the two outer cylinders determines the angle at which the pipe will be bent.
In order to be able to change the position of the cylinders if necessary, it is necessary to make additions to the design drawings in the form of stoppers and rollers, which will make this part adjustable.
After the cylinders are fixed, it is necessary to organize a rotation transmission system for them.
For this purpose, they use a chain mechanism from an old car, which can be found on the spare parts market.
It is better if the mechanism is equipped with gears; if not, then they will have to be purchased separately.
The gears are mounted on the two outer cylinders and the tensioner is placed below the shafts in the center. Then one of the outer cylinders is equipped with a handle in order to create a rotating force.
The machine for cold forging of metal products is ready. The following video will help supplement the above material with details.
How to make a torsion bar machine
A machine for cold forging of torsion bar type products is used for twisting metal spirals in the form of a snake.
It is difficult to work with such a device manually, therefore, most often for the manufacture of a torsion bar, drawings with electrical versions of machines are used.
In order to properly assemble the torsion bar, we suggest watching the video and reading the instructions below.
Tools and materials for assembling the machine:
- steel sheet;
- I-beam;
- vices and fasteners;
- gearbox, electric motor, chain;
- Bulgarian;
- welding.
Action sequence diagram:
- The basis will be an I-beam, to one side of which a steel sheet must be welded;
- Then a vice is attached to the steel, welded and secured with bolts and nuts;
- To prevent the metal product from jumping out of the machine when tensioned, plates are attached to the vice from below and above;
- The other side of the I-beam is equipped with rollers, on which the platform is subsequently mounted;
- Another vice with movable main elements is attached to the surface of the resulting structure. In this case, both structures located along the edges of the I-beam will have to be located on the same level;
- Next, the structure is equipped with a steel handle made of rod; due to its rotation, the product will be bent;
- Using bolts, connect the reduction gearbox and the engine. The steering wheel rim is equipped with a chain;
- The structure is covered with a steel casing.
As a result of these actions, a machine with two blocks is obtained - movable and stationary.
Forged hardware They add color to any interior and look very aesthetically pleasing. But not every home or dacha owner wants to have the standard solutions that the market offers. In addition, they are forged decorative elements very expensive.
Homemade device for cold forging
Hot forging requires serious skills, equipment and work space. The ideal solution for realizing your design fantasies are cold forging devices. Not everyone can afford to buy such machines, but making the device yourself is not so difficult.
1 Advantages of cold forging
When processing metal using this method, heating is not required. Consequently, no furnaces, no temperature control, no skills in working with hot metal, no special work areas, etc. are required. In addition, there is no danger of serious burns.
Cold forging devices involve bending and pressing of metal. Machines for performing these processes can be either electric (you will need an electric motor and gearbox) or manual. They are easy to make with your own hands and easy to maintain. The design of the units themselves is absolutely elementary, but it is worth knowing that the process of hand forging itself requires considerable effort from the worker.
Unlike decorative elements obtained by processing hot metal, a cold forged product can always be remade if necessary. It unbends as easily as it bends.

To give a curved shape to metal on a machine, high temperatures are not required
The method of creating decorative elements from metal without heating is very convenient when you need to make many of the same ones. In this case, it is made homemade device for a specific drawing with specific dimensions and template actions are performed.
A bending machine significantly saves time, effort and financial costs on equipment of the premises and the metal processing work itself.
1.1 Purpose of the device
The cold forging device allows you to perform absolutely all work, performed by a blacksmith who processes hot metal. Hand tools will cope perfectly with the production of such decorative elements as:
- window grilles;
- constructive for handrails of stairs, benches, chairs;
- legs, frames and other elements of home furniture;
- design of various fences, gates, wickets;
- flower stands, fireplace grates, shelves and much more.
In the cold forging process, exclusively soft metals are used, such as aluminum, duralumin, steel, copper, brass, magnesium and nickel alloys.

Examples of products made using the cold forging method of metal
1.2 Types of units
To create a decorative forged metal interior, you will need several types of parts. Among them are spiral rods, arcs, spirals, various parts made of sheet metal.
It is almost impossible to make a universal machine for cold forging with your own hands, so to create each element you will have to make a separate device. Such devices include the following units:
- Gnutik. Allows you to produce metal arcs curved at a certain angle.
- Snail. This device is designed for bending reinforcing and profile bars into a spiral.
- Twister. A tool for bending a rod into a spiral along its axis.
- Wave. A device designed for bending a reinforcing or profile rod into a wave element.
- Ring. For making rings and ovals.
- Press. A device designed for flattening metal products.
- Hammer and anvil. Very helpful universal tools, allowing you to correct shortcomings.
All units designed to perform the above tasks can be either manual or electric.

Snails for bending metal rods in a spiral
To operate the latter, you will need an electric motor and gearbox. Electrical machines, having an engine and a gearbox, they perform work much faster and make the lot easier for the worker himself.
to menu
2 How to make a cold forging machine at home?
Making a machine of any of the above types with your own hands at home is very simple. You don’t need any fancy tools or expensive mechanisms and materials for this. Everything you need for such a device can be found in almost any garage.
to menu
2.1 Materials and tools
Regardless of what kind of device you plan to make, you will need the following materials:
- sheet metal 4-5 mm thick;
- reinforcing bars, profile bars or profile pipe;
- stable bed;
- If we are going to make an electric bending machine rather than a manual one, we will need a low-speed motor and gearbox.

Homemade cold forging machine
To organize the process of manufacturing a unit for cold forging, you need to stock up on the following tools:
- “grinder” for cutting metal elements (if you don’t have one, use a metal file);
- welding machine;
- emery stone and sandpaper;
- vices and pliers;
- paper, pencil, marker;
- tape measure or centimeter.
2.2 Manual machine “snail”
Spiral-shaped elements are most often used to create a “forged” interior. Therefore, we will begin our consideration of the production process with the snail machine.
A homemade electric unit will require, in addition to the usual set of parts, the use of a motor and gearbox. The gearbox is used to reduce engine speed. But we'll talk about this later. In the meantime, let's look step by step at how to make a hand-held device.
We also note that one machine can make spirals of different diameters, but for this you will need a removable volute. This can be achieved in two ways: solid metal removable circles with a welded scroll, or one circle with removable parts of the spiral.
- First we need a piece of paper and a pencil. We draw the snail we need on the sheet, maintaining all the actual dimensions. It must be taken into account that the thickness of the lines in the diagram must correspond to the thickness of the metal, which is taken to make a spiral(ideally 4-5 mm), and the distance between the turns should be 12-13 mm (for cold forging, rods up to 10 mm are used, which should fit freely into the groove).
- From sheet metal with a thickness of 4 to 10 mm, cut out a circle with a diameter of 70 cm. If you plan to make only small spirals, the circle can be cut with a smaller diameter. If the elements are larger, cut a circle larger than 70 mm. If the circles are removable, try not to take very thick metal (4-5 mm is enough), since changing the circles will be very difficult.
- IN manual version the circle must be permanently fixed to the frame, since bending the metal around a spiral using a lever is much easier than rotating the circle. Before welding the circle, you need to weld a metal rod with a diameter of 20-30 mm to the frame and put a bearing on it (all this can be found in old car parts).
- We are making a bed. It can be made of any material. Main requirements: 1) the bed must be strong and firmly fixed to the floor ( best option– concrete the legs). 2) the base should not protrude beyond the working circle in diameter.
- Let's return to processing the working circle. We need to attach the snail elements to it.
Snail for cold forging
The homemade apparatus for cold forging is ready. You can lay the rod, fix it, rest against it with a bending barrel and walk around until you get the desired product.
to menu
2.3 DIY cold forging machine 3 in 1 (video)
to menu
2.4 Electrical analogue
The only difference is that the engine must rotate the working circle through a reduction gearbox. The bending barrel is welded directly to the circle without affecting the gearbox. Otherwise, the manufacturing principle of the unit is absolutely identical, and the gearbox and electric motor only complement it.
Metal products made using forging have long become very popular due to their beauty and sophistication. Such decorative elements are quite expensive and it is not always possible to order all the desired decorations for the interior or Vacation home. But, in addition to the hot type of forging, which is needed in order to create metal decorative structures, there is a cold variety. The last option can be implemented independently; for this you will need to build a cold forging machine with your own hands, after which you can begin to implement all your plans and ideas.

DIY hodol forging machine

Types of machines
Basically, all devices that are intended for the manufacture of metal parts using cold forging are characterized manual drive. Few of them operate on the electric drive principle, although such a structure can be built with each of the devices. The only question regarding the drive is its feasibility, because the cost of the energy resource that powers the unit and the complexity of the installation process of the mechanism may not be justified if they are correlated with the amount of work performed and its regularity.


The table shows all the devices that operate due to the drive manual type related to the cold forging process.
| Device | Short description |
| Twister | With the help of such a device, the metal is twisted, spirals and curls with a narrow core are formed. |
| Torsion bar machines | With the help of such a machine, the rods are twisted screw type, and it is also possible to produce large spirals and filaments (baskets, lanterns and bulbs). |
| Inertial stamping machines | They are intended for making connecting parts with decorative components, making patterned tips and various small patterns and reliefs. |
| Bending machines | There are several types of such machines: push, broach and combined types. The first variety is needed in order to obtain wavy bends or to bend a rod in a zigzag manner. The extended variety is in demand when it is necessary to make a ring, curl or spiral with a wide core. Using the combined variety, you can build any of the listed elements. |

Help: very often in some sources you can find the name of machines designed for torsion as well as for machines that do winding - twisters. However, this is not entirely true; machines that twist metal are torsion bar machines.

Video on how to make a cold forging machine with your own hands.
Differences of cold forging
There is such a thing as “stamping”, which is sometimes confused with the cold type of forging. Cold forging itself has 2 principles according to which this process can occur. The table shows the differences between the processes.
| Process | Description |
| Stamping | The stamping process can be described as the extrusion of certain shapes using a punch that works at high level pressure. An example of the stamping process is an aluminum can. Heating of the metal is not used in this case. The ability to apply such technology at home is hardly possible, since it is impossible to create the necessary conditions for this. |
| Cold forging type (riveting) | This type of cold forging, in fact, is cold hardening, namely, a certain number of blows are carried out in the process great strength, which allows the metal structure to change and become the required parameters in size and shape. This manipulation is carried out using a hammer, which you can also build with your own hands. |
| Cold forging type (bending) | Another type is bending. With this technology, the metal structure remains the same without changing its characteristics. This type of forging can be used at home; all you need to do is create a cold forging machine with your own hands. |
Cold forging, which is carried out on the principle of bending, is quite simple to do, especially if you have special stationary equipment that significantly facilitates the process. The advantage of this variety is that you can assemble almost any cold forging machine with your own hands without much expense.

Video review of a manual machine for forging metal
Construction of cold forging machines
Each device for cold forging has its own characteristics and parameters. In order to easily make a cold forging machine with your own hands, you need to understand what each of them is.
| Machine | Device | |
Bending machines  | The design of this device is such that by changing the rollers and wedges, the size of the waves and bends changes. They can bend rods up to 16 mm. The only caveat of this device is that it cannot be made independently, because it requires processing and turning many parts of the exact size. The cost of such a device is low. | |
Twister  | The unit works by equipping it with a special template, onto which the piece of metal being processed is pressed. The pressure must be very high, so those who work on the twister must have sufficient strength to do this. In addition, the safety of the template itself is ensured by the presence of a persistent horn (end). As for the middle horn, which is otherwise called the encircling horn, it should be made in such a way that it can change its position and be fixed in it. The efficiency of work depends on this, especially for those who are starting the process for the first time. | |
| Base with spacers | This unit will allow you to make patterns of absolutely any variation. The design itself is very simple and consists of a plate made of durable and reliable material into which spacers are screwed at a certain distance. For such purposes, you can use bolts with sizes from m8 to m24. The thickness of the metal depends only on the skill of the person working on the machine. Basically, this device is well suited for metal with a thickness of 6 mm. | |
| Snails Twister machine | With collar  | This installation consists of a base plate on which a special coil is located. This coil is used as a template for the future product. The peculiarity of the machine is that the “snail” template is divided into several parts, which are secured to each other using special connecting elements, which allows the template to vary in shape during operation, which creates various kinds of waves and bends. There are also disadvantages to this design, since in order to make such a machine for cold forging with your own hands, you need to select a very durable material that will not bend over time. Also think over the connecting loops, which are quite vulnerable, given the amount of force with which the entire process of bending the metal occurs. |
Lever type  | In this type of snail machine, the template is attached very firmly to the base. Due to this fact, its productivity is lower, however, its reliability is greater. Using a special lever, the metal plate is pressed against the template; at the same time, the movable roller must be moved during the process. To make such a cold forging machine with your own hands, you can use steel material, which is distinguished by its strength, and the roller can be made from a conventional roller bearing. In general, the design is similar to a pipe bender. | |
Torsion bar machine  | Such a device will be good for screw twisting rods. This machine is made from a base cylindrical made of metal and two fastening and simultaneously twisting elements. It is advisable to equip such a structure with a special pair of paws that will not allow the metal being processed to bend in ways that are not necessary. The principle of operation of the machine is such that the rod is placed in the elements holding it, clamped at one end, and at the other end, using a rotating spindle, twisted until the right size helical wave. | |

Equipping a torsion bar cold forging machine with an electric drive
In order to increase not only the efficiency of work on a cold forging unit, twisting rods into a helical wave, but also to increase the speed, as well as ensure stability and not be subject to overfatigue, you can install an electric type drive.

Working by hand, it is quite difficult to make all the decorative elements made of metal rods the same, since the uniformity of the rotational moment in such a situation will vary greatly. In order to avoid errors in the manufacture of products, you can use:
- axle shaft from the car, which is installed on the drive axle;
- you will also need a differential gear pair;
- For protection it is worth using a casing.
From the listed devices you can build an electric drive for a torsion bar machine. It is better for such an engine not to exceed power ratings of 900 rpm and 3 kW.
Building a curl for the machine with your own hands
Before you start creating a cold forging machine with your own hands, you need to be able to calculate the parameters of a template spiral, because there are practically no special programs for such purposes. Such a template should not only be technically competent, but also have an attractive appearance.

The calculations for this pattern are based on a logarithmic spiral. Some nuances during construction can be highlighted in the following list:
- the beginning of the construction is taken at point R0;
- the turning radius will be equal to a fixed angle;
- the length of such an angle must be multiplied by the divergence of the coil;
- the discrepancy in the standard version is generally taken to be 1.2;
- for simplicity of calculations, as well as maintaining accuracy, the bending angle is best taken at an angle of 45 degrees;
- if there is a need to build a template that will have a denser spiral, then the 8th part (s) of the unit distance from the spiral should be added to the radius;
- As for r0, it must be equal in cross-sectional size to the diameter size of the workpiece for the spiral.
Important: r0 can take any value, it all depends on what characteristics the metal is used for the workpiece, namely its density.
Taking into account all the nuances, you can start making a “snail” template; for this, it is best to be able to solve equations that have a cubic degree and higher. There is no exact formula for calculating such a device, but there is one that allows you to achieve the optimal result. The sequence when constructing a spiral template can be like this:
- the initial point r0 is determined first;
- the turns that the template will have are taken arbitrarily, their number can be any;
- using tabular data, you should calculate the diameter (b), while ensuring that it is smaller in width in the opening for the template;
- using the formula, the radius R is calculated;
- the last step is to transfer all the obtained points in accordance with the scale, after which you can proceed directly to construction. In the process, let’s adjust the radius R in the final version using a similar formula.
Help: if it becomes necessary to calculate intermediate values, then this is done in accordance with the geometric proportion.
Construction of a cold forging machine
When drawing up a drawing to further create a template for the machine, it is best to make sure that it has the maximum number of different variations regarding bends and waves. Having such blanks, you can create a cold forging machine with many interchangeable attachments, which will make it possible to produce various patterns and monograms.


Sequence of actions when creating a device:
- Initially, you will need a metal sheet, the size of which will depend on the number of patterns placed on it. The templates themselves should be placed in such a way that there is room for the manufacture of products, because during the process the material from the nozzles may shift due to lack of space. Also, if the templates are not sufficiently spaced from each other, complications may arise in the work.
- As for the variations of the templates themselves, they can be either simple or contain more than one turn of the monogram. You can make a similar ploughshare-type snail and think through the design of the bends in the disassembled and assembled state. At the same time, you should be careful when selecting the material for fixing the sliding parts - it should be as durable as possible.
- The change of nozzles can be ensured by making a rectangular slot; replaceable templates for forging can be inserted into it. They should all be attached to metal plates shaped like a rectangle. Fastening of such nozzles will be ensured using bolts.
Video instruction
Assembling the device
This version of the machine is used as an example because of its simplicity. Knowing the basic principles and sequence of equipment design, you can upgrade it at will. To assemble all parts of the equipment into a single whole, you will need to use:
- drill with carbide type drills;
- welding machine;
- a saw cutting metal or a hacksaw;
- metal sheet of the selected size;
- round metal pipe;
- metal rod;
- bearings of different sizes;
- bolts size M8.

To assemble a cold forging machine with your own hands, you need to use a proven sequence of actions:
- Initially, you need to assemble a stand that will serve as a support. To do this, all its components (pipe sections of the same size and the joints between them at the top and bottom edges) must be connected into a single whole. The design may resemble a stool in appearance. The connection is made using a welding machine, and the sections are cut with a saw.
- The next step is cutting the metal sheets. You should get circles of equal diameters and four triangles with equal sides. Triangular-shaped elements must be welded to the bottom of the connected pipe structure in such a way that something similar to a pyramid is formed. The base, which has a wider area, must be welded at the central point of the cut circle.
- Four strips that are located horizontally must be attached to a circle with an already welded element. This should be done using bolts; for this you will need a drill to make the holes.
- The next step is the construction of the handle. To do this you need to use two rods of different lengths. Their sizes can be determined by correlating them with the diameter of the circle. One rod should be commensurate with the diameter, the other should slightly exceed its size. When bending the first rod, you should maintain an angle of 30 degrees. Then weld both rods to each other, and then weld another rod into the lower part. There should also be a jumper between the first two sections, to which a lever is attached by welding, which should maintain the direction towards the structure made of rods.

A bearing for future directional variability in the device must be attached to the end of the attached lever, as well as to the segment located at the bottom of the structure. The upper section serves as a mount for a metal coil, which must be installed horizontally - it makes it possible to bend the metal. On the lower side of the segment, where there is a free end, a hole should be made equal in diameter to the size of the pipe section.


Anyone who decides to take up forging seriously and make a cold forging machine with their own hands should be very scrupulous at the stage of creating drawings and calculations. Otherwise, the creation process is quite simple, and once you understand the principle of equipment design, you can come up with various variations of it that will help improve the product.
One way to decorate areas is to use forged items. Fences, benches, gazebos, stair railings and other similar structures look very decorative. Moreover, in most cases, these products are not forging in its traditional sense. Most often, this is done not in a forge or with a hammer and an anvil, but with the help of some devices that allow you to create a wide variety of patterns and products from metal strips and square rods. To make such products you will need cold forging machines. Some of them you can make with your own hands, others are easier to buy.
What kind of devices are used?
Cold forging is characterized by various curls, bends, twisted rods, etc. Almost every type is made on a separate device - a specific machine. Their drive may be manual, or perhaps electric. For small volumes “for yourself”, manual cold forging machines are used. Although they are not particularly productive, they are much easier to manufacture. If it is necessary to put production on stream, similar devices are made, but with electric motors. In this case, there is almost no need to physically work, but the complexity of making the device increases significantly. In our material we will talk about manual machines for cold forging.
What devices are used:
- Torsion bars. With their help, tetrahedral rods or strips of metal are twisted in the longitudinal direction. The result is twisted columns, which are also called torsion bars.

This is what a torsion bar and the machine of the same name look like

This is how they make a flashlight

Device for cold forging snail - for forming curls

For bending anywhere and at any angle - bending machines (bending machines)

Machine "Volna" - for the formation of the appropriate relief

Machines for shaping the ends of rods. In this case - crow's foot
For a beginning craftsman, the most relevant machine for cold forging is a snail. Only with its help you can make many interesting things - from a fence and gate to a bench and other similar products. In second place in terms of necessity is a torsion bar machine. It adds variety to the details. All the rest can be purchased or made as you improve and gain skill.
Homemade “Snails”
Essentially it's a modernized bending machine(pipe bender), but these improvements make it easy to make curls from fairly thick rods (with a cross-section of up to 10-12 mm) and repeat them with a high degree of accuracy.

One of the homemade cold forging machines
These cold forging machines have several designs, but the easiest to implement is the one with a round table with a central leg. A lever with rollers on bearings at the end is movably attached to the leg. They make the bending process easier.
The table surface can be made of steel sheet with a thickness of 10 mm or more. For the leg, you can use any thick-walled round pipe. It is important to make the structure stable, since lateral forces will be applied, so side posts, spacers, and a stable base are needed.

Drawing of a cold forging machine “Snail”
It is easier to make a lever from a square pipe with a thick wall - at least 2-3 mm. The cross-section of the pipe is 25*40 mm or so. The lever can be attached to the leg using a bearing, or you can simply take a small piece of thick-walled pipe with a larger diameter, put it on the leg, and weld a stop strip on the bottom so that the lever does not fall down. The option with a bearing gives easier movement, but if there is lubrication, the second option also works.

Lever mounting option
The shape of the lever is also important. The lever is double, the upper part is working, the lower part is supporting. Wherever there are connections, it is advisable to add reinforcement, since the efforts are significant.

The lever must be reliable, with reinforcement
A mandrel or jig is fixed on the table - the shape along which the curls are bent. They are made in different diameters so that you can make curls of different diameters. Such mandrels can be prefabricated to form a larger number of bends. Each such sample must have rods that are installed in holes in the table. This is how this template is fixed. Also, its shape must be designed in such a way that the end of the rod is well fixed in it.

Variant of conductors for the snail
Often, mandrels are machined from a metal circle of a suitable diameter using a grinder, but there are options made of metal with steel plates welded onto it, curved accordingly.
How to make a similar machine for cold forging is in the next video. There is also a good description of how to bring the ends of the workpiece to a decent condition - ordinary raw edges look very rough. There is special equipment for processing them, but, as it turns out, you can do it without it.
Torsion bar machine
As already mentioned, these cold forging machines allow you to make longitudinal bends on the rod. This is a relatively simple design. The main task is to fix one end of the rod motionless, attach a lever to the second, with which you can twist the workpiece.
A piece of profiled pipe with a thick wall (at least 3 mm) is suitable as a base. The retainer can be welded from the same rods, leaving a square gap of the required diameter. You can use a properly sized cable clamp (available at a rigging store). Any of these stops is welded to the base.

Cable holder - excellent rod clamp
Next, you need to somehow ensure grip and torsion of the second part of the workpiece. This can be done using two bearing units. A pipe of a suitable diameter is inserted inside, and a handle is welded to it on one side - the design resembles the letter “T”. On the other hand, a clamp is made in the pipe: four holes are drilled, nuts for 12 or 14 bolts are welded into them. The result is a good clamp - the bolts are tightened after the rod has been inserted.
An even simpler machine for making torsion bars using cold forging is in the next video.
Video about homemade devices and machines for cold forging