Wallpaper appeared in the 16th century and is still a popular method decorations home interior, bringing personality to the living space.
To bring fresh breath into your interior, you need to approach the issue of wallpapering with skill and even a certain skill.
Let's figure it out how to glue wallpaper correctly.
What wallpaper is better to glue?
Non-woven wallpaper(non-woven wallpaper) are more environmentally friendly than vinyl wallpapers. At the same time, when gluing non-woven wallpaper glue is applied to the wall, whereas when gluing vinyl wallpaper The glue is applied to the wallpaper itself.
There are non-woven wallpapers that can be paint after pasting with water-dispersion paints.
When choosing wallpaper, you need to take into account the humidity of the rooms in which you are going to glue the canvas, as well as the condition of the walls.

Vinyl wallpaper can be used in the toilet, bathroom or kitchen. For minor stains, they can be wipe with a damp cloth soaked in a weak solution of detergent. For dry rooms, such as a corridor, any type of wallpaper is suitable.
However, there are also expensive non-woven wallpapers that can also be wiped with a damp cloth.
If there are unevenness on the walls, then they can be covered embossed wallpaper, wallpaper with a dense pattern or with a large cell.

As you can see, there are many factors what wallpaper better to glue, Therefore, in each individual case you need to approach the issue individually.
Remember that there are several visual patterns of wallpaper patterns:
- If the pattern is in the form of vertical stripes, then visually the room becomes tall and narrow.
- Large patterns or cross stripes create a feeling low ceilings and a wide room.
- Rooms with dark ceilings make them look low.
Wallpaper in light colors gives a feeling of spaciousness.
How to properly glue paper wallpaper

It is very important when gluing wallpaper to comply with all technology. All tools must be cleaned and washed. Brushes must be absolutely clean.
We prepare the surface (walls) for gluing.
Some experts recommend gluing additional wallpaper or newspaper if there are uneven surfaces on the wall. to smooth out unevenness.
If your surface flat, then you can safely glue wallpaper on it.
If there are large enough uneven spots on the wall from paint, old wallpaper and other repair work, you should additionally level walls. This is done using a pointed object, such as a spatula or sandpaper.

You can use special solution for removing wallpaper. There is also a special steam cleaner for these purposes.
Cracks and large depressions are puttied or cemented.
Ideally, you need to plaster the surface to proper wallpapering.

After this it is better to saturate the walls special primer, which can be purchased at any hardware store, which will prevent the appearance of fungus and mold in the future. A primer is also necessary for good adhesion of the wallpaper to the surface.
After the walls are prepared for gluing, we move on to preparing the wallpaper itself. Firstly, you need measure surface to be glued and roughly calculate how many rolls of wallpaper you need.

The length of standard wallpaper is 10 m, therefore, each roll will need to be cut into approximately 3-4 parts (depending on the height of your ceilings).
If you have wallpaper with a pattern, then you need to purchase a canvas with reserve, because you will have to cut them to “fit” the drawing correctly.
Wallpaper glue

For each type of wallpaper it is necessary to select the correct glue. Paper wallpaper is glued universal glue.
For vinyl, embossed and heavy wallpapers used glue for vinyl wallpaper.
Non-woven wallpaper is glued glue for non-woven wallpaper.
It should also be noted that if you are going to paint the ceiling in addition to wallpapering, it is better to do this first.

Follow precise instructions on a pack of powder or concentrated wallpaper glue when diluted with water. If there is not enough water, the glue will be too thick and if there is a lot of water, the glue will become too liquid and as a result, the wallpaper will not stick to the wall.
Already exist ready-made adhesives. In this case, you only need to shake the glue and it is ready for use.
A few tricks on how to glue wallpaper on walls

Before you start gluing the first canvas, you should hang plumb to the ceiling, to draw an exact landmark.
A must prevent any drafts, so we close all the windows and doors.
At gluing vinyl (paper) wallpaper It will be more convenient to apply the glue on the table, but you can do this manipulation on the floor. We apply the glue with a brush or roller in a thick layer so that they can be moved on the wall. Excess glue already on the glued canvas can be squeezed out using a damp sponge.
After you have applied the glue to the wallpaper, you can fold the glued strip into two or three layers and let the glue soak in, and in the meantime apply glue to the next canvas. Wallpaper on paper based should be soaked for 5 minutes, and other types of wallpaper should be soaked for 7-10 minutes (depending on the density of the wallpaper).

It will be much more convenient for you to study sticky wallpaper with a partner. After all, it is much more convenient when one feeds the roll, and the other, standing on a stepladder, glues it, clinging the wallpaper from top to bottom and carefully applying it to the joints.
Here's another tip: glue the wallpaper from the windows to the doors on each side of the room so that the joints are less noticeable.
If you have thick wallpaper (no matter what type or material), then glue it end-to-end, and if thin - overlap

If there are bubbles on the wallpaper that cannot be squeezed out, then carefully pierce Place a pin in such places so that the air comes out. Perhaps your wallpaper will still have bulges - this is not a problem, because when the wallpaper dries, the bulges will disappear. If the bulges have not disappeared, you should re-glue such canvases.
After the wallpaper has already been placed on the walls, you need to smooth out the joints with a small roller. If you are dealing with textured wallpaper, then use a clean rag instead of a roller, which will prevent damage to the structure of the wallpaper.
Excess edges on the ceiling and curved walls should be trimmed with a knife until the glue dries. Over time, glue will harden and accumulate on your knife, so rinse the knife periodically in hot water.

You may encounter a problem like gluing wallpaper near the radiator. Near the radiator mounts and pipes, you can simply cut the wallpaper and paste it in this way hard to reach places. To glue the canvas behind the radiator, you can use mop, having previously wrapped dry and clean material, such as a rag, around it.
Important! When performing wallpapering work, be sure to turn off the power supply in the room where the work is being carried out (sockets, switches).
Before wallpapering it is necessary Remove the housings from sockets and switches.

Wallpaper can be glued directly to the holes where the electrical wires are located, and after the canvas has dried, it can be done in the place of the electrical wires knife cut crosswise
Take out the furniture and cover with film those items that cannot be removed. Remove shelves and decorations from the walls, sockets and switches, and, if possible, door frames and baseboards.
Wallpapering is wet work. So be sure to turn off the electricity.
If this cannot be done in just one room, insulate the ends of the wires and cover them with plugs.
For a dark room, you can create temporary lighting. For example, stretch extension cords from another room and install tabletop ones.
If the floors are finished with a material that is susceptible to moisture, cover them with plastic film.
How to remove old wallpaper
If you stick new wallpaper on old ones, you are unlikely to be happy with the result. The top layer of old paper wallpaper may peel off after contact with water-based glue, and when everything dries, a bubble will probably form in this place. And if the previous wallpaper has a convex pattern, then the new coating will turn out uneven.
In addition, due to poor ventilation of the walls, it can form under the wallpaper.
You can remove the old paper covering using a spatula. Use it to pry the wallpaper, pull the bent part and tear it away from the walls.
To make the process easier, soften the glue that holds the old wallpaper in place. To do this you will need a container of water, a scraper and a sponge. Wet the canvases with water using a roller or spray them with a spray bottle. Scrape the wallpaper with a scraper and wash off the residue with a wet sponge.
Anton Toskuev, head of the construction department of the service of ready-made repair solutions "Tnomer"
For greater efficiency You can dissolve a little in water. It will definitely help if there is wallpaper on the walls that could not be removed with ordinary water.
This way you can easily and fairly quickly remove paper wallpaper. But on non-woven or vinyl, you need to first go over it with a needle roller in order to disrupt the integrity of the cover.
Sometimes the wallpaper is treated with hot steam, passed over it with a needle roller and only then moistened. Water will penetrate better through the holes.
If water does not help, it can be replaced with special wallpaper removers. Such compositions dissolve the glue.
How to remove paint
Wallpaper will not last long on a smooth surface, so you need to get rid of the paint layer. You can clean it off with the same spatula, but this will take a lot of time.
You can use a hammer drill with a wide blade or a grinder with a grinding attachment. Please note that the process will generate a lot of dust. So don't forget to wear a mask.
There are also special solutions designed for removing paint. They are applied to the surface using a roller or wide brush, moving in one direction. After the time indicated on the package, the paint will soften, and then it will be much easier to remove.
Keep in mind that such products are very toxic and take a long time to wear off. It is necessary to work with gloves, safety glasses and a respirator and with open windows.
A hair dryer can also come to the rescue. Under its influence, the paint melts and is easily removed with a scraper or spatula. In this case, you also cannot do without a respirator: there will be a pungent smell in the room.
This video shows the process of removing paint with a hair dryer:
How to prepare walls
After getting rid of the old ones finishing coatings the walls must be primed. This will prevent mold and prevent the putty and new wallpaper from falling off.
The primer must be applied from bottom to top. It is most convenient to do this with a roller, and in the corners with a brush.
Then you need to wait for the liquid to dry. This takes about 10–15 hours, but the exact time should be indicated on the package.
Afterwards, small irregularities, holes or chips on the walls are hidden with a layer of putty. It is applied with a wide spatula and leveled with even pressure.
The drying time of the putty is also indicated on the packaging.

After the putty has dried, level the surface of the walls using a grater with an abrasive mesh attached to it. Then clean the walls with a brush and damp cloth to remove any accumulated dust.
Yulia Soldatova, expert in the decor department of the Leroy Merlin company
After this, the walls need to be treated again with a regular store-bought primer.
You can also use a weak solution of wallpaper glue: approximately 300 g per 10–12 liters of water. A primer made from PVA construction adhesive will be much cheaper: just dilute 2 cups in a 10-liter bucket of water. These methods are effective, but they will not protect the walls from the proliferation of microorganisms, since the glue does not have antiseptic properties.
After the final layer of primer has dried, you can glue the wallpaper.
How to measure and cut wallpaper
If the wallpaper does not require joining the pattern, you can simply measure the height of the wall with a tape measure and cut it off required amount from wallpaper rolled out on the floor. To ensure that the strip is even, the wallpaper is folded in half and cut along the fold.
If the walls in the apartment are not very even, you will have to measure the length of each strip.
If the wallpaper needs to be adjusted according to the pattern, you will have to act a little differently. The strips must be cut from two rolls at once. In this case, the consumption of wallpaper will be less than if you customize the design using only one roll.
First, cut one strip, lay it face up on the floor, roll out the second roll and attach it to the strip so that the pattern matches. After this, you can cut a new strip.
Lifehacker spoke in great detail about calculating the required amount of wallpaper in this article:
And yes, don't throw away the trimmings. They can be used near windows or above a door.
Wallpaper should be glued in a circle, that is, one strip after another. The location where you start gluing is actually not that important. However, for many, the usual starting point is the edge of the window.
First, the first strip needs a level reference, and windows, especially in older houses, are often straighter than corners or doorways.
Secondly, several decades ago they most often used paper wallpaper, which are glued overlapping. And if the light comes from the window, during the day the seams are less noticeable.
 thewalls.ru
But if the wallpaper strips are glued end to end, then you can start from the door or corner.
It is better to start gluing wallpaper with a pattern in an inconspicuous place. For example, where it will stand. The fact is that the space between the first and penultimate stripes can be quite narrow. Because of this, the last stripe may not match the pattern of the first.
It is very important to glue the first strip evenly.
Using a building level or plumb line, draw a strictly vertical line on the wall. It will serve as a beacon to guide you when gluing. This will avoid distortions.
Yulia Soldatova, expert in the decor department of the Leroy Merlin company
 diy-ally.com
How to glue stripes
Before wallpapering, be sure to close all windows and doors tightly. If there is a draft in the room, the wallpaper will simply fall off the walls.
The inserts in the rolls indicate where the glue is applied: on the wallpaper or directly on the wall. In addition, the time for impregnation of the canvas with glue should be indicated there. In this article, Lifehacker explained what the signs on the roll mean:
And the packaging with glue should indicate how to dilute it correctly.
It’s good if the glue contains substances that prevent mold. In addition, the glue must be environmentally friendly.
Anton Toskuev, head of the construction department of the service of ready-made repair solutions "Tnomer"
If glue is applied to wallpaper, then for better impregnation, fold the ends of the strip towards the middle with the glue inward, and then several more times, without pressing the folds. Do not overexpose, take into account the time specified in the instructions.
Then apply the wallpaper to the line drawn on the wall. The canvas is glued from top to bottom, while a few centimeters need to be placed on the ceiling and floor or baseboard.
Level the wallpaper with a roller or dry brush from the middle to the edges and from top to bottom.
 diy-ally.com
There should be no air bubbles left between the wall and the canvas. If they do appear, pierce them with a needle and carefully smooth the surface.
Trim off any excess wallpaper at the top and bottom. To do this, press them well to the edges so that a fold is formed, which will serve as a cutting line. You can also press the wallpaper down with a spatula and cut off the excess with a utility knife.
 diy-ally.com
The next strips are glued according to the same principle, only the edge of the previous strip will serve as a guide.
Please note that thin paper wallpapers are glued slightly overlapping, while wallpapers made from denser materials are glued end-to-end.
The joints between the strips should be ironed with a small rubber roller. Excess glue can be removed using a soft damp sponge.
 diy-ally.com
How to glue wallpaper in inner corners
Glue the first strip, bringing it around the corner by 1-2 cm. In this case, it must first be cut to the required width. Glue the next strip directly from the corner, overlapping.
If the wallpaper is thick, then the double strip of wallpaper will be visible. In this case, press the wallpaper tightly with a spatula in the place where the canvases are glued to each other, and draw a line with a stationery knife. Then remove the two narrow strips left from both strips and smooth out the seam.
How to glue wallpaper in outer corners
The technique is almost no different from the previous one. The first strip should be placed around the corner a few centimeters, and the second should be glued overlapping.
 diy-ally.com
Then place a ruler on the corner and use a utility knife to cut off the edges of both strips. Remove excess parts and tighten the panels if necessary. Press the seam between the strips with a roller.
 diy-ally.com
How to glue wallpaper around windows and doors
When you reach the window or door, apply the strip in the same way as the previous ones. Then carefully cut off the excess wallpaper around the edges.
 diy-ally.com
 diy-ally.com
How to glue wallpaper behind radiators
Measure the height and cut the required amount of wallpaper. Place the canvas on the radiator and make vertical cuts in the wallpaper where it is attached to the wall. Coat the canvas liberally with glue, place it behind the battery and smooth it out.
The video shows this process in detail:
How to glue wallpaper behind pipes
Start gluing the canvas, and make a cut at the beginning of the pipe. Having brought the strip behind the pipe, cut off the excess wallpaper around it and level the canvas.
Here are the detailed instructions:
Mark their edges on the canvas with four diagonal lines. Then carefully cut out the window in the right place and level the wallpaper with a roller.
 diy-ally.com
How to correct defects after pasting
Directly during the work process, until the glue has dried, the strips can be slightly pulled closer to each other directly on the wall. After this it will no longer be possible to repeat this. Therefore, be extremely careful.
Defects in the form of air bubbles that appear on the wallpaper after drying can be corrected.
To do this, fill the syringe with glue, pierce the bubble and inject a little glue there from top to bottom. Then smooth the surface with a roller or cloth.
If the edges of the wallpaper have come loose, they can be glued either with a brush or using the same syringe with glue. Level the canvas and press with a dry cloth for a few minutes to be sure.
If a wide gap has formed between the wallpaper strips, cut a strip from the remaining wallpaper required thickness and glue it end-to-end where the gap is.
If the gap is very narrow, you can dip the edge of a spatula or ruler into paint of the same color as the wallpaper and paint over the gap. You can also use a regular felt-tip pen for these purposes.
Do not forget that after pasting the room, it cannot be ventilated until the wallpaper is dry.
As a rule, paper wallpapers dry for at least 12 hours, non-woven wallpapers take about a day, and vinyl wallpapers take about two days. The time may increase if the room has high humidity and low temperature. To check for sure, touch the papered walls with your hand: they should be dry.
Before you start dramatic changes in the house it is necessary to develop a plan, decide on the interior, choose suitable wallpaper, and carry out preparatory work. And, most importantly, be patient!
Where to start gluing wallpaper with your own hands?
Naturally, it’s worth starting work by finishing the walls, or rather, by preparing them. The main problem before wallpapering a room is the alignment of the walls. There are two ways that are radically different from one another.

Leveling walls with cement, putty and plaster
With this type of finishing, the area of the room will decrease slightly. To level the walls with cement, you need to prepare a screed and cement mixture. Having completed the preparations, you can begin to work.


To begin with, the walls are moistened with water. Apply cement with a large spatula and gradually level it using a level. The number of layers depends on the curvature of the wall. At least ten days must pass from the end of the rough work to the start of the finishing work.
To level the walls with plaster, you will need the plaster itself and a soil mixture. Before leveling, it is necessary to clean the walls of any dirt and unnecessary parts (nails, dowels). Then priming is carried out with a roller or a large brush in two or three layers.

After the wall has dried, plaster is applied with a spatula. Final stage repeated three times. Each layer is allowed to dry and coated with primer.

Leveling with putty is used for minor unevenness before painting or wallpapering. The thickness should not be more than 2 mm. After the putty has dried, the walls are sanded to perfect smoothness.

Leveling with plasterboard
This is the easiest way to make walls even. To do this you will need the sheets themselves, screws, metal profiles and hangers, putty, reinforcing material, sandpaper.


The work begins with attaching the guide profiles to the floor and ceiling at a distance of 5 cm. Then hangers are attached at a distance of no more than 50 cm. After completing the preparatory work, you can begin fastening the drywall. Fix it with nails at a distance of 20 cm.

After fastening the sheets, the seams formed at the junction of the sheets are primed. After the primer has dried, the serpyanka is glued on, and a thin layer of putty is applied on top of it. The work is ready!

Which wallpaper should you choose?
An important role in the interior of a room is played by the color, texture and pattern of wallpaper. They can visually reduce or enlarge the room. The modern market offers many types of wallpaper with different patterns, textures, properties, etc.
Types of wallpaper:
Paper wallpapers are varied in color and texture, they can be washable, moisture-resistant, heavy and light. It is recommended to glue them in bedrooms due to increased breathability.

Non-woven wallpaper - does not tear, stretches well, is soundproof. When gluing them, you do not need to apply glue to the wallpaper.

Liquid wallpaper does not gather dust and does not fade. Apply to any material with a flat spatula.

Vinyl wallpaper is two-layer, has a textured surface, and can be left unchanged for a long time. In rooms with such wallpaper there must be ventilation.


How to calculate the required amount of wallpaper? To do this, the area of the room must be divided by the area of the roll.


We glue wallpaper, algorithm of actions
After completing the preparatory and finishing works, definitions of the material, you can start wallpapering the walls.

To do this, you need to take several steps:
- Cut the wallpaper into strips according to the width and height of the walls.
- Mark the vertical line of the wall for even gluing using a plumb line.
- Treat the wall and strip of wallpaper (depending on its type) with glue.
- Place the wallpaper against the wall and smooth it using a roller or soft fabric to displace the air trapped between them.
- Cut off excess wallpaper near the floor and ceiling, forming a smooth and beautiful edge.
- Sockets and switches must be removed and de-energized in advance. You need to paste the wallpaper directly on it, forming a hole in the already pasted wallpaper. It is best to use a stationery knife for this rather than scissors, because... The edge of wet wallpaper can be severely torn. When gluing walls, avoid through air movement.

Using this simple algorithm you can do redecorating in a house or apartment on your own, significantly saving the family budget. And if you involve family members in this process, you will have the opportunity to spend time together and become closer to each other. After all, joint work unites.

Photo of wallpapering with your own hands


When renovating a home, most people purchase wallpaper for wall decoration. Today they are very popular among buyers of finishing materials, as before, but not everyone knows how to properly glue them on their own.
It is important to know how to properly design and combine wallpaper, as well as what rules and methods to use.


Peculiarities
Wallpapering is a process that requires careful preparation. So, the surfaces for gluing must be absolutely flat and smooth. Old coatings must be completely removed. In addition, you need to decide on the choice of the most suitable wallpaper and select the highest quality and most beautiful coating design.


Before gluing it is necessary to do some preparatory work. So, you need to turn off the electricity and remove all covers of switches and sockets. When gluing, you also need to get rid of all the baseboards. This way, you can make your work much easier.
The easiest way is to cover the walls yourself with paper or non-woven wallpaper, but it is best to choose medium-density models. They will stick well to the walls, and gluing them will take less time.


All wallpaper is glued only longitudinally, never horizontally. Wallpaper is first glued on completely free walls, and only then individual pieces are cut out and adjusted to fit windows, doors, passages, radiators and other interior features. When hanging wallpaper, it is important to take all measurements of the room and calculate the amount of wallpaper. If you decide to hang colored wallpaper with patterns or combine different-looking coatings, then you will need much more materials.
The reserve must be left for the next docking. If you have chosen wallpaper to be painted, then you can paint it only after you have completely pasted it and it has completely dried. The sticking already has some features ready-made wallpaper with a special composition - these are self-adhesive wallpapers. So, the rolls are soaked in water, and the glue thus dries out. After this, they are glued to the walls without the use of additional adhesives and are only rolled out over the surface.

Types and characteristics
Before purchasing wallpaper for subsequent wall decoration, you must first select it from the presented assortment. Manufacturers are now offering a large number of different types wallpapers that differ in their quality characteristics and appearance.
When choosing, you should rely on the reliability and quality of the material, the operating conditions of the wallpaper, as well as the room in which you plan to hang it.


Paper wallpaper
These are the most common and famous wallpapers that are popular all over the world. They are quite thin and quite inexpensive. If you purchase this type of wallpaper, you can later easily replace them with new paper ones. Moreover, this process will not cause any inconvenience.
Expensive and durable coatings are more difficult to remove; in addition, such changes to the interior will require more financial costs. And if you replace paper wallpaper, you will spend very little money and at the same time change the environment. Manufacturers present wide choose colors and patterns on these coatings. The material is completely environmentally friendly and does not cause allergies. In addition, such wallpaper allows air to pass through well and allows the walls to breathe.


But this coating has a number of disadvantages. Thus, they quickly lose their color brightness when exposed to direct sun rays, wear out quickly. If you have small children or even pets at home, they will easily tear them off. Paper coverings cannot be washed at all.
In addition, they deteriorate from exposure to high air humidity. This applies, first of all, to simplex wallpaper. These are the thinnest single-layer models and are considered the cheapest of all options.


Double-layer or duplex wallpaper
They are presented in the form of a main base layer, which secures them well to the wall, and a top decorative layer. Thanks to the presence of the base, the outer layer is not saturated with glue and stains and stains do not remain on it. In addition, such models are not translucent at all.
Many models have relief patterns or embossing. They are thicker and more reliable, but are also quite inexpensive. They are easier to glue than regular paper ones.
They do not slide off the wall after being impregnated with glue and adhere well to the surface. Such wallpapers are also presented in the form of plain, smooth coverings, which involve pasting the walls and then painting them. Big advantage This type of wallpaper allows you to change colors several times. There are also structural wallpapers for painting with a pronounced relief.


Vinyl wallpapers
They have paper as a base, as well as non-woven fabric. But the big difference from classic paper wallpaper is that their surface is treated with polyvinyl chloride. They can also have 3D patterns or be smooth.
This option coatings have higher quality characteristics.


Thus, they do not fade from exposure to direct sunlight and tolerate high humidity air. That is why they are glued even in the bathroom and kitchen. But such wallpaper does not allow air to pass through well, so the walls do not breathe and such rooms must be systematically ventilated. But now manufacturers are introducing some models that have a porous structure. Thanks to this, the coating breathes and creates a comfortable microclimate in the room.
Vinyl wallpaper is a rather expensive coating. They serve for a very long time, up to 10 years. Thus, manufacturers represent different models vinyl wallpaper, among which models with hard vinyl coating are very popular. They can even withstand many external influences of a mechanical nature.


Another model is smooth vinyl wallpaper, which does not have a hard flooring and is therefore more vulnerable to external influences. Wallpaper with silk-screen printing is a popular model of vinyl wallpaper, which looks very presentable in appearance. Such products are produced using hot stamping technology, so it feels like the wallpaper is made from natural silk threads.
Foamed vinyl wallpaper is the most reliable product that has a dense textured structure. They are very durable and high quality. Any vinyl wallpaper is quite capricious to hang because it is heavy. On the packaging, manufacturers always indicate what composition is needed in order to glue them well.


Non-woven wallpaper
This type of wallpaper is widely popular because it has high-quality composition. They are made from cellulose. The coating itself includes two layers - non-woven fabric and polymer.
They are more durable than regular paper ones and even with duplex wallpaper. In addition, they can be used to hide wall defects, such as cracks or unevenness.
Such wallpaper is much easier to glue, because if you use the right technology, then bubbles do not form under it, and the coating does not change its appearance. They are easier to dock compared to other models. They can be moved when gluing. In addition, you can choose absolutely any texture.


Such products are suitable for mounting on plaster, including Rotband, cement, slabs, and wooden walls.
In addition, when gluing, no glue is applied to the surface of the canvas itself. The canvases cover the wall with glue already applied in advance. Such wallpaper can also be easily coated with oil or acrylic paint, if you choose the most neutral option. Experts believe that non-woven wallpaper is the easiest to select and apply, so they are often purchased for self-finishing premises.


Textile or fabric wallpaper
This option includes textiles and paper as its basis. It consists of several layers. Textile materials are applied to the base. It can be linen, cotton or synthetics.
Depending on the quality of the textile material, the cost of this wall covering varies. They do an excellent job with their decorative function. In addition, the coatings have sound and thermal insulation qualities, so they are perfect for gluing in any room.

But these coatings are quite difficult to apply to the wall yourself; not everyone can do the gluing. In addition, they are quite difficult to care for; if they get dirty, washing off the stains will be problematic. They do not tolerate wet cleaning.
Fabric wallpaper brings coziness and comfort to the room. This is especially true for models made of silk, jute textiles, felt and velor. You can care for such wallpaper with a vacuum cleaner so that no dust remains between the fibers of the fabric.


Glass wallpaper
These are quite reliable and unusual wallpaper, which are produced using glass fibers, which are subsequently impregnated with a special liquid. Thanks to this, wall coverings have fire-resistant properties. In addition, they are resistant to any, even mechanical damage. This is the most durable and reliable wallpaper that can last more than 25 years.
They are easy to care for and do not attract dust at all. The coating is natural and completely safe for human health, since the woven base is highly breathable. They look very presentable, but their price tag is clearly too high.


Liquid wallpaper
This the new kind wallpaper that does not stick, it is applied like plaster. They are sold in powder form and then diluted. This solution is carefully distributed over the wall. When the coating dries, it looks completely identical to regular classic wallpaper.
Manufacturers also present washable wallpaper that tolerates wet cleaning well.
These are new generation models that are perfect for hanging in the kitchen. Nowadays they are also popular bamboo wallpaper. This is a fairly dense eco-friendly coating that looks natural and natural. But such products are quite difficult to glue.


Manufacturers present many other types of wallpaper: cork, palm, quartz, metallized. But gluing them yourself is quite difficult; not everyone can cope with such work. Depending on the type of decor, there are classic plain wallpapers with smooth surface or coatings with relief. Popular coatings are produced using the hot stamping technique.
As for smooth options, coverings such as fiberglass or photo wallpaper are quite popular. They are used for pasting one wall. Their main function is to create emphasis and attract attention. Such canvases are entire works of art in the form of paintings or abstract compositions.


Tools
When hanging wallpaper you will need some tools:
- In order to level the walls before wallpapering, you will need to use a tape measure, laser level, a long-haired roller, a smoothing brush, a spatula with a soft edge, a construction knife, a narrow metal spatula, a sponge, a container for glue, a pencil and, of course, a stepladder.
- For further work, you will need a special attachment - a mixer, so that you can mix the putty. The mixer attachment is inserted into electric drill, so this tool will also be required.


- It is better to have several spatulas in the set, which differ in thickness and shape. So, the most necessary will be straight, even products with a width of 5 to 50 cm. A classic corner spatula will also be required in order to be able to remove external and internal corners. In another way it is called a profile spatula.
- To rub the wall, to smooth the surfaces before gluing, you will need a grater. It can be an abrasive mesh or emery cloth. In some cases, they even use genuine leather.


- When gluing, you will definitely resort to using a building level. It is useful when leveling walls to control their ideal verticality and smoothness of surfaces.
- A roller is necessary so that you can apply primer or putty to the walls.
It significantly speeds up the process of applying these materials.


- In addition to the container in which you will mix the solution and glue, you will need a bucket or bowl of water. You will soak your tools in it as you work, so that you can easily wash off the building materials from them later.
- In order to level the walls, you will need two types of putty: the first will act as a base, and the second will act as a finish. Your work will be made easier by a ready-made putty composition. It can be purchased at any hardware store so as not to prepare it yourself.
- In addition, you will definitely need a primer. With its help you can get rid of harmful microbes. To do this, it is better to use formulations with special additives against mold.


Surface preparation
After you have chosen the wallpaper and prepared all the tools, you need to decide on the amount of this coating. When buying wallpaper that you will need to cover one room, it is important to choose completely identical coverings. You need to pay attention to their article number and production batch. Thus, all rolls will have the same shade and uniform coloring.
Try to purchase wallpaper with a reserve, so that you have enough of them to cover all the walls completely. It is better that all vertical sections of the walls can be covered with whole sheets. Thus, the joints between the sheets will only be wide. Horizontal joints are unacceptable and look unpresentable.


Preparatory work:
- Before re-pasting the wallpaper, you need to remove all the furniture and, preferably, dismantle the split system. You also need to completely remove the old coatings and start plastering the walls. Many people use it for effective removal old coating soap solution. It allows you to soften it and quickly remove it. You can add wallpaper glue or PVA to the soap solution. It will dissolve the old coating faster.
- But if you previously had moisture-resistant or washable wallpaper, you must first trim it, then make notches, and only then apply a soap solution. After you wet the surfaces with the old coating with this composition, you need to let it soak in so that the wallpaper swells and after some time you can easily dismantle it.


- The wallpaper is removed after a couple of hours using a spatula. But even in this way, not all of the old coating can be removed entirely. This procedure may have to be repeated several times.
There is also a special solution that allows you to soften the old coating and quickly remove it to replace it with a new one.


- But removing enamel or old paint is much more difficult. If the paint layer is thin, then it can be peeled off with a spatula, but when the paint is thick and old, then you need to tap the surface with a hatchet and clean the walls with a flat cutter.
- Some people prepare the walls by removing whitewash from them. It must be washed off with warm soap solution and then remove with a spatula. If the whitewash is very thin, it can be easily washed off using hot water and rags.


- Having removed the old covering and decided on the amount of wallpaper to be hung, it is necessary to properly prepare the surface of the walls for further repairs. At this stage, insulation can be carried out using penoplex or polystyrene foam. All defects must be hidden in advance. This way you can avoid focusing on them. After all, not all wall coverings are capable of covering defects in wall surfaces.
- Some wallpapers, even the most expensive ones, for example, fabric ones, can emphasize the imperfections of the walls, so the surface must be prepared most carefully. If you prepare the walls poorly, it will be quite difficult for you to combine adjacent canvases, the joint lines will be uneven, and the corners at the end and beginning of the wall will be crooked. The wallpaper will wrinkle and even tear.


- Bubbles from the wallpaper often form on uneven walls and defects in the walls, which subsequently lead to peeling of the pasted coating and damage to the entire wall repair as a whole. That is why it is important to initially prime the surface of the walls.
- If the material from which the wall is made is porous, it will be highly susceptible to moisture. This means that without preliminary finishing the wallpaper will not last even a year. They will peel off and quickly deteriorate. It is recommended to apply a primer, regardless of what material the walls are made of.


- After the walls are completely cleaned, they need to be leveled. In some cases, old walls begin to crumble and crumble. If you encounter this problem, manufacturers recommend resorting to treatment with a bonding primer.
- If protrusions are found on the wall, they must first be knocked down. Cracks are sealed using a special composition. But at the same time, it is better to first widen the cracks, then deepen them, and only then close them.
This way you will fill every crack as much as possible with the repair compound and properly repair the surface of the walls.


- Extended cracks must be cleaned of dust and old plaster. This can be done using a damp sponge. The widened crack must be completely covered with primer. It is important to carefully treat the entire inside of such a defect, and then the outside. After this, the primer must be thoroughly dried.
- Then you should use the first layer of putty - the starting one, which will act as a base. It needs to be applied to those places where the cracks were covered. After all the resulting patches are completely dried, you need to clean the walls with a float to level the surfaces.


- Things are a little more complicated with some coatings, which include, for example, drywall. The joints of the sheets must be glued with a special mesh, which is covered with a thick layer of putty on top. After this layer has dried, you need to treat the walls with an antiseptic primer. This special composition improves the adhesion of finishing materials and wall surfaces. In addition, it will extend the life of the wallpaper.
- The concrete contact primer is applied using a roller, but it is quite difficult for them to handle the corners; you need to soak them as much as possible, since this is where mold first gets into. If you cannot reach the corners, then it is better to treat these areas with a brush. The primer should be allowed to dry a little. But if the coating has dried very quickly, then you need to apply at least two more layers of this solution.


- After this, you need to make putty or use a ready-made, pre-purchased composition. The first preparatory layer will be the starting or leveling layer. It can be used on almost any surface, including concrete, plaster walls, panels, OSB, plywood, lime, fiberboard, laminated chipboard, OSB board. The starting layer must be applied to the walls using the widest spatula. It needs to be laid in a certain way.
So, the thickness of the applied layer should be approximately 3 mm, in some places even thicker, but the entire wall should form a single, flat plane. You need to move from the corner of the room with smooth and uniform movements.
It is better to hold the spatula at an angle of 45°, since this way traces of it on the walls will not be visible.
After the solution has been applied to all the walls, you need to illuminate the surface using light bulbs and carefully examine it to see if any imperfections in the wall will cast a shadow. If the walls are smooth, then you will not need further leveling, but if unevenness is identified, then you need to carefully level them with a spatula before the solution has completely dried.


- After you have applied the putty, you need to wipe down this surface. You can do this yourself using hard sandpaper or a grater, or using special electric grinding.
- After this, it is necessary to apply a second layer of putty. It should completely hide all the unevenness of the wall. The finishing layer is usually much thinner than the base layer. After applying it, it is important to find out if any unevenness remains, again using light.
- The finishing putty is applied in two layers, but each of them must be given time to dry. In addition, both outer layers must undergo high-quality grouting, with the last one being the most gentle. It is better to use genuine leather for it. After you have completely covered the walls with putty and let it dry, you need to apply a primer to it. Only after this will you be able to proceed to wallpapering.


Technology
Pasting walls with your own hands is quite simple work, if you choose suitable coatings for this. With their help, you can simply and without any problems stick the wallpaper evenly on your own without subsequent re-gluing. Non-professionals need to follow a certain technology that allows you to quickly glue the coating to the walls. First you need to choose a wallpaper pattern. The canvases should be distributed over all walls so that the joints are as invisible as possible.
- When gluing any wallpaper, you need to move from the window, which is located opposite the entrance to the room, alternately in different directions towards the door. Thus, if you glue the wallpaper overlapping, the shadow from the sheets will be invisible.


- But if you glue the wallpaper end-to-end, as is most often done in Lately, then you can stick to another technology. This option involves gluing wallpaper from the corner that you see first when entering the room. From it in different directions you need to move one by one right up to the door.
Walls should be covered vertically with whole canvases without horizontal joints, only if this is not special method combinations.
- If they are whole meter wallpaper fell on the corner of the room, then it is necessary to cut them in this place so that there are no bends. Because of them, the wallpaper can quickly peel off and begin to bubble. If you come across fairly old wallpaper with an edge, then first you need to cut it off evenly, but now such models are rare. Therefore, you only need to cut the sheets. It is necessary to know the height of the ceilings in order to measure the required amount of material.

- The cut part of the wallpaper should be approximately 5-7 cm longer than the height from floor to ceiling. This allowance must be divided in two and left part on top and part on bottom. It is important to mark a line in the center perpendicular to the edge so that you can cut the wallpaper straight. To do this, it is better to use a corner or the method of bending the wallpaper. You need to cut the wallpaper using a very sharp knife or scissors; this must be done smoothly and evenly.
- After you have cut the roll into pieces, they need to be stacked on top of each other in the order in which you will apply them to the walls. It is better to cut wallpaper on each wall one by one, as you go, and not for the whole room at once. For narrow areas of the room where there are doors, windows need to be cut later. Once all the smooth walls have been covered, you can move on to the detailed finishing of these discontinuous sections of the walls.


- After you cut the wallpaper, you need to prepare the glue. To do this, you must follow the instructions indicated on the box with the composition. Many adhesive mixtures are diluted in water in the proportions indicated on the package. The water must be stirred periodically during the pouring process to prevent lumps from forming.
- Before hanging wallpaper, make sure that there is no draft in the room, otherwise the coverings will move away from the walls due to the fact that the wallpaper has dried unevenly. After this, you need to draw a vertical line on the wall, which will help align the edges of the wallpaper from the corner. For this it is better to use a laser level.
You need to mark two points and connect them with a ruler. But the line needs to be made thin and barely noticeable so that the pencil does not form streaks when soaked on the wall.


- Each specific type of wallpaper indicates where the glue should be applied: on the canvas itself or on the wall. Most often, glue is applied only to paper wallpaper, but non-woven and vinyl wallpaper is glued to walls already covered with glue.
But many craftsmen indicate that it is better to apply glue both to the wallpaper and to the wall.
You will use more adhesive, but the coating will be fixed better and more reliably. In addition, it will be easier for you to align the sheets, since the wallpaper will slide well, but not too sharply, along the wall.


- Wallpaper sheets must be laid out on a flat, smooth and clean surface. inside up. You need to apply glue to it using a roller, without missing a single millimeter. After this, one edge of the canvas must be slightly bent towards the center and the second edge must be coated, which should also be bent towards the center. In this form, the wallpaper should be left for impregnation.
- In some cases, you will have to wait 5 to 10 minutes, during which time you can additionally apply glue to the wall. To do this, you can use either a brush or a roller. After this, you can unroll the wallpaper and stick the canvas on the wall. It must be applied strictly according to the marks so that the joints are as even as possible. Wallpaper should be applied from top to bottom. The allowance should be positioned evenly.


- The most important thing in this case is to set the right direction for the wallpaper. It is better not to open the bottom edge of the wallpaper initially, since the covering can quickly stick to the wall; when folded, it will simply hang down. After you have glued the top and center parts of the wallpaper, you can unfold the bottom part and glue it.
- After you have applied the entire canvas, you need to smooth it from the center to all the edges, and then from top to bottom. If you have just smoothed the wallpaper, then you still have the opportunity to check how evenly the canvas is relative to the line you previously outlined. If deviations are noticeable, you need to slightly align the wallpaper by carefully moving it.
- After this, you can finish fixing the wallpaper. Then you need to attach the wallpaper as tightly as possible to the wall. To do this, you can use a special plastic spatula or wallpaper brush, as well as a pressure roller. In this case, you need to move from top to bottom, the so-called herringbone.


This technology of movements involves smoothing from the center of the canvas to the side and slightly upward, alternately to the right and left. This way you will remove excess glue and air bubbles from under the surface of the wallpaper.
But you need to move very carefully so as not to damage the surface of the wallpaper, especially if it is embossed or has a beautiful texture. If after this there are glue residues, you need to remove them with a special sponge pre-moistened in water. This item should always be kept at hand.
If you do not remove excess old glue, the surface will not be smooth.


- Once leveling is complete, you can trim the top edge and bottom. It is better to do this after you have hung all the wallpaper or after each piece in turn. Some recommend final ironing of the wallpaper surface using a large-width rubber roller. Thus, the coating will be very smooth and firmly fixed on the wall.


- After this, you need to prepare the next sheets of wallpaper and begin pasting the walls using the same technology. In this case, you need to start from the already evenly located edge of the previous wallpaper. It should be placed as close as possible, butt joint to the first piece of wallpaper. It is important to combine the pattern if the coating has patterns.
- It is important that there are no gaps between the canvases. It is better to coat the canvases at the joints with glue with a thin brush, and then roll this area with a narrow roller. The right technology gluing involves checking the ideal verticality using a plumb line after every third wallpaper.


- After you have glued the entire wall, reaching the corner, you need to divide the corner sheet of wallpaper into 2 parts. Moreover, you need to measure the distance from the previous canvas to the corner line and add about a centimeter to the measured width. After each corner, it is necessary to measure out a perfectly straight vertical line again, so that you can build on it when gluing the next canvases.
- It is better to make a slight overlap in the corners so that the canvases fit each other as well as possible. On external corners It’s better to leave a margin of about 2 cm. This way the corner will be designed more neatly. After you have glued all the solid walls, you need to move on to fragmentary wallpapering. Where doors and windows are located, you need to start pasting from the top down, selecting the sizes of the fragments in advance and cutting them out of the canvases.


- After gluing the wallpaper, you need to let the coating dry. Some wallpaper options require a different gluing technology. So, glass wallpaper is glued a little differently. There is no glue applied to them. They need to give all the walls a good treatment.
In this case you need to choose adhesive composition, which is designed for heavy wallpaper. Glass wallpaper is different important feature: The outer side of the rolls is hidden inside, so gluing them is a little easier.
But such wallpapers take much longer to dry; for this you need to wait a day.
Any gluing technology requires the use of some recommendations. So, you need to observe the temperature regime: the room should not be warmer than 25 degrees. It is better if the sun's rays do not enter the room when wallpapering. Drafts are also unacceptable; wallpaper should dry evenly.


Working with a drawing
Wallpaper with a pattern is a very elegant covering that is used even more often than plain models. Popular wallpapers include flowers, tiles, and decorative rock or with abstract patterns. But all of them are glued with adjustment and selection of patterns. The wallpaper must be cut with a small allowance, and the second roll will need to be adjusted to fit the first, starting from the pattern on it so that the joint is completely closed and no seams are visible.
From each roll it is necessary to select a pattern that will be as similar as possible to the pattern of the adjacent strip so that the joining is correct. But this way you will use up a lot of wallpaper, so you can use another fitting method.


You need to take two rolls of wallpaper. From the top of the first you need to cut about 40 cm. Then you need to take another roll, unwind it completely and cut off about 40 cm from the other end. This technology is due to the fact that when cutting wallpaper, machines in factories leave a small margin, which we, therefore, we will remove it when cutting. This can make the fit much easier.
Each roll is cut alternately and the pattern will be joined to each other without extra effort. It's very simple and economical way, any person can cope with such gluing and joining, even if he acts alone, without outside help. The most difficult thing to work with is when gluing in the corners of rooms.


It is necessary to overlap the joint, and you need to select the wallpaper not to the edge of the first roll, but to the part that will be located right in the corner. The easiest way is to glue meter-long wallpaper with a pattern, since the joining will not be so difficult. It is best to join the wallpapers before gluing and lay them out on the floor in the required sequence, so that you can then only paste them next to each other.
The technology of gluing wallpaper with a pattern in itself is not so complicated, so it is only important to join them correctly so that the pattern does not go astray and the walls look more elegant and presentable.


Room design options
Different rooms need to be decorated differently. It is especially difficult to apply pasting when a built-in cabinet or kitchen set. It is also quite difficult to glue wallpaper in the area of the doorway, especially if you have to use it to decorate an arch. In addition, to the wallpaper located in different rooms, there are certain requirements:
- For the living room It is better to purchase only high-quality and elegant wallpaper. It would be better if they were coverings with beautiful patterns. In this case, a horizontal combination is perfect, since this option looks very noble. In the living room, photo wallpapers are often glued and placed on one of the walls. In this case, it is better to select the image depending on the interior.


The most popular are photo wallpapers with landscapes. But in modern styles They use wallpaper with images of large cities and their attractions.
Neutral wallpaper with monograms is also often hung in the living room. They are easier to join because the pattern is constantly repeated. Plus, it looks more interesting. In the living room, wallpaper with vertical stripes is also often used or the vertical combination method is used, since this allows you to raise the ceilings, making the living room more spacious and pompous.


- Concerning bedrooms, then in this case it is better to use the highest quality and natural breathable wallpaper. In addition, they should not have a too catchy pattern. For the bedroom, ordinary paper wallpaper is most often purchased. But since they fade quickly, you need to try to choose a coating with a less catchy and dim pattern. Otherwise, you will have to constantly curtain your windows with thick curtains.


- In the children's room they glue wallpaper with special unusual designs. This can be photo wallpaper with images of cartoon characters or animals, birds, cars. Paper or vinyl wallpapers are often purchased for a children's room because they are natural and hypoallergenic. Paper wallpaper is ideal for a children's room, because children often paint the walls. Thus, you will not feel sorry for replacing old coatings with new ones.


- For wall decoration in the office use wallpaper with large patterns. It is better if they are as neutral and calm in design as possible.
But if the office has small area, then you need to purchase coatings with small patterns.

- For kitchen it is better to buy washable wallpaper, since you can wipe off any dirt, including greasy spots. But fabric wallpaper is completely unsuitable for this room, just like paper wallpaper. This is due to the fact that it is almost impossible to remove stains from them; they quickly become dirty and lose their original luster. You can put regular paper wallpaper on the balcony, but if it is not insulated, then it is better to purchase non-woven or vinyl materials.


- For bathroom and toilet It is better to choose washable wallpaper or a coating that is resistant to moisture. This way, fungus will not form there, and you won’t have to worry about the integrity of your walls.

In some rooms there may be difficulties with wallpapering due to the fact that they already have a suspended ceiling. Initially, it is necessary to prepare it in such a way that gluing can be carried out. First you need to remove decorative insert, which is located at the junction between the ceiling and the wall.
After this, you need to use masking tape to glue all the edges stretch ceiling along the perimeter. This way you will protect the already installed stretch ceiling from glue stains. After this, you can proceed to wallpapering using standard technology. When all the canvases are glued, you need to place a spatula on the edge of the wallpaper and trim off the excess part of the wallpaper. Then you should remove the masking tape and install the decorative insert back at the junction of the walls and wallpaper.


See the following video for the secrets of wallpapering near a stretch ceiling.
Combination rules
When combining wallpaper, many people prefer the horizontal method; this is the most popular option. It is a so-called lower plinth made of wallpaper, but it is quite wide. Usually it is made darker than the light upper part and the size of the wallpaper is selected horizontally in a ratio of one to two. The top part is always twice as large as the bottom.

At the same time, you can combine not only wallpaper, but also this material with another; when decorating walls, you can use different ways and options. But this option has one important property: it allows you to make the ceiling in the hall higher.
Owners of rooms with high ceilings can afford another type of horizontal combination:
- A narrow top can also be made along the ceiling, but when gluing it is important to correctly align the top strip parallel to the floor so that the design of the room looks very harmonious. This gluing method is perfect for decorating halls and dining rooms with high ceilings. With their help, you can lower the ceilings a little and focus on them.
When combining horizontally, you can use two contrasting shades or one belonging to a dark color scheme, and the second to a light one.


- Another option is to combine wallpaper with the same texture, but with a different pattern, and the background color should be the same. A good option combining is a combination of wallpapers with two different color schemes, but with one common texture. Combining vertically also looks stylish.
It consists of alternating different wallpapers in color and design. Moreover, in this way you can decorate both adjacent walls and one. The canvases should be combined one after one or two after two. It is better if the coatings you choose do not contrast too much with each other. Try to choose an alternation of plain wallpapers with colored wallpapers that have some kind of pattern or ornament.


- But if you want to decorate your apartment or house in a more stylish and fashionable way, then you can resort to a vertical combination of wallpaper in contrasting colors. Thus, the combination of wide red and white stripes is popular. If you chose the method of contrasting combinations, then the canvases should be wider, and if you chose a vertical combination of light and similar-colored wallpaper, then the stripes may be narrower.
- Another way to combine is to highlight an accent wall. You can highlight it with photo wallpapers or bright coverings with ornaments. But in this way you can only cover one wall, preferably the shortest one. On other walls you need to stick plain light wallpaper.


- Combination with the use of ceilings is another interesting way. Yes, one thing wall covering completely extends to the ceiling, and other walls and floors are distinguished by different colors of coatings. This way you make a fashionable and unusual accent. This is how you can decorate the ceiling in the attic in an interesting way. It will become a bright continuation of the wall and an advantage of this apartment layout.


- You can also combine wallpaper using the patchwork method. This is another interesting method that involves gluing small pieces of wallpaper. Moreover, it is better to glue them end to end. To do this, choose about five different rolls of wallpaper, which differ in color and pattern, but have at least one common tone. They are glued according to any theme.
It is better to cut pieces of wallpaper approximately 50 by 50 cm. They are used to make unusual wallpaper collages. In addition, this way you can use unnecessary remnants of wallpaper from a previous renovation and save on buying a new roll.
Such an accent wall will look bright; it is better to decorate only one surface in this way, and make the rest monochromatic.


- Combining with inserts is another quite popular method now, which involves pasting all the walls in the same tone, and then gluing a small piece of bright wallpaper over one wall. It is better if this piece has a bright and unusual pattern. Thus, wallpaper can even replace paintings. These pieces of wallpaper are pasted over with special frames or plinths, which allow you to hide the borders and prevent bending of the corners.
- The wallpaper combination can be more complex and interesting. To do this, they use the creation of silhouettes from wallpaper. Most often, children's walls are decorated in this way. Initially, basic wallpaper is pasted, and then figures of animals, birds or something else are cut out from other, brighter ones. These elements are glued on top of the first coating. Thus, you get a beautiful and unusual pattern on the wallpaper.

Decor
When wallpapering, a decorative method such as molding is often used. It is a decorative material in the form of a three-dimensional strip that is laid on top of the wallpaper. Usually the length of the plank is about 2 m, but its width and design most often differ. Moldings can be flat or voluminous.

Manufacturers also present interesting models, which have a beautiful texture and decorative elements. They can be made of plastic, polyurethane and other materials. More popular are elastic moldings, which are easy to install. PVC or plaster moldings, as well as fashionable marble strips, also use polarity. They look very sophisticated and elegant.
With their help, they decorate walls covered with wallpaper in rooms with an interior in classic style. Moldings are mounted with glue along all walls on top of wallpaper. In addition, they are often used to frame windows and doorways for their visual expansion. For this, classic straight planks are most often used.


Also for finishing and decorating wallpaper they use ceiling or floor plinth. Such products are strips with a semicircular cross-section. They are most often used to hide the joint between a wall and a ceiling or between a wall and a floor.
Today, finishing with baguettes is popular. Such planks have an interesting and beautiful texture; they can be decorated decorative elements in the form of flowers and even entire three-dimensional images.


It is now fashionable to cover walls with baguettes, especially in this way the edge of doors is often decorated on top of wallpaper at the entrance or the edge of arches.
Decorations for wallpaper and walls now have the appearance of entire compositions. Thus, the planks can be entire ready-made arches, columns and stucco elements. They look very beautiful and elegant.


Important nuances
You can glue wallpaper at any time of the year, but there are some nuances:
- You should not hang wallpaper in an unheated room. So, if in winter, when gluing, the batteries in residential premises work strongly, then in this place the glue can quickly dry out, and the wallpaper will peel off.
To avoid this, you need to take several actions:
- While working, wet the cloth in cold water and cover the batteries with it.
- As it dries, the rag will need to be wetted again and placed on the radiator in such a way that you can paste the wallpaper. In addition, where the wallpaper comes into contact with the battery, you will need to periodically spray it with water, so the wallpaper does not dry out or become deformed.


- The most important requirement is maintaining indoor humidity. Air humidity should be no more than 60%. If this requirement is not met, the glue will become less effective due to moisture, and therefore the canvas may peel off before it has dried. In addition, bubbles may appear underneath. Ventilation or air currents should not be allowed into the room. If the air humidity in the room constantly changes, the wallpaper will dry out and stick unevenly.
- It is important to close the room after sizing and ensure a stable level of humidity and temperature. If you are gluing wallpaper in a residential area, then the temperature for different types of glue should be different. But the optimal value is from plus 10 to plus 25°. Higher or lower temperatures will negatively affect the quality of the adhesive and the glue will also become ineffective. The required temperature level can be achieved by placing a heater in the middle of the room and controlling its operating mode.


- Maintenance temperature regime in a room where you have just hung wallpaper, it is important not only on the day you wallpaper, but also for 10 days after that. If you provide stable humidity and temperature during gluing and some time after that, then the coating will be as durable as possible.
- During drying, it is better to curtain the windows if direct sunlight enters through them.
They can, by their directed action, dry the glue only in certain places, and thus the canvas may even partially wrinkle.
If you take these nuances into account, gluing will not create unnecessary problems.


Beautiful ideas
- Original finish indoor walls using wallpaper is a very popular method in 2017. Nowadays, many people choose colors when pasting, playing on the contrast of dark and light shades. In this case, it is customary to cover the wall opposite the window with dark wallpaper. This option involves simultaneously darkening the room and slightly brightening the dark wall. But if, on the contrary, you want to brighten the room, then it is better to hang lighter wallpaper opposite the window.
- Nowadays it is also fashionable to highlight an accent wall by decorating it with patterned wallpaper. For example, pink trim can be diluted with a bright purple accent. This combination is perfect for a children's room or even a bedroom.


- 3D wallpapers are even more fashionable and modern. They can be a covering with a pattern in three-dimensional space, that is, the so-called panoramic wallpaper. They occupy three walls and can have a solid pattern. You can find examples of coatings in the form of entire mythological scenes or beautiful landscapes. In this case, one wall is covered with a neutral coating.
- When gluing, you can give preference to LED wallpaper. They have beautiful colored backlighting, the brightness and color of which you can change using the remote control. They are perfect for a nursery and will look very stylish and versatile.


- In some modern interiors It is customary to use wallpaper that imitates other surfaces. Thus, for interiors in the loft style, materials with a pattern are used. brickwork, paving stones or even decorative stone.
- Provence or country style is characterized by the use of wallpaper that imitates stone or wood. For more classic interiors Wallpaper is used to resemble plank or leather. The use of plant motifs as a print on wallpaper is very popular. This wallpaper can highlight one wall in the bedroom.


- Large flowers are very popular now. You can choose a blanket or decorative pillows and lay them out on the bed.
Such an ensemble will look harmonious and elegant.
- Sometimes they try to match the wallpaper to the curtains, but in this case the curtains are chosen only to match the color of one accent wall, in order to thus emphasize the design or pattern and complete this combination.


- No less popular this year combined wallpaper on oriental and African themes. In this case, they use coatings with ethnic motifs, exotic prints and even hieroglyphs. They most often decorate one or two accent walls or use horizontal as well as vertical combination.
Despite the abundance of finishing materials, wallpapering walls remains the most common method of decoration. By gluing wallpaper, you can very quickly transform the room: make the room bright, “revive” the interior or place stylish accents.
To get the desired result, you need to choose the right wallpaper and follow all the rules for carrying out repair work.
Choosing a finishing material: features of different types of wallpaper
The process of wall finishing begins with the choice facing material. If you make a choice in favor of traditional wallpaper, you need to decide the best option. All types of wallpaper presented on the construction market have certain characteristics. Based on the qualities of the material, the conditions of their use and personal preferences, you need to make a choice.

Paper wallpaper- the most popular type of wallpaper in the world. Canvases have many advantages, but when using them, some disadvantages also appear. The main advantages include:
- loyal pricing policy allows you to frequently update the interior of the room;
- wide selection of colors and patterns;
- environmental friendliness and hypoallergenic material - wallpaper is ideal for children's rooms;
- the material allows air to pass through well, thereby preventing the formation of mold.
Disadvantages of paper products:
- Wallpaper quickly loses its original appearance - it fades under the sun's rays, wears out and wears out;
- most paper wallpaper cannot be washed;
- This material is not suitable for use in “wet” areas.

Advice. When planning to cover walls with paper wallpaper, it is better to choose modern duplex (two-layer) canvases. They are stronger and less susceptible to contamination. Some duplex wallpaper can be washed.
Vinyl wallpapers. The main advantages of the finishing material: moisture resistance and beautiful appearance. The basis of such wallpaper is non-woven or paper, upper layer processed with polyvinyl chloride. Vinyl wallpapers are available in a wide range of patterns and textures (embossed).
Vinyl coating protects decorative finishing from sunlight, humidity and reduces the attraction of dust. This wallpaper is best suited for the hallway, bathroom and kitchen. Most PVC sheets are suitable for painting.
The disadvantage of vinyl wallpaper is poor permeability. PVC film does not allow air to pass through, the walls do not breathe. As a result, the microclimate in the room worsens, the room must be ventilated more often.
Important! Some manufacturers use innovative technologies and produce wallpaper with a vinyl coating that has a porous structure. This allows the material to allow sufficient air to pass through.
Vinyl wallpaper is not cheap, but its high cost is completely worth it long term service - the coating retains its decorative effect for up to 10 years.
Today, several types of vinyl wallpaper are used:

- hard vinyl coating - a hard base is applied to the base that can withstand significant mechanical damage;
- smooth vinyl coating - forms a smooth, even surface that is more susceptible to damage;
- silk-screen printing is one of the most spectacular types of wallpaper; hot stamping technology creates the impression that the wallpaper contains natural silk threads;
- foamed vinyl - considered the most durable and dense, thanks to its deep relief structure.
Non-woven wallpaper are made on the basis of cellulose and consist of 2 layers: non-woven fabric and a polymer coating. The combination of the two layers resulted in the following characteristics:
- high strength - non-woven wallpaper is stronger than textile and paper wallpaper;
- the ability to hide wall unevenness and microcracks;
- wallpaper is easy to apply - if the technology is followed, the material will not deform or bubble;
- air passage;
- choice of wallpaper texture - embossed or smooth;
- wallpaper fits well on plaster, wood, cement, slabs and other materials.
Important! Distinctive feature Pasting with non-woven wallpaper - fastening to a wall covered with glue.
Textile wallpaper are produced on the basis of flezilin and paper. On top, the base layer is covered with textiles (jute, polyester, linen, cotton, etc.). It is the top layer that largely determines the final cost of the finishing material. Fabric wallpaper not only plays a decorative role, it also has noise and heat insulating properties.

With the help of such wallpapers you can create original interior. However, they also have negative sides:
- demanding when gluing - it will be difficult for an inexperienced craftsman to complete the work;
- intolerance to wet cleaning limits the scope of use of textile wallpaper.
Fiberglass wallpaper- wall covering made from glass fibers of different thicknesses followed by impregnation. Glass wallpaper - unique finishing material, which has a number of undeniable advantages:
- fire properties;
- naturalness and safety of use;
- high strength and resistance to any damage;
- durability - service life of about 30 years;
- repel dust and are easy to clean;
- Due to the fabric structure, air is allowed to pass through.

How to properly glue non-woven wallpaper: step-by-step instructions
Preparing the base
The process of pasting any wallpaper, including non-woven wallpaper, begins with careful preparation of the walls. This stage takes a lot of time, but the final result largely depends on the quality of its implementation. What events are required? The previous coating from the walls must be removed and the surface leveled.
Removing old wallpaper. To soften the coating, you can use a regular soap solution. To improve the effect, it is advisable to add a little wallpaper glue. Washable old or very thick wallpaper must first be trimmed a little, scored, and then moistened with soapy water. After this treatment, leave the wallpaper for a while - the coating will swell and can be easily removed with a spatula.
Sometimes the procedure has to be repeated several times. To make it easier to remove wallpaper, you can purchase special remedy, developed for this purpose - the solution is well absorbed and “softens” the material.
Enamel removal and old paint . In “Khrushchev”, “Stalin” and Brezhny era apartments, walls covered with paint are often found. If the coating peels off well, then it is cleaned off with a spatula. However, in the vast majority of cases, removing old paint requires a lot of effort. The enamel is tapped with a hatchet and cleaned off using a flat cutter or chisel.

Removing whitewash. Water-based emulsion paint or whitewash is pre-moistened with soap and water and then removed with a spatula. A thin layer of old whitewash can be easily washed off with hot water.
The next step is leveling the walls. All irregularities, cracks and other defects must be plastered or puttied. If the surface crumbles and crumbles, it is advisable to treat it with a bonding primer.
Necessary tools
To complete the work you will need:
- roulette;
- laser level or vertical plumb line with cord;
- roller with long pile;
- brush for smoothing wallpaper;
- plastic spatula with a soft edge for rolling wallpaper;
- construction knife for cutting wallpaper;
- metal spatula (narrow);
- foam sponge;
- glue tray;
- pencil;
- ladder.

Calculation of material and marking of walls.
To calculate the required amount of wallpaper, you should know the dimensions of the room. As a rule, the height of the ceilings ranges from 2.5-2.8 m, the length of the roll is 10 m. That is, one roll should be enough for three strips. Knowing the width of the roll and the perimeter of the room, you can easily calculate the total number of strips.
Most non-woven wallpapers have smooth, high-quality edges. That's why they are glued end to end. At the same time, the connection of the panels looks like a single solid surface. To facilitate further work, it is advisable to apply markings.
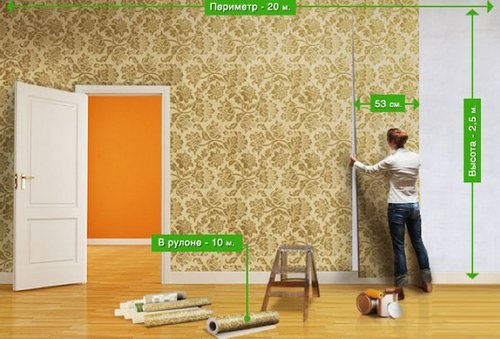
From the corner of the room, at a distance equal to the width of the roll (0.5 - 1.2 m), draw a vertical line. Use a level to check evenness. Lines are drawn along the entire wall.
Stages of wallpapering
Important! Before cutting the next panel, you should measure the height of the walls in different places, for example, every 30-40 cm. Very often the walls have differences and the length of different sections can differ significantly from each other.
If the wallpaper has a large pattern, then it must be selected. You can check the fit size from the pictogram on the label. When marking and cutting, it is important to control that the image matches and that you do not have to add a piece of canvas from the bottom or top.
For example, if the required fitting size is 48 cm, and the ceiling height is 2.5 m, then the length of each blank will be 2.88 m. According to the rules for “cutting” wallpaper, the length of the blank must be a multiple of the fitting size, i.e. 48 cm, but not less than the height of the room.

After making the calculations, you can start cutting. Cover the floor plastic film and roll out the roll face down. Measure the length of the cut (in our example - 2.88 m) and make a notch with a knife. Using a long ruler, bend the wallpaper at the level of the notch, check the evenness of the fold and cut off the sheet.
Spread the next sheet and check the fit of the drawings of the two canvases. If the workpieces fit together well, then you can cut.
Glue preparation. To apply wallpaper, you need to choose an adhesive composition that matches the type of material: paper, vinyl, non-woven fabric, textile or fiberglass. Before mixing the glue, read the instructions.
General procedure for preparing glue:
- Pour the dry mixture into a mixing container.
- Gently introduce water into the powder in a thin stream, stirring with a whisk.
- Leave the mixture to sit and stir again, removing any lumps.

Wallpapering. Direct pasting of walls is carried out in the following sequence:

How to glue wallpaper correctly: video
How to properly glue vinyl wallpaper: nuances of doing the job
The procedure for gluing vinyl sheets is not much different from gluing non-woven wallpaper. However, several nuances can be highlighted:
- The choice of glue must be approached responsibly. Vinyl wallpaper has the ability to stretch when glue is applied and shrink after it dries. A poor-quality adhesive composition may not cope with such a load and the seams will simply come apart.
- When gluing, a moderate amount of glue is applied to the walls to prevent excessive stretching of the canvas.
- In some cases, it is allowed to apply glue not only to the surface of the wall, but also to the canvas itself.
- Particular attention is paid to the seams. They must be carefully rolled out with a roller so that they do not come apart.
How to glue wallpaper correctly: photo of the joining of the canvases

How to properly glue paper wallpaper: features of cutting and gluing
The technology for covering walls with paper wallpaper depends on its type: simplex or duplex. Single-layer simplex wallpaper is applicable only for perfectly smooth walls - the canvas is very thin and all the cracks and holes will be visible through it. The installation of such wallpaper is done with an overlap. Duplex is glued end-to-end only.
The main requirement that must be met when working with paper wallpaper: after applying glue to the sheet, it must be left to “mature” for 2-7 minutes (the time depends on the density of the material).

When cutting wallpaper, pay attention to the presence of an edge. Some foreign manufacturers produce wallpaper with an edge on only one edge, while domestic ones produce wallpaper on both edges. For thick wallpapers that are glued end-to-end, the border is cut off on both sides; for thin wallpaper, on one side. It is convenient to cut the edge on a chair - the unnecessary edge is removed, and the wallpaper is rolled back into a roll.
Another nuance when working with classic wallpaper is decorating walls with borders. You can glue the decor only after the wallpaper has completely dried. It usually takes 12-32 hours for the paper to dry. This period depends on the amount of glue applied, the density of the material and room conditions.
How to wallpaper corners correctly
Pasting the outer corner:
- Measure the distance from the last strip of wallpaper pasted to the corner.
- Cut a sheet of wallpaper whose width is 2.5 cm larger than the measured distance.
- Glue the strip, bending the excess wallpaper to the opposite angle.
- At right angle the remainder is glued end-to-end, in other cases - overlapping along the vertical markings.
- Use a sharp knife to go along the corner, applying a ruler. At the same time you need to press the edges. Remove trimmings.

Inner corner finishing:
The main rule: you should never lay a whole piece of wallpaper on a corner. If this condition is neglected, then folds and bulges are formed.
- Measure the distance from the corner to the last strip of wallpaper and add 2 cm.
- Cut the desired piece of wallpaper and glue it to the wall, taking the corner.
- Press the paper firmly against the wall by running a blunt object across it.
- Seal the remaining piece with a cut with a slight overlap onto the adjacent wall.
- Apply a ruler to the joint of the walls and run a knife, removing excess material.
How to glue wallpaper end-to-end in the corners: video
How to properly glue fiberglass wallpaper
When gluing with glass wallpaper, it is important to follow some rules:
- The glue is applied to the wall, not to the canvas.
- To work, you need to use glue for heavy types of wallpaper.
- At first glance, fiberglass wallpaper has equivalent surfaces, but this is not so. The front side, according to international standards, of the roll faces inward. Wrong side some manufacturers are marked with a blue or gray stripe.
- The time for complete drying of glass wallpaper is 24 hours.
- After drying, the wallpaper can be decorated and painted. It is advisable to pre-prime the surface - this contributes to the economical use of decorative material and paint.

- Before wallpapering walls or ceilings in damp rooms, the surface must be treated with a fungicidal mixture - this will protect the coating from the appearance of fungus.
- The readiness of the walls before gluing can be checked experimentally:
- Glue a piece of polyethylene to the wall with tape;
- leave the cellophane for a day;
- if after 24 hours perspiration appears inside the film, it means it is too early to start pasting; if the cellophane remains dry, then the wall is completely dry and ready for further finishing.
- To avoid the appearance of wrinkles and bubbles, pasting must be performed under the following conditions:
- It is advisable to perform work at a temperature of 23-25°C;
- walls that have just been covered with wallpaper must be protected from drafts until the coating is completely dry;
- It is extremely undesirable for the wallpaper to be exposed to sunlight.
How to properly wallpaper a ceiling: video


