At the final stage repair work There is certainly a desire to add some zest to the updated interior. The opposite situation is when in the near future dramatic changes is not expected, also gives rise to the idea to liven up the situation original decor. In both cases, hand-made butterflies will help to decorate the wall in an interesting way. The creative process can captivate all family members; depending on the chosen concept, there is something for everyone.
Preparatory work
Decorating a wall with butterflies is a relatively new trend in the world. design solutions. Winged flowers will make the atmosphere refined, filled with romance, lightness and carefree dreams. Incarnation creative ideas reality is preceded by a preparatory stage:
- Choose the most suitable wall for the butterflies. A wide view will allow you to admire the original decor more often.
- Calculate the shape and area of the image on the wall, whether it will occupy a small area or be scattered over the entire surface. In addition to direct mounting on the wall, butterflies can be made into a panel, framed, or hung from a sconce.
- Decide what material is best to make butterflies from. Take care of its compatibility with the interior of the room. The article presents traditional and extravagant ideas for creating moths.
- Consider the color, size and shape of the jewelry. Bright shades on a light wall is the optimal solution. Butterflies of different sizes look much more impressive than those made from one stencil. Butterflies made with asymmetry will help you get as close to the natural image as possible. You should not strictly observe specularity; in the end, small deviations will add volume and dynamism to the appearance of the application.
- Depending on the chosen direction, prepare the material and tools with which you will decorate the wall.
Advice ! The overly intricate shape of the butterflies will create difficulties when cutting. If there are time constraints, it is better to stick to simple figures.
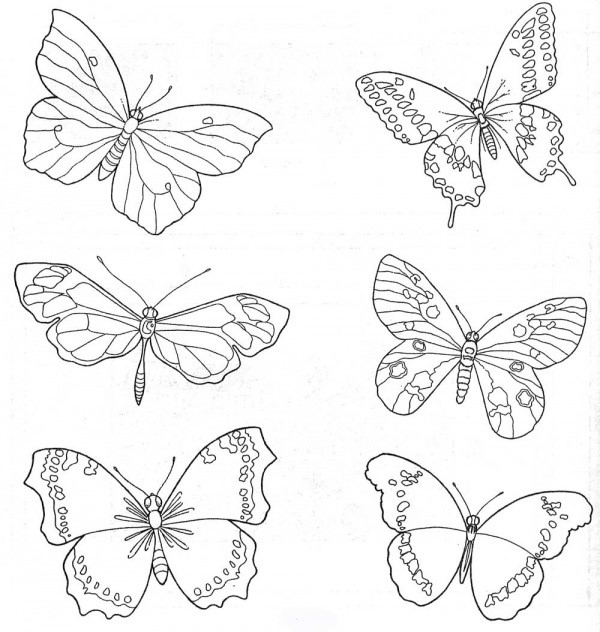

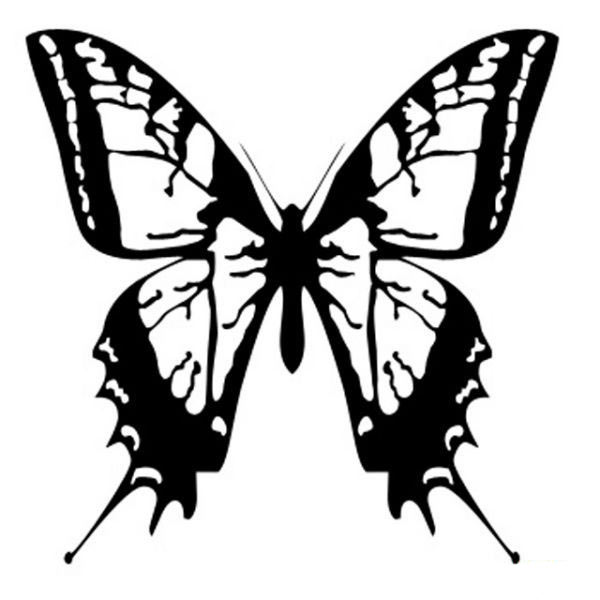
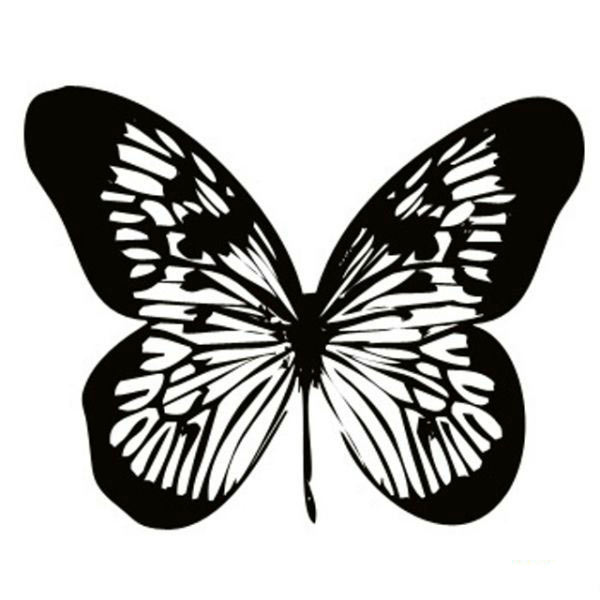
Having basic skills artistic arts, you can make a stencil for future butterfly blanks yourself on plain paper or using available pattern editing programs. In the absence of talent, ready-made templates of butterflies for the wall, designed for cutting, will come to the rescue.

Paper moths
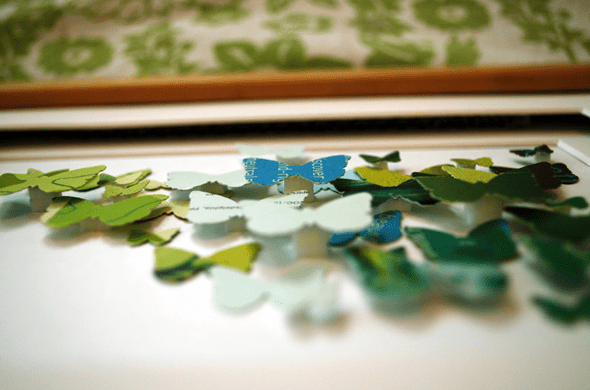
Most affordable way decoration - decorate the wall with paper butterflies. Making the moths monochromatic or combining two colors depends solely on the imagination of the novice designer. If the required shades are not available, acrylic paint and white paper will solve the problem. Butterflies on the wall made from bright sheets of glossy magazines look interesting. The variety of shades is difficult to create on your own, but bright printed designs will whimsically decorate the wall without additional costs. A pre-arranged palette will allow you to make smooth transitions in composition.

Having selected the sketches you like in various sizes, you determine the required number of butterflies. After this, the images are printed and stencils are made. Simple form most conveniently attach to cardboard and cut out inner part. Drawing complex structures Apply to a thick sheet and carefully cut out with a stationery knife. To speed up the process of preparing figures, just fold several sheets of paper and cut them out at the same time.

Cardboard version
Making cardboard butterflies on the wall is more difficult. However, the material allows for greater variation in shape design. To achieve the desired curves, just slightly moisten the product and, giving the desired bend, fix it with a weight. After drying, the butterfly will retain the required shape.
Next interesting option, how to make paper butterflies for the wall - make origami. This lesson Lately especially popular among children.

The idea of placing butterflies on the wall is initially drawn on paper. It is advisable to ensure compatibility with the wallpaper pattern and the overall theme of the room. A whirlwind of moths or a flock flying from one side of the wall to the other looks extravagant. Make a heart or a big butterfly from small parts- there are no limits to fantasy. The sketch is transferred to the wall using chalk or a pencil, carefully marking the lines along which the figures will be located.
Mounting methods
Butterflies cut out of paper or cardboard are attached to the wall in several ways:
- PVA glue. If the goal is not to preserve the attractive appearance of the wall after removing the decor, PVA glue or wallpaper solution is quite suitable. Fully glued butterflies will not create a natural effect. Volumetric applications look much more interesting. To do this, the wings of the moths are slightly bent and only the middle is fixed. When the air conditioner is running or there is a summer breeze, the butterflies will come to life, fluttering with the air flow. The glue is applied to the base in small doses so as not to spoil the surface of the wall outside the template.
- Pieces of foam plastic are used to secure light moths. Initially, the material is glued to the product, then to the wall.
- Double-sided foam tape, cut into small squares, is attached to the butterflies, having previously removed protective film. Having completed all the details, we begin to decorate the wall.
- If there is a prospect of removing butterflies from the wall without subsequent repairs, it is better to mount them with pins. This is only acceptable for wallpaper; the option of plastered walls will not allow the proposed method to be applied. Having selected hairpins decorated with beads or stones, they are bent using pliers at an angle of 90 degrees. Having secured the upper part to the body of the butterfly with glue, the end is carefully placed behind the wallpaper. If necessary, the decor can be easily dismantled without leaving marks on the wall.
Note! When fixing cardboard products, take into account their large mass, unlike their paper counterparts.
Decorating with a stencil
Butterflies made using a stencil will add originality to the wall design. Having selected and printed the sketches, the design is applied to thick film or laminated with strips of tape, outlined with a permanent marker and cut out with a sharp stationery knife. Several blanks will make the work easier; it is advisable to make one copy for each color. Luminescent paints will add extravagance to the design. At night, with directional light, the spectacle looks breathtaking. Further work includes the following steps:
- Stencils with butterflies are attached to the wall using spray adhesive or construction tape.
- A sponge cut into several parts and equipped with a handle will allow you to make a suitable brush. Acquisition ready-made tools will shorten the preparatory period.
- Ordinary paints are applied regardless of the time of day; it is better to work with phosphor material in dim light. Remove excess dye from the sponge, ensuring minimal contact with the stencil.
- A blue outline made with a regular brush along the edges of the wings will allow you to highlight the image glowing on the wall. After drying, the stencil is removed.
Advice! To regular paints not stretched, first draw along the contour with a blade or sharp knife.
In addition to paints, decorating the surface with butterflies is done with putty. To do this, after fixing the template on the wall, construction material applied using a palette knife. Upon completion of the process, the stencil is removed and washed with water to remove putty residues. After the solution has dried on the wall, you can make an extraordinary coloring of the butterflies.

Vinyl and plastic
The times when every home had an impressive collection of vinyl records are gone. Butterflies on the wall made of vinyl can remind you of the past and put stale rarities to good use. The template you like is applied to the plate, and the outline is outlined with white chalk or a piece of soap. To make the material pliable, it is placed on a baking sheet lined with baking foil in the oven. The desired condition is achieved in a few minutes, this is indicated by the curling edges. Without wasting any time, start cutting butterflies from softened vinyl using sharp scissors. If you don’t have time to do it before it hardens, you will have to repeat the procedure of placing it in the oven, so don’t rush to turn it off. Sanding them with sandpaper will make the edges of the butterflies less sharp.
Advice ! While the vinyl is warm, make the products voluminous; fancy curves will add personality to the decor on the wall.

Double-sided tape will help secure the butterflies on the wall. Pieces cut along the length of the moth's abdomen are initially glued to the wall, then the figures are attached directly to them. Silicone glue is another way to securely fix the decor to the wall.
It’s enough to simply make a butterfly out of plastic and then decorate the wall country house. To work, you will need the middle part of the bottle and materials for decoration. Having selected the stencil you like, the design is transferred to plastic with a permanent marker and cut out. The butterfly is painted with varnishes of bright colors, with sparkles; if available, you can use acrylic ones or those left over after repairs. Little needlewomen will be interested in making a butterfly for the wall, decorated with rhinestones and beads. Don't forget the wire antennae.

Fabric and metal design
On the walls with liquid wallpaper or decorated with draperies, butterflies made of fabric look appropriate. This creates an atmosphere of special warmth and home comfort. Cut and processed butterflies are attached to the wall with glue. Thin fabrics will allow you to create a three-dimensional image on the wall. To do this, the cut out moth is soaked in a soap or glue solution and dried in a certain shape.

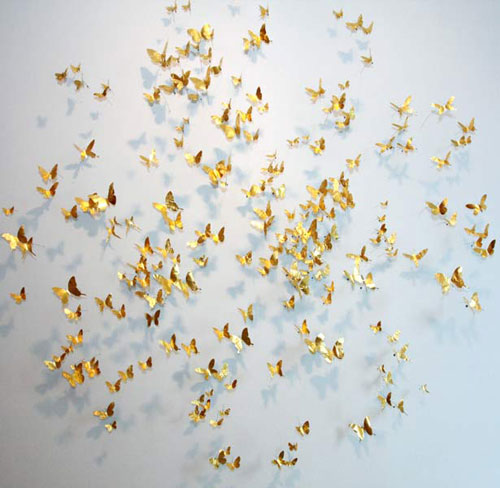
Butterflies on the wall made from tin cans look radically opposite. Working with the material will require a lot of effort and accuracy. Golden spray paint can give the workpieces an attractive look. It is better to subsequently dilute the monotony with an additional pattern. The extravagant design on the wall will harmoniously fit into the interior designed for brutal men.
Regardless of which wall design option you choose, the decor you make will definitely add individuality to the room and emphasize refined taste and awareness in matters of design art.
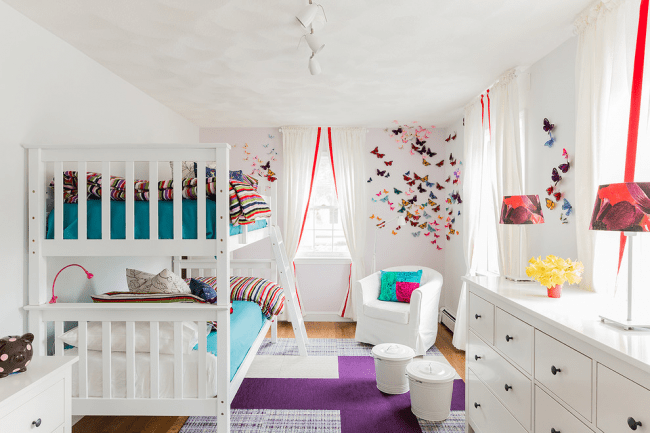
If you are bored with the interior and want to change something in your home, but you are not ready for drastic decisions, then a great option would be to decorate the walls with your own hands using such decorative elements, like a panel or applique. Particularly popular among designers are decorative elements in the form of butterflies, which symbolize joy and natural beauty.
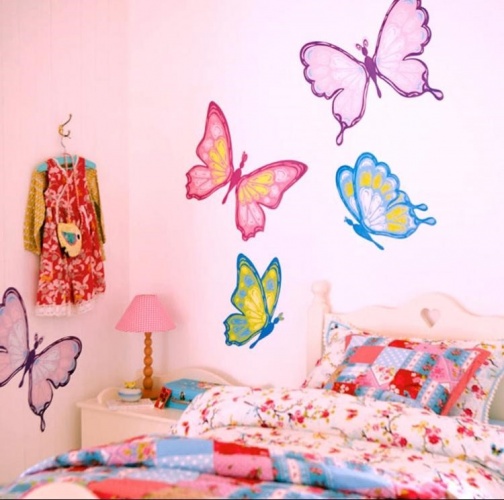
This decoration will look especially harmonious in a bedroom or nursery, but if used skillfully, it will fit into other rooms. This economical and rather unusual way of decorating walls will transform any room with minimal costs time and money.

Butterflies in the interior of the room
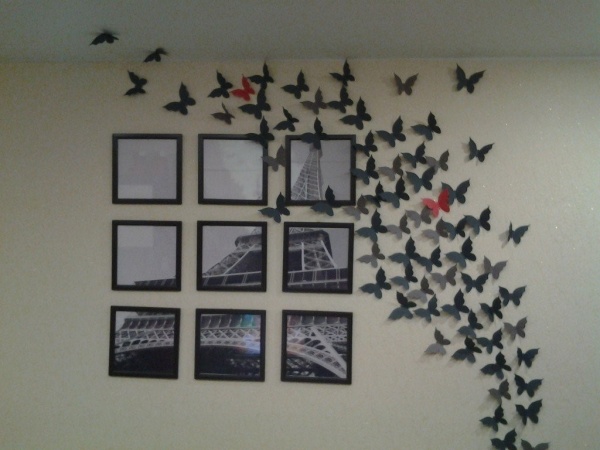
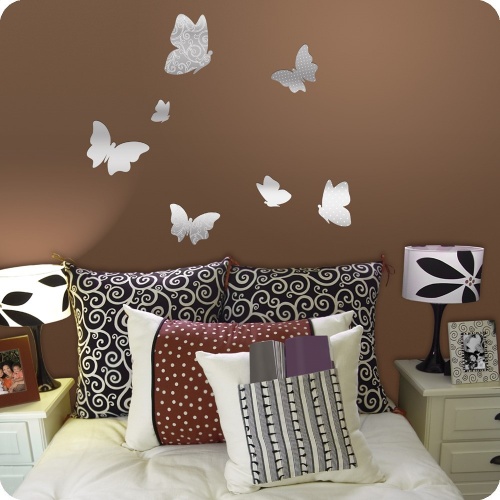
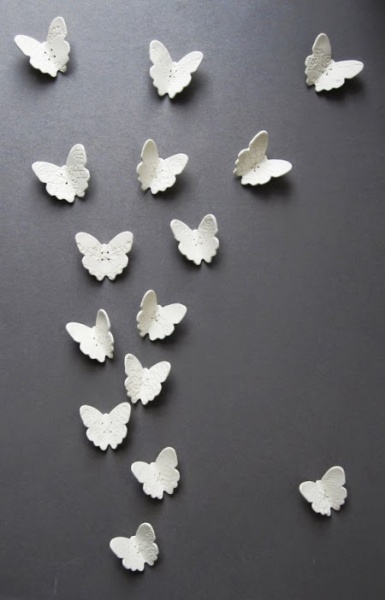
Butterfly decorations are rarely single. Usually entire groups of many moths are created. This creates wide scope for imagination, because you can place them in the most in unusual ways: on the walls, under the ceiling, around chandeliers, curtains or other interior items. Very interesting are the airy compositions that “come to life” with a light breeze.

White butterflies in the interior

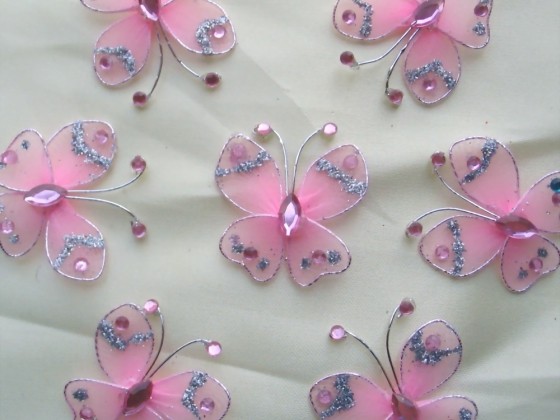
Multi-colored butterflies on the wall
Butterflies will become bright accent for a monochrome interior. Their color can be absolutely any: from strict white or black tones to the brightest neon shade. The main thing is that they fit organically into the interior, and their color echoes the color of the walls and other elements.
According to Feng Shui, butterflies bring happiness and mutual understanding to the home, bring romance into relationships and contribute to the fulfillment of your most cherished desires.
Butterflies in the interior are also used for zoning. By hanging them from the ceiling or decorating a wall with them, you can easily create several functional zones in the room.

Beautiful butterflies in the interior

Room design with butterflies
What style are butterflies suitable for?
Moths are an absolutely non-binding decorative element. This decoration will suit almost any style of room:
- Provence;
- classic;
- eco style;
- minimalism;
- high tech;
- modern
The main thing is to make sure that the butterflies match the color of the room and are located appropriately. Usually their colors contrast with the color of the walls, otherwise they will become simply invisible.

Room design with butterflies

- Absolute contrast. We glue black butterflies to the white wall, white ones to the black one.
- Color accent. Bright butterflies on a monochrome background.
- Light green or scarlet moths will look great on a beige wall.
- The best decoration for a pink wall will be blue or scarlet appliqués.
Materials used
What are they used to make butterflies for decoration? The choice of materials is truly impressive.
Paper
The most economical and easy to use material. You can attach paper butterflies to the wall using glue or double-sided tape.
Cardboard
This material is stronger and more durable than paper, but it is more difficult to make appliques from. Since it is quite heavy, you will have to secure the cardboard moths to the wall more securely.

Butterflies in the bedroom interior

Bedroom with butterflies
Vinyl film
This option is ideal for wall decor. Cutting from it is a pleasure; besides, you don’t need to bother with glue and tape, you just need to peel off the protective layer. Besides vinyl film has a very nice glossy shine and is more resistant to moisture than paper and cardboard.
Textile
Most often used to decorate curtains and various draperies. Fabric butterflies add coziness to the atmosphere of the room. They are attached with PVA glue. To give the butterflies the required shape, you can use soap solution and glue. You will have to wet them first and give them the desired bend, which they will retain after drying.

Huge butterfly in the interior of the room

What butterflies look like in the interior of a children's room
Styrofoam
Butterflies made from this material are durable and voluminous. The required color can be given using acrylic paint, and attaching it to the wall is not difficult with ordinary glue.
Gypsum
There is also nothing complicated in making butterflies from plaster: dilute the plaster with water, pour it into a mold, then wait until it dries and paint the resulting decoration with acrylic paint.
Mirrors and glass
Making wall decor elements from mirrors and glass is quite a labor-intensive task, but the result is definitely worth it. A butterfly-shaped mirror will look very original in any room.
Tree
Do you know how to carve wood? Your talent will definitely come in handy if you decide to decorate your apartment with your own butterfly-shaped decorations.

Pink butterflies in the interior

Circle with butterflies
Plastic
This is where improvised means come into play - plastic bottles. The butterfly is cut out of the bottle according to a template, the wings are given the necessary bend and color.
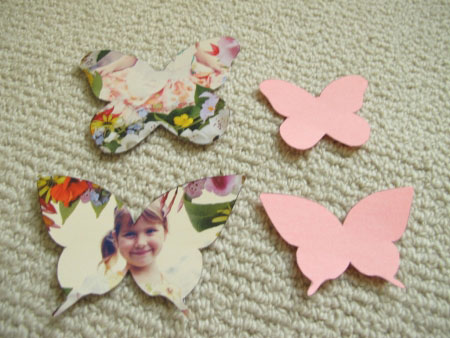
Old photos
Moths from your favorite photographs scattered across the wall can replace boring photo frames.
Fabric or painted composition
Textile moths are perfect for decorating walls covered with liquid wallpaper. On walls of this texture they can be easily fixed using PVA glue. For production, plain and variegated shreds are used.
Before cutting out the required shape, it is recommended to soak the pieces of fabric in a solution of PVA glue and dry. After this procedure, cutting will become easier, and the edges will not fray.

Butterflies with patterns in the interior of the room

Butterflies in the interior
To create a drawn composition you will need a few simple tools:
- cardboard stencil;
- acrylic paint;
- brush;
- sponge.
Drawing a picture on the wall is very simple. We apply a stencil, apply paint with a sponge, and outline the edge with a brush. It is not recommended to remove the stencil until the paint has dried, otherwise it may spread. For the same reason, paint must be applied to the wall in a thin layer.
Glowing butterflies
To create a magical corner in the room with butterflies fluttering in the dark, we will need phosphor paint.
Place the drawing on a white wall next to table lamp. Glue the stencils to the wall and apply phosphor paint with a sponge. The process is better controlled in dim light. After drying, the stencils are removed, and the butterflies remain on the wall, creating the illusion of them flying freely.
To enhance the effect, you can use blue paint around the wings.

Multi-colored butterflies in the interior

Butterflies in the interior
Moths made of colored paper
We will need several sheets of colored paper in the desired shades, a pencil, thick double-sided tape, scissors and stencils that you can make yourself by cutting them out of cardboard. A composition of butterflies of different sizes will look more impressive, so make several of them.
We trace the stencils and cut out the resulting figures. Their number depends on how large your idea is. To make the butterflies voluminous, fold the colored paper in half, but do it so that the fold line is not sharp.

Room design with butterflies

Beautiful butterflies in the interior of the room
The most enjoyable part of the job is placing butterflies on the wall. You can come up with many composition options.
Most popular:
- a flock of butterflies flying out of the room;
- a whirlwind with moths flying out from the center;
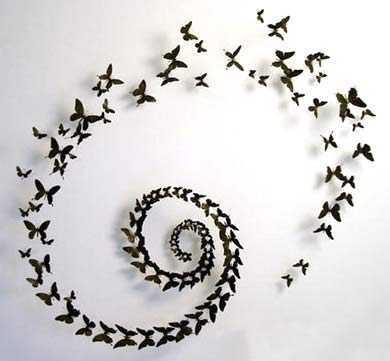
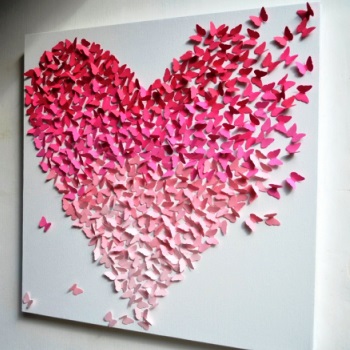
- butterflies that form a common shape (heart, large butterfly, spiral, etc.);
- chaotic arrangement all over the wall.
There should be no problems with fastening; paper butterflies are very light. Double-sided tape is ideal for this purpose, which will allow you to get rid of the decoration at any time without damaging the wallpaper.
Decor with butterflies: 7 exclusive ideas for handmade
Butterflies made of paper and cardboard are, of course, beautiful, but if the soul asks for originality, then completely different ideas will come to the rescue. We have collected 7 extraordinary ways to decorate your painting with butterflies using the most unexpected materials and design solutions.
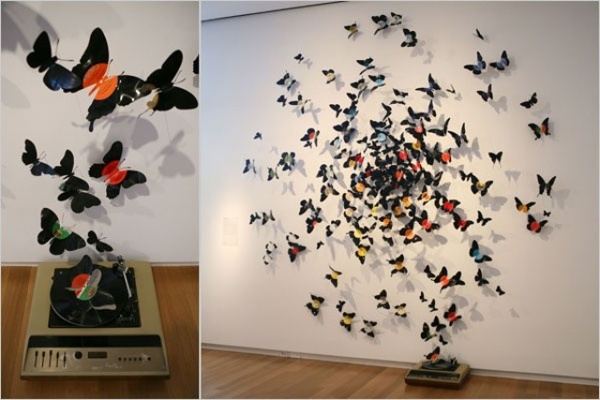
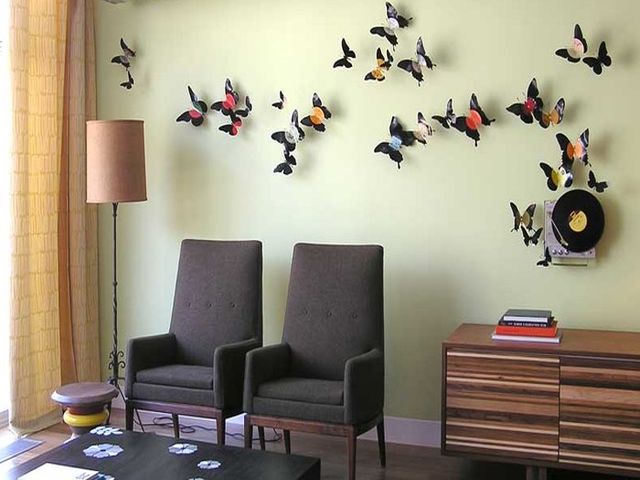
1. Made from vinyl records
Don’t rush to throw away old vinyl discs, because they are an indispensable material for decorating a room with your own hands. The plates are also used to create decorations in the form of butterflies.

Butterflies in the interior of the room

Room design with butterflies
The process itself includes several stages.
- We apply the design to the plate according to the template.
- Heat it in the oven or microwave oven for about 1 minute until the edges begin to curl slightly.
- Cut out the shape.
- Sand the edges with sandpaper.
- We attach it to the wall using glue.
2. Multi-layered and voluminous
Made from several layers of different colors and sizes, they look very vibrant and truly three-dimensional. Usually only the bodies of butterflies are glued together, while the wings remain free and bend at different angles.
An unusual effect is achieved by combining ordinary butterflies with openwork ones. To do this, two butterflies are cut out according to a template of the same size, but different in color, with the wings of one butterfly being solid, and the other with patterns.
To avoid cutting out the same shape several times, fold the paper so that you get several butterflies at once.

Photo wallpaper with butterflies

Butterflies in the heart
3. Corrugated paper
Moths made from such paper are even easier to make than from regular paper. They are very easy to make even without the help of glue.
- Cut out a rectangle of paper of the desired color, slightly larger than the planned butterfly.
- We sew the rectangle with a thread in the middle, tighten it, resulting in a bow.
- Fold it in half and smooth out the wings.
- From one edge we cut off a small strip for antennae. Using scissors, cut out a pattern along the edge of the wings.
- We roll the cut strip into a tube, forming antennae.
- We turn the wings inside out and carefully smooth them, giving them the required form.
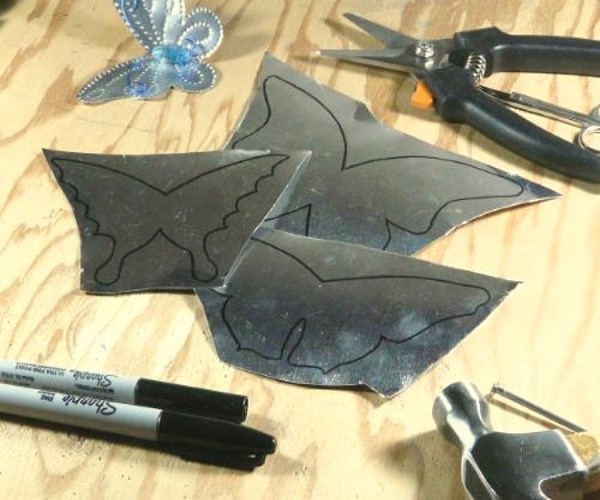
4. From tin cans
Butterflies for decoration are made even from such inconspicuous items as ordinary tin cans. When cutting out the moth silhouettes, extreme care must be taken to avoid cutting your hands. This design can be secured using thin wire. Freely moving butterflies will create a light chime at the slightest breath of wind
5. Accordion
The secret to the success of such a product is in the small accordion. You need to cut out 2 squares of paper, fold them like an accordion, then attach them to each other and wrap them with thread. We will make the antennae from flexible wire of the same color. Let's straighten the wings and give the butterfly the desired shape. The moth is ready!
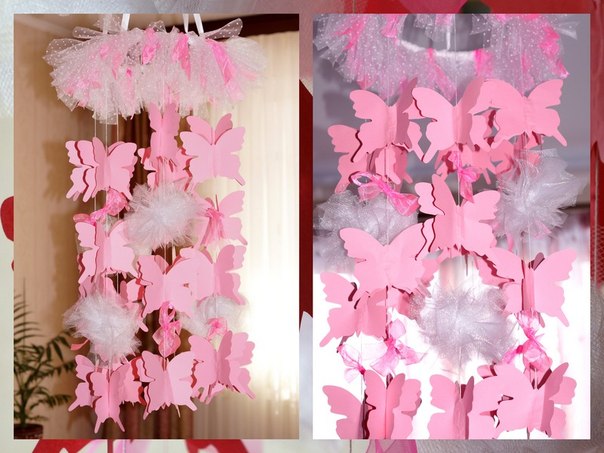
6. Mobile
An elegant hanging arrangement of butterflies will look great both in a child’s room and in a bedroom. Building such beauty at home is as easy as shelling pears.
To implement this idea, we will need a hoop, fishing line, ribbons, and the butterflies themselves, numerous manufacturing options for which we have already considered. We secure the hoop under the ceiling using satin or chiffon ribbons, and evenly attach the fishing line to the hoop over the entire area. Place butterflies made of paper or cardboard on the fishing line. They can be made either plain or colored. Such a voluminous decorative composition looks very impressive in a woman’s bedroom and emphasizes the romance and femininity of the hostess.

Room design with butterflies
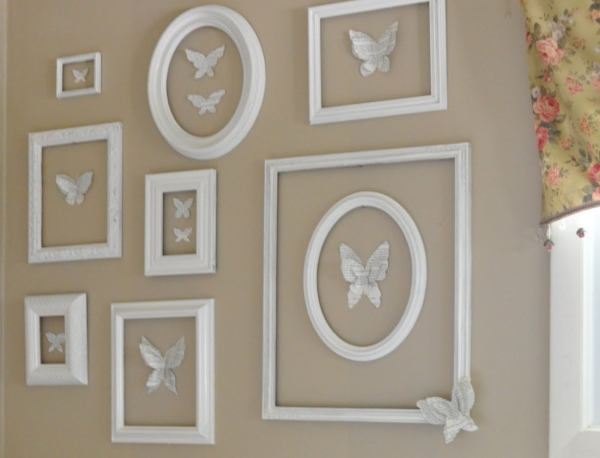
7. Paintings
The essence of the idea is that now the butterflies are not placed directly on the wall, but become part of a single application, enclosed in a limited frame.
We cut out butterflies from old magazines using a ready-made template and place them on a plain sheet, which will be the basis of the picture. We attach them using double-sided tape so that they rise above the level of the picture. If this is not available, then you can insert a piece of foam rubber between the tape.
We combine colors in such a way that they smoothly flow from one to another. We insert the finished picture into a frame.
Summing up
DIY butterflies for decoration are very budget-friendly, but at the same time creative and original version decorate the design of any room. A little time, patience, imagination and a lot of butterflies, and she will simply be unrecognizable!
Video: Decorating a room with butterflies
If you don't have money right now new renovation, but you want to decorate your apartment, this can be done with the help of homemade panels, stencils or other accessories. In this article we will tell you how you can decorate your walls with your own hands, decorating them with butterflies, as in the photo. It won't take much time, but the effect will be very beautiful, it will look especially good in a bedroom or nursery.
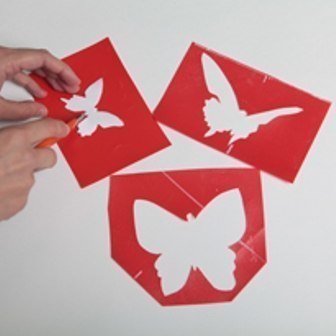
This type of decor involves applying drawings to the walls. Stencils can be either drawn by hand or printed using special blanks and then cut out. In fact, there are many ways to decorate an interior using a stencil. Let's talk about the main options.
Thanks to lighting and loose mounting, a volume effect is created
It turns out especially beautiful if the butterflies are of different sizes and are not placed chaotically, but in the form of a pattern, or are used to zone a room. In the video you can see examples of the use of butterflies in the interior:
Let's start production
First of all, you need to decide on the form of the future application. If you are bad at drawing, it doesn’t matter – you can download and print ready-made examples stencils with butterflies. Of course, they also buy ready-made stickers, but we do everything ourselves, so even if you don’t have a printer, you can order a stencil print from a photo workshop. Well, if you -
If you are a born designer, you can easily draw butterflies on paper yourself.
Butterfly stencils (click to enlarge): 


Advice! If you need large drawings, you need to look for them in vector format, then after printing, stretched pixels will not be visible.
Then we’ll decide on the color – make monochromatic silhouettes, or paint them. If you choose too many colors to paint your wings, the result may be motley and disappointing. Try to choose colors that match your interior, while the decorations should be contrasting so as not to blend into the background.
Manufacturing methods and materials
You can decorate walls from almost any available material. The most popular methods are:
- Paper. The most affordable way. You can print it out, decorate it yourself, and cut out any curls the easiest way. The main advantage is the low price of the material. The paper is easily attached to the wall in any way, and the wings of the butterflies move well from the air currents. If you get tired of decorating the walls with butterflies, you can easily remove it without regretting the time and money spent.
- Cardboard. Decorations cut from it will be many times stronger than paper ones. It is more difficult to cut out the curves, but the cardboard will be able to take the desired shape of the wings. If you wet it and put it under a press, then after drying the cardboard will retain this shape. Some butterflies with raised wings can be made this way.
- Self-adhesive film. You can find thick polyethylene or vinyl film in a variety of colors with a glossy finish.
Advice! To achieve desired effect, you can combine different methods. Use decor of different colors and sizes, from different materials, mix with other pictures. For example, butterflies will look great in combination with flowers, dragonflies, birds, and grass.

- Textile. Perfect if you want to decorate curtains or walls with a soft finish.

- Tough. Original butterflies are made from tin. If you want to surprise your guests, make butterflies from this material. When cutting, be careful not to cut your fingers. If you have small children, place the butterflies out of their reach.

- Wallpaper. If you are sure that such a pattern will not get boring, then you can purchase wallpaper with butterflies for the walls. This option is perfect for the corridor, hallway, kitchen, nursery, bedroom. If you decide to use this method, read our article about.
- Dye. Having made a stencil, you can easily paint the design on the wall. The disadvantage is that you will only get a monotonous silhouette.
- A chandelier with butterflies is also a good option, which looks very impressive due to the lighting. You can make it yourself from a lampshade from an old lamp. First paint it in suitable color, and then glue butterflies that you can color acrylic paints, add LEDs and rhinestones to them. Thin chains and wire decorated with beads are also used for fastening.
- Origami butterflies. In this case, you do not need to cut out paper, but you need to be able to assemble origami. It's not very difficult, the main thing is to do one thing, and the rest will go automatically. The main advantage of this option is that you can make a three-dimensional composition.

How to decorate walls with glowing butterflies
To decorate walls with glowing butterflies you will need stencils, luminescent paint (several colors), brushes and glue. After securing the stencils to the wall with glue, apply paint. We wait for it to dry completely, remove the stencils, turn off the light and admire the glowing butterflies! 
Butterfly decoration in the form of a painting
If you are hesitant to glue or paint butterflies on the walls, ideal solution will be placing butterflies in the form of a picture. Butterflies are cut out of any material convenient for you and hung on the wall in a frame. If the painting is under glass, dust will not settle on the butterflies and the fragile elements of the crafts will not be damaged. 
Forming a general composition

To obtain maximum effect, you need to choose the optimal location of butterflies on the wall. This can be done in many ways: in the form of a swirl, a heart, a flower, a tree, at the head of the bed, or randomly in suitable places. To accurately repeat the desired contour, first make a barely noticeable marking on the wall with a pencil, which you can then erase.
Attaching the decoration

To securely secure the decoration elements, you can use one of the methods.
- Glue using regular PVA or wallpaper glue. It is important not to let it stain the front part. The easiest and most affordable way. To make the wings flutter from the air, glue the butterflies onto a small piece of foam.
- Pin fastening is suitable for fixing on plastic panels, wallpaper and fabric. Once removed, the pins will leave almost no trace.
- Hang on threads, chains, wire. This method is best used for mounting on a ceiling or chandelier.
- Attach with double-sided tape.
Summarize
As you can see, butterflies on the wall can be an excellent decoration that will add romance and spring mood to your home. This way you can pleasantly surprise your other half while enjoying the process. Choose the most best option for yourself, and start making!
The beauty of the apartment is the most important thing, since it is the small various parts make it more attractive and comfortable. A good option for decorating a living space would be a DIY butterfly panel. Butterflies are considered the most fashionable trend of the latest season, and regardless of the time of year, a panel of butterflies will look perfect.
Butterflies are called winged flowers and therefore they will be an excellent addition to any interior. A panel of butterflies on the wall adds airiness and lightness to the room, and also fills it with charm. And according to popular beliefs, moths, whether alive or artificial, can become a symbol of good luck, joy, love and luck. That is why it is far from surprising that on the walls of many houses you can see panels with paper butterflies and more.

Making a panel of butterflies with your own hands is not that difficult; once you start, it will immediately become clear that this is a simple and entertaining process.
For such work, you do not need professional skills or attending a meeting such as a master class, but just scissors, glue and the desire to create.
It is important to note that making such a panel will help not only create beautiful picture with your own hands, but it’s also nice to relax emotionally, since psychologists recommend just such a pastime to relieve stress.
The composition of butterflies is mainly made on plain walls. For example, you can place a family of butterflies on a plain decorated wall.
Flocks of butterflies can be located in different directions and groups, and such butterfly paintings as:
- Vortex;
- Heart;
- Spirals;
- Chaotic order.

If the background for placing butterflies is colored, then the butterflies themselves should be bright, but not in the same tone as the wallpaper, otherwise they will merge and will not be visible. Before work, you should definitely sketch out a sketch according to which it will be carried out, and to be more precise, on the wall itself, using chalk, you should make notes on the location of the butterflies, so that after making them you do not waste additional time on marking.
What material should you choose for a panel with butterflies?
A stencil for butterflies on the wall can be made from cardboard or plain paper, and it can be the remains of boxes or, simply unnecessary materials, left over from previous work. Thickened stationery film and fabric would also be a good option.
Ideas for making paper butterflies are the most optimal and simple, since it is easy to handle, so there will be no problems with such a process as cutting out templates, regardless of their shape and dimensions.

Also, paper stencils can be very easily given symmetry. The paper has one more thing big advantage and this is the availability of this material, since it is sold in many stores and at a fairly reasonable price.
It is important to remember that making stencils from cardboard will allow you to use them much longer than from paper, since it is denser and stronger:
- Cardboard perfectly retains its given shape, but cutting out a butterfly will require a lot of effort.
- The result of a long and labor-intensive process will be a strong, durable stencil from which you can cut out a huge number of butterflies for room decoration.
Quilling is a method of decorating a room that does not require stencils, because it is prepared directly on the panel without preliminary preparations.
Thickened film can be stronger and more attractive than cardboard; it is simple and easy to work with. A wide variety of butterflies are cut out of the film, regardless of their type, and they are attached using ordinary glue, and even a glue stick can be used for this.
In order to create a beautiful original picture or, in other words, a panel of butterflies, you should use a combination of glossy and matte films, and if you place them at a certain slope, then a 3D effect is quite possible.
If you purchase already prepared film stencils, then small squares of adhesive fabric are attached to them at the factory, and to decorate the wall with them you just need to remove the protective layer.

A moth system is sometimes created as one fluttering wing, but it all depends on exactly how the wings are curved, how the light falls on them, and even what shade they are. It would seem that such trifles, but they can become important point when decorating a room with your own hands. Some novice designers install butterflies so that they catch a draft in the room and thereby come to life, which delights everyone who watches it.
How to make a panel with paper butterflies (video)
How to attach butterfly panel ideas to walls
You can install ready-made stencils on the wall different ways, since it all depends on the personal preferences of the decorator. In particular, the pannoquilling butterfly is attached with glue, and for other types of decoration you can use pins and polystyrene foam. Glue is considered an ideal way to create panels on the wall, but it is important not to overdo the dosage so as not to spoil the look with the remains of material peeking out from under the base of the butterflies.
Pins can be used in cases where the canvas on which the panel is attached is made of soft material, since the mace will need to be pierced into the wall so deeply that the wind currents do not tear them out and carry them around the room, which may be far from safe.

Not many people know that you can decorate a wall with butterflies using foam plastic.
Fixing occurs by gluing pieces of foam onto the moth, after which its reverse side is coated and applied to the wall. Thus, you can make the panel more voluminous than simply fixing it on the wallpaper. It is important to know that only lightweight structures can be fixed using foam plastic.
How to make a butterfly panel step by step
Before you start cutting out butterflies, you should choose a specific design, which will be an important component of the applique. To select, you need to carefully examine the wall on which the panel will be located, and also evaluate the scale of its location. Naturally, if the wall is wide, then you can make the most voluminous drawing, but in small rooms you should not overdo it with such decor, as it will put pressure on the psyche and is unlikely to help you relax.

After this, you should move on to developing the decor of the butterfly, choosing color and material.
It is worth remembering that this panel should become the brightest and most memorable spot on the wall, but it should not violate the overall harmony and atmosphere.
It all depends on the space, on nearby interior items, and also on how large the composition will be.
Creating a panel of butterflies (video)
The creation of templates or cutting out moths in another way should be done using a stationery knife. The shapes of the moths must remain symmetrical for the picture to be truly gorgeous. The last step is to attach the moths to the wall using the previously described methods.
Examples of butterfly panels (photo)


Content
You can update your bedroom, give it some romance or freshen up the nursery, or decorate it for the holiday with the help of butterflies on the wall. Decorating with butterflies gives the room a coziness, a feeling of celebration and does not require large expenses. There are a lot of options for decorating walls, and in this article we will look at the most popular and original ones.
Paper butterflies-beauties
The simplest and economical option make paper butterflies on the wall using any paper you can get your hands on. We will need:
- colored paper or self-adhesive film;
- cardboard;
- scissors;
- tape or glue;
- pen or pencil.
We will apply a stencil on the cardboard; you can create several different in style and size.
Now, using a stencil, transfer the outlines onto colored paper or adhesive film. You can glue beauties from plain paper with tape, glue, or attach them with needles. Distribute them in a chaotic manner or use them to form a heart or the same butterfly.
Butterflies on the wall in the photo in the shape of a heart:

By the way, to wall panel looked the most original, cut out not symmetrical, but slightly uneven marigolds, i.e. nothing bad will happen if the wings on both sides are slightly different, in general, if there is some asymmetry.
In general, for applications in the form of these wonderful insects, you can use everything that comes to hand: printing paper, wallpaper scraps, fabric, plastic bottles, tin cans, colored cardboard and even vinyl records.
Decorative butterflies made from plates
There are probably old records lying around the house that you certainly won’t listen to, or ones that are no longer possible to listen to due to their old age. So these will make excellent wall moths.
To do this, you will again need butterfly stencils for the wall, plates, chalk, sharp scissors, and an oven.
Using the template, transfer the contours of the moth onto the plate, touching its center.

The plate should be placed on foil, placed on a baking sheet and placed in a preheated oven on the top rack. Very quickly the plate will become pliable, then you need to take it out and try to quickly cut the workpiece.
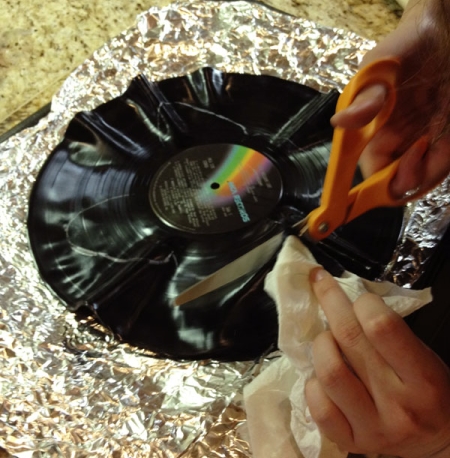
Now the wings need to be slightly bent, and now the blank for wall decor is ready. Make as many of these beauties as possible, in different sizes, and distribute them around the room.
Retro wall with butterflies
Paper fluttering from old books and newspapers will fit chicly into the retro interior. What you will need:
- old books and newspapers;
- scissors;
- glue;
- White paint;
- photo frames of different shapes.
From old issues and books you need to cut out blanks of different shapes and different sizes. Then several blanks of different shapes need to be glued together with little bodies to get this composition:
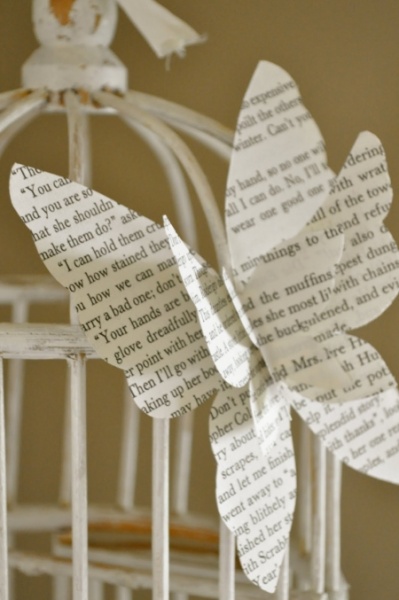
The prepared frames need to be painted in White color and place it on the wall. And place the moth in the frames. It looks very cozy and stylish.
Nylon tights will help you
Whatever is used in folk art. So the butterflies in the interior can also be made from multi-colored tights. What is needed for this:
- wire;
- tights;
- needle nose pliers;
- beads for decoration.
As you may have guessed, you need to create the frame of the future swallowtail from wire. Now this frame needs to be covered with a piece of tights. Make sure that the frame does not fall apart, tighten the material tightly. When the base is ready, you can stick beads on it or decorate it with fabric paints.

For the composition, you need to make at least 15, or even 20, such swallowtails. You can take children's nylon tights and any other suitable for this transparent fabric, the main thing is that it can be easily tightened.
Butterflies made of clay or plaster
You can make butterflies on the wall with your own hands from ordinary polymer clay, which is sold in a craft store. Plaster of Paris will also work.
Take the clay, roll it out slightly, not too thin, but not too thick, so that the moths look graceful. Now use a baking mold to mold the blanks. You also need to make a hole in them so that you can hang them later. We send the blanks to the oven to simmer.
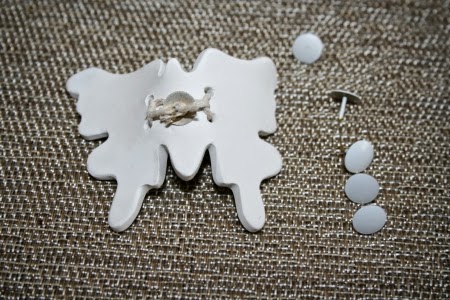
When all the beauties are ready, you need to thread a decorative ribbon or any suitable rope into them and place them in the interior. Pushpins are also suitable for these purposes.
Glowing butterflies
How to decorate a room with glowing fireflies? Prepare the following materials:
- special phosphor paint;
- stencils for butterflies on the wall;
- sponge;
- brush.
Prepare several stencils. Let each have its own example.

Now the stencil needs to be attached to the wall with glue. And then you need to apply paint using a sponge.
You can apply several colors at once to get a 3D effect.

Arrange natural beauties randomly, as if they were a flock of fireflies that had just taken off. This decor will fit wonderfully into a children's room, especially for the youngest children, who will look at everything around them with joy and interest.

Openwork butterflies
Openwork and perforated paper butterflies look gorgeous. And they're pretty easy to make.
To make the workpiece neat and elegant, it is better to print the stencil in advance.

Now prepare the basis for the future openwork - photo paper, colored double-sided paper or bright leaves from glossy magazines will do.
A sheet of paper should be folded in half and placed on some kind of stand, maybe on plywood. Better secure it with tape to prevent fidgeting.
Now you need to attach your template and carefully, using a pencil, transfer the contours onto paper.
Then, using a utility knife, carefully cut out the openwork wings. Then, using nail scissors, cut out the openwork itself.
The more blanks of different sizes you cut out, the more amazing and impressive the panel will look in the interior. In addition, you can decorate the wall with butterflies, either plain or multi-colored, bright, cheerful.


Volumetric panel of butterflies on the wall
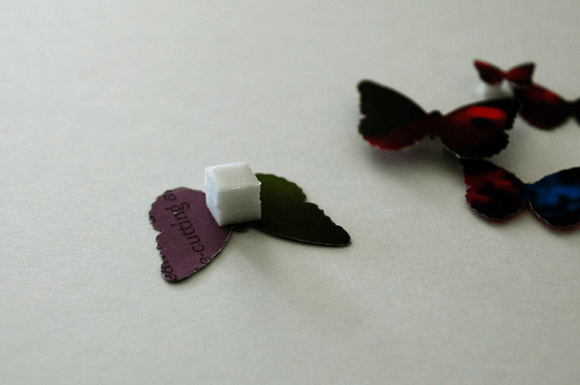
Another technique for 3D butterflies on the wall. To work, we will need the usual set: glossy multi-colored paper, old magazines, scissors, stencil, glue or double-sided tape, foam rubber will do.
First you need to cut the magazine sheets into strips. The stripes should be the same width as the future insects.
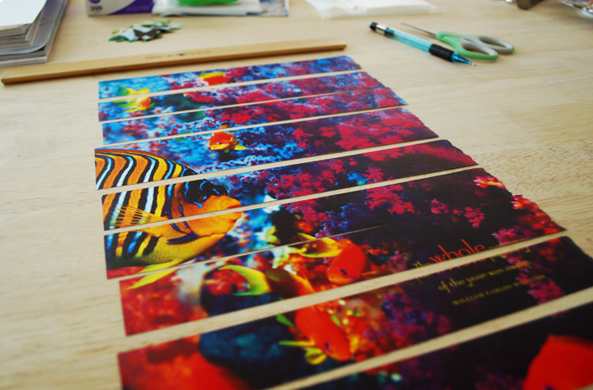
Let the strips be of different widths so that the patterns do not turn out the same.
Now, using a stencil, draw the contours of the butterflies to cut them out of the prepared paper.
In order for the composition to truly create a 3D effect, on the workpiece, with reverse side, you can stick a piece of foam rubber.
Now you can safely glue your bright insects to the wallpaper or you can make a composition in a frame.
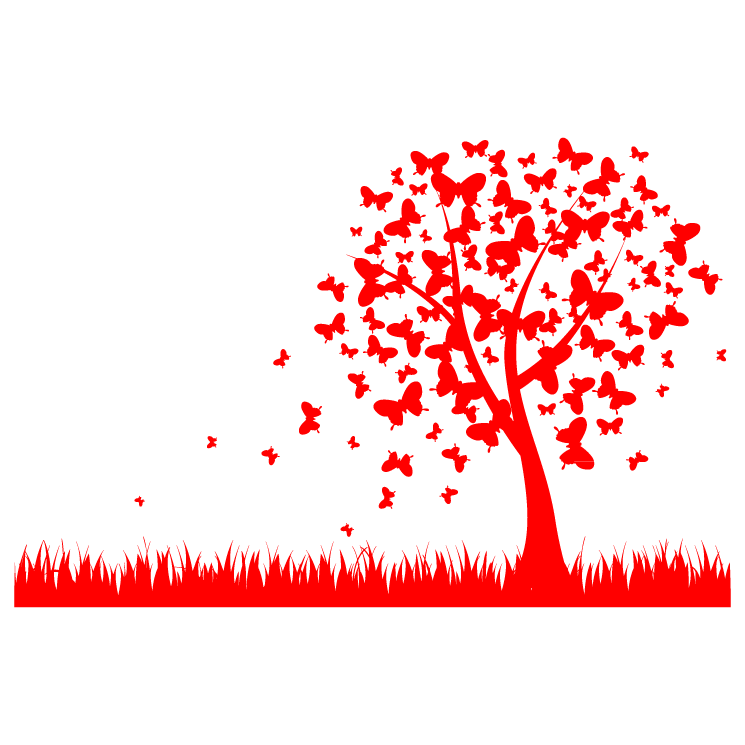
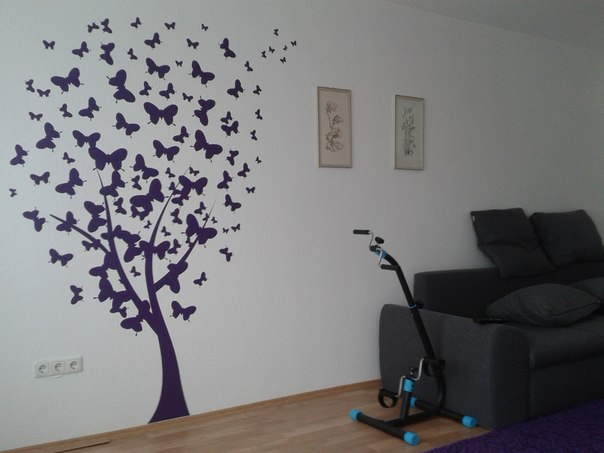
It is believed that butterflies should be literally in every home and in every room, because they bring positive energy and put you in a positive mood. But, as with everything, the main thing is not to overdo it; try to create different compositions in advance so that they look harmonious and impressive. For example, a tree with butterflies:

Or moving from one wall to another and to the ceiling:
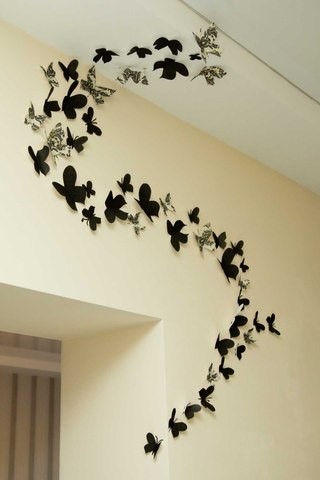
By the way, with the help of this technique they make a conditional division of the room into different zones: It comes out very original and inexpensive.

Don't forget about origami
Origami can be a successful way to decorate the interior with butterflies; this art should not be dismissed. The main thing is to master the creation technique and that’s it, consider it beautiful and original wall you already have. We offer the following butterfly patterns:

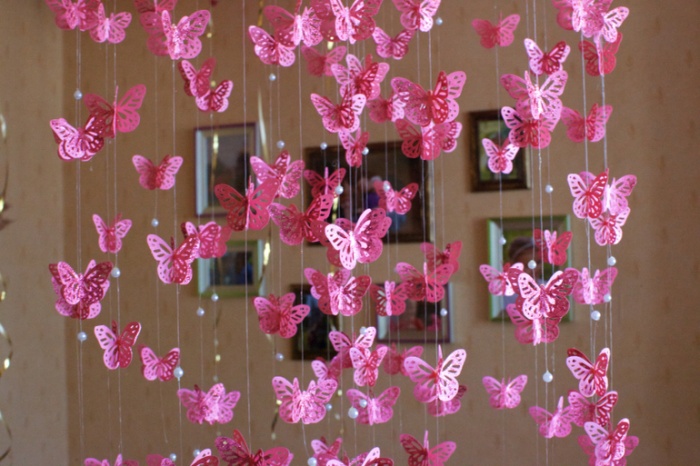
These beauties can be immediately glued to the wall using tape, or you can make a hole in each one, thread a thread and make a floating composition. Place the beauties at different levels and distances, then the composition will seem more voluminous.
By the way, a similar composition can be created from openwork. You already know how to make them. There is nothing complicated about this, connect the butterflies as if you were decorating curtains from threads. You can also use a wooden ring, to which you need to tie strings with pre-attached decorations, you will get a kind of chandelier.
When decorating the interior, do not focus only on the wall, because the decor can be placed on the ceiling, on furniture, along the stairs, on mirrors, curtains, windows and even on the floor.
Remember about the combination of colors in interior design: if the room is made in pastel colors, then butterflies can play the role of a bright spot, but if the interior is rich, “active,” then monochromatic, perhaps even muted tones, will do. Cabbage pots of the same color look very stylish in combination with some decorative elements or furniture.

They also look wonderful in a children’s room, and it doesn’t matter whether the room is a girl’s or a boy’s. Believe me, everyone loves butterflies. It will be especially nice if you involve the children themselves in creating the decor. It's an amazing time.
Mobile made of tin butterflies
A unique mobile of cabbage bowls made from tin cans will look impressive.
So, using a stencil or by eye, if you have filled your hand, try to evenly cut out the beauties from tin cans. Then each workpiece must be attached to a wire, which, in turn, must be secured to the wall. The effect will be amazing when, from a light breeze, the butterflies will flutter as if alive. A little advice instead tin can you can use foil or you can combine these two materials.

And this is what a whole panel looks like - decorating the walls with butterflies:
For more clear example, we invite you to watch a video master class on creating these charmers and an equally charming applique on the wall from blanks:
Post Views: 1,029


