Modern panel on the wall - this is often the work of the whole family, when all household members work on a bright decoration. Today, such options are in fashion, when beautiful works created by collective labor appear in the interior. But you can start not with such a large-scale event; try making a panel with your own hands in an artistic style close to you.
A panel is a decorative element that serves as a wall decoration. A wall panel will be appropriate in any interior. Sometimes it decorates not only the wall, but also, for example, the ceiling or facades. A wall panel differs from a painting in that it can either be a work of sculptural genre or belong to a technique such as mosaic, appliqué, etc.

Panels on the wall - types:
- Fabric. Embroideries, appliqués, tapestries - everything that can be done on fabric belongs to this type of panel.
- Stone. Making panels from stone is a labor-intensive process, it is usually used a natural stone, for example, basalt or marble.
- Wooden. This type of wall panel is usually characterized by an abstract plot. This wall panel is often complemented by inlaid stones.
- Sculpture. A three-dimensional panel, a kind of mini-sculpture on a plane.
- ceramic. These are mosaic paintings made of ceramic tiles.
- Graphic. Are used modern views printing, photo printing is increasingly being used, which looks organic in today’s interior.
- Other. And here is a huge layer of other techniques that use, for example, puff pastry, grains and cereals, seashells, pebbles, etc.
You can add a panel to the bedroom, the living room, and other rooms; it never goes out of fashion, and can become the most bright element interior
Panels from paintings (video master class)
DIY panel for mom
For Mother's Day and other holidays, when you want to congratulate your mother, one of the best gifts you can make is a wall panel.
Panel options for Mother's Day:
- Panel from cotton pads . The easiest option that the smallest children can do for mom, although they will, of course, need help.
- Paper panel. Mother's Day options such as cherry blossoms or quilting crafts are popular.
- Salt dough panel. Children love to tinker with dough, and seeing how it turns into interesting colorful crafts, they are delighted. For Mother's Day, you can make a composition with flowers or even an image of the mother, stylized and simplified.
- Panel applique. Flower bouquet from bright scraps of fabric, for example, cheerful sunflowers.

You can also do it for Mother's Day beautiful crafts as unusual panel, for example, with interlacing technique. Applique + embroidery, origami + quilting, patchwork + beadwork. Such a panel can be hung in both the bedroom and the living room, so that intended for Mother’s Day, it will delight you for a long time.
More than one master class tells how to make a panel for Mother's Day, the idea may be yours, but different tricks learn from the instructions of other masters.
Panel for the pool on the wall
You don’t have to wait for a holiday, like Mother’s Day, for the interior of your home to have original panel. Crafts for the pool, or for the bathroom for those who don’t yet have a pool, are popular today. As an option for a bath.
All these crafts are actually united by one thing - the theme of water. You can use the master class of panels on a marine theme. And for the pool, and for the bathroom, this will also be true.
Panel in nautical style also suitable for a bath if you use a different marine decor there. For the bathhouse, you can also make a panel applique in the form of kind grandfathers with brooms, in the naive art genre. Today it is fashionable, and a similar style can be used to decorate the walls of the pool, not only for the bathhouse.

Panel for the pool is also:
- Playing on the theme of the seabed - with all sorts of beautiful inhabitants of the deep sea;
- Sports theme;
- The element of water - the mosaic best conveys this idea.
For the pool and bathroom materials are used that are not afraid of water. You can take a master class in making crafts from shells as the basis for a pool panel. Or, to decorate the walls of the pool, you can take a master class on salt dough panels.
Panel of toilet tubes in the interior (video)
DIY panel: sunflowers
Often, it is sunflowers that become the theme that you definitely want to use in your decor. Almost all types of panels can be used, except that forged and metal panels will look rough.
Panel sunflowers can be different:
- Sunflowers from satin ribbons;
- Felt sunflowers;
- Sunflowers made from buttons.
Even such a technique as steampunk is quite involved
DIY panel: steampunk
This is a special technique, the essence of which is to assemble waste unnecessary trifles in the form of a craft. Sometimes steampunk is mistaken for wrought iron panels, but these are completely different things.

A small master class on working in steampunk technique:
- You need a base for the future panel, for example plywood;
- Most often, some kind of textured background is made, but this is not necessary;
- Everything you use - buttons, nuts, pins, zippers - needs to be glued to the base;
- You can paint everything with one color, for example gold spray paint, or use a combination of several layers;
- Frame decor.
This, of course, is not a full-fledged master class, but only a short course of work. Maybe not every steampunk panel can be hung in a bedroom or living room, but in apartments with loft or fusion interiors, these crafts will be appropriate.
DIY New Year's panel
Even a month before the New Year holidays, or even earlier, you can watch more than one master class that talks about making a New Year's panel. It could be a voluminous Christmas tree or a snowman, a large panel for the living room or a miniature one.
New Year's panel options:
- Snowman made of cotton pads;
- Snowman made of foam chips;
- Snowman made of buttons;
- Snowman made of lace and bugles;
- Snowman made of napkins;
- Snow Maiden made of beads;
- Snow Maiden made from salt dough;
- Snow Maiden made from scraps of thread;
- Christmas tree made of crepe paper;
- Christmas tree made of sequins;
- Christmas tree made of twine;
- Christmas tree made of tulle;
- Eggshell Christmas tree;
- Christmas tree made of pistachios.
All of the above is an application made of different materials, which can become the basis for a DIY wall panel.

also in New Year You can give an unusual educational panel to your baby. It is educational because it combines objects of different textures, such as felt, silk, cereal, etc. Such crafts are of great benefit for the development of the child.
You can find a master class on panels for combs. This is a functional panel that will serve as a clever storage for combs. It can be made for a living room, or for a nursery - as an original place for a little princess’s combs.
How to make a panel (video)
A do-it-yourself panel is a good gift, elegant decor, and a lot of creative work. You can follow certain instructions, use more than one master class, or adhere to your own author’s methodology. There are no strict boundaries in this genre, so for those who like creative experiments, panels are the best option.
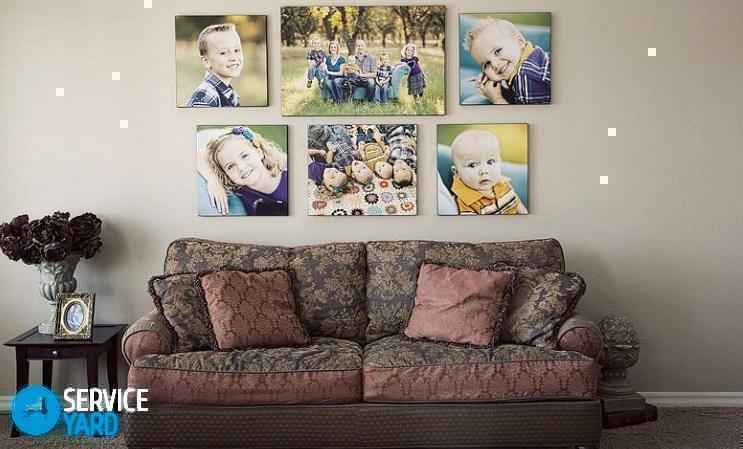
DIY wall panel (photo)


A modern wall panel is, very often, the merit of the whole family, when over beautiful decoration All household members work. Today, such options are in fashion when the interior contains beautiful works that were created by collective labor. But you don’t have to start with a very large-scale event - first try to figure out how to make a panel from photographs with your own hands on the wall in an artistic style close to you.
What types of panels are there?
Wall paintings may differ in the following parameters:
- The material can be anything: fabrics and plastic, cardboard and wood, wire and paper, fur and buttons, yarn and dry branches, photographs and postcards, mirror fragments, etc.
- Techniques: wood carving, embroidery, embossing, knitting, inlay and gluing. In this case, the decorative element can be an interlacing geometric shapes and lines, have a specific plot or abstract image.
- A shape that can be of any geometry and size. Do-it-yourself paintings and panels can be made in the form of polygons, ovals, curvilinear figures, and often consist of many individual elements.
- The 3D effect is a new trend of the times in creating such compositions. This version of the panel is quite difficult to make, but quite possible. In this case, the three-dimensional effect is achieved using various protrusions and voluminous paper applications. Applications can imitate high relief, bas-relief and unique different works.
Important! “Soft” patterned ones look great volumetric panels, created using small wallpaper nails, which are equipped with decorative caps.
- Lighting – it makes the panel not only a decorative element, but can also give it a practical property. For example, LED lights allows you to use the panel as a night light. The lighting level can be adjusted by the number of LED elements.
Choosing a place for decoration
Before you make a beautiful panel on the wall with your own hands, you need to determine its location. This may affect the shape, size and color scheme future canvas:
- The distance from the panel to the floor surface is usually 170 cm.
- If you are going to make mirror panel, then it must be installed so that natural or artificial lighting falls on the surface of the picture. Thus, reflected and diffused light can create visual harmony in the room.
Important! A wall panel made of corks, cardboard and other available materials looks great in free space. For this reason, it is not advisable to place this decor near other interior items, for example, shelves, paintings and photographs.
Preparatory work
There are a huge number of options for making a wall panel with your own hands for absolutely any room. Photo already finished products you can find it in catalogs or come up with your own own project. To begin with, it is advisable to apply the intended panel design on a prepared sheet of paper. Having this sketch, it will be easier for you to determine the future shape, size of the painting and the materials you will need in the process of creating it.
Idea 1
If you are going to use fabric as decoration, then you can use a piece of board, plastic or any other material that has a hard surface as a base. The fabric should be stretched over the base, and its allowances should be secured to the wrong side of the workpiece. The finished craft is placed in a frame and then hung on the wall.
Idea 2
The panel can also be made without a frame. To do this you will need a piece of plywood or drywall. The front part of the workpiece is covered with padding polyester or foam rubber, and then the resulting “pillow” is covered with fabric. Next, the product is decorated.
Photopanel
Making a beautiful wall panel with your own hands is very easy if you have a lot of interesting photographs in your family album. This decor option can perfectly decorate any room: corridor, children's room, living room. Such heart-shaped bedroom paintings look very original.
Materials and tools:
- A piece of thick white cardboard.
- PVA glue.
- A simple pencil.
- Stationery knife and scissors.
- A set of photographs.
Sequencing:
- Take a piece of cardboard.
- Let's draw the outline of our future collage.
- Cut it out.
- Pre-arrange the photos in the desired order.
- First we glue the elements along the contour with a slight overlap.
- We fill the interior space of the craft with photographs.
Panel made of threads and nails
A heart-shaped painting will help decorate a young girl’s room. You can make it using threads and nails.
Important! The base can be made of wood, cork, foam or plywood.
To make a heart-shaped wall panel with your own hands, you will have to try a little.
Materials and tools:
- Hammer.
- Pins with beautiful heads or thin nails.
- Acrylic paint.
- Pliers.
- Threads - any: iris, floss, wool.
- PVA glue.
- Scissors.
- A simple pencil.
- Paper.
Sequencing:
- Choose a base, determine the size of the future painting.
- Cover the surface with paint a tone lighter than the color of the threads.
- Draw an outline of a heart on a piece of paper that will be proportional to the size of the picture.
- Cut out.
- Attach the template to the base and trace.
- Hammer the nails evenly along the contour - the smaller the distance between them, the better.
- Tie the thread to one nail.
- Pull it towards the nail on the opposite side.
- Circle around it.
- Continue wrapping in any order.
- Glue beads or other decorative elements to the base.
Button panel
Almost every home has a jar or box where various buttons have been stored over the years. In the end, there were so many of them that there was nowhere to put them. Buttons different sizes, flowers, with bows or holes - all this can be a wonderful material for a picture that can decorate a boring wall.
The very first thing that comes to mind is the painting “Money Tree”. As a rule, it is made from coins, but they can be replaced with buttons. Although no one can forbid you to arrange buttons with coins in one panel.
Important! There is an opinion that such paintings bring money into the house.
Materials and tools:
- The base is fabric stretched over a frame, cardboard, board.
- Buttons of different sizes and colors.
- Glue.
- Pencil.
- Copy paper.
Sequencing:
- Apply a pattern on the base in the form of a lush crown and a thick trunk.
- Prepare buttons of different sizes.
- Mark which button will go where.
- Apply glue to the base of the buttons and glue them one by one, starting from the barrel.
- Glue the buttons that will be the leaves, going onto the trunk, so that you can clearly see how the foliage “hangs down.”
- If you don’t have a lot of buttons and there are gaps on the base, you can paint over them with any paint.
Salt dough panel
Salt dough is a wonderful material for modeling. The process of making a masterpiece develops well fine motor skills, which is very useful for children for speech production.
Important! Why from salt dough, and not, for example, from plasticine? After all, he also warms up well, develops motor skills and has a large selection color palette. But the fact is that plasticine always remains soft, and it is not possible to dry it, so the panel can sooner or later be damaged. But dried dough is a completely different matter: it is strong and hard.
Let's look at how to make paintings and panels with your own hands from salt dough.
Materials and tools:
- Flour - 2 cups.
- Fine salt - 1 cup.
- unrefined vegetable oil– 1 tablespoon (instead, you can take the same amount of dry wallpaper glue or hand cream).
- Water – 125 ml.
Important! Properly prepared dough does not stick to your hands; it should knead well, be elastic and dense. If the dough is too sticky, add a little flour, and if it sticks to your hands, add a little butter.
The dough can be made aromatic by adding different spices: black and red pepper, nutmeg, turmeric, cinnamon and more. And food coloring will help color it.

Sequencing:
- Sculpt a picture from ready dough or make individual figurines for the craft, which will need to be assembled later.
- When the modeling is completed, the product is placed in the oven at 80 degrees to dry.
- You can also dry it on a radiator, but in this case the drying process may take 5 or more days.
- The dried picture is painted with paints.
Important! To make a salt dough product strong and durable, it should be varnished.
Paper panel
Paper is one of the simplest and cheapest materials. From it you can make a lot of very beautiful decorative elements for any room. This can be done not only by adults, but also by children. Read below to learn how to make a beautiful wall panel with your own hands from colored paper.
Important! This craft can be made in less than one hour, but it will take a very long time to decorate your home. Against the background of such decoration you can make good photos, as it is suitable for cheerful and active people.
Materials and tools:
- Colored paper.
- Paper clips.
- Scotch.
- Pins.
- Stapler.
Sequencing:
- Take a piece of paper and fold it into a fan like an accordion.
- Bend it in half.
- Using a stapler, connect its inner edges. These three accordions make a circle.
- Circles can be made from paper of different colors.
- Make sure that with front side the paper clips are not visible - leave them only on the inside.
- Make a lot of these circles and make a picture out of them on the wall.
- Secure each circle with pins.
Video material
We hope that we were able to help you figure out how to make a wall panel with your own hands. This type of work provides enormous scope for creativity. You can make absolutely any author's decor and decorate the room with your masterpiece. For many, such an activity can become not only a pleasure, but also a permanent hobby.
Panels are made from fabric quite often, and some craftsmen are able to turn ordinary fakes into real masterpieces! Templates are not acceptable here; there are no specific guidelines for action. The master masters only the technique, and only then does as his heart tells him. And, what is especially important, in the vast majority of cases, even non-professionals produce real masterpieces that are not embarrassing to hang on the wall and show to others.
When deciding to make a panel, it is important to understand that any product carries a stylistic load, which in any case will have to be taken into account. The theme of the decoration must match the style of the room! Otherwise, it will look ridiculous, and soon we will even begin to irritate all the inhabitants of the house.

For rooms made in classic, country or Provence style, all kinds of still lifes, floral and landscape compositions are ideal. The main condition is that it should look as simple and cheerful as possible! Then the composition will evoke exclusively positive emotions. Of course, the abstraction that represents universal option, suitable for almost any stylistic decision.
For houses decorated in the Art Nouveau style, a decorative panel with clear graphic lines is perfect. The design should also be minimalistic: modest, almost invisible frames.
A rather rare option in domestic spaces is this scandinavian interior, suggesting bright, almost futuristic paintings, with letters, lines, bows, etc. depicted on them. Surely anyone can make such an extraordinary decoration from leftover ribbons and beads!
The currently popular loft style also dictates its own conditions to the masters: the pictures can be quite varied, but they are made in no more than two colors! This rigor and conciseness will certainly not leave anyone indifferent.

Of course, there are exceptions to any rule, so you should approach the issue of home decoration very individually. The fabric application may not correspond to the theme of the house, but be so filigree that there will be no doubt about the need to place it in the house.
You need to take just a few basic feelings as the basis for your work:
- Measures.
- Taste.
- Compliance.
- Interactions of components with each other.
Constantly following them, you can achieve stunning results, because history knows many such examples!
Fabric panels on fabric: unexpected combinations
Fabric interior decoration has come into widespread fashion quite recently: literally several recent years back. Previously, only a few people wanted to place homemade paintings in their home. Today, there are more than enough people who are ready to realize the picture on their own.
Of course, pre-selected fabric can be beautifully painted and placed in a representative frame. Such drawings already have the right to be called panels, but the pleasure of carrying out such work is available only to professional artists. Everyone else is unlikely to implement their plans as well as a specialist. All that remains is to do the impossible: add a three-dimensional image to the fabric using the same fabric!

There are a lot of options for implementing the process:
- Application.
- Kanzashi technique.
- 3D modeling.
It is important to understand only one thing: a novice master is unlikely to immediately create a stunning flower or still life. You need to train hard, using the diagrams and advice of experienced masters as a basis! And then the likelihood of getting exactly what you want increases significantly.
On initial stage It’s better to use a “draft” - fabric that you won’t mind ruining. But then, having fully developed your hand, you can safely work, even with the most expensive materials!
Do-it-yourself panel made from scraps of fabric: progress of work
Lovely independent work is that you can personally choose the colors, sizes and appearance that will have wall decoration. The panel made from scraps will be exactly as the master sees it!
However, Before starting work, you need to stock up on the following materials:
- A piece of fabric.
- Threads in matching colors.
- Meter or ruler.
- Scissors.
- Fabric paint.
- Sewing machine.

Initially, you should cut a piece of fabric of the selected size, first retreating 3-5 cm to process the edges. Essentially, these seams are similar to those that can be seen on a sheet. However, care must be taken to ensure that they are as thin as possible and do not stand out too much.
From above you first need to retreat about 3 cm in order to subsequently place the mount there. All fabric blanks: flowers, leaves, etc. must be made in advance, and then simply fixed to the base. In order not to violate the concept, you should first mark the canvas, outlining with a pencil where exactly this or that component will be located. In this way, you can avoid unforeseen situations that force you to redo work that has already been completed.
If desired, the free corners of the fabric can be decorated with paint, sparkles or beads suitable for these purposes. It all depends on the mood of the master!
Would you like to make a panel yourself, but don’t know where to start? We will help and inspire you with ideas in the article:
Who can make panels
Fortunately for many, both an adult and a child will surely be able to make a panel with their own hands! However, the latter will have to use the help of their relatives to do this. You can use the same materials and techniques for a children's masterpiece!

However, the picture will no longer depict abstractions or landscapes, but favorite cartoon characters, which it will be much more interesting to draw for crumbs. In addition, the result of efforts can be hung in the nursery and shown to everyone who comes! The most important thing is to find a topic that will truly captivate the baby.
It could be:
- Something seen in life.
- Pet.
- Fantasy hero.
- Favorite treat.
New Year's creativity will also be interesting for children, for which Santa Claus will be able to bring them gifts! Nobody says that everything will work out right away! However, kids get colossal delight and pleasure from work when a Christmas tree or a snowman from handy materials is realized on fabric.
Master class on making fabric panels (video)
When allowing children to work, it is important to remember that sharp scissors and needles will be used in the process of work! If possible, such operations should be performed by the parent! Then the likelihood that the baby will get hurt is minimized.
Fabric panels in the interior (photo)


A wall panel is an opportunity to create an individual interior by decorating walls using available materials. If we talk about a panel as a product, then it is always the author’s, handmade, which has a fairly high cost. Decorating an apartment with such fakes is not always relevant, because the product is selected according to existing interior and if repairs are made, then the panel becomes unnecessary, and the money spent is a pity. But it’s a completely different matter when the panel is made independently. This makes it possible to choose the theme, size, texture, material, color, but at the same time the cost of money is minimal.
How to do?
In fact, there is nothing difficult about making a panel yourself; no special skills or knowledge are required. The first thing that is necessary is to choose the place where it will be placed, choose a thematic direction and prepare necessary materials, which are most often found in any housewife.
A few important points
- If the room is not large sizes, you should not use large panels, they will not look harmonious and will make the room visually smaller.
- When the room is large and a bare wall is decorated, you can use a large panel or several small ones, but of the same theme.
- If the room is colorful and has plenty decorative elements, panels should be chosen in soothing colors, with a minimal combination of colors.
- When using several panels on one wall, it is necessary that they blend perfectly with each other, support one theme, or perfectly harmonize in color.
Made from improvised materials
Materials that are suitable for making panels are, as a rule, what is at hand. You don’t need to purchase anything special, and the technique is reminiscent of the handmade forgeries that many people made in schools.
Of course, stores offer a variety of products where they are used:
- glass;
- ceramics;
- metal;
- photo printing is used.
But our panels, which we will learn to make today, have nothing in common with decorated tiles and photo wallpapers. Unless they have one goal - to make everything beautiful and unique.
You can use:
- threads;
- fabrics;
- buttons;
- ear cancer;
- flowers;
- leaves;
- cereals;
- coffee beans.
You can consider the features of thematic products.
Panel on the wall in the kitchen
This is perhaps the only place where the use of food for decoration purposes will be completely justified. Appropriate here:
- cereals;
- grains;
- vegetables;
- fruits.
But, by the way, coffee beans- a universal material and can be used in any room. They are easy to work with, and during operation they do not lose their appearance and colors.
With their help, you can lay out any pictures, for example, a cup of coffee, which already matches the theme. You can cut out photographs of beautiful fruits and vegetables, complementing them with cereals.
Coffee beans are a universal material
New Year's panel
In this case, the brighter the better. Such a picture should speak of celebration, fun and good mood. Here it is permissible to combine any materials and surrender completely to your imagination. And if you are invited to visit, a hand-made panel will be an excellent gift.
Suitable use:
- spruce branches;
- cones;
- rowan berries.
You can use it as a background New Year's picture, for example, printed on a printer and decorate it. Snow-white snow can replace crumbled polystyrene foam, cotton wool and even semolina.
Children's
If a girl is into dancing, you can make a painting of a ballerina. Such work on a fake will definitely interest your child, so you can make a joint fake.
macrame panel
When making such products, you need knowledge of weaving techniques. If you have made macrame, you can create incredible beautiful decor. The advantage of the products is that everything will depend on desire and imagination. They can be:
- large;
- small;
- round;
- square.
You can decorate them:
- beads;
- stones;
- ribbons.
Material selection
Knowing about the main points, you can consider in more detail how to make panels using one or another material.
Made of wood
Additionally, you need wire, thin tree branches, and glue. For the frame, you can use wooden planks if you want a square or rectangular picture. For an oval or round frame, you can also use thick wire, and wrap it tightly with thread for decoration.
For the background, you can use plywood, white cardboard, burlap, or leave it blank. In the latter version, all elements are attached to each other and secured to the frame.
Advice
To give wood a glossy surface, it is coated with varnish.
Design ideas:
- You can place spots on the branches that are attached with glue. To prevent the bottom from looking empty, you can fill it with the same blanks.
- A composition of patches laid out in the shape of a flower will look beautiful if this is a large product, you can use cones or dried flowers.
- It could be a laid out heart or a star.
In order not to spoil the impression, it is better not to use synthetic materials in the composition.
From fabric
The fabric is easy to work with, and its variety allows you to create amazing paintings. With its help you can create:
- abstract drawings;
- sew animals;
- nature;
- create whole pictures.
Fabric is a material that is easy to work with
- Absolutely any fabric is suitable for work, the more different fabrics there are, the wider the choice when implementing ideas.
- You will need threads, frames, cardboard, elements.
- As in the previous version, you can make the frame yourself. The panels will look great without the use of frames.
- The basis on which the picture will be created, you can choose any thick cardboard, fiberboard or chipboard, plastic and other improvised materials. It needs to be covered with material, and secured from the wrong side with glue or a stapler.
Advice
Do not throw away small pieces of matter and shreds, they will be useful for the following work.
Ideas:
1 It could be nature, flowers, trees. To make a tree or flower look alive, you should use the following technique. The trunk or stem is drawn on the fabric and cut out, glued to the canvas. The leaves are also cut out, but only one side is glued to the canvas. For a flower, you can first create a composition using a needle and thread, secure it, and then glue it.
2 Nowadays, many interiors use panels using one material, without any additional elements. The idea is as follows, for example, you have a living room, where two, three primary colors are used in the interior: beige, orange, red. You need to choose a material with a pattern, where red flowers are painted on a gentle background. Or take a fabric with a red background with small beige flowers on it.
Ideally choose three different options fabrics. Next, the base is taken, a square or rectangular sheet of plywood and covered with fabric. The sizes of plywood can be different, the main thing is that in the end they look harmonious.
3 Pictures look great, for this you need to choose a drawing as an example. Then cut out the parts and glue them to the base. This is a bit of a time consuming process and it is better to start with simple drawings.
Advice
To add volume, you can place cotton wool under the fabric elements.
From photographs
The use of photographs for decorating apartments has been used for a long time and, probably, this technique is used in every family. And although it will not work to surprise with the material, it will definitely come out with the design method.
- Absolutely all photographs are suitable for this method.
- Black and white photos look beautiful.
- Additionally, you can use photos of nature and beautiful landscapes.
Design ideas:
Framework. Depending on what panel is expected in the final result, you need to choose a frame. It can be made of cardboard, where only the front part of the frame is cut out of thick cardboard and glued on the photo, on density it can also be glued to the back, as a base. If the photo will be glued directly to the base, but a frame is not needed. You can use the fabric for the front of the photo as a frame.
The family tree looks very beautiful in the interior, it brings comfort and creates a special atmosphere. Making it is quite simple, for this you need a base, you can work with cardboard, the main thing is to find the dimensions. It can be painted or wrapped in fabric. Then a tree trunk and branches are cut out of the same cardboard. Covered with paint, if something doesn’t work out, problem areas can be easily covered. Then photos are attached.
On the same basis, you can place photos in a chaotic order, and empty seats decorate additional elements. To delimit the photo, you can use colored tape or thick thread.
Another original version, take a large frame and stretch the threads horizontally. Then use clothespins to attach the photo to them.
Advice
Photos of different sizes look beautiful, while geometry and accuracy should not be observed.
From paper
Paper is another convenient and affordable material that is easy to work with.
Paper is another convenient and affordable material that is easy to work with
Design ideas:
Butterfly panels are widely used. For this, colored paper is taken, and butterflies are cut out according to approximately one sketch. You can use one color or several, in only one color palette, for example, from soft pink to burgundy. Then butterflies are glued onto the base (cardboard, plywood) or directly onto the wall. It can be in the shape of a heart, at the bottom light color and ascending to the top. This could be a flying composition. Only the body needs to be glued; the wings should lag behind the surface.
You can create a composition of flowers. Here it is better to use soft paper; cardboard will be difficult to handle. We take a square sheet of paper, it needs to be folded like an accordion. Next, the accordion is folded in half and these edges are secured with glue or a stapler, the free ones are stretched and also fastened. To make the edges of the flower appear curly, cut the folded paper with an accordion at both ends.
It can be beautifully decorated with small beads, stones or beads.
Advice
If you have a panel of butterflies, you can place them additionally around the room!
From plaster
They can be called luxurious and elegant. Stucco molding from gypsum has always been valued, and now it is possible to make panels using gypsum yourself. Plaster can be purchased at any store, as well as forms for future compositions. But if you put in a little effort and time, you can do it without forms.
- Craftsmen who do this professionally use special devices. For homemade You can use any available means, pencil, spatula. That is, those objects that will be convenient for drawing.
- You should start with the simplest forms to become familiar with the material.
- Difficult works of art are unlikely to be achieved, but once you master the basics, you can produce beautiful drawings.
Design ideas:
- You can work with plaster directly on the wall, but then you need to have a perfectly flat surface.
- Apply a little plaster so that it does not have time to dry. You can decorate flowers and patterns. If you draw well, you can create complex compositions.
- The material itself is not bright, so you can decorate it with a bright frame and paints. In the latter case, you should not overdo it so that the material does not resemble plasticine.
To create, you can use any available means - pencil, spatula
Advice
In the first stages, you can simply get acquainted with the material to know how it behaves in work.
From threads
By using ordinary thread and nails you can make a panel that will make you admire it. Such crafts belong to the art of string art and are popular all over the world. And on sale they are highly expensive.
- It is better to use wood or plywood as a base.
- In addition to multi-colored threads, you will need nails or pins; nails with beautiful heads will look beautiful.
- A sketch of the future panel (drawing) is applied to paper. Next, it is applied to the base and secured. Nails are hammered along the contour of the pattern; the less they are hammered, the more voluminous the pattern will be.
- Then the paper is torn off.
- A thread is wound around the nails horizontally and vertically.
Decor:
- Flowers and stars. It could be three large flower or several small ones. Flowers will look beautiful when using different colors of threads.
- It can be a big heart, a cat, a dog or a bear. Even the simplest drawing will look original and unusual.
- You can make a drawing from several elements, but it will require patience and time.
Advice
When using thick threads, the consumption will be lower, and the work will be done faster.
From beads, buttons
Such panels can be safely called bright and original decorations. Beads are used in many fakes, thanks to multi-colored palette and durable material can create incredible compositions.
- To create such fakes, you can use beads separately, combine them with buttons or with other materials.
- You can use fabric, polystyrene foam, wood, cardboard as a base.
- The material is attached with glue.
- Before you create a pattern from beads, you need to draw a contour with a pencil, and fill in small areas. First, glue is applied with a brush, then covered with beads.
Ideas :
- It is better to start artistic fakes with simple drawings, for example, flowers, trees, animal themes. Try to make a butterfly, to do this, draw an outline and select areas where different colors will be used.
- If the picture is large, you can use buttons, so the picture will be filled out faster, but will be no less beautiful.
- When you have artistic talent, you can draw a picture and highlight some of its elements with beads.
Advice
It is better to hang a beaded panel on an empty wall so that it serves bright accent in room.
From plaster, putty
This work is similar to gypsum, but if gypsum is used in small areas, then plaster is most often used as a material for large panels. This is not to say that this look is easy for beginners in this business, but with a little training, everything will definitely work out.
This way the panel is made directly on the wall; it is better to practice on some smooth surface.
Work technology:
- The drawing is applied to a piece of paper, the following work is performed based on this sketch;
- Then the drawing is transferred to the plaster;
- According to the drawing, the form is applied layer by layer;
- To smooth the sheet without damaging the shape, you need to cover this area with film and carefully adjust and smooth it;
- To give the surface texture, you can use a brush with hard bristles;
- When the pattern has formed, you need it to dry completely;
- Further using sandpaper aligns the zones;
- You can paint the canvas.
The process is labor-intensive and requires patience, but the result is worth it.
From the traffic jam
The only difficulty in creating such a panel is finding a sufficient number of corks. If there are houses wine corks, then creating an original panel is not difficult. This material is easy to process, lightweight and comfortable.
- They can serve as a background if cut into circles.
- Attached with glue.
- Combines well with natural materials.
Design ideas:
- Corks are available in both delicate beige tones and rich brown. If you cut different corks, you can use them to lay out a design.
- The cut circles can be painted with letters to form a phrase.
- You can cut out figures from them, which are then attached to the base.
From disks
With the advent of flash drives, disks have faded into the background. Probably every family has these computer accessories. It’s very good that they have been preserved, because there are many ideas on how to make unique, luxurious panels from them.
Design ideas:
For families with children, it would be important to make “Smeshariki”, cartoon characters. To do this, cut out parts from colored paper or fabric (nose, eyes). Then they are glued to the disk using glue. The characters are applied to a base, which can be made of cardboard or thick fabric.
- The discs are easily cut into different parts, which makes it possible to decorate panels with their help. In the light they shimmer and shine.
- Another option is to cover the disc with paint; you can choose any background that will suit the interior. When the paint is dry, apply the pattern using a pencil. Next, along the contour of the drawing, a layer of paint is removed using a knife.
- You can use a floppy disk as the basis of a panel. To do this, it can be decorated with paint or wrapped with thread.
From shells
If a family likes to relax on the seaside, shells are a must-have souvenir. Children love to collect them and replenish household supplies. But very rarely there is a use for them, so from year to year they lie and wait for their time. Now is the time when they can serve as the main element of a beautiful panel.
- Before using the shells, they need to be washed and dried well.
- To apply them to the base you will need glue.
- Before work, for convenience, it is better to sort them by size.
- To diversify the design, you can additionally use sand, pebbles, and beads.
- You can add color using paints.
- To make the surface of the shell glossy and shiny, it can be coated with colorless nail polish.
Ideas:
- It could be a flower made of shells or a chaotic arrangement. Much depends on where the panel will be placed. It is necessary to withstand the marine theme or create an overall picture.
- Such elements will look beautiful on burlap, and simple branches tied with thread can serve as a frame.
- You can take a drawing of a marine theme as a background and decorate it with shells.
- To create volume, shells are attached to the sidewall.
As you can see, any thing can be used. Here are some more examples of how to beautifully decorate a wall.
Decoupage panels
This option can be considered an update of old things. In this case, any canvas is taken as the basis. Old painting, wooden planks, iron or glass elements. The base is decorated using paints, beads, threads and other materials.
Most often, products do not require a frame. They are hung by a rope or simply on a hook. It is better to use natural materials for decoration. This can be several paintings that are connected to each other.
You can use one intended for photos or paintings as a frame. You can do it yourself if you have thin planks. For the background, the fabric with which the base is covered is most often used. Since the doll has a certain weight, the base must be reliable - wood or plywood.
As additional materials can be used:
- ribbons;
- bows;
- beads;
- buttons.
If you have time and desire, you can make dolls that resemble family members and create a family panel.
Watch
Now you can buy any Wall Clock. They have different shapes and sizes, color and texture. But it’s unlikely that you’ll be able to find a unique model; making it yourself is much easier. Such panels are convenient because you can choose all the parameters yourself. The only thing to consider is general rules for all products.
The topic can be completely different:
- time of the year;
- nature;
- romance;
- flowers;
- abstraction;
- patterns.
All that is required for the job is the selection of appropriate materials and a base. The base can be foam, wood or plywood. First of all, it needs to be prepared. You can decorate with paint or covered with fabric. If you plan to use multi-colored elements, then the base should be chosen in a single color.
It is not necessary that the clock be located in the center. On the contrary, if they are located on the edge, this will significantly expand the possibilities and you can create a beautiful composition. Here you can use all the techniques presented above. If the watch has a voluminous glass and it looks rough in the overall picture, it should be removed.
As a rule, watches have their own background; if they have already been purchased and the background does not match the overall interior, this problem can be easily solved. The watch can be easily disassembled, the main thing is not to damage the mechanism. The removed base can be painted or decorated with beads. You can use pieces of floppy disk that shimmer beautifully in the light.
With pockets
Such a panel will not only bring beauty, but also benefit. It is suitable for the kitchen, bathroom, children's room. Its main advantage is pockets in which you can put any accessories. You can make them in different sizes and shapes, and use as many pockets as you see fit.
This panel consists of a base to which pockets are sewn. A plank is attached to the top; it is better to use a wooden one. Depending on what accessories will be stored in the pockets, the base is selected. The heavier they are, the stronger the base should be. Plywood is perfect; it does not deform and will hold the shape of the panel perfectly.
Regarding fabric, there are no special frames, but it is also better to use thick fabric. Pockets can be of different sizes and placed randomly. You can use pieces of different fabrics, even if they differ in density.
Such panels are made from the pockets of old jeans and trousers, which looks very original. This product will perfectly complement the interior of the corridor.
You can decorate:
- ribbons;
- bows;
- buttons;
- stones.
If colored material is used, then its design is quite sufficient.
You should never give up, because the first successful job will bring positive emotions and pride in the work done.
Topic disclosure
Reliability of information
- Availability
- Saving money
- Unique design
- Time for crafts
- Sometimes hard to find materials
- Often, after an unsuccessful first time, work is suspended
Empty walls in an apartment make the atmosphere uncomfortable and unwelcoming. But everything changes if they are decorated with paintings or a decorative element such as a panel. It's easy to make from scrap materials. This does not require the talent of an artist or carpenter: all the figures can be made using a stencil.
Moreover, making a wall panel with your own hands is a great activity for the whole family, in which both adults and children can take part. A joint activity will unite family members, and the masterpiece created will fill the house with peace, love and harmony.
Salt dough is an excellent material for modeling. The process of creating a masterpiece perfectly develops fine motor skills, which is useful for children in speech production.
Why not plasticine panels? After all, he also warms up well, develops motor skills, and wide choose color palette. The fact is that plasticine always remains soft, it cannot be dried, and sooner or later the panel may be damaged. But this is not a problem for dried dough: it is hard and durable. And if you varnish it, it will last for centuries.
To prepare salt dough you will need:- Fine salt – 1 tbsp;
- Flour – 2 tbsp;
- Unrefined vegetable oil – 1 tbsp. l. (instead, it is better to take the same amount of dry wallpaper glue or hand and face cream);
- Water – about 125 ml.
Properly prepared dough should not stick to your hands, should knead well and be quite dense and elastic. If it is too viscous, add flour; if it sticks to your hands, add oil.
You can make the dough aromatic by adding spices: red and black pepper, turmeric, nutmeg, cinnamon and others. You can make the dough colored using food coloring.
How to make a salt dough panel:- From the finished dough, fashion a picture or make separate figures for it, which will later need to be assembled.

What the picture will be like, what details it should consist of, depends only on your imagination. Here is another example of a DIY panel made from dough.

- When the modeling is completed, the dough panel is placed in the oven to dry for an hour.
- The temperature inside the oven should be no higher than 80 degrees.


In order for the salt dough panel to be durable, it must be coated with a layer of varnish.
Fabric panel
You can decorate a wall using different materials. One of the most popular is fabric. For the panel, you can use any fabric that is available in your home:
- sackcloth;
- knitwear;
- canvas;
- calico;
- felt;
- atlas;
- silk;
- chintz.

Fabric panels can be created in a variety of ways. It is impossible to describe them all at once, but we will give examples of some of the ideas for crafts.
Square panel made of multi-colored patches
To work you will need:
- Panel base (cardboard);
- Multi-colored scraps of fabric;
- Threads;
- Sewing machine (you can do it by hand, but it takes a long time).
- First, mark the base for the panel on cardboard. To do this, redraw the drawing with a pencil in the same way as in the photo below. It is important not to confuse the numbering. Each number indicates when and where to sew the next patch.

- When the base is prepared, you can begin to lay out the pieces of fabric. They need to be bent in half and sewn to the base so that the cut part remains out of sight, and the folded part displays an even and clear fold line. To better understand how to make a panel with your own hands using this method, look at the photo below.

Felt for creativity
Children are very pleased with funny cartoon panels made of felt with images of little animals. This is the easiest way to create original decoration for the wall, since you only need:
- Original picture (you can print any picture from the Internet);
- Cardboard;
- Pencil;
- Scissors;
- Felt;
- Glue;
- Basis for panels (cardboard, fabric and other materials).

- Using a picture, you can easily use a pencil, cardboard and scissors to cut out stencils for animal figures.
- Patterns are drawn on felt fabric using a stencil.
- Then they cut out the figures and glue them to the base so that the desired picture is obtained.
Look what a fun panel you can make from felt.

Burlap panel
The burlap itself looks very unusual. Therefore, the simplest panel made from this material is a piece of canvas stretched in a frame. But a prerequisite is that the frame must be decorated, otherwise this burlap panel will not produce an effect. Decor can also be made from burlap: cut out ribbons, flowers and other decorations.

Burlap can also be used as a base for panels, as in the photo above. You can use it to make flowers, as in the second photo:

They, in turn, become decorative elements for another panel, as in the photo below:

Paper panel
Paper is one of the simplest and available materials. You can use it to make a lot of beautiful home decor items. Not only an adult, but also a child can cope with this. Read below to learn how to decorate a wall with your own hands using colored paper.
Panel of round paper structures
This panel can be made in less than an hour, but it will decorate the wall for a very long time. You can take good pictures against the background of this panel. It is suitable for active and cheerful people. For it you will need following materials and tools:
- scotch;
- paper clips;
- colored paper;
- stapler;
- pins.

The finished product is very bright and beautiful.
Panel from photographs
The word “photography” is immediately associated with the image of a person or an entire group of friends. Usually photographs are framed not for beauty, but for memory. But all this can be combined using a panel of photographs.
And here you don’t necessarily need your photographs - they can also be artistic. You will especially like this idea if you are an amateur photographer. Look what an original panel it turns out.

A simple panel made of colored paper
This panel can be made with your own hands in 20 minutes, but it looks so original that you can’t take your eyes off it. The only difficulty that will arise is finding paper in 30 different colors.


The final stage of making the panel is shown in the photo below:

Bead panel
Wall panels made of beads are usually very difficult to make. It will require patience, time and desire to do a real masterpiece. Panels can be created from beads in several ways:
- By forming a picture using beads and glue;
- By bead embroidery on fabric;
- By weaving.
Each case will require a special scheme. You can come up with it yourself. But for this you need to have a good imagination, especially when it comes to weaving. But you can use a ready-made master class; there are many of them on the Internet. Let's consider one of the ideas for a beaded panel.
Bead panel “Strawberries”

In order to make a panel like the one in the photo, you will need the following materials:
- white beads with a diameter of 5 mm;
- green beads (2 or more shades) with a diameter of 2.3 mm;
- red beads with diameters of 2.1 mm;
- beads yellow color diameters 5 mm;
- special wire for beading.

Look below what elegant panels can be made using ordinary beads.


A panel made of newspaper tubes looks very creative. Everyone has material for it. Prepare:
- Magazines or newspapers;
- If you want to change the color of the paper, you will need paint or food coloring;
- Scissors;
- Stationery knife;
- Glue.

Follow the instructions:
- Cut newspapers into individual sheets;
- Roll the sheets into tubes, fixing them with glue;
- Paint the tubes any color you wish;
- Twist the resulting tubes in a circle, alternating tubes of different colors;
- Make many of these circles of different sizes;
- Sew the resulting circles together using strong twine;
- Next, we decorate the walls with our own hands using a ready-made panel.

Using these instructions you can create many different panels. They look very unusual, and you would never guess that this is an ordinary newspaper!
Amazing paintings can be created using ordinary nails and threads. However, they are not the only ones required for the panel. Check if you have everything:
- The board is the basis for the panel;
- Small cloves (a lot);
- Multi-colored threads;
- Hammer;
- Scissors;
- Scotch;
- Stencil of the drawing (you can print any one from the Internet).

- First you need to cut out a stencil that is placed on the board. To keep the drawing motionless, it is fixed with adhesive tape.
- Then start driving carnations along the contours of the parts of the design so that, if you remove the stencil, it is clear what is drawn there. This is necessary so as not to get confused later in the selection individual fragments pattern for covering it with thread of the same color.
- The stencil can be removed when the last nail is driven in. Then start working with yarn. To do this, its end is fixed on one of the small carnations and wound around a certain area: for example, on a flower petal. There is no particular order here. The main thing is that as a result the thread is wound evenly everywhere.
- “Paint” each fragment of the picture with threads in a similar way.
Almost every house has a casket or jar, where for years they have been folded with buttons. In the end, there were so many of them that there was nowhere to put them. Multi-colored buttons, large and small, with holes or with bows - all this can be an excellent material for a panel that will decorate a boring wall.
For a button panel you will need the following materials:
- base (cardboard, fabric stretched over a frame, board);
- buttons of different colors and sizes;
- glue;
- fantasy or drawing to summarize it on a basis;
- pencil;
- copy paper.

The most original thing that comes to mind is the “Money Tree” panel. Of course, it is better to make it from the coins themselves, but since coins are not green, they can be successfully replaced with buttons. But no one forbids combining coins with buttons in one panel. It is believed that Money Tree brings money to the house. Make such a panel for your home so that there will always be prosperity in it. For this:
- Apply a pattern on the base in the form of a thick trunk and a lush crown;
- Prepare green and brown buttons of different sizes and shades of color;
- Apply glue to the base in the right places and stick the buttons one by one. They start gluing from the trunk, since it should look under the crown of the tree. Glue buttons in the shape of leaves, going onto the trunk, so that you can see how the green foliage “hangs down”.
In fact, the buttons do not have to be green, since it may be autumn. Then the leaf buttons can be yellow, red, brown. Here it is appropriate to arrange buttons together with yellow coins. And you can make a background from silver coins: as if frost fell on an autumn morning and the ground froze.
Beautiful panels of buttons - ideas in the video:


