“It’s mind boggling! Just finished the renovation! And she - “I want a new ceiling, something fabulous!” – Alexey was indignant. “There are a lot of ways to decorate the ceiling on the Internet. Even draping the ceiling with fabric will add zest,” I reassured my friend. “It takes a lot of money!” He did not let up. “Don’t worry, we’ll make a fabulous fabric ceiling with our own hands!” He said he would have to help. Well, let's get started!
Fabric ceiling
Choice of color and material
Both silk and synthetics, veil, and even velvet or satin are great for decorating the ceiling. The choice of material dictates the result. Organza will make the room airy, and luxurious velvet will help create a cozy atmosphere.
Which color should you choose? Pink will slightly reduce the height and add youthful style. Orange will fill you with a cheerful summer mood. Lilac relaxes and helps relieve tension and stress after a hard day. Delicate beige adds airiness.
It's time to go to the fabric store. To make a fabric ceiling, we decided to use organza in several colors of calm lilac and soft beige colour. That's what the sweet consultant girl called these colors. We men don’t really understand where it’s soft lilac and where it’s calm beige. They understood one thing for sure: they will add comfort and fabulousness to the interior of the bedroom.

Fabric ceiling in the bedroom
Preparation
How to calculate the quantity? With a suspended ceiling, everything is simple - you can measure the floor of the room, because the area of the ceiling and floor are the same. In our case, 12 m2. But what about drapery? We decided that the fold step would be equal to half the step between the folds. So in theory we need twice as much fabric as the ceiling area. And so they did. According to the drawing, we will alternate lilac and beige in different ways. Therefore, we bought 14 meters of lilac and 10 meters of beige fabric.

Fabric stretch ceiling
Note. You need to calculate the strips with a slight overlap. The width of our strip is 1.2 m. those. overlap approximately 20 cm.
Now worth a visit hardware store. What do we need. For the frame of our structure, along the perimeter of the walls, a 4x5 cm block with a total length of 50 meters (perimeter 48 meters) and a piece of plywood 35x35 cm, 1.5 cm thick. For fastening the bars, there are 160 dowels, for the staple fabric there are several packs. Plywood is needed for the center. In the nearest carpentry workshop we will cut a circle with a diameter of 35 cm.

Let's make a circle at the nearest carpentry workshop for cutting
Tools:
- Construction stapler;
- Perforator for walls and ceilings. We rented it. Since I have a small household drill, and such a floor slab cannot be overcome;
- Last (wallpaper spatula) doubles as a template;
- Construction knife and scissors;
- Level. Laser is best.
It is worth noting that it is better to make a fabric ceiling with an assistant.
Execution of work
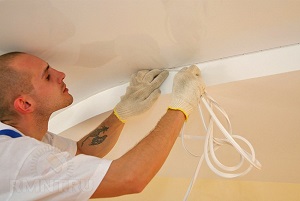
Let's transgress. First, we attach the bars to the walls around the perimeter of the room. If the ceiling height allows, you can experiment with the height. You can add additional airiness to the room. But, when the ceiling height of a standard panel is 2.6 m, there is no other option but to mount the frame at the very top. The first circle of plywood was secured in the center. As expected, brick walls The partitions gave up without a fight, but the slab took a lot of strength and sweat.

First, we’ll attach the bars to the walls around the perimeter of the room.
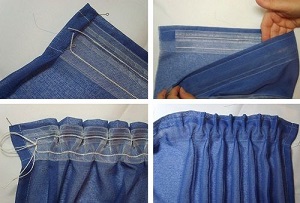
The next step is to start marking and cutting the strips into pieces of 3 and 4 meters. It's simple. You need to draw a circle into 14 parts. There were 4 lilac three meter stripes, 2 beige stripes. And four meter stripes, four of each color.
Finally, we move on to attaching our strips. We stretch it along the perimeter of the walls without folds, and wrap the ends of the strip inward. It is imperative to overlap about 10 centimeters, otherwise lumbago will be visible. Then we place the fabric on our section of the circle and assemble it. We carefully secure the whole thing with staples. The pattern is as follows: there are lilac stripes at the corners. Inside - beige. There is one beige stripe on the three-meter wall, and two on the four-meter wall.

how suspended ceilings are installed
We managed to secure several strips. And then it dawned on me. If you fix LED strip along the perimeter of the frame, you can get original lighting. And now, we are already going to the construction hypermarket. The LED strip was connected to distribution box to one of the switch keys. I had to give up adjusting the light in the main lamp.
To be honest, it is not difficult to fasten the fabric to the block - one pulls it, the other fastens it. But I had to “sweat” with the circle. We drew marks on the template with a marker so that the waves of the drapery were the same. Less than two hours had passed before all the elements were secured. Draping the ceiling with fabric was a success!

If you attach an LED strip around the perimeter of the frame, you can get original lighting
We attach the lamp to a plywood circle. It seems that's it. But, something is missing. Exactly! The fastening brackets around the perimeter are not hidden in any way. Another trip to the supermarket for a polypropylene curtain rod. We bought the baseboard coated so as not to waste time on pre-painting.
Advice. Prepare material in advance for decorating the junction of the ceiling and wall. And you also need to paint in advance. Otherwise, there is a high risk of staining the fabric.
The fillets were glued only to the wall. That's all, actually. The fabric on the ceiling looks beautiful and truly fabulous, especially with lighting.

Fabric stretch ceiling with lighting
All work required:
- work day;
- two enthusiasts;
- minimal tool;
- a little fantasy.
Try it and you will understand that sometimes original ideas do not require much time and effort!
 We solve a controversial issue: first, suspended ceiling or wallpaper
High-quality repair ceiling in the apartment with your own hands
We solve a controversial issue: first, suspended ceiling or wallpaper
High-quality repair ceiling in the apartment with your own hands
Modern fabrics allow you to perform unusual shapes ceilings and change any room beyond recognition. Let's look at what draping a ceiling with fabric is like, the features of fastening the fabric and popular decorating styles.
The content of the article:
A fabric ceiling is a ceiling surface decorated with fabric, which is considered alternative way ceiling design. The main purpose of draping the ceiling with fabric is to add harmony to the interior and create coziness in the room. To obtain the desired result, adhere to certain rules for selecting fabric and arranging the structure, which we will now get acquainted with.
Advantages and disadvantages of fabric ceilings

Decorating ceilings with fabric has become popular due to the many advantages of this method. Advantages of floor drapery:
- No pre-treatment of the base base is required, since the canvas is usually attached at the edges and does not touch the surface of the ceiling.
- This is one of the few ways to decorate a ceiling that does not require construction skills.
- The fabric covers the unsightly appearance of the ceiling.
- Wiring, cables and communications can be attached to the base ceiling, which will then be covered with a sheet.
- The fabric ceiling has good heat-insulating properties.
- The false ceiling is not easily damaged, minor defects are invisible.
- A ceiling decorated with fabric turns into an exclusive work of art.
Design features of fabric ceilings

The canvas allows you to create interesting design effects on the ceiling, which should match the overall interior of the rooms. For selection optimal option Learn popular ceiling drapery techniques.
A tent-shaped ceiling looks good if the walls are decorated in the appropriate style. This type of drapery looks good when done independently. The tent covering significantly reduces the height of the ceiling near the walls and cannot be used in any room. For a better perception, it is advisable to take a photo of a fabric ceiling made in the shape of a tent.
Wave-shaped ceilings are made using additional suspensions. Any material is suitable for such structures, but it is better to use translucent and not very heavy types.
The method of installing a fabric ceiling “from the walls to the center” has many variations. For example, a canvas from soft material can be hung with slack or pulled tighter until large quantity flat folds. Usually a chandelier is placed in the center of the composition to create a semantic center.
Choosing fabric for ceiling drapery
The construction of a fabric ceiling is very simple: a fabric for creating a false ceiling and a frame for attaching it. Very often, the canvas is modified to install lamps, and slats, tubes or other elements are added to the base ceiling or frame to create a relief surface. Information on drapery fabrics and profiles is provided below.
Requirements for material for upholstery
There are practically no restrictions on the choice of fabric for drapery, but there is a practical side to the problem. The material for the ceiling must have the following properties:
- Do not change the strength properties and appearance under the influence of sunlight.
- Do not lose shape and color after numerous washes.
- The material should not wrinkle too much.
- Choose stretchy fabric.
- Do not use materials that tend to “collect dirt.”
- The choice of fabric type is also influenced by the user’s desire to use a material with certain properties.
- Fabric made from natural ingredients (linen, cotton, wool) goes well with wooden elements premises. In addition to decorative functions, it has good heat and sound insulating characteristics.
- Fabrics for drapery must be treated with antistatic and anti-allergenic agents and dust-repellent substances. After impregnation, the material is not afraid of sunlight and has a high degree of wear resistance. All types of fabrics - natural and synthetic - are subjected to this impregnation.
Types of fabric for ceiling drapery

The following fabric ceiling upholstery options are popular among customers:
- Linen. The coating turns out beautiful and solid. The canvas does not sag over time and does not stretch during installation. During cleaning, dust is quickly removed from the surface.
- Jacquard. Gives the room comfort and respectability.
- Fine silk. Always creates a feeling of sophistication and celebration.
- Cotton. Associated with calm.
- Chiffon. Used in bedrooms and children's rooms. It gives the ceiling lightness and airiness. The material does not stretch after installation, and dust does not collect on its surface
- Exotic jute. Helps create original styles.
- Beautiful matting. Combines with country style.
- Brocade. Material used for the ceiling bright colors. Noble heavy fabric is used to decorate a living room or hall.
- Herringbone fabric. Suitable for any design.
- Canvas. Brings a feeling of unshakable well-being.
- Velvet. Delights with luxury.
Some types of materials have sound absorption and water resistance properties, for example, leather, tapestries.
Color range of ceiling coverings

Different colors and patterns of fabric create effects that visually change the shape of a room, and can also influence people’s emotions. To decorate the ceiling, fabrics with any structure are used - shiny and matte, transparent and dense, plain and with patterns.
Colors are chosen depending on the purpose of the room:
- If the color of the ceiling is darker than the walls, it will press and seem to hang over you.
- Fabric with transverse stripes is stretched in narrow spaces. This design visually increases the space of the room, but reduces the height of the ceiling.
- A ceiling with a longitudinal pattern or stripes increases the height of the ceiling.
- A small pattern on the ceiling makes the room cozy.
- Canvas with large patterns is not recommended for installation in small rooms.
- Light ceilings create the illusion of increasing the interior space of the room; dense and dark colors create the opposite effect.
- The red color of the canvas is uplifting, but may cause irritation for some people. Fabric of this shade is never used in rest rooms.
- Yellow is good for the eyes and stimulates the nervous system.
- In rooms with green ceilings you can relax and unwind. Green color It is considered a relaxant all over the world. It calms, reduces blood pressure and has a positive effect on heart rate.
- It works well with blue ceilings, it takes away lethargy and apathy.
- Purple color makes you think, but your eyes get tired quickly.
Preparatory work before upholstering the ceiling with fabric

Features of preparation for installation of a fabric ceiling:
- The fabric should be prepared before draping. Cut a small piece from the main fabric and measure it. Wet the material, dry it and measure again. If the size has not changed, you can begin draping the ceiling. When changing the size, the entire fabric should be decoated - wet, dried and ironed.
- It is advisable to use one piece of canvas to create a seamless ceiling. If it was not possible to purchase a wide fabric, the material is sewn together and then ironed, especially carefully at the joints.
- Before work, wrap the fabric around a long pole, this will make it easier to assemble the structure.
- It is best to install the ceiling with two people: one holds the roll, the second attaches the canvas to the frame or ceiling.
Fabric ceiling installation technology

You can fix the material to the ceiling in any way you like, but all options will be modifications of the most popular fastening methods.
The frame method involves mounting the structure on the floor and then attaching it to the ceiling. The frame is assembled from wooden or plastic slats. Typically this method is used to obtain flat designs or products with slightly sagging fabric. Frame ceiling can be attached to the ceiling using special devices. In this case, you can adjust the height of the ceiling. One of the varieties of fabric ceilings made frame method, is called boiserie. They are sold as ready-made fabric or leather panels that are made to order. The user can only attach the product to the ceiling.
Fastening fabric with slats involves the use of wooden or plastic bars measuring 30x40 mm, which are first attached to the ceiling without fabric. Wooden structures used in rooms, plastic ones - in the kitchen, bathroom or toilet. For drapery, fabric with a 20% margin is used. In this way, fabrics of pastel shades with gold or silver threads are fixed.
Fastening the fabric to the slats is carried out in the following sequence:
- Secure the slats around the perimeter of the room near the walls using dowels and self-tapping screws.
- Stretch the fabric from one wall to another, across the entire width of the room, check that there are no waves on the fabric.
- Secure the canvas to the bars with staples, starting from the middle of the wall and moving towards the corners, gradually unwinding the canvas from the roll. For fixation, use staples No. 8, 10. Fill the staples often, so use an electric stapler.
- After securing the canvas on one side of the room, move to the other. At the end of the work, the fabric should not sag.
- Measure the gaps between the slats and the walls and cut them to size decorative panel from MDF.
- Close the gap with the prepared panel. Traces from staples can also be masked with braid, and instead of an MDF board, use a ceiling plinth.

Velcro is considered the easiest fastening method. The canvas is held on by textile Velcro fasteners, which are sewn onto the fabric and glued in appropriate places on the ceiling or frame. This method allows you to quickly remove the canvas and forever solve the question of how to make fabric ceiling collapsible. This option is not designed for massive structures; the Velcro fabric may not be able to withstand heavy fabric.
Silk fabric is most often fixed to the ceiling using the adhesive method. The process is similar to wallpapering, but the glue is applied only to the ceiling. Upholstery of the ceiling with fabric is performed in the following sequence:
- Smooth out surface unevenness with putty.
- If the ceiling is painted, walk over the surface sandpaper until roughness is obtained.
- Clean the ceiling from dust and rinse with soda solution. When found dark spots paint them over so they don't show up later.
- Prime the surface.
- Apply a layer of special glue to the ceiling and give it a little time to dry.
- Next, press the canvas firmly against the ceiling and smooth it with a rubber roller. The next strip is glued in compliance with the pattern of the canvas.
- The fabric begins to be glued from the center of the room to the walls. If the material has a pattern, make sure it doesn’t get lost.
To obtain a ceiling in the form of waves or a sail, thin tubes or cords are attached to the ceiling or walls, and the canvas is thrown over them. Also, beautiful waves are obtained when the canvas is attached to the ceiling using Velcro.
Watch a video about draping the ceiling with fabric:
You can endlessly experiment with draping the ceiling with fabric, the main thing is that the material used and the design style must match the interior of the room. All methods of decorating ceilings are quite simple and allow you to make a fabric ceiling with your own hands.
Many people choose stretch fabric for the ceiling. This material has a number of advantages compared to film. But there are also disadvantages, one of which is a higher price. To reduce costs, you can install the canvas yourself. This article provides detailed instructions How to install fabric ceilings with your own hands. Some construction skills and an assistant will be required.
Features of fabric for suspended ceilings
For production, polyester fabric is used, which is impregnated with polyurethane. Properties are determined by the characteristics of the material. Fabric stretch ceilings withstand temperature changes from -50º to +100ºC. The canvas can be stretched in unheated rooms: verandas, gazebos, houses for temporary residence.
The maximum roll width is 5.1 m. This is enough to create seamless ceiling in a standard sized room.


Polyester does not burn, does not electrify, does not emit harmful substances even when heated. Fabric fabric is much stronger than film. An accidental blow from a sharp object or a flying champagne cork will not damage the surface.
Disadvantages include poor color scheme- only about 20 tones. But the fabric can be dyed (up to 3-4 times), draw patterns or apply a decorative textured layer.

Polyester ceilings are more expensive than vinyl film. But the canvas does not need to be heated for installation. Installing a fabric stretch ceiling is easy to do with your own hands. This will save you a lot of money.
The most popular manufacturers are:
- Clipso (France);
- Descor (Germany);
- Cerutti (Switzerland).
How the fabric is attached
A frame of profiles is fixed along the perimeter of the walls. For fabric, take a plastic baguette with a clip fastening, which in cross-section resembles the letter “A” with curved lower ends. The canvas is inserted between them and held using the clothespin principle.


The baguette itself can be ceiling or wall. The first one takes up less height, but if the room is not too low, it is better to use the second option. As a rule, the base floor is not perfectly level, so wall mount It’s easier to set the ceiling level.

The fabric is fixed at a short distance from the edge, so it is purchased with a reserve. It is enough to add 10-15 cm from the length and width of the room. The excess is later trimmed off.
What is required for installation
In addition to the stretch ceiling kit, before starting work, you must prepare the following tools:
- stepladder;
- hammer drill or impact drill;
- screwdriver or Phillips screwdriver;
- hammer;
- laser or water level;
- hacksaw;
- pencil and tapping cord (can be replaced with a tape measure);
- construction or stationery knife;
- screws and plastic dowels;
- spatula with rounded ends.


To install lighting you will need:
- chandelier;
- built-in lamps;
- thermal rings of suitable diameter;
- wires;
- platforms or plywood or timber for mortgages.

Preparatory work
The surface of the rough ceiling does not need to be leveled. But if pieces of plaster, putty, etc. fall off, they will stick out unsightly on the tension fabric. And heavy parts can even damage the fabric. Therefore, the base ceiling is prepared before installation.

If the chandelier is already hanging, it needs to be removed. The apartment is first de-energized. The wires are removed from the ceiling.

Remains of paint and plaster are removed from the surface of the ceiling. If there is mold, the affected areas are removed. The surface is impregnated with a composition that will not allow the fungus to reappear. This is also useful for prevention. After drying, the ceiling is covered with a primer (preferably deep penetration). It strengthens the surface.

The next step is laying out the electrical wiring for lighting. The wires are laid in a corrugated pipe and secured with clamps and dowels. Putty is not used as it may fall off later.

As a rule, a chandelier is used for lighting, sometimes in combination with built-in lamps. But the fabric will not support the chandelier, so a mortgage is being prepared for it. Take a piece of plywood or a wooden block slightly larger than the chandelier mount. The mounting platform is mounted at such a height that the lower part is at the level of the future ceiling. If the thickness of the plywood or timber is sufficient, they are fixed with dowels. Otherwise, a frame is made from metal profile, which is attached to the ceiling. And a mounting platform is screwed to its lower part. Recessed lights are also attached to pre-installed platforms.


Fastening baguettes
First you need to mark a place on the walls. Retreat from the rough ceiling:
- 10-15 cm if built-in lighting is planned;
- 3-5 cm if there is only a chandelier.
Markings are made at the corners with a pencil at the required height.

Using a level, achieve the same distance from the floor. So the ceiling will be completely horizontal.

Then the tapping thread is pulled along the wall along two marks and released. A straight line remains on the surface. The operation is repeated for the remaining walls. Holes are drilled along the line every 10-15 cm. After this, the profile is attached.

To get around the corners of the room, the baguette is cut with a hacksaw at an angle of 45 degrees. The profile joints must fit closely to each other. Sometimes baguettes are produced with holes for screws. If they are not there, you will have to drill them. Then the frame parts are attached to the walls with screws and plastic dowels.

Fabric stretching
The installation technology is simple, but it is much more convenient to work with an assistant. Installation of a fabric ceiling begins from the middle of the walls of the room. The material is carefully tucked into the baguette with a spatula, then the tool is removed.

The canvas is inserted in the corners in the same way. The entire ceiling is gradually stretched. This installation technology avoids distortions.

At the next stage, excess fabric is trimmed from the edges. Small remnants of the canvas are tucked into a baguette. The stretch ceiling is ready.

On last stage install lighting fixtures. To protect the material from overheating, thermal rings are used, which are glued directly to the fabric. Then cut a hole for the wire. The lamp is fixed and connected.
Homemade fabric ceiling option
Specialized material may be too expensive or not suitable for other reasons. In this case it will be useful step by step guide for installing a homemade fabric ceiling.
For work you will need following materials and tools:
- textile;
- planed timber (preferably 30x30 mm)
- drill and dowels;
- sealant;
- staples and construction stapler for driving them in;
- masking tape;
- ceiling plinth and polyurethane glue;
- Chipboard or boards.

The fabric must be strong enough. It can be pre-painted (with acrylic) or a pattern can be applied using a stencil.
The factory width of the roll is about 2.8 m. If this is not enough for the entire ceiling, it is divided into zones. Wires can be laid between them. In addition, it will be more convenient to stretch the fabric not over the entire surface at once, but in parts.
Installation of fabric stretch ceilings begins with preparing the base. This stage is the same as in the previous case.
In the second step, a beam is attached around the perimeter and from the walls to the chandelier. Holes are first drilled in it every 40-50 cm. Then the part that will be adjacent to the surface of the ceiling is covered with sealant. This is done to protect against fungus and possible wood-boring insects. The beam is attached to the ceiling with dowels. It is placed in one row near the walls, and in two rows towards the center (with a distance of several centimeters).
The arrangement of the ceiling area is a fairly broad topic that is included in the concept of repair. Today, the development of technology makes millions of people happy with its accessibility. original ideas, allowing you to solve individual design problems yourself. And at the same time, by the way, save money, and at the same time receive moral satisfaction from the creative process.
Few people will have to dispute the fact that it is high time to abandon whitewashing and painting (at least if we are not talking about closets, entrances of houses or outbuildings). This means that new methods must replace “grandmother’s” methods. And they are. These are suspended ceiling structures.
At about the same time, stretch ceilings made of PVC and ceilings made of fabric impregnated with a polyurethane composition entered the market. What are their fundamental differences, pros and cons, advantages and disadvantages? Let's compare.
The elasticity of PVC film is definitely a plus. Some users have already encountered the legendary water bubble, which forms when the room is flooded from above (a call team arrives and releases the accumulated water, after which the ceiling returns to its previous shape). Fabric ceilings do not have this advantage.

But unlike PVC, fabric stretch ceilings can be repainted many times with water-based paint. The polyester thread is woven in such a way that painting layer upon layer is carried out without any visible defects: the ceiling fabric looks like new.
There's one more thing important advantage fabric ceilings. To install them, you do not need to heat the room with heat guns to a temperature of +60…+70 °C. This means that your decoration (decor and wallpaper), furniture, and other household items will not be damaged. Agree, this is an important “detail”, especially when you consider that in some apartments and offices quite a lot of money is spent on furniture and finishing materials.

A fabric ceiling structure can easily be placed in rooms where there is little or no heating. Polyvinyl chloride clearly does not agree to such conditions - give it a temperature of +18...+20°C, not lower! In a cool atmosphere, it simply becomes deformed and deteriorates irreversibly. As for fabric ceilings, they can easily withstand a temperature range of -40...+80°C without compromising their performance characteristics.
Ceilings made of fabric are durable, they are practical, have high fire safety, and are functional. In addition, manufacturers offer enough wide choose design design (color, pattern). In stores, ceiling fabric is sold in rolls 5 m wide. It is easy to calculate the required footage and buy as much as you need without waste.
And finally, the most important advantage: a fabric stretch ceiling is easy to install yourself, without resorting to the services of a professional team. This, if two or three people work, will take a maximum of 2-3 hours.
Video - Installing a fabric ceiling
Work order
There is a simple order of steps that need to be performed sequentially one after another, without getting ahead and without mixing one with the other. If you want to get high-quality results as quickly as possible, follow the recommendations.
We prepare a baguette, screws, and a decorative plug in advance
A baguette is a fastening profile for mounting a frame around the perimeter of a room. The frame will hold the ceiling fabric. Material: wooden strip, metal corner or plastic strip. Both the purchased version and the product are suitable self-made(many men are interested in carpentry, so they often have everything they need at their disposal). Optimal sizes 40x50 or 50x50 cm.

The decorative plug plays the role of a border that is visible from the outside. It is stuffed after stretching the fabric at the point where it joins the walls. The function is the same as that of the baseboard, which covers the edge of the pasted strips of wallpaper at the bottom of the walls.
Self-tapping screws or self-tapping screws are needed to ensure point fastening of the fabric to the walls. Using a drill, holes are pre-drilled into which factory-made plastic bushings or homemade wooden plugs are placed. It is easy to drive self-tapping screws into them using a screwdriver. With a large area, it is certainly better to use a self-tapping screw, but in a 5-meter “Khrushchev” kitchen you can do it manually, using an ordinary screwdriver.
Calculate the area of the canvas
As mentioned above, no special wisdom is required to stretch fabric ceilings. No heat is needed to stretch the fabric. All you need to know is how to correctly calculate the area. We offer a simple, time-tested formula: (room width + 15 cm) x (room length + 15 cm) = fabric area in square meters.
It is easiest to work when the ceiling has a strictly square or rectangular shape. But sometimes there are protrusions on the ceilings; the room may have bay windows, columns, decorative niches, ceiling embrasures, windows and other “non-format”. Also remember to cut small holes in the places where the electrical wiring will be located. pendant lamps and chandeliers.
In these areas, you need to carefully take measurements and cut the fabric accordingly. If possible, it will be done without any seams. However, on large areas, sometimes you have to install complex seam structures - this is not a problem, you just need a little more time and more attention so as not to make a mistake with the cut.
Video - Complex installation of a fabric ceiling
Don't forget about lighting devices
In places where they are removed from the ceiling lighting, it is necessary to install a thermal insulating gasket. It has a round slot through which the electrical wire will pass. The gasket ensures fire safety.

Plastic liners are installed before the tension of the overall web begins.
Checking the set of tools for work
Once again, carefully check the list of necessary tools:
- water or laser level;
- electric hammer drill or hammer drill;
- screwdriver (screwdriver);
- hammer;
- scissors;
- roulette;
- grinder or hacksaw (for metal or wood - depending on the material of the baguette);
- construction knife.
Now let's act

Step 1. Using a level, mark the line for attaching the baguette. From neatness to at this stage The type of future ceiling in tension will depend. Determine the height in such a way that the fabric is as close as possible to the “original” construction ceiling, unless you want to visually lower the height of the room for some reason. Although this also happens (in the case complex structures, consisting of several levels).
Step 2. Stuff baguette around the perimeter of the room.
Step 3. Temporarily remove chandeliers and lamps.
Step 4. Stretch the pre-cut ceiling fabric.
Step 5. Pull the electrical wires from the ceiling light fixtures out through the holes in the thermal insulating rings. Place chandeliers and lamps in their places and secure them carefully.
Step 6. Carefully nail a decorative cap onto the entire frame.
Step 7. Install a decorative plug in the places of bay windows, ceiling embrasures, windows, etc. (If there are any). Sometimes on the sloping ceilings of private houses or country houses There are windows that have special frames - they need to be removed before stretching the fabric ceiling, and then put back after the work is completed.

Stretch fabric ceilings do not require special care. They are unpretentious, and at the same time they are ready to please you for many years. The production uses knitted weaving technology. This means that the elasticity is sufficient for the fabric to “breathe”. But painting it a different color is quite possible. Use water-based paint. It fits well, there are no cracks or sagging on the surface.
Ceilings trimmed with fabric look stylish and rich. The choice of textures and colors of canvases suitable for ceiling decoration is huge, so fabric finishing is increasingly used in modern renovation. There are several ways to decorate the ceiling with fabric, we will talk about them in this article.
Fabric ceilings - what are they?
The most popular among them are:
- suspended ceilings made of fabric;
- draped fabrics;
- covering the ceiling with silk.

Fabric stretch ceilings
They are made from a special fabric based on synthetic fabric impregnated with polyurethane. They are attached to special baguettes with a clip, installed on the walls around the perimeter of the room.

Advantages of stretch fabric ceilings:
- do not require preparation of a rough ceiling;
- have a smooth surface;
- strong and durable;
- fireproof;
- allow you to create an even and smooth ceiling.
Flaws:
- the color palette of the canvases is not too large and includes only basic colors and shades;
- drawing a pattern on a suspended ceiling is possible only after it has been fixed;
- the work requires skill in installing tension systems;
- After dismantling, the blade must be replaced; re-installation is not possible.
Stretch fabric ceilings are an excellent choice for finishing rooms in classic style. They gently and unobtrusively emphasize the decor of walls and interior items, without distracting attention. They are used in the living room, office, and other rooms where strict lines and muted colors are appropriate.

It is not recommended to use fabric suspended ceilings in rooms with high humidity: the material will collect condensation and dust and quickly become dirty. It is also undesirable to install them in the kitchen - the porous structure of the canvas absorbs odors, soot and grease, so the ceiling will quickly lose its freshness.
Prices for fabric stretch ceiling
fabric stretch ceiling
Note! Stretch ceilings can also be made from natural fabrics. It is important to choose a fabric of such a width to avoid unnecessary seams. As a rule, curtain fabrics are used for this purpose.

Draped fabric ceilings
This type of finishing allows the use of any fabric, from smooth silk to translucent chiffon and organza. Through use different textures you can create various effects, give the ceiling any shapes and bends.
Two-layer designs are also popular, when over a smooth stretched fabric of thick fabric lay a skillful drapery of translucent shimmering material. Drapery can be used to decorate the entire surface of the ceiling or its individual fragments.

Fastening draped ceilings can be done:
- staples or small nails to wooden guides;
- on sticky tape;
- on wooden frame, which is later attached to the ceiling.
Advantages of draped fabric ceilings:
- they do not require expensive preparation of the rough ceiling;
- easy to install with your own hands;
- the canvas can be easily removed for cleaning or replacement;
- drapery is resistant to mechanical damage;
- a huge selection of colors, including patterns, and textures allows you to create a unique finish;
- Finally, this is an inexpensive but very effective way of finishing.

Flaws:
- draperies quite significantly lower the ceiling level; they should not be used in apartments with a base height of less than 2.7 meters;
- fabric is a fire hazardous material, so care should be taken Special attention selection of lamps and electrical wiring;
- the material absorbs odors; it is not recommended to install it in the kitchen or in rooms with strong odors.

Drapery can be pulled in rooms where comfort and homely atmosphere: in the bedroom or nursery, living room or dining room, as well as on open veranda or a terrace - there it can be mounted for the summer period and removed for the winter.
Draped ceilings fit perfectly into East style design or "empire", and smooth stretched fabric will decorate rooms in the style of "country" or "Provence". In a nursery, you can use fabric to create a fairy-tale atmosphere by choosing textiles with magical motifs.
Prices for satin stretch ceilings
satin stretch ceiling
Note! Almost any fabric is suitable for draperies; the main requirement is resistance to sunlight and the ability to maintain its shape for a long time without sagging.

For this finishing method, mainly silk fabrics or satin are used. The canvases are glued to the prepared surface in end-to-end stripes, like wallpaper. It is important to use a special glue that does not leave streaks and does not change the structure of the fabric.
Silk for covering the ceiling can be either plain or printed with a bright pattern. Bright hues visually raise ceilings and expand rooms, giving it a soft glow, especially in combination with directional or spot light. Bright colored fabrics allow you to achieve originality and attract attention.

Advantages of covering the ceiling with fabric:
- this finish looks stylish and rich;
- environmentally friendly material, does not emit harmful substances and does not disrupt air exchange;
- does not fade over time;
- does not lower the ceiling level;
- Easy to attach on your own.
Flaws:
- it is necessary to level the rough ceiling;
- the fabric cannot be removed for washing and cleaning;
- careful selection of material is required.
Pasting with fabric can be used in almost any room, from an office to a bedroom, it is only important to choose the right shade and pattern. Designers often use silk finishing in ceiling niches in combination with wooden beams. Often combined with wall decoration, columns or decorative inserts.

Note! When choosing colored silk, it is important to consider the size and general style rooms. A large and bright pattern visually expands the room, and a small printed one gives it coziness. At low ceilings It is better to use light pastel colors.
Fabric ceiling finishing technology
First you need to draw a sketch and decide on the method of attaching the fabric, since the preparatory work, and the finishing technology itself. After choosing the ceiling design, you can begin to calculate the material and select the fabric, as well as purchase the canvas and related materials.
Technology for fastening stretch fabric ceilings
A textile ceiling can be ordered from a specialized company, and if you have the tools and skills, you can install it yourself. This work is not that difficult, it is only important to follow the stretching technology and be careful.
Ceiling profile prices
ceiling profile

Required materials and tools:
- polyester or other suitable fabric;
- guide baguettes with a clip;
- hammer drill or drill depending on the wall material;
- measuring tool, scissors and knife;
- laser or bubble level;
- a special spatula for tucking the canvas into the baguette;
- paint removal tool old decoration and ceiling preparation.
The stages of work and installation technology are described in the table.
Table 1. Installation of fabric stretch ceiling.
| Steps, illustrations | Description of actions |
|---|---|
| Under fabric ceilings there is no need to level the surface; it is enough to remove the old peeling coating or finish. Whitewash or paint is removed using a spatula or a special remover. The wallpaper is removed and the remaining glue is washed off. Seal cracks, seams and cavities using alabaster or cement putty. Suspended structures completely dismantled, the holes from the frame fastening are sealed with putty. If this is not done, the sound insulation of the ceiling will deteriorate. |
| To ensure that the ceiling is level and strictly horizontal, careful level markings are necessary. It is more convenient to use a laser level, but you can get by with a bubble level. Marking starts from the lowest corner. Step back from the ceiling at least 5 cm and draw horizontal lines with a pencil or marker using a level on both adjacent walls. They lead to the corners and put a mark in them. Lines are drawn from it in a similar way to the last corner; ideally, they should converge at one point. |
| It is most convenient to use special moldings for suspended ceilings made of plastic or aluminum as guides. They are equipped with special clamps - clips, under which the canvas is tucked using a spatula or spatula. The guides are secured according to pre-applied markings using dowels and self-tapping screws. Holes in the wall are made with a drill or hammer drill every 30-40 cm. |
| Mounting platforms or special fittings are installed for lamps. |
| The fabric for the stretch ceiling must be cut to the size of the room with allowances of at least 20 cm on each side. The fabric, unlike PVC fabric, does not have good elasticity; it cannot be stretched. Therefore, it is important to correctly calculate the required width and cut the fabric. Canvases made from specialized material are usually selected according to the width of the room, and the length is rolled out directly from the roll. |
| The fabric is straightened and aligned so that there are equal fabric allowances on all sides. Having retreated from the corner at least half a meter, the canvas is temporarily fixed in a baguette in increments of 0.5-0.7 m without strong tension around the perimeter of the room. The fastening of fabric ceilings begins from the middle of the short walls, then the long ones are fixed, the corners are tucked into the baguettes last. The fabric is tucked into the baguette using a rounded spatula. |
| Gradually tightening the canvas, it is leveled and stretched to an elastic state. The excess is cut off with a mounting knife or scissors. When cutting, it is convenient to place a wide metal spatula under the knife - it will protect the canvas and baguette from damage. The remains of the canvas after trimming with a spatula are tucked into a baguette. |
| After finishing the ceiling and walls, the gap between the molding and the wall is covered with a decorative plinth. |
| Install lamps by cutting holes in the canvas the right size. Glue is applied to the mounting ring and it is glued to the canvas in place of the lamp so that the centers of the ring and the lamp coincide. After the ring has set to the fabric, the material inside the ring is carefully cut out. The height of the lamp is adjusted so that it is at the level of the ceiling panel, after which the lamp is screwed in. It is advisable to use conventional lamps with a power of no more than 60 W or halogen lamps up to 35 W to avoid strong local heating and deformation of the panel in the area of the lamp. |


Video - Installation of suspended ceilings
Fabric stretch ceilings can also be mounted on wooden blocks installed around the perimeter of the room. In this case, the fabric is fixed to the guides construction stapler, and later the fastening points are covered with a plinth or decorative baguette made of polyurethane.
Installation technology for draped ceilings
Unlike smooth ceilings, draped fabrics do not have to be pulled tight; they can form waves, folds, and if you gather the fabric in the center of the room, it can create a cozy tent. You can also pre-mount a frame on the ceiling and give the ceiling relief and bends in the right places.
The photo shows various shapes draperies.

To work you will need:
- wooden block 20x40 or 40x40 mm, depending on the density and weight of the fabric, as well as the size of the room;
- drill and hardware for attaching the block to the walls;
- jigsaw;
- measuring tool and level,
- fabric of one or more types;
- elastic band or tape for curtains, allowing you to make even folds;
- construction stapler;
- polyurethane decorative baguette and small nails for fastening it.
Calculating the size of fabric for drapery is a rather complex task, which depends on the shape of the drapery. To avoid mistakes, it is better to draw a sketch of the ceiling to scale, then cut out the proposed canvases from soft paper on the same scale, fold them like an accordion and lay them out on top of the ceiling drawing. The larger the folds, the denser the drapery will be. You also need to leave fabric allowances for attaching to the guides.

Preparing the ceiling before installing draped fabric is carried out in the same way stretch ceilings. If the fabric chosen is translucent and the ceiling is non-uniform dark color, then it is better to pre-paint it or putty it with a light compound. Marking of walls for guide bars is also carried out using the above technology.
Install the draped ceiling according to the instructions below.
Table 2. Installation technology for draped ceilings
| Steps, illustrations | Description of actions |
|---|---|
| Cut the bars to the desired size using a hacksaw or jigsaw. Drill small holes in them at 40-50 cm intervals and mark the wall through them, placing the block with its lower edge against a pre-drawn line. |
| According to the markings, holes are drilled in the wall, dowels are hammered into them, after which the bars are fastened to the wall with self-tapping screws. If it is necessary to create a ceiling of complex shape, a frame of the desired design is made from a block. |
| Cut the selected fabric. To make a simple longitudinal drapery, sew elastic or curtain tape on two opposite sides of the fabric. With its help you can gather the fabric into even folds. To construct a tent-shaped ceiling, several strips of material of the same width are cut out. You can use fabrics of different shades, this will give the tent additional charm. One side of the strip is collected, and the second is evenly distributed across the width of the sector. |
| Grab the corners of the fabric to the block using a stapler and distribute the folds evenly. Fix the canvas around the perimeter. For thick fabric, you can use a stapler; for thin fabric, it is better to press it to the block with a wooden plank and nail it with small nails. |
| The polyurethane baguette is attached to the block using nails or self-tapping screws. You cannot attach it with glue using conventional technology - it will not stick to the folds of the fabric. You can give the baseboard or baguette any desired shade by covering it with paint. Paint and dry the baguette before installing it in place so as not to stain the fabric. After installation, the nail heads are carefully tinted. |


In the case of a multi-layer ceiling, the first layer of dense fabric is stretched without draperies, the second, made of transparent material, drape and fasten directly on top of the first. This ceiling acquires depth and a soft shimmer, especially when equipped with LED strip lighting.
Prices for ceiling lamps
ceiling lamp
Technology of covering the ceiling with fabric
Pasting with fabric is not much different from decorating the ceiling with wallpaper. The surface preparation must be more thorough, otherwise the fabric will not stick to the ceiling. The fabric for pasting the ceiling must be strong enough and not deform when stretched, otherwise the strips will warp and it will not be possible to glue them end to end. For this reason, natural or artificial silk is often chosen.

Required materials and tools:
- durable silk or satin fabric;
- glue or mastic suitable for gluing fabric;
- painting tool for puttying and leveling the ceiling;
- a foam roller for applying glue and a hard roller for leveling;
- scissors and measuring tool.
Table 3. Covering the ceiling with fabric.
| Steps, illustrations | Description of actions |
|---|---|
| Fabric glued to the ceiling will reveal all the irregularities and defects, so careful preparation is required. First you need to carefully remove the old coating, and then seal all the cracks and seams. The ceiling is then leveled using putty. Dry and apply a primer of a suitable composition. |
| The selected fabric must be checked for shrinkage. To do this, a small piece of fabric is measured, soaked and dried in room conditions. The shrinkage is measured again and calculated. If it is more than 5%, the finishing fabric will first have to be wetted and dried or ironed with steam. Otherwise, it may shrink when applied and fall off. |
| Cutting the fabric into strips is carried out only after checking the shrinkage, leaving allowances of 10 cm. If a large pattern is applied to the fabric, you need to adjust it in advance and cut the fabric with this in mind. It is better to roll strips of fabric into rolls; the latter are put on a rod and gradually rolled out when gluing. It is more convenient to do this together. |
| To glue the fabric, you can use casein glue, special mastic or furniture hot-melt adhesive that hardens when exposed to heat. In this case, the fabric will have to be heated with a hair dryer. Prepare glue according to instructions. Apply it to the ceiling using a roller, apply a strip of fabric and level it using a roller. The next strip is glued end to end and the seam is carefully rolled with a roller. Cut off the remaining fabric near the walls. Dry the glue or mastic according to the instructions. The joints of the ceiling and walls are finished with decorative plinths or baguettes, secured with special glue. |


Not the entire ceiling can be covered with fabric, but only certain areas. This technique can be used in zoning premises.
Note! When heated and in bright light, the fabric may fade and change shade. When choosing lamps, it is better to give preference to LEDs or chandeliers in which incandescent lamps will be located at a sufficient distance from the fabric trim.
A ceiling trimmed with fabric using any of the above technologies looks quite impressive. It will decorate any room in your home and allow you to create a unique coziness in it.