By virtue of current trends saving space in the bathroom, water and personal time, shower enclosures are becoming increasingly popular. But, despite the simplicity of the design, a person who is not experienced in installing shower enclosure difficulties may arise.
Shower enclosure set
Due to the wide range of these products and the huge number of configurations, universal instruction for its assembly simply does not exist, and the instructions that manufacturers supply in the kit leave much to be desired.
So, let's consider the process of assembling a shower enclosure using the example of a simple Chinese-made 9021F cabin, Santeh. Any model has an insert indicating all the necessary components, so first you need to check the presence of all screws, screws, seals and accessories (rollers, handles).
If there is not enough dowel, then this is not a reason to run back to the store with a check, but if, for example, a roller was not counted in the kit, then this is a good reason to go and make the sellers fuss. But it is better to check the entire package in the store. This can save you nerves, money and time in the long run.
So, we opened the instruction
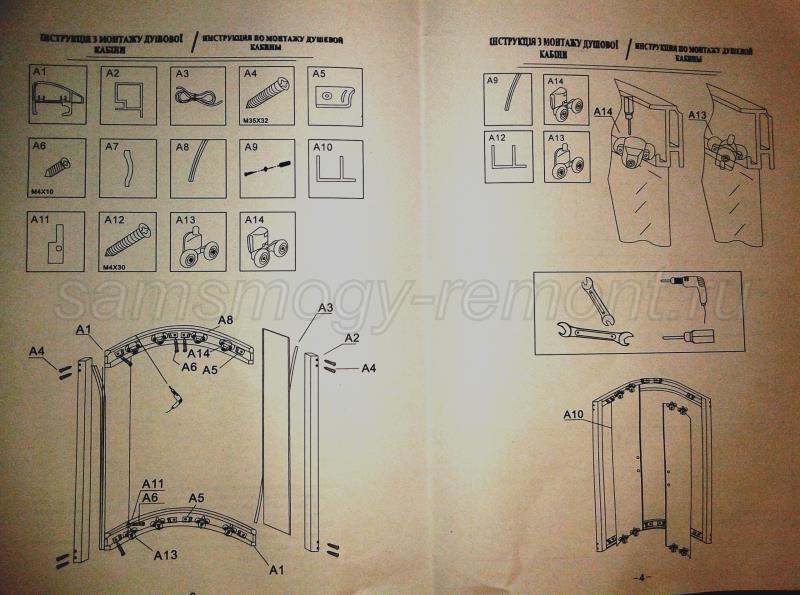
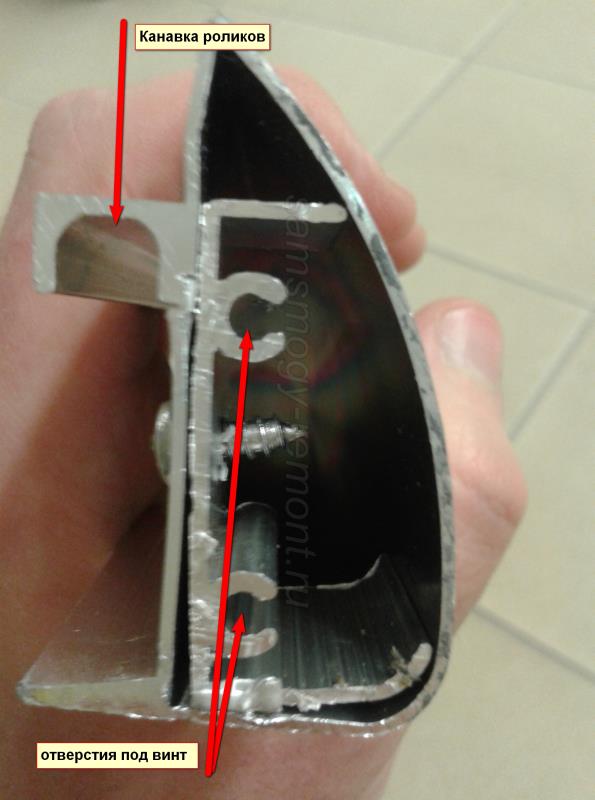
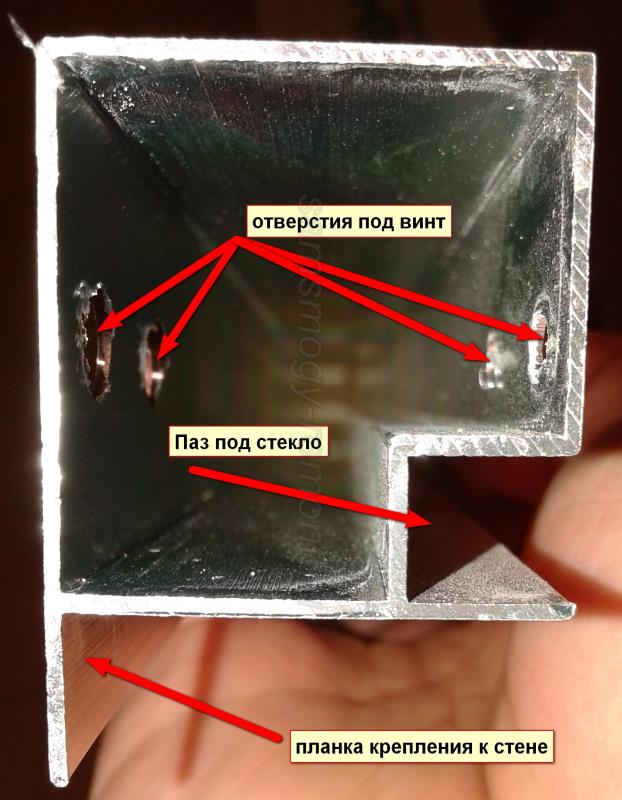
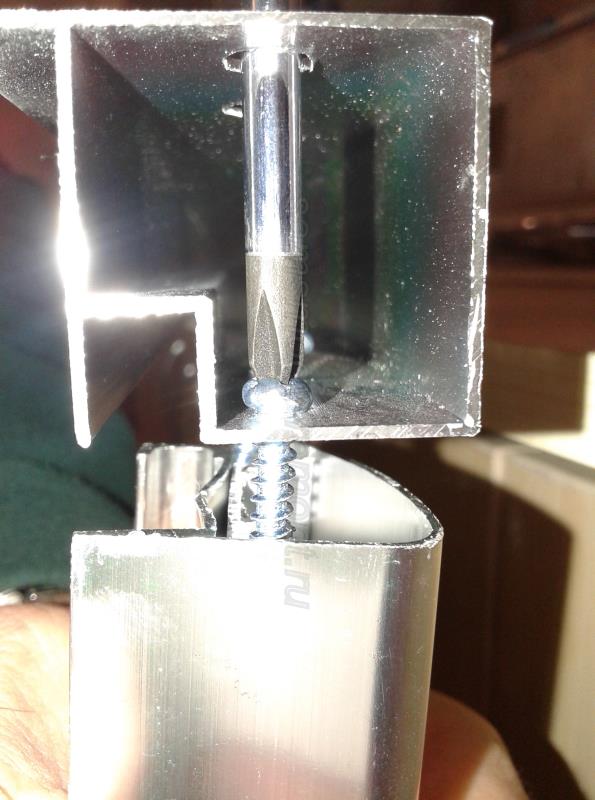
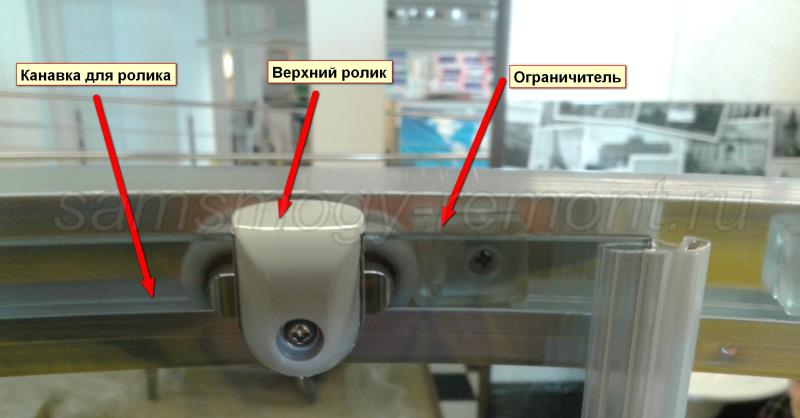
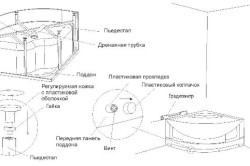
Among the abundance of drawings of the necessary configuration, positions A1 and A2 deserve special attention, this is a cross section of the profiles, which are the supporting frame of the shower cabin, in reality they look like this;
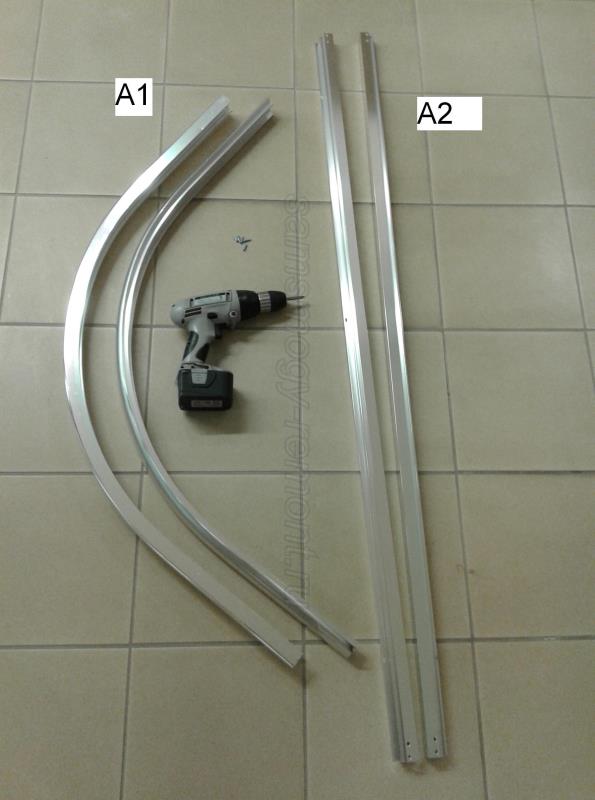
Frame assembly
With the help of screws, we need to connect this into a frame. A1 profiles have grooves for rollers, so you need to keep track of which arc will be upper and which will be lower. We take out the screws from the bag and begin to methodically twist the horizontal arc A1 with the vertical profile A2. The profiles should be placed relative to each other in such a way that the grooves for the rollers are opposite the groove for the glass. The axes of the twist holes are on the same line.
We carry out similar manipulations with the rest of the screws until our frame is ready.
Glass preparation and installation
Next, remove the glass from the package. It is necessary to distinguish between moving elements and fixed ones. The fixed panes are even and will be inserted into the grooves of the vertical profiles by means of a sealant. Movable elements, simply speaking doors, are arched and have holes for rollers and handles. The first step is to mount the A3 sealant on the edge of the glass and trim it to the desired size,
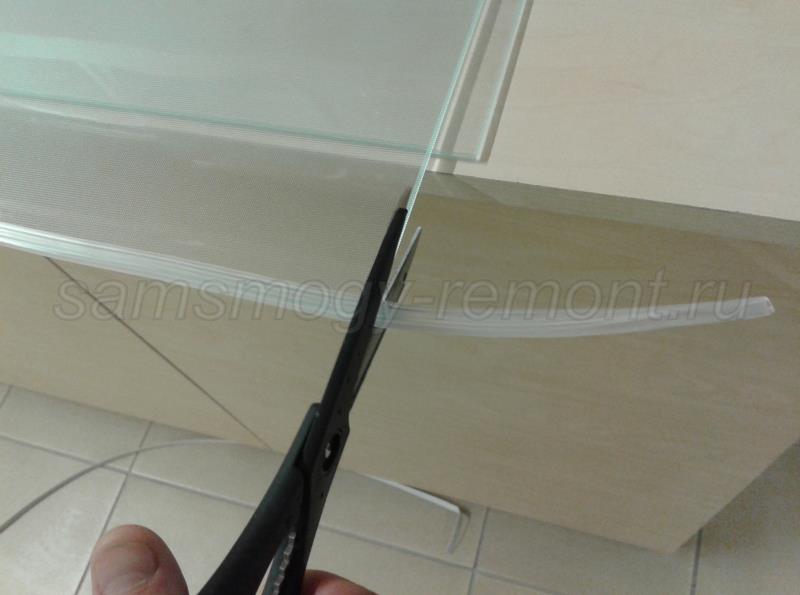
then insert the edge with the seal into the groove of the vertical profile. This should be the design.
So that the glass does not fall out and does not move, it must be fixed to the arc using the A11 clamps.
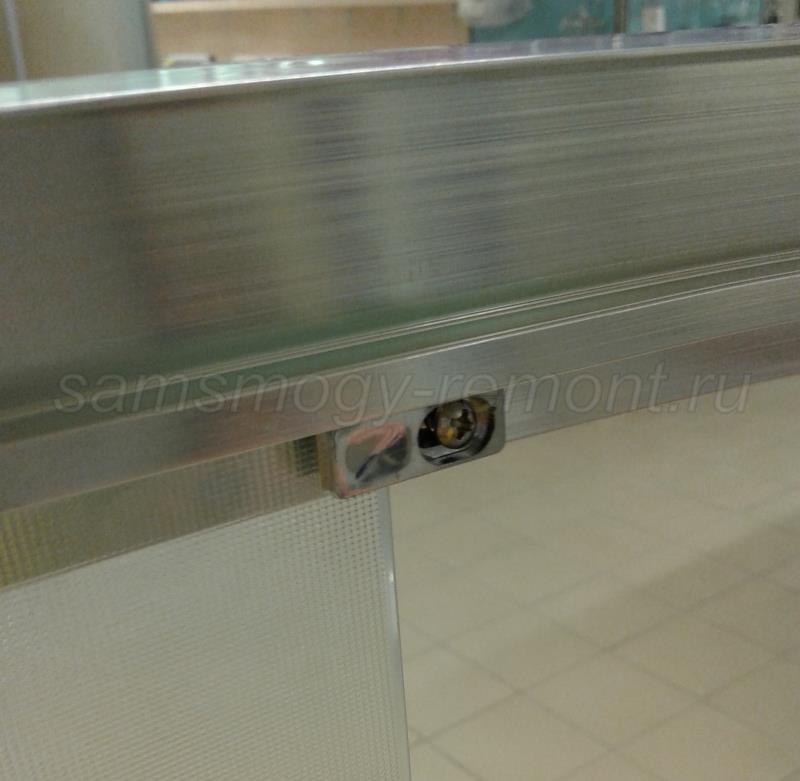
The package contains screws, but, as a rule, they are not signed by Chinese manufacturers and are poured all together. For clamps, it is necessary to take the shortest screws so as not to scroll the profile right through.
We insert the second glass and fix it in the same way. Note that there are 4 clamps in the set, therefore, it is necessary to fix both the upper corner of the glass and the lower one.
As you can see from the instructions, A5 limiters are provided on the frame. There are 8 pieces in total, 4 for each arc. The limiter is used to force the stop of the rollers. In the extreme open position, they are assigned the function of preventing the door from hitting the wall, and in the extreme closed position, excessive impact of the doors against each other.
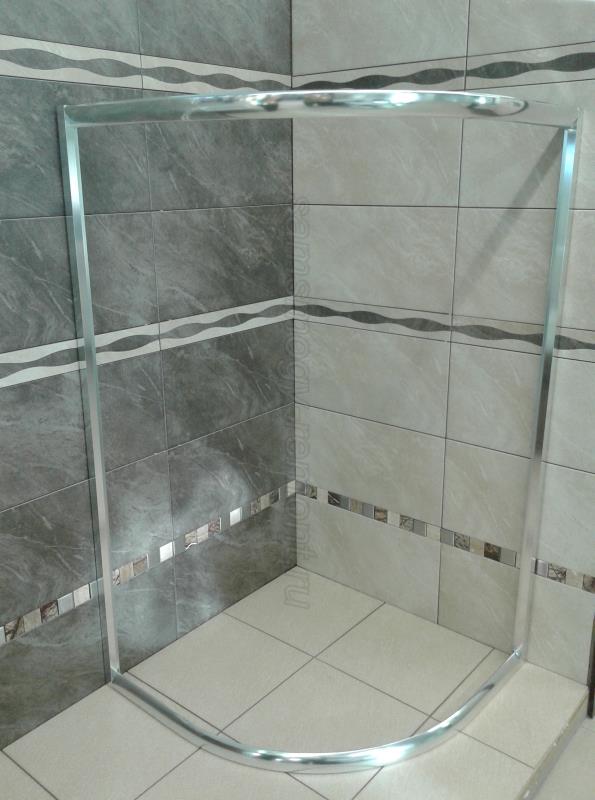
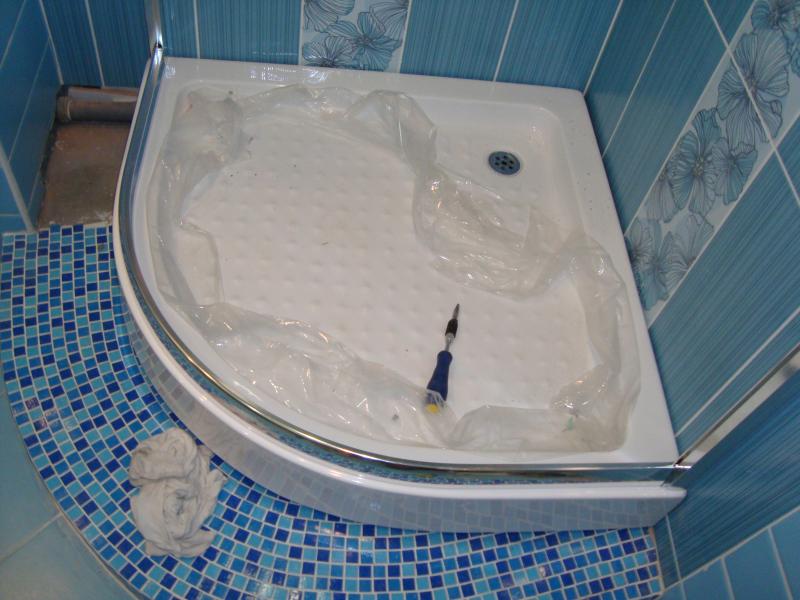
Depending on cab configuration and manufacturer, these stops may be factory installed, or you may need to mount them by hand, matching the location of the notch on the latch to the caster wheel. So, our frame is ready and we can safely install it on a pre-mounted pallet.
We make holes in the wall through the prepared holes in the “mounting bar”, insert the dowels (included in the delivery) and mount the frame to the wall. It should be noted that mounting configurations may differ from manufacturer, for example, the design may have a wall profile that compensates for wall irregularities, but requires additional manipulations to fix the frame on the wall.
Shower door installation
The frame is ready and mounted on a pallet, now it's time to prepare the doors. We remove the arcuate glass with holes from the box and place it with the bulge down, this is done so that the screws of the rollers can be freely tightened.
However, it should be done carefully, without creating unnecessary pressure and shock. Firstly, the glass is tempered, which increases the internal stress in the glass. Secondly, celestial craftsmen, when tempering glass, often violate the technology, which increases the likelihood that, with careless handling, the glass can be assembled into a scoop. By the way, the same applies to fixed windows.
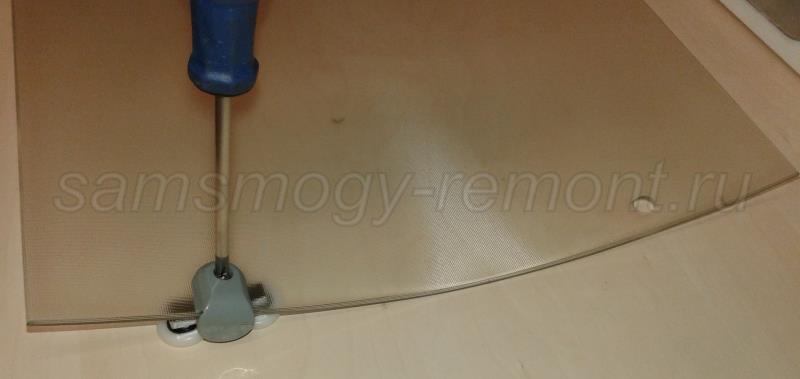
Pay attention to the rollers. According to Fig. 1, they are upper A14 and lower A13. The difference is quite significant and lies in the fact that the lower rollers have a button that compresses the spring inside the roller itself. The upper rollers have a screw for fine adjustment of the door inclination.
At the stage of mounting the rollers on the door, it is enough to understand that the rollers with the button are placed at the bottom, the rollers with the screw are at the top. If you do not adhere to the correct placement, you can find at the end of the installation that the puzzle does not add up and needs to be redone. So, we collect rollers on the cab.
Attention! The rollers on the second door should mirror the first door so that the handles converge inward. Otherwise, the doors will not be able to fully function, and the handles installed doors will look in different directions.
Now it's the turn of the A7 handles (see the first photo), there are 4 pieces in the set, we place the two halves on opposite sides of the glass and fasten them together with thin long screws. There are models when there is only one hole for the handles, respectively, and the handle looks like a cylinder with one screw, such handles simply twist together, here you need to arm yourself with a screwdriver at low speeds and with a ratchet set to 4-5, so as not to lick off the edges of screws and carefully tighten the halves. This must be done carefully and not overstretched.
After installing the handles, the doors, not counting the sealing elements, are ready for installation. Now we pass to the most responsible phase. It is necessary to mount the door on the frame. With some experience, this part of the work, as well as the assembly of the entire frame, can be done by yourself, but it is strongly recommended to call someone for help. Because, you run the risk of not calculating the dimensions or not holding it in the right place, to be left without glass.
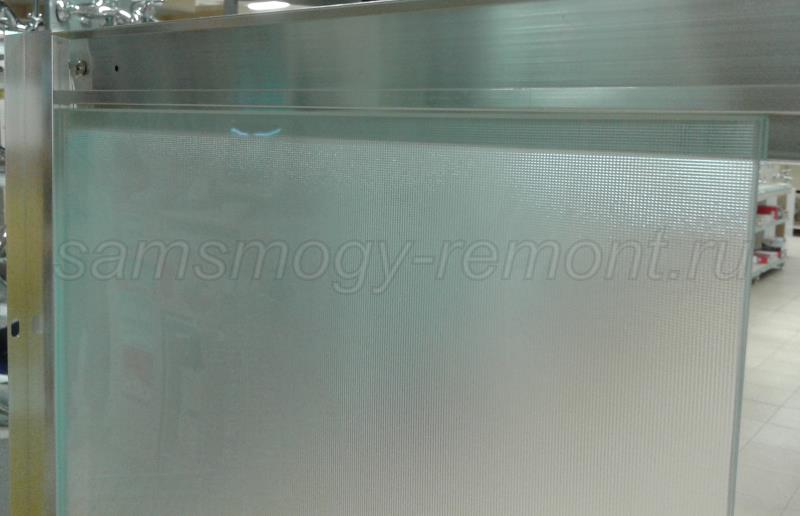
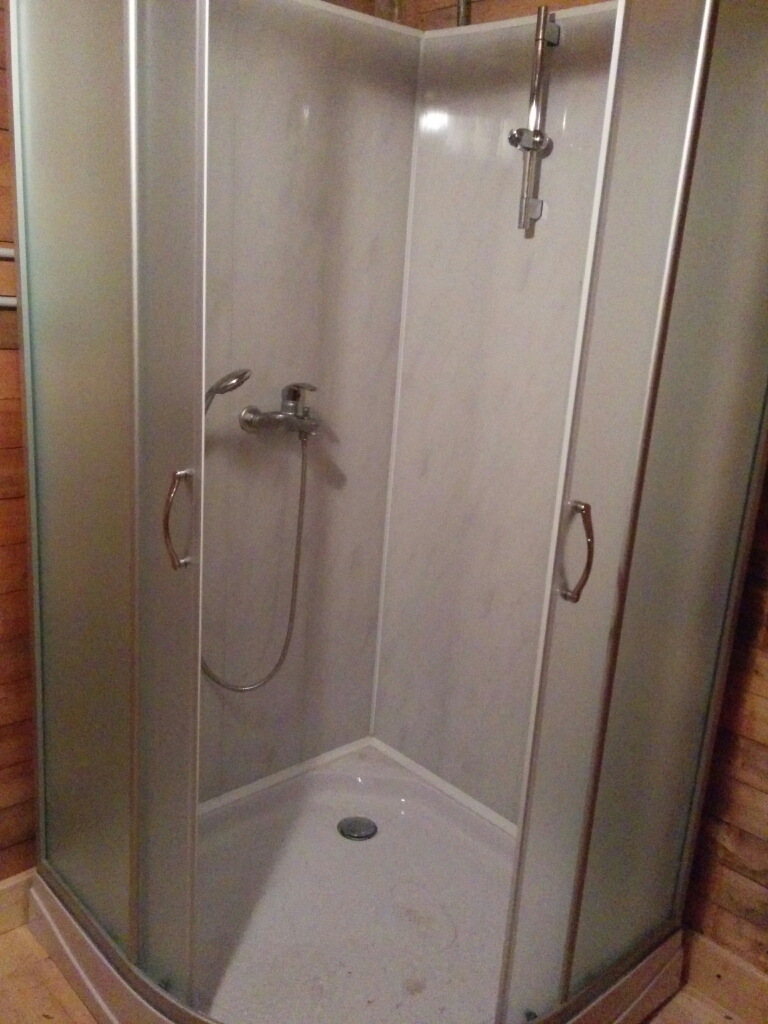
At this stage, we have doors on which handles and rollers are mounted. The very process of mounting the rollers consists in landing the wheels in the "grooves for the rollers" for this, holding the glass vertically, we bring the upper rollers to the groove of the upper arc and insert the wheel. From the inside of the shower enclosure, it should look like the picture shows.
At the same time, the lower rollers “slightly do not reach” the groove, for landing, buttons are provided on the lower rollers. It is necessary to press the button and, when the wheels are lowered, snap them into the groove of the lower profile.

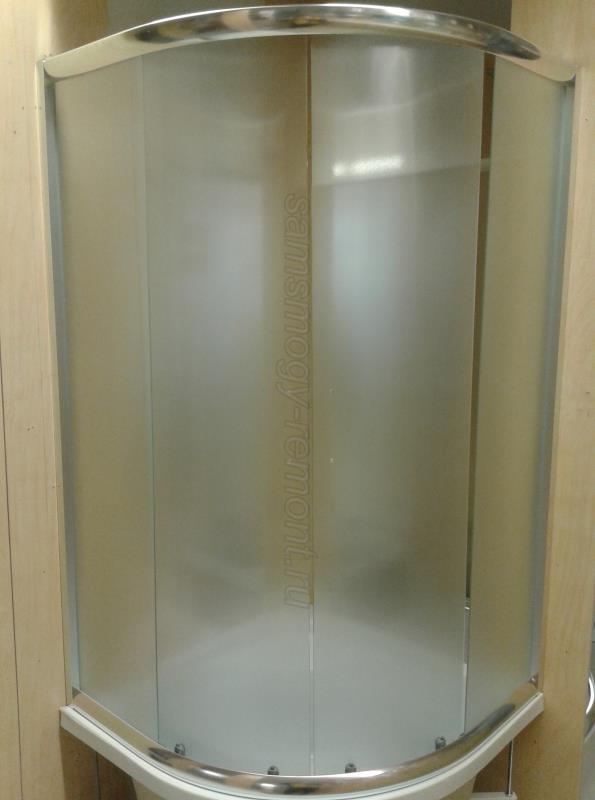
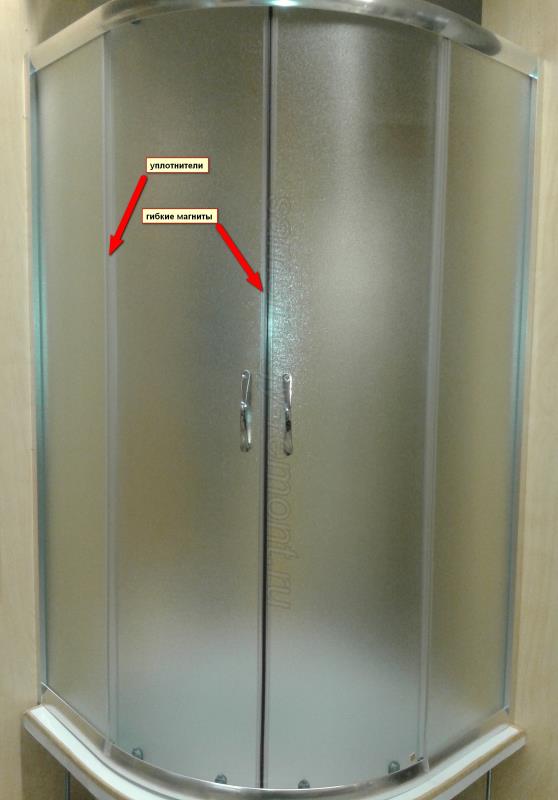
Now the cabin is almost ready, it remains to install A10 seals on the ends of the doors, which serve to prevent water from seeping between the windows on one side and magnets to tightly adjoin the doors on the other.
This is followed by door adjustment using screws on the upper rollers.
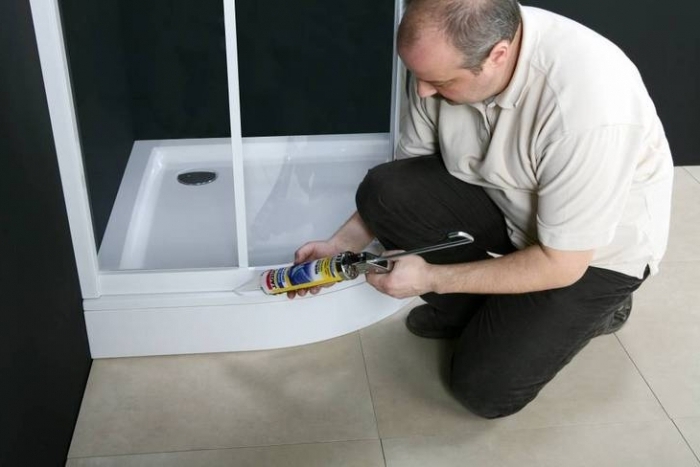
Cabin sealing with silicone is carried out either last or before installing the doors. However, this is a matter of habit and a specific situation. Everything is ready, enjoy.
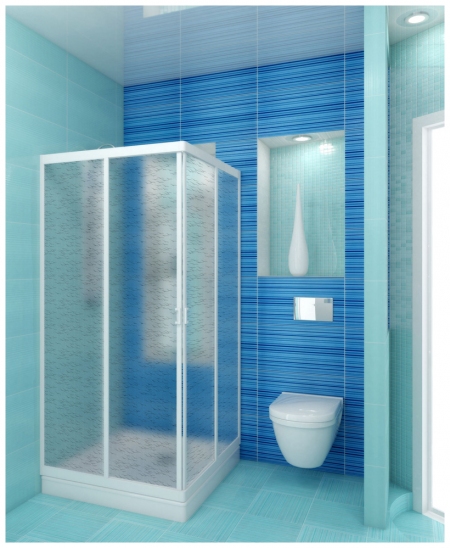
Bathrooms are equipped for hygiene procedures in apartments, cottages and private houses. Their design and style completely depends on the taste and preference of the owner. Some have a bathtub, others have a shower, and others, due to the fact that the room has a small area, prefer a corner. This plumbing fixture has different kinds Let's take a look at them.
Design
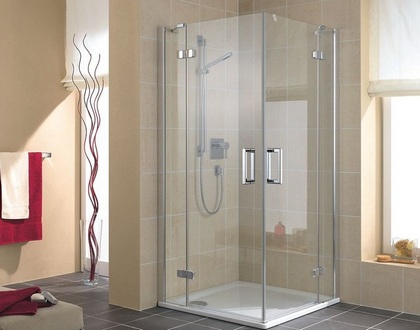
In the event that a light design is preferred, then a shower enclosure without a frame is chosen, which is completely glass, has hinges that align the profiles (they attach the glass to the wall).
There is a so-called "semi-frame" look, which does not have vertical rails, but thanks to the doors (they are sliding), you can save space.
More popular among consumers is the frame design of the shower cabin, since due to the fact that the glass is inserted into the frame, the strength of the device increases.
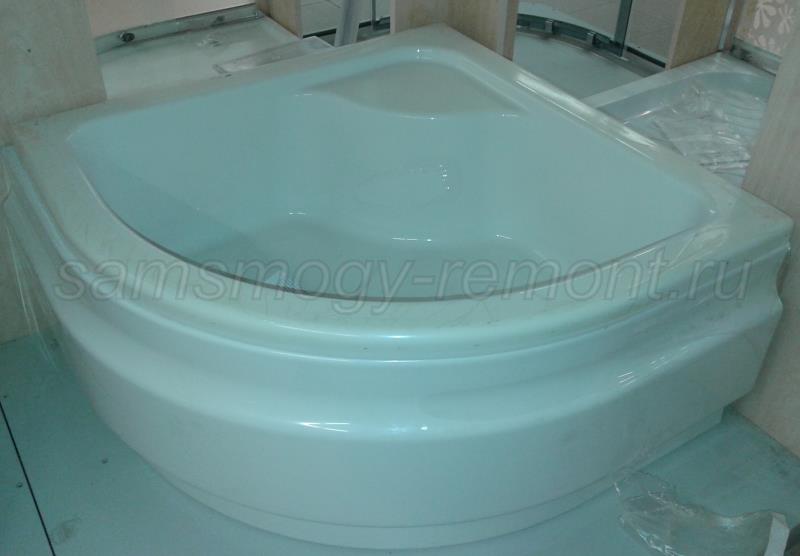
In shape, the corners are different, for example: oval, square or rectangular. And the dimensions are from 0.75 X 0.75 m to 0.9 X 1.2 m, and sometimes 1.0 X 2.0 m. When sold together with an acrylic tray, the shower channel or mini-bath is included in the kit.
The corner can have doors that fold, rotate, slide apart or operate with a lift-and-turn design.
The first type saves space and prevents water from spreading. At the moment the door is opened, all the liquid flows into the sump.
If the door rotates, then its mechanism does not require much maintenance, and when opened, part of it opens inward.
The folding door, although small, has a large entrance width.
For vertical movement of doors, a lift-and-turn structure is used, which ensures the movement of doors vertically, that is, when opening, they rise automatically and, when closed, they are completely adjacent to the floor (or pallet).
Mounting order
- According to the scheme and instructions, all the elements included in the kit are laid out;
- Install the sealing strip;
- Attach the guide with a magnet;
- Install hinges and holder;
- Dowels are driven in and a fixed partition is mounted;
- Fix handles and install doors;
- Mount the groove (for water drainage) and the threshold (door);
- Produce putty (silicone) outside.
How to install correctly (step by step instructions)
After the bathroom is completely renovated, the installation of the shower enclosure begins, for which you will need a set of installation tools.
It is important! Please note that the installation of the frame structure takes the minimum time, as it is sold fully or partially assembled. Its only drawback is the big box. And in order to install a frameless structure, accuracy is necessary, since the room in which the corner is installed does not always have ideal and even walls, and this greatly complicates the regulation of the structure.
 Let's see what to do in this case:
- From the profiles (horizontal) remove the transport corners. On the fixed walls on the right and left, install the upper and lower guides and screw them;
- In the event that the horizontal profile has not been removed, then each side of the shower enclosure is expanded by 20 mm, and then the plumbing fixture will not repeat the radius of the tray;
- In order to make it easy to screw the aluminum guide, the screws are lubricated with petroleum jelly;
- After that, they attach the corner to the profiles, put it on a pallet, expose it using building level, and on the wall designate the profile;
- For dowels, holes are drilled and guides are screwed;
- Let's see how to apply silicone sealant on them: in order for water not to flow out of the pan, it is applied from the outside vertically. At the same time, remember that for the free flow of water, you cannot apply it from the inside;
- The shower enclosure is fixed to the installation profiles, and re-exposed using a level;
- Using screws with a gasket, fix the corner with inside to the profiles, and from above the heads of the fasteners are closed with a decorative cap or plug;
- There are holes in the glass doors (in the upper part), a roller mechanism (made of metal) is fixed there, and in the holes in the lower part there is a plastic structure that will allow you to easily and quickly put on and remove the shower enclosure door;
- Decorative strips made of plastic, attached to the glass fixed part of the plumbing fixture;
- In order to make it easy to manipulate, the glass is rubbed with soapy water;
- Glass doors are put on the horizontal profile located at the top, for this a roller mechanism is used and it is latched using a plastic one to the lower guide;
- Handles are inserted, a transparent silicone gasket is placed under each of them.
How to make the right choice?
Since this plumbing fixture is mounted in the corner of the bathroom, this design will be beneficial for those who live in an apartment with a small area, but want to take water procedures comfortable. Today, the shower enclosure competes with bathtubs, as it can be placed both along the wall and in the middle of the room. This plumbing fixture may have unusual shape and design.
The shower corner with a 90×90 tray has gained particular popularity among consumers, as it is stable, airtight, comfort and safety are guaranteed when bathing. Pallets with this size have a large depth and therefore they are convenient for children and the elderly, as they replace a bathtub, and a small seat in the form of a step is also mounted here.
The pallet for such a corner is made of acrylic, ceramics, quartz or enameled cast iron.
Acrylic does not darken and has antibacterial properties, while quaryl is resistant to various mechanical stresses and is also durable. If the pallet is ceramic, then it is massive, durable and stable.
 Glass or plastic is used for the walls. If they are made of glass, then they are durable, they can be transparent, frosted or tinted. They are easy to care for, stains do not appear on them, but such designs are more expensive than plastic ones, which can be of different colors.
Proper operation
We looked at how to assemble a shower enclosure yourself and how to choose the right model, and now we'll figure out how to care for it.
On the advice of the manufacturer, before the first use, regardless of the material of manufacture, the walls and the tray must be treated with a composition that will give the shower enclosure protection from pollution and increase the water repellency.
In order to metal surface acquired the effect of chromium, make a silver grout. And the shower enclosure is cleaned as it is used, but the frequency of cleaning (once a week or once a month) and the use of special means. If you follow all the recommendations and rules of care, then the design will last a long time.
We looked at how to properly install a shower enclosure yourself. But in the event that for some reason you cannot do this, then seek help from specialists.
- Site preparation
- Installation
- Doors for corner
- Sealing
Few owners modern apartments can boast large sizes bathrooms. Some bathrooms cannot fit even the smallest bathtub.
The shower enclosure will help save some space in the bathroom, as it does not have rear walls, and its installation takes place directly against the wall.
Someone simply prefers the shower, rejecting the charm of a comfortable and fragrant bath procedure. The solution to the problem can be the installation of a shower enclosure or a shower cabin.
The difference between a shower corner and a cabin is that the corner does not have a back wall and is attached directly to the bathroom wall.
The shower enclosure set consists of a tray, side walls, doors with the necessary fittings.
You can buy all the components as a ready-made kit or as individual components. The last purchase option has important nuance A: Designs from different manufacturers may not match. In this case, it can be very difficult to correctly install the corner.
Little tip: when making a purchase, it is important to consult with the seller in the store and select compatible construction details.
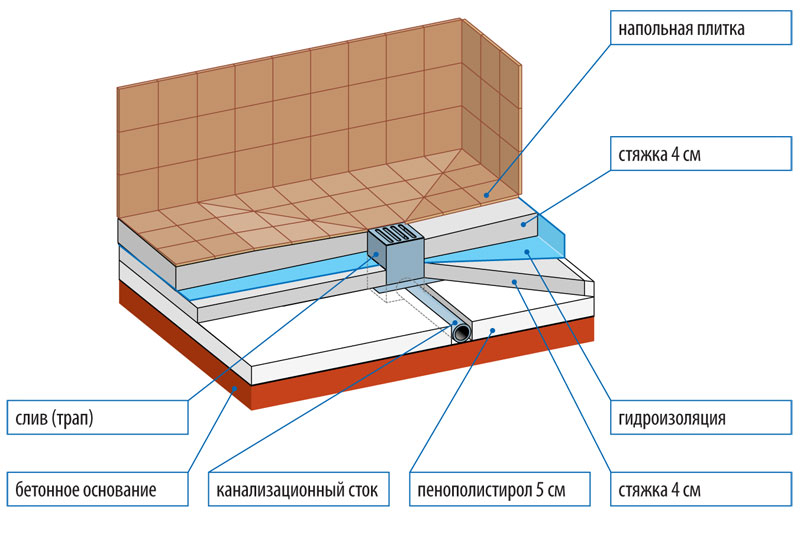
Site preparation

Necessary condition correct installation corner for the shower is a thorough preparation of the floor and the corner of the bathroom where the structure will stand. Walls and floors must be brought out strictly in level, at an angle of 90 °. This is necessary in order to minimize the gaps between the parts of the shower enclosure attached to the wall.
It is possible to finish the walls, for example, with tiles, in advance, if a preliminary check shows a clear adjoining of the shower enclosure tray and walls to the vertical surface of the bathroom. Otherwise, it is possible to lay out the tiles after installing the pallet so that the tiles hang slightly over the pallet.
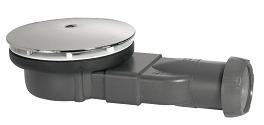
Before starting the installation of the pallet, it is necessary to bring the corrugated tube from the drain hole to the fan pipe, placing it at a slope.
Back to index
Installation
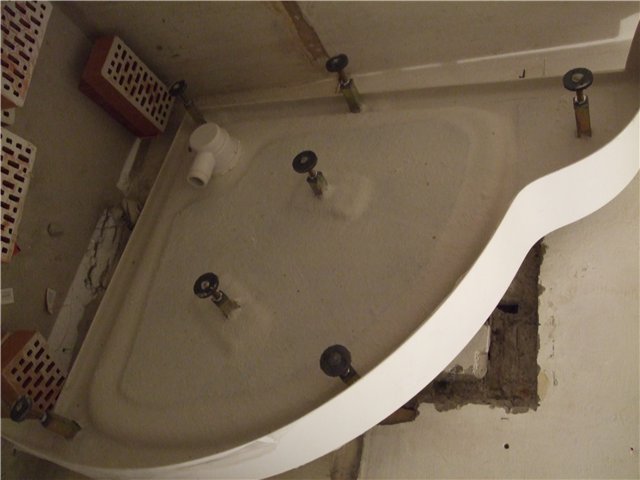
Installation of a shower complex begins with a pallet. There are 2 production options.
Place the tray in the prepared corner and adjust using the screw feet exactly to the level. Next, fix the screw legs with special nuts. corrugated pipe, attached during installation to the drain hole of the pallet, connect to the fan pipe. It must be remembered that all connections under the pallet must be reliable. In the event of an emergency leak, it will not be possible to quickly dismantle the structure of the shower enclosure to eliminate leakage. You can make sure that the drain is ready by pouring a small amount of water into the drain hole. After making sure that the water leaves the pan intensively, there are no leaks in the joints, it is necessary to check the condition of the floor under the structure. The presence of a dry floor after a control check indicates that all work has been done correctly.
You can also make a recess in the floor, mount a pallet there, having prepared all the elements of the drain complex in advance. Next, finish the floor screed with the pallet installed. This installation method is very time consuming and troublesome, but it is more reliable.
Convinced of precise installation pallet, you can start laying the bottom rail. You can attach it with silicone sealant.
The next step in installing the shower enclosure is attaching the uprights that will run from the bottom rail up the wall. To install them, mark, using a level, the location of the mounting holes. Next, drill through the wall using tiles a drill with a drill for ceramics and a hammer drill with a drill for concrete for the wall, drive in plastic dowels, generously lubricate the racks with sealant and attach them to the wall with self-tapping screws. After installing the vertical rails, you can also attach the lower rail to the wall, also treating it with a sealant and connecting it to the wall with self-tapping screws.
The installation of the upper guide is carried out in the same order. It, connected to vertical posts, is attached to the ceiling.
Having installed the racks, you should proceed to the production of fastening the side walls of the shower enclosure. Finished wall sheets are installed on prepared racks and attached to them with self-tapping screws. Then they should be attached to the guide below, carefully sealing during installation.
By attaching side walls to the vertical racks and the guide below, you can do the top. Its installation is similar to the installation of the guide at the bottom.
Back to index
Doors for corner
For the normal operation of the entire corner shower complex, special attention should be paid to the door installation process. They can be plastic or glass.
Working with glass doors For shower corner requires special care due to the fragile material of the parts. In production installation work you need to be extremely careful, avoid bumps, do not press on the curved glass surface. Do not hold on to pre-screwed fittings: the glass may break and shatter into small pieces. Accessories are installed at the final stage of installation. Rough handling can result in cuts and other damage to the installer.
All shower corner doors are equipped with specialized eccentric rollers. To install the door, hook the rollers on the lower and upper rails. Next, adjust the sashes, achieve maximum contact between the doors. The sashes should move smoothly along the guides when opening and closing, in the absence of any gaps at the top and bottom of the structure.
After the doors are fully installed, you can begin fastening the fittings.
Installing a shower enclosure often has its own characteristics. When choosing the installation location of the cabin, the location of the sewer risers must be taken into account. Water supply without any problems is carried out to any desired installation location of the shower enclosure. But the sewer needs a certain slope.
Installation of shower enclosures has its own nuances: door rails are attached to the walls of the bathroom. For proper operation sliding canvases it is important that the vertical guides are at the same level and in the same plane (measured by the level).
Installation Features
There are two ways to install shower enclosures, each of which has its own nuances:
- Before starting the installation of a corner with a pallet, they check (or bring in a new one) the sewer and plumbing system. After connecting the pallet, the water drain is checked: it is necessary to make sure that there are no leaks at the joints. After that, the pallet is leveled using the legs, on which there is an adjustable screw.
- When installing a shower enclosure without a tray, special attention is paid to the waterproofing of the ceiling and correct work plum. After facing the walls and floor with tiles, proceed to the installation of the corner.
Steps for installing a shower enclosure
Installation of the shower enclosure is carried out in the following sequence:
- The bottom guide is mounted. The seams are sealed with a silicone-based waterproof sealant.
- Inserted into the bottom guide vertical racks, the attachment points are marked.
- Holes are drilled in the wall, plastic dowels are installed.
- Vertical racks are installed and fixed. A sealant is also used.
- Glass sheets are inserted into the guides.
- The top fixing bar is installed.
A shower corner is a simple thing, but very useful. Particularly attractive is the fact that its cost is several times less than a shower stall. In addition, installing a shower enclosure with your own hands is quite simple, this will further reduce the burden on the family budget.
What you need to know about installing a shower corner
The main difference between a corner and a full-fledged shower stall is that the corner is just a fenced off part of the bathroom. The shower cabin is much more complicated, it is a kind of capsule, in which many manufacturers provide such pleasant additions as hydromassage of the back, feet, equip them with a telephone, a steam generator, etc.
Note!
If in the case of a shower corner additional lighting is not needed, then in the booth, most likely, there will not be enough light, so it is equipped with a backlight.
That is, in connecting the cabin is more difficult, in addition to plumbing and sewerage, you will also need a socket.

Do-it-yourself installation of a shower enclosure will require solving several problems:
- it will be necessary to organize a reliable flow of water;
- you will also need to connect cold and hot water;
- final stage can be considered the installation of walls.
However, the same problem can be solved in different ways.
For example, when organizing a drain, you can go in 2 ways:
- just buy a shower tray, raise it above the floor and mask all the pipes under the tray itself;
Note!
From the point of view of ease of repair, installation of a shower enclosure in this way can be considered optimal.
And so that the gap between the pallet and the floor does not disfigure the interior of the bathroom, you can always close it with a decorative panel.
- do not use a pallet at all - in this case, even at the stage of installing the screed, you will have to mount it in and provide the required slope;
- a compromise option - the most flat pallet is used. In this case, an ordinary siphon will not work; you will have to look for special flat models. Sometimes a recess is made in the floor so that, after installation, the edges of the pallet do not rise above the level of the floor in the bathroom.
Even at the stage of choosing a pallet, you need to think about the shape of the future corner. If, for example, a pentagonal shower enclosure is to be installed, then the shape of the shower tray must also be appropriate.
As for the material of the walls, the choice in this matter is not very large.
If we completely discard budget options, when the corner is simply fenced off with curtains, then you can select:
- glass walls - used only strained glass 8-10 mm thick, you can choose any color, and only the price can scare you away from buying. The cost of glass sheets will go far beyond 10 thousand rubles;
- plastic- you can note their lighter weight, lower resistance to mechanical stress and light weight, which somewhat facilitates installation. Otherwise, a nice pattern can also be applied to the plastic and the shower corner will look quite stylish.
Installation Guide
The main installation steps are already listed. It remains only to consider them in more detail and pay special attention to small but important details.
Installation of the pallet, connection to the sewer
To install shower enclosures with your own hands, you need to start with the installation and. We will consider the best option from the point of view of labor costs - when the pallet rises above the floor and pipes are placed in the resulting gap.
The work instructions will look like this:
- the pallet itself is first tried on, the position of the drain hole is noted;
- further the sewer corrugation joins sewer pipe, its other end is attached to the siphon with a union nut;
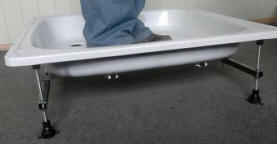
- after that, the siphon is attached to the pallet itself, installed in the corner. The level of the pallet is checked by the level and, if necessary, its position is adjusted using threaded legs;
Note!
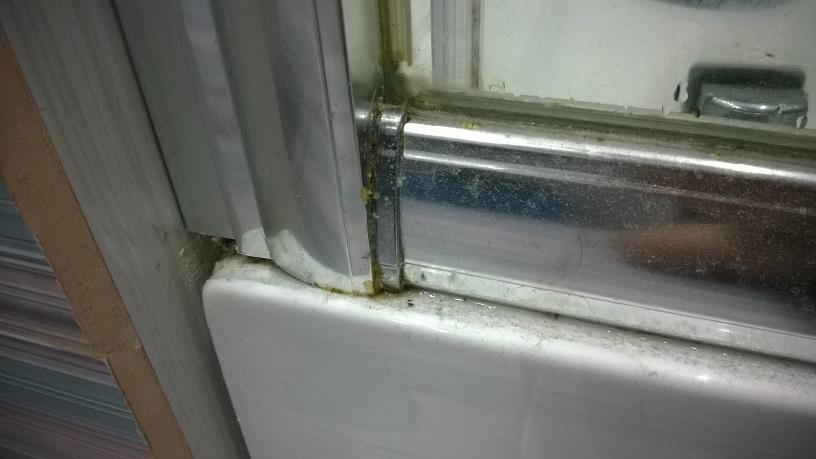
Special attention it is worth paying attention to the junction of the sides of the pallet and walls, these places must be carefully smeared with sealant.
If this is not done, then dampness, mold and fungus under the pallet are guaranteed.
- after that, it remains only to fix the panels that hide the gap near the floor.
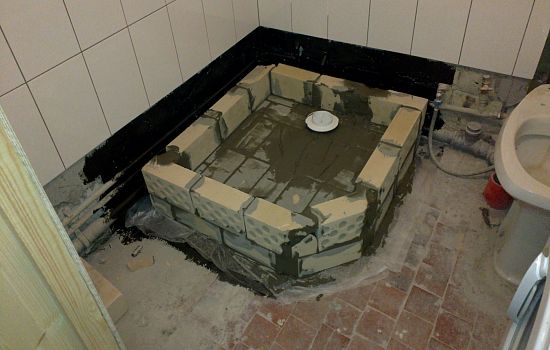
At this stage, the main problems most often arise with how to seal the shower enclosure. An ordinary silicone sealant is also suitable for this, you should not try to find a miracle composition, the main thing that needs to be ensured is the rigidity of the pallet, it should not sag even a millimeter.
This is what most often causes the dampness of the space under it. Even if the deflection is 1-2 mm, the edge of the pallet is easily peeled off from the layer of hardened sealant, and water seeps into the gap without any problems.
If the rigidity of the factory frame is not enough, then you can always put an ordinary brick under the pallet (put a piece of rubber on top so as not to scratch the plumbing fixture).
If, despite all efforts to seal the shower corner in the bathroom, dampness, mustiness and fungus still cannot be removed, then the cause should be sought in poor ventilation. Of course, you should first check the tightness of the joints.
Wall installation
Much depends on the design of the corner:
- if the bathroom is tiled, then the walls of the bathroom itself can act as a back wall. In this case, the installation is very simple - you just need to fix metal profiles and insert glass or plastic into them;
- and here is the shower enclosure back wall will require a little more effort, you will also need to install the rear opaque walls.
Note!
Shower enclosures with a back wall can be installed in wooden houses.
They can also be placed not only in the corner of the room, but also slightly away from the walls of the room.
As for how to properly install the shower enclosure, the installation procedure remains the same, in the case of placement against the wall, you need:
- install metal profiles on the wall and on the floor. Naturally, before installation, the verticality of the location is checked, then holes are simply drilled and the profile on the dowel is attached to the wall;
Note!
For the tightness of the shower corner, the joint between the profile and the wall must be coated with sealant.
- further glass walls are simply inserted into the profiles. Formally, rubber gaskets should provide sufficient tightness, but it will not be superfluous to play it safe and additionally coat them with silicone. In this case, water will definitely not get into the gap between the glass and the gasket;
- you can also advise on top of the glass sheet to additionally fix it with a metal jumper to the opposite wall, which will increase the rigidity of the structure. On this question, how to assemble a shower enclosure can be considered closed.
For shower enclosures not adjacent to the bathroom walls, the procedure remains the same, except that the profiles do not need to be fixed to the wall. The frame is simply assembled, and then the walls are mounted.
In conclusion
Self-assembly of a shower corner is an extremely simple task. All that needs to be done is to install the pallet, connect it to the sewer and fix it around the perimeter of the wall. Any novice builder will cope with this.


