It is difficult even to imagine any construction site without technological processes using cement mortars. And for the owners of their own country house, with their constant state of “permanent” repair and landscaping, concreting in general is a very popular operation - either garden paths need to be poured, then the foundation for the gazebo, then the blind area should be renewed, then a fence should be put up ... In a word, literally on every step requires the manufacture of concrete - the difference is only in the scale of the event.
Many individual builders prefer not to bother with self-mixing of the mortar - this can be avoided if there is a concrete goods factory nearby or another company that provides services for the manufacture of concrete and its delivery to the place of work. But, firstly, it costs a lot of money. Secondly, not everywhere such an opportunity is present. And, thirdly, it does not always make sense to use such services for reasons of a small scale construction or repair task - it will be either simply ridiculous or extremely unprofitable. It’s easier to make the right amount of solution yourself. This, of course, can be done manually, but it is better to purchase (rent) a concrete mixer or show yourself a real owner: for the future, make yourself a concrete mixer with your own hands.
The article will discuss several homemade models concrete mixers - from the simplest to those that already differ little from the samples presented in stores.
Brief excursion - what are concrete mixers
By and large, you can cook without any equipment at all. Some masters even like to work like this, "the old fashioned way", mixing cement nt with sand and other components (if necessary), and then gradually adding the right amount of water. For this, large containers with low sides are used, factory-made or even home-made, knocked together from boards and sheathed with thin metal.
Mixing by hand - how much time do you have?Some people prefer to do without containers altogether, by preparing the solution simply on a prepared flat area. However, in any case, the procedure of mixing with a shovel or hoe, first dry components, and then with water, is a very laborious process that takes a lot of effort even at the preliminary stage, before concreting. And if the work is planned on a fairly large scale, then this approach will not justify itself.
Prices for concrete mixers Whirlwind
concrete mixer Whirlwind
Construction mixers or drill attachments - they will go more for dry mortars or composite polymer materials. Sand with cement for them is already a rather difficult “test”, and if there is still a need to add gravel, gravel or expanded clay of a large fraction, then the mixer or drill can be safely put aside: not only can you not achieve a high-quality, homogeneous batch, but also and there is a high risk of overheating the gearbox or the electric drive of the device.
Concrete mixers (concrete mixers) cope with this task, which differ not only in size, capacity and drive power, but also in the principle of their operation.
Forced mixing principle
Forced principle - the mixing of the components of the solution is carried out in a fixed container. It is carried out due to circular movements of the shaft with blades connected to a mechanical drive. (Work with construction mixer or drills with a nozzle can also be safely attributed to the forced kneading principle).
The layout of the installation may be different. So, the working drum can be a vertically located cylinder of small height, in which blades-blades rotate on a vertical axis (as in the figure above).
Another option is when the container itself is located horizontally, and the shaft with blades is also oriented in a horizontal plane. Below is a schematic diagram of such a concrete mixer - who knows, perhaps someone will use it as a prototype for self-production.
In the drawing, the numbers indicate:
1 – drum body, which solution is mixed.
2 - a frame on which all units of the unit are mounted.
3 - Electric drive. In this case, with such dimensions of the mixer, the power of the order of 5 ÷ 6 kW will be optimal.
4 – control and management elements: toggle switches, indicator lamps.
5 - Lower hatch (shutter) - for unloading the finished solution into a container substituted from below.
6 - lever to open the shutter.
7 - safety grill installed during kneading.
8 - a gearbox for transmitting rotation from an electric drive to a working shaft.
9 - Protective casing of the belt drive.
10 - safety clutch.
11 - a working shaft with blades installed on it for mixing the solution.
The unloading of the finished solution can also be organized according to a different principle - the working drum is mounted on the frame not rigidly, but pivotally. When mixing concrete, it is locked in working position. And in order to extract the finished solution, the container removed from the stopper, and with the help of a special lever it rotates in the suspension trunnions. The solution is unloaded into the substituted container through the top loading hatch.
Another scheme is somewhat simpler, with a lever for capsizing the containerForced-action concrete mixers achieve very high levels of mortar homogeneity. They are actively used in industrial conditions, in construction, in private practice. However, they are not without significant drawbacks:
- In the working tank, it is often impossible to avoid the creation of "dead zones" - along the walls, especially in the corners. It is not easy to fit the blades with a minimum clearance to the inner walls of the cylinder, especially since under such conditions there is a constant increased wear of rubbing parts.
- Structural complexity - reliable hermetic protection of rotation units (bearing blocks) on the working shaft from the aggressive effects of cement mortar is necessary.
- It is almost impossible to prepare a solution with a filler of medium or large fraction in such a concrete mixer. But on the other hand, for plastering and finishing works, using ready-made building mixtures, this the most optimal option.
Gravity mixing
The gravitational principle of mixing - the components of the solution are mixed under the influence of their own gravity. illustrative example- place in glass jar two different products, for example, two types of cereals, close the lid and start rotating - mixing will begin.
It is clear that such an approach in its "pure" form does not provide high-quality preparation of the solution, or it will take too much time to achieve an acceptable consistency. Industrial environment similar way does not apply, but for domestic needs a small simple concrete mixer can be made.
The drawing shows a can - it is convenient in terms of tightly closing the lid. But, in principle, almost any container can be used, if the owner thinks well about the issue of its reliable closure while mixing the solution.
The axis of rotation can be fixed outside the container - in this case, it is not necessary to ensure the sealing of the assembly when it passes through the wall. But still, it is better to make it through - such an artificial obstacle during gravitational mixing of the solution will somewhat increase its quality.
On the Internet you can find many interesting solutions for the manufacture of such simple concrete mixers from improvised means. Very often old iron barrels are used. To make a stand - probably not a single good one home master there will be no particular difficulty.
The most difficult thing, probably, again, is to think over the issue of a tightly fitting hatch, which, when open, will allow loading the components of the mixture and pouring water, and when closed, with stirring, will not allow the liquid solution to flow out. Approaches here can be different, but most often they use a door on welded hinges, the opening for which is sealed with rubber around the perimeter.
Some creative masters somewhat complicate the design, in order to improve the quality of concrete mixing. So, for example, to increase the amplitude of differences in height, the barrel can be placed not along the “correct” axis of the cylinder, but diagonally.
Of course, it is somewhat more difficult to rotate such a concrete mixer, but on the other hand, the uniformity of mixing the solution will be achieved faster.
Combined principle
So, it was mentioned above that the gravitational principle of mixing in its “pure form” does not differ in productivity and high quality of the batch. Surely there will be objections - after all, it is believed, and many sources state that most of the usual concrete mixers with an angled rotating drum use the gravitational principle. One can agree with this, but only by making one very important remark.
In such mixing devices, the blades are necessarily rigidly fixed on the inner surface of the working drum. Their configuration and size are thought out by the designers. During rotation, these blades move relative to the solution tending downward under its own weight. Thus, in this case it would be more appropriate to talk about the combination of two principles - both gravitational and forced. And indeed, this is how the vast majority of cooking devices are arranged.
There are several advantages right away:
- No sealing is required, neither the drum itself (it is constantly open at the top), nor the rotation unit (since no contact with the solution is expected here).
- Part wear is much less.
- Such concrete mixers are simple and reliable in operation, easy to maintain.
- There are practically no restrictions on the component composition of the solution - crushed stone, gravel, expanded clay, etc. can be used.
The manufacture of a concrete mixer of this type will be discussed in more detail.
By the way, let's go back for a minute again to those simple concrete mixer-barrels, which were mentioned above. If you show a little ingenuity, then they are also very easy to upgrade, dramatically improving both their productivity and the quality of the mixed solution. To do this, it is enough to triple the blades or some other artificial obstacles on their inner surface.
One of the options is shown in the diagram. In this case, a comb was used, which is easy to weld from a corner and trim a reinforcing bar. Two such combs will immediately transfer the concrete mixer from the category of gravity to the “family” of more advanced, combined ones.
Vibratory mixing of mortar components
Not so often, but still, some enthusiasts try to apply the principle of mixing the concrete solution using vibration. In industrial conditions, such installations give excellent results, they are used for the manufacture of highly precise reinforced concrete parts with the highest performance characteristics.
And at home, the craftsmen try to use a powerful one as a drive (the main thing is that its vibrational action is independent, it does not require pressing the cartridge against an obstacle).
It turns out something like this scheme:
1 - the body of the container in which the components of the solution are mixed. Preference is given to round, not too large in radius, but high tubs ( barrels).
2 - a bracket is rigidly attached to the body, in which the vibro-impulse generator is located, in our case - a perforator (pos. 3).
The power of the perforator should be at least 1.3 - 1.5 kW. Even this will not give a guarantee of success, and with less drive force, it is not worth trying.
A long rod (pos. 4) is inserted into the perforator chuck, which is connected to a vibrator (pos. 6). This rod must be of such length that the disk vibrator is approximately in the center of the prepared solution layer height (pos. 5).
It seems to be - everything is simple, but far from always such a scheme shows good results. Mistakes, most often, lie in the neglect of seemingly small nuances:
- A flat vibrator simply will not work. A shape is needed that will propagate vibrations in a dense medium from a central point almost spherically to the periphery. There should be something spindle-shaped, similar to two plates connected together with the bottoms out. In principle, this is one of the solutions - two metal plates mounted on an axis.
- The vibrator diameter depends on the drive power. In calculations, one can proceed from their approximate proportions: 150 ÷ 200 mm per 1 kW of puncher power. So, if we take a 1.5 kW puncher, then we prepare "plates" from 225 to 300 mm in diameter.
- The diameter of the cylinder itself should be such that from the outer edge of the vibrator, placed exactly in the center, to the container wall there is a distance approximately equal to the radius of the plate.
- To create vibration waves that can cope with the mixing of the cement-sand mixture, the level of the solution above and below the vibrator must necessarily be approximately equal to the diameter of the "plates".
Vibratory kneading of concrete mixes gives excellent quality of a solution. The process is very easily monitored visually - from active stirring, movement, bubbling - to a flat, rippling surface (ready-made solution). But, you must admit that for this you need to observe a lot of specific “whims”. And yet - "heavy" solutions with gravel or gravel in this way are also problematic to prepare. So this method does not find wide application among private traders - it is easier to make a concrete mixer according to the "classical" scheme.
Independent production of a "classic" concrete mixer
It is necessary to immediately warn "hot heads" - not everyone can take on the manufacture of such a concrete mixer. Although in many articles there is a “bravura motive” that it is both easier and cheaper than buying a ready-made one, you should not believe it.
- Firstly, you should not start such work if the owner knows about the art of welding only by hearsay or does it in this field.
- Secondly, the work will be profitable if most of the components for the manufacture of concrete mixers can be found among unnecessary things in their own household, from neighbors or even in a landfill.
- Thirdly, the existing experience in design, production of plumbing, welding, electrical work and the available inexpensive or generally free materials should be multiplied by the expressed desire to make a concrete mixer on their own. There is a fairly large category of people who are eager to try to do everything with their own hands - this is a task just for them. If you start work without fulfilling such conditions, simply cherishing the ephemeral hope of saving something, then it’s better not to start. Time and materials will be wasted, and it will be much cheaper and easier to purchase a small and inexpensive concrete mixer - fortunately, the choice is quite large.
The general scheme of concrete mixers is approximately the sameIf we consider almost any of these concrete mixers, then three main structural units are always clearly distinguished:
- The container itself (badya), in which the solution is mixed, with all the additional mixing devices in it.
- Frame (frame, frame), which serves to place on it a mixing tub, an electric or manual drive, controls and, if necessary, means of movement. The frame must provide a movable hinged fastening of the container, the degree of its freedom both around its own axis and relative to the horizon with different angles tilt. The structure itself may be stationary, or it may be wheeled for movement around the construction site.
- The drive is a mechanism that ensures the rotation of the mixer tank around its axis. In most cases, an electric drive is used. For small concrete mixers a manual drive may be sufficient. It is possible (infrequently) to meet options for installing internal combustion engines (gasoline or diesel) - then the concrete mixer will not be dependent on the power supply. Any drive transmits torque with the number of revolutions necessary for the kneading technology through the gearbox (there are no restrictions - the craftsmen use any type of gear - gear, belt, worm, etc.).
Now consider the manufacture of all these nodes separately.
mixing tub
In the manufacture of a mixing tank, it is assumed that during operation it is usually filled to a maximum of 30 - 40% of its total volume. Usually these tubs are made with a volume of 100 to 200 liters. If these limits are exceeded, it will be difficult to independently create a reliable stable frame and supply a home-made concrete mixer with such a powerful drive. With small volumes of the tank, both assembly and operation of the concrete mixer often become simply unprofitable.
Prices for concrete mixers Enkor
concrete mixer Enkor
The easiest way, of course, is to find a ready-made container that is suitable in terms of volume and dimensions as the main mixer. Immediately asks for se the same metal barrel.
The easiest approach is again a metal barrelThis option is quite possible, however, for a good concrete mixer, the cylindrical shape of the tub is not optimal. A lot of unmixed solution may remain in the corners around the bottom, and splashing out of the solution from above during stirring is not ruled out.
Do smooth transition d on to the walls - the task is very difficult, but probably any master can give the barrel a pear-shaped shape. Triangular cutouts are made on top, and then the remaining "petals" are welded so that a uniform narrowing is obtained.
Improved barrel - made narrower in the upper partAn interesting solution was found by a craftsman who decided to adapt plastic barrel. And why not? Smooth curves of the form - what is required for the capacity of the concrete mixer. It is quite possible to attach the blades to its inner surface, and from the outside below - an axis with a rotation transmission mechanism not by welding, but by screw connections. But what a huge gain in terms of the mass of the device itself!
The original approach - a plastic barrelAs a result, the designer of this model even managed not with a steel frame, but with a mobile wooden base- wheeled trolley.
The height of a standard barrel for use as a concrete mixer tank is still too big, complicating the alignment of the entire unit. Please note that in such cases, support rollers are usually used for stabilization - a high tub, as it were, rolls along them, resting on its upper part.
If there is no suitable container, but sheet metal with a thickness of 2 ÷ 3 mm is available, then you can try your hand at making the container yourself, giving it all the necessary shapes.
In order not to be unfounded, for those owners who consider themselves a master in welding work, you can offer an interesting drawing for the manufacture of a "classic" concrete mixer with a drop-shaped bucket.
The general dimensions of the tank, without the connection unit with the reducer - 400 ÷ 500 mm. It would seem - a little, compactly, but even only in the cylindrical part about 30 liters of mortar are placed - a completely acceptable indicator for a household concrete mixer.
1 - automotive wheel hub. You can make this part yourself, but it’s still easier to use the finished one.
2 - the bottom of the tub. It is cut from a steel sheet, preferably 5 mm thick. In the figure below, this position is shown separately in an enlarged view. Holes (8 PC, with a diameter of 6.5 mm) must exactly match the holes on the hub (pos. 1 ).
3 - the cylindrical part of the tub (shell) is welded from a steel strip bent into a ring, 2 mm thick, 150 × 1580 mm in size. All welds during the assembly of the tub are made solid, sealed. It is advisable to reinforce the shell from above with a metal bandage ( ribbon).
4 - the conical part of the tub is welded from four identical parts. Their dimensions, including the radii of curvature in the upper and lower parts, are shown in the figure.
5 - along the upper edge, the edge of the tub flares outward, and By circle, a steel bar with a diameter of 10 mm is welded (well shown in the diagram - node A ).
6 - “blades” are welded inside the tub - solution dividers. In this case, the structure shown in the diagram, made of a reinforcing bar with a diameter of 16 mm, will be quite enough. Such dividers are made in 3 pairs and welded evenly around the circumference, through 120 °. By the way, they should give the tub additional strength. In each pair - one straight divider coming from the bottom in the neck, and one - bent at a right angle.
bottom node ( B), which includes, among other things, the already mentioned hub and bottom, is better shown in a separate, enlarged drawing.
7 - bolts connecting the hub to the bottom. The nuts are on the outside. Between the parts there is a rubber gasket at least 2 ÷ 3 mm (pos. 11).
8 – a screw with a washer that secures the hub to the gearbox output shaft (pos. 9 ). A key prevents the hub from turning on the shaft (pos. 10 ).
Lower connection block ( B) is prepared, tried on, but mounted only after the frame is assembled and the drive and gearbox are installed on it. In principle, this will be one of the final operations - on the node already mounted to the gearbox B will "sit down" on the screws of the concrete mixing tank.
All welds must be free of scale and carefully checked to ensure that full impermeability tubs.
Video: homemade concrete mixer with a bucketwelded from a steel sheet
concrete mixer frame
In the manufacture of frames or carts for concrete mixers, the ingenuity of craftsmen is also quite welcome, who can adapt metal parts and wheels that are unnecessary in the household for this design.
Frames can be wheeled - that is, it will not be difficult to transport them to the right place. You can also make a stationary, fixed frame - it is easier to manufacture, and in a suburban area, usually any large movements of the concrete mixer are not planned.
The frames may also differ in the degree of freedom provided by the mixing tub. So, the container can be installed pivotally, with a change in the angle of inclination of its axis to the horizon as necessary - for solutions of varying degrees of "severity", for pouring out ready-made concrete, for washing the container, etc.
A simpler option is when the bucket on the frame always occupies one position, and the entire concrete mixer leans forward to unload the solution - like a wheelbarrow (as shown in one of the figures above) or children's rocking chairs on arched skids.
Video: homemade concrete mixer with a swing frame
However, we will continue to consider the drawing of a concrete mixer, the manufacture of the mixing tub of which was described above. It is possible to go this route as well. Drawing, for ease of perception and for greater clarity in the dimensions and layout of parts, is presented in two projections.
Concrete mixer - front viewAssemble such a frame from ordinary and shaped pipes and scraps sheet metal- for an experienced locksmith - welder will not be something extremely difficult at all. Meanwhile, this design is well tested - it is not heavy, but it ensures reliable stability of the concrete mixer in the transport and working position, ensures maximum ease of operation.
She is a side view.1 - this is the same tub that was described in the last section of the article.
2 - handle-lever for setting the bucket in the desired position and for tipping it when unloading. For a lever, you can use steel pipe½ inch (½ʺ).
3 – a gusset cut out of 3 mm steel (s 3) ensures that the lever is securely fastened to the swivel subframe (pos. 18 ).
4 – metal wheelsØ 350 mm. Usually they are taken from decommissioned agricultural machinery.
5 – persistent legs with thrust bearings, for stable installation of the concrete mixer in the working position. They are made of ½ʺ pipe (pillars themselves) and s3 steel (thrust bearings).
6 - the cross beam of the frame of the concrete mixer. A profile pipe with a cross section of 60 × 20 mm is used.
8 - an inclined beam (pipe 60 × 20 mm), and for its rigidity - a strut (pos. 7 ) connected to the cross beam. For strut - pipe ½ ʺ.
9 – a panel to which the electric drive control elements will be attached. The panel is cut from s3 steel.
11 - wheel axle. It is made from a metal circle Ø16 mm - according to the size of the mounting hole available wheels.
12 - longitudinal beam of the bed of the concrete mixer. profile pipe 60 × 20 mm.
13 - vertical stand. Profile pipe 60 × 20 mm.
14 – an eye of hinged fastening of a rotary subframe. Two parts are made, from s5 steel.
15 - transmission gearbox. IN this option- ready-made assembly, worm type, with a gear ratio i = 17.
16 – safety clutch on the drive shaft.
17 – . Specifically, in this concrete mixer model, the developer used a three-phase drive (380 V), with a rated power of 1 kW, and a rotation speed of 950 rpm.
18 - a swinging subframe, on which both the electric drive with the gearbox and the mixing tub itself are mounted. It is made from the following parts: two spars from a ¾ʺ pipe, four crossbars from a corner 35 × 35 mm.
19 , 20 And 21 – electric drive controls: start button, capacitor box and power cord with a three-phase socket, respectively.
Now - a slightly larger node A, which ensures the installation and fixation of the mixing tub in the desired position.
On the stretcher (pos. 18 ) welded eyelet (pos. 22 ), and on an inclined rack (pos. 8 ) – sector (pos. 10 ). Both the eyelet and the sector can be made of s3 steel. The selected position is fixed with a pin (pos. 23 ), and so that it does not get lost, it is recommended to hang it on a chain.
The number of fixed positions in the sector may be different. However, it is usually sufficient T rex:
- at an angle of 50 ° to the horizon - for mixing heavy concrete mortars;
- at an angle of 30 ° - for the preparation of light mortars (for example, masonry);
- horizontally - for washing the tub.
After the frame is assembled, all welds are beaten off from slag, the parts must be cleaned of corrosion pockets. Then it is recommended to cover the structure with high-quality paint for metal. The rubbing components of the frame (subframe suspension in the frame lugs, wheel axles) are generously lubricated with ordinary hinged grease.
In the considered version, the drive and the gearbox unit are attached to the subframe (so that exact alignment is observed). After checking the performance (trial run), you can finally assemble the concrete mixer by putting it in place and fixing the mixing tub with bolts.
A few words about the drive
In the example under consideration, the electric motor and gearbox already recommended by the model developer were used. However, in the practice of self-manufacturing concrete mixers very widespread there is a situation when the master “on the go” selects a drive from what is available and comes up with a way to transfer torque to the mixing tank.
It is customary to calculate the required power of the electric drive, based on the ratio of 20 W per liter of solution for a scheme with an inclined bucket. (In a horizontal arrangement, for example, in models with a barrel on a horizontal axis, 15 W / l will be sufficient). You should not forget about this ratio so as not to overload the drive. For example, if the engine in our case has a power of 1 kW, then more than 50 liters of solution should not be mixed, regardless of the size of the tub itself.
Thus, often they begin to manufacture the tub itself, starting from the parameters of the drive, which is planned to be put on a concrete mixer.
The rotation speed of the mixer tub must also be within certain framework . So, it is considered optimal from 30 to 50 rpm. To make the speed less - to deliberately delay the process of making the solution. And if the speed is too high, then spraying of the solution will begin.
Find a ready-made gearbox that would meet the requirements both in terms of dimensions and gear ratio- doesn't always work. Therefore, many masters find their own, sometimes very original ways transmission of torque with the provision of the desired angular velocity. In the variant that was considered, the mixer is planted directly on the driven axle of the gearbox. However, often the bucket is mounted on a free axle, and the torque laneeaten on it with a gear, belt, chain drive. For example, here are some original solutions:
Instead of pulleys - bicycle wheelsHomemade gearbox - drive from an old washing machine transmits the rotation of belt drives through the pulleys of their gears and old bicycle wheels.
The simplest frame with a homemade gearboxFixed frame for a concrete mixer with a homemade gearbox.
Homemade gearbox, which combines a belt and two chain drives. Again, not without bicycle parts.
A small-sized concrete mixer, the rotation of which is transmitted to the bucket directly through a belt drive. The pulley is structurally placed on the mixing tank itself.
Very often, car parts that are unnecessary in the garage are used. A popular solution is to use a flywheel with a ring gear. By the way, it is very easy to find a drive gear in a pair for it - from the bendix of a car starter, since they are " made for each other".
The flywheel can be fully assembled welded to the bottom of the tub.
Another option is when only the ring gear is used. Probably, it is not necessary to say that in this case, its very careful centering will be an extremely important point.
In a word, a thrifty owner can very often find details for his own original solution the issue of manufacturing the desired gearbox. Perhaps the options shown will be a good hint for someone.
Video: another design option for a concrete mixer
Prices for concrete mixers Stroymash
concrete mixer Stroymash
If everything worked out, then the owner can be congratulated on the successful acquisition of a good “assistant”. But in order for the concrete mixer to last longer and not cause any emergencies, you need to follow certain rules:
- Like any equipment associated with the consumption of electricity, a concrete mixer requires compliance with electrical safety rules. And in this case, this issue is even more acute, since operation is always carried out in conditions of high humidity and a high probability of water splashing. That is, all cables and contact connections must have the most reliable insulation, which completely excludes electric shock or short circuit.
- The operation of a concrete mixer is always associated with high levels vibrations. This leads to loosening of threaded connections, which means that they need to be checked and tightened regularly. At the same time, one should not forget to control the safety of other assemblies and parts, welds, etc.
- Before starting work, you need to make sure that the installation of the concrete mixer is reliable. It should rest firmly on all of its standard stands. If the structure is mobile, then wheel chocks (wedges) are placed under the wheels.
- Never, under no circumstances Not Do not leave a working concrete mixer unattended. Curious people should not be allowed near it, and even more so - children.
- When working, it is better to use protective equipment for the skin and eyes - since the cement acts quite aggressively on tissues and mucous membranes.
- Checking the quality of the resulting solution with a shovel or stick while the concrete mixer is running is the height of imprudence! Very often, such actions end in a serious injury to the hands or face.
And in conclusion of the article - proof that there are no limits to creativity when creating home-made equipment.
Video: homemade concrete mixer based on an old T-16 tractor
This article is suitable for any amateur builder who, in his free time from his main job, is trying to equip life in his summer cottage. Construction is indispensable without concrete. Even if you are building a house from wooden beams, you will definitely need a reinforced concrete foundation or piles. And having kneaded a concrete solution a couple of times with your hands in a bucket or trough using a drill or a shovel, an inquisitive mind begins to look for less labor-intensive ways.
There are several options. You can order home delivery and the next day the truck mixer will bring the required number of cubic meters. Perhaps this option is not entirely economical. More hardworking owners can buy a concrete mixer, it is compact and equipped with an electric motor for mixing the solution. Throw cement, sand, water and gravel into it in the right proportions, and only manage to release the concrete mixer by pouring the solution out of it. It is cheaper, but you still have to buy such a concrete mixer.
But there is another option: to make a concrete mixer with your own hands. Yes, it is possible if there are drawings. You will spend time on this, but it will more than pay off for you. Moreover, the device is not as complicated as it seems at first glance. The concrete mixer has a simple principle:
- there is a tub or something like a flask where the solution is mixed;
- drive, that is, the mechanism by which the tub rotates and mixing occurs;
- frame that holds it all together.
The concrete mixer has additional small parts, which will be discussed below, but these three are the main ones. And now let's delve into the nuances of making a homemade concrete mixer.
What is a concrete mixer
According to the mixing method, concrete mixers are mainly divided into four types: gravity, mechanical, vibration and combined. Let's talk a little about each, so that you have a little idea about it and so that you can choose the right one for yourself. After all, it can be used for absolutely different needs: basically this is the foundation (of a house, a fence and much more), but various building materials can be molded from it in shape. Blocks of cement, wood concrete and other things.
Gravitational
A unit of this type is the easiest option both to manufacture and to use. Do-it-yourself manual concrete mixer, the tub of which simply rotates along the axis, and the components of the mortar are mixed under the action of gravity. For large volumes, this option is not suitable, because it does not provide good mixing. But if you always knead the solution in small quantities and you didn’t need more, then this option may well be suitable.

Mechanical
Such a home-made forced-action concrete mixer in its pure form is rarely used, because it has a number of disadvantages. It looks like this: a barrel in a horizontal position with a hole at the top for the entire length. The axis runs along the center of the barrel, and metal parts are welded to it, which mix the solution. The hole does not allow you to turn the barrel in only one direction and have to swing it from side to side. Compared to gravity, it has a larger volume, which is a plus. The disadvantages are: poor mixing in the corners and splashing of the solution at high vibrations.
Sometimes mechanical concrete mixers are made absolutely motionless, only the axis inside it moves, to which metal dividers are welded. This design is well suited for the manufacture of wood concrete blocks. We will talk about this below.

Vibrating
Making this type of manual concrete mixer with your own hands is not such a simple matter. The basic principle is that the solution remains stationary and all the mixing work is done by the vibrator. There are many nuances here, which, if not taken into account, will only lead to wasted time.
The tub must be round, not wide, but high, similar to the shape of a Soviet washing machine. The vibrator should be of a strictly defined shape, similar to two low plates stacked together. Actually, at home, two metal plates are the best option. The vibrator should not be too large, its size depends on the volume of the mixing vessel. If you overdo it in choosing the size, then even with visible work, it still will not mix. And the last thing: the location of the vibrator inside the vessel is strictly along the axis, the distance to the bottom of the barrel is equal to the diameter of the vibrator.
If all these conditions are met, the ideal solution from your barrel is guaranteed. But with poor quality sand or cement, it will take a little longer to mix. One minus: high power consumption. And in no case do not try to use a perforator as a barrel vibrator. Many craftsmen tried to make a concrete mixer, but most often failed.

Combined Concrete Mixer
This type of concrete mixer is a combination of gravity and mechanical installation. The solution rotates in a horizontal or inclined plane, and protrusions are made inside the vessel itself, which additionally help to mix the components. They are usually made of metal plates of various shapes, which are welded to the inside of the flask. This type of concrete mixer allows you to mix a large volume of mortar, the mixing quality is also good. Weld plates in a concrete mixer will not amount to great work, so this type is the most widely used. In the future, we will talk about this type of concrete mixers.
We manufacture a concrete mixer
The theory is over. Let's get down to practice. Now let's take a closer look at how to make a concrete mixer with your own hands. This process must be divided into several stages. We know that a concrete mixer consists of three main components: a mixing bucket, a drive, and a frame. If everything is clear with the drive, it can be either manual or mechanical, when a concrete mixer uses a gearbox and an electric motor, then we will dwell on the manufacture of the tub and frame in more detail. If there are drawings at hand during work, it will be generally wonderful.
Making a tub
The most popular item used as a mixing vessel is standard 200 liter drums. With some reservations, it is suitable for any type of homemade concrete mixer. You can use the body of the washing machine if it is strong enough. But that would be too easy, our goal is to make the tub ourselves.
First, the material. For walls, we take metal with a thickness of at least 2 mm, for the bottom - at least 5 mm. Secondly, the form. It is cylindrical, but at the top in the neck area should narrow in the form of a cone.
Let's write down the sequence of actions point by point:
- We make a flange-hub. You can find her drawings and make it yourself, but it's better to buy a ready-made one. The detail is important, but not easy to manufacture.
- We make the bottom of sheet steel with a minimum thickness of 5 mm. In the very center we drill holes and attach the flange-hub.
- We cut out five main parts of the body from metal 2 mm thick - a shell (it folds up and a cylinder is obtained) and four petals, which are then fastened together to form a cone.
- We connect the bottom, shell and cone with welding machine and get the base of the barrel for mixing.
- We strengthen the neck so that later it does not deform. To do this, we weld a reinforcing bar of 10 mm to its circumference.
- Inside the barrel we weld crosswise cutters. Usually two or three is enough. They are also made from reinforcement, but more durable, or from metal plates. The main thing is to bend them at a right angle. They will mix the solution. In addition, due to them, a homemade concrete mixer will be stronger.

When the tub-mixer is ready, you can start making the frame.
Frame manufacturing
The frame is the backbone of the entire structure. A bucket, a drive and a gearbox are attached to it. For good stability, the legs of the support are welded, and to make it easy to move the concrete mixer, even when filled with mortar, wheels are installed. The frame design itself can be different, the main thing is to maintain stability during the operation of the entire device. Many craftsmen for this adapt various unnecessary metal parts collected in the corners of their summer cottage.

- The concrete mixer is based on a T-shaped design, due to which a home-made concrete mixer will stand steadily on the surface. The first post is vertically welded to it.
- A transverse beam is welded to the second rack, along the edges of which wheels are attached.
- Both racks are fastened together at the bottom with a beam (this makes the structure more stable) and at the top with a stretcher, which will later serve as the basis for attaching the tub.
- The frame is reinforced with an inclined rack, to which the capacitor box and the starter are attached. These two devices serve to turn on the rotation mechanism.
- The subframe is made of two pipes and a corner. It looks like a double frame, fastened with jumpers.
- An electric motor and gearbox are installed on the subframe.
- The hub flange, which is already attached to the tub, is put on the gearbox. To fix the mixer, a key is used and it is finally fixed with a bolt through a hole in the shaft.
- A handle is attached to the subframe, which allows you to tilt the mixer tub at different angles.
- In conclusion, the frame is protected from scale and covered with paint for metal. The tub can also be painted, but only on the outside, inside the barrel is not necessary.
Now the do-it-yourself concrete mixer is ready for use! You can pour the foundation, install pillars, pour forms of building blocks from wood concrete and much more.

Drive for homemade concrete mixer
In practice, it often happens that the master already has an electric drive and a gearbox of a certain power, and the concrete mixer and its parameters are selected based on this. The ratio of the volume of the mixed components and the power of the electric motor should be approximately as follows: 20 W per 1 liter of solution.
That is, if you have a 1 kW engine at your disposal, then the maximum volume of the mixture should be 50 liters. Given that the tub must be loaded by 30-40%, then its approximate volume can be from 125 to 160 liters. For standard 200 liter barrel a gearbox with a 1.2 kW electric motor is suitable, the load will be equal to 60 liters of solution.

The number of turns is also important. Optimum value: from 30 to 50 rpm. If you do more, then the solution may splatter. You can do less, of course, but then the mixing process will be long, and excess electricity will be consumed.
If there is no electricity
There are times when you need to start construction on a site where electricity has not yet been installed. Then we do not need the engine, but we will use manual power. The sequence of actions in the manufacture remains exactly the same, only the drive is replaced by two handles - on one side and the other. The disadvantage is that it takes more effort to mix and it will take more time. But for short and small works, this option can be considered quite acceptable.
Washing machine tub
You can make a tub out of a washing machine if you have it lying around since Soviet times. Moreover, the body of almost any washing machine is suitable for this. You just need to solder all the holes in the drum of the old washing machine. For this, a machine with both horizontal and vertical loading is suitable. There is another feature of this option. If the amount of mortar that you are going to mix in the future concrete mixer is not too large, then the washing machine engine will fit perfectly as a drive.

Using a concrete mixer
A concrete mixer is rarely used in one place. Often you have to drag it or roll it around the site, so prepare an extension cord of sufficient length in advance. Components are loaded into a tub with an inclination of 20-40 degrees in the following order: water, cement, sand, and lastly crushed stone, gravel, expanded clay are poured.
For complete mixing of the concrete solution or a mixture of wood concrete, 3 to 5 minutes are enough, then the bucket is tilted with the handle, and the solution is poured into the place prepared for this. You can immediately fill in a new portion of the components and continue working.
After a hard day's work, the device, all its connections and seams must be thoroughly rinsed. Usually this happens already in the evening, when there is not much strength left and you want to leave everything, because the next day it will again have to be dirty. Don't be lazy. Even in such a situation, it is better to rinse the concrete mixer, this will increase its service life.
Wood concrete blocks consist mainly of two components. In addition to various chemical additives, this sawdust and chips, as well as the hydraulic binder Portland cement. Such blocks are valuable because houses made of them perfectly retain heat. Therefore, wood concrete blocks are an excellent solution for building walls. warm home. As for the properties of wood concrete, it is low thermal conductivity, increased bending strength, does not support combustion, and is easy to process.

Imagine that everything worked out for you and now you are the owner of a very useful thing in construction - this is a concrete mixer. But so that its service life does not end with one foundation or a set fence, and the thing serves you for a long and long time, you will have to follow the safety rules and take care of it:
- Pay close attention to cables and contact connections. They must be securely isolated. The work takes place in conditions of high humidity and water splashing, so the requirements of electrical safety rules come first;
- The vibration that accompanies the operation of the concrete mixer loosens the threaded connections of your makeshift bucket. Therefore, periodically check them and tighten them. And do not forget about the welds, they can also be broken;

- Before turning on the machine, make sure it is stable. All regular stands should rest firmly on the ground, and it is desirable to install wheel chocks under the wheels;
- It is impossible to check the quality of the solution during the operation of the concrete mixer, there are frequent cases of serious industrial injuries;
- Use skin and eye protection;
- Never leave a running concrete mixer unattended.
Conclusion
In conditions of total savings, when the budget for construction works limited, and this is no wonder these days, many save on quality building materials or on the services of third-party masters. But there are craftsmen who also save on construction equipment. Of course, make a drill or electric planer- a dubious occupation. But the concrete mixer, despite its apparent complexity and bulkiness, is ideal for this, even for home production blocks from wood concrete. You could see this in our article.

Let's summarize. A small number of parts, some of which can be found right on your site. Homemade concrete mixer It has a simple circuit, drawings and manufacturing sequence. You will also need a few tools: a grinder, welding, work with a drill, and, possibly, a soldering iron. From consumables: bolts, nuts, washers, metal sheet and corner. The main thing is to clearly define in advance why you need it and what you want to see as a result of your work. Then your concrete mixer will not be inferior to any industrial production, even if it is made from the body of a washing machine.
Any concrete mixer (including a mixer based on a Kamaz truck) is designed to optimize, facilitate and speed up the workflow at a construction site. Sometimes it is more expedient to order Kamaz with a ready-made solution. In some cases, you can prepare concrete manually. But even if the volumes of the solution you need are small, and you have enough strength to mix the mixture in the trough with a shovel, our good advice to you is to buy a concrete mixer or rent it. The device of a concrete mixer depends on the expected load, the time of continuous operation and the amount of mortar.
Classification of concrete mixers
All devices designed for the preparation and mixing of concrete mortar, according to the principle of their operation, can be divided into two main types:
- gravity;
- forced type.
The principle of operation of a gravity-type concrete mixer is based on the rotation of the drum, on the walls of which the divider blades are rigidly fixed. When the drum rotates, the blades pick up the mixture and lift it up, preventing it from sliding over the surface of the container; under the force of gravity, the components fall down and again rise up with the blades. Thorough mixing of the solution is carried out by repeated repetition of the process.

How a forced-type concrete mixer works: the container for mixing the solution is stationary, and the mixing of the solution occurs due to the rotation of the blades fixed on the axis inside the drum. But such devices consume a large amount of energy (for example, a standard 250 liter concrete mixer has a motor with a power of about 5500 W), which makes their use on household plots problematic. Therefore, these concrete mixers are considered professional and are rarely used for domestic needs. In addition, their price is much higher than that of gravitational ones.

Gravity-type concrete mixers with a tank capacity of 100 to 200 liters allow you to get from 60 to 120 liters of ready-made mortar in one batch. They are quite simple and easy to use, which is why they are very popular.
There are two types of drum rotation drive for gravity models:
- coronary;
- gear.
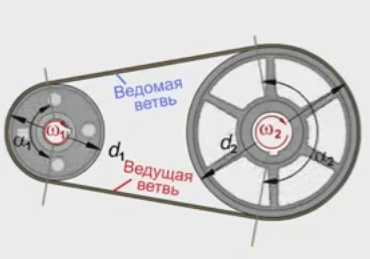
In the first type, the rotation from the engine to the drum is transmitted through the drive gear and ring gear, which is located outside the entire circumference of the container. The disadvantages of such a drive include the wear of the ring teeth that are not protected from external influences, however, the replacement of this structural element is not very difficult.
Gravity-type geared concrete mixers are considered more reliable, since all drive elements are inside protective cover. However, if the gearbox itself fails, it is necessary to replace this element completely, which leads to financial costs. The models with a gearbox themselves are 30-40% more expensive than similar concrete mixers with a crown drive (with the same performance).
The design of a gravity concrete mixer with a drum crown drive
Let us consider in more detail the device of a gravitational concrete mixer with a crown drive, which rotates the drum using an electric, gasoline or diesel engine. Of these, the most common type is an electric motor powered by a 220 V network. In the case when complete autonomy of the concrete mixer operation is required (for example, when electricity supply networks have not yet been connected), models with internal combustion engines are used.
The main part of the concrete mixer is the drum. Blades are fixed on its walls. An axle is attached to the bottom of the drum, which is mounted on the traverse through the bearing. Around the entire circumference of the drum in the central part, a crown (encircling round gear) is fixed, through which the rotation from the engine will be transmitted to the drum.

The traverse with the drum fixed on it is fixed to the support frame (through bushings and rolling bearings). On one side of the frame there is a container overturning mechanism with a latch to create the required working angle and the possibility of unloading the finished solution. On the other side, an electric motor block and a working gear are attached.

The rotation from the engine is transmitted to the working gear (usually by means of a belt drive), which is engaged with the ring gear of the drum. Thus, the rotation of the gear sets the drum in motion and the solution is mixed.

The circuit diagram of a household concrete mixer is quite simple and consists of:
- electric motor;
- starting capacitor;
- start-stop switch;
- automatic protection against short circuits and overloads (for some models combined with a switch).
The electrical part of the concrete mixer is shown in detail in the video:
For many models, the frame is equipped with 2 (sometimes 4) wheels, which greatly facilitates the movement of the device around the site.
The difference between concrete mixers with a gear drive is that an engine and a gearbox are attached to the bottom of the traverse. The rotation from the engine through the gearbox (reducing the engine speed and increasing the torque) is transmitted to the axis of the drum. In all other respects, the design of the frame and the tipping device does not differ from models with a corolla drive.

Some models of concrete mixers are sold unassembled. Detailed instructions for self-assembly are included in the package. If you have any questions, watch the video:
Some manufacturers offer concrete mixers in the form of ready-made car trailers. This greatly simplifies their transportation and subsequent operation.

Main technical characteristics
When choosing a concrete mixer, it is necessary to be guided by its technical characteristics, which include:
- drum volume (the finished mixture will be from 40 to 60% of this value);
- power, on which the time of continuous operation at maximum load depends;
- weight that must be taken into account for transportation and movement around the construction site.
The volume of the drum of concrete mixers intended for individual use, as a rule, varies from 100 to 200 liters. Models of large volumes (250-300 liters) have significant dimensions and rather impressive weight (up to 150-200 kg), which greatly complicates their use. Usually, the owners of their own suburban housing choose concrete mixers with a volume not exceeding 150 liters (the weight of such products is up to 70 kg). The motor power for such devices is 700-1000 watts. Such a load is quite acceptable even for networks of holiday villages (for example, a conventional electric iron consumes from 1000 to 1500 W).
Of course, to speed up the process of large-scale concrete work (for example, pouring the foundation of a future house), you can order a Kamaz (mixer), which will deliver a large amount of ready-made mortar. However, this requires the presence of access roads.

In custody
Having in your arsenal such a unit as a concrete mixer, you are completely independent of the capabilities of the organization that supplies the automobile concrete mixer. You can prepare a concrete solution at any time when it is needed. Moreover, a concrete mixer is a necessary thing in the household.
Any owner of the site wants to equip it as much as possible - to erect the necessary buildings, create flat areas and paths, etc. Often in such cases, concrete is required, and its manual preparation takes a lot of time and effort. You can, of course, buy a ready-made unit for these purposes, but considerable funds will be required. DIY concrete mixer solves such problems(see others for private construction).
A concrete mixer is an installation designed for the preparation by uniform mixing the necessary components of the mixture and ensure the desired consistency of the solution. In practice, four mixing principles are used:
- Gravity method. It is based on the use of the weight of substances, i.e. gravitational forces. The problem is solved in a rotating container (drum). The components that are at the top fall down onto other substances, due to which they are mixed. The repetition of this procedure is provided by many revolutions of the drum. The main difference between the gravitational method is rotation of the entire container with concrete mix ingredients.
- mechanical method. This option is similar mixer. To stir the mixture, you need rotating blades, which descend into it and perform the task. Using mechanical way the working container remains stationary, and the blades inside it rotate.
- vibration method. It can be realized by shaking the components at a certain frequency. Home craftsmen rarely use this technology. due to installation complexity.
- Combined method. It combines the gravitational and mechanical approach. It can be implemented in two ways - independent rotation of the container and the blades located inside it, or rotation of the container only, but with the placement of rigidly fixed blades in it.
Types of concrete mixers and materials used

- working capacity;
- mixing blades;
- drive with transmission;
- body (bed);
- mechanism for unloading the solution.
According to the method of setting the torque, 2 types of installations are distinguished - manual and mechanized.
In the first case, the rotation is done manually, and the transmission increases the speed of rotation of the working body. Mechanization is provided by an electric or gasoline engine.
By working tank design the following main varieties are distinguished.
Milk can (flask)
From such a container, it is quite simple to make a manual concrete mixer. A pipe is passed through the center of gravity of the can, which goes out on both sides. The pipe must be securely fixed in the walls of the flask, for which it is used cold welding.
This design mounted on racks. On the one hand, the pipe is bent to form a handle, for which you can turn the container manually. The second pipe outlet is installed on the frame in the bearing. Suitable for such a simple installation. 40 l standard flask.
From the barrel
If using a metal barrel up to 100 l, That manual installation produced in the same way as the previous one. When a barrel is used 200 l, fits good electric drive.
This design requires a container close tightly with a lid. A shaft is passed through the bottom and the lid of the barrel. When assembled, the container is installed on the racks of the bed so that the axis of rotation is inclined.
A large gear for a chain drive or a belt drive pulley is mounted on the shaft from the side of the bottom of the barrel. Torque provided electric motor with a power of 1-1.2 kW. The window for the ingredients is cut into the bottom closer to its edge. When loading, it is located at the top, and when unloading the solution - in the lower position.

Washing machine option
This Appliances and suggests itself in the basis of a concrete mixer. Most suitable option– . It is better to replace the activator reservoir with a metal barrel.
A shaft of the same diameter is installed in place of the gearbox. On the carving of the machine, the blades and brackets are strengthened, which must be well balanced. The drain hole is plugged. This homemade concrete mixer is quite suitable to prepare a small amount of concrete.
How to do it yourself?
When choosing the design of a homemade concrete mixer, one must proceed from availability of a home workshop and the necessary equipment. You should take care of such a tool in advance: a welding machine, a grinder, an electric drill, a vice, a hacksaw, a chisel, a set of files, pliers, a screwdriver, a hammer, a sledgehammer, a set of wrenches, an adjustable wrench, metal shears, a caliper, a metal ruler.
Working capacity
Its volume is selected based on the need. For example, when building a basement, small structures, arranging paths, it is enough to find sealed tank for 40-60 l, and when building a house, you will need a container with volume not less than 100-120 l.
 Large containers should be made of metal, and for miniature installations, durable plastic can be used.
For home-made devices, any cylindrical, sufficiently strong tanks of the required volume are of interest - metal or plastic barrels, a large saucepan, a tank of a washing machine or heating installations (for example, Ariston), a milk can, etc.
The manufacturing process can be considered on the example of a barrel. The role of mixing elements can be performed comb formed inside the container. The comb is made of a metal rail, to which are welded in a row nails 20 cm long in increments of 8-12 cm.
Two such details are welded along the entire height of the barrel opposite each other. Then, in the center of the bottom and covers are attached on both sides bearing flanges, after which a hole is drilled and a shaft is threaded. To strengthen the shaft entry point, it is recommended to strengthen the bottom and cover by welding cross-shaped rails. The lid is hermetically welded to the body of the barrel. The loading opening can be made bottom or side.
Body and base
The body of the concrete mixer must withstand significant loads during operation, caused by a rotating container with fully loaded solution. The base of the housing must ensure its stability during operation, despite vibrations and torque.
To do this, the width of the support is selected approximately twice as much working container diameter. The drum is mounted on vertical racks, which are reinforced with oblique supports.
For the base it is recommended to use a corner measuring at least 10x10 cm. The tank is installed at a height of at least 110 cm. The lower position makes it difficult to unload the solution. All connections are best provided by welding, but in the absence of a welding machine, it can be provided threaded connection using bolts with a diameter of at least 20 mm. For small concrete mixers, the body can be made of wood - timber and board.
Engine
 IN homemade devices, most often, rotation is provided by an electric motor power 1-2 kW.
It attaches securely to the frame base and is adjustable for alignment.
The transmission of torque to the shaft of the working capacity is carried out using chain or belt drive.
To do this, a gear or pulley of the appropriate diameter is pressed onto the working shaft. It is recommended to keep the drum rotation speed within 20-30 rpm. For this, the required gearbox on the engine is used and the diameter of the driving and driven gears (pulley) is selected.
final assembly
Direct assembly of the concrete mixer is carried out in the following order:
- Enclosure mounting and strengthening the foundation. If necessary, it is weighted.
- Installation and fixing working capacity on vertical racks. Best Option- the shaft is inclined.
- Installation electric motor and its gearbox on the frame so that the output gear (pulley) coincides with the location of the gear (pulley) on the drum shaft.
- Installation and adjustment transmission belt or chain.
- Installation electrical network , starting and controlling devices.
Common mistakes in the manufacture of a stirrer
The experience of using homemade concrete mixers by home craftsmen indicates such typical mistakes allowed in the manufacture:
- Installation of old containers, in which holes quickly form when exposed to the solution. For the working body, it is necessary to select a high-quality tank that is not subjected to severe corrosion.
- Production of details "by eye". During installation, and even worse during operation, inconsistencies will definitely come to light. Everything must be done strictly according to the detailed drawings.
- The combination of cast iron and steel in the body does not give a reliable weld. As a result, they are destroyed by vibration.
- The container is selected taking into account that it can be filled with a solution of only 2/3 of the volume. Exceeding the load leads to engine failure.

Advantages and disadvantages
The main advantage of a homemade concrete mixer is in saving money during numerous works using concrete pouring. It allows you to reduce the complexity of preparing the solution, speed up construction, mechanize labor. Using such a device, you can carry out work without assistants. There is no need to think that the unused concrete will harden in a timely manner and will have to be thrown away.
A homemade concrete mixer also has significant drawbacks. In him there is no way to control the mixing process that is reflected in the quality of the concrete. When building a large object, it will not be able to fully satisfy the need for a solution. The materials used and the craftsmanship can only provide a limited operability of the plant.
Useful videos
Look at a homemade concrete mixer in action:
Barrel stirrer with manual drive, look:
How to do it yourself - all the steps in detail:
A detailed story about the independent production of a full-fledged sheet metal concrete mixer and an engine from a washing machine, see:
People who plan to build their own house make a list necessary fixtures. And it turns out that you can’t do without a concrete mixer. The acquisition of such a device is associated with large cash outlays, so the craftsmen have developed instructions on how to independently assemble such a device. An important factor is the fact that this product is designed for a long and repeated service.
You can be sure that if you carefully follow the instructions, the assembly of the concrete mixer will not take much time. Here are the benefits you get:
- the design involves the use of economical materials (i.e. you do not have to spend a lot).
- even a person without special skills can assemble this product.
- the component parts are not particularly rare. They are easy to find, but be prepared that if they are not in your possession, you will either have to ask friends or buy them.
A homemade concrete mixer includes the following parts: a handle for ejecting concrete, a motor, a frame, a container for concrete. If you intend to transport the concrete mixer from place to place, then you should also assemble an appropriate mobile structure based on a trolley with wheels.
First you need to consider a plan for the upcoming work, namely, draw a drawing of a concrete mixer, decide what components it will consist of.
There is no doubt that a bucket will be part of the concrete mixer. You will have to find a container or vessel of large volume.
- Perhaps it will be one of those barrels that often stand on personal plots (both metal and plastic will do).
- Sometimes there are also very large, multi-liter pots, which are also suitable for concrete.
- Round capacious tanks, like the "titans" used to make tea on trains.
If you could not find such a container at home or with friends, then you will have to work hard - to make it yourself. At the same time, save a lot of money, because in the store such products are not cheap.
It should be noted right away that for comfortable operation of the concrete mixer, a capacity of 200 liters is required. and more. Then you do not have to unload and unload it, but immediately prepare the right amount of the mixture.
 In particularly unfavorable conditions, people manage to make concrete by persistently mixing the mixture with a shovel. But it's hard, exhausting work. After all, the composition of the mixture includes cement, sand and water - the substance turns out to be viscous, and the end result can be worse than if you use a concrete mixer. But some old container (for example, a 200-liter barrel) will become an essential part of the concrete mixer and save you from torment.
Consider two options for making such useful device. So, in the first case, you will rotate the concrete mixer with your own hands. Which, however, is much easier than doing it without this device at all, with a shovel. The second option is more “advanced”, it uses an engine (electric or gasoline), but, accordingly, more costs will have to be applied.
If you decide to make a concrete mixer without additional traction, then you will need a shaft and a barrel. Handles are fixed on both sides of the shaft. You turn these knobs, and the shaft rotates with the barrel of mixture that is skewered on it.
The assembly sequence is as follows:
Now consider the option if you decide to use the engine. 
In this case, the engine torque will go through the belt to the pulley, and from the pulley, fixed instead of the handle, to the shaft. The rest of the details are the same as when using manual traction.
Maybe you'll like it better vertical version this design. To do this, do the following:
- Place the frame with the motor on the base. She will provide turns.
- The barrel turns due to the shaft and special rollers on which it rests.
- In order not to make it difficult to turn the device over, a handle is welded to the frame axis, and the frame itself is removed.
Typically, such an advanced model of a concrete mixer is stored and used for its intended purpose in a special protected place. It can be a garage, a shed, a spacious utility room - the main thing is that there should be electrical wiring.
Not everyone has welding equipment, and not everyone knows the skills of this craft. In this case, the frame is made of an iron corner, and the concrete mixer itself is bolted. If you have an old washing machine, then the engine from it will fit this device. Also, if you find an unnecessary drill with a working 1.3 kW motor, you can use it. A regular petrol engine will do just fine.
frame
 The greatest load of our structure will be taken by its frame. After all, when the bucket rotates, a load is formed, which significantly supplements the mass of concrete. At the base of the frame, a steel angle with parameters of about 110-130 mm is required.
If welding equipment is not available, you will have to get by with 27 mm bolts (or better, even larger ones). Using bolts with a smaller caliber is highly discouraged, because. they may not withstand the upcoming heavy loads. But in any case, frame welding remains a more reliable option.
Try to find a 1.3 kW motor. Some craftsmen who do not have such a device manage to connect two motors with identical speeds and torque. But a small failure of one of them can lead to a total breakdown.
Reducer
Rapid mixing of concrete is unacceptable. It is recommended to do about 35 revolutions per minute. Most engines are designed for high speed. Slow engines are extremely rare in specialized stores. So it would be optimal to use a fast engine, supplemented by a gearbox.
Belting
 This is the most economical and easiest way to manufacture a gearbox. You will need pulleys and belts.
If you need to reduce the speed from 1000 to 35 per minute, then you need to divide the actual number by the desired one. So, 1000/35 = 28. Therefore, the diameter of one pulley must exceed the diameter of the second by 28 times.
Suppose the diameter of the small pulley is 3 cm, then 3 * 28. It turns out 84 cm - this should be a large pulley.
chain drive
If you decide to use a chain drive, then the principle of its device is the same as with a belt drive. The only difference will be that the calculations take into account not the diameter, but how many teeth in the small gear.
Gear
If you have a ring gear from an engine old car, or better - a gearbox, then it can be used for gearing.
The sequence of actions is as follows:
- Flip the barrel.
- Place a hardened steel disc (crown) in the middle of the bottom
- Mark the places you need.
- Set aside the crown and use a drill to make holes in the marked places.
- Fasten the crown with bolts as tightly as possible.
But if it is possible to weld a crown, this will be the best option.
If you have already installed the crown, then to install the gearbox, you must perform the same steps. Those. you make marks, make holes, fasten as tightly as possible with suitable bolts.
The next step: mounting the barrel, inside which the blades are already welded or screwed. Use for this metal corners or sheets.
For reliability, it is required to replace the last pulley or gear wheel with a special gear located on the starter (bendix) of the car. If you have not done this before and do not want to make a mistake, delve into the documentation. It is this gear that is designed to accept and withstand the greatest load when the bucket loaded with concrete rotates.
Steering wheel
If you are making a vertical concrete mixer, then to unload concrete from it, you need to make a steering wheel
Your choice of the following options for its creation
- use a pulley or wheels (you can use old ones)
- a piece of pipe with thick walls will do.
If we have selected a suitable pulley or wheel, then we drill several holes along their circumference (your choice - 6 or 8). The minimum diameter is 6 mm, but it is better to do more. The holes are threaded. Even long bolts can act as handles (but in this case it is necessary to cut their heads and cut threads of more than 10 mm), but threaded rods or metal handles are better suited. They must be screwed into the holes on the wheel or pulley.
The manufacture of a handwheel from a thick-walled pipe is almost the same as in the case of a pulley and a wheel. Sometimes, if the pipe diameter is too small, some handles are set with an offset.
In the event that it is not at all possible to make a steering wheel, then the concrete is removed with a shovel. This is a more time-consuming, but also effective way.
The most important part of the concrete mixer will be the tub. She needs to give Special attention. Well, if you have a suitable container. And if not, you have to do it yourself. You will need a metal sheet 2 mm thick. A development of a large truncated cone is drawn on the back of this sheet, and a development of a small truncated cone is drawn on the back. You also need to draw a circle for the bottom.
Then you need to cut this scan, bend and connect all the components of the tub. Before the final welding, it is necessary to study how accurately the parts fit together.
Machine frame
 You need to determine whether you are counting on long term concrete mixer service or one season will be enough. In the first case, you can assemble a frame from wood, but for a durable construction it is necessary to make it from metal.
If you chose the option with a tree, then prepare the screws - they will be needed during assembly. In addition, you need to find a bar (its parameters to choose from are 10 × 10 or 15 × 15 cm). The joints are carefully glued at the joints.
A concrete mixer that will serve you for many years should have a metal frame. For production, you will need a 45 × 45 mm corner or a channel. As with other operations, welding the base will be a more reliable method of fastening, but in last resort riveting or bolting is suitable.
concrete mixer frame
Whatever type of construction you choose, it is imperative to drill holes in the frame of the concrete mixer for all the devices that provide work.
Engine
As you know, Soviet washing machines, like refrigerators, despite long operation, serve faithfully. Therefore, a motor taken out of an old washing machine may well serve as an engine for a homemade concrete mixer. To ensure an acceptable speed for a concrete mixer, a gearbox is used.
You can also connect a gasoline engine. This option is more mobile, because. does not require electrical wiring. The engine can be taken from a moped. The transmission is carried out using a chain, which can also be taken from a moped or scooter.
Despite providing more mobility, the use of a gasoline engine comes with risks. If sparks or other accidents hit, an explosion is possible. But also the use electric motor poses a potential hazard.
 To protect yourself and others, remember the following rules:
- because work in a humid environment, it is necessary to check the insulation of the cord.
on the contrary, you cannot check the solution when the tub is rotating. - because the concrete mixer will vibrate during operation, it is necessary to install a reliable stop under the wheels (if we are talking about a mobile version). Otherwise, she may suddenly move out of place, injuring someone.
- the same vibration weakens the tightening of the nuts. Therefore, check them regularly and tighten if necessary.
- Mittens will also come in handy. They will protect you from the solution and the occurrence of allergic irritations.
- do not leave a working concrete mixer unattended. It is unacceptable for children to approach her.
From all this it follows that even such a seemingly difficult unit as a concrete mixer can be made by hand. The main thing is to carefully and responsibly follow the instructions. And since no construction is complete without a concrete mixer, then it can be rented out, which will not only recoup the costs, but also earn.


