It is often quite expensive to buy a window for a living space. Especially when it comes to ancillary buildings. After all, the main requirement for such a product will not be the satisfaction of aesthetic tastes, but the good quality of the new element. Moreover, standard sizes may not fit into the features of the structure of your premises. Customization is also expensive. Another thing is if you know how to make a window with your own hands.
For the manufacture of a wooden window, special skills are not needed - perseverance and accuracy are enough.
It is much easier to deal with this on your own, you do not have to go anywhere. For this you need conventional tools and material.
Materials and tools
We will not consider plastic windows for the simple reason that this material is expensive and requires the use of special equipment. It will be much easier to consider how to do quality window from ordinary wooden slats.
Tools:
- chisel;
- saw;
- drill;
- milling cutter;
- screwdrivers;
- hammers;
- screws;
- electric planer and more.

Be sure to pay attention that the tree is not wet. Otherwise, over time, the window is deformed and will have to be changed again.
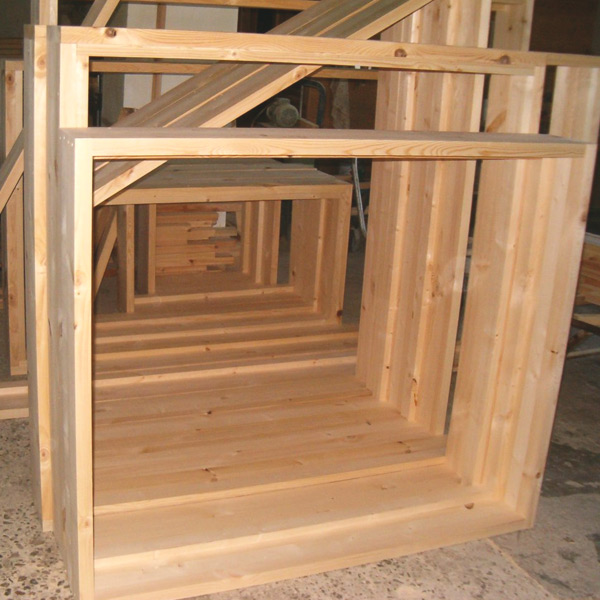
Usually, not a solid board is used to make a window, but spliced wood. This will avoid further warping and shrinkage during drying. The window is made from a box tightly fixed in the wall opening and a frame into which the glass is inserted. So, when making a box, it is more advisable to use a board with a section of 50x150 mm, while the frame will be stronger from a bar of 50x50 mm. The frame parameters are determined in accordance with the dimensions of the opening for which the window is being prepared.
In order to subsequently enjoy the beauty and practicality of your product, you need to focus on technical points. Without sufficient skills, it is unlikely that you will make a high-quality window to the kitchen, bedroom or hall. But in the living room there are less pretentious rooms that will boldly "accept" your creation.
Back to index
As mentioned above, the design of a wooden window consists of a box attached to window opening walls and directly frames with glasses. Starting work, first of all, you need to refer to the size of our future window. This will help us old frame. Although experts advise to measure everything again. First of all, I make a box. This is undoubtedly the most simple detail. For its manufacture, slats 5x15 cm are suitable.
The most affordable and practical material is pine. Oak would be a better substitute. But for the first independent experiments, it is better not to use expensive varieties of wood.

Immediately pay attention to the degree of dryness of the tree, as well as the presence of various deformations - knots, cracks. Do not forget, the box takes on a large load-bearing load and is attached to the wall opening.
In the blanks, it is necessary to make grooves in the shape of the letter "G" with a depth of about 15 mm. The block consists of 4 parts, fastened together with wood glue. After that, holes are drilled in the parts, which are filled with a wooden rod about 3 cm in size. This will ensure a reliable connection of the board at an angle of 90 °.
Back to index
Window frame manufacturing
In order to make a frame, it is best to purchase bars 6x4cm.
But be guided by the design of your window. The profile shape depends on a number of factors, such as the number of glasses in the frame, their thickness, and the size of the glazing beads. If it is planned to manufacture the 1st glass profile, then 2 rectangular grooves are made: 1 for inserting glass, the 2nd for installation in a box. If the profile is double-glazed, add 1 more groove - under the 2nd glass. To make a mold, use an electric planer or milling cutter.
If you take standard size, then take the glass with a thickness of 4 mm, and glazing beads - 10 mm. Before cutting wood for the frame, you need to measure the perimeter of the window and add 10% to the result.
Having prepared everything you need, assemble a frame from the boards. Following the dimensions, you need to cut the boards obliquely, along the edges (angle 45 °). The profile obtained in this way reliably provides tongue-and-groove connections. With the help of self-tapping screws, additionally immobilize, making sure to drown the hat in the tree.
Back to index
Glass cutting: some nuances

This is not as difficult a matter as it might seem from the outside. However, there are a few things to consider important points. The first is personal safety. Gloves / mittens will protect against cuts, glasses - from crumbs and dust.
It is necessary to perform cutting along the line, in 1 movement. This is easy to do with a ruler, but it should be longer than the glass. A characteristic sound will indicate to you the correctness of your actions. Then move the glass to the edge and press lightly. The glass will break off along the markings. After cutting is finished, finish the edge of the glass sandpaper. For fitting, glass can be inserted into the frame and pulled out.
Attention should be paid to the correct determination of the size of the glass. It depends on how it will fit to the frame. Therefore, the measurement accuracy should be up to 1 mm.
At the final insertion of glass, the grooves are treated with sealants. From above, the glass is fixed with a glazing bead, fixed with thin nails. If you have wide glazing beads, try fixing them on thin screws. Tighten the screws very slowly, starting from the middle, to avoid excessive pressure in the corners. They are always more fragile. Then you can work with paint and add handles.
To install new window frames, many people are accustomed to doing the same as everyone else - to call craftsmen who dismantle old windows and insert new ones, most often made of plastic or aluminum. True, their significant drawback is the rather high price and the need to use special equipment.
That is why many are wondering: “How to make a window frame their hands? And what you need to do?".
Materials and tools for making a window frame
So, when choosing required material choose boards with a section of 5 by 15 cm or a beam of 5 by 5 cm.
You will also need:
- wood glue;
- window squares (metal);
- glass.
You will also need a drawing and some carpentry tools:
- saw;
- hammer;
- chisels.
After the acquisition and preparation, we can get to work.
How to make a window wooden frame from bars with your own hands
For manufacturing, it will be enough to have 4 strips, which will need to be connected into a rectangle. In this case, it is important not to forget to set the angle to 90 °. To obtain the required profile, the frame is assembled from several similar rectangles with different widths.
Also, do not forget about accurate measurements, otherwise the weight may turn out to be lopsided. In such an extraordinary way, you can even make a curly profile.
IN last years plastic double-glazed windows confidently replacing wooden counterparts. However, their reliability and technical performance are firmly entrenched, time-tested. In addition, this is a budget way to change the window, especially if you decide to make a new one yourself.
Wooden structures are an environmentally friendly and reliable construction item. Everyone knows about their advantages: firstly, wood windows "breathe", and secondly, wood - available material, thirdly - they can be made by hand, without the use of sophisticated equipment.
Windows for summer cottages, outbuildings or verandas can be made independently, having studied the technology a little. During production, attention must be paid to correct calculations window size and geometry. Not only the aesthetic factors of operation depend on this, but also the functionality of the structure.
How to make a wooden window with your own hands
The main point in assembling the details of a new wooden window is a jeweler's precision. If you are unsure of your abilities, then it is better to turn to a professional or order a ready-made window made in production.
Required tools:
- screwdriver;
- drill;
- glass cutter;
- electric planer;
- hammer;
- chisel.
Stage number 1. Preparatory work
In order to make a window, you need to create a sketch. To do this, you must clearly know the dimensions of the future window and its functionality, for example, whether it will open or not, the number of sashes and vents.
The sketch is drawn to scale. This is important in order to correctly calculate the amount of material, the location of the bolts and loops, handles and heck. The presented video contains examples of window drawings, maybe you will find here what you need:
In addition, the calculation of the material for this window is carried out. It is better to do the calculation with a margin, in case the part, due to lack of experience, can be spoiled
Important! Decide in advance on the type of window in order to purchase the necessary fittings.
Stage number 2. Making blanks for the window
An important point is the choice of the type of wood. The most popular windows are made of solid pine, in addition, oak can be an alternative.
The board must be prepared for processing, namely dried, not deformed or damaged.
According to the drawing, cut out necessary details, which will later be connected to each other.
In working with a milling machine, a skill is needed, so it would be more appropriate to use an electric planer and an electric jigsaw.
In addition to the array, you can use glued laminated timber as a working material. It has a strong texture and is also resistant to deformation.
To work, you need a board 150x50 mm.
Stage number 3. Making a box or frame
A groove or groove is made in the blank boards, the depth of which is 15 mm, the groove is a recess in the shape of the letter G. We will need to make four identical parts of this kind.
Connect the parts of the box together with wood glue or PVA glue. Holes are drilled in the corners in the finished rectangle and a 3-4 cm rod is hammered in. This wedge provides a reliable connection of parts at a right angle.
The box is ready. It is placed in a window opening and fixed with dowels. Gaps are filled around the perimeter with mounting foam.
Stage number 4. Making a window
The frame requires a beam of 6x4 cm. The shape and design depends on the number of compartments, glass and the size of the glazing beads.

There are two types of profile:
- single glass;
- double-glazed.
The single-pane design includes two grooves: one for installation in the box, and the other for glass installation.
Double pane profile - more complex structure, having three grooves, for two glasses and a box.
Usually glass with a section thickness of 4 mm is used, while the size of the bead will be 10 mm.
The base of the frame is assembled from blanks. To make the assembly convenient, the ends of the blanks are cut off at an angle of 45 degrees. And the pre-prepared profile is joined using the tenon-groove method, which ensures reliable adhesion of the parts and immobility of the structure.
You can also consider another reinforcement option - a metal corner. This item is sold in any hardware store. The corners are attached to each corner of the structure using self-tapping screws. Currently, builders have begun to abandon this method, believing that it is not aesthetically pleasing. However, if the window will subsequently be painted with paint, this option may be considered.
Stage number 5. Glass installation
Importance correct calculation the size of the glass is due to the fact that this factor determines the tight fit of the glass to the frame, which is responsible for the thermal conductivity of the window. If gaps are formed during the installation process, then it will blow into such windows.
Important! Measurements of glasses before cutting are made with an accuracy of up to a millimeter.
Glass is cut with a glass cutter, after which the sharp edges are treated with sandpaper.
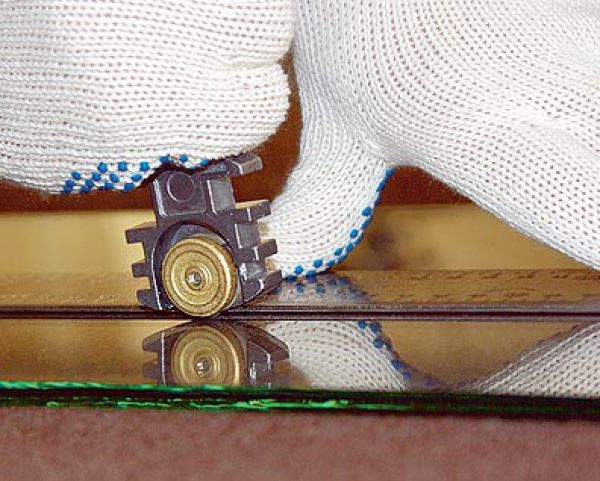
When carrying out this process, you must follow the safety rules:
- work must be carried out in gloves with a dense rubber coating to protect the palms of the hands from cuts;
- a mask is put on the face;
- the eyes are protected with goggles, as there is a threat of glass fragments and chips.
Working as a glass cutter also has its own subtleties. So, how to cut glass. The movements of the glass cutter on the glass surface should be smooth with a moderate degree of pressure. If you have not applied enough pressure, then the incision will be of poor quality and with further actions, you will get a jagged chip. On the contrary, excessive pressure can push through the glass, and you risk injuring yourself with glass fragments.
A ruler is used to cut glass. The material from which it will be made does not matter. If you don't have a ruler, you can use a straight line.
Important! The length of the ruler must exceed the size of the glass.
After processing with a glass cutter, the canvas is moved to the edge of the table, and lightly pressed by hand. If you have done everything correctly, the glass will break in place of the cutting line. Thus, we cut out all the glass for the window.
For final assembly on wooden details apply sealant. It is better to take a colorless tool so that the window looks aesthetically flawless. Next, apply the glass and let the sealant dry. From above the canvas is fixed with a glazing bead. The glazing bead is a triangular rail that simultaneously presses against the glass and the frame. His task is to fix the glass and hide the seam.
The rail is mounted using thin nails, less often with self-tapping screws if the glazing bead is wide.
Stage number 6. Window installation
The finished window is mounted in the box using self-tapping screws. The gaps between the frame and the box are sealed with mounting foam or sealant. Next, the window sill is mounted in place. You can learn more about the process of manufacturing a wooden window by watching the video:
Making a frame in two parts
When a window is required that will open, the technology changes a little and becomes more complicated. Such a window is made a little differently. In the center, a bar is mounted in a vertical position, which has grooves similar to the frame. The second half of the window is made separately, has a frame a few centimeters thinner. It is attached to the main structure and is a "door".
Making a wooden window is a fascinating and rewarding process. In addition, how nice it is to look out the window, created with your own hands, which keeps your warmth and a piece of your soul.
Now one of the most popular windows in private homes are wooden. First of all, it is affected by the easy accessibility production material. It will be more convenient to build a window yourself if its shape is non-standard, while the number of fittings, sashes and shape will be chosen by a specialist. Below is a detailed description of how to make wooden windows with your own hands.
In connection with the design characteristics, wood windows are divided into:
Aluminum-wooden
Wooden windows may have aluminum upholstery. In this form, the period of their use increases and does not need timely painting.
Bearing part aluminum wooden windows constructed from aluminum, which will then be covered with wood. In this case, thanks to aluminum, the strength of the window increases, and the tree transforms the appearance, making it more attractive and increasing the warmth of the window. However, this type of windows is not very popular due to the high price of aluminum and the complex production.
German
German (or, as they are also called, European) have installed fittings that appeared in Europe. This type of windows has the ability to adjust the angle of inclination and height of the sash, have locking mechanisms, and window ventilation is also available.
Eurowindows include sashes and window frames. Thanks to the double-glazed window, which is built into the sash, the window has thermal safety. It doesn't take much effort to open it. Due to the glued timber, which is used in the manufacture of windows, the room is reliably protected from drafts. And it is also very convenient that it is very easy to care for eurowindows.
This type of windows is extremely reliable, distinguished by warmth and durability in use. Their period of operation is over sixty years. This is facilitated by the presence of a glued three-layer beam, which is not amenable to deformation and drying out.
Russians
In Russian windows, separate wooden parts are installed, in which there are 2 glazed sashes with a thickness of 4 centimeters or more. The material used is pine. Of the minuses, it is worth highlighting the easily deformed windows, as well as the complex combination of the sash and the window.
Finnish
This type of window is distinguished by its two sashes, which are dominated by a sequential opening mode, and a wide frame. The inner sash has a single-chamber double-glazed window, and one simple glass is fixed on the outer sash. To produce the outer sash, both aluminum and wood are used. The sashes are interconnected by a sequential opening mechanism. The window frame and sashes are made using solid wood, not glued beams. The design of the window is very attractive, however, its quality characteristics are worse than those of the German one.
- Double-leaf mullioned wooden windows - several sashes are connected into one whole structure with the help of an impost, this option is reliable, durable and easy to use;
- Deaf, in which there are no valves. There is no ventilation function. Due to the ease of manufacture, the cost of such windows is low. It is necessary to think over the care of the front part of the window structure and ventilation before proceeding with the installation;
- Double sash windows - the opening mode is similar to double sash windows, however, here the first sash has a swing-out handle, and the second without a handle. You can open the second sash only when the first one is closed;
- Tilt-and-turn and rotary - have sashes that open inward. Thanks to the ventilation mode and reasonable price, they have become quite common.
More celebrated swedish windows from wood. They are something like a fusion of Russian and German. It has an inner frame with a single pane of glass and an outer frame with a single pane of glass. This results in a high degree of thermal and sound insulation.
carved windows from wood, the presence of multiple patterns is characteristic, which makes them the most beautiful.
To make the features of wood windows more understandable, it is better to analyze their main advantages:
Ability to breathe
Only a tree has this property. The regulation of a healthy microclimate in the house depends on wood. After all wooden surfaces at in large numbers Moisture absorbs it, and when it is small, give it away. Houses have a healthy and comfortable environment if they have wooden windows.
Plastic and other windows have the effect of moisture accumulation on the windowsill of adjacent surfaces.
Due to the ability of wood to breathe, there is smooth air circulation in the room. The micropores in the tree create an air supply, even if there has been no airing for a long time. Returning home, after a long absence, you can feel the fresh and renewed air.
Attractive design
On a wooden window, the structure of the wood that was used in the manufacture stands out perfectly. In addition, wooden windows are well suited to every type of interior and exterior. Usually, the dwelling is furnished with wooden furniture and doors that are perfect for wooden windows. In addition, wooden windows are very beautiful and highly functional.
Compared to wooden windows, plastic windows have an unattractive appearance. The tree gives the room more comfort and warmth.
Long period of operation
With the help of the current composition and impregnations, the quality of the wood used in the manufacture of the window becomes much higher, despite the fact that wood is a rather vulnerable material, especially before fire or moisture. Today's impregnations and dyes, which increase moisture resistance, give wooden windows the most durable operation. In addition, at the time of use, the appearance of such windows retains its originality. For example, plastic windows, when used for more than 10 years, will need to be replaced, while wooden windows retain their solidity even after two decades of operation.
Low thermal conductivity
This characteristic can be explained by the use of an adhesive beam in the window manufacturing process. In addition, the thermal conductivity is affected by following the technological moments of window installation.
High quality durability
Quality, like the tree itself, is evaluated at the time of purchase of the material. But it is not possible to appreciate the level of strength of plastic windows, because the metal profile is located inside the building. And also, when making a wooden window on your own, you can pick up quality wood that suits the owner both in the operational and in the material sense. It is recommended to choose a three-layer glued beam, the minimum thickness of which reaches 7 cm.
Ease of repair
This advantage will make it possible to reduce the cost of repairing the restoration of a wooden window with your own hands. This type of window is very easy to maintain and repair.
Safety and environmental friendliness for human health
This advantage is the most important during the selection of wooden windows. Since wood is natural material that do not emit various substances hazardous or harmful to human health.
Before you start making a wooden window yourself, you need to prepare everything the right tools. So, we need:
- screwdriver;
- square;
- drill;
- chisel;
- glass cutter;
- roulette;
- milling cutter or jigsaw;
- plane;
- hammer;
- ruler.
After that, you need to prepare the following materials:
- sealant;
- glazing beads;
- dowel;
- self-tapping screws;
- wood glue;
- glued laminated timber for the box (oak or pine).
Let's take a look at the steps for constructing wooden windows on your own:
Box manufacturing
Wooden windows are:
- small sizes;
- large sizes;
- medium sizes.
You must select the window material before you begin work. A less expensive and more optimal variation is pine. Due to the fact that the composition of this wood species has a large amount of resin, it is the most opposing moisture and other external irritants.
Oak is considered to be of higher value and corresponding quality. Although, in order to eliminate the fear of damage by expensive wood, pine is more suitable for beginners. The boards must be dried correctly, they must not have cracks, knots and deformed. It should be remembered that the box is the main load-bearing structure that receives the entire load.
And you can also use an adhesive beam, the strength characteristics and durability of which are greater.
For the construction of the frame, boards are suitable, the dimensions of which are 150 x 50 mm. The workpiece must have a slotted hole in the shape of the letter L and a depth of 15 mm. The parts are fastened together with wood glue, and then with a wooden rod, the minimum length of which is 3 cm. The role of the clamps for each part of the box falls on the rod.
Now the box is being installed in the opening, which was previously prepared. This lesson involves drilling holes in the wall, screwing dowels into them and fixing the box with self-tapping screws. To seal joints and seal joints, apply polyurethane foam.
DIY wooden windows drawings:
To create a frame, you will need a beam with dimensions of 7x5 cm. However, the thickness of the beam can be changed if the strength and size of the window allow. The set amount and thickness of glass in the window will affect the shape of the profile.
It is also enough to make two grooved holes in the shape of a rectangle if the installation of a profile with one glass is planned. Otherwise, there should be more holes.
For the construction of a profile of a specific shape, a milling cutter or an electric planer is required. With a glass thickness of 5 cm, a glazing bead is required, the thickness of which reaches 10 mm.
The frame is assembled after preparing all the details. To do this, you need to cut the boards at an angle of 45 degrees. Next, a tongue-and-groove connection is made using a prepared profile. To make the level of fixation higher, self-tapping screws are additionally used. It is worth noting that each hat should fit tightly into the tree, so the attractiveness appearance windows will improve, and the manifestation of corrosion will decrease.
Glass installation
In order to prevent the accumulation of condensate in the window and the absence of cold bridges, it is necessary to correctly measure the height and length of the glass that is planned to be installed in it. The minimum allowable error during the taking of measurements is 1 mm.
Diamond self-tapping screws are best for cutting glass. A fine-grained sandpaper for polishing edges.
Now it is necessary to attach a ruler to the glass with a margin and draw a line along it with a glass cutter. Then the glass must be put on the table and broken off. After that, the necessary piece of glass must be installed in the window, then the edges of the glass are smeared with sealant and laid again if there is no need for correction. Using glazing beads, glass must be fixed. Small nails are driven into the surface of the glazing beads, if they are wide, then it is more reasonable to use self-tapping screws to secure them.
When studying the technique of making wooden windows with your own hands, it should be noted that the final assembly of the whole structure. If the window is dominated by large dimensions, and also consists of two parts, then installation and assembly is carried out first. vertical bar, then it is necessary to fix the hinged hinges of the sash. And lastly, handles and other fittings are attached.
The last step is to mount the fully assembled window into the window frame and fasten it using self-tapping screws, which first pass through the surface of the box, and then through the wall. To seal all cracks, mounting foam is used, and after it has completely dried, the walls are plastered. You can put an end to this work by installing the ebb of the part and the window sill.
If you have any difficulties, then here you can find and watch wooden windows with your own hands video.
So, we have told everything about wooden windows: what types and varieties they exist, what and how best to make them, how to install and what is required for this. We hope our advice will be useful to you and will help in your endeavors. Thank you for reading to the end. See you soon in the next similar publications.
Choose the type of wood from which you are going to make a window. For this type of work, you will need well-dried planed boards. The cross section of such boards should be 50x150 mm. Using an electric planer, it is necessary to make a groove on the board so that the profile board has the shape of the letter G. This installation measure will contribute to the tightness of the structure.
Based on the size of the window opening, the board must be divided into four parts. The resulting parts must be connected to each other. The connection can best be made with a straight tenon or straight groove. In the course of work on one of the boards (which will perform a horizontal connection), it is necessary to cut a spike. On the other board (which will make the vertical connection) you need to cut a groove. The joints must be smeared with wood glue and the boards must be joined. The connection of the boards of the box should be made at an angle of 90 degrees. To strengthen the structure, a hole is drilled at the end of the box and a wooden pin lubricated with glue is inserted. Also, to strengthen the design of the box, it is necessary to install metal corners in the corners and attach them to the box with screws. The box will be ready for further use after the glue has dried.

The frame is made and connected in the same way as the window frame. In the process of manufacturing the frame, a beam is used, the cross section of which should be 50x50 mm. In order for the frame to open and close easily, it is necessary to leave a gap between the frame and the box of 1-2 mm.

Step 4: window frame tenon joints
The profile must be divided into blanks and made on them tenon connection with a saw, hammer or chisel.
It is necessary to install glass and hinges in the required places. After completing these steps, work on creating a window can be considered completed. The window must be treated with anti-corrosion materials and painted to protect against moisture.

Thus, the article described and characterized the manufacturing process window frame with your own hands.


