When Vladik and I started doing chemicals, our favorite substances for experiments were soda and vinegar. We used up a lot of soda,
Today, for convenience, I have collected in one article several simple experiments with soda, with which your little scientist can easily begin to get acquainted with chemistry.
By the way, it wouldn’t hurt to explain to your child how chemical transformations differ from physical ones.
Chemistry studies such transformations when, as a result of the interaction of substances, something new is obtained. For example, a nail remained in water and after some time a new substance formed - rust. A physical experience will be when transformations occur with one substance. For example, they put ice in a glass, then the ice melted - water was formed, and if the water was heated, there would be water vapor. Ice, water and steam are different states of the same substance - water. I think this will be clear.
Let's return to our soda. Chemists call it sodium bicarbonate or sodium bicarbonate, but you decide for yourself what to call this substance when conducting an experiment with a child.
Experience 1
Add a little vinegar to half a glass of water, and then pour half a teaspoon of soda into the glass. The solution immediately bubbles, as if boiling. As a result of the reaction, carbon dioxide is released. Why is this happening? Molecules of soda and vinegar come into contact in a glass and gas is released. Let's modify the experience a little.
Much has already been written about the use baking soda in one area or another. The properties of this substance allow it to be used in the kitchen for cooking and at home for cleaning. various surfaces from fat and plaque, in treatment various diseases and so on. Another use of sodium bicarbonate is the ability to organize educational shows for children, for example, you can make your own volcano from soda.
Stock up on baking soda and vinegar because your kids will ask for it again and again!
This is possible due to the ability of soda to react violently with certain substances, such as vinegar. And one of the most common experiments involving this property of sodium bicarbonate is the demonstration of a volcanic eruption. Below is a detailed look at how to make a volcano from baking soda.
Volcano eruption experience
The first thing you need to know is why such a reaction occurs when combining soda and vinegar. Without going into details: soda has pronounced alkaline properties, while vinegar, on the contrary, has acidic properties. When their molecules combine, both environments are neutralized to neutral, resulting in the release of carbon dioxide, the rapid release of which causes the appearance of foam.
Experiments with the combination of these substances can be used not only as a demonstration of a natural phenomenon. This is a good moment to explain the basics of the interaction of various substances and the reactions between them.
Preparation for the experiment begins with making the volcano itself. This can be done in several ways, which will result in reusable or disposable inventory. To create the first one, you will have to put in more effort and time, while the second one is suitable for a spontaneous decision to please children with an interesting show.
Method No. 1
In this case, a reusable model is created for repeated execution of the experiment.
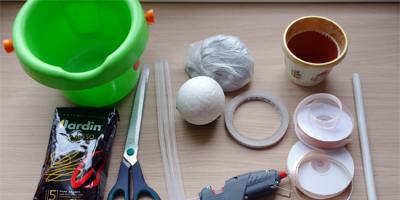
To make the Vulcan body, the following components are needed:
- an ordinary 1.5 liter plastic bottle for any drink;
- a flat plastic lid (for example, from disposable food containers);
- tape of any kind;
 It is not necessary to sculpt a “volcano” from new plasticine; already used plasticine will do just fine.
 - gypsum or alabaster (can be replaced with salt dough);
- gouache with PVA glue, in a ratio of 1:1 (replacement possible acrylic paint);
- tray or cutting board (as a base);
- paper;
- foil.
Sequencing:
- Building the foundation. The plastic bottle must be cut, measuring the desired height of the cone (the upper part is needed). The resulting base is carefully attached to the above with tape plastic cover.
- Attaching the base of the volcano to the base. The resulting structure is attached with tape to a tray or cutting board. You can also use a suitable piece of plywood or thin board as a base.
- Forming a cone. Using pieces of paper and tape, a cone is formed around the bottle with the upper base at the edges of the neck. To avoid subsequent soaking of the paper pulp, the cone is wrapped in foil.
- Finishing the “walls” of the volcano. Dilute gypsum or alabaster to a thick sour cream. The resulting mixture covers the slopes of the “fire-breathing mountain.” Using a toothpick or fork, the relief of “mountain slopes” and trenches are formed for the preferential movement of “lava”.
- Final finishing. After the “slopes” have completely dried, they should be painted with gouache mixed with PVA. It's best to use brown and black paint and touch up the "lava" troughs a little with red.
After preparing the “volcano”, you need to deal with the “lava”. It, of course, needs to be prepared immediately before the demonstration of the “eruption”. The components in this case are:
- baking soda - 10 g;
- dishwashing detergent - 2 drops;
- gouache or red food coloring;
- vinegar - 10−15 ml.
This quantity of ingredients is indicated for minimum quantity"lava" and low "volcano". If it is necessary to increase the intensity of the “eruption”, the amount of all components increases accordingly. The sequence of actions in this case is as follows:
- Combine baking soda, the chosen type of dye and dishwashing detergent, stirring thoroughly.
- Pour the resulting mixture into the “volcano mouth”.
- Add vinegar carefully to the “mouth” and enjoy the result.
For a more active reaction, vinegar can be poured in quickly. By the way, the added dishwashing detergent is responsible for this.
Method No. 2
As mentioned above, a volcano made using the previous method allows you to obtain a prop that can be used repeatedly. However, this takes quite a significant amount of time. For one-time use, you can make props using a simplified method.
 The spectacle is truly spectacular
 The ingredients in this case will be:
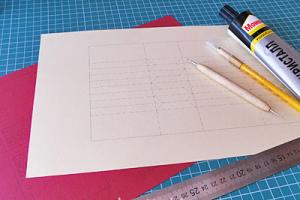
- sheet of cardboard;
- plasticine;
- small jar;
- tray or cutting board (as a base).
The sequence of actions is as follows:
- Roll the cardboard into a cone, giving the required “slope” angle. Glue it in this position or secure it with tape. Cut off the top part to obtain a “vent”.
- The outer part of the cardboard is covered with plasticine, forming “ledges” and “grooves”.
- Before demonstrating the experiment, the jar is filled with a mixture of soda, dishwashing detergent and dye, after which it is placed on the base and covered with a “mountain” cone.
- Next, vinegar is poured into the mouth and the “eruption” begins.
It is possible to conduct an experiment with citric acid or lemon juice. In this case, vinegar is not used, and soda should be added last.
The properties of baking soda allow this product to be used in a variety of situations. And as everything described above shows, even as a means of entertainment or to broaden the horizons of children. Thanks to the simple preparation and the ability of soda to react violently with vinegar, you can give your children an unforgettable spectacle that they will ask for pleasure from more than once.
The home volcano is not only similar in appearance, but also can erupt lava. Creating such a miracle develops the child’s creative abilities. In addition, such a mini volcano is suitable for school projects. It will also serve visual aid in studying chemical reactions without the help of textbooks. You will find how to make a model of a volcano from various available materials in this article.
Paper volcano: materials
To build a fire mountain we will need:
- sheets of newspapers, magazines;
- a piece of cardboard or plywood;
- double sided tape;
- plastic bottle;
- flour;
- watercolor or gouache paints;
- scissors;
- tassels;
- vinegar;
- baking soda
Paper volcano: progress
1. We gather the children around us and begin creating the shape of a home Vesuvius. Place the plastic bottle in the center of the cardboard and tape it to the base. Run strips of adhesive tape from the neck of the bottle to the cardboard diagonally, forming a cone.
2. Now old newspapers are used. We crumple them into balls and insert them between strips of tape to give volume and density to the foot of the mountain. The next step is to cover the cone with paper strips. We cut the newspaper into wide, long pieces and glue them, as shown in the picture.

3. Now we will compact the body of the volcano. To do this, prepare a sticky mixture of flour and water in a ratio of 1:2. While the parents are busy with the dough, the children cut strips of paper. We advise you to stock up on rags for wiping your hands while building the volcano model. We dip strips of newspaper into the finished paste and tightly glue the entire structure to the very mouth of the fiery mountain. The work is completed, we are waiting for the model to dry completely. If you want to speed up the drying process, then place your homemade volcano in the oven.

4. It's time to decorate the mighty mountain. Children will especially enjoy this moment. It will help develop creative abilities and get great pleasure from the result. Primary colors are brown, gray, green, red. We give the base and cardboard the color of the vegetation. In these same places you can draw a river. Paint the body of the fire-breathing handsome man in shades of brown and gray. Throw streams of lava along the hillocks and depressions.

5. The most interesting and exciting moment has arrived - a little magic and the volcano’s mouth will begin to erupt lava. Let's prepare a magical mixture. Pour into the neck of the bottle warm water, mixed with liquid soap or dishwashing detergent. Add 2-3 tbsp there. soda Take a glass of vinegar, preferably tinted red with food coloring or gouache, and pour it into the bottle. The best option: half a bottle of water, 2-3 tbsp. soda and 150-200 ml of vinegar.
6. The sounds of hissing, seething can be heard from the home volcano and... after a couple of seconds, the mouth of the fiery mountain erupts with a fountain of lava! We watch what is happening for a couple of minutes and rejoice at the enthusiastic, children's screams.
DIY volcano made from dough
Continuing the topic of how to make a volcano with your own hands from improvised means, we offer a creation from dough.
Dough volcano: materials
To work you will need:
- flour - 400 g;
- salt - 200 g;
- water – 150 ml;
- watercolor paints or food coloring;
- glass cup or plastic bottle;
- vinegar, baking soda;
- a piece of thick cardboard or plywood.
Dough volcano: progress
1. Knead the mixture salty dough. Ready option It should be very dense, not stick to your hands, but easily take the desired shape.

2. Place a glass in the center of the base of the volcano and cover it with dough, forming a model of the mountain. For greater plausibility, create strands of a mountain range and a lake at the foot. “Plant” trees by inserting artificial aquarium plants into the dough. Leave the finished layout to dry. Due to the influence of the surrounding nature, drying takes a couple of days, so we put the volcano in the oven and lightly bake it.
3. It's time to draw. Armed with a brush, paints and a glass of water, we begin to revive the mountain. Make the top white with snow or red with lava, or maybe there are gold veins in its rock. Your volcano is your fantasy.

4. To make the fire-breathing vent start to “spit” lava, pour water and dishwashing detergent into a glass covered with dough. Add a couple of tablespoons of soda and pour vinegar over the entire mixture. After a couple of seconds, the lava will rise and begin to flow down the rock slopes.

Using the same analogy, a volcano is made from plasticine
To make it you will need:
- cardboard sheet;
- small, plastic bottle;
- plasticine;
- thin plywood or plastic;
- soda, vinegar;
- food coloring.
The skeleton of the mountain will be a cardboard cone, which is cut out taking into account the size of the bottle placed inside. Then this structure is covered with colored plasticine. The product is placed on plywood taking into account the protection of furniture from “lava” stains and aesthetic completeness. You can attach it to the base using plasticine or cement mortar.
When the model is completely ready to erupt, fill half the bottle with water and liquid soap. Pour soda into the crater of the volcano and fill it with red-tinted vinegar. Streams of lava will begin to erupt from the depths of the mountain.

You can even make a home volcano out of sand and soil by simply forming a slide and placing a test tube with a reactive mixture there. Whatever option you choose, children always watch what is happening enthusiastically and ask to repeat it. So stock up on baking soda and vinegar right away. When the experiment is completed, the homemade volcano can be washed with a damp sponge and left until next use.
(Visited 5,232 times, 10 visits today)
Within the framework of this article, a simple and accessible step by step guide regarding how to make a volcano at home. As the child develops, he asks more and more questions. It is best to give a confirmed answer to them a clear example. And one of them will be given within the framework of this article.
Ingredients
To solve the question of how to make a volcano from plasticine at home, the following components and materials are needed:
- Plastic container (you can take any bottle with a capacity from 0.5 to 2 liters).
- Plasticine for creating a model (depending on its size, you may even need several packages).
- Food foil.
- Two glass flasks for mixing ingredients (in as a last resort you can use cups).
- Dishwashing liquid.
- The paint is red.
- Acetic acid.
- Sand.
- Disposable medical syringe.
- Scissors.
- Spoon.
We prepare all this in advance so that later, during the experiment, various hitches do not arise. Most of Every housewife has this list. What is missing, we buy more.
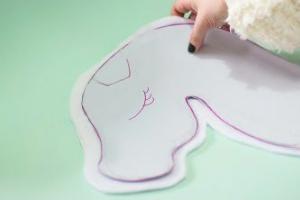
Making a layout
The most difficult stage in how to make a volcano at home is creating a layout. Here you need to turn on your imagination and formalize it properly. We use as a basis plastic bottle. It should be in the center, and symbolic lava will erupt from it.
Next, layers of plasticine are placed on it to form a slide. Cover the crater of the volcano with food foil. At the same time, it is necessary to make a hole in it using scissors in order to be able to mix the lava ingredients. At the final stage, cover the surface of the plasticine with sand. If desired, it can be painted with paint to make the layout more natural.

Mix and get the result
Now let's figure out how to do it at home. First, mix the paint in one of the cones. Then add to them. Mix the resulting solution thoroughly until a homogeneous mass is obtained. Pour acetic acid into the second flask. Now, using a spoon, pour the solution from the first vessel into the volcano through a pre-prepared hole.
After this, everything is ready for the eruption. You just need to fill the syringe with acetic acid and then quickly inject it into the volcano nozzle. This will start a reaction inside, as a result of which lava will flow out through the hole. If desired, the experiment can be done several times. To do this, it is enough to then re-add
When thinking about how to make a volcano at home, do not forget that lava will flow out of its mouth. Therefore, it is recommended to arrange it in advance so that nothing gets damaged (for example, on a pallet or in the bathroom). Another nuance is that the plasticine model can be used repeatedly during such experiments. Therefore, in the future, to obtain a “volcanic eruption” you will only need soda, acetic acid, red paint and dishwashing liquid.

Summary
Within the framework of this article, an algorithm was given on how to make a volcano at home. Most of the materials used are available to every housewife, the rest can be purchased. There is nothing complicated about this, so you can conduct a bright and educational lesson with your baby. If desired, this experiment can be repeated again among his friends and use the same layout. The only thing you need are the ingredients to simulate lava, which shouldn't be a problem.
A volcano made with your own hands not only has an external resemblance to the real one, but also knows how to erupt lava, or rather, a liquid similar in consistency. This miniature volcano is perfect for school projects. With this product you can clearly demonstrate certain reactions without using a textbook. So, making a volcano with your own hands is not difficult.
For this type of production, it is necessary to use the following types of materials:
- newspapers or magazines;
- a sheet of cardboard, or better yet plywood;
- tape for connection, preferably double-sided;
- plastic bottle;
- flour;
- paint for painting;
- scissors and brushes of different thicknesses for ease of use;
- vinegar and baking soda.
It’s quite possible to make a volcano at home, but you need to follow the recommendations as closely as possible . You need to create a homemade volcano in stages:

Dough volcano
The second option for a do-it-yourself volcano at home is to make it from dough. For this you will need the following materials:

Since it is easy to make a model of a volcano at home from dough, first of all you need to knead the salt dough. The dough should be as dense as possible and not stick to your hands. You need to place a glass in the center and cover it with dough prepared in advance. In this process, it is necessary to implement a model of the mountain.
At the bottom of such a mountain it will be possible to draw a river or attach artificial plants. What happened should be left to dry. If the drying process takes place outdoors, then this will take about four days, so you need to resort to using the oven. After drying, you can start drawing. In this case, you can rely on your fantasies.
You need to start the volcanic eruption itself in the same way as in the first case, but the material should be placed in a glass. The main thing is to follow the rules and everything will work out. It is better to keep children away from some components of the composition.
Plasticine miracle
 How to make a model of a volcano with your own hands from plasticine is a topic that will arouse the interest of a young learner. There are stationary and active forms of the product. Creating a stationary model is a simple process; it is enough to build a model of a smoking mountain from plasticine. The actual creation will look much more interesting. Creating such a product will be entertaining for both those who go to school and children. preschool age. It is likely that an experiment with a model of a home volcano will arouse a child’s interest in geology, geography and chemistry.
Creating an erupting volcano is easier than it seems. Before making crafts, it is advisable to familiarize yourself with the images and find out the structure, and also just look at the pictures, for example, in a children's encyclopedia or a school textbook. Still, this project is more educational than developing motor skills and creative imagination. The child will expand his horizons, significantly expanding his knowledge about the structure of the planet and its phenomena.
Before turning into lava, the magmatic mass ascends through a tight volcanic vent. A large container for the “magma” and a narrow neck for the vent are exactly what is needed to properly recreate the experience. Good fit plastic container from under water and plasticine.
Required:

Process of creation
 The base should always be larger than the rest. The base of the volcano is located 15-25 cm from the ends of the cardboard. The first step begins with recreating the volcanic vent. Depending on the desired size of the mountain you need to give the bottle desired length. Shorten, if you need a low volcano - to do this, cut off the top and bottom, then connect them with adhesive tape. Attach the bottle using the same adhesive tape to the middle of the base and begin sculpting the volcano.
To do this, it is better to stock up on material, because this is a very resource-intensive process. You can take old and damaged plasticine and crumple it. This is just right for giving the necessary, natural black, gray and brown coloring.
You need to knead the resulting plasticine mass and begin construction from base to top: build a structure measuredly, row by row. Convexities and irregularities will give the product a much more believable appearance. To drain magma, “channels” can be laid.
This requires red, orange and yellow flowers. It is necessary to mold different colors of molding material into a single piece, but do not mix them with each other, so that the colored stripes and patterns are visible.
The created model will be an excellent example if you need to do a school exercise or take part in a competition. It will help kids play in the “Mesozoic era,” where volcanic eruptions were common events and the earth was inhabited by dinosaurs.