The door handle is an important element of any door. Together with the door, the handle bears significant loads during daily use, and also plays a role decorative element, which should be harmoniously integrated into the interior of the room.
At self-installation doors, replacing an unsuitable or broken handle home handyman you have to face the question - how to install a door handle? Good result work will help ensure strict adherence to the instructions for installing the door handle. In addition to the direct installation of fittings, it is important correct selection handles capable long time perform its functions.
Helpful information:
Types of door handles
Before buying handles for interior doors, you need to understand how they differ from each other besides the manufacturer and price. In addition, knowledge of the classification of door hardware will allow you to choose a handle that will best fulfill its purpose - to participate in opening / closing the door.
Lever handles are one of the most common options for door handles. They can be used for both entrance and interior doors. Design feature The push handle is equipped with a special tongue - a halyard flap. When you press the handle, a special mechanism pulls the damper into the door leaf and it opens. When the handle is released, the damper returns to its place, the tongue protrudes above the end of the door and prevents it from opening. To open the door, you need to press the handle again.
Lever handles are available in two versions.
First option– with separate overlay. In this option, a separate mechanism with a cylinder and a key is used to lock the door. The handle and lock are installed separately. When choosing, you should pay attention to the size of the pads. The distance between the axes of the tongue and the bolt is not significant, since the lock can be installed at a sufficient distance so that the operation of the mechanisms does not interfere with each other.
Second option– when both the latch and the lock cylinder are enclosed under one cover on the door. When selecting a lock for such a handle, you need to take into account the parameters of both the lining and the lock. In particular, it is necessary to take into account the distance between the damper axis and the bolt, the shape and size of the key slot on the escutcheon.
The easiest option for installation would be a handle, in the thickness of which the lock mechanism is located. In this case, the hole for the key is on the handle itself, and the tongue consists of two parts. When the lock is opened, the latch and bolt of the lock act as one unit. Turning the key blocks the movement of the bolt and when you press the handle, the door shutter is removed, and the door remains closed due to the bolt.
A push door handle, without a locking mechanism, is most often used as interior fittings.
Push-button pen
Push-button handles or ball handles are similar in their mechanism of action to push-button handles. The ball handles also hold the door due to a special pawl. But in order for the dog to hide, you need to spin the ball - hence the second name of this variety - pen - ball. Round door handles Most often used on bathroom doors. This is explained by the fact that the lock of these handles contains a key slot on one side and a special latch on the other. It turns out that you can easily block the door from inside the room. And in case of an emergency - for example, if a child is locked in a room or there is a suspicion that the locked person’s health is deteriorating - you can easily open the door from the outside using a key. However, the market does not stand still, and some modern push handles contain a similar locking mechanism.
Stationary handles
Perhaps the oldest and simplest type of interior fittings. The operating principle is push/pull. The stationary handles are fastened with tightening screws. Screws are used to attach handles to interior doors. The difference between stationary handles is only in the form:
- bracket or U-shaped (with a straight or bizarrely curved bar);
- mushroom (round, polygonal or artistic element on a stalk).
To hold doors with stationary handles It is better to use a roller mechanism. When free, the roller protrudes above the surface of the door leaf and does not allow the door to move. However, if you apply a certain force, the roller is recessed into a special groove and the door opens.
Handles for sliding doors
These handles have a special design. This is due to the handle being recessed into the door leaf during installation. Such a handle practically does not protrude above the surface of the door leaf and does not interfere with opening.
Handles differ for sliding doors thick. The thickness of the handle for sliding doors should correspond to the door leaf. A handle that is too thin will be difficult to install correctly. A handle that is too thick will stick out and prevent the door from opening. .
What are door handles made of?
The purpose of the fittings determines the material from which it is made.
For example, the handle for the front door should be more durable, since the weight of the front door is significantly greater, which means the load on the handle is higher. Thus, high-quality steel is often used to make handles for front doors. The door handle for the front door must withstand the main mechanical methods opening - breaking out and drilling.
It is imperative to take into account the operating conditions. So wooden handles afraid high humidity, which means it is not advisable to use them on doors to the bathroom and kitchen.
The most commonly used door handle materials are:
- tree. Very beautiful material, but is capricious with regard to room humidity and is not very resistant to active use.
- plastic. Most cheap material, but at the same time the most unreliable.
- Brass is the most common metal used to make door handles. The main advantages of the material are strength and wear resistance. In addition, it creates a feeling of warmth when touched.
- various grades of steel, including stainless steel. The main advantages are strength and durability.
In addition to the main material, finishing elements made of glass or natural stone can be used.
How to properly attach a handle to a door?
No matter how complex the mechanism or decor of the door handle is, its installation can be done in a few standard steps.
Step 1. Selecting accessories
As already mentioned, the handle should match the design of the door itself and the interior of the room as a whole. So modern style The high-tech look is best met by laconic chrome-plated handles. For a room in the Rococo or Baroque style, luxurious ornately shaped handles with gilding are suitable.
In addition to the handle, the visible door fittings are the hinges, which means the hinges and handles must be made in the same color. Find out more in our material about.
It is also necessary to take into account the purpose of the door and the characteristics of the room where the door is located.
It is imperative to clarify the method of placing the lock. Namely, the method of its attachment in relation to the handle - a separate installation of the locking mechanism is required or it is built into the handle. Preliminary measurement of the thickness of the door leaf is important not only for sliding doors. In thin interior door It will be difficult to install a lock and handle designed for a massive entrance door. If the lock cylinder and handle are located under one escutcheon, it is necessary to take into account the size of the internal elements of both mechanisms so that they do not interfere with each other’s operation.
When purchasing, it is advisable to hold the handle and squeeze it in your palm. Protruding elements should not leave a clear imprint on the skin. Otherwise, using the pen will be unpleasant. In addition, there should be no burrs on the handle.
Step 2: Locate the Handle
Before you start marking and drilling, you need to decide on the location of the handle.
The distance between the handle and the edge of the door leaf is regulated by the size of the mechanism and the length of the tongue, if any. If the handle is stationary, it should also not be placed too far from the edge. This arrangement will make it difficult to open/close the door.
For ease of use, the installation height of the door handle is also important. This parameter is easy to calculate when approaching the door - the installation height of the door handle is determined by the level of the belt. The height of the handle directly depends on the height of the regular user, which means that the level of the handle in the living room and children's room will be different. Door handle height common use, such as the kitchen and bathroom, should be at an average level, usually 80 - 120 cm from the floor.
Step 3. Marking the location of the handle and its fastening on the door leaf
Having determined the location of the handle, it is necessary to prepare the canvas for making holes for installation. The standard length of the tongue in the lock is about 60 mm. This is exactly how much needs to be set aside from the edge of the door. A straight line is drawn through the resulting point parallel to the end edge of the door leaf. Next, using a square at the required height, draw a perpendicular line to the end of the leaf, along the end of the door and again along the other side of the leaf at a distance of 60 mm.
To clarify the dimensions of the hole for the mechanism, it must be freed from the lining, attached to the door and the boundaries of the groove are drawn. If the door is equipped with a separate locking mechanism, it is necessary to make markings for it as well. Marking the door for a lock is carried out in a similar way.
Don't forget to mark the place for the tongue exit on the end of the door. This place should be exactly in the middle of the thickness of the canvas.
All marks must be made carefully and accurately. Reducing the dimensions may lead to difficulties in installation or may interfere with the free movement of mechanism parts. Too much big hole will be noticeable under the lining and ruin the entire appearance.
Step 4. Making holes for the handle and lock elements
For drilling large diameter holes, there is a special drill - with a crown. To avoid damaging the opposite side of the canvas, you should not try to immediately drill a hole through the entire thickness of the canvas. It is optimal to drill to about half the required depth. Next, it is better to continue drilling from the opposite side until the channels are connected. This trick will not only protect the appearance, but will also ensure the correct movement of the channel under the mechanism - strictly perpendicular to the surface of the canvas.
When drilling, you need to hold the drill strictly perpendicular to the blade. Deviations are unacceptable; this will lead to distortion of the mechanism and incorrect or short-lived operation of the handle and lock.
After preparing the groove for the mechanism, you can begin to create a hole for the tongue and bolt of the lock. This must be done very carefully and carefully. An excessively wide passage can damage the door leaf during operation and create a noise effect. It is better to cut the hole using a chisel.
Step 5. Directly installing the handle
After making the necessary holes, you can begin attaching the handle. Before screwing, it is worth marking and using a thin drill to mark the places for screwing in the bolts directly holding the handle in the door. The purpose of pre-drilling is to ensure that the handle attaches neatly and the latch functions properly. If the bolts for connecting the halves are hidden by a cover plate, it must be removed before installation using a special key. The key must be included with the handle.
Step 6. Making a slot in the door frame
After attaching the door handle and installing the lock mechanism, you need to mark and cut a groove in the door frame where the tongue and bolt of the lock mechanism will be hidden. There are two marking methods.
First option. A coloring substance is applied to the installed pawl: ink, paint, chalk, toothpaste And so on. Then when closed door By pressing or rotating the handle, a mark is made on the door frame. This option is convenient if there is a very small gap between the door and the frame or it is covered with a decorative overlay on the door leaf
Second option. With the door closed, the level of the tongue is marked using a ruler inserted between the door and the frame.
After graduation installation work You must ensure that the handle is attached correctly. If the lock works without difficulty, the bolt is easily controlled by the key and securely fixes the door, opening/closing the door does not cause difficulties, the handle is installed correctly.
The door handle installation instructions provided are suitable for most interior door handles. Installation of the handle for the front door in most cases is carried out by the manufacturer. This situation is explained by the complex design of the lock and the need for special precision during installation. Besides entrance doors are made from special durable metal, which is difficult to drill with home tools.
We recommend watching a video about installing an interior door handle
Replacing a door handle
Sometimes replacement is required old pen on already installed door. The process of replacing a door handle is slightly different from installing a new one. First of all, it is necessary to take into account that there are already various holes in the door, the size of which must be measured and when choosing a new handle, be guided by them.
So the size of the mechanism and decorative lining should not be smaller than that of the old handle. Otherwise, the edges of the old hole will be visible and ruin the appearance. If the hole is still large, it must be filled with putty and, after hardening, thoroughly cleaned.
If the size of the new lock is larger, you need to expand the grooves for it using a chisel or drill.
If the old tongue remains operational, you should leave the old mechanism, this will help avoid difficulties during dismantling and reduce the likelihood of damage to the door leaf.
To clean the painted lock plate, it should be dismantled and returned to its place after cleaning.
When painting doors, it is better to remove the door handle. This way, there is no need to cover the handle and pad with newspaper or masking tape, as there is no danger of getting them dirty.
Now you own everything necessary information for high-quality installation or replacement of a door handle. If you correctly mark the door leaf and carefully drill all the holes and grooves, installing the handle will only take a few minutes.
When replacing a broken handle, you must perform a similar sequence of operations, paying attention Special attention choosing a new pen.
Tweet
Stammer
Like!
Interior doors are sold without fittings. Therefore, the purchase and installation of door handles is carried out separately. To do this, you can use the services of a carpenter or insert it yourself.
Types of door handles
When choosing accessories, you need to know what types of handles there are and how they differ from each other. The variety offered in stores allows you to match them to the style of the room and ensures ergonomic use. Depending on the installation method, products are divided into two classes:
- invoices;
- mortise
Overlays are attached to the surface and, as a rule, there are no difficulties with them. And mortise ones require preliminary preparation holes in door leaf.
Mortise products can be of two types:
- Rotary, also called knob handles, which, when the handle is turned, open or close the latch that holds the interior door closed. In most cases, they are made in the shape of a ball or disk.
- Push ones work on the same principle as rotary ones, only the mechanism is activated by pressing the handle. As a rule, they are sold together with a lock or latch, which is where another name for them comes from - push handle latches. Fittings with a push mechanism are widely used for both interior and entrance doors.
Which type of product is best to choose depends only on your preferences. You should also consider the style of the room. Designers advise buying them the same for all doors in one room.
The height at which the door handle should be is not clearly defined by any standards. On average, it is placed at a distance of 1 meter from the floor. This value can fluctuate up or down depending on your preferences. It may also depend on the height of those who will constantly use the door. When installing, you can build on the level at which other handles in the room are located so that their height is the same.
Tools
In order to insert a handle into an interior door, you need to have a certain set of tools. It includes:
- tape measure, square and pencil;
- chisel;
- screwdriver, drill;
- drill, crown.
Using all necessary tools greatly simplifies the work process. It is quite possible to embed the fittings without a screwdriver and a crown, but in this case the work will take much longer.
Installation of fittings is ideally done when the canvas is removed from its hinges. If this cannot be done, then you need to securely fix it in order to carry out the marking and insertion efficiently and evenly.
Before you start cutting, carefully study the instructions for the door handle. All the sizes are listed there, and you will know what diameter of crown and feather you will need for the job.
The instructions below will help you place the handle on the door leaf and avoid mistakes. And for those who are encountering this matter for the first time, it will be useful to watch a video on this topic in order to have a visual idea of the upcoming installation work.

Step-by-step instructions for installing a door handle
- Marking the canvas.
- Drilling holes for handle and lock.
- Lock installation
- Handle insert.
- Marking the loot.
- Cutting a groove in the loot
We will pay special attention to each stage of the work, analyzing it in detail.
Marking the canvas
Installation begins with markings on the door leaf. First you need to decide what height will be chosen for the location of the handle. Using a square, tape measure and pencil, mark the places on the canvas where holes need to be made. To do this, measure the required distance from the floor and draw a horizontal line with a pencil, first on one side, and then transfer it to the end and the other side.
At the end in the middle of the drawn line we mark the place where the hole will be made for the lock tongue. On the same line on both sides at the same distance from the beginning of the blade - this is usually 60 mm - we mark the places where the handle itself will be inserted.

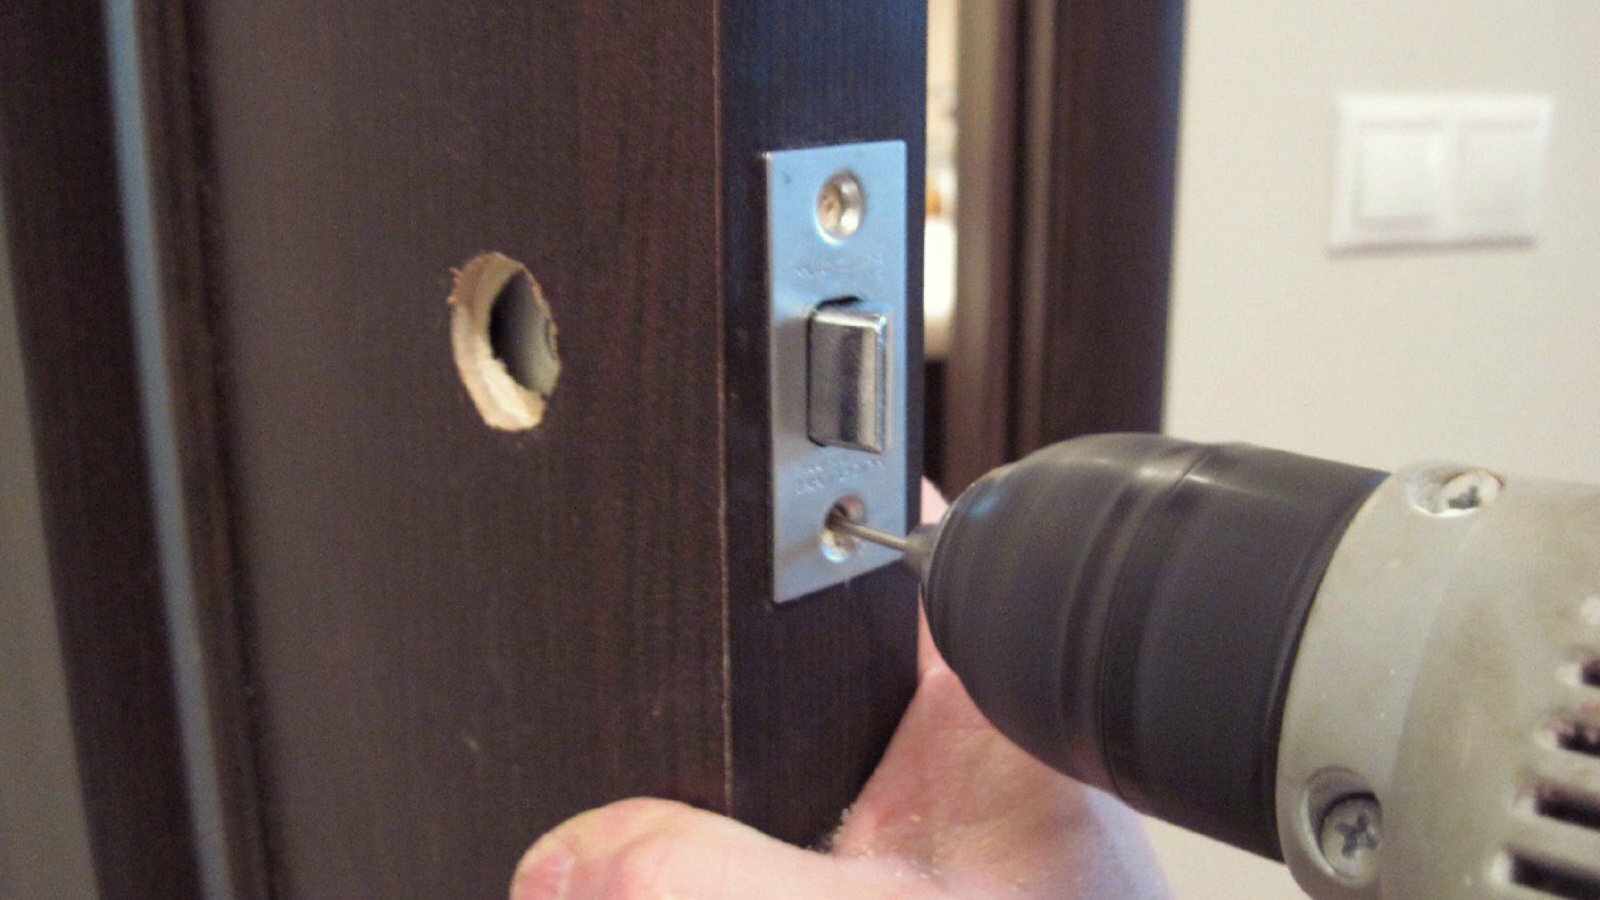
Drilling holes for handle and lock
Using a drill and a hole saw, we make a hole for the door handle. You need to check on each side of the canvas to a depth of half the thickness of the interior door. For convenience, experts recommend making a mark on the outside of the crown with a marker. First, we drill on one side to the required depth, and then on the other until it is completely drilled. This is done so that the crown does not move to the side and so as not to damage the appearance when selecting material for fittings. You need to hold the drill at an angle of 90 degrees and do not allow it to deviate either vertically or horizontally. Using a chisel we smooth out all the unevenness.
We make the hole for the lock using a drill and a pen. The work should be carried out carefully, since the distance between the pen and the corner of the end is not at all large.
Some experts prefer to make a hole for the latch first, and then for the handle. It doesn’t matter in what order you do this.

Lock installation
To install the lock, it must be inserted into the corresponding hole. Place the overlay on top and trace it around the perimeter with a pencil. Now you need to use a chisel to select the material to a depth equal to the width of the overlay in order to recess it into the canvas. For ease of work, you can use several chisels of different widths.
The trim is attached to the door with screws. It is recommended to make holes for them in advance using a thin drill, attaching an overlay and marking the necessary places with a pencil.
Handle insert
There are products in which the screws are on the outside. There is no need to disassemble them. When putting one part in place, you need to get into the holes of the latch with two guides, which have threads for bolts. Then you need to attach the second half and tighten it with bolts. They need to be tightened evenly so that the handle works well and the latch returns easily.
Products in which the screws are hidden must be disassembled. They come with instructions and a key for disassembly. The handle can be easily removed if you find the stopper on it and press it with a key. The collapsible part is bolted, after which the handle is put in place. Do not use force; assembly should be easy if done correctly.

Marking the loot
After installing the handle, you need to make a corresponding hole for the tongue in the tray. Therefore, first of all, it is important to carry out the markings correctly so that the door closes well and the lock fits into the groove without effort or friction.
Close the interior door and mark the top and bottom of the tongue on the door with a pencil. Using a square, we determine the exact middle of the castle and mark this value on the loot. Use a drill and a pen to make a hole and remove excess material with a chisel.
Cutting a groove in the loot
Before screwing the trim, it is important to check how the door closes. This will allow you to be sure that the groove for the tongue is made correctly and there will be no difficulties during operation. When closed, the door should have a slight play, that is, it should wobble a little. This is necessary because the metal thickness of the latch strike plate will be added to the groove.
The strap is fastened flush with the tray. To do this, as when installing a lock, it needs to be sunk into the hole to the required depth.
A slight play may remain even after you have screwed the cover on. This defect can be easily corrected. The strike plate always has a tongue with a small hole for a screwdriver. It is designed specifically to be bent. Using a flathead screwdriver inserted into this tab, you can adjust the doors by bending it slightly.
The entire process described can be clearly seen in the video of fitting fittings into interior doors. Installation of the handle can be considered successful if it turns easily and the latch fits into the groove without friction or effort.
The most common type of lock for doors between rooms is the latch handle. Regardless of the design and shape of the product, installation is very easy. Let's consider the procedure for installing such a handle on an interior door with your own hands.
Latch handle design
Models of this plan consist of two main elements: the product itself and the working mechanism. Both handle parts are cut into the door leaf separately.
Latch models are available with or without a latch. The lock is an additional turning mechanism. If it is not there, the door cannot be locked from the inside with a thumbscrew or a key (there is a keyhole on one side and a locking tab on the other, as in the photo).
Door handles vary in type of construction, but this does not affect the installation process in any way.
Height and distance from the edge of the door
The internal element (latch) is uniform, so it is installed the same for different pens with latching mechanism. The height from the bottom of the door and the distance from the edge are standard.
For latch handles, there are two options for inserting into the canvas: 60 or 70 millimeters from the edge. The rotary latching mechanism can “move” to the right or left by about 1 cm, and this also needs to be taken into account.
- If the handle has a spherical shape, and the distance from the edge of the door to the decorative element of the door (for example, glazing) exceeds 140 mm, it is better to fix the mechanism 70 mm from the edge. If you install the handle at a distance of 60 mm, when closing the interior door from the inside, you can hit your hand on the door frame.
- When installing a pressure product, the indentation must definitely be 60 mm.
The standard handle installation height (distance from the floor to the center of the latch) is 900–1100 mm. If the door is usually used by one person, optimal height will be located at the level of his belt.
Installation of the product on an interior door is carried out on the right or left side. For round handle models, you only need to reverse the latch design. The tongue should point towards the closing of the interior door. If the device is asymmetrical, the elements simply need to be swapped, focusing on the opening side.
What do we need?
To make the insertion process as simple as possible, prepare the following:
- drill (or screwdriver);
- wood crown (half a centimeter in diameter);
- drill (about 24 mm);
- chisel;
- hammer;
- pencil.
Installation process
Step-by-step instructions for installing the latch include several steps.
Marking
The procedure begins with marking the door leaf.
- Use a pencil to mark the location for drilling. Diagrams are usually included with the product.
- If there are no explanations, you can apply the dimensions yourself. To do this, mark with a pencil a distance of 60 mm from the door edge, the height of the location is from 90 to 1100 mm.
- We mark the central point for drilling on the side edge of the door leaf. Dimensions are drawn along the center line.
Hole preparation
At this stage we do the following:
- Using a chisel, we hollow out a 3 mm recess under the face plate of the latch, corresponding to its width. It is better to mark the center in advance with an awl so that you do not have to apply the markings again.
- Using a half-centimeter crown, we drill out through hole. It is better to do this on both sides of the door leaf so as not to damage the door coating at the exit of the crown.
- Now let's move on to the side edge. Take a wood drill (about 24 mm in diameter). They need to make a hole in the marked center for the latch. You shouldn’t go too deep, otherwise you can make a hole in the canvas all the way to the panel.
Product Installation
At this stage we have two holes ready. Then we proceed in the following order:
- We install a snap mechanism into the side hole and fasten it with self-tapping screws.
- Remove the upper part of the handle. There must be a side hole for this.
- Using the key included in the kit (you can take any other thin flat object), press the tongue inside the hole and lift up the handle itself.
- We remove the decorative trim and find the mounting holes underneath it.
- We install the outer part of the product, and then the inner half.
- We tighten both parts with screws that are included in the kit.
- We put on the decorative trim and the body of the handle-latch. In this case, it is necessary to press on the inner tongue with a key or other suitable object.
- Now the door needs to be closed in order to circle the place where the latch tongue touches the door frame. Using this marking, we hollow out a recess for the entrance of the lock.
- We install a decorative plastic pocket covering the wooden groove.
- We screw a metal plate over the hole under the latch tongue. At this stage, the installation of the handle is completed.
If you don't have a drill, all the holes can be cut with a chisel. However, the process of installing a door handle will require some experience and skill and will take more time.
Video instruction
The following video will help you visualize the process more clearly.
Installing door handles with your own hands is quite a troublesome task, especially if a person is faced with this task for the first time. In order to avoid difficulties during the installation process, it is necessary to consider the design and basics. Depending on this, the work may be performed with some differences.
Installation technology various types door handles have their differences
Handle design
Before installing a door handle, you need to understand the design features modern models this type of fittings. Of course, the specific type of system is of great importance, but several general defining points can still be identified.
The design of a standard handle consists of the following parts:
- lever;
- ring;
- kernel;
- socket;
- travel limiter;
- stoppers.
You should also take into account such details as the tongue and locking mechanism, the metal cover on the box, and the tightening screw. The last detail is used when installing a handle on hollow interior doors. It acts as self-tapping screws, fixing the system by tightening opposite sides. You also shouldn’t miss another important piece of the design – the latch. If this type of locking system is present, an additional turning screw must be inserted.

Push-type door handle with tongue for secure door fixation
You shouldn't get down to business if you're not sure you can put everything together. correct sequence with your own hands. Otherwise you may lose important details or completely damage the product.
Types of handles
The process of installing handles on interior doors with your own hands may differ depending on the type of mechanism used. Typically, the following types of handles are installed on interior doors:
- On the socket– they are easy to install with your own hands, since there is no need to drill a large hole; it is enough to ensure free movement of the rod. Externally it is decorated with a rosette overlay.
- Nobs- This is a rotary system that looks like a round handle with a latch or keyhole. It's pretty convenient option, especially if you install such a system on a bathroom door, but if low-quality materials are used, it quickly breaks down.
- Push– to open the door, you need to move the handle to the lower position by pressing it. This removes the halyard latch, which returns to its place immediately after releasing the handle.

The most popular types of door handles
Required Tools
Before you try to install a handle on an interior door, you need to prepare your tools. You don’t necessarily need everything, especially if you purchased the simplest fittings. In order to install handles and latches on the doors with your own hands, you will need:
- drill;
- screwdriver;
- a set of drills, including a “feather” and crowns of different diameters;
- chisel;
- hammer;
- self-tapping screws;
- square;
- pencil;
- stationery knife;
- awl;
- roulette;
- conductor.
The last tool is a template for installing handles. It will facilitate the process of marking and drilling all the necessary holes.

A screwdriver will make the job of installing a door handle much easier.
Installing a handle on an interior door
Before inserting a standard door handle into an interior door, you need to make markings. To do this, use a square and a pencil. Measure the required height from the floor. Usually this value varies between 80-100 cm. If you have a prepared conductor, everything is much simpler. Just screw it to the door from the end. The holes will subsequently align with the tongue trim. So, let's look at how to insert a handle into an interior door with your own hands:
- Using a drill and a crown drill, drill a through hole in the canvas.
- Using a pin drill or a smaller hole saw, drill through the end of the door.
- Then you need to put the tongue with the locking system inside and check its operation.
- Trace the contours of the trim and remove a thin layer of material so that the piece of iron is installed flush. Screw the part with self-tapping screws.
- Insert the rod inside the already installed part. Place a handle with a ring and rosette on top. If the ring rubs against the door, you need to recess it by grinding off a small layer of coating around the hole with a chisel.
- Screw the handle with three self-tapping screws or secure with tension pins.
- Attach a decorative trim on top. The connection in most models is adjusted with a hex key.
In order to install the metal trim on the frame, you need to mark the position of the tongue. This is convenient to do at the stage of installing this very part into the canvas. Drill or scrape out a recess of the required size in the box. Then trace the iron plate, press it flush and secure it with self-tapping screws.
Lock mortise
It's one thing to install simple fittings, but how to install a handle with a lock on an interior door? To do this, it is better to remove the fabric from the hinges in order to carefully embed the lock.

An example of a high-quality embedded door handle of a simple design in a new leaf
Now let's look at how to properly install a handle with a lock on a door with your own hands:
- Mark the position of the lock on the end of the door, outline the contours of the system.
- Using a pen, drill several holes in the marked area, and carefully gouge out the rest with a chisel, periodically checking the passage of the lock.
- Remove a couple of millimeters of the coating to recess the iron plate.
- In order to insert the handle, you need to drill a hole on both sides of the blade, suitable in diameter for the free passage of the axis. To mark its position, make a mark on the lock with a pencil, set it temporarily in place and transfer the mark to the door, and then measure the required depth.
- Secure the lock with self-tapping screws.
- Insert the axle inside and deepen the ring.
- Install the handle, lock it in place.
Make a recess on the frame for the pin and tongue to fit into. Press the nozzle flush and secure with self-tapping screws.
If play is formed, it is necessary to file the handle axis with a grinder. Some manufacturers put special marks on it to make this easier.
Latch Installation
Another question - how to install latches on door handles? In most cases, this is no more difficult to do than inserting the handle itself. Let's look at how to quickly install a latch handle on an interior door with your own hands:
- Drill an additional hole in the door. It should match the position of the latch mechanism.
- Thread the axle into the lock and install the cap on top . You need to install a plug or key lock with reverse side premises. A rotary latch is attached inside.
- Fix the position of the parts with self-tapping screws and disguise the fastening with decorative caps, if provided for by the design.
- An additional hole is cut on the frame for the latch tongue, if there is one. If the lock operates on the principle of fixing the halyard tongue, no additional recess is required.
As you can see, installing door interior handles doing it yourself is a troublesome task, but quite accessible even for a beginner. Please note that misalignment of parts can lead to rapid breakdown of the fittings.
This article will help you figure out how to embed a latch handle into a door leaf. By adhering to the work algorithm described in the article, you can easily perform this operation yourself, with a minimum set of tools and very quickly.
No door can do without a handle. The most popular type of handle for interior doors today is the latch handle.
The design of handles of this type is such that, regardless of appearance, they are all installed in the door leaf in the same way. This article will tell you how to do it yourself.
Latch handle design
The handle itself, that is, the visible part of it, can look completely different. So:

or like this:

All these latch handles essentially consist of two parts - the handle itself:

and the latch mechanism:

Both parts of the latch handle require separate insertion into the door leaf.
Latch handles come without a latch - a door with such handles cannot be locked from the inside, but with an additional latch rotating mechanism, installed on the handle and allowing you to lock the door from the inside, and with a key - on one side of the handle there is a key holder that allows you to lock the door from the outside, on the other there is a lock. All handles have design differences that do not in any way affect the insertion process. Interior(latch) is also the same, that is, it cuts in the same way for all types of latch handles.
So let's get started.
Necessary tool
To make the process of installing the latch handle as easy as possible, you will need:
- Hand drill or screwdriver.
- Wood crown with a diameter of 50 mm.
- Wood drill with a diameter of 23-24 mm.
- Chisel.
- Hammer.
- Pencil.
The crown and drill can be purchased separately, or in the form of a set, which is called “Kit for inserting latch handles.”
Installing the latch handle
1. We begin the installation process by marking the door leaf for drilling. The marking diagram, as a rule, comes complete with the handle.

If there is no diagram, you can mark it manually. To do this, place a mark at a distance of 60 mm from the edge of the door.

2. On the side edge of the door, along the center marking line, mark the center for drilling.

3. Using a chisel, hollow out a three-millimeter recess under the face plate of the latch. It makes sense to first mark the center with an awl so that you don’t have to mark it again.

4. Using a crown with a diameter of 50 mm, drill a through hole. It is better to do this on both sides of the door to avoid damage to the door covering at the exit of the crown when drilling.


5. As a result, we get the following hole:

6. Move on to the side edge. Using a wood drill with a diameter of 23-24 mm, drill a hole for the latch into the marked center. You shouldn’t make it too deep, otherwise you risk drilling through the door all the way to the panel.

7. We now have two holes.

8. Install a latch in the side hole and screw it with self-tapping screws.

9. Remove the upper part of the handle. To do this, look for a hole on the side.

Using the included key or any other thin flat object:

press the tongue inside the hole:

and remove the handle itself:

10. Remove the decorative trim and thereby open the mounting holes.

11. Insert the outer half of the handle.

12. Insert the inner half. We tighten both with the screws included in the kit.

13. Put on the decorative trim and handle body. Don't forget to press the inner tongue with the key.

14. With the door closed, mark the place where the door jamb latch tongue touches, and then hollow out a recess for the latch tongue in the resulting location.

15. Insert a decorative plastic pocket.

16. Screw on the metal plate.

17. The handle is installed.

If you don’t have a drill, then all the holes can be made using a suitable chisel, however, in this case, installing the handle will require more serious repair and construction skills and may turn out to be an overwhelming task for an untrained person.