To decorate the facade of a house, decorative architectural elements are often used, giving its appearance special beauty and originality. Among such elements are window arches. They are used quite often both in private homes and in buildings of various institutions.
How to make such an arch? Is it difficult? How long will it take to complete the work? All this and more will be discussed further.
Types of brick arches
First, let's look at what an arch is and what types it comes in. An arch is a shaped lintel that can be installed both above door and window openings. Here we will consider the window arch.
There are three types of arches:
- wedge arch, in which the bricks above the rectangular window are laid out in a wedge, and the bricks fix themselves, pressing against each other;
- a beam arch, which is also called truncated or incomplete, is an arc whose height is less than its width, that is, its radius;
- a regular arch (full) is half a circle, that is, the height is equal to the radius.
Each of the listed arches has its pros and cons. Below we will describe the technology for creating a beam arch, which is perfect for almost all facades.
How to make a brick arch with your own hands?
The technology for creating an arch includes several stages:
- making a template;
- installing a template;
- brick arch set;
- arch compression;
- dismantling the template;
- fine finishing.
Making an arch template
The first stage is making a template. The template itself is made from a sheet of chipboard using fiberboard and wooden blocks. The quality of the template, the compliance of its shapes and sizes with the given parameters determine the quality of the arch itself, so its production must be taken as seriously as possible.
First you need to determine the dimensions of the template. To do this, the width of the opening is measured (take, for example, a window 1500 mm wide). The width of the template is taken to be 5 mm less - 1495 mm. This will help you later dismantle the template without any problems. last stages, even if it swells from moisture. The height of the template must correspond to the selected arch height; for example, let’s take 168 mm. It is desirable that a whole facing brick be laid along the top of the arch, therefore the height is selected based on the number of bricks. The height of one row is approximately 72 mm (the height of the brick and the seam), and the number of rows is chosen to be 4. Thus, the height of the arch is: 72 * 4-120 = 168 mm, where 120 mm is the height of the shaped brick laid on the edge.
The height can be chosen both higher and lower, but you need to take into account that an arch that is too low with a large width can sag under the influence of the load from the brickwork.
The thickness of the template depends on the thickness of the wall. It should be such that you don’t have to make another additional template, because there should be two arches: the front one and the backing one. We assume a thickness of 200 mm, which is half the thickness of the cinder block. A larger template will be heavier, which is also undesirable.

So, the template parameters are as follows: width – 1495 mm, height – 168 mm, thickness – 200 mm. Now you can start making it. The center of the arch, the top and bottom points are marked on the chipboard sheet. To obtain a truncated semicircle, the upper and lower points are connected to each other by an arc. To do this, you can use a wire or thread with a pencil tied to it on one side and a metal peg on the other. This is a kind of compass, only its radius is much larger than that of an ordinary one.
For more convenient installation of the template, you need to retreat about 100 mm from the lowest extreme points of the arc. This is necessary so that the arch has supports for attaching the bars.
A circle is cut out along the resulting contour. You can use a jigsaw for this.

The template consists of two such circles, so they need to be cut out in duplicate. In this case, it is easier to first cut out the first one, and then circle it, attaching it to chipboard sheet, and cut out the second one along the resulting contour.

In order for the template to become voluminous, they fix between two circles wooden blocks. After this, the template structure is fastened with screws or nails.
A strip of fiberboard is attached to the upper arched part of the template with nails (20-25 mm). It makes the template smoother, gives it the correct shape, and also holds the bricks laid on top.

Next, the template is installed in the window opening. Supports made of boards 20 mm thick are installed under it, and between the supports there is a spacer to fix them. The template is installed on the boards at the same level as the facing shaped brick; its height should coincide with the window frame.

When installing a beam arch, you need to slightly trim the top brick, which will be installed on the template, and the window frame with a grinder. In this case, the arch will be installed lower, and the brick will move towards the inner corner.

The face arch usually protrudes above the wall surface, and this protrusion should be minimal (less than 60 mm). A large protrusion can lead to the arch's bricks getting wet and gradually collapsing. But it is advisable to cover even minor protrusions with some kind of material, for example, tiles or a sheet of metal. On the other hand, the larger the protrusion, the more impressive and voluminous the arch looks, so it’s up to you to decide what to give preference to: beauty or practicality.
When laying facing bricks, you need to pay attention to the fact that it has two front sides, and in cases where the brick protrudes strongly beyond the plane of the wall, not only the front sides are visible, but also the “back sides”, the surface of which is uneven and rough, and does not look very attractive.

Before you start laying out the arch, you need to install fines on both sides, which will make it possible to clamp the arch faster and easier.
You need to start making the arch from the “heels” on which it rests. After installing them, the height of one row of masonry is measured with a tape measure and the number of rows around the arch is calculated. In the example described, the brick with a seam measures 70.5 cm in height, and the number of rows is ten. Next, marks are applied to the template to mark the positions of the rows.

The arch is built up from both sides at once from the bottom up. The last brick, called the “key” brick, is installed in the center of the arch at its apex and secures the remaining bricks. There can be two such bricks if their total number is even. Key bricks must be driven tightly into the masonry so that they not only hold themselves, but also hold the entire arched structure.

When the arch is built, it needs to be clamped with a brick, and it is advisable to do this on the same day, without delaying it until later, otherwise it may burst. Since brick fines were previously installed, clamping the arch will not be difficult.
After clamping the arch, you can immediately remove the template and clean the surface. If the weather is good and the air temperature is high, the solution will quickly harden on the same day, which will make it possible to remove the template without damaging the masonry. If it is left for a day or two, it will be much more difficult to clean the grout from the grout.

The seams during the laying process are not always perfectly smooth and clean, so cleaning them is a mandatory procedure. The mortar may be squeezed out of the seams, ending up on the front surface of the masonry, or may not completely fill them. In the first case, the seams are cleaned and wiped with a dry cloth. In the second, the solution is additionally applied to the seams in the direction from bottom to top.
The next day, the wall with the arch needs to be raised several brick rows.
Back-of-the-butt arch

Now you can proceed to the backfill arch. To make it, the same wooden template is used, but with some modifications. Because the arched windows have a quarter of 5 cm on the sides, then both the arch and, accordingly, the template must have it, so the template needs to be increased by this amount. To do this on fiberboard sheet wooden blocks with a cross-section of 45x45 mm and a length of 200 mm are nailed, the distance between them is about 70 mm.

Since the sheet is quite flexible, the resulting tape is easily bent and attached to the upper arched part of the template.

Next, the technology for making the backing arch repeats the technology for making the front arch. First, the “heels” are installed, and bricks are laid from them to the top of the arch. For this purpose, used backfill single bricks installed on the edge are usually used.


Before starting work, it is advisable to immediately prepare everything necessary materials and tools, as well as make a template, cut wooden blocks, supports and spacers. In total, the entire process of making an arch takes 8.5-9 hours, so it’s better to start work in the morning and do everything in one day.
Why might an arch burst?
Let's look at the reasons why an arch may burst:
- The radius (height) of the arch is too small with a large width. This design absorbs significant loads that are not distributed evenly. The result may be the appearance of cracks, but the arch itself will not collapse;
- Corners or metal bases are used as a template. They are used to further strengthen the structure, but sometimes this leads to the opposite result. Why? When using a wooden template, the brickwork shrinks and becomes compacted after it is removed. If you use a metal base, it does not allow the masonry to sag, since it is not removed and interferes with uniform natural shrinkage. In this case, the overall structure will be quite strong, although with cracks;
- the template was in the arch for quite a long time after its manufacture. For example, he was not taken away immediately, but left overnight. During this time, the wood absorbed moisture, swelled, and the arched masonry could not withstand the stress. True, this does not happen often, but still, in cases where it is impossible to immediately remove the template, it is better to cover the arch with polyethylene;
- foundation subsidence. Appearance of cracks around window openings- one of the signs of an incorrectly chosen or constructed foundation, and cracks on the arch are no exception. In this case, you need to strengthen the foundation.
That's all for building a brick arch over a window. As you can see, there is nothing complicated about this, and the process itself takes no more than 9 hours, so it can be completed in one day. The main thing is to prepare everything you need in advance and strictly follow the technology. This is the key to a quality result.
To decorate the facade of a house, decorative architectural elements are often used, giving its appearance special beauty and originality. Among such elements are window arches. They are often used both in private homes and in buildings of various institutions.
How to make an arch? Is it difficult? How long will it take to complete the work? All this and more will be discussed further.
First, let's look at what an arch is and what types it comes in. An arch is a shaped arc that can be installed both above door and window openings. Next, we will consider the window arch.
Species window arches there are three:
- wedge arch, in which the bricks above the rectangular window are laid out in a wedge, and the bricks fix themselves, pressing against each other;
- a regular arch (full) represents half a circle, that is, the height is equal to the radius.
- a beam arch, which is also called truncated or incomplete, is an arc whose shape is less than its width, that is, its radius;
Each of the listed arches has its pros and cons. Below we will describe the technique for creating a beam arch, which is perfect for almost all facades.
How to make a brick arch with your own hands?
The technology for creating an arch contains several stages:
- making a template;
- installing a template;
- brick arch set;
- compression of the arch;
- dismantling the template;
- fine finishing.
Making an arch template
The fundamental stage is making a template. The template itself is made from a sheet of chipboard using fiberboard and wooden blocks. The quality of the template, the correspondence of its shapes and sizes to the given parameters determine the proportions of the arch itself, so its production should be approached as lightly as possible.
First you need to determine the dimensions of the template. For this purpose, the width of the opening is measured (take, for example, a window 1500 mm wide). The width of the template is taken to be 5 mm less - 1495 mm. This will help in the future to easily dismantle the template at the last stages, even when it swells from moisture. The height of the template should correspond to the selected arch height, for example, take 168 mm. It is desirable that a full face brick be laid along the top of the arch, therefore the height is selected based on the number of bricks. The height of one row is approximately 72 mm (the height of the brick and the seam), and part of the rows is selected 4. Thus, the height of the arch is: 72 * 4-120 = 168 mm, where 120 mm is the height of the shaped brick laid on the edge.
The height can be chosen both higher and lower, but it must be taken into account that an arch that is too low with a large width can sag under the influence of the load from the brickwork.
The thickness of the template depends on the thickness of the wall. The arch should be such that there is no need to make a second template, because there should be two arches: the front one and the backing one. We take a thickness of 200 mm, which is half the thickness of the cinder block. A larger template will be heavier, which is also undesirable.
So, the template parameters are as follows: width – 1495 mm, elevation – 168 mm, thickness – 200 mm. Now you can start making it. Get a sheet of chipboard to mark the center of the arch, the top and bottom points. So, to get a truncated semicircle, the upper and lower points are connected between the signs by an arc. To do this, you can use a wire or thread with a pencil tied to it on one side, and reverse side- a metal peg. This is a kind of compass, only its radius is incomparably larger than that of an ordinary one.
For more convenient installation of the template, you need to retreat about 100 mm from the lowest extreme points of the arc. This is necessary so that the arch has supports for attaching the bars.
A circle is cut out exactly along the resulting contour. You can use a jigsaw for this.

The standard consists of two such circles, so they need to be glued in duplicate. In this case, it is easier to first cut out the first, and then trace it, placing it on a sheet of chipboard, and cut the second along the resulting contour.

To make the template three-dimensional, wooden blocks are fixed between the two circles. Afterwards, the template structure is fastened with self-tapping screws or nails.
A strip of fiberboard is attached to the upper arched part of the template with nails (20-25 mm). It makes it smoother, gives it correct form, and also holds bricks laid on top.
Installing an arch template in a window opening

Next, the template is installed in the window opening. Supports made of boards 20 mm thick are installed under it, and between the supports there is a spacer to fix them. The template is installed on the boards at the same level as the facing shaped brick; its height should coincide with the window frame.

When installing a beam arch, you need to slightly cut the top brick, which will be installed on the template, and the window frame with a grinder. In this case, the arch will be installed lower, and the brick will move towards the inner corner.
Facial arch arrow

The face arch usually protrudes above the wall surface, and this protrusion should be minimal (less than 60 mm). A large protrusion can lead to the arch's bricks getting wet and gradually collapsing. But it is advisable to cover even minor protrusions with some kind of material, for example, tiles or a sheet of metal. On the other hand, the larger the protrusion, the more impressive and voluminous the arch looks, so it’s up to you to decide what to give preference to: beauty or practicality.
When laying facing bricks, you need to pay attention to the fact that it has two front sides, and in cases where the brick protrudes strongly beyond the plane of the wall, not only the front sides are visible, but also the “back sides”, the surface of which is uneven and rough , doesn't look very attractive.
Construction of a brick arch

Before you start laying out the arch, you need to install fines on both sides, which will make it possible to fix the arch faster and easier.
You need to start making the arch from the “heels” on which it rests. After installing them, the height of one row of masonry is measured with a tape measure and the number of rows around the arch is calculated. In the example described, the brick with a seam measures 70.5 cm in height, and the number of rows is ten. Next, marks are applied to the template to mark the positions of the rows.

The arch is built up from both sides at once from the bottom up. The last brick, called the “key” brick, is installed in the center of the arch at its apex and secures the remaining bricks. There can be two such bricks if their total number is even. Key bricks must be driven tightly into the masonry so that they not only hold themselves, but also hold the entire arched structure.
Clamping the arch with a brick

When the arch is built, it needs to be clamped with a brick, in addition, it is advisable to do this on the same day, without delaying it later, otherwise it may burst. Since brick fines were previously installed, cramping the arch will not be difficult.
After clamping the arch, you can immediately remove the template and clean the surface. If the weather is good and the air temperature is high, the solution will quickly harden on the same day, this will definitely make it possible to remove the template without damaging the masonry. If it is left for a day or two, it will be much more difficult to clean the grout from the grout.
Cleaning the arch from the solution

The seams during the laying process are not always perfectly smooth and clean, so cleaning them is a mandatory procedure. The mortar may be squeezed out of the seams, ending up on the front surface of the masonry, or may not completely fill them. In the first case, the seams are cleaned and wiped with a dry cloth. In the second, the solution is additionally applied to the seams in the direction from bottom to top.
The next day, the wall with the arch needs to be raised several brick rows.
Back-of-the-butt arch

Now you can proceed to the backfill arch. To make it, the same wooden template is used, but with some modifications. Since arched windows have a quarter of 5 cm on the sides, both the arch and, accordingly, the template must have it, so the template needs to be increased by this amount. To do this, wooden blocks with a cross-section of 45x45 mm and a length of 200 mm are nailed onto a fiberboard sheet, the distance between them is about 70 mm.

Since the sheet is quite flexible, the resulting tape is easily bent and attached to the upper arched part of the template.

Next, the technology for making the backing arch repeats the technology for making the front arch. First, the “heels” are installed, and bricks are laid from them to the top of the arch. For this purpose, used backfill single bricks are usually used, installed on the edge.


Before starting work, it is advisable to immediately prepare the necessary materials and tools, as well as make a template, cut wooden blocks, supports and spacers. In total, the round process of making an arch takes 8.5-9 hours, so it’s best to start work in the morning and get everything done in one day.
Could this cause the arch to burst?
Let's look at the reasons why an arch can break through:
- The radius (height) of the arch is too small with a large width. This system takes on significant loads that are not distributed evenly. The result may be the appearance of cracks, but the arch itself will not collapse;
- Corners, or metal bases, are used as a template. They are used to further strengthen the structure, but sometimes this leads to the opposite result. Why? When using a wooden template, over time it is removed, the brickwork shrinks and becomes compacted. If you use a metal base, it does not allow the masonry to sag, since it is not removed and interferes with uniform natural shrinkage. In this case, the overall appearance will be quite durable, although with cracks;
- the template was in the arch for a long time after its manufacture. For example, he was not taken away in one sitting, but left overnight. During this time, the wood absorbed moisture, swelled, and the arched toe could not withstand the tension. True, this happens infrequently, but in cases where it is impossible to immediately remove the template, it is better to serve the arch with polyethylene;
- foundation subsidence. The appearance of cracks near window openings is one of the signs of an incorrectly chosen or constructed foundation, and cracks on top of the arch are no exception. In this case, you need to strengthen the foundation.
That's all there is to building a brick arch over a window. You can see here that there is nothing complicated about it, and the process itself takes no more than 9 hours, so it’s quite possible to complete it in one day. The main thing is to prepare everything you need in advance and strictly follow the technology. This is the key to a quality result.
An arch is an architectural element made in the form of a curved lintel over an opening in a wall or a span between two supports. Similar designs are widely used to decorate facades and interior interiors residential buildings and public buildings.
Do-it-yourself brick arch is not a problem for home handyman having some skills in performing construction work.
Types of brick arches
An ordinary brick arch is a symmetrical vaulted structure, the strength of which is ensured by lateral expansion. Experts distinguish the following types of brick arches:
- wedge - bricks are laid out with a wedge and secured with a “lock”;
- beam - bricks are laid along a truncated arc;
- full arches - bricks are laid out in a semicircle with a height of half the width of the opening.

First of all, you need to decide on the type of arch you plan to build and prepare the necessary materials and tools. Each of the described brick arches has its own pros and cons, but the diagram and sequence of work on their construction is not much different.
The sequence of building a brick arch

The technology used to build a brick arch with your own hands depends on the chosen type and design features of the architectural element. The entire process of constructing a brick arch can be divided into the following stages:
- development and production of a vaulted element template;
- installing a template;
- laying out a brick arch;
- compression and fixation of the arched structure;
- disassembling and removing the template;
- finishing of brickwork.

To make a template for the future arch, chipboard sheets and wooden beams. Depends on the quality of the template appearance and the quality of the arched structure, so it is necessary to correctly calculate its dimensions.
The template is made several centimeters smaller than the width of the opening along the height of the arch, so that there are no problems with its dismantling after laying out the element.

The center of the arched structure, its upper and lower points are applied to the chipboard sheet, then they are connected to each other in the form of an arc so that the result is a truncated semicircle. Using the resulting markings, two circles are cut out, which are connected using bars and screws, forming a full-size arch. The template is installed in the opening and fixed in it using wooden supports and spacers.

Before laying out the arch, grooves are installed on both sides of the opening, allowing you to clamp the arch quickly and easily. The brick arch is set from bottom to top simultaneously on both sides. A “lock” is installed in the center at the top of the arch - a brick that is tightly driven into the masonry and secures the entire structure.

After clamping the brick arch, the template is removed and the surface is cleaned. In order for the masonry to look neat, it is necessary to carefully align the seams and remove excess mortar from the front surface of the brickwork.
Materials used for constructing brick arches
For the manufacture of arches, a special wedge brick is usually used, since its trapezoidal shape contributes to better fixation of the arched structure. You can buy wedge bricks at finished form in stores selling building materials. You can make wedge brick yourself by cutting it to the desired shape ordinary brick blocks.

Special solutions are often used to secure arched structures. For example, for stove arches, the solution is made from clay with the addition of fireclay sand with inclusions of fine gravel, sifted through a sieve with cells up to 0.8 cm in diameter. In this case, the thickness of the seams should be minimal.
The main mistakes when building arches with your own hands

A do-it-yourself brick arch, if calculated correctly and accurately following the work production technology, will become a magnificent decoration for your home and will last a very long time. However, there are a number of reasons that can lead to the destruction of the arched structure:
- insufficient height of the arch with a large opening width - with this design, the loads are distributed unevenly, which can lead to the formation of cracks;
- the use of metal corners and bases as a template - metal, unlike wood, prevents the uniform natural shrinkage of the arched structure, which can cause it to crack;
- untimely dismantling of the template - if the wood has time to become saturated with moisture and swell, this can lead to excess stress, so the arch should be protected from moisture by covering it with polyethylene;
- weak foundation - cracks in arches often occur when the foundation subsides; in this case, it is necessary to carry out a set of measures to strengthen the foundation and prevent subsidence of the base of the arched structure.
Arches can be made in a variety of styles and used to decorate various architectural elements. A do-it-yourself brick arch will give your home original look and will create a unique atmosphere.
Video
By the way, a brick arch can be not only in a house, but also in a stove. The following story will tell you how to make such an arch.
Often the builder is faced with the task of building an arched ceiling, arranging a domed roof or an original “humpbacked” bridge over a pond, which is becoming an increasingly popular small architectural form. At the same time, in most cases, masters do not bother themselves with complex calculations, using two quantities that are known even to a seventh grader. These values are the width of the span, subsequently covered by the arch, and the height of the rise of the arch, which is calculated by determining the distance between an imaginary horizontal line drawn between the points at which the arch is supported and the highest point of the arch. According to experts, these values are not enough to build a reliable arch with high performance characteristics. The main role in the design of an arched ceiling is given to the choice of materials from which the arch will be constructed, and the associated calculation of the arch, the correctness of which determines its subsequent operational characteristics. By following these recommendations, you can design a reliable arched ceiling which will become great solution and not only diversifies the design of the apartment, but also becomes an excellent decoration landscape design garden Specialists in this field will easily carry out everything necessary calculations, but what to do if it is not possible to use their services and you have to do all the work yourself? In this case, use our recommendations that will help you cope with the task as efficiently as possible.
Arch systems from a professional's point of view
From the point of view of engineering specialists, arched structures are systems of a broken or curved nature, the supporting elements of which are subject to vertical loads, leading to inclined reactions directed into the opening. The horizontal component of such a support reaction is the thrust, which indicates that arched systems are thrust structures. This is their main difference from beams, which experience only normal mechanical stress. IN modern construction arches are used as the main load-bearing structures of buildings for various purposes, be it household, industrial or agricultural buildings, with a span of 12 to 70 m. As for foreign construction, in this industry the design of arched spans is even more developed, which makes it possible to construct arches up to 100 m high or more.

Classification of arches: main varieties
According to static circuit , distinguish hingeless , double-hinged And three-hinged arches ;
Also, the supporting ends of the arch can be connected by a horizontally located rod that takes up the horizontal load and is called puff . The calculation of an arch with a tie is somewhat different from the calculation of a two-hinged arch or a three-hinged arch without a tie.

Each of these types has its own advantages and disadvantages, and therefore the choice of design is made by a design engineer who will calculate the three-hinged arch taking into account the strength requirements for it, the materials used for its construction, and the architectural tasks assigned for one design or another.
In accordance with the support scheme, there are arches with tightening And arches without tightening . If the former perceive the thrust, then the thrust of the latter is transmitted to the supports. The tightening is made from profile steel or reinforcement. If the arch will be used in aggressive environments that promote metal corrosion, it is permissible to use glued wood ties.

According to the form they are distinguished:
- Triangular arches consisting of straight semi-arches. Calculating a triangular arch is not difficult, and you can do it yourself;

- Pentagonal arches;
- Segmental arches, the axes of the semi-arches are located on a common circumference;
- Pointed arches, consisting of several semi-arches, the axes of which are located on two circles;

How to calculate a three-hinged arch with a tightening: recommendations from experts
If you are planning to install a small arch, calculation and design will not cause you any particular difficulties, since it is preferable to use sheets for their production building material huge sizes, such as plywood, plasterboard or OSB boards. The largest indicators of their length and width are 250 and 120 cm, respectively, which allows you to simply draw an arch on a sheet of material and cut out at least two component parts of the load-bearing beams. Finally, such arches are sheathed sheet material, after which we can assume that the arch is ready. Despite the speed and simplicity of installing arches using this method, it also has its own disadvantages, including a large number of material wasted on waste, the decorative nature of the finished arch and the inability of the structure to bear the load.

The arrangement of arched structures becomes significantly more complicated if the master is faced with the task of installing an arch over a large clearance (up to several meters) or an arch that can withstand the highest loads. Due to the fact that it is difficult to find materials on the construction market whose dimensions allow the installation of such an arch, it is designed as a stacked structure consisting of several parts. In this regard, the master is faced with the task of accurately calculating the arch and determining the dimensions of its parts.

As mentioned earlier, arches are distinguished according to parameters such as shape, size and height, and before implementing a project for calculating a wooden arch, it is necessary to clearly understand the design and approximate dimensions of the desired arch. Taking into account these parameters, it is easier to decide on the choice of materials for its installation and subsequent calculations.
Amateurs often get scared when they hear the phrase “arch calculation,” but the calculations in this case are simple and are based on the use of school formulas from geometry. In addition, to facilitate calculations, it is necessary to draw the outline of the arch on a slightly reduced scale on graph paper. After this, an arch template is made in real size, having which you will be able to most effectively carry out further calculations, since you will be able to attach a so-called copy of the arch to the place of its installation and evaluate the correctness of the calculations made. To make a template, you can use thick cardboard, plywood or a sheet of fiberboard.

Arched structures occupy a vast niche in architecture, and their use is a very broad topic that cannot be covered in one article. In this material, we will look at making an arch in an apartment or private house, since a traditional rectangular opening, designed in the form of an arch, will become an exclusive detail of the apartment’s interior, distinguishing it from other apartments.
Let's consider an example of calculating a three-hinged arch:
In most cases, regardless of the experience of the master, he knows three parameters of the arch, including the width of the span covered by the arch, the height of the arch, and the depth (width) of the wall. The master is faced with the task of calculating the parameters of the arch parts, assembling them into a single arched structure and firmly securing it.
Method number 1 - empirical
Although any calculation of an arch begins with calculating the radius of its circumference, an arch does not always represent an arc of a circle. There are situations when the arch consists of two arches (this applies to arches made in the Gothic style) or are characterized by asymmetrical outlines. In this case, each arc of the arch is calculated separately. But, let's return to calculating the circumference of the arch. It is more convenient to produce it on paper, while reducing the size, on a scale, for example, 1: 50. Having prepared the paper and a compass, draw a doorway on a sheet taking into account the scale and draw an axis of symmetry dividing the opening in half. After this, the axis of the compass must be changed by placing the leg with the needle directly on the axis of symmetry. Next, you need to draw several arcs and, having chosen the most optimal one, remove the rest using an eraser.

To demonstrate this example more clearly, let’s draw the arc of an arch:

where R is the radius of the circumference of the arch, and L represents half the chord of the arch, while the size of the chord corresponds to the length of the arch clearance. As for H, this indicator reflects the height of the arch.

Method number 2 - mathematical
To carry out a mathematical calculation of the radius of the circle of an arch, use the Pythagorean theorem, according to which:
R= L2 + (R2 - H2)
R= L2 + (R - H)2
Having expanded the binomial, we transform the expression into the form:
R2 = L2 + R2 - 2HR + H2
Subtract R from both sides and get:
L2 + H2 - 2HR = 0
Let's move the term with R beyond the equal sign:
2RH = L2 + H2
And finally, we get the desired R:
R = (L2 + H2)/ 2H
Important! Formula for calculating the radius of an arch's circumference: R = (L2 + H2)/ 2H , where R is the radius of the arch circumference, H is the height of the arch, L is half the chord of the arch (the length of the arch clearance).

Due to the fact that the arch consists of several parts, for the manufacture of which you will have to use a board of a certain width, we will calculate the dimensions of the part that can be made from a board with specific dimensions. To do this, it is necessary to solve the inverse problem. Taking into account the known radius of the arch and the height of its rise (in this case, this is the width of the board), we will calculate the maximum possible length of the part that can be made from a board with a certain width, that is, we will calculate the length of the arch. Due to the fact that we already know certain relationships from previous calculations, we derive the following formula:
L2 = 2RH - H2
HR-H2
To properly make an arch, you need to prepare several more details, taking into account the fact that they will have to be joined during the installation process. The joining method is selected depending on the purpose of the arch. It is practiced to use overhead parts along the “cheeks” of the arch and join two arches, taking into account the shift by half the part.

In the process of calculating the parts, it is necessary to take into account which side of the arch, depending on its location in relation to the parts, interests us most (internal or external). Simply put, we need to understand how the load-bearing parts of the arch will be located in relation to the arch itself. For example, when installing a domed roof, the load-bearing parts of the arched structure will be located below the arch, and when installing an arched vault - above. Situations arise when it is necessary to arrange a double-sided arch. In the latter case, the calculation of the arch parts will be based on the smallest rounding.

If during operation the arch will bear high loads, it is necessary to strengthen it with the help of various beams and tie rods installed between the arch nodes. Thus, you can equip a load-bearing truss that can withstand increased loads.
If you decide to arrange an arch in the Gothic style, you need to determine the radius of curvature of the arch at the ends as accurately as possible. In this case, you will make your task easier by using an empirical method for calculating an arch, with which you will experimentally select the rounding point of the arch, then from this point downwards draw a line running parallel to the wall, measure the resulting distance and draw a line of the same length on the other side. Then the leg of the compass is placed on this line, the distance (radius) is determined and, moving down or up parallel to the line, the point is determined where the line of the wall and the arc of the arch will close through the second (smaller) arc. On the second side of the drawing you need to do the same.

To make your task easier and calculate the arch as efficiently as possible, you can make several drawings and choose the most suitable one. As you already understand, the given examples of arch calculation are far from the only ones, and there are other methods of calculation, but the empirical method clearly shows you what the arch will look like after installation. In addition, during the calculation process, you can easily adjust the drawing until you achieve the desired result.
Having made the drawing and made sure that it is correct, you need to make an arch template, using which you can easily install any arched structure.

A few words about choosing material for the arch
To make an arch you can use various materials, including metal (calculation metal arch is produced somewhat differently), as well as brick and concrete, but the simplest and cheapest way is to make an arch from plasterboard. Due to the fact that an arch made of brick and concrete will be very heavy, it is necessary to install a reinforcement frame for it. The reinforcement is easy to bend, and you can easily weld a frame from it. After this, using a hammer drill, you need to drill holes in the walls, drive pins into them and weld the arched frame to them.

Making an arch from plasterboard is much easier and faster, but the finished structure will be less durable than its brick or concrete counterparts. To do this, it is necessary to make a frame from tin profiles, cover them with plasterboard on the sides, and use segments to cover the internal opening (to make them, the plasterboard is cut on one side, bent and finally secured with self-tapping screws). The resulting edges must be smoothed with putty.

Calculation of a brick arch: main points
To calculate a brick arch, it is also necessary to make a template from fiberboard, the quality of which largely determines the performance characteristics and appearance of the future brick arch. First of all, it is necessary to calculate the dimensions of the template, which will require knowledge of the width of the arched opening. For example, the width of the arched opening is 15,000 mm.

Since the width of the template should be 5 mm less, it means it will be 1495 mm. Even if the template swells from moisture, you can easily dismantle it at the final stages of work. The height of the template should correspond to the height of the arch; in our case, let it be 168 mm. Since it is recommended to lay a whole face brick at the top of the arch, it is necessary to calculate the number of bricks. Since the height of one row is about 72 mm (brick height + joint height), and the total number of rows is 4, the arched height is 72 * 4 - 120 = 168 mm. (120mm is the height of the brick laid on edge).

In conclusion
Most often, the installation of arched structures is carried out for decorative design premises, regardless of its purpose. This could be a house, an apartment, or an office.

Often, an arch is used to decorate the doorway between the kitchen and living room. However, arch installation can also be used in larger types of construction. If you plan to decorate the interior of a room using an arch, experts recommend making an arched structure from plasterboard, as this is much cheaper, simpler and less labor-intensive. At the same time, the finished structure is in no way inferior to arches made of brick or wood. In order not to be disappointed in the beauty and correctness of the arch, experts recommend approaching the installation of the arched structure with due care and calculating the arch, which can be done in several ways. In our article we have offered you the two most common and effective ways arch calculations, using which you can build a reliable and aesthetically attractive arch.
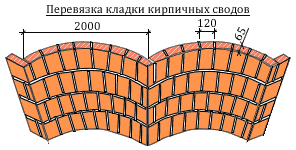
The architectural features of buildings of various configurations force us to lay not only walls, but also other surfaces (arches, vaults, pillars, etc.) from brick or other stone of the correct shape.
The peculiarity is that all work must be carried out using a special solution (Portland cement), which has special characteristics. This is due to the need for the solution to harden as quickly as possible.
The process of laying arches and vaults is quite labor-intensive and requires special attention and skills. Before starting this task, you should draw up a project, approve it, and only then begin construction. If there are working drawings in which the calculation of the brick vault is made, materials are purchased to complete the task.
Traditionally, wedge bricks, which have a trapezoidal shape, are used for laying arches and vaults. The use of such bricks ensures not only the aesthetic appeal of the structure, but also maximum reliability and strength of fastening of the entire structure.
You can also use ordinary brick, which, if necessary, is hemmed along its entire length to give it a wedge-shaped shape. Constant quality control of masonry is mandatory. For this, a cord, ruler, and level are used. The interlocking brick is installed using force, thus wedging the masonry.
Scope of arches and vaults

An arched vault can serve as one of the options for making the top of any opening. As a rule, such a structure is built:
- in wall openings;
- as cladding;
- during the construction of stoves, fireplaces, street barbecues, barbecue;
- to create an original portal (gate, wicket).
Additionally, you can build a dome out of brick, which will serve as a kind of “zest” architectural design. The masterful laying of a brick cornice looks no less attractive, but is due to certain nuances that do not allow this idea to be fulfilled on different objects real estate.

Before starting masonry, you should make a formwork along which the template will move, taking into account the following parameters:
- choice of arch shape;
- accurate calculation of the arch radius;
- determining the distance between supports;
- clarification of masonry thickness;
- advance paynemt.
If the arch is planned to be erected on an old building, then it is first necessary to strengthen the foundation, which will minimize the likelihood of deformation of the openings. The process of laying vaults depends on the planned type of structure, but involves carrying out this activity in several stages:
- drawing up design drawings;
- template installation;
- vault masonry;
- strengthening the structure;
- dismantling circled;
- execution of facing decoration.
All stages are completed as quickly as possible. Moreover, the masonry must be carried out from the “heels” to the “lock” synchronously on both sides. The seams are not left empty. They are completely filled with mortar, and the upper surface is rubbed with the remainder of the mixture. An important role for this activity is played by air temperature and humidity. Lay out the brick vault when sub-zero temperatures Absolutely forbidden.

The construction of arches and vaults is used not only in civil engineering. Quite often, such technology is used in the process of building churches. The technology for performing this activity is similar. The only difference is in the scale and quantity of building materials required. By design, brick vaults are:
- cool;
- flat;
- flat;
- semicircular;
- three-centered.
Carrying out preparatory work and masonry process

example of church construction
Having visually assessed the scale of the work, you should begin building the approved structure. To make a template, chipboard and beams are usually used. Pre-calculated parameters are applied to the sheet and the workpiece is cut out. The template should be mounted extremely carefully, since the aesthetics of the future arch depends on this. If there is a need to create more robust construction, then it is more advisable to use a frame made of reinforcement. This template is used as a circle when constructing formwork.
Before starting masonry, all necessary materials and tools should be placed as close as possible to the work area. The brick is pre-soaked in water. Since the arch is laid on both sides simultaneously, bricks should be stored on both the right and left sides of the work site. If used brick is used as the base of the masonry, then to add aesthetics, the surface of the arch must be additionally lined. You can also build a cornice brick wall, which will create a finished look of the structure.
If you are not confident in the accuracy of the masonry, you should first rehearse the entire process. Having analyzed the shortcomings and assessed your abilities, you can begin to build the arch directly at its future location.

Considering the projects of brick churches, it becomes obvious that the height of the dome and its overall dimensions require strengthening the walls of the structure. The masonry is carried out using a single-row or multi-row ligation system. In places of maximum load, a steel mesh is additionally laid, which prevents cracks from appearing.
Considering that over time the vaults may sag a little, the installation of the circles is carried out slightly higher than the expected height. In this case, the brick ceiling vaults will be constructed with the utmost care, avoiding any mistakes. After all, even the slightest flaw can lead to instability of the structure and its further destruction.
After the arched brick vault is laid, it is necessary to provide time to allow the mortar to completely harden. Depending on the complexity and dimensions of the structure this stage may last several days, after which the formwork can be dismantled. In some cases, it is not possible to painlessly remove the formwork without damaging the arch. Therefore, it is necessary to consider in advance the possibility of installing a removable structure.
More on the topic:


