There are always a variety of cold smoked products on the shelves of grocery stores. Unfortunately, the quality and taste of such “delicacies,” so to speak, are far from perfect. The problem is in the manufacturing technology.
Over the past few decades, in Food Industry are actively used chemicals, under the general name "liquid smoke". Meat or fish are immersed in the solution for some time, acquiring characteristic appearance and aroma. It is clear that this process has nothing to do with smoking.
Important! These additives are certified and approved for use. The harmful effects on the body are no greater than from any other additives and flavorings.
But we want a natural product! Therefore, real gourmets prefer to organize cold smoking themselves, using old antiquated technologies.
To meet the needs of workers, various smoking units are available for sale, both for hot and cold smoking.
Classic technology involves spaced chambers connected by a long tunnel in which the smoke is cooled. As a result, no heat treatment is performed, and the smoked product remains as soft as if it had just been cooked.
Instructions: how to make a simple cold smoked smoke generator
To make a simple smoke generator you will need:
- Three-liter tin can
- Tin liter can
- 4 screws
- Half inch tube
- Half-inch fitting with adapter for rubber hose
- ½ coupling for connecting the fitting and tube
Let's start production

How does a cold smoking machine work?
The cameras are located at different levels. The height difference regulates the draft in the chimney and affects the intensity of smoke cooling. The difference can be up to 1 meter.
Important! To install such an installation, free space is required, and a natural slope of the ground is desirable.
Such conditions are not always available in the courtyard of a private house or on summer cottage. Moreover, the construction of a real smokehouse involves engineering work.

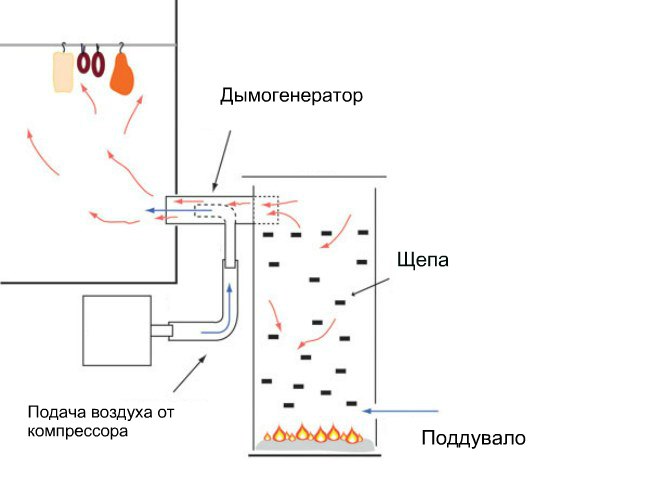
In the lower chamber (let's call it the firebox) smoke is formed. There are several options:
- This can be a relatively sealed container in which, with a weak influx of fresh air, fuel (chips or sawdust) smolders intensely. The inlet damper regulates the flow of fresh air. It should be insufficient to cause a fire, while at the same time ensuring normal draft in the chimney;
- The second method is a two-chamber firebox. An open fire is lit under the brazier, and a metal sheet material is poured to create smoke (the same sawdust or wood chips). Draft is generated in the upper chamber, only for smoke.
A smoke generator is a device typical for a cold smoked smokehouse. With hot smoking, smoke is usually produced directly in the smoking chamber, so a separate apparatus for producing smoke is not required. For a cold smokehouse, it is important that, firstly, the smoke reaches the products already cooled to room temperature, and secondly, so that the process proceeds autonomously for a long time, without requiring supervision. Smoke generator drawing for household use, and short description builds of it can be found later in this article.
There are two main methods of smoking -. Designs of smoking installations are being developed for these methods. Both methods have their own advantages and disadvantages, so it is very difficult to say for sure which method is better.
For example, with hot smoking, the temperature is usually in the range from 50 to 120 degrees, and the main advantage is the speed of cooking. But, at the same time, such processing cannot be called “gentle”, since high temperature can destroy most of the beneficial vitamins and microelements contained in products.

Cold smoking, on the contrary, allows you to cook food in a more gentle way, preserving useful material, as opposed to hot smoking. The smoke temperature at which cold smoking occurs ranges from 20 to 35 degrees, but the cooking time will not take 2-3 hours, but from one to three days. Such a long processing period allows the products to retain their freshness longer and be suitable for consumption for another 3-5 weeks after smoking. Therefore, people who want to cook food immediately for a long period of time choose the cold smoking method, and a homemade smokehouse with.
What is a smoke generator?
Any smokehouse should have a compartment in which firewood or chips are placed, the smoke from which affects the smoked product. But the problem is that cold smoking, as mentioned above, can last two to three days, which makes life much more difficult, since you need to constantly maintain the desired temperature, avoiding overheating or, conversely, lack of heat. For these purposes, people came up with such a design as a smoke generator for a smokehouse.

A smoke generator for cold smoking is a device that produces a sufficient amount of smoke necessary to support the smoking process, and also transfers this smoke to the smoking cabinet.
Sketches or drawings of a smoke generator can be easily found on the Internet. Despite the apparent complexity, if you have a certain skill, simple materials at hand and advice from home craftsmen, you can make the device yourself. Its main advantage is that it can operate automatically and does not require constant monitoring.
The smoke generator device is simple. The main source of smoke in it is shavings, sawdust or wood chips that are inside the generator and slowly smolder. Features of the choice of sawdust can be considered separately, but you need to pay attention to important subtlety– do not use sawdust coniferous species trees. For smoking, as a rule, they are used exclusively hardwoods wood, and fruit chips are also allowed.

The main task of the master is to assemble all parts of the generator housing in such a way as to ensure a uniform supply of smoke to the smoking cabinet.
Design
In order to make a smoke generator for cold smoking with your own hands, you will need the following elements:
- Line segment metal pipe. The pipe can be round or square, with a diameter of approximately 100-140 mm. The pipe will be the basis of the device - the chamber in which the formation and movement of smoke will occur.
- Smaller diameter tubes for making an ejector. The ejector structure is visible in the figures.
- A spring that will be located inside the chamber. It is only needed so that smoke from the lower layers of sawdust can easily rise upward.
- A compressor that will supply air to the ejector.
- Thermometer. Using a thermometer, it will be possible to determine the temperature inside the smoke generator to avoid the possibility of cooling or overheating of the container in which the smoke is generated.

In short, the operating principle of any smoke generator comes down to a simple diagram:
- The smoke generator chamber heats up from below external source heat, or the sawdust themselves smolder in it.
- Sawdust gives off smoke smoke.
- The smoke rises up and, with the help of an ejector, goes into the chimney, from where it is then directed through a tube into the smoking chamber.
Thus, the smoke generation process is completely automated and does not require any human intervention.
By and large, all these components can be purchased at any hardware or hardware store. You will also need the following to connect the parts of the smoke generator: Building tools like a Bulgarian and welding machine, but all this can be borrowed from someone for a while.
Compressor
Often people who are planning to build a smoke generator ask the question “how to make a compressor.” In fact, everything turns out to be simple - just like a smoke generator compressor, a regular computer cooler can work. It is glued from the inside to the trim plastic bottle, and a hose is put on the neck of the bottle, which goes to the smoke generator. Such a device may well work, although it looks unpresentable.


You can also use an aquarium compressor, many people do this. You can do without a compressor at all, and the smoke generator will also work, but, however, not as efficiently. Air will flow into the smoke generator by gravity, and natural draft will not be enough. Subsequently, this will lead to smoking taking much longer. long term, and the result will not be what was expected. That is why it is better to spend a little time and money, but install the simplest compressor in the smoke generator.

Assembly
As mentioned above, the main components of a smoke generator are: a chamber (a piece of pipe), a chimney, dampers and a compressor. Now the question remains how to put it all together. Everything will be told in order.
First you need to build a camera. Usually the height of the smoke generator reaches 70-80 centimeters. It should have a removable lid on top so that there is access to the inside of the device - for filling with fresh sawdust and for cleaning. At the bottom it is necessary to provide a container for collecting ash.
In the most simple options smoke generator, sawdust is poured directly onto the bottom, which is tightly welded to the lower edge of the pipe. In this case there is no ash pan, and to clean the smoke generator it is simply turned over and shaken out.

In more accurate designs, sawdust is poured onto a grate, which is fixed at some distance from the bottom. The ash formed during the smoldering process spills down through the grate. In such devices, the bottom is often made removable - for example, in the form of a glass, the diameter of which is slightly larger diameter container containing sawdust. That is, the glass is simply put on the smoke generator from below and fixed to it with bolts. You can also equip the ash pan chamber with an opening damper, like a stove door. For cleaning ash, this is the most labor-intensive option.
In any of the options, you need to drill a hole with a diameter of 5-6 millimeters in the lower part of the smoke generator for air access. No more is needed, otherwise the sawdust inside may simply catch fire, but they should only smolder, producing smoke.

At the top of the chamber, approximately 7-9 cm below the top edge of the pipe there will be a chimney. As can be seen in the drawing, the smoke exhaust pipe is attached to a hole in the wall of the generator; its length can be 7-8 centimeters, so that it is convenient to put on a long plastic tube that goes to the smokehouse. But generally speaking, in stationary versions, the smoke generator is attached directly to the wall of the smokehouse, and the chimney tube directly enters the smoking chamber.

Now you need to assemble the ejector. This is a device that sucks smoke from the smoke generator and directs it into the chimney. Its design is clear from the drawings. A thin tube into which pressure is supplied from the compressor extends a few centimeters into the wider chimney pipe. Due to the movement of air, a slight vacuum appears, and the smoke from the smoke generator chamber goes into the chimney.
Job
Now that all the main parts are connected and securely fastened, all that remains is to assemble the smoke generator to test its operation:
- Wood chips are placed inside the smoke generator, weighing approximately 700-800 grams. As has been said many times, sawdust should be predominantly deciduous or fruit trees, but not conifers.
- The lid closes tightly and the device is installed in its place on the wall of the smokehouse. Or, if you have a freestanding structure, a hose is attached to the chimney leading into the smokehouse.
- Through the side hole, the sawdust inside is ignited and the compressor is turned on.
These three simple steps will help the generator start working, and the owner will get ready to receive the most delicious smoked products.
All materials used in this article for the design and assembly of the smoke generator are average, that is, approximate. Let's say, if you haven't found a steel pipe, you can use a milk can, an old fire extinguisher, a deep saucepan or any metal containers, even the lightest and softest metals.

The same applies to sizes. The drawings indicate approximate dimensions, and you must relate them to your specific case. Everything will depend on the design of the smokehouse itself.
Also, do not forget that if your smoke generator is connected to the smokehouse with a long hose, then condensation will accumulate in it. The smoke comes out of the device hot and cools as it moves through the hose, so it will inevitably release moisture. If you do not remove it, it can completely clog the hose! Therefore, provide a tee on the hose through which water will flow into the bottle.
Smoking fish, meat or game is not just about increasing the shelf life of meat products. This is a unique opportunity to change them taste qualities in a positive way. And although modern technologies offer many options for changing the taste, smoking is still a popular operation. Of course, manufacturers today offer various designs smoking installations. But making a smokehouse and installing a smoke generator in it with your own hands is not only cheap, it’s quite simple.
The most important thing is that there are no complicated devices here. Any installation can be made from scrap materials, often second-hand ones, and often those that are supposed to be thrown into the trash. After all, the smoking technology is very simple. It is based on the fact that smoke from burning wood enters the chamber where meat products are hung. By soaking in smoke, they are preserved and receive that extraordinary taste and smell. Of course, the type of wood used in the smoking process will play an important role. Experts recommend choosing chocks from fruit trees for this purpose.
Smokehouse design
The scheme is simple. This device consists of two parts:
- In one, wood is burned. At the same time, they, in principle, should not burn. The main process is smoldering. This is why it is so important that little oxygen (fresh air) enters this chamber.
- In the second chamber of the smokehouse, carcasses (fish, poultry, pieces of meat) are hung.
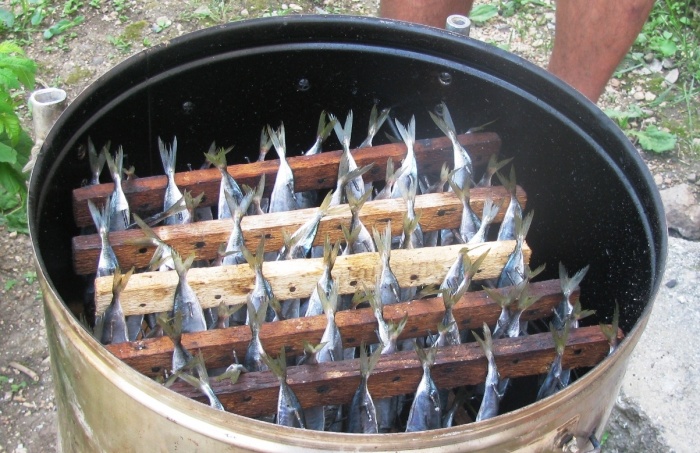
Both chambers are connected by a pipeline through which smoke from smoldering wood will move. At the same time, the more smoke comes into the second chamber, the more intense the smoking process will occur. A small hole must be made in the same chamber to remove excess smoke. The same hole will serve as a smoke exhaust to create a rarefied atmosphere inside.
There is, however, one negative point in this smoking installation. In order for the stored products to be smoked inside for several hours, it is necessary to keep the firewood smoldering all the time by throwing additional logs into it. Therefore, you have to stay near the smokehouse all the time. You can get rid of this if you make a smoke generator for cold smoking with your own hands.

What is a smokehouse smoke generator
The smoke generator circuit is simple. To help you understand what we are talking about, look at the photo below. It clearly shows how this device works.
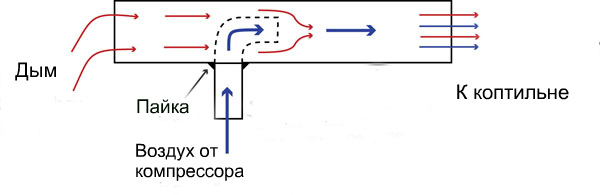
It turns out that between the chamber of the smokehouse, where the firewood is smoldering, and the chamber in which meat products are hung, small sizes cylindrical device. A pipe with an outlet inside is soldered into it, through which air is supplied under low pressure. By creating a flow moving towards the second chamber of the smokehouse, the air also pulls smoke from the combustion chamber of the smoke generator. In this case, the smoke is completely absorbed without remaining on the walls or leaving the combustion chamber. That is, this is the most effective form of smoke consumption, with virtually no losses.
So here is a combustion chamber with an intermediate element, which creates a directed flow of a mixture of air and smoke, and is a smoke generator. It is clear that the larger the combustion chamber, the longer the smoking process will take. If speak about domestic installations, then you can use various household items for this. For example, an aluminum milk can, a used fire extinguisher, an old broken thermos. But the optimal solution is a smoke generator for cold smoking from steel pipe with a diameter of 80-100 mm and a length of half a meter.
On one side it is tightly closed with a lid, this is done by welding. The other side is left open, only a half-hole (round, rectangular) is made on the side, which will be used for igniting wood chips. A hole is also made on the side to which the pipe is attached. Air will be forced through it. By the way, to create a directed air flow under pressure you will need to purchase air compressor. For example, the one used in aquariums. This is a simple smoke generator device.
Now, regarding the location of this pipe. It should be closer to the fuel combustion zone or vice versa. The best option- if the pipe is located higher, that is, away from the combustion zone. The whole point is that when reverse installation Several negative actions occur.

- Firstly, the height of the combustion chamber is limited. And this is the direct reason for the attenuation of firewood.
- Secondly, intense smoke suction leads to rapid combustion of fuel, which reduces the life of the smoke generator.
- Thirdly, the draft inside the smokehouse is reduced, especially when the compressor is turned off.
- Fourthly, the low landing of the pipe creates conditions under which unburned wood chips get inside. And this blocks the passage.
- Fifthly, a low landing means that the pipe is located in an area with high temperature, which reduces its working life.
The intermediate element of the smokehouse, which is also part of the smoke generator, can be made from ordinary pipes with a diameter of 20-25 mm. You can simply weld it to the combustion chamber of the smoke generator and to the smokehouse chamber, and in the gap install a pipe from the same pipe, to which a smaller diameter pipe is welded. Through it, air from the compressor will be supplied to the smoke generator.

In principle, the intermediate part can be done in different ways. Here are just some variations:
- Two pipes are connected with a thread, where a fitting in the form of a tee is installed between them. A squeegee is inserted into its free hole, onto which the adapter from the pipe to the hose is screwed. Air will be supplied to the smoke generator through the connected hose.
- Instead of a hose, you can solder a copper tube.
- Install a tee fitting on top of the combustion chamber using the installed squeegee. One side of the fitting will be directed into the chamber where the products are hung, and air will be supplied to the second.
Some modifications of this connection are shown in the photo below.

By the way, the method of attaching the pipes to the combustion chamber of a smoke generator for a cold-smoked smokehouse made by yourself can be done not only by welding or soldering. The same photo clearly shows the threaded fastening. That is, there are many options on how to make a smoke generator. But a properly made device will serve faithfully for many years.
Smoke generator compressor
As mentioned above, you can use an aquarium compressor to supply air to the smoke generator. This is a small device low power(4-5 W), which is quite enough for the household smoking unit to work efficiently.

But craftsmen do not stop there. Save so save. Here's how to make one type of compressor for a smoke generator with your own hands. To do this, you will need a computer fan and a five-liter plastic bottle.
- The bottom of the bottle is cut off.
- A fan is inserted into the resulting hole and secured with self-tapping screws.
- A hose is attached to the bottle cap through a cut hole.
- The fan is connected to the electrical network.
Simple and effective solution. The main thing is to ensure that all connections are sealed.
In principle, this is all that concerns such a device as a smoke generator for smoking, made with your own hands. There is only one question left: how to smoke meat and fish products.
Firewood for smoking
There is only one limitation on the choice of firewood for the smoke generator. Do not use softwood chips for smoking. They contain resin, which gives the meat a bitter taste. All other tree species can be used without restrictions.
As for sizes, there are no restrictions here either. The only thing you need to pay attention to is the ability of smoke to travel through laid and smoldering pieces of wood. Therefore, when small chips are placed in the smoke generator, it is recommended to install additional element, along which the smoke will move freely towards the outlet pipe. This can be a perforated tube or spring of the required length and width. Between large chips, smoke will move on its own.
Almost everyone loves smoked products; fish or meat is especially tasty. own smoking, when you know for sure that no preservatives were added during the cooking process, especially smoke smoke (various meat processing plants are very fond of it to reduce the cost of production). The smoking process itself takes a lot of time, so the equipment should not fail. If you decide to make a smoke generator for cold smoking with your own hands, the drawings and some features of assembling the device given below will come in handy for you.
Homemade smoke generator option
One of the main elements for high-quality smoking is the source of smoke. Typically, shavings or sawdust are used, which burn slowly inside the generator. At the same time, you can assemble your home smoke generator in such a way that one load of firewood will be enough to operate autonomously for 24 hours. To do this, it is enough to reduce the air flow and increase the volume of chips in the loading chamber.
There are also a lot of assembly options, it all depends on the technical capabilities and goals of creation. There are three main elements, without which no device will function correctly:
- Container (combustion chamber);
- Ejector;
- Air pump.
At the same time, the process of smoking products has its own subtleties that must be observed:
- Minimum temperature of smoke entry;
- Duration of the process;
- Do not use pine sawdust;
- All products are pre-cleaned before smoking.
To comply with all these features of the process, you need to collect the main elements correctly and carefully. And so that the products in your homemade smokehouse turned out to be especially tasty, it is recommended to use slivers of alder, cherry, apple, pear or willow.
Helpful information! Once your smoker is ready, try different wood chips to find the one that works best for you. the best option, because each of them gives its own special taste.
Let's move on to the features of the main elements of the smoke generator and their assembly.
Making a smoke generator for cold smoking with your own hands: drawings of the main elements and assembly procedure
First you need to prepare the elements that will be required to assemble the equipment. You can use the following drawing in your work:
So, to install a smoke generator for a cold smoked smokehouse with your own hands, you will need:
- Pipe, usually stainless steel is used. Cross section - 100 by 100 mm (it is recommended to take a diameter of 10–12 cm for a round pipe).
- Parts of a metal pipe up to 400 mm, with a diameter of 2.5-4.0 cm (usually used for hot smoking).
- A corrugated plastic pipe 2-3 mm or a metal sleeve, the diameter of which will correspond to the chimney pipe.
- Compressor (you can take an aquarium version).
- Tee with a cross-section corresponding to the diameter of the smoke channel.
- Wires for connecting elements and.
- Thermometer.
All components are in open sale, and often are even at your fingertips, so getting them out won’t be difficult. There are also a lot of drawings, you can find them on the Internet and choose the one that suits your idea.
To connect the elements, also prepare a welding machine and a grinder. If you have never worked with them, then it is better to invite someone more experienced to help. The main difficulty lies in welding the fitting, making a door for the firebox and removable covers at the bottom and top.
Related article:
In a separate publication we will talk about making the right choice of this device according to your goals and budget.
We assemble a smoke generator with our own hands for cold smoking: video of the process
When you have prepared the drawings of the smoke generator for cold smoking, we begin to assemble the parts. Here are the main elements and sequence of equipment assembly:
- First, we cut off a piece of pipe for the body (0.5 - 0.8 m).
- We make the upper and lower covers to fit the outer diameter of this segment. In this case, the bottom should have sides on the sides so that the ashes do not fly out.
- On the sides of the base, slightly above the sides, drill several holes that will serve for ignition and oxygen supply (diameter 0.6 - 0.8 cm)
- To make it convenient to use the smoke generator, weld the legs, which should be about 15 - 20 cm in height.
Note! If you use a removable bottom, you will not need side doors in the firebox. For a deaf person, make a door and place it on several hinges; in this case, you need to make slits for air to flow in, just like in conventional ovens.
- The top cover must fit tightly onto the pipe, and it is also necessary to make a piece so that the unit can be opened.
- Now we weld the chimney on top of the base, retreating 50 - 80 mm from the cut.
- Weld the fitting perpendicular to the wall, it is necessary to maintain a protrusion 60 - 80 mm long. Before welding, the ends of the part should be equipped with threads for the tee.
- After welding work attach a tee, and 2 pipes to it - one down, the second to the smokehouse.
For the correct process of preparing cold smoked products, we collect all the elements into one system:
- Place the generator on a base that is made of fireproof materials, such as a concrete slab.
- Place about 0.5 - 1 liter of dry wood chips.
- Connect the pipe and chimney to the smoking chamber.
- Light the wood chips using the special drilled holes.
- Start the fan.
The process has begun, the tee acts as an injector. If you have assembled everything correctly, the combustion process will occur independently and your additional participation in the operation of the device will not be required.
Note! You can change the temperature yourself by changing the length of the chimney.
When assembling a smoke generator for cold smoking with your own hands according to the drawings, it is quite possible to use a pan, a can, or other containers in the form of a cylinder as a body. You can assemble the model without a fan, but it will function worse, since most often the natural draft is not enough for the effective process of preparing delicacies.
- If you do not want to assemble such a unit yourself, you can buy a smoke generator for cold smoking, the price of which will vary depending on the performance, chamber volume and company.
- When assembling a smoke generator for cold or hot smoking, do not forget to use the drawings and prepare all elements for assembly in advance.
- From correct sequence assembly and good welding determine how well the unit will perform. You can also try sawdust and wood chips different breeds trees to understand which shade of taste you like best.
You might also be interested in:
 How to use a multimeter correctly: simple instructions

 Corrugation for wires and cables: device and correct installation

 Self-installation and adjusting the water pressure switch for the pump
 Connection diagram LED strip 220v to the network - do it correctly
Cold smoking, be it fish, meat, poultry or cheese, is a rather lengthy process. During this time, pathogenic microorganisms are destroyed and the products are saturated with exquisite taste and aroma. And the products themselves can be stored after cold smoking long time. Cold smoking requires smoke with a temperature of no higher than 40C. And in order to reduce the temperature of the smoke from the fire, it was located at some distance from the smokehouse. The smoke went through a chimney in the ground and naturally cooled. This was the case before (although some people still use this method). Currently, a smoke generator is used to simplify the process of cold and hot smoking.
The basic principle of operation of a smoke generator is the smoldering of wood chips or sawdust with insufficient oxygen. Industrial and factory systems have automation for sawdust dosing and air flow speed and, as a result, a minimum of operator participation. But you can collect homemade smoke generator no worse than factory analogues.
How to choose the right smoke generator
To make a smoke generator yourself, you need to understand the principle of its operation and know its schematic structure. At home, the most optimal smoke generator for cold smoking is considered to be one that is easy to disassemble for cleaning; it must be mobile so that it can be moved to another place. Not large in size and economical, at the same time it should be productive for your volume. Possess a simple design and maximum strength. To ensure that the smoke flows in the required flow, an adjustable air blower is installed in the smoke generator.
Most smoke generator circuits have an upper smoke intake or a lower smoke intake. In the first option, the smoke from below passes up the combustion chamber through the wood chips, is partially cooled and enters the smoking cabinet. The disadvantages of this type include frequent attenuation of wood chips during smoking; a more powerful compressor is needed. And even during operation, the condensate that forms flows down the wood chips, saturating it. 
With lower smoke intake such problems do not arise. But it is necessary to increase the length of the chimney or make a special cooler in the form of a cylinder for additional cooling of the smoke. And also control the temperature of the supplied smoke.
Important! Whatever the design of the generator (lower or upper), before loading wood chips into the combustion chamber, it is necessary to dry it. Wet fuel produces a lot of condensation when smoldering. Therefore, pre-drying and moisture control of the chips is recommended.
How to make a smoke generator for a smoking cabinet
The smoke generator for a cold smoked smokehouse consists of several modules:
- The combustion chamber
- Ash pan
- Smoke pipe
- Condensate collector
- Ejector
- Fan unit
Do-it-yourself smoke generator components for cold smoking, drawing with a description of all components.

The combustion chamber
Wood chips smolder in the combustion chamber; before you start making them, you need to decide on the material. Usually the chamber is made from a pipe, preferably from food grade stainless steel. The pipe can be either round or square; you can use a fire extinguisher of a suitable size. The pipe body should have a diameter of 90-115 mm, the height of the pipe should be from 50 cm to one meter. Plumbing and heating stores sell chimneys made of of stainless steel different diameters and lengths that are ideal for the combustion chamber. You can also buy plugs for the pipe there. ![]()
Grate and ash pan
A grate made of perforated metal is installed in the lower part of the combustion chamber. The wood chips burn on the grate, and it also prevents the wood chips from falling down. The grate bars can be made from a metal sheet of suitable thickness, often by drilling holes with a diameter of 4-6 mm. A hole is drilled in the pipe just above the grate for
igniting wood chips with a diameter of 7-10 mm. This hole also serves as a blower. In some designs, two holes are made opposite each other. If necessary (too much fuel consumption), one hole is covered. 
Under the grate there is an ash pan, which is also the bottom cover that serves to collect ash. The removable ash pan is convenient because it can be emptied of its contents at any time and the cleaning process of the chamber is simplified. The dimensions of the ash pan are 4-6 cm in height. At long work The volume of ash in the smoke generator is very small, so this size of the ash pan is enough for one or two loads. 
Smoke pipe
From the combustion chamber, warm smoke enters the chimney, where it is partially cooled. The larger the volume and height of the chimney, the better the natural cooling. As practice has shown, it is better to make the hole for the outlet pipe at a height of 5-7 cm from the grate. The outlet pipe inside the combustion chamber does not need to be protected with a mesh (limiting the entry of chips or ash into the pipe), this can lead to rapid coking of the inlet. 
First comes the 3⁄4 pipe, then the 3⁄4 cross. A plug is screwed into the end of the cross for inspection and cleaning. A 50 cm long pipe goes to the top through which the smoke enters the ejector and then into the smoking cabinet. This pipe serves to cool the smoke. The length of the pipe usually does not exceed the length of the combustion chamber. In some smoke generator designs, the vertical pipe is replaced with a pipe bigger size, equal to the diameter of the combustion chamber. I rightfully believe that warm smoke cools down better.
Condensate and resin container
Along the vertical section of the chimney, the smoke rises, condenses on the walls of the pipe and flows down. In addition to moisture, this condensate also contains harmful substances and resins, which are not needed on the smoked product. At this stage, the smoke is purified from heavy unnecessary fractions. A condensate collection tank is installed at the bottom of the cross.
The condensate collector is made from ordinary glass jar with thread and a lid for it. This design is convenient for quick cleaning. 
Ejector
One of the main components for a cold smoked smoke generator is the Ejector. It is installed on the upper 3⁄4 tee of the chimney. The ejector consists of an air supply fitting into which a tube with a diameter of 6-10 mm is attached. A quick-release connection for a watering hose is used as a fitting. A tube made of aluminum or
stainless steel, if necessary, the hole for the tube is drilled to the desired size.
After screwing the fitting into the tee, the tube should protrude by 1.5-2 cm (green mark in the figure), this is selected empirically during testing of the device. This distance is of great importance in the operation of the smoke generator. Therefore, when assembling the tube, you need to take it with a reserve. 
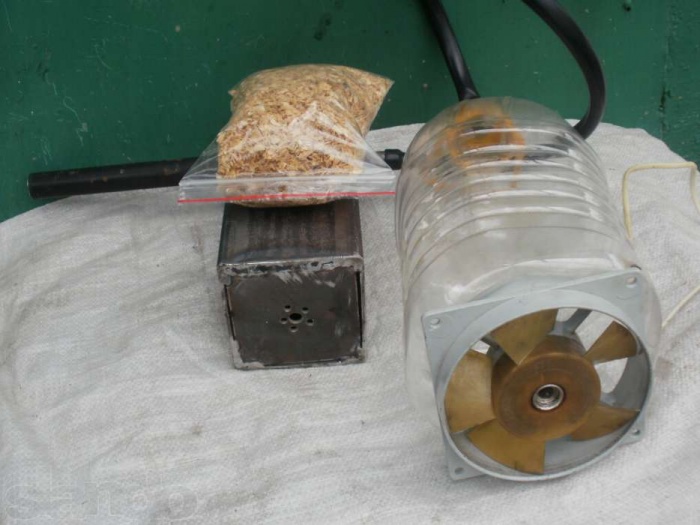
Compressor or fan for smoke generator
The air required for uninterrupted smoke draft is supplied to the ejector fitting. The most common device for this is an aquarium compressor for a smoke generator or use computer cooler cooling. You don't have to buy finished device, but make a compressor for a smoke generator with your own hands. 
It will require a housing, which uses an electric junction box suitable size. A radial fan (snail) for a PC can be purchased at any
computer store. Be sure to install a fan speed controller made according to a simple scheme. 12 volt power supply. Second part of the quick release coupling. Next, using glue and screws, the fan unit for the smoke generator is assembled. 
How to handle a smoke generator
So, the smoke generator for smoking is made with your own hands, all that remains is to put it into operation.
- Pour the required volume of dry wood chips into the chamber with a fraction of 7-12 mm. Close the lid. How much wood chips should be added per hour of work? The consumption of wood chips in a smoke generator is individual for each person. Depends on several
parameters. Chip moisture content, wood chip fraction, compressor power, pipe diameter. - The compressor turns on at full power.
- Light the wood chips in the pilot hole using a gas torch.
- After igniting the wood chips, install required power fan for the desired amount of smoke.
- After 2-3 smoking processes, it is necessary to clean the chamber, chimneys, and grates.
 . Full, step by step description with comments, photographs, diagrams and drawings.


