Are you planning to send your old storage water heater to the landfill? Do not hurry. It will still serve you usefully. We will tell you below how to remake an old boiler with your own hands.
Conversion options are suitable for storage models because the basis is the tank.
Useful products from a water heating tank
IN in capable hands Any item that has served its useful life is turned into a useful product for the home or garden. There are many examples of this. We will reveal the secrets of making the most interesting of them.
solar collector
In the article “” you will find materials on making a collector from other available materials. Here we will tell you how to make a collector from an unnecessary tank. It will serve as a replacement central water supply during the summer period, and will also be indispensable in the country.
What you need for homemade:
- water heater tank;
- chisel;
- hammer;
- metal brush;
- black paint;
- plywood sheet;
- Styrofoam;
- glass;
- bars 50x50 mm;
- foil;
- hoses;
- polyurethane foam;
- antiseptic for wood processing.
Progress:
- To remove the metal tank, you will have to remove the lining.
- Take a chisel and a hammer or grinder. Do not spare the shell and thermal insulation, you need a completely cleaned container.
- If it becomes rusty, thoroughly clean the surface with a metal brush. Then find the leak and seal it.
- Degrease the surface, cover it with black paint for effective heating.
- To increase the level of efficiency of the product, you need to organize thermal insulation. For this purpose, a housing is made.
- Assemble the frame from stored timber. The structure should be twice as wide as the tank.
- WITH inside Cover the frame with sheets of plywood. Lay polystyrene on the outside and cover it again with plywood.
- Place stands inside the housing to prevent the heater from rolling. Attach the board to the base of the body, make marks and cut out supports.
- If the collector is located on the street all year round, treat the box with an antiseptic and paint it.
- Installing reflective elements will help increase heating efficiency.
- Place the foil at an angle so that the rays hit the surface of the collector.
- Connect water hoses to the outlets.
- Cover the structure with glass.
- Seal all cracks with foam.
You can decorate the container with plastic. In winter, the water must be drained.
Brazier
What else can be made from a water heater? If you want to be original, build a grill with a stove. Initially you will need metal pipes that need to be cooked. They will serve as a firebox.

Weld a metal tank on top. Pre-cut off its top part.

Install a bar in the inlet of the pipe on which the firewood will burn.

Thanks to the rocket firebox, the grill maintains the temperature well, so the meat comes out juicy.

You can make a barbecue grill, as shown in the photo:

To do this, a smaller part of the body is cut off and placed on fastenings to another part to form a container with a lid.

A handle is welded on top for convenient use, and spacer legs are welded on the bottom.
Smokehouse from a water heater
The principle is similar to the barbecue. In this case, it is advisable to use a boiler with a volume of at least 80 liters. Cut off the top by 10 cm. Install hinges for the lid.
A handle is also welded on top, so the lid can be removable.

You need to install a plate underneath to collect fat. There are holders for hanging meat inside the structure. Ventilation hole from below will serve to launch smoke inside.
Potbelly stove
This useful and compact device can be installed in any room. The main thing is the possibility of bringing the pipe to the street.

- Prepare the body. Use a grinder to remove all pipes and elbows.
- Make a shallow slit lengthwise.
- Remove the casing and remove the insulating foam.
- Clean out the tank.
- Consider that the location of the heating element should be at the top.
- Use chalk to mark two openings: the firebox and the door. Cut them out.
- Weld the pipe holes.
- Install handles and latches on the doors.
- Weld three or four supports at the bottom of the structure.
- In the place of the heating element, cut a circle and install a pipe for ventilation.
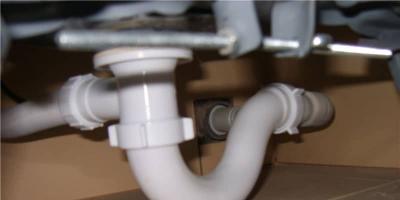
Water dispenser
If your boiler is leaking, turn it into a sink. To do this, clean the tank using the technology described above. Cut off the top part with a grinder. The leads for the pipes and fittings also need to be cut. Treat the surface: clean, prime, paint. The inside of the container can be coated with white paint.

Close one pipe hole with a plug. Place the tube and faucet on the other. Attach a handle to the cut part and organize the lid. It will protect the water from debris.
Flowerbeds
By sawing the container into two equal halves, you can use them for planting flowers, herbs, and vegetables. It all depends on the size. The products can be installed in a greenhouse. To do this, weld to back side supports, and fill the inside with earth.
If the parts of the body are primed, painted and beautifully decorated, they can be used as flower beds and unusual outdoor decorations.
Chair-bench
This is not a joke, but the idea of Greek designer Nelly Trakido. Today it is fashionable to remodel unnecessary items into unusual and useful things for the home.

Using metal tools and paint, the designer turned an unnecessary tank into stylish bench. The legs from an old stool acted as supports. The seats are removable. Covers can be changed according to your mood.

If you don't know how to use unnecessary equipment, use your imagination. Every item can be given a second life. The use of a water heater is not limited to these examples. Home craftsmen make them receivers for compressors. You can watch the video for more details:
You can also organize an unusual trash can. If the tank volume is small, the product will look stylish in the interior. Create!
The main advantage of the device is the economical consumption of hot water when minimum costs. To heat water, craftsmen use different sources: electric heating elements, solar energy, heat from a boiler. This article will describe how to make a water heater.
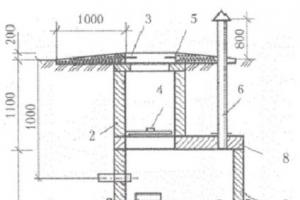
Indirect heating boiler design
An alternative to baku is gas cylinder.
Boiler from a gas cylinder
If you decide to make a boiler from a gas cylinder, then it is better to purchase it new and without a valve. If you are using an old container, the hot water may smell like gas.
The cylinder requires preliminary priming. For this purpose, it is cut into two halves. To prevent an explosion, we recommend filling it with water first. Interior the structure is cleaned and primed. This prevents rusting. After this, the balloon is brewed.
Two holes are cut into the container to drain hot and cold water. At the cold water inlet, the supply pipe is equipped with check valve. This prevents water from leaking out of the tank.
To obtain an indirect type heater that will operate from the heating system, in addition to outlets for hot and cold water, two more holes are made for installing a heat exchanger. In it, one pipe is adjacent to another.
The coil is installed in the center of the tank or along its walls. Nozzles are welded to its inlet and outlet pipes.
If you want your device to stand, then you should weld supports to it. The attachment will require loops in the form of “ears”.
A 32 mm nut is welded to the place where the heating element will be installed. She must have internal thread. It is advisable to install a heating element for water with thermoregulation or an alarm sensor. Its power should be 1.2-2 kW.

The result is an indirect heating boiler. In this case, the main structural element is the gas cylinder.
How to make a coil?
The coil is important detail devices. It can be based on metal or metal-plastic pipe with a small diameter. Typically copper or brass is used as they are different high level heat transfer. The manufacturer can choose the diameter of the coil at his discretion. The main condition is that its contact with water is maximum.
The serpentine tube is wound in a spiral onto a cylinder-shaped mandrel. For this purpose, a log or pipe with a large diameter is used. When winding the coil, it is necessary to monitor the turns. They shouldn't touch each other.
Do not make the winding tight, as it will be very difficult to remove the coil from the mandrel.
The number of turns on the coil is directly dependent on the volume and height of the tank. Typically, for every 10 liters, 1.5 kW of coil heating power is used.
Thermal insulation
To minimize heat loss, the tank should be wrapped in a layer of thermal insulation.
For this purpose, use:
- construction foam;
- isolon;
- polyurethane foam;
- foam;
- mineral wool.
Some craftsmen use a foil-based backing for the laminate. The water heater is wrapped in this case like a thermos. The insulation is attached using wire, glue or strip ties. We recommend insulating the entire building.
The lining will not only ensure long-term preservation of hot water, but will also shorten the duration of heating of the tank, which will reduce coolant consumption. Without well-equipped thermal insulation, the water in the device will quickly cool down.
Often they resort to the construction of a double tank: a small tank is placed inside a large one. The space created between them also performs a heat-insulating function.
To secure the container, hinges are welded to the top of its body, and a metal corner is installed on the wall to which they are attached.
Other methods of making a water heater
You can build a water heater powered by the sun. This is a fairly common design, which is distinguished by its efficiency. The device is often found in country houses. Making the device is not particularly difficult, so many can build it with their own hands.
You will need:
- large capacity tank (100 l or more);
- PVC pipes for filling the container and supplying water to it;
- steel corners measuring 20 mm or square blocks of wood measuring 50 mm for a frame for a container.
It is more advisable to use polyethylene barrels as containers. They are distinguished by their strength. They should be placed in a sunny place where there is no wind. As a rule, the roof is chosen for installation summer shower.
In order for the barrel to heat up better, it needs to be painted black. Screens are installed for protection. They are constructed from boards coated with reflective material similar to foil. In this case, the sun's rays are directed towards the tank and increase the temperature of the water. In hot weather, in a container of 200 liters you can get water whose temperature will be 45 ºС.
Water heater made from polyethylene bottles
Do-it-yourself water heater made from ordinary ones plastic bottles can be done in one day. They form the basis of the storage tank. The number of bottles depends on the desired capacity.
For installation you will need:
- sealant;
- PVC pipes;
- drill;
- two valves or taps with a ball design.
First of all, the bottles are prepared. A hole is drilled in the bottom of each, the diameter of which is equal to the diameter of the neck. The neck of another is inserted into the hole in the bottom of the bottle. This is how they connect. Each battery consists of 10 bottles. The number of batteries is unlimited. All joints are treated with sealant.
The finished modules are located on the south side of the roof on the internal waves of the slate covering. The output of each section is connected to a PVC pipe, which is located perpendicular to them. The cutting of each section is carried out in the same way as connecting bottles into a battery, followed by treating all joints with glue.
In the main pipe, to which the outputs of each battery are connected, valves are installed on both sides for supplying cold water and discharging hot water.
This one has a fairly high level of functionality. One person needs 100 liters of water to take a shower. Based on this indicator, it is possible to calculate the volume of the structure.

In summer, in sunny weather, in an hour you can heat 60 liters of water to 45 ºС. This temperature is quite suitable for domestic and household needs in the country.
Conclusion
The rapid rise in price of energy resources is forcing many to create cheap alternative devices. Many people build a water heater with their own hands and create comfort at minimal cost.
Sometimes a homemade water heater is great option save on the necessary expensive equipment. It can be used as a temporary option in case of breakdown old technology, or on an ongoing basis, for example, V country houses , where is the need for hot water seasonal. Of course, for constant water supply in a private house or apartment, it is best to use factory systems. The manufacture and installation of a homemade device for heating water does not require special experience; anyone can make it. The main thing is availability required material and tools for work. So, how to make a water heater with your own hands?
Of course, self-made pressure storage water heaters, designed by yourself, will be more convenient to use. But their assembly requires additional investment and knowledge. Such systems must be equipped circulation pump to maintain a pressure of 1 atm or connect to a water supply system already installed in the house.
If the budget is limited and there is no opportunity to purchase such additional equipment, or there is no water supply system in the house at all, you should pay attention to the non-pressure option. You can make such a water heater with your own hands from an ordinary bucket or large-capacity pan. The main thing is to mount such a device higher so that water runs out of it under the influence of gravity. But you will have to constantly monitor the filling of the storage tank and the water temperature.
Because in such homemade device It is difficult to provide a mixing system; the water should initially be heated no higher than 40 degrees.

What to make a storage tank from
Before making a water heater, you need to decide on the design features of the future boiler. Most often, this is a storage tank with a heating element installed inside it, which is responsible for heating the water.
For storage tank It is better to choose containers made of corrosion-resistant metal. The most suitable options: stainless or enameled steel, high-quality plastic, aluminum. You can also use iron tanks, but they will have to be pre-treated with a special protective composition, which minimizes rust formation. Otherwise, the water passing through such a heating device may not be suitable for domestic needs.
For homemade storage water heaters They use a variety of containers; an example is a gas cylinder. This is a fairly convenient tank in size, shape and strength.
How to make a water heater from a gas cylinder
Ideally, a new vessel will be purchased for this. If this is not possible, use a used cylinder. To get rid of the smell of gas, it should be carefully treat with nitro primer and rinse inner surface. To do this, the cylinder will have to be cut first and then welded again.
Worth paying Special attention, that before performing work that will involve violating the integrity of the cylinder, it must be filled with water to prevent the possibility of an explosion.

Tools and materials:
- welding machine and drill for metal;
- metal-cutting tool for applying threads (die);
- screwdrivers and gas wrench;
- empty gas cylinder;
- heating element with thermostat;
- insulating composition for heating element (lubricant or tow);
- metal eyeliners;
- nut, safety and check valves;
- fasteners for fixing the finished boiler.
Manufacturing instructions.

The DIY water heater is almost ready. Now the completed device can be filled with water and checked for leaks. If all is well, you can connect the heating element and use the device.
Economical DIY water heater
The constant increase in electricity tariffs forces many consumers to switch to saving mode. Not a bad option - storage boiler do it yourself, powered by solar energy.
To make it you will need:
- large volume storage tank (100-200 liters);
- PVC pipes and hoses for water supply;
- fasteners.

Instructions on how to make an economical boiler for a summer cottage:
- holes are made in the storage barrel for the pipes;
- hoses are connected to them;
- the capacitive tank is installed in a sunny place protected from the wind;
- water supply is organized (this can be a hose connected to the water supply);
- conclusion is made to the tap or outdoor shower.

Under the influence sun rays the water in the barrel heats up and can be used for your needs. This practical option for organizing a summer shower on your own garden plot. Often such barrels are installed directly on the roof of various buildings. To make the most of natural energy and achieve maximum efficiency from such a device, next to the reservoir in which the water is located, reflective elements(for example, the remains of a foil backing for a laminate), or the tank itself should be painted a dark color.
If desired, anyone can make a water heater with their own hands. The main thing is to think ahead design features equipment, select suitable materials and secure the water heating system.


If you have an old boiler, do not rush to throw it away. You can make many interesting and useful things from it. Specifically in this case, we will look at how you can make an excellent grill out of a boiler.
Materials and tools for homemade:
- old boiler;
- grinder with grinding and cutting discs;
- pliers, screwdrivers, wire cutters and other classic craftsman tools;
- corner or other suitable material to create legs;
- drill with drills;
- welding;
- heat-resistant paint (the author’s is black);
- loop with a lock for the blower;
- bolts, nuts, washers and other fasteners;
- round grill.


In general, a drill may not be needed, the author just decided to make everything collapsible, connecting the structure with bolts and nuts. In principle, all this can be simply welded if all the parts are made of steel.
Grill making process:
Step one. Preparing the boiler
First of all, you need to take the boiler and remove all excess. As a rule, boilers are lined with thermal insulation on top so that they keep the water warm for a long time. This insulation must be thoroughly cleaned off. You may need to cut it off first with a grinder or a sharp knife, depending on what the sheathing is made of. Well, then take a grinder with a cleaning wheel and use it to remove all insulating material.
It is important to remember that the remaining insulation will begin to smoke when using the grill.
Step two. We cut the boiler
Now the boiler needs to be cut. Here you will need the grinder again. The author decided to choose that part of the tank where the bracket is located, with which the tank is attached to the wall. In the future, this bracket will be needed to assemble a wooden slab. In addition, the author also cut out an opening on the workpiece for installing the grille.


Step three. Making legs
The legs are made very simply; you will need a steel corner or elements of metal shelving, which is what the author used. It was decided to use bolts for fastening. But to simplify the procedure, everything can be connected by welding. As for the length, for ease of cooking, it was decided to make the legs 75 cm long.


Step four. Screwing the legs
Using bolts and nuts to secure the legs, the author killed two birds with one stone. Thanks to the screws protruding inward, the grill grate can now be installed.


Each leg is secured with two bolts and nuts, so you will need to drill holes in the tank for them. It is very important here that the top holes are at the same level, since this is where the grille will be located. It is best to mark a couple of points from the top and then draw a line around it. The legs should also be located at the same distance from each other.
After assembly, it turned out that the grill was not very secure. To make the legs stiffer, the author added a crosspiece to the lower part.
Step five. Blower for grill
For efficient work grill, the author decided to equip it with a blower. To do this, you need to cut a window at the bottom of the container. There is no need to throw away the resulting plate; a door is made from it. The door must be secured to the hinges and a bolt must be attached. It is important to take care of the handle; it should not actively conduct heat, as it will get very hot when using the grill. The author made it from a bolt and several nuts.


To secure the bottom grille, you will need two steel rods. Their author simply welds on the right level, cutting off the excess. If it is not possible to weld the rods, you can use threaded rods and secure them with nuts and washers.


Step six. Wood slab fastening
A wooden stove is a very convenient addition to the grill, although the grill itself must be well fixed. Here you can place plates with cooked food and so on. For a wooden slab, the author drills holes in the boiler bracket and then inserts threaded rods into them. Subsequently, these rods will be put on wooden blocks and tightened with nuts.


Step seven. Painting
At this stage, the author paints a part made from a boiler. First you need to remove all the rust and thoroughly sand the surface. Here you will need heat-resistant paint, since the container gets very hot.

Step eight. Assembly
After painting, the entire structure is reassembled. Using a level, it is advisable to measure the inclination of the grill and adjust the legs.


Also now the author attaches the hinge and the blower valve. Rivets were used for such purposes. You can also use bolts and nuts.


Step nine. Manufacturing and installation of internal grilles
Coals will be loaded onto the inner grate, and air will flow from below, which will lead to good combustion coals. To make the grille, the author decided to use a steel plate in which he simply drilled holes. The found plate already had a couple of rows of square holes. It is important here that the plate is thick, since the coals generate a high temperature when burning.
Then all that remains is to place the plate on the rods welded into the lower part.


Step ten. We collect wooden slab
The wooden slab is very easy to assemble. They will be needed here wooden beams which need to be cut to size. Next, two holes are drilled into them, through which threaded rods will pass. The author drilled the holes in the shape of the letter “V”.


Well, then this whole sandwich is assembled and tightly tightened with nuts. It's important to stock up on good ones large washers, since it takes a lot of effort to tighten. Washers are placed on both sides. It took the author 10 nuts to assemble. Two here act as a support, and two more on the other side press the wood. The remaining nuts are needed to secure the rods themselves. You need to tighten everything thoroughly using spanners.
As a result, a wooden slab can be thoroughly sanded, and for protection it would be good to paint it with protective varnish, paint, and so on.
In conclusion, it should be mentioned that the grill must be securely fixed, otherwise if you place something heavy on a wooden plate, the entire grill may topple. It can be screwed to the floor or to a large heavy board.
Step 11. Let's start testing
That's all. The grill is assembled and can now be tested. According to the author, the project was successful and worth the effort.