Constant flooding of the site due to high level ground water- a fairly common problem that can be solved with the help of properly arranged drainage.
Drainage using special ditches is the easiest and cheapest way to perform drainage. To equip the drainage system, landscape features are used - ditches are dug along natural slopes and drain moisture to a nearby reservoir or a separately built well to collect drainage water.
Device and purpose
closed device drainage system on the site begins with digging trenches. The depth of each trench corresponds to the occurrence of groundwater - usually this value is from 90 to 180 centimeters. The bottom of the drainage system is covered with sand, on which plastic or asbestos-cement pipes are mounted. Crushed stone is placed on top of the pipes - this filter does not prevent the free penetration of water into the drainage system. Crushed stone is covered with geofabric, and another layer of sand is placed on top. The final stage of construction is the backfilling of the upper sandy layer of the trench with soil.
Regular cleaning of the soil from weeds that impede the flow of water is recommended!The shape of the trench (ditch) depends on the type of soil. Clay, as a stable ground, allows you to build sheer walls. On sandstones, the walls are only made flat, otherwise the trench will begin to crumble during laying.
In addition, there are drainage systems open type made in the form of open ditches. They are divided into three types:
- Furrows located in any part of the garden. This is the simplest and most effective engineering solution for surface water drainage.
- Single ditches arranged along a natural slope. Usually placed along roads or borders.
- Channels located around the perimeter of the site.
 Open drainage systems do not have strictly regulated sizes. The depth and width of the ditches is selected based on the characteristics of the site.
Ideally, this is a system consisting of several channels interconnected by side outlets (performed across the channels). To protect the fence, the depth of the ditch should be from 30 to 50 centimeters (in areas with an embankment). Bypass channels arranged along the perimeter of the site do not have side outlets. The flow of water occurs due to a natural or artificial slope.
The biggest disadvantage open system are unreinforced walls prone to shedding and slipping of the soil.
The task of any drainage system or a separate ditch is the timely removal of melt, ground and rain water.
The system protects against flooding vegetable beds and gardens, prevents undermining of fence posts and foundations of buildings.
The importance of strengthening walls
Arrangement closed system requires significant financial investments from the owners. Therefore, more often  the choice is made in favor of open ditches to drain water from the site.
Open furrows and trenches gradually crumble - the soil slides off the walls and settles at the bottom, reducing the depth of the engineering structure and making it difficult to drain water. the only possible way out in such a situation, the walls will be strengthened. Moreover, it is better to do this in advance, even during the construction of the drainage system. If the strengthening is carried out later, you will have to deal with the "extra" soil that has already fallen to the bottom. Cleaning a drainage system of any length is a long and laborious process.
Strengthening technology
 The choice of the way to strengthen the ditches occurs depending on the length of the drainage structures and the steepness (shape) of the walls. The greater the height of the walls and the steeper their projection, the more reliable fixation will be required.
Shallow furrows with sloping slopes, as a rule, do not need special reinforcement. They are periodically cleaned with garden tools. A reasonable way to prevent possible shedding is to plant the slope with plants with a fibrous root system that securely fastens the surface layers of the soil.
The average steepness of the walls requires the use of geogrids or biomats. Reinforcement with improvised materials is allowed. Very steep slopes are reinforced with gratings or biomats.
The only thing to pay attention to is that concrete cannot be used for strengthening, since the proper functioning of the drainage is based precisely on the permeability of the bottom and walls. The drainage system is not the same as storm sewer, so waterproofing is unacceptable here!
Ways to strengthen
To strengthen ditches with an average wall slope angle of 5 to 15 degrees, a geogrid is used. This material is made of polyester threads and is sold by manufacturers in rolls.
Work order: 
- To strengthen the slopes, they are pre-tamped with a roller.
- Then the necessary pieces of the grid are measured and laid out on the walls, observing the tightness of the join.
- For fixing, anchor rods 15 centimeters long or metal brackets are used U-shaped. The recommended distance between the mounts is from 70 centimeters to one meter.
- The reinforced mesh can be additionally covered with crushed stone or soil, followed by planting with plants (mint, periwinkle are suitable).
To work, in addition to the grid, you will need a manual roller, tape measure, scissors, a marker, a hammer and fasteners.
To strengthen ditches with a large angle of inclination of the walls (from 15 degrees or more), biomats are most often used.This material in its structure resembles a washcloth - several layers of the mesh structure are superimposed on each other, and then fused into a single whole under the influence high temperatures. The biomat does not interfere with the growth of grasses, which allows additional compaction of the walls of the ditch.
Work order: 
- The walls are leveled and thoroughly cleaned of debris.
- The edge of the mat is fixed at the top of the wall with anchor rods.
- Then the roll unfolds to the very bottom and is cut off along the right size.
- The lower part of the biomat is fixed with anchor rods.
- The procedure is repeated until the ditch is completely strengthened along its entire length. The mat pieces are overlapped (approximately 10-15 cm), and the joints are also reinforced with anchor rods.
- The laid mats are covered with a layer of soil into which plants are sown (mint, periwinkle, saxifrage, bryozoan). It will take about 40 grams of seeds per square meter soil.
For work, in addition to biomats, you will need a hammer, anchor rods and a rake for leveling the soil.
Installing a geogrid (durable polypropylene mesh) is another way to reinforce steep slopes. The cells of this material have increased elasticity - they are easily stretched in length and width. The roll rolls along the walls of the ditch. The top cut is fixed with anchors. Also, the grate is fixed over the entire area with hook-shaped fittings. From above, the finished fortification is covered with a thin layer of soil and sown with plant seeds.
If funds for industrial materials not enough, you can use budgetary ways to strengthen the walls.Strengthening procedure with car tires:
- The walls are cleaned of debris, and then lined with tires. Each row is shifted by half a tire in relation to the previous one.
- All tires are connected to each other with wire and additionally strengthened with stakes.
- The finished structure is covered with sand or soil (including the gaps between the tires).
Strengthening using slate:
- The shape of the material does not matter. These can be wavy or straight sheets installed in a ditch previously cleared of dirt.
- Sheets are fixed in a ditch with reinforcement or stakes driven into the ground.
The upper cut of the slate may protrude above the edge of the ditch. This does not affect performance in any way. The main thing is that the sheets are  overlapped and carefully protected the walls from soil shedding. This reinforcement is no different. long term services, but is one of the easiest and cheapest ways to strengthen the walls of open drainage systems in areas.
It is quite easy to equip drainage around your site to remove excess moisture. It is important to choose the optimal format according to which the drainage ditch will be prepared along the fence, and to determine the required set of materials and tools.
Problems to be solved:
- In areas with heavy rainfall, soil erosion is a problem;
- With a high passage of groundwater in the area, the soil is waterlogged;
- With a natural slope of the site, all the water accumulates in the lower part and “pulls” the entire fertile soil layer with it;
- In hilly and mountainous areas, depending on the season, a huge amount of water falls on the site from the territory above the slope;
- Atmospheric precipitation from the road surface accumulates under the fence along the perimeter of the site and can wash away the base and supports of the fence.
In all these situations, the optimal solution is the arrangement of drainage ditches or a productive hidden drainage system around the perimeter of the site.
The main task drainage ditch consists in the collection of surface precipitation and their removal from the site.
However, it is not used to transport excess water., it is rather a localized drainage field, where excess water accumulates and gradually soaks into the ground, without bringing negative consequences to the buildings and the fertile soil layer of the site.
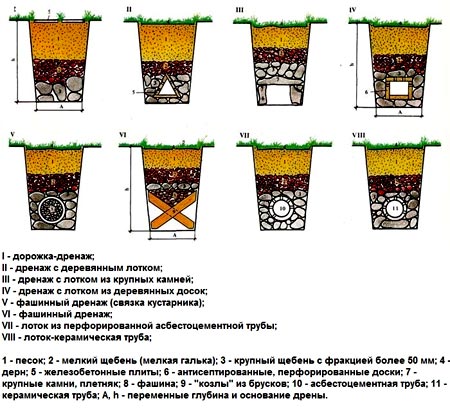
Kinds
There are three types of drainage:
- open;
- closed, laying of perforated pipes with backfill;
- backfill, the ditch is filled with coarse gravel and filter media for quick water drainage.
 To arrange drainage under the fence around the site from the outside, it is easiest to use open drainage ditches with reinforced slopes and a stable slope so that all excess water from the site and adjacent territories, including the road surface, quickly goes to the depth of groundwater or is transported to the drainage field, drainage well.
Of the main advantages:
- small volume of land works;
- minimum materials;
- an extensive selection of slope strengthening;
- an easy way to maintain, clean and prevent drainage.
Requirements. Distance from the fence
For any drainage systems focused on the improvement of a private area, SP 104-34-96 and SNiP 2.05.07-85 are standardized. Optimal slopes for organizing a drainage ditch, distances to a fence and other structures, as well as options depending on the required throughput and characteristics of the drained area, such as general slope, soil type, etc., are discussed.
For a flat area or with a slight slope of up to five degrees to the horizon, the additional slope along the bottom of the ditch should be 3-5 ‰ (ppm), which corresponds to a difference in height of 3-5 cm for every 10 m.
In fact, the quality of the slope and its uniformity are determined on site during the preparation of the trench. It is difficult to ensure the shape of the trench with high accuracy, so it will be necessary to correct its geometry during the operation of the drainage.
 It is important that the drainage ditch is located at a distance from the fence posts and supporting structures so as not to blur their base. It is enough to move the upper boundary from the plane of the fence by 30-50 cm, and when arranging the strengthening of the walls, compact the soil so that the water does not wash out under the fence.
Wall reinforcement methods
The drainage ditch only partly acts as a transport system, the water entering it must be effectively absorbed into the soil along the entire length along the bottom of the ditch. It is not advisable to use concrete sections or otherwise reinforce the bottom.
It is allowed to use hard waterproof base, only if underground communications pass under it, which should be protected from the effects of precipitation and groundwater.
Effective ways to strengthen slopes:

During the earthworks and the preparation of the foundation of the ditch, an extended pit is dug out with a width of about twice as much as necessary. A pillow of coarse sand or gravel is poured along the bottom.
Slopes are compacted manually or mechanically, are covered with the material selected for reinforcement. Next, a layer of soil is poured in the same way with tamping and compaction, only of a lesser intensity.
Calculation
In order for the drainage ditch to cope with the task, several important rules must be followed:
- The depth of the ditch along its entire length must be greater than the depth of the foundation nearby buildings by 300-500 mm;
- The slope along the entire length, taking into account turns or detours along the perimeter of the site, is directed to one point or along the lower boundary of the site;
- The slope is determined by the composition of the soil and the design capacity and is in the range of 1 to 5 cm for every 10 meters of extension.

In the presence of drainage well, separated from the contour of the drainage ditch, you should take the extreme point of the drainage system that is separated from the well and calculate the depth, and then calculate the control points located along the route, which will be used to derive the correct geometry of the ditch.
DIY
It is quite simple to equip a ditch with your own hands, even if you perform most earthworks by hand. However, the complexity will be caused by the presence of a large volume of selected soil along the length of the ditch.
It can be used to equip the front garden around the perimeter of the site so that it is raised above the general ground level.
 The easiest way to use the option is to strengthen the slopes with biomats, geomats, mesh or geotextiles. In this case, there is no need to over-compact the soil under the base, you can limit yourself to a small amount of loose drainage, sand or gravel, which will significantly reduce the load on the performer.
Price
A qualitatively, quickly and aesthetically pleasing drainage ditch can be organized using heavy rafter equipment.
In the minimum volume, an excavator is required, which will dig the base for the ditch in a matter of hours and at the same time it is easier to adjust the shape and geometry of the slopes, the depth of the base.
The executing company will prepare a project of work and an estimate in advance, so as not to guess about the cost of work after the fact and count on a guaranteed result.
The main burden on the budget of this event may be the preparation of a drainage well, if necessary, the rest of the work is much cheaper.
Not everyone is destined to become the owner of a personal plot on a flat, open and at the same time dry area. Plots with high level groundwater deposits, with the threat of flooding, are not very convenient for development, but not a reason for grief. The device of a drainage ditch or an entire groundwater drainage system will help get rid of this problem.
Drainage ditch around the house
Drainage is the process of draining the soil in swampy areas, removing excess water from the soil. Another so-called system of pipes, trenches, wells, mounted for these purposes. Why is it needed?
Drainage systems are a smart engineering solution that allows you to get rid of the problem of groundwater on personal plot. Usually, the territories of horticultural cooperatives and settlements with individual buildings are protected from flooding by a drainage ditch in which a pipe is laid, with the possibility of diverting the collected water to a lower place.
It is quite possible to build protective structures in the country with your own hands, but this must be done before the start of improvement. Drainage ditch, pipe, well, drainage - these elements create a drainage system on the site.
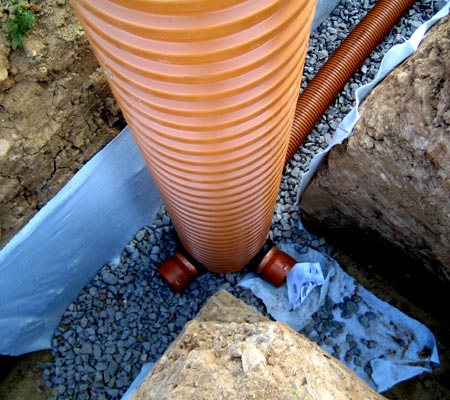 Installation of a well for drainage on the site
 To strengthen them, you need a large number of earthworks, both with their own hands, and, possibly, with the use of special equipment.
Types of drainage at their summer cottage
The water drainage system in the country is a network of interconnected pipes and channels, which are designed in such a way as to collect and remove excess water from buildings, the yard, the garden in the most convenient way and thereby strengthen these objects. If the drainage is done correctly, then surface water will in no way harm the foundation, the possibility of mold and fungi will disappear.
Before starting landscaping work on the site, it is necessary to determine the degree of flooding threat, your capabilities and choose the drainage system that is necessary and most suitable for this case.
Open or surface drainage
The simplest system for do-it-yourself work.
 Construction of an open drainage ditch made of granite cobblestones
 large-scale excavation it is not required here, there are enough ditches dug across the territory into which the storm pipe drains its water, rain streams flow, and excess irrigation.
Deep drainage system
More difficult option, which is needed in a site with a high level of groundwater, located in the lowlands, and will also not be superfluous in clay and loamy areas. The basis of such drainage is a drain - a pipe that is laid in a trench at a certain depth. The trench leads to a catchment well or collector pipe larger diameter.
vertical drainage
This structure is in the form of several wells located around the building. The water collected in them is pumped out by a pump. In order to make such a drainage system, engineering calculations and project preparation are needed.
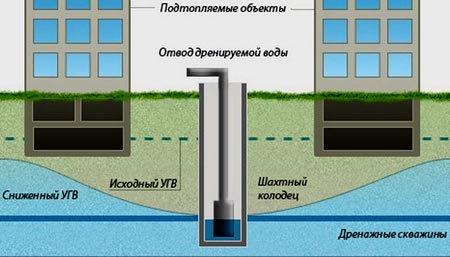 Scheme for the installation of vertical drainage wells
 Radiation system
A complex type of hydro-reclamation structures. Consists of pipes and wells. It is built mainly in large areas or on an industrial site.
Open drain device
The easiest option for drainage in the country is open drainage systems. They are divided into two types: point and linear. Point ones are storm water inlets that are fixed in places where it ends.
Such storm water inlets are usually equipped with grates for collecting debris. The linear variant of open drainage is represented by a drainage ditch.
The simplest drainage systems are easy to make with your own hands. The art of creation engineering communications owned by the ancient Romans. A variant of Roman drainage is used in some farms to this day. Ancient engineers came up with the idea of reinforcing drains with bundles of thick rods that prevented shedding.
 Option for an open drainage ditch
 It is easy to make such a simple strengthening with your own hands, a pipe is not needed here, and it can last for 15 years.
Stages of creating a drainage trench on the site:

Quite often at summer cottages or garden plots drainage or ordinary ditches are located. Their slopes can be mobile and gradually move down towards the bottom. In this case, the question arises of how to strengthen the ditch. Most various ways fortifications are discussed in our article. In addition, they can be used to strengthen the slopes of ravines or the banks of ponds and other water bodies.
How to choose a strengthening method depending on the angle of the slope
It is worth deciding how to strengthen the ditch, guided by the angle of the slope of the ditch:
- Often, slopes with an angle above 8% need serious strengthening. It is enough to plant them with plants of horizontal and vertical action.
- Slopes with a steepness of 8 to 15% are reinforced with biomats (geomats) or geogrids.
- Significant slope steepness (over 15%) can only be supported by methods of internal reinforcement - geogrids and gabions.
Pro tip:
If your ditch has a large slope, but does not have a significant height, you can use stones driven into the elephant.
Geomats
Geomats are a polymeric material with a waterproof structure. It is created by superimposing polypropylene gratings on top of each other under the influence of high temperature.
The structure of the resulting product resembles the structure of a washcloth. Thus, geomats protect the soil, and on the other hand, do not prevent plants from growing through them. Over time, plant roots intertwine with the lattices of the material and strengthen its structure.

The laying of geomats is carried out as follows:
- Before strengthening the bank of the ditch, the surface of its slope is leveled and cleaned of debris.
- the upper edge of the first geomat is fixed in the upper part of the ditch with anchor bolts.
- The roll is rolled out and cut off, reaching the desired length.
- The folds of the material are straightened and its lower part is fixed with anchor bolts.

- The following rolls are stacked in turn. In this case, it is necessary to create a longitudinal overlap of one roll on another by about 15 cm.
- The resulting surface is covered with a layer of soil of 3-5 cm and sown with plant seeds.
Pro tip:
Seed consumption should be approximately 40 g / kV meter. At the same time, the sowing scheme is optimal: 2/3 of the seeds are poured onto the open surface of the geomats, 1/3 - onto the covered soil.
Geogrids

Geogrids are made from glass or polyester threads. The product is a mesh with square cells, reinforcing the surface of the slopes.
The geogrid laying process looks like this:
- The surface is leveled and compacted with hand rollers.
- Rolls of geogrids are distributed along the ditch at a distance corresponding to the width of the web of one grid.
- The rolls are rolled out by hand almost end-to-end with each other.
- The expanded mesh is fixed with metal anchors - rods 3-5 mm in diameter, 150-200 mm long with bent upper ends every 1-1.5 m.
Pro tip:
If the area is subject to strong winds, it is better to use metal wire U-shaped brackets instead of anchors.

- The laid out geogrids are covered with the selected material (soil, crushed stone or stone) in small piles, which are then leveled manually.
- If the mesh was covered with soil, soil-covering plants are sown from above.
Strengthening with a geogrid
What is a geogrid
The geogrid is a grid of cells made of high-strength polyethylene and polypropylene. The principle of its operation is based on the adhesion force of its cells with the granular material with which it is subsequently filled. Such material is crushed stone and less often vegetable soil. Strengthening the ditch suburban area strengthen by sowing on the slopes of perennial grasses.
It should be noted that when using soil-covering plants, the geogrid ceases to be visible over time and does not violate the natural landscape.

Strengthening technology
To strengthen the drainage ditch, you need to purchase:
- fine gravel or sand;
- special geogrid;
- mount for her:
- special plastic fixture;
- or the usual armature, bent in such a way that it began to resemble one-sided hooks.

You can strengthen the banks of the drainage ditch with geotextiles as follows:
- Preparing to fortify. The process begins with pumping out water, if the ditch is filled with it, in order to gain access to the strengthening of its lower parts. There are three ways to implement pumping:
- with the help of natural drainage (an inclined pipe, through which the drains will go by gravity);
- pumping out;
- self-extraction.
- Next, they move on to clearing the banks of the ditch or drainage, which will be strengthened. It is enough to remove large clutter - massive branches and plants, large stones, but small grass and minor debris ( plant origin) can be left.
- The geogrid is spread along the length of the entire slope of the ditch.
- Then it is strengthened using the chosen fastener method (purchased fasteners or hand-made).
Pro tip:
This stage should be given a sufficient amount of time, since the quality of fixing the geogrid directly depends on its service life. If the work is done correctly, it will be approximately 10-20 years, depending on the conditions of the area.

- The cells of the geogrid are filled with reinforcing material. Ordinary soil should not be used for this, as it will simply be washed out over time. Depending on the degree of moisture, the ditches are used:
- Crushed stone if the recess is filled with water. In addition, to improve the aesthetic properties, crushed stone can be replaced with any similar material, for example, river pebbles.
- Sand if the ditch is dry.

- Decorative stage.
Decoration, in addition to the aesthetic function, has an additional strengthening of the coast. Can be used small shrubs or seeds of special ground cover plants with abundant roots. In addition, plants will protect the soil from the occurrence of corrosive processes.
DIY gabions
What are gabions

Maccaferri gabions are often used to reinforce open drainage ditches. They are a factory-made metal mesh product, made in the form of a parallelepiped, and then filled with large stone or rubble.
Gabions are made of galvanized wire coated with PVC to protect against chemical, corrosive and mechanical influences. The design is able to withstand significant loads due to the use of a mesh with double torsion.
Drainage properties of the product are provided due to its porous structure. Also, thanks to it, hydrological loads on the slope and the removal of soil particles from it are excluded.
Gabions are a perennial structure. They have a beneficial effect on the natural ecosystem, and due to its action, their effectiveness only increases over the years. Manufacturers themselves promise a service life of up to 100 years.

How to make a gabion with your own hands
The only drawback of factory gabions is the high cost. In addition, finding a retail manufacturing company can also be difficult. For this reason, we suggest making them yourself:
- You will need reinforcing bars with a diameter of 6 mm. The rods are welded into a rectangular structure of suitable size.
Pro tip:
The main advantage of homemade gabions is the ability to choose the dimensions that are suitable for specific conditions. For example, in a small area, structures with a size of 800 * 400 * 400 mm will be appropriate.

- The cell size of the rebar cells is selected according to the diameter of the purchased stones, so they must be purchased in advance. So, if the average fraction diameter is 150 mm, then cells of 100 * 100 mm are suitable for you.
- After the structure is welded, it is installed on the banks of the ditch.
- Then the cells are filled with purchased cobblestones.
- From above, for reliability, a home-made gabion is covered with a chain-link mesh.

Pro tip:
The usual grid the chain-link is subject to rusting. This problem can be solved in one of two ways:
- purchase a galvanized chain-link covered with PVC and devoid of such a disadvantage;
- fasten the chain-link in such a way that after a few years it can be replaced with a new mesh.
From above, the edges of the mesh along the perimeter are additionally reinforced with cobblestones, which will give the structure a more decorative look.

Budget options
Strengthening with slate
If the proposed options, even with self-manufacturing too burdensome. Consider how to strengthen the ditch in the country in a budgetary way. Of course, such a solution has a much shorter service life, but it can also save slopes from sliding.
The easiest way is to place sheets of slate, flat or even wavy, along the edges of the ditch. Sheets are fastened with metal posts.

Tire reinforcement
You can also use the experience of builders from the UK. They offer to strengthen the ditch at the dacha with the help of the old car tires. There are 2 options for their use:
- Tires are laid in rows and firmly tied together. For additional strength, stakes are hammered into the middle. Then the space inside the tires is filled with local material, such as soil, or sand. The same material fills the voids between nearby tires.

- Tires are laid in rows, shifting each overlying row by half the diameter of the tire. Tires themselves fall asleep in rows with the same available material(sand or soil).

It is worth noting that the creation of such a fortification will cost 10 times cheaper and 9 times less labor-intensive than the installation of a slope support using the mesh reinforcement method. In addition, it is possible that you can get unusable tires for free.
We discussed with you how best to strengthen the ditch with water or dry. The choice of strengthening methods presented in our article is quite large. We hope that you can easily find an affordable option for yourself.
The problem of how to strengthen a ditch in a summer cottage often arises when creating a drainage system that allows you to properly drain excess moisture from the soil. To solve this issue, both improvised means and specialized materials are used.. Knowing the rules and the sequence of their application, you will ensure the normal functioning of this required element water system.
Gabion structures have high strength and reliability.
Arranging drainage is quite simple. The main difficulties begin with its long-term operation: the ditch requires constant cleaning, otherwise the water will stagnate for a long time. The strengthening of the walls also becomes very important, since if you ignore their care, the ditch is very quickly eroded, capturing the adjacent summer cottage areas of fertile land.
Gabions. This engineering structure is used in a special difficult cases at a high speed of water flow in the ditch or at a large, up to vertical, angle of inclination of the drainage walls. Gabions can often be seen on the banks of mountain rivers, where they protect the banks from erosion. Gabions look like a cell made of a cellular wire mesh filled with large stones: river pebbles, crushed stone, etc.
Purpose of drainage ditches

Slate can serve as improvised material for strengthening the ditch.
The system of drainage ditches in the summer cottage performs a very important function - the removal of excess groundwater and lowering their level. This reduces the waterlogging of the soil and avoid flooding, especially in low areas of the territory.
Ditches can be of different shapes, differ in width and angle of inclination of the walls. If the drainage passes through the neutral territory along your fence, then it is especially important to strengthen its walls, because the soil weakened by water can begin to collapse, expanding the drainage, which will undermine the foundation of the fence.
Drainage ditches are used not only to lower the water level in the soil, but also to remove moisture from areas surrounding the foundation of the house. Thanks to this solution, the basement will not be flooded with water.
Geomats and geogrids are designed to strengthen the slope by creating and holding a plant layer on its surface. These materials have a porous structure that allows plants to develop freely. Unlike open soil porous protective materials create an inseparable layer with plants that is not washed away by water.
Back to index
Ways to strengthen ditches
There are many ways to strengthen the walls of the drainage ditch, but they are all used with one common goal - to prevent further increase in the width of the sides and siltation of the bottom. Let's take a closer look at the most popular methods to achieve this goal:

- Use of a geogrid. It is a flexible cellular structure made of polymeric material. Cell walls are perforated to allow free flow of water. The geogrid is the most technologically advanced and correct method strengthening ditches, as it has high reliability and complete environmental safety.
- The main purpose of the geogrid is to create a layer along which groundwater will move freely from the source of their accumulation (in this case, soil) to the place of discharge - a reservoir, drainage well or other ditch.
- Installation of concrete gutters. An effective, but rather expensive method, especially if the length of the ditch is significant. Concrete trays make it easy to clean the drain. Such a drain can be made quite narrow and deep, thereby preserving the area of \u200b\u200bthe site. Concrete trays can be purchased ready-made or made from your own using formwork. The latter method is even preferable, as it will make it possible to make a solid tray, without seams and joints into which water can enter.
- Planting plants. This method does not always help, only on condition that the slope of the ditch walls is no more than 8-10 °.
- The use of improvised means: old slate, car tires or other materials. Due to the fact that the main purpose of these materials is by no means to protect the slopes of the ditch, rely on them long term service is not required. They can only be considered as a temporary solution.
- A small and shallow drainage ditch can be laid out with flat river pebbles, fastening it cement mortar, but this method is only suitable for drainage with a small amount of water.
Back to index
How is ditch protection installed?

From correct sequence actions during the strengthening of the walls of the drainage depends on their service life, stability and reliability. First of all, you should choose a way to strengthen the walls of the drainage. It is recommended to use professional modern facilities: geogrid, geomats and geogrids, especially difficult conditions- gabions.
Regardless of the method chosen, work should only be started with a dry ditch, so work is carried out during the minimum groundwater level. Let us consider in detail the installation sequence of some of the materials listed above.
Installation of the geogrid is carried out on a surface cleared of debris, large stones and branches. Perfect option- a flat slope, which may be slightly overgrown with grass. Along the upper edge of the drainage, pieces of reinforcement 50-60 cm long are hammered into the ground, and the distance between them should correspond to the size of the grid cells. The upper end of the reinforcement is bent at an angle of 90 °, thus creating an L-shaped fastener.
The mesh is put on the fasteners and stretched in the direction of the opposite side, fastening in the same way. After the lattice has taken a stable position, pieces of reinforcement or anchors make fasteners in separate cells. It is not necessary to install fasteners in each segment, it will be enough to distribute them evenly in a checkerboard pattern.
The final stage is filling the cells with fine gravel, gravel or sand. The dimension of the material depends on the speed of water movement - the higher it is, the larger the filler should be.
Geomats and geogrids are also roll material, which cover the slopes of the drainage. Under these materials, you can install non-woven insulating material, which will freely pass water, but not allow the soil layer to erode. A geomat or geogrid is laid on top of it. Their upper edge is fixed along the slope with anchor bolts, stretched to the opposite side, where the action is repeated. The surface of the material is covered with a small layer of soil mixed with seeds. lawn grass. Within a couple of months, all layers will grow together, creating a reliable natural slope protection.
Gabions are used in cases where saving space on the site is critical. They allow you to make the wall of the ditch almost vertical, narrowing the drainage to a minimum.
Creating a gabion on your own requires significant financial and time costs, but the result will be robust construction that will last for decades.
For work, you will need reinforcement bars with a diameter of 5-6 mm, a fine mesh netting (preferably with a polymer coating), welding machine and a large number of large stones. First, long mesh boxes are welded from the reinforcement, the height of which should correspond to the depth of the ditch. The size of the cells will be such as not to allow stones to pass through them. After installing the boxes on both sides of the drainage, they are filled with stones, and the entire structure is covered with a chain-link mesh on top, screwing it with galvanized wire to the reinforcement.
The advantage of gabions is their beautiful view, which fits into landscape design. A budget way to strengthen is to install an old slate. For this, both wavy and flat coatings are used. It is buried in the ground along the slopes of the ditch, reinforced with spacers from metal pipes or fittings of large diameter.


