One of the most important stages in the construction of a house is the installation of the roof, because for this you need to choose best option rafter locations. To build a roof yourself, you need to consider several options for installing the roof, as well as learn about the sequence of actions performed.
Rafter system design
Each house should be designed truss system which is suitable for this building. If this is not done, then the load will be distributed unevenly, which can lead to a skewed roof.
To create the right project, consider that:
- If it is necessary to lay the insulation, the truss system must be done in such a way as to facilitate further work. Heaters are usually sold in widths
- 1200 mm, so the step between the rafters should be selected taking into account precisely this characteristic. Otherwise, the insulation will have to be cut off constantly.
- The power of the supports is determined by the cross section of the beam from which they are made. Attention is also drawn to the condition of the wood. It is better to choose resinous bars, as they are used longer.

Wood pretreatment and preparatory work
Before starting work, the timber must be treated with special compounds so that it is protected from the effects of microorganisms and fire. Antiseptic is applied prior to installation. The composition should be applied with hard brushes.
In order for the composition to protect the wood for as long as possible, it is applied in two layers (before this, the material is dried). Installation of rafters on the roof occurs only after the complete drying of the applied compositions.
Preparation begins with checking all walls and ceilings, as well as taking measurements. If in some places the wall deviates from the horizontal, this is corrected by using cement screed. If the house is built of wood, irregularities are removed by installing wood linings.
To make work easier, install scaffolding. They should be at roof level.
Mauerlat
Mauerlat is the base on which the load acts, therefore it is from him that the construction of the truss system begins. The location of this element is carried out in such a way as to evenly distribute the load from each support. This element of the truss system is a log or beam that is laid on external walls. This option for creating a truss system is the most effective.
Important ! so that moisture on the Mauerlat does not reduce its service life, two layers of roofing material are laid under the timber.

A bar with a cross section of 10X15 cm is used as a Mauerlat. This element is laid after the completion of the construction of the walls. After laying before fixing, the horizontal is determined using building level. The most popular method of fastening is the use of anchor bolts.
The bolts are fixed on the reinforced belt during the completion of the wall construction. After that, holes are drilled in the beam, which coincide with the location of the bolts.
Types of rafters
Before building a rafter system, it is necessary to determine the type of rafters used. They are divided into 2 types:
- on the slope;
- hanging.
If the building is small, only simple rafters are used, which are attached to the Mauerlat and interconnected by a crate. If the structure is large (for example, a residential building), then more construction is carried out. complex design roofs. Before installing rafters gable roof do-it-yourself selection of the slope, which is determined based on the expected load from snow and wind.
Hanging rafters are structures that are supported in only two places. This means that with such a scheme, intermediate supports are not used. Distinctive feature this type of rafters is to create a bursting load on the walls of the building. This type of frame is used most often in the construction of residential buildings. If the angle of the roof slope is less than 45 degrees, then additional elements are installed. Most often, puffs are used that connect the rafters to each other.
Important ! The higher the tightening, the stronger it should be.
For the construction of a layered truss system, a third support is required, which is usually another load-bearing wall.
Preparing for installation
Before starting work, prepare necessary tools And Consumables. To avoid dangerous situations, it is better to build scaffolding near the house. Do not forget about personal insurance.

For work you will need:
- timber, the cross section of which is 15X15 cm;
- waterproofing material;
- adjustable wrench, which will be needed when tightening the anchor bolts;
- building level;
- hammer;
- drill;
- nails.
For rafters, a beam is selected, the section of which is 50X200 mm
Installation steps
Installation of gable roof rafters is as follows:
- lifting the beam to the roof;
- sawing out a part of the lower ends of the rafter legs in such a way that a reliable connection is formed in contact with the Mauerlat;
- connection of paired rafter legs;
- installation of extreme rafters and their connection with the help of a ridge run.
In order for the rafter legs to be connected to each other more reliably, half of their thickness is cut out in the place where they are connected. Cutting parts of the rafters takes place on the ground, since it is inconvenient to do this on the roof.
Before installing the rafters, the Mauerlat is marked in order to observe the selected step between the supports. Usually the distance between them is one meter. The same marks are applied to the ridge run.
Methods for installing rafter legs on walls
If the rafters are installed on brick walls, they are fixed with a device called a "ruff". It is a metal element that is driven into the wall from the inside of the building and covers the rafters with a loop.
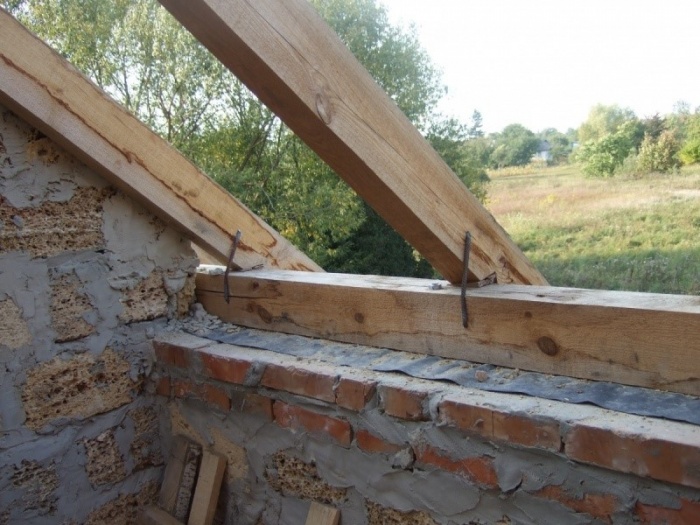
On all structures that do not shrink, fastening occurs by cutting out recesses in the rafters for attaching to the Mauerlat. Attachment occurs with nails or corners.
Important ! between the rafter system and the pipe there must be a distance of at least 130 mm.
Strengthening the rafter legs with additional elements
If the rafter system has already been created, but the owner of the house has learned that it is not adapted to the loads that will affect it, he needs to strengthen the rafters. This happens by inserting additional wooden beams, which are called help. Attachment to the rafters occurs with the help of metal clamps or toothed plates.
Also, strengthening can occur when there is too much load in the middle of the rafters, which threatens to break the timber. To avoid this, additional overlays are created on the connection area with the support. The new part of the truss system can be built both above and below the old roof elements.
If the installation is higher, then in addition to strengthening the roof, a change in slope also occurs. This method avoids the loss of time for a complete replacement of the rafters and involves securing new rafter legs to those that have already been installed. The process of changing the roof begins with the removal of the crate. After this, the installation of new elements takes place, which, by the method of connection, do not differ from the old truss system.
In some cases, it is necessary to strengthen the bottom of the rafter leg. This is necessary in situations where the Mauerlat begins to rot and become less reliable. To strengthen the rafter legs, struts are attached, resting against the Mauerlat or an additional bed. For more reliable fastening, recesses are cut out on the rafters. Additional elements fastened with nails.
Ways to strengthen damaged structures
Methods for restoring damaged parts of the roof include:
- installation of wooden linings;
- creation of bar prostheses;
- the use of overlays based on the beam.
The first method is used for single damage to the rafter legs. To strengthen the element of the truss system, wooden linings are attached and fixed with bolts or nails. Additional elements must rest securely against the Mauerlat and be fixed in this position by twisting.
Bar prostheses are more often used for massive damage to rafters. To strengthen, first, temporary supports are installed so that the rafters are in a fixed position. After that, the damaged parts of the structure are cut out. Then a prosthesis is put on, which rests on the Mauerlat.
The overlays that rest on the beam are used when part of the Mauerlat has rotted. In this case, this section is cut out. To support the rafter leg, an additional reinforcing brace is created, which abuts against a pre-fixed beam. The beam is located below the Mauerlat, if the wall structure allows it. In order to make a crate in a place where there is no longer any support, an additional board is attached, on which the crate is attached.
During the construction of any building, the completion of the main work is the construction of such an element as the roof. Its importance is exceptional in general for the entire structure, because the basis is a special truss system. It is the rafters for the roof in the future that will have to withstand any load from external adverse factors.
In this article
Beginning of work
The construction of the roof of any building is carried out using wooden or metal rafters. It is a specially designed system of series-connected elements that provide the load-bearing capacity of the entire roof as a whole.
In preparation for the assembly of rafters for the roof, it is imperative to draw up a drawing indicating all dimensions. This will be needed when calculating the required amount of building materials.
For wooden rafters it is worth using dried wood, which is not affected by fungus and rot. And also you can not use a tree in the presence of large cracks and splits on it.
Metal rafters for the roof should not have visible and hidden deformations. No areas of corrosion are allowed. And most importantly, in no case should roof rafters be installed without treatment with anti-corrosion compounds.
wooden rafters
Do-it-yourself wooden rafters for the roof do not present any particular problems even for people who do not have a special architectural education.
But we must remember that there are certain foundations from which you should not deviate. First of all - this existing species truss systems.


Dimensions of truss elements
For wooden rafters, the most common is the use of timber and boards.
For supporting elements, a beam section of 100 * 100 mm is taken. If a board is used, then the minimum is 100 * 50 mm. The size of the board is also allowed 200 * 50, but no more. If, in order to save Money it was decided to use logs, their minimum diameter should be from 100 mm. And at the same time they must be necessarily processed and cleaned.
Before putting the rafters on the roof, you can use a special Internet service to accurately determine the required dimensions of all elements where you need to enter the main parameters of the roof. Or you can make all the calculations manually, taking the data taking into account the snow and wind load in the required region of the country.
It must be remembered that the minimum distance between the rafters should be from 60 to 100 cm. Otherwise, the roof may be unreliable and not withstand the subsequent operational load.

The sequence of installation of elements of a wooden truss system
To build a reliable roof with your own hands, you must follow a certain sequence of actions. 

Fire-retardant composition increases the degree of fire resistance wooden materials in the event of a fire in an emergency.
Fastening truss elements
To fasten all elements of wooden rafters, self-tapping screws with a length of more than 70 mm should be used. They must be made of stainless steel or with anti-corrosion treatment. This helps to prevent the occurrence of spot rot, which can subsequently spread to all elements.
Special mounting plates, beam holders and beam connectors with mounting brackets must also be made of anti-corrosion materials.
To join each element, it is necessary to make geometric cuts. With their help, additional adhesion between structural elements will be provided.

to install metal rafters may require the use of a special welding equipment, since, in addition to the bolted nut connection, some elements require precisely welding together.
What is the result?
Following such simple rules and conditions, it will be possible to independently build a truss system of almost any complexity and the required type, depending on the needs of the owner of the house.
It is worth remembering that in no case should you allow savings on the quality of building materials. And in case of doubts about the correctness of the actions performed and uncertainty about own forces You should definitely seek professional help.
It is better to entrust the installation of rafters to specialists, the roof is not the element of the building with which you can experiment. However, it is necessary to know the basics and features of how to put rafters on a house, if only in order to control the quality of work and be able to build a simple truss structure.
How to properly put the rafters on the house - let's deal with the terms!
If most people more or less imagine what a rafter is, then a problem may arise with the rest of the terms found in the case of a roofer. Mauerlat, crossbar, bed, stand, brace, run - it is unlikely to do without the help of specialized literature or experienced builder! However, if you are reading this article, then you can do without them.
- Mauerlat is traditionally wooden beam with a section of 15 * 15 cm, which acts as an extreme lower support for the rafters, distributing the load from the joining points of the rafters to the entire upper wall area. IN Lately metal is often used instead of wood, for Mauerlats these are channels and I-beams. Mauerlat is installed with a slight indent from the outer edge of the wall and fixed. To prevent rotting and corrosion from below, the beams are insulated with roofing felt or other waterproof material. It is with this element that the installation of rafters often begins.
- Lying - an additional beam to distribute the load from the rafters around the entire perimeter of the walls. They differ from Mauerlats in that the beds are installed inside complex truss structures, that is, they are not an obligatory element of the roof, but only an addition in necessary cases.
- Rack - vertical beam, which reinforces the truss structure from the inside. In turn, girders are installed on the racks, which are supported by struts - inclined beams that support horizontal elements and counteract compression or skew of the structure.
- Run - a horizontal beam that crosses the rafters perpendicularly along the entire length of the roof. Three types of purlins can be distinguished in the roof structure - ridge purlins (on which the rafters converge at the top of the roof), side purlins and Mauerlats, which are described above.
- Crossbar - a beam that is installed between the rafter legs, increasing the strength of the structure and its stability. Usually the cross section of the crossbars is 10 * 15 cm.
- Rafter legs or rafters - beams on which the roofing is directly installed. Rafter is also a common name for the entire truss structure. For this element, a bar with a section of 10 * 15 cm is used. For the manufacture of a plank truss system, it is used pine board with a section of 50 * 150 mm or 60 * 200 mm.
Before installing the elements, it is necessary to accurately calculate their number, as well as take into account possible loads on the rafters: they can be one when installing slate, others for tiles and third for.
For example, shed roof built from minimum quantity elements, can easily withstand sheets of metal or slate, while under the tiles, over time, the rafters can deform, bend, which means that you will need to additionally strengthen the structure with racks or struts, and also use beams with a large section.
How to install the rafters - layered or hanging?
Rafter structures are divided into two groups - layered and hanging. Hanging rafters are usually built on the roofs of buildings without internal load-bearing walls. Hanging structure rests on the ridge run and power plates, and is fastened below with puffs, which prevent the rafters from moving apart under the influence of the load. It should be noted that much more timber is spent on hanging rafters, since this ensures their stability. You can save wood on plank rafters, since log options take 15-20% more timber.
Sloped rafters are installed on those buildings that have load-bearing walls inside, since this type requires a minimum of three support points. Layered elements can block the span with a maximum length of up to 6.5 meters. If there is a need to increase the width of the covered area, then this can be easily achieved by installing additional supports: with one additional riser, the width can be increased to 12 meters, and with two - up to 15!
Depending on the section of the bars that are used for the manufacture of rafter legs, the spacing of the rafters varies from 0.8 to 1.2 m. The construction of the rafter frame, including runs, racks and struts, provides special stability to the rafter legs. This type is most often used in private construction, since on the one hand it turns out strong and reliable roof, and on the other hand, layered rafters are very economical- wood on them, in comparison with hanging ones, is needed many times less. Quite often, a roof is constructed by combining both types.
How to put rafters on the roof - what for?
To begin with, guided by detailed instructions, as given in a separate article, calculate how much material you need. Before installing the elements of the truss structure, they must be treated with compounds against fungi, insects and flame retardants that prevent ignition. Having spent money on these compounds before putting the rafters on the roof, you will extend their service life by decades.
How to put rafters on the roof - step by step diagram
Step 1: Installing Mauerlats
The most important connection in the layered versions is the place where the rafter leg rests on the Mauerlat. It is with the fixing of the Mauerlat that the installation begins. To do this, metal pins are pre-concreted in the walls, which go deep into the walls by at least 40 cm. Wire twists with a diameter of at least 6 mm will also be suitable for the same purposes.
Step 2: Making the layout
Raise up two beams, which will be rafter legs. Cut notches on the left and right leg for emphasis on the Mauerlats, do not forget to mark for yourself which side of which beam belongs to. Install the bars, joining them at the top to make marks for the notches at the top. Notches are needed in order to make a connection with an emphasis, and not an overlap - this is considered extremely unreliable even with strong reinforcement with nails.
The installation of rafters, as well as the creation of the entire roof, is a very responsible process. Taking into account that the base of the roof can be fixed to the wall using improvised means for lifting, subsequent work on its creation, which includes the installation of rafters, will be impossible without scaffolding, which also includes mobile structures. Scaffolding is used to lift materials to the desired height, in addition, they can be used as a working platform for a person and a place for laying building materials.
The device of the truss system.
Preparation of scaffolding and scaffolding
Do-it-yourself rafter installation can seem like a lot of work, but if you follow all the tips and follow them correctly, the process will be fun. If you are building a house, then you must use at least 3 scaffolds, in any case, their number should not be less than 2. For work, it is better to make mobile scaffolding, as they are very convenient. Installation of rafters should begin only after all safety issues have been resolved, in no case should this be neglected, since health is more important than construction speed.

Types of truss systems.
If there is no internal load-bearing wall in the house, that is, there is no additional support, and the building legs rest only on the outer walls of the house, then hanging rafters should be used.
What is a rafter? Translated from the Old Russian language, this is a construction to support gable roof. And the rafter legs are inclined, with the help of which the roof slope is formed. The rafter legs are usually connected by "grandmothers" or "fillies", which are made vertically. The puff is a horizontal beam, with its help the rafter legs are connected.
Varieties of rafter designs
Roof structures, as a rule, contain the following components:

Schemes of layered rafters and their application.
- Rafter legs are used to form the slope.
- To transfer part of the load - columns or internal supports.
- Various inclined elements (braces, braces) that perform the same functions as the racks.
- Elements that fasten rafter legs to each other. Usually floor beams are used for this.
Triangle - optimal shape roof truss. This design has the highest rigidity.
Despite the many possible roof shapes, two types of rafters are commonly used:
- Layered truss system;
- Hanging rafters.

Figure 1. Installation of rafters.
The first case is used subject to the presence in the structure of the building of internal load-bearing elements. At the same time, the rafter legs have an emphasis not only on external walls, but also on internal columns or supports. Racks are used to transfer the load. Figure 1 shows the mounting schemes of the rafters.
The hanging structure has an emphasis only on the outer walls, and in the ridge the rafters rest on each other. Hanging rafters are used in the absence of intermediate supports, while the span is less than 12 m. A design feature is a high spreading load, to reduce it, special puffs are used. The legs of such a rafter system should be strengthened with struts, which will also reduce the pressure on the load-bearing walls.
Walls made of brick or stone require the installation of a Mauerlat. Mauerlat - wooden beam, which usually has a cross section of 150x150 mm and is fixed with special studs. These studs must be pre-embedded into the wall. A waterproofing layer must be laid under the Mauerlat.
Do-it-yourself installation of hanging rafters on the Mauerlat: step by step instructions
For work you will need the following tools:

Scheme and installation of hanging rafters.
- axe;
- hammer;
- knife for precise fitting of parts;
- pencil;
- plumb;
- roulette;
- building level.
To install the rafters, it is necessary to take a beam, the length of which will be 6 m, and the section 50x200 mm. It should be noted that if the cross section is suddenly small, then after some time, such a structure may sag. Based on the case described above, the roof slope, namely its angle, should be 33 º. The next step in installing the rafters is that, using scaffolding, you need to raise 2 beams and connect them at the top.

Knots of layered rafters.
- On the rafter legs, you need to “cut the heel” in the following way so that the rafter rests well on the Mauerlat.
- With the next rafter, you need to do the same. It will be nice if the rafter legs are marked as “left” and “right”.
- After completing these works, the rafter legs must be connected.
- After that, at the place where the rafter legs are connected, you need to perform with right angle"stump", so that the rafters at the top are not overlapped, and then fastened with nails. This method is unreliable, as the rafters rest against each other.
- For the correct execution of the “hemp”, one should initially attach one rafter to the other, then draw a line of their connection (you can use a pencil for this) and only then saw off.
- To cook construction material on the ground, you need to measure and make several patterns at once.
- Having done all the operations, we begin the installation of the rafters, first on one gable, and then on the other. Using nails, we fasten the rafters to the Mauerlat.
- The following pairs of rafter legs are prepared according to ready-made patterns on the ground;
- Then you need to pull the thread along the ridge between the already finished pairs of rafters and proceed with the installation of all the remaining rafters.
- The distance at which the rafters are installed is 70 cm. Of course, in fact, it can be within 68-73 cm from each other. This is considered the optimal distance for the roof, as it is reliable, and such a distance between the rafters will be convenient in the future when you stretch the film.
- For these purposes, it is necessary to initially mark the Mauerlat, and then install the rafters on it.
- It is worth noting that the adjustment must always be carried out with the help of a thread that is pulled between the rafters, when necessary, it will be possible to adjust the height of the rafter legs on the spot. In some cases, you need to put small boards under your feet.
- Adjustment in the lower part in width, which is between the two rafters, is made according to the indicated markings on the Mauerlat. As for the upper part, here the adjustment is carried out using a temporary board with the same markings. This means that after each pair of rafters is installed, a board is temporarily nailed to the top of the left and right rafters according to the markings already made in advance, which correspond to the markings applied to the Mauerlat.
- In the described case, the hanging rafters will need to be connected with a horizontal bar, that is, with a puff, due to the large distance between the supporting walls. It is worth paying attention to the fact that initially the rafter pairs were connected by a horizontal board in the area of \u200b\u200bthe ridge, thus forming a ridge knot.

Gable roof installation.
In this case, due to the large distance between bearing walls, where the width of the house itself is about 11 m, the puff will not consist of one bar, but of several interconnected boards. Such a puff, made of several boards, will help solve several problems at once:
- the result is a tightening of the desired length:
- it is worth noting that the strength and reliability of tightening made of 3 boards with a total thickness of 60 mm is much higher than if it is one beam with a thickness of 60 mm.
Quality roof: summing up
For the required length, 4 and 6 m boards were cut, after which they were fastened with nails, twisted with nuts and studs with rafter legs.
Under constant control, you need to keep the distance that is between puffs. It should be the same as that between the rafter legs.
To do this, you need to use narrow boards, as in the case of adjusting the distance of the rafter pairs at the ridge, which are marked and correspond to the markings on the Mauerlat. Always keep your distance under control!
In addition to all this, the puff and the skate were connected by another 1st board. Given the fact that there is no retaining wall, the puff will simply bend, unable to support its own weight. In order to avoid such troubles, the tightening together with the ridge of the rafter pair are connected by a “headstock”. All of the above actions must be done with each rafter pair.
21.02.2017 1 CommentThe truss system of a gable roof is a simple design that is available for a do-it-yourself device even for a novice developer. It is only necessary to make preliminary calculations, familiarize yourself with the details and stages of the construction of the roof, and calculate the materials needed for installation. When calculating, it should be taken into account that the bearing capacity of a gable roof depends on the influence of loads from wind, snow, and the weight of materials on it.
In order to make the process of building a gable roof truss system as easy as possible for you, below is a detailed step-by-step instruction for the installation of the truss system with their own hands.
In contact with
Classmates
Requirements for building materials
 For the device of the truss system the best option will use lumber from conifers wood - pine, spruce or larch, I - III grade.
The material for the rafters is taken not lower than grade II, the Mauerlat is made from boards or timber of grade II, for racks and girders material of grade II is taken, the lathing is made from grade II-III lumber, it depends on the roof. Crossbars, puffs are made of Grade I material. On linings, linings, material of grade III can be used.
Note! Lumber must be dry with a moisture content of not more than 20%. Before installation, it should be treated with flame retardants and antiseptics against fungal diseases.
 You need to store lumber under a canopy, providing protection from the sun and moisture. Level the storage area, shift the lumber with linings for ventilation.
For installation, fasteners are required: ties, plates, studs, bolts with washers and nuts, self-tapping screws with EPDM gaskets, 2.8 mm thick, mounting tape, galvanized brackets.
Brackets are used when fastening the Mauerlat, they are fastened with nails or self-tapping screws.
KR corners serve to attach the rafters to the Mauerlat, prevent the rafters from moving.
Whole fixing material must be made of high quality material and have corrosion protection.
Tools for the construction of the truss system
 To install the gable roof truss system, you will need the following set of tools:
- tape measure, different lengths 5, 10, 20 meters;
- markers, pencils;
- cord, for stretching;
- hammers, various purposes, nail puller;
- scissors, for cutting;
- roofing knife;
- putty knife;
- scotch;
- hacksaws, electric saw, electric drill with various drills and nozzles;
- screwdriver with nozzles;
- markings, horizontal and vertical levels;
- rails, rulers;
- mounting foam;
- safety belt and rope - for safe work.
Keep all roofing tools in a tool bag for safety.
Types of truss systems for a gable roof
sent rafters
Rely on Mauerlat and racks mounted on inner wall, with a step equal to the rafters. To give rigidity during spans of 6 m, struts are additionally placed.

The scheme of the rafters of a gable roof
hanging rafters
If the building is of a small width, it is possible to arrange a truss system when the rafters rest on the mauerlat or walls, without intermediate supports. The maximum span is 9 meters. Such roofs can sometimes be arranged without a Mauerlat. The rafters are installed on the wall, using gaskets, on the rafters in this embodiment, a bending moment acts.
To unload, put wooden or metal lining. They securely reinforce the corner. For hanging rafters of a larger span, a headstock and struts are installed. For hanging systems, the rafters are arranged with a larger section, and the lumber is chosen not lower than grade I II.

Scheme of hanging rafters of a gable roof
Calculation of the truss system
 It is possible to determine the cross-section of a gable roof beam in the truss system by collecting all the loads acting on it: the weight of the coating, lathing, snow, wind pressure, precipitation.
Permanent loads can be determined by the weight of 1 m 2 roofing, crates. It is important that the weight per 1 m 2 of the roof is in the range of 40-45 kg.
Variable loads from snow, wind are calculated according to the tabular values of SNiP normative documents, depending on the height of the building, temperature zone. The load from snow is equal to its weight multiplied by a coefficient depending on the slope of the slope. All these calculations are carried out during the project.
And if there is no project, and the roof is being erected on a small building? You need to look at the construction of a house in the neighborhood, which is being carried out according to the project, the roof area is the same as your building. The gable roof truss system will serve as a model.
Rafter beam dimensions
At the top point, a ridge is laid that connects the rafters. The height of the ridge depends on the slope of the roof. The slope is influenced by the choice of coating material. Minimum dimensions are:
- for tiled roofs, slate 22 gr.;
- for metal tiles - 14 gr.;
- ondulin - 6 gr.;
- corrugated board - 12 gr.
The optimal angle is 35-45 gr. slope, provides a quick discharge of water and snow. In regions with strong winds, the roofs are made flat and then the angle of inclination is within 20-45 degrees.
You can determine the height by the formula: H \u003d 1 / 2 Lpr * tgA. Where A is the angle of inclination, L is the width of the building.
The task is simplified when using a ready-made table. The coefficient depends on the width of the building and the angle of inclination. Multiply the coefficient by 1⁄2 of the width of the building.
The rafters are made from pine or spruce bars, with a section of 50 × 100 mm, 50 * 150 mm.
The size of the rafters depends on the pitch. The pitch of the rafters is smaller, a larger number is installed, the cross section will decrease. The distance between the rafters at a gable roof is in the range from 600 mm to 1800 mm, it all depends on the design of the roof and the materials used for its construction.
|
Length rafters, mm |
Distance between rafters, mm | Rafter beam section size, mm |
| up to 3000 | 1200 | 80×100 |
| up to 3000 | 1800 | 90×100 |
| up to 4000 | 1000 | 80×160 |
| up to 4000 | 1400 | 80×180 |
| up to 4000 | 1800 | 90×180 |
| up to 6000 | 1000 | 80×200 |
| up to 6000 | 1400 | 100×200 |
The roof does not end at the level of the walls, it is extended 500 mm outwards. The rafter leg can protrude, or a board or bar is built up. In this case, moisture does not fall on the wall, the foundation is not poured.
Step-by-step installation of the design of the gable roof truss system
The gable roof truss system consists of the following elements:
- Mauerlat.
- Lie down.
- Racks.
- Rafter.
- Struts.
- Puffs.
- Crate.

Mauerlat installation

Mauerlat fasteners to a monolithic reinforced concrete belt
Mauerlat evenly distributes the load on the walls of the building, its installation can be done in several ways:
- fasten to the wall through a reinforced concrete belt with studs;
- studs are inserted into the masonry;
- a simple and common way for simple roofs, fastening with wire rod.
For him, take a bar with a section of 100 × 100 mm, 150 × 150 mm or 200 × 200 mm. Which section to choose depends on the size of the roof and its coverage. The Mauerlat is joined along the length, for this, make a 100 mm cut, 500 mm long, fold the bars and fasten with studs.
In the corners, the Mauerlat is tied with cuts to the floor of the beam, fastened with brackets or bolts. At wooden buildings, Mauerlat is the last crown. On brick walls, perform a monolithic reinforced reinforced concrete belt, with a section of 400 × 300 mm. Align the pins with a thread of 12 mm in diameter along the belt, through 120 mm, for fastening.
Drill holes with a diameter of 12 mm in the Mauerlat, lay them so that the pins go into the holes. Tighten with nuts from above. Previously, we lay two layers of roofing material or roofing felt under the bar. On the outside of the wall, lay the Mauerlat with bricks. Laying the Mauerlat on a horizontally and vertically even base. It is necessary to check the horizontal level of the surface. Check diagonals. Align with pads if necessary.
Installation instructions for beds, racks, rafters, struts and puffs
Do-it-yourself do-it-yourself installation of a gable roof truss system is carried out in the following order:
- To carry out the installation of the bed, with the sent rafters.
- Mark the installation step of the rafter legs.
- Prepare according to the size of the rack.
- Install them, if necessary, unfasten them with spacers.
- Lay a run. Check geometry. Install fastener.
- Try on the first rafter leg, mark the cutting points.
- Mark the points and install the rafters at the beginning and end of the roof, pull a cord between them in order to align the rest of the elements with it.
- Having installed the rafter leg, we attach it first to the Mauerlat, then to the ridge run, to each other.
- Screw every second leg with wire to the Mauerlat.
The fastening of the rafters to the Mauerlat is done with the help of notches, thrust corners and a hemmed support bar. Reinforce with nails or staples.

Methods for attaching rafters to the Mauerlat
Install the support posts on the beds or linings and linings. A bed is a beam 50 × 100 mm or 50 × 150 mm, laid on the middle wall along a roofing felt lining. Place brick columns under the lining, 2 bricks high.
The rafter legs are connected to each other on the ridge. Consider the common connection nodes of the truss system:
- They make cuts at one leg and washed down at the other. Insert one leg into the cut of the other and fasten with a bolt.
- Install overlays, wooden or metal.
- With the help of cuts in the run, they are fixed with nails or bolts.

Methods for connecting rafters on a ridge
For the stability of the roof to wind loads, puffs, struts and runs are installed. The tightening is a bar 100 × 150 mm, runs and struts are made from a bar 50 × 150 mm or 100 × 150 mm.
With the installation of contractions, the reliability of the rafter design increases. The sections of the beam are the same as the rafters. They are attached to the legs with bolts or nails. The bracing device adds rigidity to the structure. They are installed tightly, to the surface of the rafters.
Lumber has a standard length of 6 m. Rafters can be longer. Then you need to connect them. There are several connection methods:
- Fasten by applying bars on both sides at the junction, connect them with nails in a checkerboard pattern.
- Overlap, one part of the rafter to another, at a distance of 1 meter, fasten with nails in a variable order.
- Run a cut obliquely, cut out part of the legs of the rafters, connect them, reinforcing them with bolts.
Lathing device
 A crate is laid along the roof rafters. It serves to distribute the load from roofing material, snow on the rafters. It plays the role of an air gap between the roof and the truss system.
The design of the crate depends on the accepted roofing material:
- under soft tiles make the crate continuous, an anti-condensate film is laid on the rafters, pressed against the top with a counter rail, the crate is nailed onto it, then the OSB boards and the lining carpet, we lay the tiles on top.
- under the roof of the corrugated board, the crate should be sparse. The step of the lathing depends on the brand of corrugated board, its thickness and the angle of the roof.
- make a crate for standard slate in increments of 500 mm from a bar 75 × 75 mm or 50 × 50, as well as boards from 30 × 100 mm. It is necessary to take into account the design features of the roof, with the final choice of a suitable option.
The lumber from which the crate is made is pine of the first or second grade. It is advisable to take a width of no more than 14 cm. With a width of more, the boards can warp and damage the roofing. The length of the nails should be three times the thickness of the crate. Lay boards along the ridge. Set the first board of greater thickness to the height of the roofing.
To arrange a continuous crate along the slope of the roof.
With the first layer, lay a board along the ridge from it at a distance of 500-1000 mm next, and so on. With the second layer, lay the crate in the direction along the rafters. Arrange the joint between the boards only on the rafters in a run. The nail is sunk completely with the head into the pulp of the wood.
Cornice overhangs
Arranged to protect against precipitation, play an aesthetic role. Eaves overhangs suit tightly without gaps. The final stage on roofing.

Scheme of the device of the eaves overhang of a gable roof
Gable
The gable roof has two gables. They have the shape of a triangle, with the apex at the ridge and the sides coincide with the slopes of the roof. Gables support the rafters and enclose the attic space. Protect from wind and precipitation, give stability to the roof.
In wooden buildings, the pediment is made frame. In brick buildings, frame or brick. Gables made of brick or gas block are erected before the roofing device. They require very precise execution.
Frame gables fit into the finished opening when the truss system is already assembled.
The frame is made of bars or boards. The frame elements are connected on spikes or to the floor of a tree, all fastened with nails. They are sheathed by nailing boards, lining or siding, maintaining the color in the decoration of the facade of the building. For the device of a window opening, under it they make additional frame by window size. If the attic is insulated, then the pediment also needs to be insulated. Insulation is laid in the middle of the frame. A mineral wool insulation with reduced flammability is used. From the outside, the frame is upholstered with a hydro-windproof film or a windproof membrane, with inside under finishing material nail the vapor barrier film or vapor barrier membrane.
In contact with


