Roof installation is a complex multi-step process. To independently assemble and install a rafter system, you need to carefully study the methods of connecting elements, calculate the length of the rafters and the slope angle, and select the appropriate materials. If not the necessary experience, you shouldn’t take on complex designs. The best option for a residential building small sizes– do-it-yourself gable roof.

A standard roof of this type consists of the following elements:

Mauerlat is a timber laid on top of the walls along the perimeter of the building. It is secured using threaded steel rods embedded in the wall or anchor bolts. The beam must be made from coniferous wood and have a square section of 100x100 mm or 150x150 mm. The Mauerlat takes on the load from the rafters and transfers it to the external walls.

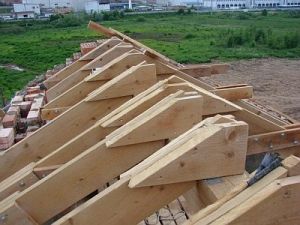
Rafter legs- these are long boards with a cross section of 50x150 mm or 100x150 mm. They are attached to each other at an angle and give the roof a triangular shape. The structure of their two rafter legs is called a truss. The number of trusses depends on the length of the house and the type of roofing. The minimum distance between them is 60 cm, the maximum is 120 cm. When calculating the pitch of the rafter legs, you should take into account not only the weight of the covering, but also the wind load, as well as the amount of snow in winter.

It is located at the highest point of the roof and most often represents a longitudinal beam connecting both slopes. The beam is supported from below by vertical posts, and the ends of the rafters are attached to the sides. Sometimes the ridge consists of two boards that are nailed to the top of the rafters on both sides and connected at a certain angle.

Racks are vertical beams with a cross section of 100x100 mm, located inside each truss and used to transfer the load from the ridge run to the load-bearing walls inside the house.
The struts are made from scraps of timber and installed at an angle between the posts and rafters. The side edges of the truss are strengthened with struts and the load-bearing capacity of the structure is increased.
Tie - a beam connecting the lower parts of the rafters, the base of the truss triangle. Together with the struts, such a beam serves to strengthen the truss and increase its resistance to loads.
A log is a long beam with a cross-section of 100x100 mm, laid along the central load-bearing wall, on which vertical posts rest. Lezhen is used when installing layered rafters when the run between the outer walls is more than 10 m.
The sheathing consists of boards or timber placed on the rafters. The sheathing can be continuous or with gaps, depending on the type of roof. It is always attached perpendicular to the direction of the rafters, most often horizontally.
If there is no more than 10 m between the external walls and there is no load-bearing wall in the middle, arrange hanging rafter system. With this system, the upper ends of adjacent rafters are sawn at an angle and connected to each other using nails, excluding the installation of racks and ridge beams. The lower ends of the rafter legs rest on the external walls. Due to the absence of racks, the attic space can be used for arranging an attic. Very often, the function of tightening is performed by floor beams. To strengthen the structure, it is recommended to install the top tie at a distance of 50 cm from the ridge.

If there is a central supporting wall, the arrangement is more justified layered rafter system. A bench is laid on the wall, support posts are attached to it, and a ridge beam is nailed to the posts. This installation method is quite economical and easier to implement. If ceilings in interior spaces are designed at different levels, the racks are replaced brick wall, dividing the attic into two halves.

The roof installation process includes several stages: attaching the Mauerlat to the walls, assembling the trusses, installing the rafters on the floors, installing the ridge, and attaching the sheathing. All wooden elements Before assembly begins, they are thoroughly treated with any antiseptic composition and dried in air.
To work you will need:
- timber 100x10 mm and 150x150 mm;
- boards 50x150 mm;
- boards 30 mm thick for lathing;
- roofing felt;
- metal studs;
- jigsaw and hacksaw;
- hammer;
- nails and screws;
- square and building level.

In wooden houses The functions of the mauerlat are performed by the logs of the last row, which significantly simplifies the work process. To install the rafters, it is enough to cut grooves of the appropriate size on the inside of the logs.

IN brick houses or buildings made of blocks, installation of the Mauerlat occurs as follows:

The mauerlat bars must form a regular rectangle and be in the same horizontal plane. This will facilitate further installation of the roof and provide the structure with the necessary stability. Finally, markings are made on the beams for the rafters and grooves are cut along the thickness of the beam.

When choosing a hanging rafter system, it is necessary to assemble the trusses on the ground and then install them above the floors. First you need to draw up a drawing and calculate the length of the rafter legs and the angle of their connection. Typically, the roof slope is 35-40 degrees, but in open, heavily blown areas it is reduced to 15-20 degrees. To find out at what angle to connect the rafters, you should multiply the angle of the roof by 2.

Knowing the length of the run between external walls and the angle of connection of the rafters, you can calculate the length of the rafter legs. Most often it is 4-6 m, taking into account the eaves overhang 50-60 cm wide.

The upper ends of the rafters can be fastened in several ways: overlapping, end-to-end and “into the paw”, that is, with grooves cut out. Metal plates or bolts are used for fixation. Next, the lower and upper ties are installed, and then the finished trusses are lifted up and installed above the floors.

The outer trusses are attached first: using a plumb line, the rafters are aligned vertically, the length of the overhang is adjusted and attached to the mauerlat with bolts or steel plates. To prevent the truss from moving during installation, it is reinforced with temporary beams made of timber. After installing the outer rafters, the rest are set, keeping the same distance between them. When all the trusses are secured, take a board with a cross-section of 50x150 mm, the length of which is 20-30 cm longer than the length of the cornice, and nail it along the upper edge of the slope. The same is done on the other side of the roof.


The first option: a rectangular groove is cut out on the rafter leg at the point where it touches the mauerlat, 1/3 of the width of the beam. Stepping back 15 cm from the top of the box, a steel spike is driven into the wall. The rafter is leveled, the grooves are aligned, then a wire clamp is placed on top and the beam is pulled close to the wall. The ends of the wire are securely fastened to the crutch. The lower edges of the rafters are carefully cut off circular saw leaving an overhang of 50 cm.

Second option: the upper rows of walls are laid out with a stepped cornice of bricks, and the mauerlat is placed flush with the inner surface of the wall and a groove is cut out in it for the rafter. The edge of the rafter leg is cut to the level of the upper corner of the cornice. This method is simpler than others, but the overhang is too narrow.

Third option: ceiling beams extend beyond the edge outer wall by 40-50 cm, and truss trusses are installed on beams. The ends of the rafter legs are cut at an angle and rest against the beams, secured with metal plates and bolts. This method allows you to slightly increase the width of the attic space.
Installation of layered rafters

Figure 1 shows the cutting of rafter struts into a beam laid on intermediate supports, and Fig. 2 - resting the rafter leg on the mauerlat
The procedure for installing a layered rafter system:

When the main elements are fixed, the surface of the rafters is treated with fire retardants. Now you can start making the sheathing.

For the sheathing, timber 50x50 mm is suitable, as well as boards 3-4 cm thick and 12 cm wide. Waterproofing material is usually laid under the sheathing to protect the rafter system from getting wet. The waterproofing film is laid in horizontal strips from the eaves to the roof ridge. The material is spread with an overlap of 10-15 cm, after which the joints are secured with tape. The lower edges of the film should completely cover the ends of the rafters.

It is necessary to leave a ventilation gap between the boards and the film, so first stuff them onto the film. wooden slats 3-4 cm thick, placing them along the rafters.

The next stage is covering the rafter system with boards; they are stuffed perpendicular to the slats, starting from the roof eaves. The pitch of the sheathing is influenced not only by the type of roofing, but also by the angle of inclination of the slopes: the greater the angle, the greater the distance between the boards.

After completing the installation of the sheathing, they begin cladding the gables and overhangs. You can cover the gables with boards, plastic panels, clapboard, waterproof plywood or corrugated sheeting - it all depends on financial capabilities and personal preferences. The sheathing is attached to the side of the rafters; nails or screws are used as fasteners. Overhangs are also hemmed various materials from wood to siding.
Video - DIY gable roof
Properly designed and assembled according to technology, the roof serves as a barrier preventing cold air and moisture from entering the house. From the outside, with the naked eye we see only a small part of the structure - the roofing. But the roof frame, which is the most important component, performs the main supporting functions and takes on the effects of wind and snow loads.
To prevent it from deforming as a result of operation, it is necessary to correctly calculate the cross-sectional size of its elements and determine the distance between them, taking into account the weight of the roofing material, slope and climatic conditions. In this article we will tell you what the truss system is pitched roof at home, what it consists of, how it is designed and assembled with your own hands.
Rafter system for gable roof houses are a system of interconnected supporting elements that together make up the frame of the structure.
It is made of wood or metal in accordance with the calculation of the loads that will affect them during operation. The roof truss frame performs the following functions:
- Gives roof slopes the necessary slope. The traditional shape in the form of an equilateral rectangle of a gable roof is given by the rafter frame, which forms the slope between the base of the roof and its ridge. The angled surface allows snow and water to slide freely off the slope.
- Distributes the load from the weight of the roofing pie. The weight of the roofing pie, taking into account the snow load, can reach up to 500 kg/m2, so the gable roof is subject to intense load, especially in winter. The rafters of a gable roof evenly distribute the weight that rests on them, and then transfer the load to the load-bearing walls and foundation of the house.
- Serves as a basis for attaching thermal insulation and roofing material. The rafter frame of the roof serves as a kind of skeleton of the structure around which its “body” is built. Thermal insulation should be installed between the rafter legs, and a roofing covering should be fixed to the sheathing, which protects against moisture penetration.
Please note that the design of a gable roof truss system is quite complex to design and assemble, especially if the craftsman lacks experience. After all, in order for it to be able to withstand intense loads, you need to correctly calculate the cross-section of the rafters and the pitch of the rafters, taking into account the slope and length of the slopes, the roofing material used, and also draw up a drawing according to which the assembly will be carried out.
Types of rafter systems
Rafter systems differ in many factors; their composition depends on the layout of the wooden or brick house, the total weight of the roofing pie, the material from which the frame is made, as well as the type of roofing covering.
An important characteristic of a structure is their load-bearing capacity, which determines how much weight they can withstand without deformation. By characteristic features The following types of rafter systems are distinguished:
Layered
A layered rafter frame is a frame whose rafters have 2 support points. The upper end of the leg rests on a ridge girder mounted on vertical posts fixed to the inner wall. And with the lower end it is installed on the Mauerlat.
Assembly of a layered rafter system on a gable roof is possible only if there is at least 1 load-bearing partition or main column located inside the house. This design is often called non-thrust, because the second support point of the rafters compensates for the thrusting load on the walls of the house, which is assumed by the hanging installation of the frame.
Rafter legs of the layered type experience load only in bending, which can be eliminated by various struts. The layered rafter system allows you to cover houses up to 14 meters wide.

Hanging
The hanging rafter system is distinguished by the fact that its rafters rest only with their lower end on a mauerlat beam installed on the external load-bearing walls. The upper end of the rafter legs of this design does not rest on anything, but seems to hang in the air, which is why 2 types of load arise: bending and expansion.
The thrust load of such a layout of elements on the external walls is so great that it has to be compensated with the help of numerous crossbars and ties, due to which the rafter pairs are tied together.
The structure of a gable roof with hanging rafters consists of triangular trusses, the rigid shape of which is not subject to loads. The complexity of the dangling circuit is believed to be much higher.
The rafter system of a gable roof can be easily installed with your own hands if you correctly calculate the pitch of the rafters, that is, the distance between the rafters and the size of their cross-section.

Combined
Combining the best of both systems, it is recognized as the most reliable. It is used in cases where columns, rather than walls, are used indoors as support inside the house. Then hanging and layered rafters can be alternated to strengthen the structure with additional elements without increasing the consumption of building materials.

Important! sliding rafter roof- another type of frame, which differs in that the rafter legs are installed on the Mauerlat not using a rigid fastening, but using a movable support. The sliding fastening allows the roof to change dimensions within the range of movement during the shrinkage of the wooden house.
Design
The construction of a gable roof truss system of any of the listed types is a set of auxiliary and supporting elements. They distribute the weight of the roofing pie evenly, and also compensate for the bursting and bending loads that arise between them.
The cross-section, length and pitch of the rafters are determined using an engineering calculation that takes into account the weight of the roofing pie, climatic conditions in the construction region, as well as the slope of the structure. The rafter frame of a gable roof usually includes the following elements:
- Mauerlat. Install the Mauerlat beam on the outer walls of the house, on which the roof slopes rest. It serves to soften the pressure on the supports and evenly distribute the load from the weight of the roofing pie. It is made of durable timber with a cross-section of 150x150 mm or 200x200 mm and is attached to the upper chord of the walls using anchor bolts or long metal studs.
- Sill. This is an analogue of the Mauerlat, only it is installed on internal load-bearing walls, and vertical supports must be placed on it for mounting the ridge girder.
- Rafter legs. This term refers to frame elements that are made from boards with a cross-section of 150-40 mm and are installed at an angle to the base of the roof, forming an angle of inclination of the slope. The distance between the rafters, their length and thickness are determined using calculations that take into account the total loads to which they are subjected during operation.
- Puff. A tie is called a beam that is placed horizontally and connects the legs of one pair of rafters to reduce the bursting load on the outer walls of the structure. The crossbar is a tie installed under the very ridge of the structure.
- Racks. It's called a stand vertical beam, placed on a bed to support the ridge girder. It is easy to determine what distance should be between the racks, because it follows the pitch of the rafters.
- Struts. Diagonally located supports that support the rafter legs in the middle or at the bottom, preventing them from bending, are called struts.

Please note that determining how to correctly position the elements of the rafter system can only be done by calculating the temporary and permanent loads to which they will be subjected during operation. Calculating the total weight of the roofing pie helps determine the correct distance between the rafters, calculate their length and required thickness.
The calculation of the rafter system of a gable roof is based on the fact that in the frontal dimension it has the shape of an equilateral triangle, the sides of which can be easily calculated using simple trigonometric formulas.
These simple calculations help determine the optimal distance between the rafters, their thickness and length. The design calculations are performed in the following sequence:
- Determine the structure and slope of the roof. There are various ways to select the type and slope of the roofing structure. This parameter depends on the climatic conditions and performance characteristics of the selected roofing material.
- Determine the total load on the structure. To do this, sum up permanent loads (the weight of the roofing, the weight of the frame, thermal insulation and floors) with temporary loads (snow load, wind load), multiply by a correction factor that takes into account the slope of the slopes, and then add 10-15% to this figure so that the frame had some margin of safety.
- Calculate the length of the rafter legs. To do this, they use the Pythagorean theorem, because the truss is an equilateral triangle. It turns out that the square of the length of the rafter leg is equal to the sum of the squares of the height of the blood and half the length of the laying. Knowing how to calculate the length of the rafters, you can calculate the height of the ridge.
- Determine the cross section of elements. The optimal cross-section of elements is selected from tables in accordance with the length of the rafter legs and the distance between them. The higher these indicators are, the thicker the rafters should be.
Remember that before you calculate the rafters for the roof, you need to decide on the basic design parameters. In particular, it is necessary to know exactly the height of the ridge and the slope of the roof, as well as the dimensions of the room being covered. The result of the calculation of roof elements should be detailed diagram rafter system, reflecting their sizes and angles between them.


Calculating the angle of inclination
The angle of inclination of the slopes is selected not depending on aesthetic preferences, but based on weather conditions, taking into account the roofing material. Steeper slopes of 40-45 degrees are constructed in areas with a lot of snow cover, and flatter slopes of 10-20 degrees in places with strong gusty winds.
Keep in mind that the steeper the slope, the higher the consumption of materials, the higher the final cost of the roof. Be sure to take into account the requirements of the material:
- Tiles and slate require a slope of at least 22 degrees, otherwise precipitation will seep through the joints between the elements.
- Metal tiles are laid at an angle of at least 14 degrees, since they suffer greatly from gusts of wind, they can become deformed or even fly off.
- The soft roof allows an inclination angle of up to 5-10 degrees, making it possible to cover slopes of any geometry.
- Ondulin is considered one of the most reliable materials and can be used even for roofs with a slope of less than 6 degrees.
- Corrugated sheets cannot be laid at an angle of less than 15 degrees, however, it is advisable to treat slopes even with an acceptable slope with sealant for better waterproofing.

Assembly technology
Before installing the roof frame, it is necessary to calculate the parameters of its elements, based on the calculation of the total load on the structure, and also create a detailed drawing reflecting its results.
Having a frame diagram in front of you, it is much easier to carry out high-quality installation of the rafter system of a gable roof. The technology for assembling the structure implies the following sequence:
- First, the Mauerlat is laid on the upper belt of the external walls, on which the slopes will rest, and on internal partitions If the system is layered, install a bed. These elements must be firmly fixed using anchor bolts or studs.
- Then the rafters are fastened. They are fixed with nails to the Mauerlat, and are also connected to each other using a metal plate. It is worth remembering that the rafters are cut to fit the mauerlat timber, and not vice versa. First, the rafters located on the edge are installed in order to set the level along which the remaining pairs will be aligned.
- After installing the rafters, you should install auxiliary supporting elements that will support them - struts, tie rods, tie rods. To fix the crossbar more reliably, its end is made with a protrusion half the thickness of the beam and it is cut to the rafters, fixing it with nails in several places.
- A sheathing is nailed over the rafter legs, onto which the roofing material is fixed. The material and pitch of the sheathing are selected in accordance with the characteristics of the roofing material and the slope of the roof.
Remember that a well-designed and high-quality rafter system is the key to the strength, reliability and durability of a gable roof. Therefore, do not neglect the help of professional roofers and designers when creating a roofing design for your home.


Video instruction
The rafter system is the roof frame, which is the basis for the decking roofing coverings.
The rafter system is designed to withstand the load of the roof, taking into account natural loads: winds, snow, rain.
The roof option is approved at the design stage.
The purpose of the roof includes several functions: warmth in the house, protection of the premises from natural phenomena, therefore the rafter system must be given Special attention.
You can read how to calculate the rafter system.
It is customary to classify rafter systems so that the task of choosing a future roofing option is solved easier:
- Single-pitch. The simplest ones. More suitable for utility rooms, bathhouses, small private houses, gazebos. Provides for an inclined position of the structure at a slight angle (no more than 25°);
- Gable. Used for small houses and country houses. They have the form of a triangle, in which the rafter boards are connected by a beam and are at a certain angle;
- Gable broken lines. They have two slopes with a fracture, thanks to which there is an opportunity to increase the attic area;
- Three-slope (half-hip). They have two trapezoid-shaped slopes, which are connected by one end triangular slope (hip);
- Four-slope (hip). Used for residential buildings, require significant labor costs. They have two end triangular slopes and two trapezoidal ones;
- Tent. Used for square-shaped buildings. They consist of four triangular slopes, the upper corner of which is connected in the center of the roof;
- Multi-pincer. Consist of trapezoidal or other slopes of various shapes, connected to each other.
The most suitable designs for - and broken gable. There are others, but they are less common and not as practical as the above.
Rafter structures are also classified into:
- Hanging. With this type of roof frame, due to the lack bearing walls in room;
- Layered. Option rafter installation, supported by a carrier interior wall or support in a building.
When designing a building, the material for the roof frame is calculated based on the intended configuration and load. It’s not difficult to make rafters for yourself, it’s important to approach the matter wisely.

Rafter systems of layered and hanging type
Calculation of the load on the rafters
For correct calculation load on the rafters, it is necessary to take into account many factors that can affect the weight of the structure.
Important indicators to consider:
- Constant load: includes the mass of the roofing pie and covering material;
- The load is temporary: constant and maximum amount of snow, rain, intensity of wind gusts, and in areas with high seismic activity - the effect of storm winds, tornadoes, hurricanes.
In addition, you should keep in mind the weight and strength of the rafter legs, and also pay attention to the fastening of the gable roof rafters and the installation option.

Scheme of rafter systems
The distance between the rafters of a gable roof and the thickness of the rafters
 The rafter pitch of a gable roof is the empty space between the rafters. The functionality of the roof depends on the correct calculation of the step. As a rule, the step is about a meter.
To more accurately calculate the distance between rafter boards, there is a specific calculation scheme:
- Determine the length of the slope.
- The length of the slope is divided by the distance between the rafters.
- To determine the number of rafters, one is added to the resulting value and rounded up. This is how they determine how many boards are needed for the slope.
- The length of the slope is divided by the number of boards to obtain the distance between the rafters.
This calculation is not always final.
Additionally, you should take into account the load of the roofing (its weight), the thickness of the rafters, as well as the dimensions of the rafters for a gable roof.
The thickness of the rafter board largely depends on the covering material:
- . Boards are used with a cross-section of 5x20 cm at a pitch of 60 to 90 cm with a sheathing section of 4x5 cm;
- . Rafter boards - 5x15 cm, pitch - from 60 cm to 95 cm;
- . The section of the board is 6x18 cm or 5x15 cm, the distance between the bars is from 80 cm to 130 cm;
- . Rafter cross-section - 5x15 cm, 5x10 cm with pitches from 60 cm to 90 cm;
- . The cross-section of the beam is the same as for corrugated sheeting at a pitch of 60-80 cm.
All indicators should be taken into account and the thickness of the rafters should be accurately calculated so that there is no excessive load on the foundation.
Incorrect calculation of the length of the gable roof rafters, as well as incorrect calculation of the pitch indicators, can lead to sagging of the roof.
Installing the rafters of a gable roof with your own hands requires taking into account the weight of the rafter board and all additional fastenings of the structure.

What does the rafter system consist of?
truss structure - a complex system and installing a gable roof rafter system is not an easy task. Rafter system consists not only of rafter boards, but also of other additional elements:
- Mauerlat. An element that distributes the entire load evenly across the supports;
- Run. Boards holding the legs of the rafters together: at the top - a ridge, at the side - a side girder;
- Puffs. A connecting beam that prevents the rafter legs from diverging;
- Struts, racks. The bars, which fix the stability of the rafters, resting on the bed;
- . A lattice made of bars, which is applied perpendicular to the rafters. Transfers the load of the covering material to the rafter frame;
- . A connecting beam that serves as a connection between the roof slopes;
- Fillies. If the length of the rafter legs is insufficient, they are mounted to form an overhang;
- Roof overhang. Extends beyond the bottom line of the slope to prevent precipitation from entering the walls.
The rafter system involves rafters, braces, braces and racks located in the same plane. They are located in such a way that the main load of the roof structure falls vertically on the external load-bearing walls. Therefore, the manufacture of gable roof rafters is a very important process.

What does a gable roof truss system consist of?
Installation of a rafter system with layered rafters
A layered rafter system is used when the span length does not exceed 6.5 meters.
If there are load-bearing structures inside the building, it is possible to install additional racks.
The main support of the rafter legs is the mauerlat.
Mauerlat installation
Before installing the Mauerlat, it is necessary to install an armored belt. It consists of formwork, into which reinforcement is laid and filled with concrete. At the base, when the concrete has not yet hardened, studs are installed, to which the Mauerlat is then attached.
Mauerlat is a beam that is laid on a support (load-bearing wall) and is the base of the rafter frame. Pre-laid layer waterproofing material. If the length of the beam is not enough to cover the length of the wall, then it is increased.
- Check the equality of the diagonals. A discrepancy of a few centimeters can lead to refurbishment of the frame;
- Secure the corners of the Mauerlat;
- Attach the Mauerlat using pins or wire. The studs are tightened in two steps, having previously drilled holes for them.
The stability of the roof structure depends on how firmly the Mauerlat is installed.
Therefore, it is necessary to take seriously the attachment of the Mauerlat to the supporting support.

Mauerlat installation
Sill
After the Mauerlat has dried (after 5 days), mark the installation of the plank on the Mauerlat timber: its axis should be equally spaced on each side of the mauerlat beam. The bed is attached to a two-layer waterproofing layer with anchor bolts. To the wall with inside The bench should be secured with wire twists or staples. Next, markings are made for installing the rafters.

Installation of a gable roof rafter system
The supporting points of layered rafters are the walls and racks inside the frame. The rafters are mounted with hinged fastening units. When using sliders for fastening, a slight lowering of the roof frame is ensured in the first years of the roof's service.
This installation method is necessary to prevent distortions, since in the first years the building settles a little.
The rafter beams should be secured either by installing them in prepared grooves and strengthening them with fasteners, or by attaching board overlays.

Installation of rafters
Ridge knot
The rafters are connected end-to-end by cutting the edge of the beam so that the angle when connecting the opposite beams corresponds to the angle of the slope. Hammer the rafters under the ridge with nails. An option is possible in which the beams are connected with bolts, nails or pins, that is, with an overlap.
If necessary (if provided for by the project), a cut is made in the rafter beams to attach the ridge beam (purlin).

Ridge knot
Racks
The racks are attached with a short span - in the center, on the sides and in the center - with a wider roof base. Fastening is carried out vertically from the ridge to the inner wall.

Run
Run - a connecting beam for fixing rafter legs. Fastens with bolts or brackets to the rack.

Filly installation
The final stage of installation of the layered system is the installation of fillets with a short length of rafter legs for the overhang. To install the canopy, it is necessary to install additional small rafter boards.


Installation of a rafter system with layered rafters
DIY gable roof rafter system: installation with hanging rafters
Rafter system, equipped with hanging rafters, is a triangular structure, where the sides are rafters, and the base is a tie connected to the lower heels of the rafters.
Installation of a hanging type rafter frame can be done without installing a Mauerlat: a board that is fixed on a two-layer waterproofing can replace it.
If the structure has a large span, then struts, headstocks, crossbars are attached to it.
Racks in the hanging system are not provided.
Puffs
The puff is the longest beam of the roof frame. To prevent it from sagging, it is necessary to attach headstocks - boards that are attached to the top of the structure on one side, and to the tie on the other. Fasten with bolts or overlays made of wood. The slack can be adjusted using the threaded collars.

The device of the truss system
Installation of strut beams
The headstock can be complemented by strutted beams, forming a rhombus, where two struts are the lower sides, and the rafter boards are the upper ones, the upper corner being the ridge. Thus, the struts rest against the headstock, distributing the load.

Strut beams
Rafters
The rafters of a hanging structure are mounted similarly to a layered one. When installing attics, the tie is installed closer to the ridge, providing more space under the ceiling. In this case, the tightening is secured by cutting and bolting.
ATTENTION!
When installing a hanging system, a prerequisite for installation is the accuracy of calculations and the strength of the rafters and tightening.
The presence of errors leads to displacement of the axes of system elements, which ensures distortion of the structure.
This photo will tell you how to install rafters for a gable roof:

Installation of rafters

Hanging rafters
How to strengthen the rafters of a gable roof
 It is necessary to strengthen the rafters of a gable roof when the load calculation is incorrect or frame defects are detected.
Strengthening can be done using:
- Beams, which are installed to transfer the load to them;
- Installation of struts with an inclined mount with a rest rest;
- Application of double-sided slats;
- Increasing the cross-section of rafter beams in the place of supports on the strut by applying sheathing from boards with nails or bolts;
- Wall made of boards, which are attached to the rafters in places where snow accumulation is expected to increase the load-bearing capacity of the rafters.
You can resort to strengthening the mauerlat beam and the base of the rafter beam. Due to high humidity and reduced ventilation, these parts of the frame are more susceptible to rotting, therefore, when arranging the roof special attention needs to be paid
Warning /var/www/krysha-expert..php on line 2580
Warning /var/www/krysha-expert..php on line 1802
Warning: Use of undefined constant WPLANG - assumed "WPLANG" (this will throw an Error in a future version of PHP) in /var/www/krysha-expert..php on line 2580
Warning: count(): Parameter must be an array or an object that implements Countable in /var/www/krysha-expert..php on line 1802
Warning: Use of undefined constant WPLANG - assumed "WPLANG" (this will throw an Error in a future version of PHP) in /var/www/krysha-expert..php on line 2580
Warning: count(): Parameter must be an array or an object that implements Countable in /var/www/krysha-expert..php on line 1802
The calculation of the rafter system should be done not after the construction of the house frame, but at the stage of preparing the building project. We must remember that for very important and prestigious buildings, it is recommended to order such work from professional architects, only they will be able to carry out correct calculations and guarantee the duration and safety of operation of the structure.
Although this is one of the simplest types of systems for residential buildings, there are several types of design. Diversity allows you to increase the options for using roofs when building houses according to standard or individual exclusive projects.
| Type of gable roof truss system | Architectural features and brief description |
|---|---|
| The most commonly used option has two completely identical rectangular slopes. Loads between individual elements are distributed evenly regardless of their location. The number of additional stops is not limited, specific solution accepted depending on the plans for using the attic space. Calculations can be done using free programs posted on construction sites. |
| The ridge is shifted to one side of the house or slopes with different angles of inclination. The roof truss system is more complex to calculate. If in a simplified version it is possible to calculate one slope and automatically apply the obtained data to the second, then this option cannot be used for an asymmetrical rafter system. Advantages: original appearance. Disadvantages are the complexity of calculations and installation and the reduction in usable attic space. |
| Most often used during the construction of attic spaces, it allows you to significantly increase the volume of attic spaces. The calculations are of medium complexity. Rafter system with external bend. Systems with an internal fracture are rarely found; apart from the original appearance, they have no advantages. |


Structural elements of the rafter system
We will give a list of all the elements that need to be calculated for each specific case.
The simplest element of the rafter system can be made from timber 150×150mm, 200×200mm or boards 50×150mm and 50×200mm. On small houses it is allowed to use paired boards with a thickness of 25mm or more. The Mauerlat is considered an unimportant element; its task is only to evenly distribute point forces from the rafters along the perimeter of the facade walls of the building. It is fixed to the wall on a reinforcing belt using anchors or large dowels. Some rafter systems have large expansion forces; in these cases, the element is designed for stability. Accordingly, the optimal methods for fixing the Mauerlat to the walls are selected, taking into account the material of their masonry.

Prices for timber
They form the silhouette of the rafter system and perceive everything effective loads: from wind and snow, dynamic and static, permanent and temporary.

They are made from boards 50×100 mm or 50×150 mm, and can be solid or extended.

The boards are calculated based on their bending resistance, and taking into account the data obtained, wood species and types, the distance between the legs, and additional elements to increase stability are selected. The two connected legs are called a truss and may have tie-rods at the top.

Tightenings are calculated for tension.

Runs
One of the most important elements of the rafter system of a gable roof. They are designed for maximum bending forces and are made of boards or timber with a section corresponding to the loads. A ridge girder is installed in the highest place; side girders can be mounted on the sides. Run calculations are quite complex and must take into account a large number of factors.

Can be vertical or inclined. Inclined ones work in compression and are attached at right angles to the rafters. The lower part rests against floor beams or concrete slabs; options for resting against horizontal beams are acceptable. Due to the stops, it is possible to use thinner lumber to make rafter legs. Vertical stops work for compression, horizontal stops for bending.

Lezhny
They are laid along the attic, resting against several load-bearing walls or interior partitions. Purpose – to simplify the manufacture of a complex rafter system, to create new points for transferring loads from various types stops For the beds, you can use beams or thick boards; the calculation is made based on the maximum bending moment between the support points.

Lathing
The type of lathing is selected taking into account technical parameters roofing coverings and does not affect the performance of the rafter system.

What type of lathing is needed for corrugated sheeting? When to install wood and when to install metal? How to choose the right lathing pitch and what factors to consider?
Prices for construction boards
Construction boards
Stages of calculating a gable roof
All work consists of several stages, each of which has a great impact on the stability and durability of the structure.
Calculation of parameters of rafter legs
Based on the data obtained, the linear parameters of the lumber and the pitch of the trusses are determined. If the loads on the rafters are very large, then vertical or angular stops are installed to distribute them evenly, and the calculations are repeated taking into account new data. The direction of influence of forces, the magnitude of torque and bending moments change. During calculations, three types of loads must be taken into account.
- Permanent. These loads include the weight of roofing materials, sheathing, and insulating layers. If the attic space is in use, then the weight of all finishing materials should be taken into account internal surfaces walls Data on roofing materials is taken from their technical characteristics. Metal roofs are the lightest, natural slate materials, ceramic or cement-sand tiles are the heaviest.

- Variable loads. The most difficult efforts to calculate, especially now, when the climate is changing dramatically. For calculations, data is still taken from outdated SNiP reference books. For his tables, information from fifty years ago was used; since then, the height of the snow cover, the strength and the prevailing direction of the wind have changed significantly. Snow loads can be several times higher than those in the tables, which has a significant impact on the reliability of calculations.

Moreover, the height of the snow changes not only taking into account the climate zone, but also depending on the location of the house on the cardinal points, the terrain, the specific location of the building, etc. Data on the strength and direction of the wind are also unreliable. Architects have found a way out of this difficult situation: data is taken from outdated tables, but to ensure reliability and stability, a safety factor is used in each formula. For critical rafter systems on residential buildings, the standard is 1.4. This means that all linear parameters of the system elements increase by 1.4 times and due to this, the reliability and safety of the structure’s operation increases.

The actual wind load is equal to the indicator in the region where the structure is located, multiplied by the correction factor. The correction factor characterizes the location of the building. The same formula is used to determine the maximum snow load.

- Individual loads. This category includes specific forces that affect the rafter system of a gable roof during an earthquake, tornado and other natural disasters.
The final values are determined taking into account the probability of simultaneous action of all the above loads. The dimensions of each element of the rafter system are calculated using a safety factor. Using the same algorithm, not only rafter legs are designed, but also lintels, stops, braces, purlins and other roof elements.
In order for a constructed building to last for many years, it needs both a reliable foundation and a strong roofing system that can withstand the vicissitudes of the weather. The roof must withstand heavy loads with dignity: heavy snowfalls, sharp gusts of wind, heavy downpours. The roof truss system is best suited for this.
Roof trusses and its types
The rafter system is the basis of the roof, which focuses on load-bearing elements structure and also serves as a frame for various types of roofing materials: insulation, waterproofing, various coatings.
The dimensions and design of the rafters depend on:
- purchased material;
- size of the building;
- house dimensions;
- building materials for rafters;
- individual customer preferences;
- roof loads relevant for a particular region.
The rafter system has:
- crate - bars, in a perpendicular direction, fit on the rafter legs;
- ties that absorb tensile forces;
- wooden racks located in a vertical position;
- mauerlat - a bar, the installation of which is carried out along the wall, the rafters focus on it;
- rafter legs are a kind of wooden beams that take on the main load of the roof.
Each of these factors is very important, because it is necessary to understand what type of truss system will be best suited for a particular situation.
When it comes to low-rise buildings, wood structures are the most common. In many cases, three types of truss trusses are used: hanging rafters, layered rafters and a mixed rafter system.
Characteristics of hanging rafters
Hanging rafters are the most elementary type of rafter systems, their characteristics:
If the roof of the house has a complex structure, the types of rafters can be alternated. For example, if there are supports or a middle main wall, layered rafters are installed, and if there are no such elements, hanging rafters are installed.
Features of layered rafters
For a layered rafter system, the house must be additionally equipped with a load-bearing wall located in the middle. Layered rafters are distinguished according to the following characteristics:

The design of the combined system is the most complex, since it includes parts of two other types of rafters - hanging and layered. It is applied for mansard roof. The walls of the rooms, which are located on the second floor, form vertical supports, these supports are also intermediate racks for truss beams.
Part of the rafters that connect one end of the uprights functions as a crossbar for the slopes located on the side, and for the upper part of the structure they are a puff.
At the same time, the horizontal bars perform the following functions: for the upper slopes - a Mauerlat, for the side ones - a ridge beam. To increase the strength of the roof, struts are mounted that connect the side slopes and vertical racks.
The combined sling system is the most complex and time-consuming to manufacture, but these shortcomings are fully compensated by the increase in the load-bearing qualities of the roof in the absence of unnecessary supports, especially when there is a need to cover significant spans in the building.
 You can increase the bearing qualities of the roof using a mixed truss system
 Roof trusses for various roof types
When constructing a certain building, rafter systems of one type or another are necessarily used, and the type of roof will completely depend on the design of the future structure.
Rafter truss for gable roof
Gable roofing is a common roof construction for residential buildings that have no more than three floors. Preference is given to this particular design due to the technical characteristics of the inclined shape of the rafter system, and also due to the fact that installation work carried out easily and simply.
Included in the rafter system gable roof includes two rectangular inclined planes. The upper part of the building from the end side resembles a triangle. The main components of a gable roof are the mauerlat and rafter legs. In order to properly distribute the load across the rafters and walls, struts, crossbars and racks are installed, thanks to which you can create a durable, rigid, elementary and lightweight structure for installing a structure for a gable roof.
 A gable roof is considered the simplest roofing system; it is used for residential buildings of no more than three floors
 You can install sparse or solid sheathing on top of the rafters, and then attach bitumen coating, tiles or some other type of material to it. The rafters and the sheathing itself are usually made of beams or boards, which are fastened with nails, bolts or metal fasteners. Metal profiles can be used as rafters, due to which significant spans overlap. There is no need to use extra racks and struts.
The device of the truss system for a gable roof allows you to evenly distribute all the existing load along the perimeter of the building. The lower ends of the system focus on the Mauerlat. They are fixed with fasteners or metal brackets. By the angle of inclination of the bars for the rafters, you can determine at what angle the roof slopes will be inclined.
 The truss system for a gable roof allows you to evenly distribute the load from the roof along the perimeter of the building
 Rafter system for hip roof
When arranging a system for a hip roof, installation will be required different types rafters:
- conjurers (shortened);
- lateral;
- hip main;
- obliques (diagonal elements that form a slope in the shape of a triangle).
The rafter legs, located on the side, are made of boards, and they are mounted identically to the parts of a traditional pitched roof with a layered or hanging structure. Hip main rafters are layered parts. For splices, boards or bars are used, attached not only to the Mauerlat, but also to the diagonal beams.
To install this type of structure, the angle of inclination, as well as the cross-section of the slanting beams, are accurately calculated. The dimensions of the parts also depend on the span length.
 To prevent the hip roof from deforming from heavy loads, you should accurately calculate the angle of inclination of the diagonal beams for the rafters
 Maintain symmetry when installing diagonal beams for rafters, otherwise the roof will deform under significant load.
Rafter system for sloping roofs
A broken roof is a structure with rafters that consist of several individual elements. Moreover, they should be located at different angles relative to the horizon. And since the lower rafter part is almost vertical, the attic space of the building receives additional space, thanks to which it can be used as a living space. The installation of this type of roof is carried out during the construction of a four- or gable rafter structure.
Calculate four-slope system rafters are needed by professionals, but you can make a gable sloping roof yourself, since its installation is very simple. To do this, it is necessary to install a support frame, which should consist of purlins and racks. Horizontal parts are fixed with hanging rafters. But the supports of the sloping roof are secured to the mauerlat with the shortened legs of the rafters.
 The assembly of rafters for a sloping gable roof can also be carried out by non-professionals, since the installation of such a roof is very simple
 "Cuckoo" in a roof truss
The so-called cuckoo on the roof is a small protrusion that is located on attic floor. Here is a window for better lighting attic room. The installation of the “cuckoo” is carried out carefully, while monitoring the parameters of the entire structure: depth of cut, angle of inclination and other factors. However, before this, the necessary measurements are made.
The first stage of work begins with the installation of the Mauerlat (beam with a cross-section of 10x10 cm, which is needed to support the slings). The rafter system acts as a skeleton for the roofing material. To impart rigidity to the structure, spacers are used, which are mounted between the two legs of the rafters.
After installation is complete roof truss lay the sheathing, the type of which depends on the roof covering purchased. Installation of the sheathing is done continuously or with a certain step. For it, boards, OSB and plywood sheets. In addition, the installation of roofing material must be identical throughout the entire roof.
The main difficulty when installing such a rafter system is the location of the internal corners. Snow can accumulate in these places, which means the load will increase, which is why a continuous sheathing is made.
 A “cuckoo” on the roof is a small protrusion on the attic floor, under which there is an additional window.
 Chalet roof rafter truss
The peculiarity of this design is that the canopies and overhangs are moved outside the house. In addition, there must be rafters and roof beams extending up to three meters on the sides of the building. Each of these elements is secured with a bracket to the wall of the building in the lower part. Next, tie the edges of the beams. They serve as a support for covering the roof of the building.
But when creating large overhangs, it is necessary to install the reinforced belt in parallel with the installation of studs for the Mauerlat. It is necessary to make anchors that help secure the consoles. In this case, the rafters will be perfectly fixed with anchors and, in addition, with mortises.
To carry out the side cornices, a ridge beam is made, after which beams are placed at the level of the mauerlat, which must be identical to the length of the ridge. The truss, and subsequently the building materials for the roof, rest on these structural details.
When designing a building, the angle of the chalet roof is calculated based on the characteristics of the local climate and other factors. When the slope angle is about 45°, the load from snow is not taken into account, since when this option he won't stay on the roof. At the same time, the flat roof will withstand the load from snow, but it is necessary to install a reinforced roof truss. Before installing the chalet roof, a building design is prepared, because the originality of the roof itself, as well as the long eaves and overhangs, oblige this.
 A chalet-style roof is characterized by canopies placed several meters outside the house
 Rafter truss designed for soft roofing
Soft roofing is done different ways, however, there are common characteristics in the technological methods of its construction. Initially, you need to prepare. When arranging a roof for a house made of foam concrete or other material, a mauerlat is first installed, then in the upper crowns of the building a cut is made for the ceiling beams in increments of up to one meter. The distance between the boards is calculated based on the type of rafter structure.
- Install individual parts of the rafter system. To completely eliminate the risk, the rafter boards are attached to the ground with screws. After the roof truss is created, it is raised to the top of the building.
- Secure all elements of the rafters to the ceiling, internal boards, jibs, as well as crossbars. Further, this base for the roof will become a single whole structure.
- The next stage is the sheathing, which is installed under the soft roof with small gaps or no gaps at all. Gaps of no more than 1 cm are allowed. Quite often, leveling plywood is installed on top of the boards. Its sheets are laid using the bricklaying method. The resulting joints are not aligned with the gaps between the plywood and the board.
If the length of the sheathing boards is not enough, then the joints of the parts must be located in different places. In this way, you can correctly distribute areas that have been weakened.
Self-production of the rafter system
Before the installation of the rafter system begins, the mauerlat must be secured to the longitudinal walls with anchors. Next you need to decide on the required leg section for the rafters, depending on the distance and their length. If there is a need to increase the length of the rafters, then connect them with different fasteners.
When using different insulation, you need to choose the ideal distance between rafter elements in order to reduce the number of thermal insulation scraps.
Installation of the rafter system must be done in the following order:
- A template is made according to which the truss is assembled. Take 2 boards corresponding to the length of the rafters and connect them together at just one edge with a nail.
 A template for rafters called “scissors” will help you quickly assemble the entire roof rafter system
 - The result is a design called “scissors”. Its free edges are placed on supports at the points of contact between the rafter legs. The result should be the final angle, that is, the angle at which the roof slope will be inclined. It is fixed with several long nails and transverse boards.
- A second template is made, thanks to which the cuts are installed on the rafters. It is made from plywood.
- Special mounting cuts are cut on the rafters (a prepared template is used for these purposes) and connected at an angle of inclination of the slope. You should end up with a triangle going up the stairs to the roof. Next, it must be attached to the Mauerlat.
- Initially, two side gable rafters are installed. Their correct installation in the vertical and horizontal planes occurs due to temporary struts attached to the rafters.
 For proper installation of the entire rafter system, the first pair of rafters is installed on the roof
 - A cord is stretched between these tops of the rafters. It will indicate the future ridge and the level of other rafters located in the gap.
- Raise and install the remaining rafters at the initially calculated distance, which should be at least 60 cm from each other.
- If a bulky rafter structure is envisaged, then it is additionally strengthened with struts, supports, and so on.
 The bulky structure of the rafters is additionally strengthened with struts and supports
 - A ridge beam is installed on special supports, to which not only short, but also diagonal and intermediate elements of the rafters are attached.
 Correct fastening ridge beam ensures the reliability of the entire rafter system
Typical components of a standard rafter system
The strength of the rafter structure depends on the ideally selected section of the boards, as well as on the high quality of the rafter assemblies. The connection of parts for the roof structure is done according to established rules.
The main typical units in the rafter system:
- rafter support assembly on the mauerlat;
- ridge;
- unit for combining the top ties and the entire rafter system;
- securing the strut, rack, as well as rafters and beams.
After the design of the rafter system has been chosen, it is necessary to draw up a plan in which to highlight all the nodes. They are made differently in each design as it depends on different nuances: type of roof, its size, angle of inclination.
Rafter from profile pipe is a metal structure that is assembled using lattice rods. The production of such farms itself is a very labor-intensive process, but also more economical. For the manufacture of rafters they are used paired material, and the gussets are connecting elements. The structure of the rafters from profile pipes is assembled on the ground, using riveting or welding.
Thanks to such systems, any spans are blocked, but the correct calculation must be made. Provided that all welding work is done efficiently, in the future all that remains is to transfer the structural elements to the top of the building and assemble them. Load-bearing rafters made from profile pipes have many advantages, such as:

Crossbar in the rafter system
Crossbar is a fairly broad concept, but in the case of roofs it has certain value. The crossbar is a horizontal beam that connects the rafters. This element prevents the roof from “expanding.” It is made of wood, reinforced concrete, and also metal - it all depends on the type of structure. And the crossbar serves to distribute the load exerted by the rafter system.
It can be fixed in various places between the legs of the slings. There is a direct pattern here - if the crossbar is fixed higher, then the timber for its installation must be selected with a large cross-section.
There are many ways to fix the crossbar to the rafter system:
- bolts;
- nuts;
- studs with washers;
- special fasteners;
- nails;
- mixed fastenings, when different types of fastenings are used in parallel.
The fastening is available with a mortise or overhead. In general, the crossbar is a design unit, as is the entire system of roof slings.
 The crossbar in the rafter system is designed to strengthen the roof structure
 Fastening the rafter system
To ensure the reliability of the rafter system, you must first find out how they are attached to the supporting roof and ridge. If a fastening is made to prevent deformation of the roof when the house shrinks, then the rafters are secured on top with a hinge plate or a nut and bolt, and below with a sliding support.
Hanging rafters need a tighter and more reliable fastening in the ridge, so in this case you can use:
- overhead metal or wooden plates;
- cutting method;
- connection using long nails.
In the layered system, the rafter legs are not connected to each other, since they are attached to the ridge girder.
The rafters are attached to the mauerlat using the cutting method, which is made in the rafter leg. Thanks to this fastening method, the roof support will not weaken. Cutting is also done when installing rafters on floor beams. In this case, a cut is also made in the support beam.
Video: how to make rafters with your own hands
Thus, an ideally selected rafter system and their design characteristics will help create the basis for a reliable roof for your home.


