With the onset of winter, the problem of keeping heat indoors becomes more pressing than ever, and you have to think about how to insulate your windows before the onset of cold weather. What does even metal-plastic windows made according to the latest technologies, after some time they require additional insulation measures. It is best to do this before the first frost, since most of the building materials used negative temperature behave worse.
Washing windows as a means of insulation
Heat loss occurs not only due to drafts, but also due to significant contamination of the glass. The fact is that a low level of transparency leads to the fact that heat passes through the window more intensely. Therefore, in summer, dusty windows lead to an increase in the temperature in the apartment, and in winter, to a decrease.
In this regard, to preserve heat, you can simply wash the window. This should be done from the inside and outside with a rag soaked in a solution based on ammonia or ethyl alcohol. This way, you will clean the glass from grease stains without causing unpleasant, difficult-to-remove stains.
Before insulating windows for the winter, it is necessary to thoroughly wash the frames, since the quality of adhesion of seals and insulation to a contaminated surface is much lower than to a clean surface.
Basic methods of insulating windows
Old wooden windows may have significant gaps. Moreover, even a millimeter gap between the window and the frame can result in colossal heat loss. If the window no longer closes tightly, the gap can be closed with a regular rubber seal, which is sold at any hardware store. If you carry out insulation in winter, the glue may not set well. In this case, you can melt the insulation with a fan heater or a regular hairdryer.

In addition, you can use the following simple ways insulation:
- Fill the gaps between the frames and sashes with cotton wool or foam rubber, and then seal with masking tape.
- Use self-adhesive foam rubber or polyethylene foam. You can buy it in the same hardware store in roll form.
- Wet the white toilet paper in water, then seal all the cracks with this mixture and seal with masking tape.
- Use putty or plasticine. These materials provide fairly good thermal insulation, but their separation can be quite problematic. Therefore, this method should be used only as a last resort.
These measures will not bring the desired result if you do not take care of the insulation of slopes and window sills. To do this, you need to inspect the places where the slopes adjoin the concrete and seal all large cracks with tow or polyurethane foam. After this, another layer of construction sealant should be applied.
Solving the problems of plastic windows
Few people know that even the latest double-glazed windows can provide poor thermal insulation. And people who have only recently replaced their old wooden windows with plastic ones can often observe condensation and ice from inside glass In this case, heat loss can be leveled by installing shrink film on the inside of the frame.

Insulating windows with your own hands in this way allows for minimal heat loss. In addition, this allows you to create an additional air layer between the glass and the film, which prevents the formation of condensation.
Before installing the thermal film, it is necessary to degrease and clean the frame. After this, you need to cut the material to the size of the glass, adding 2-3 cm on each side for secure fastening. Then the film is glued to the tape so that it covers the entire surface of the glass. It is very important to stick the film without bubbles and areas with a loose fit to the window. After installation, the product is heated using a household hair dryer and glued to the window. The end result won't look the best, but will keep you warm and dry all winter long.
Lock adjustment violation
Over time, the position of the locks on plastic windows may become disturbed, thereby causing heat loss.

The lock of any plastic window consists of a moving and a fixed part. The latter is located on the frame and is an adjusting bolt. With its help, you can change the position of the wedge, which changes the tightness of the sash to the frame. This is done with a hex wrench, which can be purchased at a tool store. In the warm season, the gap can be slightly increased, but in winter it should be minimal.
Replacing the seal
Another problem with plastic windows is wear of the seal. It can be solved by a simple replacement procedure, which includes the following steps:
- Closing the lock, removing the top hinge cover, lock washer and studs.
- Opening the lock and releasing the door from the upper and lower hinges.
- Removing the sash handle and dismantling the old seal.
- Cleaning and degreasing the groove.
- Installing a new seal in the prepared groove. It must be done in such a way that there is no gap between the ends of the insulation. It is also not allowed for the rubber to stick out of the groove.
To increase the service life of the seal, it must be properly cared for.
The product requires systematic cleaning and lubrication (at least once a year).
It is best to clean rubber with a fluffy cloth, after which it is advisable to degrease it soap solution and dry it dry.
The durability of the seal largely depends on its choice. It is best to purchase a “original” product, but if this is not possible, you should contact a consultant at a hardware store who will help you choose a seal for your window. To do this, it is advisable to provide the seller with a fragment of the old insulation.
Most likely the installation metal-plastic windows was part of your plan for insulating your house or apartment. And now this element itself needs insulation, but it shouldn’t be blowing from anywhere... Why is it blowing? Properly installed metal-plastic windows do not need insulation. But, if errors were made during installation or a long period passed during which the double-glazed window was not maintained, insulation of PVC windows may well be required.
To understand how to solve the problem, you need to find out what elements the window consists of. Below in the diagram you can see all the main details.
So now we need to figure out which parts are most likely to cause difficulties.
It can be:
- Joint (seam) between the frame and the wall (window sill, slopes);
- Double-glazed window fittings;
- Bead (The element that holds the glass in place - if it blows from under the glass).
- Seal.
Here we have arranged the reasons not according to any principle, but only in a chaotic order. But a little further we will understand the reasons sequentially - starting from the simple solution, to the most difficult (labor-intensive, labor-intensive). We will see that insulating windows with your own hands is not as difficult as it might seem at first.
Problems with windows

In the previous subtitle, we dealt with structural elements that can cause problems and may require insulation of double-glazed windows. Employees of one Kyiv company identify the three most common:
- The rubber seal has not been maintained for a long time and is in poor condition. This insulating element plays important role in thermal insulation;
- Lack of tight contact between the sash and the frame. For example, this can happen due to skewed hinges;
- The seam between the frame and the window opening was poorly made initially and destroyed as a result of erosion.
How to find out what the problem is in a particular case?
This stage of insulating PVC windows usually does not raise any questions. A person may not know what the element is called, but where it most often blows from is not difficult to determine. Most people use one of three proven methods.
- Check with a candle or lighter. Light a candle and hold it to the gap between the frame and the wall or between the sash and the frame. In the place where the candle goes out, a cold stream is passed through. This is where examinations need to be carried out;
- The sash pressure should be very tight. There should be no pulling from under it. To check the “strength” of the clamp, insert a sheet of paper into the sash and slam it shut by turning the handle. If a sheet falls out, the hardware may need adjustment. Or the window may be in “summer mode”;
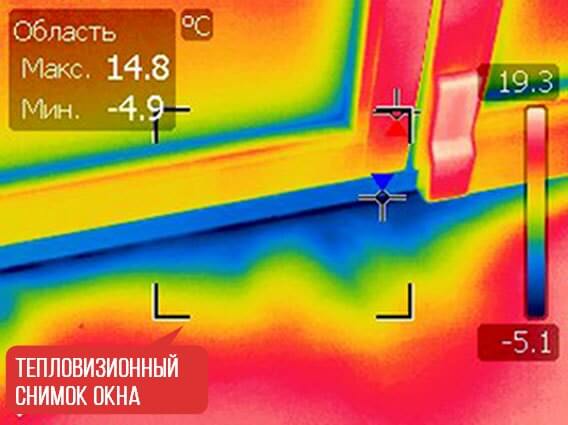
- Although the third method is more expensive, it can help identify problems not only with windows - thermal imaging research. Using special equipment, heat leakage zones can be identified. An example photo is shown below.
Summer and winter window modes
If you open the sash and look at its end, you can see several pressure rollers. They are responsible for adjusting the clamping density, in fact, summer and winter modes. Using a special key, adjust the degree of pressure and seal of the sash to the frame. In some profiles you can do without a key by turning such rollers manually.
You can see a notch on the pressure roller itself. If it is turned closer to the sealing rubber, it means winter mode, and if outward, it means summer mode.
For more information on how to change the window mode, watch the video.
So, at this stage, we have already figured out the structure of the window itself, found out which elements can cause difficulties, and found out what problems residents most often encounter. Now let's look at the most common problems and find out how to solve them.
Handles, hinges...
When insulating windows with your own hands, you need to start with the fittings. As employees of the same Kyiv company for repair and installation of windows say, if the problem is not started, it can often be solved by adjusting the fittings. Since the topic of our article is, after all, the thermal insulation of windows, it is only worth saying here that the average cost of ordering an adjustment from a company in Kyiv costs approximately 100-150 UAH. ($4), and in Moscow 400-700 rubles. You can correct this yourself by watching the video:
Sealing rubber bands
In CIS countries various reasons It is unpleasant to carry out regular maintenance. This leads to premature or very severe wear. various parts. Therefore, when deciding how to insulate windows, make sure they are in good condition sealing elements windows
The seals are located on the frame and also on the sash. In most cases, removable parts are installed that can be easily replaced. How do you know if the seal needs replacing? One of the methods was given at the beginning of the article.
Second. Open the sash and feel the seal. If it is hard (and especially if it starts to crumble, it needs to be replaced). There is an easier way. Test without getting up from your chair.
The seal requires lubrication at intervals of approximately 6 months. If such a procedure has not been carried out for at least 3 years, there is a 90% chance that the rubber band needs to be replaced.
What is the best way to insulate windows? There is no definite answer, but the seal definitely needs to be changed.
In a separate article, we have already described in detail how the procedure is carried out and showed a video.
A short summary of this section. Two small, but most common problems when insulating windows are fittings and cutters in plastic windows. But there are also more “severe patients” who need “hospitalization”. In such cases, the problem is usually with the window sill or ebb.
Low tide

How to insulate a plastic window with your own hands if problems are observed in the lower part of the window? The first thing that might come to mind would be window sill insulation. But, its removal is a thorough matter, which is more like a construction project, so there is an alternative. You can start by insulating the outside of your windows by adding flashing insulation. First you need to dismantle the old ebb. To do this, we twist all the screws that secure it and carefully remove the piece of iron itself.
When working on high floors, be extremely careful and use insurance.
We are interested in the seam between the frame and the window opening. It is sealed with polyurethane foam - a material that is easily affected by cold and moisture. Therefore, if the foam was not reliably protected, it may be the reason for the blowing.
Look at the layer of foam under the frame. If:
- The foam itself crumbles,
- There is no vapor barrier,
The seam needs repair.

Carefully scrape off the old foam layer with a knife. Prime the remains of the old layer and the entire surface and cover it with a new vapor barrier membrane. You need to place one edge of the membrane under the frame, and place the second under the ebb. Apply a new layer of foam. The foam can be protected from the outside using PSUL tape.
At this point, the sealing of the outer seam, which can be a source of cold, can be considered complete
Let's create another camera
Among the three reasons for blowing out metal-plastic windows mentioned at the beginning of the article was glazing bead. To insulate this element, special films are used. It creates, as it were, another air pocket between the glass and the film itself, which eliminates all blowing between the glass and the frame. Thanks to this, a single double-glazed window becomes a double-glazed one.

How to insulate double-glazed windows in this way?
Film - a good option, when insulation was needed “yesterday”. In this article we are only, in general, discussing all the ways to insulate plastic windows with your own hands, but in a separate article we discussed this topic in more detail.
External insulation
How to insulate plastic windows from the outside? There are two key points here:
- Firstly, in an apartment on the floor above the second, it is prohibited by law to insulate anything from the outside - you need a special license. You can insulate windows yourself only in a house or on the first or second floors of an apartment.
- It is better to entrust such work to professionals.
- Secondly, when we talk about external insulation of windows, we are talking about insulation of slopes and insulation of the seam under the ebb, which we talked about above. The issue was discussed in a separate article a little earlier.

Cost of services
Window insulation includes several procedures. Below in the table we give the approximate cost of the services of contractors.
Results
You probably understand how to insulate plastic windows depends on the method and approach. You may need to replace the seal or use foam to seal the outer seam. Insulation for plastic windows can also be a film that is glued to the frame from the inside. You can seal the seams inside using tape, well, this is already the case for very old PVC windows. And let's repeat: how to properly insulate windows?
The first thing you need to find out is the cause of the heat leak. As you remember, there are only three main ones. Although, of course, there are various unusual and unforeseen situations, especially in our area, where windows were not always installed soberly. Therefore, if you still have questions, use the comments or the “Q&A” section.
Hide
In Rus' there was a wonderful and useful tradition - to do everything with your own hands. She lives in our turbulent times. For example, insulating your window to protect from bad weather is sometimes as pleasant as dressing up christmas tree or color eggs for Easter. Because you are giving yourself a gift in the form of warmth and comfort in your home. We will discuss the intricacies of this procedure below.
How to insulate windows for the winter
Materials for window insulation are right at hand or in any hardware store.
The most time-tested and affordable insulation - newspaper. Stick it in the cracks, glue it on top with paper according to grandma’s recipes and rejoice! Only in the spring, when the time comes to peel it off, you will suffer - you will have to rub the sashes vigorously with soapy water.
Find cotton wool And paper tape Not a problem in the store either. For better insulation they are used together. These things are easy to detach from the window and do no harm to it. And most importantly, they protect from drafts!
The paper tape “sits” firmly on the window, but leaves marks. Now they sell self-adhesive foam rubber. This film is an excellent replacement for energy-saving glass
Still in use foam rubber. In addition to the usual ones, you will find lightweight self-adhesive ones in building materials stores. So choose him! After all, in the spring you won’t need to remove it, and it will serve you faithfully for a couple of years.
Heat-saving films- a common, although new, means of insulation. Its mechanism of operation is as follows: the ultra-thin layers of metal that make up it reflect heat back into the apartment in winter, and do not let the sun's rays inside in summer. It needs to be changed every year - but that’s not a problem. Low price allows.
If your window needs not only insulation, but also some kind of reconstruction, pay attention to the following types of insulation.
A plastic window may siphon due to disturbed fittings. Instructions for adjusting it with explanatory photos can be found at the link:
Sealant

Small gaps are filled with sealant
It reliably closes small gaps between glass and glazing beads or in frames. At the same time, you can safely open the window in winter if it suddenly gets hot.
There are different types of sealants, but silicone is more suitable for windows. It is elastic and does not deteriorate from precipitation. But there is one “but”. If the sealant accidentally gets on the frame or window sill, it is difficult to remove.
Polyurethane foam
There is little hassle with her. Only after it dries, you need to cut off the “extra”, hide this “beauty” under putty and paint it. Inside the house - this is necessary for aesthetic reasons, and outside to protect the foam from the destructive rays of the sun.
Sealant

The best seal is silicone
It, like foam rubber, serves to seal windows, although installing it is much more difficult. The seal may or may not be self-adhesive. If you choose adhesive, be aware that you cannot paint it, it will deteriorate.
Seals come in different structures. Professionals prefer silicone rubber with a tubular profile. He is not afraid of painting and temperature changes.
Tools for insulating windows
Your most important assistant in this matter is a knife. Are you afraid of getting hurt? It can be replaced by any thin, sharp object: scissors, a ruler or a screwdriver.
If you are installing a seal, you will also need a groove cutter for the seal and a roller for rolling it up. A lever syringe is used when treating windows with sealant - a tube of material is inserted into it.
How to insulate windows yourself?
First, let's clean the window from crumbling paint and putty. Then thoroughly wash the entire window and vacuum in inaccessible places. Do not consider these efforts unnecessary - this way the insulation will hold up better.
We insulate between the sashes and the profile
This cannot be done if the temperature outside is zero and snow has fallen. Glass may crack due to temperature changes. We use newspaper, cotton wool or paper tape. It is worth noting that with such insulation, the far frame is not sealed.
To insulate the window with newspaper, our ancestors soaked it in water. The resulting mass was used to fill the distance between the glass and the bead, as well as large cracks. Sometimes newspapers were rolled into tubes before wetting. On top, all these joints with a porridge-like mass were glued with paper. Laundry soap diluted to a liquid consistency - it was used as glue.
Drier methods of profile insulation - cotton wool and tape. Scotch tape without cotton wool is used quite often. In this case, they simply paste it over the places “where the wind is blowing from.” However, cotton wool without scotch tape is like beer without vodka – money is wasted! The cotton wool is pushed into all the cracks using a knife, and tape is glued on top. Even if in some places the tape peels off from the profile, the air bubbles of the cotton wool will not allow the cold to pass through.
Repairing cracks between glass and frame
Experience shows that you can’t stuff a lot of cotton wool into small cracks. That's why they're better insulate with sealant, filling the space between the glass and frames.
To remove the glass, remove the glazing beads with a chisel. The sealant is applied from a gun.
They work with sealant at temperatures from +5 to + 40. First you need to pull out the glass. Using a strong screwdriver with a sharp tip, remove the glazing beads that hold the glass. First, remove the bottom bead, then the side ones, and lastly the top one, holding the glass. After this, remove the glass. And don't forget to wear gloves!
Clean with a spatula seat glass from dirt. On the tube with sealant, carefully remove the nozzle and insert it into construction gun. Use it to blow the sealant into the grooves. Did material get on the frame or window sill? It’s not easy to remove, but a cloth soaked in gasoline will do just fine. It’s easier to pick it off the glass with a knife.
Before insulation, get spare glazing beads, because old ones often break.
Making the sashes airtight
When your window is over 20 years old, the sashes may dry out and not close tightly. Foam rubber and window seals will help seal the cracks.

Self-adhesive foam rubber is installed around the perimeter of the sash
If you use self-adhesive foam, then simply press it onto a previously cleaned surface around the perimeter of the valves. Check - if it continues to blow, cover the gap with tape. In the spring, remove the adhesive tape, but the foam rubber will remain.
Seal installation- the matter is more troublesome. It is only suitable for windows in good condition. Otherwise it will start to crumble. Selected according to the size of the cracks. To close gaps of 2 - 3.5 mm, profile E is used, P - for gaps of 3 - 5 mm; 3 – 7 mm – will cover D.
We start by removing the doors from their hinges. Next, we check the windows for rotten parts by tapping. In those places where the sound is duller, the wood is rotten. It should be removed if possible, and the holes should be filled with putty and painted.
Using a milling cutter, we knock out a groove around the perimeter of the frame. We clean it of sawdust and lubricate it with furniture glue so that the seal is better held. Then roll the seal into the hole with a roller. When the work is finished, we hang the sashes back on their hinges.
We knock out a groove in the profile with a milling cutter and insert a seal there
It is not always possible to install a seal due to the age of the window. But if you take it on, remember: you may need to replace the fittings. But then the window will last at least 10 years.
We insulate glass
For this there is heat-saving film. We will also need a knife, scissors and... a household hair dryer. If there is a draft through the window, you first need to cover it with foam rubber, otherwise nothing will work with the film. We clean the surface of the window, and then glue double-sided tape to insulate the windows around the perimeter of the profile.
The film is glued to double-sided tape for insulation
We take the film and separate the two layers from each other by prying them off with a knife. Cut a piece of film to the size of the window and note that it should overlap the tape.
Remove the tape from the protective paper strip. Carefully and preferably not alone, glue the film onto the tape. Pull firmly so that there are no folds - but not too hard so as not to tear. Then blow the film with a hairdryer - this will give it additional smoothness. And soon it will fit perfectly on the window. If the film does break, tape will fix everything. If it is swollen, the windows are not insulated enough, and the whole operation will have to be repeated all over again.
We insulate the openings between the window and the wall
We seal the windows themselves, but we often ignore the openings - we don’t notice them behind the window sills or slopes. But in vain! They also need to be insulated. This is why you need polyurethane foam. Squeeze it out of the tube into the slot, and you're done!
You can make the putty yourself. Mix building plaster and chalk in a 2:1 ratio and dilute with water. Use the resulting solution to fill all the cracks.
Insulation of windows in Moscow. Prices
The service of insulating windows in Moscow with a sealant costs from 2000 to 3500 rubles - quite inexpensive for the capital. The price includes both material with a service life of 15 years and installation work. If you wish, you can get by with a smaller amount; the lifespan of the insulation is reduced by half.
With the onset of cold weather, we begin to worry about the thermal safety of the room. And since the bills for public utilities only grow, then everyone turns to the issue of thermal insulation more people. A large percentage of heat loss occurs on the windows and can range from 1/3 to 1/2. This problem is faced not only by owners of old wooden windows, but also by plastic ones. To preserve heat and provide comfortable conditions Windows are sealed different ways- some of them are temporary and will not last longer than one season, while others, more labor-intensive, will protect windows for several years. In this article we will look at the main causes of seal failure and ways to combat them.
Causes of thermal insulation failure
Wooden windows are highly economical and reliable. They can last for decades, but with prolonged use their thermal insulation characteristics deteriorate: cracks and gaps appear, the glass fogs up, and often even frost appears. This happens for various reasons. These include drying out of wood, deformation of the window structure or the building itself. Drying of wood leads to the appearance of cracks and destruction of the wooden structure.  The deformation of the building can cause the window to skew and its frame to fit loosely against the wall. This will immediately lead to severe heat loss. Plastic windows, compared to wooden ones, are designed to improve thermal insulation and create comfortable indoor conditions. But their use will not always allow you to retain heat - there are a number of reasons for this. These reasons include:
- poor installation;
- seal defects;
- problems with double glazed windows;
- mechanical damage.
Did you know? The first double-glazed windows were created in Germany back in the 19th century.
Common places to blow
Before starting work on sealing windows, it is necessary to identify blowing points.  Common places for blowing in wooden windows:
- windowsill;
- the junction of the window frame and sash;
- wooden frame;
- glass.
Very often, weak points in wooden windows are the joints of glass and glazing beads, window sashes and frames (in particular vents, which often open). It is also worth noting the vulnerability of the junction of the window frame and the opening. To determine the place of blowing in plastic windows, it is necessary to inspect inner part window profile. If a layer of dust forms on it, then there are problems with thermal insulation in these places. The exception in this case is the top hinge of the window profile. In this place, the formation of dust is explained by the design features. Plastic windows have the following blowing points:
- sash perimeter;
- windowsill;
- the junction of the impost and frame;
- window hinges;
- seal.
Did you know? While conducting research into various means of protecting against radiation, Japanese scientists have identified materials that reflect heat when applied to the surface of glass.
Identifying problem areas
If examining common blow spots does not help identify the problem area, you can use other methods. The first way is to run a damp hand around the perimeter of the window; at the blowing point you will feel a strong temperature difference. Another option is to inspect the inside of the frame, but this method is only suitable for plastic windows.  If these simple methods do not allow you to identify problem areas, you can use the flame of a candle or lighter. If you hold a burning candle along the window frame, the joint with the slope and the window sill, the flame will begin to fluctuate in the places where it is blown.
What and how to insulate
Window insulation measures are divided into two categories: temporary and conditionally permanent. Temporary ones are carried out annually with the onset of cold weather - these include insulation with paper, cotton wool, and foam rubber. Conditionally permanent methods include methods using polyurethane foam, sealant, rubber or polymer seals. Let's look at each of the thermal insulation methods.
Newspaper (paper strips)
This method is very old, it was used by our grandmothers. Over time, the method of insulating windows using newspapers or paper strips has undergone some transformations, and now there are several options for its implementation. You can make paper putty to seal window holes and seams.
It is necessary to shred paper or old newspapers, soften them with water, and add clay or crushed chalk to the resulting mass. We cover the cracks with this mixture; To do this, it is better to use a knife or a metal ruler. This tool penetrates well into hard-to-reach places. Window tape or paper strips are suitable for covering this putty. You can also use strips of fabric. You can glue them using soap and water: pre-moistened strips are smeared with soap and covered with paper putty. Another variation of this method involves insulation using paper rolls. The cracks are sealed with twisted paper tubes soaked in water. The joints of the frame and glass are sealed using paper strips coated with soap.
 Important! When using adhesive tape, a layer may peel off old paint, so it may need painting.
This method is very effective, but is only temporary protection from the cold. With the onset of warm days, the insulation must be removed. But at this point a new problem arises related to the careful removal of the paper.
Energy saving film
A new trend in window insulation is the use of energy-saving film. The principle of its operation is to reflect infrared rays and reduce heat loss. This kind of film winter time will protect the house from the cold, and in the summer will prevent the room from heating up. It is a good barrier to maintaining a comfortable climate in the house.  Such protection can be applied to the entire surface of the window, and not just to the glass, which creates additional thermal insulation. Energy saving film also called the “third glass”. There is a film that is glued to the window frame and forms additional protection 0.5-1 cm wide. After its installation, the temperature in the room increases by 3 or even 7 °C. The use of this method is convenient for both plastic and wooden windows.
Polystyrene foam, polyurethane foam, basalt wool, foam rubber, paraffin
Other materials are also used to insulate windows. For example, foam rubber sealant, paraffin, polystyrene foam or polyurethane foam. Let's look at the features of using each of these materials. Using foam strips will help protect windows from drafts. This material easily penetrates into the cracks between the sashes and the window frame. Narrow foam strips are excellent for gluing window sashes around the perimeter; they fit tightly and allow you to use the window in winter.  If you stick such a seal in several rows, this will improve the tightness of the room. You can seal cracks larger than 2 mm using flat foam rubber. To fill the cracks with foam rubber, use a thin and blunt object, such as a screwdriver or a table knife. After filling the gaps, they are sealed with tape, which provides additional thermal insulation. It is convenient to seal small cracks with paraffin. Using a steam bath, it is heated to 60-70 ° C - in this state it is easy to draw it into a syringe - after which the cracks are filled with it.

Glazing beads can be installed only after the sealant has completely dried. It is necessary to take into account that after dismantling the beads, you may need new ones, since they often break. This way you will not only insulate the window, but also carry out repairs.
Important! To seal cracks in wooden windows, you can use wood putty or a mixture of plaster and chalk. After completing the insulation work, as finishing coating varnish and paint can be used. Unlike sealant or paraffin, this coating applies without problems.
Foam plastic can be used as slope insulation, which is used for both external and internal decoration. Before using polystyrene foam, it is necessary to pre-treat the surface: remove dirt and old polyurethane foam. To insulate slopes, it is better to use sheet foam, which is easy to use and has high thermal insulation properties. Foam plastic is glued to the slope and all cracks are sealed.  A reinforced mesh is glued onto the foam base, then you can apply plaster and paint. Basalt wool, like polystyrene foam, is an excellent heat-insulating material. The use of this material will allow you to insulate slopes and window sills. The advantages of this material include fire resistance. When using this material for external insulation of slopes, additional finishing is required, since this material easily gets wet and loses its thermal insulation properties. Sometimes simple insulation or sealant is not enough to insulate windows. For example, when there are large gaps in the window frame or see through at the junction of the window opening and the frame. In such cases, it is better to use polyurethane foam. With its help, you can not only insulate slopes, but also insulate the space under the window sill. But during prolonged contact of polyurethane foam with the external environment, it deteriorates its insulating properties and may even be partially destroyed. Such insulation is a very effective and affordable solution to the problem of heat loss.
Important! To seal, you can prepare your own putty. To do this, you need to mix 1 part chalk and 2 parts building plaster with the addition of water. This putty will be an excellent alternative to polyurethane foam.
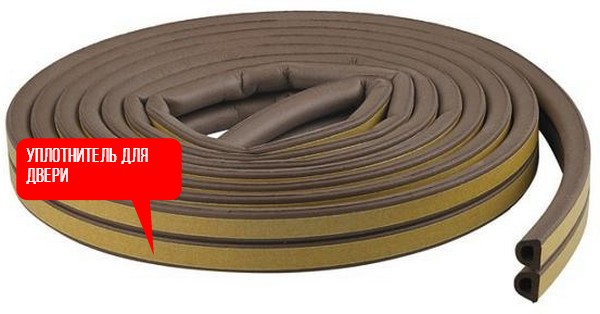
You can also seal the window structure using a tubular profile. It is highly reliable and long term services, which will allow them to be classified as conditionally permanent insulation methods. It is better to install such an insulator in the warm season, but it can be done with the onset of cold weather, the main thing is that the temperature does not drop below -10 ° C. It is attached to the window frame using a self-adhesive strip. Such isolation is labor-intensive, but the result will not be long in coming. A tubular seal is used to insulate windows using the so-called “Swedish” technology. 
Before starting work on window insulation, you need to decide on the size of the seal. To do this, use a piece of plasticine wrapped in polyethylene. It is placed in the gap between the window sash and the frame and the window is closed. Depending on the size of the gap, a tubular seal of sizes E, P, D is used. To install the seal, it is necessary to make a slot in the supporting frame. The seal is secured with glue. The use of this method allows you to insulate windows for 20 years, or even more.
Progress of work on insulation of wooden and plastic windows
Each of the insulation methods given above is effective. But any work carried out in combination is much more effective than using them separately. Let's look at the procedure for carrying out sealing work.
Step 1: Replace the seals
People who are faced with the problem of poor thermal insulation of windows, the first thing they do is replace the seal. It is best to do this work in dry and warm times. Replacing the seal on wooden windows is quite simple. But with plastic ones the situation is different - the seal on them wears out after only 5 years of use. It is recommended to replace only those that are already worn out and cannot cope with their functions. In other cases, using silicone putty a couple of times a year can extend the life of the seal. To replace the rubber seal on the windows, you need to pry the old one and pull it out. Before inserting a new seal, you need to wipe the grooves from dust. A new seal must be purchased of the same thickness and, preferably, from the same manufacturer. A new seal is inserted into the cleaned grooves. To make this operation easier, it is recommended to remove the sash. This way, the seal on the sash and window frame is replaced. To change the rubber gasket that protects the glass unit, it is necessary to perform more complex and time-consuming operations.
Important! Seals from different manufacturers have different structures and may also differ in color.
First, remove the glazing beads that hold the glass unit in place. Now you can easily remove the glass and pull the seal out of the grooves. Just as when replacing the seal on the sashes, the grooves must be cleaned. It is recommended to cut the rubber gasket with a margin of 6 cm, in which case it will fit tightly around the entire perimeter of the glass unit. The new seal is placed in the grooves, after which everything can be put back together. For additional fixation of the seal, you can use glue. 
Step 2: Pressure Adjustment (New Designs Only)
For many, this function in plastic windows may seem new, but manufacturers recommend adjusting the pressure twice a year. There should be one for each season. To make this adjustment, you will need a 4mm hex wrench or pliers, depending on the design of the window. At the end of the sash there is an eccentric with a notch, which is what is required. An eccentric is a device for adjusting the fit of the sash to the window frame. In plastic structures it is possible to set winter and summer mode, as well as average, which is set by default.
By rotating the eccentric, you can adjust the tightness of the sashes. Using the winter mode allows you to retain heat in the room due to a tighter fit. And with the onset of warm days, the windows are switched to summer mode, which allows for increased air circulation. In some cases, such adjustment is not enough, so additional adjustment of the hinges is carried out. If the window design provides for winter ventilation, then both the lower and upper hinges are adjusted. And in cases where such a function is not provided, it is enough to just adjust the lower hinges. To make such settings, you need to open a window. In the open position, set the sash to the ventilation position. Only in this position can the top hinge be adjusted. By rotating the adjusting screw, you can change the tightness of the sash to the frame.Step 3: Insulation of slopes
A variety of materials can be used to insulate slopes. The most popular of them: polystyrene foam, polystyrene foam and sealant with a layer of polyvinyl chloride. All of them provide good thermal insulation. Before deciding on the sealing material, it is necessary to examine the external and internal slopes. Poorly performed work or wear and tear of the material can lead to the thermal insulation of the room being compromised. In such a situation, before starting insulation, it is necessary to remove the old material and install the slopes again. Thermal liners can be used to insulate slopes from the inside. After carefully fixing and strengthening them, cosmetic finishing of the slopes is carried out. Basalt wool can be used as such liners. Another option is to glue foam plastic to the inner surface of the slopes. Then it should be puttied or covered with plasterboard.
Did you know? There is a myth that thermal insulation materials They repel mice, but such materials do not exist.
Another way of finishing and sealing is to install so-called “sandwich panels”. Such a panel already has a thermal insulation layer, which makes them convenient option insulation of slopes. For additional sealing, a layer of cotton wool can be used as a base for the sandwich panel. An important point in the process of insulating slopes is the inadmissibility of air gaps.  To avoid this problem, you can use special adhesives. They are applied around the perimeter of the surface being treated, as well as on the seams. Properly applied adhesive promotes good adhesion to the surface of the slope.
Step 4: Working with the Window Sill
Another problem area in window insulation is the window sill. Poor installation can lead to big problems during operation. For example, if the space under the window sill is not sufficiently filled with polyurethane foam, air pockets may form there, which compromise the thermal insulation. Another problem is the destruction of foam under the influence of mechanical loads or thermal factors.
Important! When installing window designs in winter, you need to use the so-called “winter” polyurethane foam, which provides better sealing.
In such situations, re-sealing with foam is required. To carry out such work, first of all, it is necessary to remove the old foam, and then fill the space with a new layer. But such material does not allow closing small cracks. You can seal them using sealant. It penetrates well into cracks and seals them completely. In addition, it repels water well. The combination of such materials will cover all problem areas. 
Step 5: Pasting the glass
Sometimes, after eliminating all the problems, heat losses remain at a fairly high level. In such cases, glass is covered to provide thermal insulation. Various materials can be used for this. For example, for better protection from low temperatures, you can cover the junction of the glass and the frame with tape. Energy-saving film can also be used as glass insulation.
To insulate windows, packaging film, or, as it is also called, film with bubbles, can also be used. This film can be purchased at any hardware store. It helps protect the house from the cold and improves the energy efficiency of the building. It takes very little time to install, and subsequently it does not require special care. The film can be repeatedly glued and peeled off. This seal does not prevent sunlight from entering.  For installation you will need scissors, a spray bottle and bubble wrap. We cut the film to the size of the glass and wet its flat side. Apply the film with the wet side to the generously moistened glass. Water provides good adhesion to the surface. We level the attached film well. This insulation helps protect the glass from excess heat loss, and most importantly, it is a very convenient and economical method. The use of film does not leave any traces, which makes it easier to care for the window after removing the seal.
Step 6: Insulation from the outside
The outer side of the building is insulated with slopes and ebb. The lack of thermal insulation of external slopes will not reliably protect windows from drafts and cold. For thermal insulation of external slopes, foam plastic 5 cm thick and a mounting mesh are used. Finishing slopes from the outside is often accompanied by complete insulation of the building, but this work can be carried out separately.
Important! The foam plastic should cover part of the window frame and completely cover the installation seam.
In the process of performing such work, pre-prepared foam strips are tightly glued to a previously cleaned surface. At the end of such work, the foam must be plastered, which will protect it from further destruction. When carrying out thermal insulation work, it is necessary to remember that in order to properly distribute light in the room, the slopes must have a turned angle in relation to the window.  Drain - very important point to ensure the window is sealed. To prevent moisture from accumulating, the slope must have a bevel of 5° and protrude 4 cm from the building, and the side edges must be bent upward. This shape will allow water to flow freely without penetrating under the tide. For additional protection The places where the ebb tide contacts the window and slopes are additionally sealed from moisture.
How to stick thermal insulation film
Due to its multilayer structure, such protection has a low heat transfer coefficient. The energy-saving effect is ensured by the air gap. Protection of 15 microns allows you to increase the room temperature by 3 °C. For installation you will need a knife, scissors and a hair dryer. For wooden structures The film can be applied either to the entire surface of the window or only to the glass. If you stick it on the entire surface of the window frame, you need to seal the cracks, and for ease of use, remove the handles. Windows must first be thoroughly washed and degreased.
Double-sided tape is applied to a clean surface around the perimeter. The film is folded in two layers, so you need to separate them. We cut the film according to the size of the window. It is necessary to take into account that the film must be glued to the tape, so it is worth making a margin of 2 cm. Before gluing, we check that the measurements are correct. If all measurements are correct, then you can remove the protective paper strip from the double-sided tape. To proceed further you will need help. Carefully distribute the film over the entire surface of the window and glue it along the entire perimeter. At the moment, you can ignore the wrinkles that form. When gluing, do not stretch the film too much, as it has a heat-shrinkable structure. Use a hairdryer to smooth out wrinkles. Under the influence of hot air, the film smoothes out and settles. Another option for sealing windows is gluing film directly onto the surface of the glass. In this case, the glass unit is removed from the frame, after which it can be applied to the window. It has different side coatings, one of them is metallized. helpedHow to keep the house warm? This topical issue This question is asked by everyone - residents of urban high-rise buildings, the private sector, owners of country houses and country cottages. In winter, the cold tends to penetrate into the rooms in any way. Walls, floors, doors and, of course, windows are the main channels through which cold comes into the house. But the most vulnerable object is windows. Many are accustomed to solving the problem by installing sealed metal-plastic double-glazed windows. But there are enough adherents of traditional frames - wooden ones. With the onset of cold weather, the problem of how to insulate windows for the winter becomes actual and takes on special significance. The high cost of energy requires active action and bold decisions.
Video tips for choosing materials for window insulation
Window insulation: following the path of least resistance
Everyone remembers the times when any available materials acted as universal insulation. For the winter, the frames were stuffed with whatever they could - cloth, rags, cotton wool. At best, they caulked it with foam rubber. The top was certainly covered with paper strips obtained from the inner newspaper margins. Some used plasticine. In short, everyone knew how to insulate windows.
Particularly advanced frame fillers. But the quality of Soviet putties left much to be desired - the material peeled off safely.
Fortunately, today caring homeowners have a whole arsenal of tools at their disposal that can easily answer the question: how to insulate windows with your own hands. The most common classic remedies are:
- foam;
- masking tape;
- rubberized seal;
- putty;
- film.
One of the archaic methods of insulation: fabric or rags are caulked into the cracks of the frames
Using these materials, it is quite easy to carry out insulation work. They are also characterized by low cost. However, each method has its own disadvantages, among which are the following:
- fragility;
- the need for dismantling;
- foam rubber or tape will not protect against moisture.
A good option is rubberized insulation. It is a little more expensive, but does not allow moisture to pass through, protects well from wind and is reliable in operation. But it’s better to approach solving the problem comprehensively and save yourself from the annual tedious work for several years.
Leading group modern materials:
- sealant;
- silicone seal.
IMPORTANT TO KNOW: Taping window frames or paper tapes is fraught with peeling of the material if the humidity level increases.
Effective heat preservation: little tricks
So, to decide how best to insulate your windows, you first need to perform a thorough inspection of the frames. The main indications for creating a barrier to the cold:
- the presence of gaps between the components of the frames;
- loose fit of glass and glazing beads to frames;
- errors when installing windows - distortion of the structure;
- insufficiently strong fixation of the block;
- chips and cracks in glass.
However, the general diagnosis is cracks formed in one way or another. Most often you have to focus on eliminating them.

Rubberized insulation for windows - inexpensive and effective method. Service life - one season
The first stage of any construction and repair work is surface preparation. When starting to insulate windows, it is necessary to carry out measures to clean the wood:
- wash the frames thoroughly;
- wait for it to dry completely;
- degrease with alcohol or gasoline;
- allow the vapors to evaporate;
- clean the surface of peeling paint and small chips.
In the process, it will become clear how you can insulate the windows.
If there are damaged glasses, they must be replaced. It is also recommended to check the suitability of the glazing beads. Over time, they become thinner and split. Another factor influencing the condition of frames is frequent fluctuations in air humidity levels: frames either shrink or expand. This problem typical for the private sector, especially if miscalculations were made when installing waterproofing.
IMPORTANT TO KNOW: If the air in the house is excessively dry, you can humidify the space by placing an open container filled with warm water.
Exterior work - how to insulate windows on all sides
It is advisable to carry out insulation of windows in two stages: from the outside and from the inside. As noted above, the source of problems is often careless installation of windows with skew or insufficiently reliable fastening. Or the frames have become very dry and loose.

All of the above disadvantages can be eliminated. This is not to say that it is simple. But the result is worth the money and effort spent. The algorithm for performing the work is approximately as follows:
- inspection of frames and external side slopes;
- identification of cracks, voids, crevices;
- removing the plaster layer and freeing the frame;
- removal of crumbling fragments of the mortar with which the block is strengthened;
- filling voids with polyurethane foam;
- after the foam has hardened, cut off the excess;
- plaster.
- if necessary, replace glazing beads;
- filling of cracks and gaps;
- grinding;
- coloring.
IMPORTANT TO KNOW: Poorly protected windows are the main cause of heat loss (up to 50%).
Sealing from the inside: maximum sealing for insulation
Sealant is one of the effective answers to the question of how to properly insulate windows. Due to its penetrating and bonding properties, this material almost perfectly connects adjacent surfaces. Careful sealant treatment of each frame joint is the basis for reliable window protection. However, we must not forget that such a procedure requires certain skills. The best way to do it is this way:
- using flat paint brush completely clean the pre-prepared surface from the smallest specks;
- use a construction gun to apply sealant;
- ensure that the material is laid down in an even layer;
- do not allow interruptions in the extruded “sausage”;
- Be sure to let the sealant dry completely before trimming off the excess.

Do-it-yourself window insulation will give an effective result. The service life will be 15-20 years. The subtlety and labor-intensive nature of the work is more than compensated for by its durability. However, sealing in this way cannot be carried out when frost is approaching. Work temperature is from +5 °C to +40 °C. That is, in cold weather you can only work with internal frames.
IMPORTANT TO KNOW: To remove sealant from glass, it is recommended to use gasoline - it will dissolve the material and will not leave any traces.
There is a similar method that has also gained popularity - the use of a silicone rubber seal. It is distinguished by a tubular profile and the ability to choose a material of a suitable diameter - depending on the size of the cracks. Window insulation done in this way for the winter is considered effective, but requires certain skills.
Another important factor– tightness of fit of glazing beads. Most often they are nailed with small nails. But this element is attached perfectly using sealant. As in the case of external insulation, window painting or varnishing plays an important role.

The silicone rubber seal must be carefully pressed against the insulated surface at the junction of the frame parts
Traditional methods: features of materials
If you carefully protect windows using modern techniques, glazing and other traditional techniques lose their relevance. However, not everyone has the opportunity to carry out major window repairs. Also, if the frames are reliable enough, window insulation tape is quite effective remedy.
For many years, foam rubber has not given up its position. This material can be used to caulk all cracks. Adhesive-backed strips are easily mounted to the surface and provide good seal.
But there are also obvious disadvantages. The main one is a spongy structure, which entails the absorption of moisture and freezing when severe frosts occur. In this case, the main function is lost - the foam rubber for insulating windows ceases to protect against the effects of cold air, and the cold makes its way into the house.

To stick the film on the window, you should use double-sided tape.
Another “old-fashioned” method, which, however, can be given modern features, is a film for insulating windows. Previously, dense polyethylene was installed on the outside of the frames, which significantly reduced the level of illumination in the premises. Modern films are distinguished by their thinness, transparency and ease of installation: they are simply glued to the glass from the inside using double-sided tape. But you need to be prepared for the fact that when high humidity the adhesive tape may come off.
However, specialists will help you truly effectively protect your home from the cold. Professionals thoroughly understand the intricacies of painstaking work that require high precision and a competent approach. They'll pick it up suitable materials for window insulation and will implement the practical implementation of tips and recommendations.


