All gardeners know how important watering the garden is. However, watering the garden is a rather laborious process, for this reason, gardeners and summer residents are now interested in how to do drip irrigation.
After all, having assembled the system with his own hands drip irrigation you can solve several problems at the same time, save money, time and remove from your site excellent harvest. Because the system drip irrigation evenly distributes moisture and fertilizer throughout the plot.

In our industrial age, there are few completely different designs drip irrigation.

Device for giving
Most summer residents are interested in the question of how to organize drip irrigation with their own hands? Having decided to assemble the drip irrigation design with your own hands, it is necessary to take into account some nuances, and above all those related to the reserves of the water resource, because there should be enough water to charge the siphon.
The siphon in this situation can be a pipe in the form of an arc, installed vertically, while at one end it must be connected to a tank filled with water, and its other end must be connected to the pipeline.

Moreover, the siphon must have a height corresponding to the volume of liquid in the tank.

The design of irrigation for a summer residence looks like this: water from a tank flows into irrigation hoses, in which holes of a certain diameter are cut to spray water resources. This design of irrigation can take a variety of forms.

As an example, consider the irrigation of shrubs, for which a ring irrigation design is created, and a rectangular irrigation system from a standard pipeline is great for vegetable plantings.

Watering is regulated using a special system that includes a rain valve, several springs, a lever, a pusher, and a tank cover.

The valve will operate if a notch is created on the lid of the tank for rain, which acts as a load. The rain collection valve works on the same principle as drain system toilet bowl.
When creating the actual design of drip irrigation, it is necessary to take into account certain features of the planting and development of the roots of seedlings, each specific type of planting. Because the speed of fluid movement depends primarily on the depth at which the roots of the planted plantations are located.

So, the deeper the roots go into the ground, the slower the flow of moisture. Plants with shallow roots are more susceptible to drought.

However, the roots of most green spaces are located at a depth not exceeding 20-25 cm, so drip irrigation in a greenhouse needs to use less water, unlike fruit trees.

Automatic design
The automated design of drip irrigation is convenient because it allows you to water every day, at a specified hour, without your presence. The fact is that this system will turn on and off on its own at the right time.
How to make drip irrigation for summer cottages automatic?
The creation of the design of an automatic drip irrigation system must begin with the fact that the pump must be connected to a hose in which through holes must first be made. Water will flow freely through these holes.

The gap between the holes should be 30-35 cm. Next, the hose must be drawn throughout the area. In the process of setting the start time for irrigation, you need to take into account such a parameter as pump power.

The drip irrigation system is ideal for the lawn, because the roots of the grass are usually located at a depth of no more than 15 cm. Moreover, in the summer, the lawn simply needs regular watering, otherwise you risk at least losing the attractiveness of the lawn, otherwise it can lead to complete lawn loss.
Note!


Considering the financial cost of planting new grass, automatic watering seems to be justified.

However, when organizing an automated design, as in the photo of drip irrigation, some design features must be taken into account.
So, there are cases when there is an excess of water in the nearest area, but no water has arrived at the last one. In addition, there are situations when a powerful water pressure, when pumped by a pump, leads to waterlogging.

A special dispenser, purchased at any gardening or assembled with your own hands from a plastic bottle, is able to solve this issue.

The so-called drip irrigation from bottles is formed, the action of which is similar to the operation of a toilet bowl drain barrel.

Note!

This structural element will provide you with the rate of fluid flow to each bed, and individually to each seedling root.
IN automatic design irrigation, the leading place is given to a dropper mounted on a pipeline system. It is through this device that fluid is supplied directly to the root system.

If, when assembling an automated irrigation design, you decide to save a little on costs, then it is acceptable to replace the drippers with plastic parts from the medical system.

However, the best option is ready-made droppers with a mechanism for regulating water pressure, which are available in specialized stores.

DIY drip irrigation photo


Note!


In today's issue, we will look at the drip irrigation system. All gardeners know that plants need moisture to grow properly. Yes, of course ... you can run a hose into the greenhouse or beds, but such a procedure requires additional time and money.
By the way. About greenhouses and a variety of greenhouses
Now, in a period of instability economic situation in the country, people try to keep the family budget and reduce all kinds of expenses. Savings not only in order to make an irrigation system from improvised materials, but above all, to save on water and get a rich harvest as a result.
That is why, you can take care of the crop with the help of drip irrigation. And honestly, this is a new trend!
The system can be made independently, and it does not require large cash outlays. In addition, installation is quite simple, so any summer resident can easily cope with this task.
If you make the wrong water supply on the land, you may encounter uneven distribution of moisture. Water will absorb, mostly only the first plants due to the pressure in the hose.

A significant advantage of such a system is that only the roots of the plant are moistened, while the earth and leaves remain dry, this avoids sunburn. In addition, such watering prevents the rapid growth of weeds.
Experts note that gardeners can save up to 80% on water consumption. At the same time, all plants receive a sufficient amount of moisture necessary for normal growth.
To make such a system at your site, you need to flat surface, at a height of 1 m, install a container with clean water. After that mount necessary elements and start irrigation.
Irrigation system maintenance:
- If possible, the container should only be filled with clean water.
- Clean filters regularly.
- Before polis work, flush the pipes.
- To avoid clogging the system, it is recommended to use only liquid fertilizers.
- With the onset of autumn, dismantle all the details of drip irrigation.
Subject to these simple rules, the system can be operated for several seasons.
How to make drip irrigation with your own hands without high costs?

The system of such watering plants was developed in arid regions in the last century. To date, manufacturers offer expensive and complex irrigation systems. Therefore, not every gardener can afford to buy it. But you can do it yourself. In this case, the system will perform fewer functions compared to industrial counterparts, however, with correct use will effectively water the plants.
The easiest option is to use a flexible hose for each plant. First of all, you need to install a barrel or canister with a volume of more than 100 liters. The container must be installed at a height of at least 1 m. If downpipes are installed, the container will always be filled during rain.

To prevent dirt from entering the hoses, they are installed at a height of at least 5 cm from the bottom of the container. Before that, you need to do the wiring, and decide on the places of the droppers.
Impossible to do accurate calculations, therefore, the number of holes in the hose and the length are recommended to be done with a small margin. If they are redundant, then it is easy to turn them off.
At the next stage, you need to make the wiring and mount the cranes, the number of which depends on the characteristics of the system. Enough to buy the most simple options, they will be enough to perform basic functions.

How to perform drips?
To do this, you can use one of the methods:
- Buy a special sleeve from an agricultural store with holes.
- Heat the nail and make the required number of holes.
- Insert small bends up to 30 cm long into the main hose. A rubber or plastic hose is suitable for this.
Make holes with a drill to avoid torn edges. And preheat the main hose in hot water.

After that, you need to connect all the elements into an integral system, then make the first launch and check its effect.
Drip irrigation from plastic bottles?

With the help of ordinary plastic bottles, with a volume of 1.5-2 liters, you can make the simplest irrigation system. Several holes should be made in the lid of each vessel, the diameter of which should not exceed 2 mm.
Small holes can be made with a heated nail. You can also purchase special pegs that are put on the neck of a plastic bottle.
Notch the bottom of the plastic bottle to prevent moisture from evaporating. Then dig a hole, approximately 15 cm deep, and insert the bottle there, at an angle of 45 degrees. At this stage, you need to be careful not to damage the roots of the plants.
Fill the container with water, which will flow to the root system, through the holes made. In addition, with the help of drip irrigation with plastic bottles, you can fertilize plants with liquid solutions.
Such simplest system will feed the sprouts for several days. This method is suitable for summer residents who do not have the opportunity to water the garden daily.
Drip irrigation from polypropylene pipes

Unlike metal pipes, polypropylene analogues have great advantages. In addition, the material is quite cheap, and is suitable for assembling a drip irrigation system.
Before assembly, you need to prepare the following:
- Capacity with a volume of 100 l. The water will be heated by sun rays which is good for plants.
- Ball valve.
- Filter for water purification. Otherwise, the system will quickly fail.
- Capacity for nutrient fertilizers.
- Pipeline
- Branches from polypropylene pipes or special tapes, which are connected using special tees.
To determine the size of materials, you need to mark land plot. For watering 1m2, you will need about 30 liters of liquid per day, depending on the type of planting. You also need to calculate the number of taps and the distance between the installed droppers.
To ensure the necessary pressure, it is recommended to install the tank at a height of 1-2 m. This will be enough to provide irrigation of 50m2. The container is established on a strong and equal support.
The tap is installed in a hole made in a container with water, at a height of 10 cm from the bottom. On the other hand, make a connection to the country water supply. To fill the container to a certain level, it is recommended to use a float valve.
For cutting polypropylene pipes for bends, special scissors are used. You can also use a construction knife or a hacksaw for metal.
Attach pipes to fittings cold welding, soldering or crimping. The most reliable option is soldering, for this you need a special tool with nozzles.
The polypropylene material is connected to the main line at the surface or at a depth of 75 cm. The filter is installed directly to the tank. Make a plug at the end of the main pipe.
The next step is to make droppers. To do this, in the tap do required amount holes. At the end of the outlet pipe, it is also necessary to install a plug.
On last step assembling the system, you need to connect the water supply to the water tank, fill it, and start drip irrigation.
Or is it better to buy a drip irrigation system in an online store?

As can be seen from the examples above, it is not at all difficult to make a watering system on your own. But if it allows financial condition, then you can order it in the online store. Today, there are many companies that sell components via the Internet.
In this case, you can purchase a ready-made kit at a price of 1,000 - 4,000. The cost depends on the functionality. If the system works in automatic mode, then the summer resident can practically not participate in the irrigation process.
Therefore, each person chooses for himself, to make equipment with his own hands, while you will need to buy the necessary components or take advantage of the offers of online stores.
Drip irrigation was invented by agrotechnicians a long time ago and they began to use it in arid regions, where there is little rain and continuous water savings. Moreover, if everything is done correctly, it will be possible to get a very good and high yield. These days it's completely automated system on poor soils.
Due to the fact that such irrigation is very expensive, not every gardener can afford to buy and assemble the installation of such a system. Although every summer resident dreams of having this wonderful design on his site, which will replace watering from a hose or watering can, that is, it will make work easier. And also who has water meters - to save on this.
Therefore, there is a good way out of this current situation, to make such a system with your own hands. After all, it is not at all difficult to mount it, and the work will cost much cheaper than in industrial designs. And she will cope with the task perfectly well, but only a little care is needed.
This is an irrigation method where water is supplied directly to the area to the roots. Which significantly increases the yield of country crops and the beauty of ornamental plants.

Advantage of the system:
1. Saving watering is that the water level is very low and accurate.
And most importantly, it is served in the amount that is needed for all cultures.
2. With conventional hose or watering cans, an earthen crust appears after the soil dries out. But with a point one, this does not exist. After all, the ground part will remain dry, which will prevent the formation of weeds. More will disappear various diseases to which seedlings are exposed in a humid environment.
3. Due to this irrigation, it is not necessary to constantly loosen the soil, as there is an improvement in air flow to the roots.
4. In this system, you can feed various crops, but only with liquid fertilizer.
5. If there is a timer, then a fully automated filing process can be made.
6. Leaves don't get burned in hot weather because they don't get water.
7. Wind and bad weather do not affect this type of irrigation.
In general, if you follow certain rules, this type will last for many years:
- The water tank must be clean;
- The pipes are well flushed;
- Be sure to disassemble all connections and fittings in the fall;
- Filter cleaning.
Flaws:
1. For this system, you need to buy different parts.
2. Tapes can become clogged, so water filtration is a must.
3. Also, tapes and droppers tend to break mechanically.
4. For some crops, spot watering is not suitable due to the depth of the roots, so they definitely need sprinkler irrigation.
How to make drip irrigation yourself for a summer residence at no cost
I wanted to offer, in my opinion, the easiest way to spot irrigation from materials that any summer resident can find. In this case, you will have to buy the bare minimum. And for giving, especially when you are not there for a whole week, this is the most the best option.

We will need:
- Barrel - 250 liters;
- Cranes - 2 pcs.;
- Hose - as many meters as you need for wiring;
- Fittings - for connection;
- Pipe - to fill the container from the water supply;
- Sgon - 1 pc.;
- Nuts - 2 pcs.
- Clamp - 5 pcs.
1. We install a barrel near the house, while the height should be 1.5 - 2 meters. It is advisable to install the tank so that water from the drainpipe falls directly into the container and fills it with rainwater. If you do not have such an opportunity, then you can supply water from the water supply, but only put a tap at the exit from the house in order to shut it off if it is full. It is also a good option to attach a float from the toilet at the beginning of the tank and as the water decreases, it will fill itself.

2. We drill holes in the barrel, select the size depending on what kind of squeegee you have, and fasten it with the help of nuts.
Important! Try to make the exit 5-7 cm above the bottom so that the hose through which the power will be supplied is not clogged with dirt.
3. Next, we assemble the system. We screw in a T-shaped adapter from the drive, attach a supply to fill the tank on one side, and a tap to shut off on the other. After it, it is desirable to put a filter, but I don’t have one, so I won’t put it, because we do everything from what we have (from improvised materials).

4. Well, now we assemble the system and run the hoses through the beds.

5. You can look at the picture for an approximate location of the hoses.

6. At the end of each drip hose we put a tap to clean it in case of contamination.
7. Well, now we do watering ourselves near each plant. To do this, we screw in the roofing screw, and if it is necessary to drip faster, we unscrew it a little bit, but if it is slower, we twist it.

8. Thus, we adjust for ourselves, as you need. You can not appear in the country for a whole week, since the capacity for the greenhouse will be quite enough. In general, you yourself see no difficulty, and most importantly cheap.
Do-it-yourself drip irrigation installation from polypropylene pipes
In the last chapter, we considered the most easy way irrigation. In this one, I wanted to describe the version in a more complicated way, but only for this we will have to buy some materials. There is no complexity in the system, and the result is shown in the picture.

We will need:
- Water tank - 200 - 250 liters;
- Polypropylene pipe;
- ball valve;
- Filter;
- Threaded fitting pitch 1.2;
- Angles.
1. The tank can be either metal or plastic. It should be fixed at a height of 1.5 - 2 meters for the best pressure.
2. We put a tap in the barrel, and behind it a filter, at a height of 5 - 7 cm, so that it does not take dirt from the bottom and screw the adapter to it on main pipe.
3. We take polypropylene tees (since they are cheap) and cut them into threads 1.2 in diameter.
Also in the store you can buy ready-made internal thread, here is only your choice.

4. And we wrap a fitting into it, on which a drip hose will subsequently be put on.

5. We solder the main pipe with an adapter from the barrel. And already in it, in which place droppers are needed, we weld tees with a fitting.
6. We attach a spot hose to it.

7. We unfold the hose at the end of the greenhouse or garden bed using standard angles for it.
Important! The hose should drop droplets to the top.

It seems that I explained it normally, if it’s not clear, ask, I’ll answer in the comments.
Video tutorial on how to do-it-yourself watering in a greenhouse
An interesting way, the company Zhuk found on the Internet and I really liked it. Decided to show you. In the greenhouse, everything is clean and tidy, and most importantly - it works perfectly. It is not difficult to assemble such a system. All parts are sold in a package, there is even an awl for piercing the main hose under the droppers. In general, the guy explained clearly and understandably.
By the way, at the exit from the barrel, if anyone needs it, you can set a timer for a while so that he turns the water on and off for as long as necessary. Then it will be possible not to approach irrigation, everything will be automated.
I think the video is clear and easy. There will be no incomprehensible situations, since even the package contains instructions. The whole system is not expensive, around 4000 rubles, and the harvest will be very good. There is also a special water connection kit.
The secret of making watering from plastic bottles
I would like to tell you how easy it is to make a system of plastic bottles. I think this is the easiest option for gardeners. The most interesting thing is that you do not need to buy anything, only occasionally you will have to supplement them with water. For tomatoes and cucumbers, it is better not to.

It is advisable to take them of the old sample, square or made of thick plastic.
1. First you need to pierce holes in a bottle of 2 or 4 pcs. it all depends on how many plants you have around it. We make them at the same distance from the bottom, about 2 cm. Why should we do it at such a distance? Yes, so they don't crash.
By the way, the flow must be done depending on what kind of land you have. That is, if clay is present in it, then the best option is to pierce 1.5 mm., Respectively, if the soil absorbs water well, then 1 mm. will be quite sufficient. And its consumption is much less, that is, it will be enough for a week calmly. So try it yourself on your soil.

2. We dig a hole about 15 - 20 cm, insert it there with holes in front of each bush 20 cm from it and bury it. As soon as everything is done, bubbles should appear in it.

If you set it for the first time, then you can spill water by opening the lid. Then pour it again and close tightly. Further, the system will work by drip.
So try guys and you will succeed.
Do-it-yourself drip irrigation for plants from medical droppers
Here's another great way. Perfect for relaxing for a week away.

1. We buy medical droppers at the pharmacy. The issue price is about 20 rubles.
2. We spread the main pipe around the greenhouse, attach it to the barrel with a tap and a filter. I already wrote above how and at what height to put the container, so I will not focus on this.
3. We drill holes in the unfolded and soldered pipe and insert the tip of the drip system tightly. In the flask where the liquid drips, there is a small filter right up to the dispenser. To make a bigger hole in it, you must first remove the hose. Then, using a needle, increase loosening in different directions and put it on again.
4. How much water needs to be fed into the hole, adjust the wheel.
If you are interested, you can watch a similar video on how to prepare the system.
Now I hope it is clear how easy it is to water your country house. It looks like all the options have been listed. Therefore, collect and use at your pleasure.
Drip irrigation is considered one of the most modern ways moistening beds in greenhouses and open ground. How to make a drip irrigation system with your own hands is of interest to many greenhouse owners, because this method of watering plants is cost-effective and convenient. This is due to the fact that plants receive the necessary moisture with little or no human intervention.
Methods for installing a drip irrigation system and do-it-yourself manufacturing options are described in this article.
How to make a drip irrigation system with your own hands
It is possible to do such irrigation with your own hands, but it is much faster and more convenient to buy a finished structure and assemble it on the spot.
How to assemble the structure with your own hands will be described below, but first we will try to figure out which preparatory work needs to be done in order for it to function smoothly.
Territory preparation
Before you do this irrigation, you need to prepare the site. In our case, we are considering the installation of irrigation in a greenhouse, so let's take as an example the design closed ground(picture 1).
Automatic irrigation involves the installation of a reservoir for storing water and distributing tapes among the beds. It is important that you need to mount the structure immediately on the finished beds, and it is not recommended to change their location in the future. Of course, you can increase or decrease the number and size of the beds, but in this case you will need to re-assemble.
 Figure 1. Preparing the premises for the installation of an irrigation system
 The tapes are laid out in the beds so that the droppers are near the main plants. Plugs are installed at the ends of the pipes to prevent water loss. They must be removable so that during the cleaning of the system the water can be quickly drained.
Tank installation
The water storage tank should be located at the beginning of the building. It must be placed on an elevation (about 2 meters above the ground) so that water enters the pipes under the action of gravity (Figure 2).
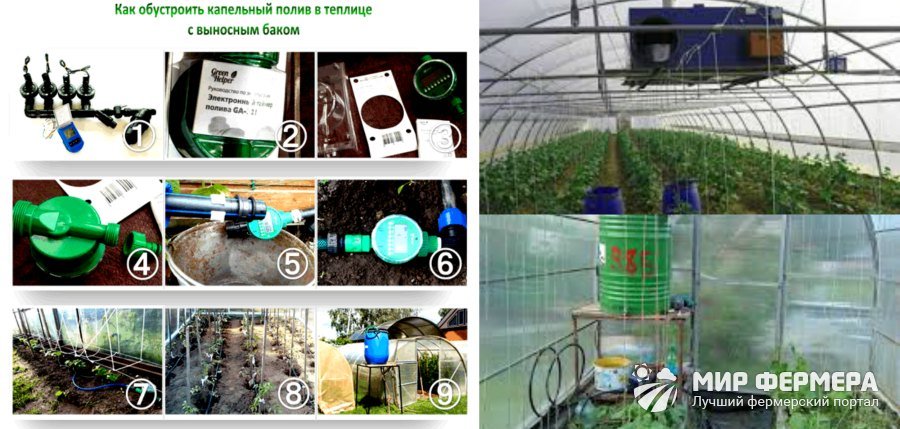 Figure 2. Installing a water storage tank
 If there is not enough space for the tank in the room itself, it can also be installed outside the structure by laying pipes on the ground. But in this case, the water must be drained for the winter so that it does not damage the tank when it freezes.
Starter installation
In ready-made kits, all the necessary elements (except for the tank) are provided in the complex. On site, you only need to connect the hose to the tank, install the starter on the tank and program it to automatic switch on and switch off with a sensor.
The starter is connected to the tank by drilling a hole with a diameter of approximately 14 mm in the main pipe. It is this device that starts the water and stops it if necessary. If you buy not ready product, but only parts of it, choose your starter carefully. It must be powerful enough to provide water to all plants, therefore, when buying, be sure to take into account the number of beds and the area of \u200b\u200bthe room itself.
How to calculate drip irrigation for your site
In order for the soil moistening design to exactly match the size of your greenhouse, you need to accurately calculate the length of the tapes and their number.
To do this, you need to measure the length of the beds. For example, if you have 10 beds of 15 meters in length, you need to buy a little over 150 meters of tape. The margin is necessary in order to eliminate possible losses during installation. Plugs must be installed at the end of each tape, and fine filters near the water tank so that the hoses do not become clogged with debris, sand or plant residues.
How to make drip irrigation yourself
How to make drip irrigation in a greenhouse yourself without large financial costs, the tips below will tell you.
From bottles
Great for small buildings homemade designs from plastic bottles.
To do watering yourself in the country or in the greenhouse using this method, you need to use this step by step instructions(picture 3):
- A hose is laid out along the beds and holes are drilled in it. The hose can be laid out both on the surface of the earth and underground. The latter method is more acceptable for closed ground structures.
- A plastic bottle with holes in the bottom is placed near each plant.
- A medical dropper is inserted into the neck of each bottle, which is connected to a hose.
 Figure 3. Installation of bottle irrigation
 This design will ensure a constant supply of moisture directly to the roots of the plant. But for this it is necessary that it has a stable water pressure, the tank is installed on a hill, and the main pipe is supplied with a starter.
The video shows how you can make a similar design from plastic bottles.
From medical droppers
You can make such watering in the greenhouse yourself with the help of medical droppers. The principle remains the same as for the installation of a bottle structure (Figure 4).
A flexible hose is laid out along the entire length of the beds, which is connected to the main pipe and water storage tanks. Holes are drilled in the hose into which droppers are inserted with special valves through which water will reach the plants.
 Figure 4. Scheme of installation of irrigation from medical droppers
 The main difference between such a system is that water does not flow to the roots, but to the surface of the soil, and the number of droppers can be any.
Automatic drip irrigation
Automation of the introduction of moisture greatly facilitates the care of plants, since the saturation of the soil with moisture is carried out practically without human intervention.
To mount a similar design, a controller operating on an autonomous battery is installed on the water tank. The tank, in turn, is connected to the water supply, and when it is empty, automatic filling. Automation also involves the installation of sensors that will start and turn off soil moisture in time.
How to make drip irrigation in a greenhouse
Assembling a spot irrigation system yourself is quite a feasible task. To do this, you need to buy a ready-made kit and simply mount it on the spot.
Note: IN this moment the most popular products are Dusya and AquaDusya. The latter is fully automated, while the former is considered simple and suitable even for small greenhouses.
To properly install, you need to follow some recommendations:
- Make an installation plan and schematically draw the location of hoses and drippers;
- Install a water tank above the ground to maintain a stable pressure in the pipes;
- Lay out pipes or flexible hoses for water supply on the beds;
- Install a starter and electronic sensors on the main pipe and water tank to automate watering.
At the final stage, the finished structure is necessarily tested to check whether the water is flowing normally and whether the hoses are leaking.
From the central water supply system
If your site has running water, it will not be difficult to make automatic watering in the greenhouse. To do this, just connect the water storage tank to central water supply and install a special sensor that will fill the tank.
This design allows you to almost completely automate watering, but it should be remembered that for the winter all its elements are dried and removed.
How does a drip irrigation system for a greenhouse work?
The principle of operation of such structures in a greenhouse is quite simple. Water is constantly stored in a special tank and enters pipes or hoses under pressure.
Holes are made in all hoses into which droppers are inserted. Through them, water seeps in small drops and enters the soil. It is this method of providing moisture that is considered the most convenient, since all plants, without exception, receive the right amount of water. However, it is also impossible to leave the irrigation structure unattended: valves, hoses and droppers must be checked periodically in order to eliminate blockages or malfunctions in time.
Greenhouses often grow not only vegetables, fruits and herbs, but also houseplants in pots, which also need high-quality watering (Figure 5).
 Figure 5. Scheme and example of installation of an irrigation structure for closed beds and indoor plants
 In this case, the system will be beneficial for several reasons. Firstly, it can be installed not only on the ground, but also on vertical racks. Secondly, the design allows you to bring tubes to each pot and plant.
How to choose drip irrigation for a greenhouse
The success of soil moistening largely depends on the quality of the system chosen. To buy a really good product, pay attention to several important parameters (Figure 6):
- Pump power and its functions: in quality products, it not only starts the system itself, but also creates desired level pressure.
- The walls of the hoses must be strong so that during operation the water does not break through them.
- Sensors should be easy to manage: the ease of use will depend on this.
 Figure 6. Do-it-yourself system assembly tools
 As a rule, quality products are more expensive, but since their operation lasts for years, it is not worth saving on such an acquisition.
How to choose a drip tape for watering
A key role in the use of such irrigation is played by a tape - a flexible hose that is laid out in the beds and brought to the plants.
When buying, carefully inspect the tape. It must be strong enough, but at the same time flexible, so that creases form on it, due to which the entire system may fail in the future.
The assembly technology of such irrigation structures is shown in the video.
Summer heat becomes a test for both gardeners and plants open ground and greenhouses. You have to run around with a watering can or hose every evening and water the plants, but not all gardeners have this opportunity. You can find a way out of this situation by equipping an irrigation system from various improvised materials, because the factory design costs a lot. Drip irrigation will not only save time and health, but also save the amount of water consumed, each plant will receive as much moisture as necessary for a full life. With your own hands, a drip structure can even be assembled from medical droppers, using a barrel as a reservoir for heating and accumulating water. The video will show the drip system in action.
Advantages of drip irrigation
The Israelis were the first to use drip irrigation. How effective the idea turned out to be can be judged by the fact that today Israel is the leading exporter of agricultural products. Let's look at the main advantages of drip irrigation.

Advice. In a barrel of translucent plastic, algae can multiply, which greatly clog the irrigation system. The same applies to transparent water hose. Choose opaque products.
Where is drip irrigation used?
The drip system is designed for watering plants planted in an ordinary way. These are not only agricultural crops, but also flowers, trees and grapes. It is very convenient to irrigate greenhouses and greenhouses in this way. Drip irrigation is not at all suitable for moistening lawns. It is impossible to water a large area with tubes. In this case sprinklers are used.
Efficiency and ease of use allows you to take care of even big garden or a berry grower, without spending huge amounts of money on watering and energy for its implementation. Proper application allows you to achieve impressive results, which is very difficult to achieve with ordinary spraying.
Advice. The effectiveness of drip irrigation is increased if the root circle is mulched with straw or other organic matter.
The device of the system of medical droppers
To assemble the simplest irrigation system, you will need the following materials: a barrel, a drip irrigation hose, tees, connections and plugs to it, droppers. The hose can be plastic water pipe or any rubber. The steps for installing the system are as follows:
- First lay out the water supply pipes along the beds. If you need to irrigate several beds, then they make the wiring and use the tees to connect the hoses into a single system.

Medical dropper can be used for drip irrigation of plants
- Make plugs at the ends of the water pipe.
- Opposite each plant, holes are made in the supply pipe. For this, an awl or a self-tapping screw is suitable.
- A dropper tube is inserted into the holes made. The amount of water supplied is regulated by a wheel. Each crop requires a different amount of water supply and irrigation frequency.
- Connect the water supply to the barrel through a coarse water filter - it will protect the system from clogging.
- If you notice that the amount of incoming water has decreased, you must disassemble all the components and rinse.
Advice. For the system to work correctly, it is necessary to ensure proper internal water pressure. This can be achieved by raising the barrel above ground level by two meters.
Underground drip irrigation
Underground irrigation differs from drip irrigation in the way that water is supplied to the roots of plants. Moisture enters through holes in pipes that are laid underground. Usually used polyethylene pipes two to four centimeters in diameter. Holes are made round or slit-like every 30 cm.
The depth and spacing of the pipes depends on the composition of the soil and the crop being grown. Consider similar device on the example of a greenhouse bed:
- dig a trench to a depth of half a bayonet of a shovel (to the depth of the roots, but not higher);
- a strip of film is laid at the bottom, which will serve as a waterproof barrier so that water does not immediately go deep into;
- cuttings of branches or pebbles are laid on polyethylene, and a polyethylene pipe is placed on top low pressure, it will not tear in winter at low temperatures if water remains inside. Very important point: water supply is arranged in the middle of the pipe through a tee so that the water is distributed evenly;
- plugs are made at the ends of the water pipe;

Organization of an underground drip irrigation system
- now proceed to drill holes every 15 cm of the pipe on both sides. A metal drill with a diameter of 2 mm is suitable;
- the end of the pipe is brought out and connected to the water intake;
- testing the system;
- so that the holes are not covered with earth, the pipe is wrapped with non-woven material, ideally with geotextiles, but old nylon tights or agrofibre will do. They do not grab tightly with electrical tape or ties;
- another layer of branches is laid on top of the structure and the earth is sprinkled;
- control moment. Turn on the water supply for a couple of minutes, dig out the soil in several places and check the degree of wetting. If the watering is uniform, you can start planting seedlings.
Advice. With watering, apply fertilizers that have a chelated form. They dissolve well in water, leaving no particles that can clog the drip system.
Drip irrigation from plastic bottles
From plastic bottles, you can build the simplest drip irrigation, which does not require any financial investments at all. Of course, this design will not replace a full-fledged drip irrigation system, but crops that are demanding on moisture, such as pepper, cabbage, cucumber, eggplant or tomato, are quite suitable. There are several types of such devices.

Watering trees and berries
Here are a couple more ways simple watering rows of raspberries and fruit trees.

All types of drip irrigation can be combined with each other. Their autonomy will allow to achieve best results when growing plants. Assembly will not take much time and effort. In any case, the effectiveness of a homemade irrigation system is undeniable and high, you can verify this by starting from the very beginning. simple device as an experiment.
DIY drip irrigation system: video
Drip irrigation: photo


