Wood has been used by people for the manufacture of household items since ancient times.
It is an environmentally friendly material that is easy to process. It is affordable, its price is not high, and the texture is very beautiful with the right finish.
It is for this reason that DIY wood ceiling chandeliers will never go out of style.
We create beauty ourselves
Product from driftwood
Each snag that you found in the forest has its own, individual and unique shape.
It is perfect in every bend, because it was created by nature itself. The main thing is not to spoil it all during processing, to cut off the excess, but not to violate the natural beauty.
It is necessary to clean the surface of bark, damaged wood and dry well. Then you need to carefully sand it using sandpaper.
The next step is to choose the type of lamps and purchase the appropriate components.
Note. Since wood is a flammable material, it is better to use energy-saving or LED lamps. They heat up slightly.
In order to lay the wires, you can make a series of holes with a long and thin drill.

After laying the wire, the holes can be puttied by choosing a putty of a suitable color. You can use a chisel with a narrow blade to select the grooves for the wire on the upper (ceiling-facing) side of the branches.
Lighting cartridges are attached to the ends of the branches.

The driftwood can be hung from the ceiling with chains.All wooden details varnished in several layers.
Lamp from the board and cups and saucers

This design is attached to the wall, but it can also be hung from the ceiling.
Manufacturing instructions:
- A suitable board (made of oak, ash, but pine can also be used) must be treated with stain and varnish.
- Holes are made in the bottoms of cups and saucers with a diamond drill for glass.
Note. If you use thin, translucent cups, the decorative effect is higher.
- Wires are connected to electric cartridges (see), passed through holes in cups and saucers, and everything is attached to the board.
- On the back side, the wires are connected in parallel with each other and the supply wire.
- The board is suspended from the ceiling with chains or a twisted cord.
If you artificially age the board, and use clay pots instead of cups and saucers, the design becomes completely different.
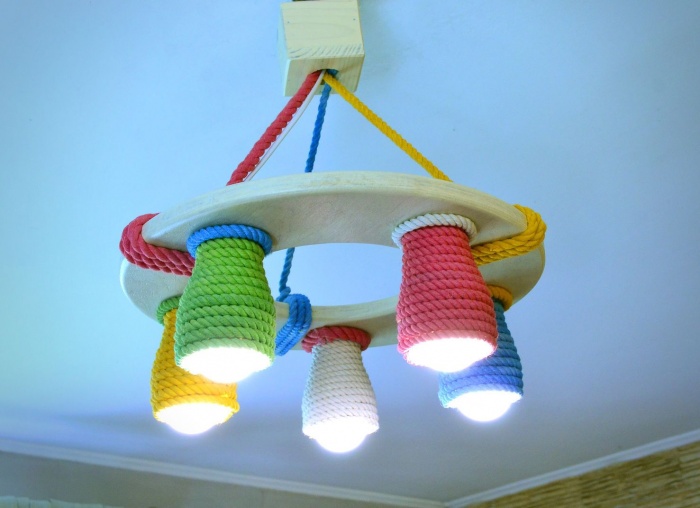
Country Style
Several boards irregular shape, processed using the brushing technique, covered with stain and varnish, a coil of hemp rope, several meters of chain and shades with cartridges - that's all that is needed to create an author's lamp with your own hands.
Do-it-yourself lamp - it's not difficult
Another design made by myself, in the video:
Previously, candles were used to illuminate the premises. They were mounted on the rim of a cart wheel suspended from the ceiling.
Wooden ones in the form of a stylized wheel with light bulbs in the form of candles are often found today.

Very often, forged details are used along with wood, emphasizing the style.

Forging and embossing in the finish. Here are the lamps in the house.
Clothespin lampshade
From what only people with imagination and skillful hands do not make crafts! Ordinary clothespins, opened with varnish or painted and attached to a frame made of wire or metal mesh - that's the lampshade for a completely unusual look.
Clothespin lampshade
Plywood lace
From thin quality (preferably birch) plywood using manual jigsaw you can create real masterpieces of applied art.
The manufacturing technology is very simple:
- On a sanded plywood sheet, using carbon paper, transfer the drawing of details.
- Parts of the structure are cut along the contour.
- Inside each piece to be removed, a hole is drilled with a thin drill (1 mm).
- Cut out all internal parts.
- Clean the edges with small files of various shapes.
- Assemble the product with glue.
- Coated with varnish.
Advice. PVA glue turns yellow over time. It is necessary to carefully remove its residues on the visible parts of the product (it is better to use special glue for wood).
If you use incandescent lamps, their power should not exceed 40 watts. They must be located as far as possible from wooden parts to avoid overheating and ignition.
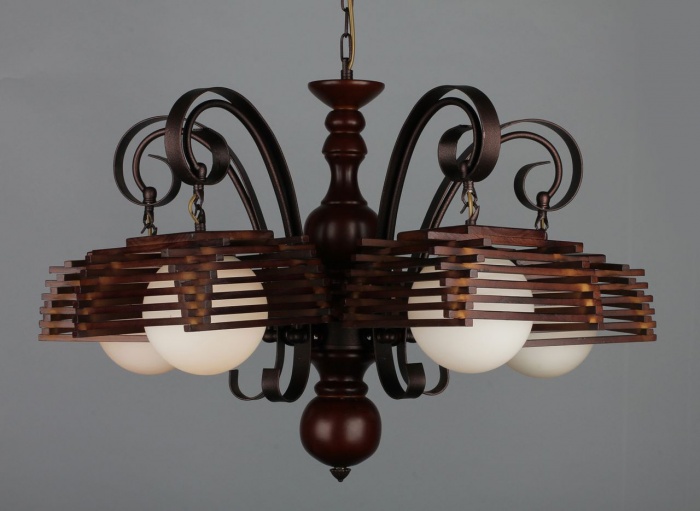
Carved and chiseled chandeliers
In the Middle Ages, chandeliers were made of metal (copper, bronze or silver) and were very expensive.. It was then that wooden carvings with a coating imitating metal appeared.

Ceiling wooden chandeliers are often made on the basis of turned products.

Details are made on a lathe, photo
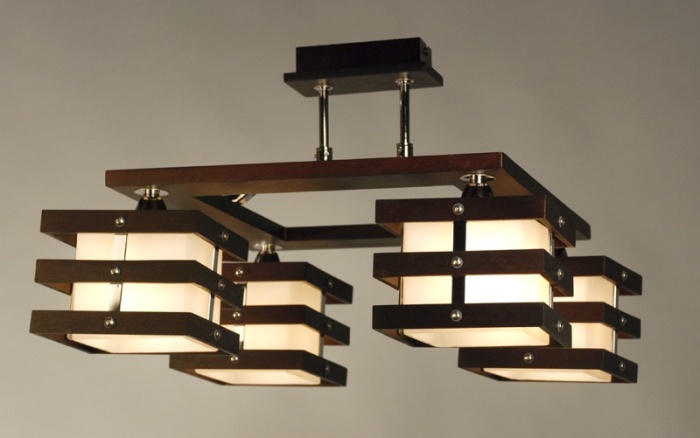
Oriental lamps
For a room decorated in Japanese or Chinese style, metal is not used in the design of wooden lamps (see). The shape is usually rectangular, and frosted glass is used instead of rice paper.
Chandeliers can be suspended or fixed to the ceiling.

In oriental style.photo

Ceiling lamp,photo
Design solutions from veneer or wooden plates
Often for making wooden products use valuable veneer or bars and plates various forms and sizes.


If you hang it from the ceiling - there will be a chandelier, photo
Wooden chandeliers can be matched to any interior style precisely because wood is a versatile material.
A kitchen with one sad but very economical light bulb in the middle of the ceiling has been waiting for its own lamp for a couple of years, which we, as usual, decided to make with our own hands. In addition to this idea, there were a couple of different ideas in my head: a lamp made of ropes or bottles, a lamp made of cups or twigs, or maybe made of veneer or clay? In short, it didn’t work out for us with the lighting of the kitchen. True, a vintage lampshade from the 60s hung over the work table.
Then, having looked at scandinavian interiors, we caught fire with branches and snags. We decided that one should definitely hang on the ceiling in the kitchen, especially since we dream of a wooden kitchen furniture. Said not done. Because finding a snag is not an easy and protracted business.
In search of a suitable tree, we wandered along the banks of several rivers (Latoritsa, Southern Bug, Zbruch, Dnieper and Desenka), roamed the forests and puzzled friends who love hiking. And then to the nearest park and right in the middle of the central alley they found their future wooden lamp:)
A long-awaited find
Satisfied with the long-awaited find, we returned home and ... were confused, because doubts piled on us. And what will it look like? “What will people say?” (ukr). But how to hang such a lamp if there is no planned kitchen furniture?
In short, our branch first became a subject of interior design and special pride, and then it was slightly shortened, because part of it went to children on a wooden lotto with animals. How so? And like this: an unknown beast began to gnaw at the branch :) I had to cut off a part, and then - it wasn’t there - they made a loto out of another piece of the branch. There was a snag left untouched by the beast, and just desired length.
A year has passed and then our beloved “The village” writes to us, they say, let's cooperate. We so wanted it! But we don’t have anything fresh and suitable for their theme. Well, in fact, I won’t do a master class for “The village” about sewing a felt giraffe :) What can we offer? Of course, the long-awaited driftwood lamp. It's mainstream and Scandinavia! We discuss this idea with the editor, she agrees and we start working on a lamp from a branch with our own hands.
Everything could be done simply and quickly, but we are not looking for easy ways, so we go back to the forest. This time we need thinner branches to make wooden cases for the cartridges in the lamp. Fortunately, we find a fallen and dried tree quickly, combining a pleasant find with a useful paddock of the younger generation.
 While the kids are sleeping...

Suitable branch
All the necessary materials for a lamp from a branch:
Large dry branch, wire, E-14 plastic cartridges, energy-saving light bulbs with a similar base, thin metal mounting cable, clips for it, dry branches with a diameter of 3.5 centimeters, small nails (about 10 pcs.), Wood screws (2 short , 1 long), square board (8 x 8 x 2 cm), white acrylic paint, acrylic lacquer, masking tape. Saw, drill (engraver), drill, soldering iron, pliers, screwdriver.

DIY kit :)
And now the process of creating a wooden lamp with your own hands:
1. We clean the remains of the bark on the branch sandpaper. Some places are left untouched to give a natural look.

Sanding the branch with sandpaper
2. We mark places on the branch for drilling holes for wires. Also, at the top of the branch, draw a line along which we will make a groove for the wire.

Marking places for drilling holes
3. We drill holes with a drill. We make a groove with a drill (engraver).

Drilling holes

Making a groove for the wire
4. We drill holes in the square board for the cable, wire and mounting screw.

Sawing and drilling a square board
5. We saw branches with a diameter of 3.5 cm into pieces 5 cm long.

Sawing blanks
6. From these blanks, using a drill and a cutter, we drill out the core for a plastic cartridge 4.5 cm deep.

We fix the workpiece

Drilling a hole for a chuck
7. In them we make holes for the wires.

Drilling a hole for the wire

Ready-made set of cases for cartridges
8. We cut off the wire of the required length, connect the cartridge to it, put the cartridge in a wooden case. Then we pass the free end of the wire into the hole on the large branch.

We collect details
9. We insert the steel cable into the holes on the branch and fix it with screws.

We fix the steel cable
10. We lay the wire along the groove, fix it with nails bent into the letter G. We solder the joints of the wires, isolate the soldering points with the help of heat-shrinkable cambric.

Soldering the wiring

Connection point for wires in heat shrink tubing

We fix the wire with L-shaped carnations
11. We process all wooden parts of the lamp with sandpaper, cover with one layer of matte acrylic lacquer. We pre-paint the square board with white paint, and then varnish it. We did this so that the wooden overlay does not stand out against the white ceiling.

Sanding and painting a square board

Varnishing a branch
12. We pass 2 ends of the steel cable and the power supply wire of the lamp into a square wooden blank. We set the desired height of the lamp with a cable, fix the cable with clamps.

Wooden chandeliers are increasingly seen in the interior of country mansions. What is the reason for such popularity of such lighting devices? Of course, first of all, it is important to note environmental safety natural wood. This useful and quality material perfect for DIY wood chandelier making.
Wooden chandeliers made of wood fill the room with pleasant and soft light, allow the owner of an apartment or house to completely relax after a busy day.
Wooden chandeliers have excellent technical and operational characteristics. Professional interior stylists note their unique wear resistance, as well as the possibility of making such lighting fixtures with their own hands.
Attention! A high-quality wooden chandelier has a fairly high cost.
It is not necessary to spend money on buying a ready-made lighting fixture, because it is quite possible to make it yourself, turning your creative ideas and original ideas into reality.
In addition, a do-it-yourself wooden chandelier is a guarantee of uniqueness and individuality.

Reasons for choosing wood for making a lamp
In our age of scientific and technological progress and innovative technologies, polymeric materials have become widespread, which pushed natural wood into the background. Despite the variety of finishing and decorative materials offered by lighting manufacturers on the modern market, interior designers do not stop using natural wood in their work.

Original wooden chandelier with your own hands, step-by-step instruction, as well as photos can be found in the video:
Natural wood has certain advantages. For example, this natural material retains its original characteristics during mechanical processing.
Advice! For relaxation, professionals recommend choosing spruce or pine for the manufacture of a wooden ceiling chandelier. Doctors recommend choosing such chandeliers made of wood for people with chronic diseases respiratory organs, as well as asthmatics.

Also among the benefits natural wood highlight the ease of processing. If desired, you can make semi-antique wooden chandeliers, a modern version, and of any degree of complexity.
When choosing a tree for decorating the interior of a living space, you can make it cozy and harmonious.
Wooden ceiling chandeliers will help to bring an accent to the room, emphasize the main idea chosen for decoration.
Advice! In order to put into practice creative fantasies, you can experiment with the selection of wood species.
For example, antique wooden chandeliers can be made from oak or larch, and modern options lighting fixtures made of pine.
Among the advantages of choosing a tree to create ceiling chandeliers, professional stylists also note the excellent combination of this decorative material with other decor options: glass, plastic, metal, fabric.
Disadvantages of wooden ceiling lights
It would seem that with such a huge number of positive characteristics, the tree should become ideal option for the manufacture of ceiling lighting fixtures. But unfortunately, even wood has some significant drawbacks that should be mentioned.
Wooden chandeliers are highly flammable as wood is not resistant to high temperatures.
Attention! It is strictly forbidden to use light bulbs in such chandeliers that will heat up during operation.
For safety reasons, professionals working with this natural material, prefer to choose fluorescent or LED lamps that cannot create fire hazards.
Among the disadvantages of ceiling wooden chandeliers used in rooms with high humidity, we single out the instability of the tree to negative influences environment: moisture, temperature fluctuations.
Ceiling lighting made of wood are exposed to insects.

Advice! To provide your ceiling lamp reliable protection From these factors, it is important to cover the finished product with a special protective impregnation.
Also among the disadvantages of choosing lighting fixtures made by hand from wood, we note their high cost. As it dries, in some cases the initial appearance ceiling chandelier.
Given all these shortcomings inherent in wooden products, you can make an original and functional lighting device that will become the pride of the owner of an apartment or house.

Work materials
To assemble the ceiling with your own hands wooden chandelier, you will need tools and materials:
- roulette;
- screwdriver and hammer;
- pencil;
- electric drill;
- hammer and pliers;
- antiseptic for processing a wooden product;
- base, light bulb, electric wire;
- decorative elements
Depending on which particular model of the lighting device will be created, this list can be supplemented with other materials and tools.
There are certain rules that must be observed when starting work related to the creation of wooden ceiling chandeliers.
First of all, you need to take care of the full processing of the material with a special antiseptic composition.

In addition, due attention must be paid to the mounting system finished product to the ceiling surface. For example, you can pick up the original metal chain so as not to be afraid that the chandelier will fall from the ceiling.
In the process of connecting a wooden lamp, it is better to use the services of a professional electrician in order to prevent emergencies.

Since ancient times, people have valued what was created by nature. In the old days, almost all household items were made from wood. And this is no coincidence. More environmentally friendly and safe material is hard to find. And the natural beauty of the unique texture impresses with its exquisite outlines. That is why modern design The interior is not complete without this valuable material. Wood can be used not only for interior decoration or for the manufacture of furniture. Wooden lighting fixtures look unique, original and inimitable, especially if they are homemade wooden lamps. Often such an element in the interior is used to emphasize a certain style. Therefore, configurations can be very diverse.
Simplicity and sophistication. Driftwood chandelier
Making a lamp out of wood with your own hands is not so difficult. Moreover, some products do not even require a special type of wood. You can even use driftwood found in the forest. Moreover, each of them has a unique shape, each of its bends is perfect, since this is a creation of nature itself. Now the main thing is not to spoil its natural beauty during processing. A lamp made of wood (snag) will become not only a source of light, but also a wonderful ceiling decoration.
Manufacturing technology
Preparatory work consists in cleaning the driftwood from bark and unusable wood, as well as in thorough drying. Then the snag is carefully polished with sandpaper. Based on the type of lamp, the necessary components are purchased. It should be remembered that wood is flammable, so a wood lamp requires the use of energy-saving lamps. Also suitable for LEDs.
In special places, holes should be drilled for wiring. On the side of the branches that will be located closer to the ceiling, you can make grooves for the wire with a narrow blade. After laying the wire, all holes must be puttied. At the ends of the driftwood, cartridges are installed on which lamps and shades are attached. The snag is attached with chains to the ceiling. All wooden elements must be varnished. Ceiling lamp made of wood is ready.
Japanese style. Desk lamp
Table lamps can be an excellent decoration of the interior. The tree is the best suited for making such a miracle. So that the work does not cause unnecessary trouble, you should prepare all the materials and tools in advance. For manufacturing, you will need a processed piece of board, square (it is desirable that the wood is the same), light veneer, wooden spikes, PVA glue, a drill with a disk nozzle. For such a lamp, a lamp with a small base is used. From electricians, a cartridge and wire are also needed.
Manufacturing process
Table lamp it is very easy to do it from wood with your own hands, especially if you have the appropriate skills.
First you need to drill holes in the corners of the wooden plank. To do this, measure one and a half centimeters from each edge and outline the squares on which the vertical bars will be installed. Holes are marked in the center of each square. If the spikes are made by hand, then their size should be adjusted to the diameter of the drill. Otherwise, the drill should be selected according to the size of the dowels. No need to drill holes through. Up to half the thickness will be enough. It is also necessary to drill holes in the bars and glue spikes there. In the center of the base board, you need to make big hole for the patron. If there are difficulties, then you can simply drill a hole for the wire. Between the holes in the base, make shallow cuts for the veneer. You also need a deep enough channel for the wire. The wire cord must be fixed in the cut. A do-it-yourself wooden table lamp is almost ready. Remained final stage- assembly. The bars are glued to the stand, the cut veneer plates are inserted into the cuts. The original wooden lamp is ready.
Lamp made of wood and coffee service

Making such an original lamp is quite simple. To do this, you need to take a suitable size board made of precious wood, pre-treated with stain and varnished. You will also need three coffee cups with saucers with holes in the bottoms (you can drill to strengthen decorative effect it is best to use thin glass cups. The wires connected to the cartridges are passed through the holes in the shades (saucers and cups) and attached to the board. All wires are brought out to that part of the board that will be hidden, connected to each other and to the main wire. This design can be mounted on the wall or hung on the ceiling with chains or a twisted cord. The variant with is more modern. But with the help of such a lamp, you can create the effect of antiquity. To do this, instead of cups and saucers, you can use clay pots, and wipe the board itself with sandpaper. Such a lamp made of wood will fit perfectly into the design of the kitchen. country house.
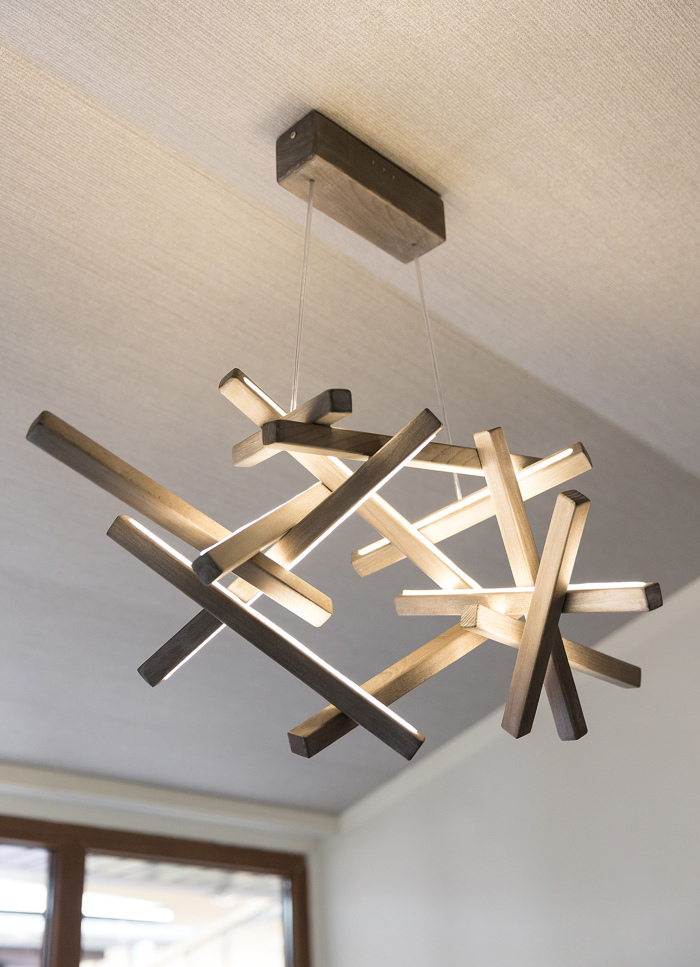
Original lamp-arrow

Dimensions are selected individually based on the characteristics of the interior. It looks quite impressive when the arrow lamp occupies the entire wall vertically. One such device is enough to completely illuminate the entire room.
When making such a miracle, fantasy is required. by the most simple solution will take a long board for the base of the arrow and several small planks for the point and plumage. All parts must first be fastened together with glue. For reliability, you can additionally connect wooden plates and screws. As a lighting element, it is best to use a street garland. Based on its size in wooden structure drill holes and insert bulbs there. On reverse side it is necessary to fix the wires well with adhesive tape and glue. It will not look very neat, but all this will be hidden when installing the lamp.
A little imagination, and you can make such original lamps from wood. Photos may give some ideas.
Plank lamp

Each carpenter has a lot of valuable wood scraps, which, as a rule, are difficult to find a use for, but you should not rush to throw them away either. You can make an unusual one from them. Moreover, you won’t need nails for this design, but such a lamp made of wood will come out. The photo cannot even convey all its beauty and spectacularity.
For the manufacture will need seventeen identical-sized boards. Multicolored and different texture boards look better. Each plank must be given a wedge shape. To attach the blades to the base, you will need wooden pins. A hole is made in the base, in which a cartridge with a wire is placed. The design is extremely simple to manufacture, but looks amazing in any interior.
Log floor lamp

A real masterpiece of LED lighting technology is quite simple to do with your own hands. Create original led lamp it is possible with the help of an ordinary log, the dimensions of which depend solely on the idea.
To make a lamp, you will need wood glue, a transparent tube, varnish for wood products, LED Strip Light, brush, hammer, saw and drill.
Manufacturing sequence
A well-cleaned and dried log must be cut into uniform rings of approximately 5 cm. A hole should be made in the center of each ring, corresponding in diameter to the tube with LEDs. She needs to be in there tight. In the lower and upper rings, holes are made at half the thickness of the log. A small hole is made in the base for the wire. Each ring is varnished. Then a tube with diodes is inserted into the holes of each of the rings.
To make an interior modern apartment or in a country house original, interesting and spectacular, you can make wooden lamps with your own hands. Photos of the most unusual specimens from branches, clothespins and others wooden elements below. There are just a huge number of options.

In order to create lamps made of wood with your own hands, you need to connect your imagination. Clothespin floor lamps are simple, cheap and original. For such a lamp, a frame made of metal rods and wooden clothespins is required. Its external outlines depend on the bending of the frame.

A chic chandelier made of branches will transform any room. Its very easy to do it yourself. Thin branches of some trees can not even be processed. The wire is drawn from the main source, winding each branch, approaches the lighting cartridge.

Having imagination and certain skills, you can independently make lamps from wood with your own hands. The photos shown in the article are only a small part of what you can think of. Moreover, wood is the most environmentally friendly material.
Original designer lamps from wood. Homemade lamps wood photo.
If you like to do everything with your own hands, we recommend to your attention a selection of the most original lamps from wood made by designers. But to make such lamps it is not at all necessary to be a designer, just look at these photos, show a little imagination and you will succeed.
Wood is a unique material that has been used for home improvement since the time of our ancestors, wood has positive energy, it is an absolutely environmentally friendly material. In this article, we will look at the most original variants making lamps out of wood.
Ceiling lamps made of wood.
Original hanging chandeliers wood lamps.


Homemade chandelier flower garden.

Chandelier ball, made of rope. To make such a chandelier, an inflated balloon is used, which is wrapped with a rope, then the rope is covered with glue, when the glue dries, the balloon is blown off and the result is such a design from which you can make a pendant lamp.


Pallet lamp. wooden pallet sawn into pieces that are used to make lamps.

original solution.

Lamp made from ordinary kitchen graters.

Woven lamps. Here, a basket is woven from a thin vine and hung from the ceiling.

Table lamps made of wood.

Night light made of wood.


