An exclusive do-it-yourself wooden chandelier will become worthy decoration interior. An unusual wooden lamp is selected according to the style of the room. The variety of ways to design lighting fixtures is amazing. It is not at all necessary to purchase expensive models of recognized design experts. original wooden chandelier it is quite possible to assemble with your own hands. The proposed ideas will make it easier to choose the shape of a wooden lamp.
Timeless classic
Massive wooden ceiling chandeliers appeared at the dawn of the 16th century. Most often, tree branches served as the main ones, the edges of which were crowned with candles. Castles of wealthy gentlemen and churches were the main area of application of original lighting fixtures at that time. But if earlier wooden chandeliers performed a purely practical function of lighting, now more attention is paid to the appearance from the standpoint of decorating the room.
The emergence of new practical materials and the development of technology has not weakened the interest in natural sources. The tendency to take care of the environmental friendliness of surrounding objects and one's own health is one of the reasons for the growing popularity of wooden chandeliers.
Attention! A variety of forms of execution of wooden lamps allows them to be used not only in traditional rustic styles, but harmoniously introduced into more modern interior trends.

Antique wooden chandeliers are still relevant for country and chalets. Adherents of a brutal interior can easily assemble a simple chandelier with their own hands, where a powerful frame acts as a frame. wooden beam. For lovers of original configurations, designers have prepared a lot interesting ideas, and many ideas can be realized independently.
The concern about the high cost of a chandelier is justified only when choosing complex configurations, where jewelry work is required to process an array or additional expensive materials are present. In most cases, the price is in the budget category.
A variety of wooden chandeliers are shown in the photo:


Advantages and disadvantages of wooden lamps
A wooden lamp is always stylish. Buying a ready-made model is not difficult. But if a decision is made to decorate a wooden chandelier with your own hands, it is better to familiarize yourself with all the positive and negative aspects of such a choice in advance.
Main advantages:


Numerous advantages of chandeliers are overshadowed by some disadvantages:
- Initially, the tree belongs to flammable materials, therefore, it needs special processing. Protection with fire retardants and insecticides will prevent ignition of the lighting fixture or damage to the frame by insects.
- If you want to do it yourself or buy a chandelier made of oak or mahogany, you will have to part with a large sum.
- The use of insufficiently dried wooden blanks in work or poor-quality pre-treatment of the material will lead to deformation of the chandelier.
- Even though reliable protection, the use of wooden lamps in rooms with a high level of humidity is undesirable.
Attention! When designing a lighting fixture, you should consider in advance the type of lamps used. For these purposes, LED spotlights are optimally suited or fluorescent lamps that are not prone to heat.
Wooden ceiling chandeliers of various models are shown in the photo:


Antique chandeliers
Antique wooden lamps can be conditionally divided into groups according to the category of complexity. Some are presented simple forms and are available for making with your own hands, even for novice craftsmen. Others are complex and require specific woodworking skills and special processing tools.
Studying a wide model range will give an idea of the possible options for decorating a room with a wooden chandelier.

Simple geometric shapes, connected by chains and decorated with spotlights, are quite within the power to assemble on your own. The deliberate roughness of a wooden chandelier will look relevant in a rustic hut, a simple country house.

Another original wooden chandelier model showing simplicity rustic style. The zest of the lamp is given by light ropes, contrasting in color with dark wood. The configuration is ideal for do-it-yourself assembly. A suitable entourage for such a lamp is a country-style interior.

Another example of a laconic chandelier made of wood, which does not require significant effort to self-manufacturing. A pair of bars, a small piece of chain and 4 LED lamps s - and the main part of the kit is already at hand.

Artificially created contrasting veins are part of the designer's intention. You can assemble a similar model of a wooden chandelier in one weekend. The only thing you should take care of in advance is to find suitable shades, classic glass will not be appropriate here.

Working on numerous planks of plafonds can take a lot of time and effort, therefore, with insufficient experience, it is better to purchase such a wooden lamp in finished form.

The chandelier, where wood, metal and glass are harmoniously combined, invisibly plunges you into the atmosphere of the Middle Ages, where you can meet a knight in armor along the dark corridors. This lamp will fit perfectly into the interior of a spacious living room. country house or a cafe where the theme of antiquity is interestingly beaten.
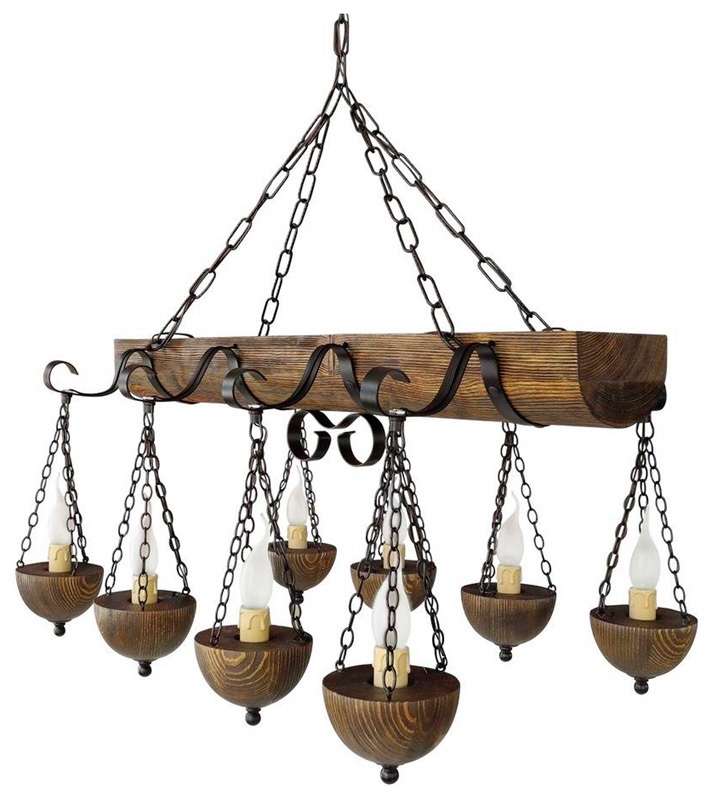
Candle-shaped lamps most closely match the theme of antiquity. A ceiling chandelier made of wood with numerous hanging elements is able to dispel the darkness even in a large room. If you have experience working with metal, you can assemble a similar wooden model with your own hands.

Another example of the designer's original idea, where everyday objects become an accent element of the interior. hunting lodge or village tavern - appropriate place for a non-trivial chandelier made of wood.
Comment! Similar wooden models on chains are best hung in rooms with high ceilings. standard height 2.5 m will not be enough.

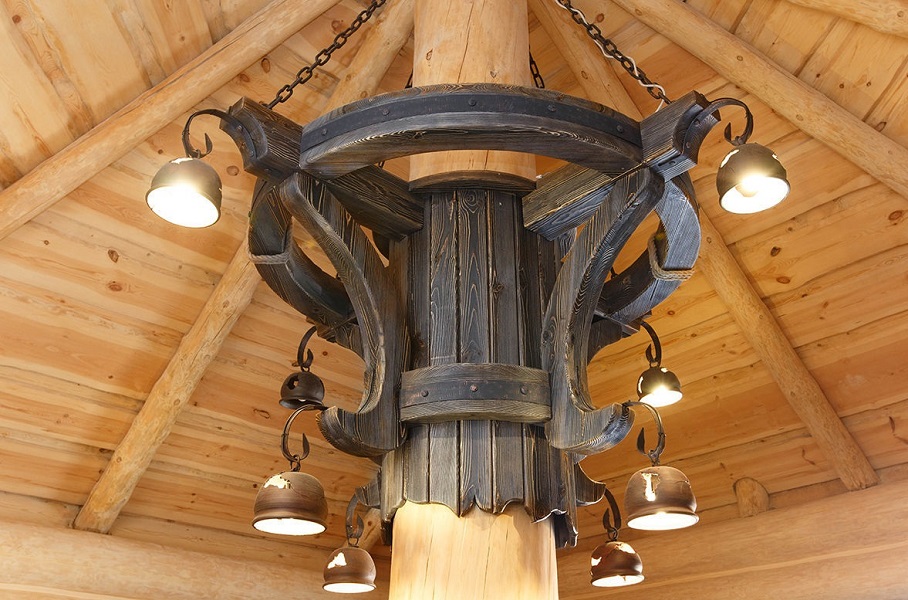
Peculiar torches are another easy way to find yourself in a medieval setting. The decoration of the wooden lamp with metal and candle-shaped lamps fully correspond to the idea of antiquity.

The wooden chandelier, where the frame resembles the steering wheel of a ship, looks more sophisticated than previous examples. Similar model from a tree will harmoniously fit into an interior with the Mediterranean style. It will be difficult to translate the idea into reality with your own hands due to the presence small parts and glass shades.

It will be possible to master the manufacture of such a chandelier made of wood experienced craftsmen. The lamp is ideal for an interior where eco-style dominates.

The horns of wild animals as the frame of a wooden chandelier - what could be more interesting. It will be difficult to find such a basis, so it is better to satisfy the vending idea with a finished copy of the lamp.

The section of semi-antique wood chandeliers is completed with a photo of a kind of combined copy of the two previously presented models.
Original design ideas
Country, chalet, eco style - not all areas where wooden lamps are applicable. The Art Nouveau interior often includes non-trivial solutions to familiar household items. This tradition extends primarily to chandeliers.
Each individual will determine the place and suitable design for the original models presented below.

The laconic outlines of a wooden chandelier topped with LED lamps along the edges of the branches are optimally suited for an interior where minimalism and functionality are at the forefront.

The complex-looking geometry of the next wooden lamp is quite simple to do with your own hands. LED lamps and bars corresponding to them in length are the main details of a non-standard wooden chandelier.

Another example of a concise and at the same time original form of a lighting fixture made of wood. Here you will need to prepare in advance the grooves in the wooden planks for laying the electrical cable. Lamps of a different shape give a completely different perception of the chandelier than in the previous sample. The undoubted advantage of both wooden models, which can be easily assembled with your own hands, is the ability to illuminate a large space around, so they are ideal for arranging a terrace or gazebo.
Another wooden copy designed for outdoor use. The unusual shape of a wooden chandelier is fixed on a pole and provides full illumination of the surrounding area.

A real wooden masterpiece, appropriately complemented by glass inserts, will adequately decorate the most presentable interior. Scandinavian style or another eco-friendly direction will organically perceive a sophisticated wooden chandelier.
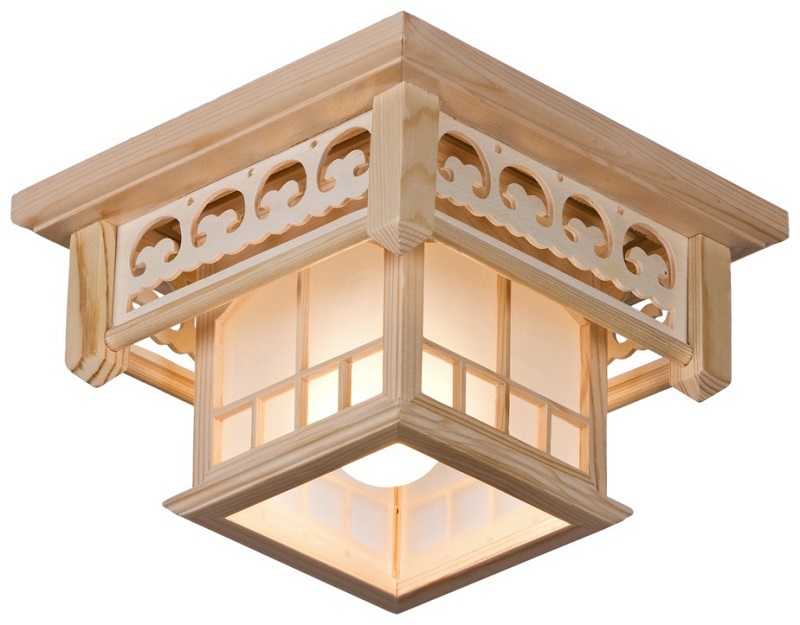
An identical model of a smaller luminaire is suitable for the interior of a small-sized room. It can be a kitchen or a children's room.

Returning to the topic of geometry, I would like to present another uncomplicated and at the same time interesting copy of a wooden chandelier, which is not difficult to assemble with your own hands.

An unusual combination of an openwork base, complemented by matte shades. Such a chandelier made of wood and glass will not go unnoticed and will successfully act as an accent element of the interior.

The lamp made of metal and wood is highly functional due to the ability to adjust the direction of the light fluxes. The idea is difficult to execute with your own hands, so it’s better to stop at buying a finished copy.
DIY wooden masterpieces
To assemble a wooden chandelier with your own hands, experience with wood will not be enough. You will need some basic electrical knowledge. You can take a ready-made model from wood as a basis or develop your own original design. Depending on the ability to handle metal, they select only a wooden lamp or a lighting fixture, complemented by metal elements. The photo gallery will once again demonstrate possible options DIY wooden chandeliers.


Wooden chandeliers are a stylish interior element that is suitable not only for rustic design trends with a national flavor, but also modern ideas decoration of the premises. Country and chalet, Scandinavian and eco style, modern and loft - for each style you can choose successful model wooden lamp.
Modern interior design is not only about properly placed stylish furniture And color scheme, which prevails in the premises, but also in competent lighting. Lighting devices allow you to focus on certain areas of the room, visually enlarge the space, or, conversely, give the bedroom or living room more comfort and warmth.

Today, crystal wall sconces are no longer a sign of wealth and luxury, but wooden lamps are actively regaining their former popularity. Few people know that in the 16th century it was structures made of trees that were installed in temples, palaces and houses of wealthy officials. Of course, there was no LED lighting in those days, and instead of energy-saving lamps, the rooms were lit with candles placed on wooden branches.
In 2010, a tornado hit New York, leaving behind mountains of broken branches and fallen trees. Young designers Harris Hine and Amily Visclocky wanted to bring the subject to public attention by creating lamps from found driftwood, but instead revived a long-forgotten style. Thanks to this idea, more people began to engage in such know-how and you, too, can easily create unique bras ( Wall lights) by hand. Photos of ready-made and interesting lighting fixtures can be found in huge quantities on the Internet, but we will announce some of the features of such designs further.
Advantages and disadvantages of wooden sconces
Beyond Stylish appearance, such lamps can be safely called environmentally friendly. Not only does the tree not exude any harmful substances, but, on the contrary, it will saturate the air of the room with useful aromatic resins that make breathing easier. Another plus is the ease of processing the material. If for the production of plastic and metal structures If special equipment is used, then a wooden lamp will require tools that are in almost every home.
Wood is strong and durable, especially if it is treated with special impregnations.


If we talk about the shortcomings of such structures, then you should pay attention to the following nuances:
- The tree burns excellently, so the use of incandescent lamps in such designs is not recommended. Otherwise, the contact in the lamp socket may burn out and the entire lamp will flash in a matter of seconds.
- Insects actively attack such lighting products.
- Wood is a hygroscopic material. This means that it accumulates and absorbs moisture well. So that the structure does not deform and serve for many years, it is better to use such a lamp at a constant temperature and humidity. Based on this, you can hang a sconce over the bed in the bedroom, but you can install such lighting in the kitchen or bathroom is not recommended.
Healthy! Cedar is the most moisture-resistant breed, and additional processing with special solutions will give it even more resistance to temperature extremes and moisture.

As you can see, before working with wood, it is necessary to prepare a project for the future lamp and calculate it in such a way that the lamps are located at a distance from the tree. Consider several options for such sconces and ceiling chandeliers.
Wooden design options
The sconces in the interior of the living room, the photos of which are presented in the article, look very cozy and homely. For this room, you can create a very stylish lamp that can be mounted on the wall or used as a table night light.
One of the options for creating a lamp is a sconce made of wood and a broken water pump. The resulting result looks very stylish and will suit design lovers, in which there are unusual devices that are not used for their intended purpose.
An unusual lamp will turn out from the floor of a dried tree trunk, covered with varnish, and pieces of colored crystal glued to it. Such a lighting device can be hung horizontally, vertically or used as a floor lamp-night light.
A stylish Chinese lantern can be made from a broken lamp, bamboo, and coconut fiber rope. It's pretty simple design which looks very impressive both in the house and on the porch or in the gazebo. By attaching a wooden hook to bamboo, you get a multifunctional sconce on which you can hang plants.
You can make a wall sconce made of wood with your own hands very simply. To do this, you will need a wooden plank, which can be given any shape. A kind of stick will be attached to it, on which the lamp will be placed. It will require sticks of the same diameter and length, which we will fold according to the principle of a wooden well or house, which children usually fold from pencils. The result is an unusual lamp, as if from old fairy tales.
A creative lamp can be made from a pine branch, a garland and a cornice holder. Such a device is also multifunctional, since you can hang jewelry, scarves and much more on the branches. The garland bulbs do not heat up, so such a sconce will not light up, and no skills in conducting electricity are required to create it.
A wall lamp for a nursery can be made from a wooden plank in the shape of a cloud and LED lamps. The resulting night light looks very nice on the wall, as the light is scattered as if from under a cloud.
By connecting your imagination, you can make very creative lamp for a country house, apartment or garden. You can use everything that, as it seemed to you, has not been used for many years and is practically preparing for a “ejection”.
What to look for when creating a lamp
- Always wear a face shield when sawing wood. Sawdust can cause an allergic reaction.
- If there is only one light bulb in the lamp, then two wires will go from it. The phase is connected to the switch, from which the conductor will go to the introductory phase. Zero ( of blue color) connects immediately to the leading zero.
- If there are 2 or more lamps in the lamp, then there will be more wires, and the connection principle will remain the same.
The optimal location of the sconce depends on the type of room, for example:
- The height of the sconce above the bed in the bedroom should be 1.2-1.6 meters from the floor.
- In the nursery, it is better to position the lamp so that the child cannot reach the light bulb.
- In the corridor it is recommended to place at a height of 2 meters from the floor. If the ceilings are low, then you can hang the sconces lower - at a distance of 1.8 meters.
- Optimal Height the location of the sconce for the living room is 1.3-1.4 meters from the floor.
In custody
As you can see, you can make an unusual lamp for a room from ordinary objects. As a result, you will get an exclusive and stylish interior element that will cost you a penny, and will look much more interesting than an expensive metal chandelier.
Surprisingly combining style and closeness to nature, wooden chandeliers are timeless.
Loft-style wooden chandelier with many light bulbs
Lamps made of natural wood, accompanied by hanging decorative elements made of ceramics, metal and colored glass, have always been in fashion, no one writes them off as designer junk. It’s just that they have always belonged to expensive furnishings, and invariably decorate exclusive interiors that not everyone can afford.

Designer lamps made of wood
About incompatibility
Imagine an eight-arm carved solid oak chandelier with wrought iron candelabra hanging from a long chain in a cramped living room. panel house and everything will fall into place.
If you still want to decorate your interior with such a wooden chandelier, then let it be smaller, but conciseness and style will remain.

Chandelier made of wood in the form of horns 
Wooden table lamp 
Table wooden lamp 
Long wooden chandelier 
Wooden floor lamp 
Wooden chandelier in the interior
Elite light source
Wooden lamps from a valuable array are not produced in large batches, they are unique and most often handmade products.
Their high cost reflects the uniqueness of the look. They are among elite sources light, suspended wooden ceiling chandeliers are often made in a single copy, often they are complemented by forged metal elements.

Pyramid-shaped wooden table lamp with lampshade
Hidden behind the traditional wood and metal decor of the chandeliers are modern LED light sources. The incredible possibilities of LED technology and electronic control the lighting system is even hard to imagine until you see them with your own eyes.

Table lamp made of wood 
Chandelier made of wooden sheets 
Wooden table lamp 
Chandelier with wooden lampshade 
Unusual table lamps wooden
Author's design
Such author's design works are considered works of art. They are created by artists on individual orders under certain interior, considering unique color and the size of the future product. Craftsmen who design lamps know how to work with wood, make forged metal parts, cook glass for stained-glass chandeliers, mold and fire ceramic decorations.

Unusual wooden table lamp
As a rule, they design and manufacture not only hanging wooden chandeliers, but also the whole range of exclusive lighting fixtures for a specific interior: wooden lamps for wall mounting, table and floor lamps, spotlights, as well as street sconces for lighting effects in landscape design on territory of the customer site. They are developing different types decorative ceiling and wall lamps for the kitchen and bedroom, nursery and living room, hallway and garden porch, but all lamps carry the same design style.

Stylish bright wooden chandelier 
Cone-shaped chandeliers with wooden inserts 
Sconce with wood decor 
Unusual stump lamps 
Small table lamp made of wood and metal
familiar environment
Incredibly high ceilings wooden beams, spacious room, large floor vases, wall tapestries, heavy carved furniture, large dining tables, wicker rattan chairs by the fireplace - this is the environment in which natural wood chandeliers will look as natural and organic as possible.

Wooden table lamp with fabric shade
Here, vintage wooden sconces with bronze inserts, and even wall-mounted stylish LED spotlights made of wood, directing narrow beams to original stained-glass windows, will find their place.

Wooden table lamp in the shape of a man 
Wooden table lamp with glow-in-the-dark material 
Round wooden chandelier 
Traditional style wood sconce 
Stylish sconce made of wood and metal 
Fashionable wood and metal chandelier
In harmony with the style of the interior
Of course, wooden chandeliers are not so arrogant as to illuminate only the fireplace halls and prim living rooms in the castles of aristocrats and the estates of the rich. After all, they once got there from the huts of ordinary peasants and artisans.

Wood cut table lamp
There are several styles of interior design in which wooden lamps fit easily and naturally. Here are the most popular:
- Country (Anglo-American country)
- Provence (French countryside)
- Oriental styles (China, Japan, Korea)
- Chalet (simplicity of an alpine house)
- Rustic (deliberate, sly roughness of furnishings)
- Modern ( chic style the end of the century before last with an antique touch)

Table lamp made of wood and metal
All these styles, born on different continents and in a specific cultural environment, are different in their own way. But they are united by the simplicity of forms, the predominance in interior decor. wooden elements, fabrics, ceramics, stone, creating genuine and natural environmental friendliness.

Black table lamp made of wood
In such interiors, large suspended wooden ceiling chandeliers look natural and emphasize them favorably. The wall will be decorated with sconces made of a translucent cut of resinous cedar, the headboards of the beds will be illuminated by forged floor lamps with carved inserts, original desk lamp from unusual driftwood are perfectly appropriate on the desktop, and elegant fabric lampshades will give soft light in the bedroom.

Wooden floor lamp
Brown-beige, white and pastel colors are easily combined with wooden lamps, forged elements of lighting fittings, reflections of colored glass of shades and lampshades.

Table dark lamp made of wood 
Suspended chandelier made of wood, metal and glass
The deceptive simplicity of Provence and country
Provence, like country, professes simplicity and warm rustic comfort. It fills the house with the smell of the forest and a relaxing atmosphere.
But Provence is not so simple. This is the style of significant details. A well-crafted solid wood is often used as a suspended ceiling chandelier, revealing the wonderful texture of wood. Horns for lamps are also made of wood, they can be covered with woven lampshades to match the decor.

Unusual wooden lamp
Spotlights made of polished birch chaga with miniature LEDs look great. Their natural charm lies in the fact that each chaga has a unique shape placed on wooden wall, it seems like a natural growth until it gives up its secret at the flip of a switch.
Wonderful material for decorating chandeliers - the bases of old fruit trees. Where the roots meet the trunk, the wood exhibits amazing patterns. When creating unique products, this part of the tree is also used. Particularly valuable and beautiful cuts give an array of walnut, chestnut, cherry, Karelian birch, white wood of ash and acacia.

Table lamp made of wood and fabric 
Wood sconce
Chalet: mountain hut
The chalet does not focus on the elegant details of Provence. The rough, often uneven forms of solid wood adopted in this style turn the most ordinary things into suspended ceiling chandeliers: old barrels and ladders, beehives, baskets for vegetables, or just a log peeled from the bark.
Horns for LEDs in a rustic and unpretentious chalet style are made from real horns. They are supplied with lampshades and fixed on the wall as a sconce, with built-in optics, horns and fancy rhizomes serve as spotlights.

Wooden chandelier in the shape of horns in the interior of the bathroom
A room with a large fireplace, indispensable for an alpine house, can be illuminated by lamps, which are shaped like torches on the wall.
The rustic style is in many ways indistinguishable from the chalet style, and yet it even more frankly neglects smoothed forms. Here, the wood of the lamps is deliberately treated roughly, and may turn out to be completely unprocessed.

Simple wooden table lamp 
Wooden chandelier in medieval style
Eastern philosophy of grace
The popular style of interiors with an oriental accent involves not only chiseled wooden chandeliers, but thin carved details of wooden wall lamps. Here we use vine, rattan, bamboo, thin metal and even palm bark, resembling fur.
From this variety of natural decorative materials lampshades of table lamps, floor lamps, ceiling chandeliers can be skillfully woven.

Wooden chandelier in a marine style
In interiors with an oriental touch, graceful chandeliers made of bent solid wood, forged and cast metal with painted faience shades are very beautiful.
No less intriguing are lamps made of wood and rattan, woven into spherical shades, fragile in appearance and durable in use.

Designer wooden chandelier 
Wooden chandelier with nautical fabric lampshades
retro beauty
Such retro lamps are in demand in modern interior design.
Art Nouveau was offered to European society by young bohemian artists at the end of the 19th century. It was an explosion of ideas, a reaction to amazing progress. Edison had just invented the electric light bulb and launched the world's first power station near New York. With the advent of electric lighting and lighting devices required modernization.

Rectangular wooden chandelier in medieval style
Ceiling chandeliers, table lamps and wall lamps took on new futuristic forms.
This is the atmosphere that modern style brings to the interior. Under the ceiling, it is illuminated by an old wooden chandelier.

Unusual wooden chandelier
Only in her forged chandeliers do not burn candles, which the founders of modernity managed to abandon, but electric lamps, for which the then designers had not yet managed to come up with a worthy outer shell.

Table lamp made of stone and wood
Rustic chic in the apartment
You should not think that beautiful interiors with wooden chandeliers and lamps are available exclusively for decorating spacious country estates.
They can decorate city apartment. See how much good examples apartment interiors using wooden lamps are on the Web. The style close to Provence and country is especially popular.

Original wooden pendant lamp
Light, but massive-looking false beams, fixed on the ceiling, will instantly make the room more comfortable. A few more design tricks will give the apartment a rustic touch.
But do not forget to pick up the main element of the interior - a wonderful wooden chandelier. It will fit into almost any style, because the tree can be given any shape in the manufacture of the lamp.

Pendant lamp with wood insert 
Creative wooden chandelier 
Small chandelier in loft style 
Large wooden chandelier
Photo gallery (50 photos)
Overall dimensions of the lamp, mm: 337x559x419 (width x depth x height)
Form the base
Free-form base details give good opportunity to practice building contours using the method of increasing on a scale grid, since these details must first of all look expressive, and the accuracy of sizing in this case is not very important.
1. Enlarge all templates to the specified sizes. From 19 mm material, cut out two blanks for base A and one bracket B. From 10 mm boards, make two blanks for racks C. Fasten the blanks of the base and racks in pairs with double-sided tape.
2. Use spray adhesive to attach the paper templates to the blanks. Mark the center of a 6mm hole on one of the C posts with an awl. Save the 19mm offcut to make spacer D shown in fig. 1.
3. Now remove the templates, separate and sand the parts. Planing or grinding  align the edges of the halves of the base A, which will be glued together. Mill lamellar nests in both edges and glue the base, squeezing the parts with your hands for several minutes, until the glue begins to set; then gently place the sticker on flat surface for drying. When the glue is completely dry, sand parts A, B and C sandpaper № 220.
Note. When sanding the C-pillars, keep the center of the hole marked earlier. If necessary, deepen the hole with an awl.
4. Take the cut saved for the D spacer and transfer the contours of the C-pillars to it (photo A). Then mark the height according to the dimensions shown in fig. 1. File the height spacer and sand the top and bottom edges. Apply glue between the lines on both sides of the spacer (photo B) and clamp the part between the posts, aligning it with the marked contour lines.
Note. When gluing the posts, make sure that the marked center of the hole is located on the outside of the gluing.
When the glue dries, saw off the protruding parts and sand the spacer flush with the edges of the uprights.
5. Stick a piece of double-sided tape on the bottom edge of the C / D gluing and attach it to the base A (photo C). Do the same with bracket B, aligning it with the center of the hole in the uprights (photo D). Then drill and countersink pilot holes through the base and secure the B/C/D assembly with screws as shown.
6. Drill a 6mm hole through the posts and bracket at the marked point (photo E) and glue the dowel into the hole. When the glue is dry, cut off the protruding ends of the dowel and sand flush with the surfaces of the C-pillars.
Unscrew the screws from the base, separate the bracket with the uprights and remove the adhesive tape. Then reattach the assembly to the base with screws and some glue.
 Make a wooden lampshade
We made a lampshade using two devices: a circular (for band saw) and milling (described in the "Advice of the master").
1. Using a compass, mark a center and a circle with a diameter of 158 mm on a 6 mm board. Drill a 3mm hole in the center, cut out the disc and sand the edges. Mill an annular groove on the underside of disc E,.
2. For shell F, saw off a strip 1 mm thick from the edge of the workpiece with dimensions of 25x32x485 mm.
Note. Install a splinter guard in the saw table and saw off the strip from the outside to avoid dangerous kickback.
Sand the strip and cut it to the final length.
3. Mark the line where the ends of the strip overlap. Then glue the shell F (photos F and G). When the glue is dry, gently sand the outside of the piece to make the overlapped edge invisible. Glue the shell to disc E (photo H) and leave to dry.
4. Countersink the hole with inside disc E and screw the lampshade to bracket B. Apply any finish. (We sprayed semi-gloss nitro varnish from an aerosol can three times.)
The compact LED light with magnetic base is easy to install and provides easy access for changing batteries. Secure the mounting plate with small pan head screws. Then just insert the batteries and turn on the lamp to make the world a little brighter.
Do-it-yourself wooden table lamp - drawings
 Born pretty ки Ð´Ð»Ñ Ð½Ð¾Ð³Ñей Ð³Ñ Ð°Ð´Ð¸ÐµÐ½Ñ Ð¾ÐºÑÐ½Ð°Ð½Ð¸Ñ Ð±Ð»ÐµÑк…
A kitchen with one sad but very economical light bulb in the middle of the ceiling has been waiting for its own lamp for a couple of years, which we, as usual, decided to make with our own hands. In addition to this idea, there were a couple of different ideas in my head: a lamp made of ropes or bottles, a lamp made of cups or twigs, or maybe made of veneer or clay? In short, it didn’t work out for us with the lighting of the kitchen. True, a vintage lampshade from the 60s hung over the work table.
Then, having looked at scandinavian interiors, we caught fire with branches and snags. We decided that one should definitely hang on the ceiling in the kitchen, especially since we dream of a wooden kitchen furniture. Said not done. Because finding a snag is not an easy and protracted business.
In search of a suitable tree, we wandered along the banks of several rivers (Latoritsa, Southern Bug, Zbruch, Dnieper and Desenka), roamed the forests and puzzled friends who love hiking. And then to the nearest park and right in the middle of the central alley we found our future wooden lamp :)
A long-awaited find
Satisfied with the long-awaited find, we returned home and ... were confused, because doubts piled on us. And what will it look like? “What will people say?” (ukr). But how to hang such a lamp if there is no planned kitchen furniture?
In short, our branch first became a subject of interior design and special pride, and then it was slightly shortened, because part of it went to children on a wooden lotto with animals. How so? And like this: an unknown beast began to gnaw at the branch :) I had to cut off a part, and then - it wasn’t there - they made a loto out of another piece of the branch. There was a snag left untouched by the beast, and just desired length.
A year has passed and then our beloved “The village” writes to us, they say, let's cooperate. We so wanted it! But we don’t have anything fresh and suitable for their theme. Well, in fact, I won’t do a master class for “The village” about sewing a felt giraffe :) What can we offer? Of course, the long-awaited driftwood lamp. It's mainstream and Scandinavia! We discuss this idea with the editor, she agrees and we start working on a lamp from a branch with our own hands.
Everything could be done simply and quickly, but we are not looking for easy ways, so we go back to the forest. This time we need thinner branches to make wooden cases for the cartridges in the lamp. Fortunately, we find a fallen and dried tree quickly, combining a pleasant find with a useful paddock of the younger generation.
 While the kids are sleeping...

Suitable branch
All the necessary materials for a lamp from a branch:
Large dry branch, wire, E-14 plastic cartridges, energy-saving light bulbs with a similar base, thin metal mounting cable, clips for it, dry branches with a diameter of 3.5 centimeters, small nails (about 10 pcs.), Wood screws (2 short , 1 long), square board (8 x 8 x 2 cm), white acrylic paint, acrylic lacquer, masking tape. Saw, drill (engraver), drill, soldering iron, pliers, screwdriver.

DIY kit :)
And now the process of creating a wooden lamp with your own hands:
1. We clean the remains of the bark on the branch with sandpaper. Some places are left untouched to give a natural look.

Sanding the branch with sandpaper
2. We mark places on the branch for drilling holes for wires. Also, at the top of the branch, draw a line along which we will make a groove for the wire.

Marking places for drilling holes
3. We drill holes with a drill. We make a groove with a drill (engraver).

Drilling holes

Making a groove for the wire
4. We drill holes in the square board for the cable, wire and mounting screw.

Sawing and drilling a square board
5. We saw branches with a diameter of 3.5 cm into pieces 5 cm long.

Sawing blanks
6. From these blanks, using a drill and a cutter, we drill out the core for a plastic cartridge 4.5 cm deep.

We fix the workpiece

Drilling a hole for a chuck
7. In them we make holes for the wires.

Drilling a hole for the wire

Ready-made set of cases for cartridges
8. We cut off the wire of the required length, connect the cartridge to it, put the cartridge in a wooden case. Then we pass the free end of the wire into the hole on the large branch.

We collect details
9. We insert the steel cable into the holes on the branch and fix it with screws.

We fix the steel cable
10. We lay the wire along the groove, fix it with nails bent into the letter G. We solder the joints of the wires, isolate the soldering points with the help of heat-shrinkable cambric.

Soldering the wiring
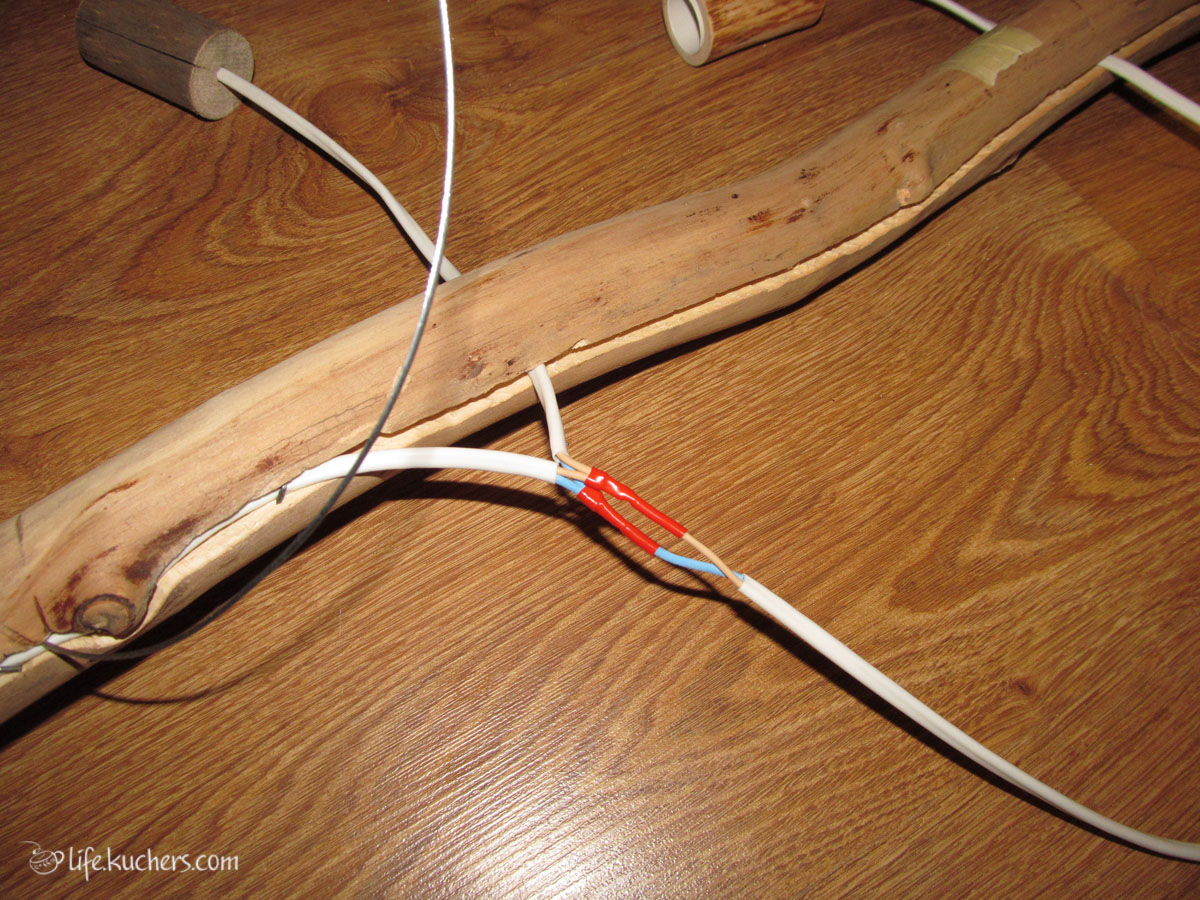
Connection point for wires in heat shrink tubing

We fix the wire with L-shaped carnations
11. All wooden details We process the lamp with sandpaper, cover it with one layer of matte acrylic lacquer. We pre-paint the square board with white paint, and then varnish it. We did this so that the wooden overlay does not stand out against the white ceiling.

Sanding and painting a square board

Varnishing a branch
12. We pass 2 ends of the steel cable and the power supply wire of the lamp into a square wooden blank. We set the desired height of the lamp with a cable, fix the cable with clamps.


