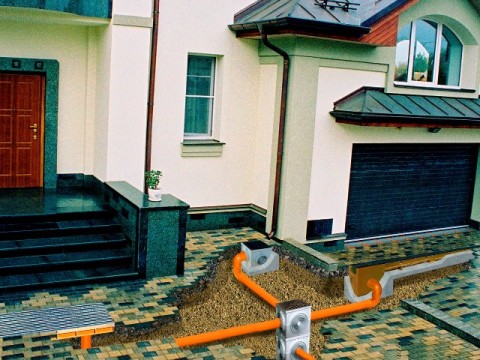
A clean and dry yard after rain, no puddles on the lawn and no washed-out beds, healthy plants and perfectly smooth paths are the result of competent planning and installation of surface drainage. It is difficult to achieve such a result on your own without impressive expenses, but it is realistic if you make storm drainage with your own hands to drain the surface and remove rainwater. In combination with a storm drain (a system for draining water from the roof), the drainage network will also reduce the amount of moisture penetrating into the deep layers of the soil - the load on the deep foundation drainage network will decrease.
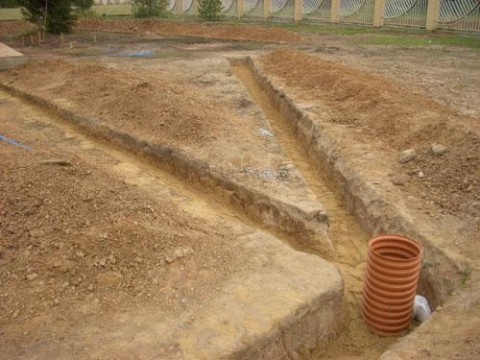
It is worth planning the layout of drainage networks and storm water even before the start of construction. Foundation protection in the form of a wall system is easier to install if the foundation pit is not filled up. While the construction is going on and there is equipment on the site, it is advisable to order the digging of trenches so as not to dig manually and not to carry dirt in the improved area. Protection against melt and rain water is:

Stormwater and drainage around the perimeter of the house
- Surface linear storm drainage - collection and drainage of rainwater from the ground surface.
- Storm sewer - drainage of water flowing down drainpipes.
- Point drainage - drainage of local areas with problematic natural outflow.

Scheme for removing moisture from the surface: drainage system
Storm sewer network
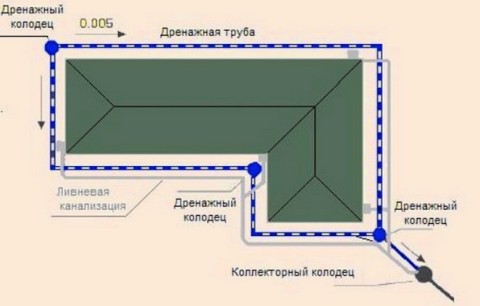
Storm water sewer network it is equipped with an output to a common highway, if there is a collector or city stormwater pipe nearby. In the case when the branches of the city network are located at a great distance, the output of the local drainage system and storm sewer organized in 2 ways: to the filtration field (a section covered with crushed stone to remove moisture into the soil), or to a receiving tank (drainage well, pond, roadside ditch). Drainage from a private storm drain into a common household sewer system prohibited.
System elements:
- Drainage gutters that are mounted along the edge of the roof slopes.
- Water pipes.
- Water intake tanks.
Receiving tank with outlet
- External sewer pipes that are connected to water intake tanks.
The containers are mounted under the outlet of the drainpipe, the pipe is connected to the sewer pipe. Pipes are dug in at an angle to the drain.
Drainage: features of a surface storm system
The drainage system of the surface of the site consists of point and linear branch branches connected into one network with an outlet to the water intake. Storm drainage on the site is equipped in the form of open channels, dug under a slope to the drain site. Marking is performed only after studying the direction of natural outflow during heavy rain. Be sure to form drainage lines:
Drainage network: point catchers and storm trenches
- Along the perimeter of the site.
- On slopes and on sites in natural depressions.
Drainage branches on the slope
- Around the tracks.
Storm drainage around the house is a line of trenches laid along the blind area around the entire perimeter of the buildings. To drain the tiled yard, channels are formed at the entrance to the garage, near the porch, steps.
Point drainage outlets are dug in in places where there is no need to lay drainage channels: under watering taps, near the outlet of downpipes (in areas where there is no storm sewer). Drainage from point drainage wells is discharged into the outlet pipe of the general surface network.
Integration: is it possible to combine storm water with a drainage network
Two separate networks: drainage and storm water
The optimal scheme for draining the site with the house is separate drainage and stormwater networks around the house. It is undesirable to connect linear channels with sewers: during heavy rains or rapid snow melting, one pipe may not be able to cope and overflow through water inlets will occur.
It is advisable to connect stormwater and drainage in one trench only in one case: if the trench is dug under the outlet from the point drainage and sewer rather than perforated pipes are used. The pipes are laid parallel along the bottom of the concreted trench. Lay hermetic sewer pipe it is impossible to enter a channel with drainage backfill: the diameter of the pipe will reduce the usable volume of the ditch and create difficulties in cleaning the trench.

General outlet of point drainage and storm water to the filtration tunnel
Instead of trying to connect stormwater and linear drainage in one pipe, it is better to make a common receiver, especially if you cannot make a tie-in into a city highway. Rainwater can be used to irrigate or fill artificial reservoirs. Set as a receiver plastic tanks, or make wells without a bottom - to drain the incoming liquid into the ground.
How to make storm drainage of the site and around a country house
Storm drainage is a surface system that does not require bulk earthworks and digging deep trenches, so you can do a simple wiring with your own hands. Before starting work, the places of mandatory arrangement of lines and water collection points are determined, and the drainage trajectory is planned. It is possible to detect all places where natural outflow is not enough during heavy rainfall and after the snow melts. It also requires the installation of a branched linear storm drainage area with clayey, moisture-saturated soil that does not absorb water from the surface.
For preliminary calculations quantities necessary materials it is worth drawing a diagram of the channels on the site plan.
Storm drain installation plan
Materials: what you need to install a storm drainage network
List of materials needed for independent device storm drainage of the site and installation of the system around the perimeter of the house:
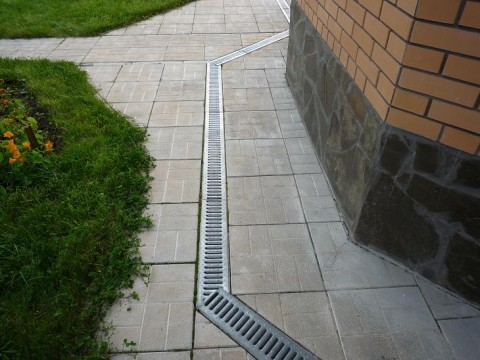
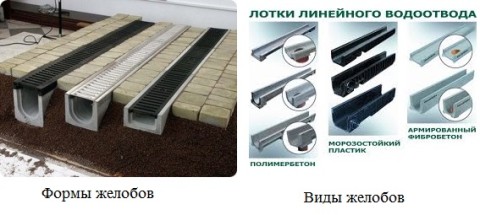
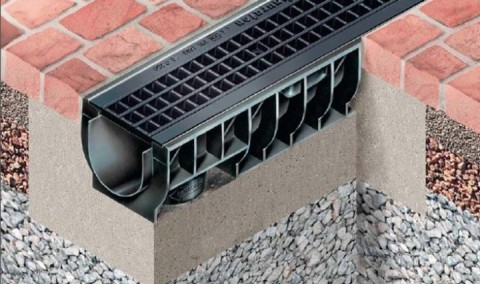
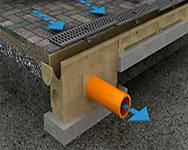
- Trays (gutters) for installation around the foundation. Production materials - plastic, polymer concrete mix, concrete. Plastic channels are installed in areas where there is minimal physical impact on the gratings: along the edges of the lawn, in flower beds. Concrete gutters are strong and durable. Such a tray can withstand loads up to 25 tons. They are installed in places of increased loads: in yards where there is constant traffic, on access roads. They also choose protective grids: metal and cast iron - for areas with heavy traffic, decorative plastic - for the lawn, garden.
- Connecting elements, spacers, bases. Auxiliary materials that the manufacturer recommends using when assembling channels. Be sure to install spacers inside the plastic trays.
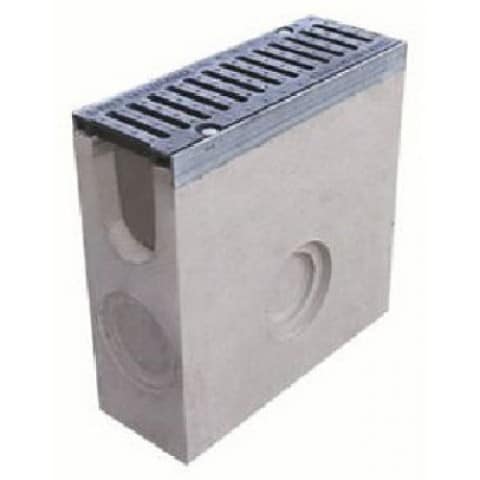
- Sand traps. Separately, they buy products for installation in a linear system and for installation in storm water inlets.
On the walls - preparation for pipe removal
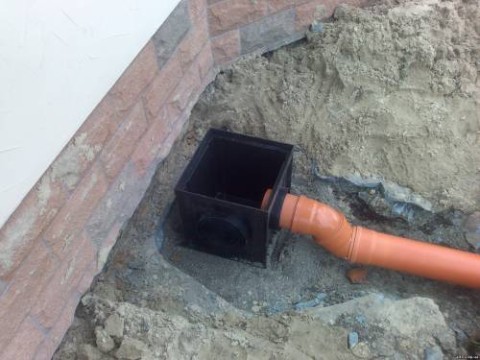
- Storm water inlets. Predominantly ready-made plastic containers are used. The outer walls are equipped with preparation for connection with a branch. Plastic receivers are easy to install on top of each other - you can assemble a container of any height.
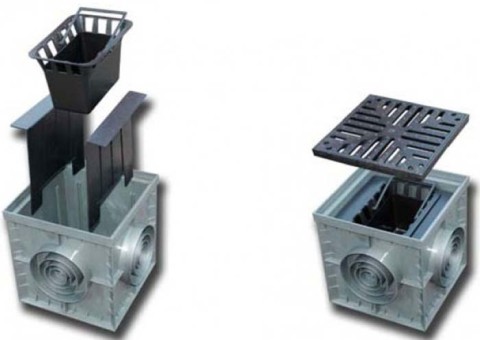
Containers with basket and attachments
- Geotextile. Cloth for drainage filling channels not equipped with gutters.
![]()
Synthetic waterproof fabric
- Crushed stone, sand. The crushed stone fraction is medium and large.
- Mortar for pouring the base under the gutters and water inlets.
- Drainage wells. Finished plastic or corrugated pipe large diameter.

Factory PVC drainage wells
- Pipes for outdoor sewerage with fittings.
- construction tool. You will need draft boards for formwork in the channels, pegs and line for marking, shovels, picks, building level.
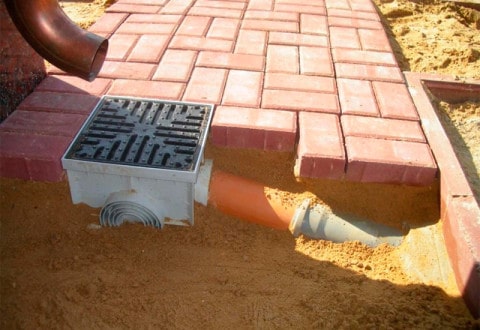
Installation of point water inlets
Point water inlets - stormwater and drainage elements installed under the outlet of drains. It is necessary to plan the installation so that the flow from the drain falls exactly in the center of the grate.
The edge of the well should be flush with the decorative coating
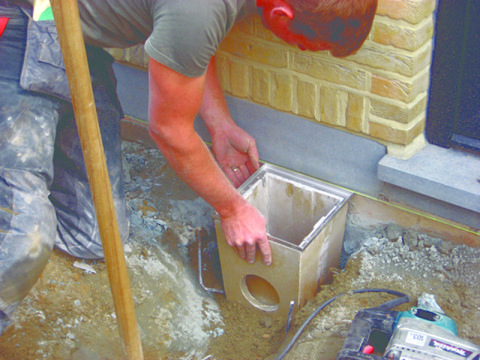
The dimensions of the pit for installing the container are determined by the height of the receiver, adding up to 30 - 40 cm for bedding and base. There should be a gap of up to 5 cm along the perimeter on each side. Dig a recess, level the walls and bottom. Be sure to check the horizontality of the bottom and the angle so that the container does not move during installation.
Checking horizontal level
A dense ten-centimeter layer of compacted sand is formed at the bottom. A layer of crushed stone up to 25 cm high is laid on a sand cushion. It is advisable to fill the bottom concrete mortar. The poured base is left for several days until it hardens completely, or the container is fixed in a fresh solution (if necessary, fixed fixation).
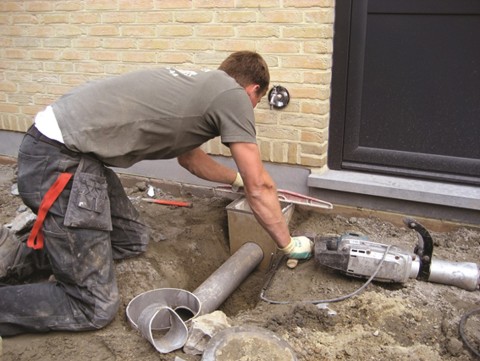
On concrete base install the storm water inlet so that the lid of the container is flush with the blind area. If installation is carried out before laying decorative coating, then leave the free edge of the well above the ground to the height of a tile or stone.
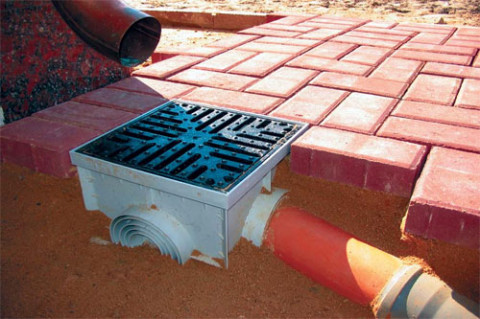
Correct installation receiver
Side gaps are covered with rubble or poured with concrete. Before backfilling, a pipe outlet fitting is connected to the outlet. Install internal parts: basket, partitions, fix the lid.
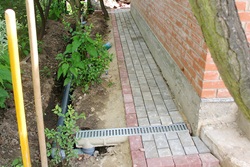
Arrangement of an open storm system around the foundation
Drainage of storm water along the perimeter of the building can be planned as a ring closed at the collection point, without revision wells. For cleaning, collapsible sand traps are provided. Rules for the device of a linear system:
- The indent from the edge of the foundation should be from 50 cm. Optimally, plan the channels along the edge of the tracks or blind area.

Trays - along the edge of the blind area with a margin for paving slabs
- The depth of the channels is determined by the height of the tray with a decorative cover with the addition of the height of the bulk layer - up to 40 cm.
- Width - up to 50 cm.
To prevent the installed gutters from shifting and deforming over time, you need to follow a few rules during earthworks. The bottom, the walls should be even and solid. At the bottom, a standard sand cushion and crushed stone bedding are necessarily made.
Plastic tray installed on the factory stand
So that the tray (especially plastic) does not deform, it is better to make a concrete base for installation. The thickness of the concrete layer is 5 cm.
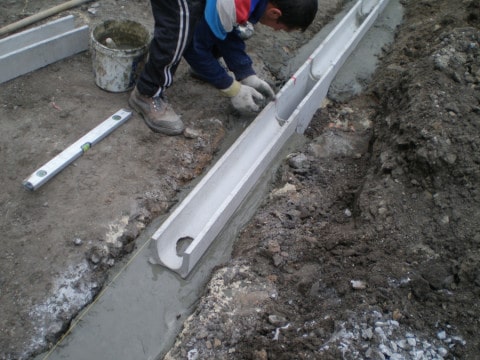
Laying the gutter on the mortar
Gutters are installed in prepared trenches. The structures are interconnected with special locks. The extreme points (at the beginning and at the end of the line) are closed with plastic or metal plugs. If plastic gutters are used, factory spacers are installed inside.

Sand trap in the drain line
The gaps between the trays and the walls of the trench are covered with rubble, or concreted. On long sections, sand traps are installed - in-depth trays with a mechanical filter. At the installation sites, outlet pipes are connected to the sand traps. Trenches for discharge pipes are dug at an angle.
Budgetary storm drainage of the site: building open channels
Drain rainwater from garden paths, flower beds and along the fence can be economical open way. Instead of ready-made trays, storm drainage filling channels are equipped. Trenches are dug along the planned lines. Depth - from 50 cm, width - from 50 - 60 cm.

Instead of gutters - backfill trench
The branch is formed with a slope towards the receiving tank. The walls are at an angle to the bottom to reduce the pressure of flowing water. The bottom is filled with sand. Check the correct slope. For one meter - up to 3 cm height difference.
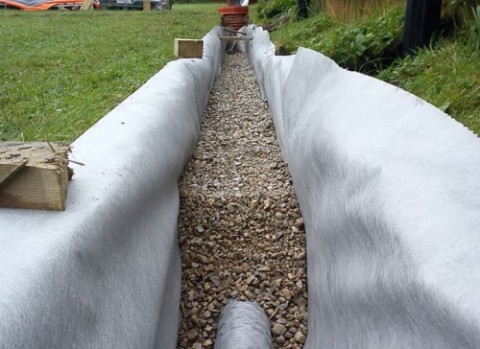
Pipe in crushed stone backfill
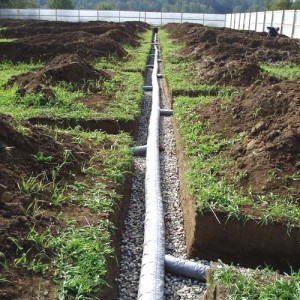
Geotextiles are laid on the sand layer. The edges are left free. Over the entire width of the trench, crushed stone is covered with a layer of up to 30 cm. A system with a perforated drainage pipe inside the crushed stone backfill will be more durable. Wrap the edges of the canvas with an overlap.
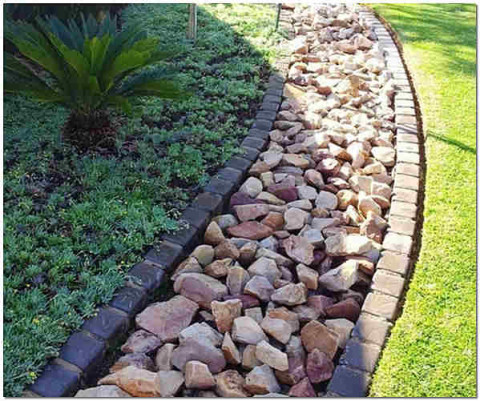
Dry stream with decorative backfill - a beautiful drainage line
Top drainage clip fall asleep decorative material: river pebbles, colorful chips, stone. Dry streams are an aesthetic and economical solution.
Drainage well and drain outlet
The drainage well is the connection point of the system. With a moderate amount of water and good water-absorbing characteristics of the soil, the drainage tank is installed on a crushed stone pillow. Through a well without a bottom, water penetrates the soil.

Drainage well with filling bottom
If the installation of a filter well is not possible, then liquid is drained from the drainage tank into a common storm main or taken out of the site - into a natural reservoir, moat. The outlet from the well can be connected to a pond or a receiving tank dug in the area.
Video: installation of stormwater around the house
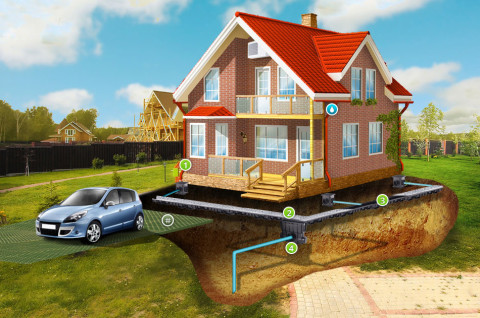
Stormwater and linear open drainage are only the surface part of the foundation protection. Along the perimeter of buildings at different depths, it is necessary to create 3 - 4 types drainage systems. Choice of organization and technical parameters networks depends on the composition of the soil, the depth of the foundation. Doing deep drainage networks on your own is not worth it. Calculations should be done by specialists, and the installation of trench branches is best done immediately after pouring the foundation. Even before the start of construction, a reservoir deep drainage system is being equipped. Not only the ability of the system to drain water in large quantities, but also the durability of the foundation depends on the accuracy of the calculations.
Add site to bookmarks
This solution is often used in homes with thatched roofs or slate or shingle roofs. However, even in this case, it is necessary to lay hermetic vertical insulation in advance on foundation walls. Around the walls, a system of a half-meter base made of non-absorbent materials is needed: ceramic tiles or stone. The layout of the backyard area should be such that it provides a slope of several percent towards the house.
absorption well
The absorbent well is being planted concrete rings with a diameter of 1-1.2 m or PVC pipes of a smaller diameter. Sand is poured into the bottom of the well Sand and gravel. Such a filling is covered on top with a layer of geotextile, which, when silted, is not difficult to change. If the top waterproof primer The new layer has a small thickness (up to a meter), then a plastic barrel without a bottom is suitable for casing the well. By doing construction works the distance of such a well from the house should also be taken into account. It should be at least 2 m. And the depth should be much greater than the level at which the foundation was laid.
In addition, all necessary calculations take into account the capacity of the well to receive a certain amount of rainwater. This accounting must be done in the sense that it takes a certain amount of time to filter it. Waterproof soil is poured around the well, which will act as an additional filter. This sprinkling is separated from the main soil by geotextiles. Thus, if an overflow of the main well occurs or a diversion is required a large number water, a soil filter that goes to the surface will absorb excess water. For safety, the intake opening of the absorbing well is necessarily closed with a grate.
Everything is useful in the household
Rain and melt water can be very useful in household. They, for example, can be used for irrigation. It should not be forgotten that much more rain and melt water is formed than it is necessary for economic needs. That's why when using different catchment tanks closed type you should have a different drain to drain water - the same absorbent well, which has already been mentioned above.
The water collection tank can be placed in basement Houses. Rainwater will be able to enter the tank through the drainpipe, and its excess will be drained into the sewer or drain through the overflow hole in the tank. Fence required amount water is carried through a hose that is mounted on a float. It is this hose that is needed in order to use the most clean water from the middle layers. Once a year, such a tank must be cleaned and washed from the inside. The cleaning problem can be solved in another way, using a special mechanical filter at the tank inlet. Such water from the reservoir is supplied separately from tap or well water.
If it is planned to be used only for irrigation, then you can use an inexpensive submersible pump, which is mounted directly into the tank. However, if the reservoir is large and there is a high amount of precipitation in a particular area, then the collected water can be used for a wider range of needs. In this case, special pumping stations- hydrophores. Such a system already allows you to connect drain cisterns toilets, washing machines or washbasin.
Additional water collection methods
Some people use special kopanka ponds to collect water, located right on land plots. In summer, part of the water evaporates naturally, but in other time periods, due to recharge by groundwater, such water can overflow the banks and flood everything around. Therefore, these ponds should be located at the lowest points of the site.
An important detail, and sometimes an acute headache, can be the removal of water from the garage door. If it is not possible to arrange drainage, then a special absorbent ditch can be dispensed with. This structure consists of the ditch itself and a perforated box inserted into it, which is filled with waterproof materials. A sand layer is placed at the bottom of the box, then a layer of fine gravel, from above these layers are covered with coarse gravel.
Through this, the water that flows down from the deepened descent enters the ditch, where it is absorbed by the soil.
Drainage- surface drainage systems for the removal of storm and melt water from sites, parking lots, industrial terminals, etc. The surface drainage system includes plastic trays, metal and plastic gratings, sand traps, storm water inlets, non-pressure pipes, drainage wells, pumps. surface drainage integral part engineering networks to prevent excess water masses from entering the soil or collecting and removing them from large areas of parking lots, roads. The installation of a surface drainage system has several assembly schemes, each scheme is intended for the magnitude of the load on the surface of the drainage tray.
 |
 |
The peculiarities of our climate require the use of special solutions for the removal of melt and rainwater from various territories and sites, car parks, industrial terminals, etc. Creating a high-quality drainage system allows owners of private houses to get rid of many troubles associated with flooding the site. Installing a competent drainage system will prevent the destruction of the foundation of the house and other buildings, asphalt and paved roads, and protect tree roots from rotting caused by excess water.
Drainage systems most often include trays, storm water inlets, different sizes and grate shapes made of metal or plastic, non-pressure pipes, wells and pumps. It is possible to recommend the installation of a drainage system to all owners of cottages, houses and plots, since in our climate zone V different time year there is a large amount of precipitation.
Today it is customary to use two types of drainage systems.
Deep (underground) drainage
The main task that is set before him is to lower the level ground water. This drainage system is a one-piece system of pipes that are laid in the ground on required depth. To do this, in those places where it is necessary, they dig a ditch, dig and equip wells and settling tanks. Sand is poured into the ditch before laying the pipes. Manholes allow you to control the water level and carry out cleaning. Such a system is indispensable in places where groundwater comes close to the surface or if the site is located in a lowland, in a swampy area.
Surface linear drainage
The linear design is suitable for collecting water in large volumes. For example, with concrete pavement squares, transport terminals and streets. Such a system should be installed on terrain with a slope. Linear drainage requires gutters, which, thanks to modern technologies, are produced with excellent characteristics of strength, wear resistance and long term services. Also needed are sand traps that protect gutters from clogging with debris and sand, storm grates made of various materials produced taking into account the expected load. The choice of materials for their manufacture is quite wide: steel, copper, cast iron, stainless steel, etc. The size of the grating and its shape depend on the wishes of the customer.
Point drainage
The point design of the drainage system is used to collect excess water both in the yard and from the roofs of buildings. Gutters are often made of plastic or cast iron. It is recommended, if water is to be drained into a public sewer, to use a polypropylene drain outlet. If the system is located on the roadway, then cast iron is excellent here, due to its strength and ability to withstand heavy loads.
Surface and underground drainage cannot replace each other, as they are designed to perform several different tasks. For example, you should not install an underground system if the site is located on an elevated area, or if the groundwater runs deeper than 1.5 meters from the surface of the earth. For maximum efficiency experts recommend combining these two types. Areas such as terraces, garage entrances and entrance groups buildings must be equipped with both types of drainage.
Groundwater increases the negative effect of heaving deformations, heats the pits and fills the basement floors of finished buildings. In a word, in this case, water is rather an enemy of a person than his assistant. Therefore, groundwater drainage is a mandatory operation both in the construction of structures with a residential basement, and in the construction of buildings of any type on swampy soil.
In this article, we will consider the removal of groundwater from the site, offering our reader several options for dealing with the so-called "top water" - moisture penetrating into the soil from the atmosphere (in the form of snow or rain). We hope that this information will help you "drain" the soil of your site, thereby extending the period of trouble-free operation of your home.
Groundwater is another all-season problem that all owners of private houses face. In winter, snowdrifts sweep over the site, in spring they melt, and in summer and autumn it rains. As a result, the site is flooded, the basement is filled with water. And the walls ground floor damp and moldy.
![]()
But such “consequences” of seasonal flooding are only the outer side of the problem. It’s not just the landscape or basement that suffers from flood waters. They destroy the very foundation of the house and reduce the bearing capacity of the soil. Therefore, floods must be dealt with.
|
|
And this struggle, most often, involves artificial drainage of groundwater from the site, implemented in three ways:
- With the help of drainage wells.
- with drainage trenches.
- With the help of combined systems consisting of trenches and wells.
Moreover, all three methods involve a completely different approach to the problem being solved. Therefore, below in the text we will consider each technology for drainage of sites.
Drainage of perched water with the help of wells

A study of the soil using drilling rigs shows that the structure of the soil at our latitudes consists of the following layers: a fertile "horizon", up to 30 centimeters deep, a layer of sandy loam (sandy-earth soil), a clay "lens" (a natural barrier to atmospheric moisture) and the underlying soil with high moisture permeability.
Thus, if you break through a layer of sandy loam and a clay lens, then the entire top water will go into the "horizon" with a high "throughput". It is on this principle that a drainage well works, draining the soil at a certain point in the site.
Moreover, even 100-mm wells with a depth of about 3-4 meters "work" with high efficiency. Such a puncture in the ground guarantees a decrease in the level of groundwater within a radius of 1.5-2 meters from the pit.
Well, the process of arrangement drainage well implemented as follows:
- A hole is drilled in the ground, up to four meters deep.
- A rail is inserted into the pit, on which a "stocking" of geofabric is stuffed (with a stapler).
- Gravel or crushed stone (the latter is preferable) is poured (manually) into the "stocking".
- The mouth of the pit is closed with gravel bedding (5-10 centimeters deep) and a piece of geotextile, on top of which turf can be laid.
Such wells are equipped at problematic points of the site - near the discharge of runoff from the roof, in places of natural accumulation of groundwater, in the place of puddles that do not dry out for 3-4 days after rain.
Drainage of surface water using drainage trenches
Drainage trenches are The best way control of perched water in areas with a noticeable slope. In addition, such a trench works well even if it is possible to discharge accumulated moisture into natural (ravines) or artificial (drainage wells) water collectors.
Drainage from groundwater houses using trenches is implemented according to the following scheme:
- On the site determine the natural slope of the landscape. It can be assessed visually or seek help from surveyors.
- Trenches 50 centimeters wide and 0.5 to 0.7 meters deep are torn off along the slope line.
- All trenches are reduced to one point - drainage well or lead to a cliff in a ravine. Accordingly, the slope of the bottom of the trenches is 3-4 degrees in the direction from the house (the highest point) to the collector or ravine (lower point).
- A geotextile is laid at the bottom and 10 centimeters of the trench depth are filled with gravel. The remaining volume - 30-50 centimeters can be filled with a sand and gravel mixture.
- A roll of geotextile is laid over the backfill, which is covered with turf.
As a result, a natural stream flows inside the trench, fed by perch. Therefore, for drainage efficiency, it is possible to immerse drainage pipe. But this move will increase the thickness of the backfill from 10 to 25 centimeters, which will affect the cost of the entire drainage system.
Drainage from the groundwater foundation - a combined solution to the problem
The owner of a site with very wet soil and high level groundwater should not count on half measures. In this case, it will be necessary to use both drainage shafts and drainage trenches, with the help of which a system of complex protection of the foundation is formed.
And for the arrangement of such a drainage system, you will have to do the following:
- At a distance of 3-4 meters from the corners of the building, 4 (or more) wells are drilled for a drainage well.
- The wells are connected by drainage trenches, in which, on a 5-centimeter gravel bed, drainage pipes are laid.
- Wells and trenches are covered with rubble and covered with sod.
Geotextile lining between the walls of trenches (wells) and gravel bedding - is used without fail.
Such a "contour" system guarantees a lowering of the groundwater level and leveling the destructive effects of precipitation on the entire area of the supporting soil.
When planning the territory, when arranging the site, one way or another, there is a problem of diverting rain or melt water from its territory. To do this, equip the reception Wastewater into storm sewer systems. Such systems may consist of open gutter trays or underground pipes.
open gutters
Rainwater drainage
Hidden drainage of rainwater from the roof is provided with the help of gutters. Thus, general form buildings are not disturbed.
Open drains are arranged in small areas, often completely asphalted, covered paving slabs or stone. There are no problems with drainage in such areas, if they are not in a lowland. To ensure a constant and high-quality drainage of rain or melt water, drains from concrete trays are laid in such areas. They are sold in stores and usually have a standard length of 60 cm.
The trays fit beautifully into the landscape, do not spoil its design and divert water towards the lowering of the area. Lay the trays on a sandy base. Before laying, it is necessary to select the vegetative layer of soil under them. The trays are laid along the blind area, under the drain pipes, along the paths and roads, at the curbs or along the perimeter of the site, if the slope allows, in the direction of lowering the terrain, into the gutter.
We organize drainage
If the area is small and covered with gravel or coarse sand, or it is a grassy lawn in an area where there is not much rainfall and meltwater, subsoil drainage can be arranged from perforated pipes.
Such pipes are sold in specialized stores. They are laid at a shallow depth, under a layer of rubble through which rain or melt water freely penetrates to the pipes, and then rolls down them into a receiving well or gutter.
If the site is large enough, has a difficult terrain, is crossed by paths and paths, or is located in a lowland, it is necessary to arrange a storm sewer system from pipes located underground.
The assignment for the design of storm sewer systems can be given to a design organization engaged in this kind of activity. If the estimated length of the storm sewer is relatively small, does not cross other underground utilities. Communication lines and electric cables are not located on its path, then it is not for a specialist to arrange such a storm sewer.
Determination of direction
First you need to decide on the direction of the drainage of storm drains. It can be a slope descending into a ravine or to a river. In this case, there will be no problems with the volume of earthworks.
If this is a ravine located behind a hill, then you need to determine the height of the bottom of the ravine or ditch relative to the surface of your site. This will help the simplest geodetic device - "level".

Various fittings for receiving stormwater
With it, you can calculate the depth of all wells and the required slope yourself. But such calculations are needed only for large areas and distances. Usually, the owners of private plots do not have such problems - and so everything is clear where the water flows and where the nearest ditch is.
sewage well
The reception of wastewater from the storm sewer system begins with the removal of water from downpipes. To do this, either a system of trays is arranged under the pipes, or small receivers are closed with a strong metal grate. From the receivers, water enters a receiving well, arranged not far away. Its depth usually does not exceed one meter. The well can be equipped with a reinforced concrete ring or laid out with bricks.
A prerequisite for the construction of a well is the presence under it solid foundation- a special round slab or a self-poured foundation. Plates must be no thinner than 5 cm and must be reinforced. They are a guarantee that your well will not fall into the ground over time and will not warp it.
There should be no gaps in the well, that is, the ring is installed on the mortar and the joint is plastered. Brickwork it is also plastered so that the water that gets into the well does not penetrate from it into the ground and does not erode the soil, but remains in the storm sewer systems.
The top of the well, if it is located on an asphalted area, can be lowered slightly below the level of the coating, so that water enters the well through the holes drilled in the cover. It is advisable to make a hard surface of the site with a slight slope towards the well, or place the well in a place where water flows by gravity.
Pipes for storm sewers
Stormwater is usually arranged from asbestos-cement pipes with a diameter of 100 or 150 mm, depending on the volume of expected effluents. On a plot of several acres, 100 mm pipes are enough. They begin to be laid from the receiving collector or ditch into which the water will be discharged.
It is advisable to determine the route in advance. Wells will be equipped in the places of its turns. This is necessary to prevent clogging of the sewer, as sand, debris and dirt settle at the corners or at uneven pipe joints.
Having dug a trench under the pipes, a layer of sand is poured at the bottom of it, which will serve as the basis for asbestos-cement pipes. It will facilitate the work and protect the pipes from a possible fracture during backfilling.
Special drains for storm sewers
Having brought the end of the pipe into the ditch with the help of a level, "visors" or with a bottle of water, the pipe is given the necessary slope. At the same time, wooden blocks, boards can be placed under the pipes, but, in no case, stones and bricks, since the pipe can break on them when backfilled with soil. After that, the pipe is sprinkled with sand, leaving the end leading to your site or receiving well free.
A special sleeve with a sealing rubber is put on this end. Gum to facilitate putting on the pipe is lubricated with grease. The next pipe is inserted into this coupling. Align it horizontally, determine the slope and sprinkle it, like the first one. Only now the joint is falling asleep well.
To determine if the pipe lies flat in a horizontal plane, you need to look into it. If the outlet of the first pipe is fully visible, the pipe is sprinkled. For easier viewing, you can use a mirror.
Having reached the turn, under the end of the pipe they arrange a foundation for a well. The pipe is inserted into the well by 20-25 cm. The next pipe is inserted at the same distance, only from the side where the sewer line turned.
The free space in the well is filled with mortar at half the height of the pipes, making a tray between the pipes with a smooth rounding if the turn is sharp. At will, each well can be equipped with a cover or a hatch for receiving water.
If there are several buildings on the site, then for each, somewhere on the corner, a receiving well is made for water from the roof, and a pipe is laid from it to the next well and then, gradually deepening, beyond the territory of the site.
If the distance is large, then it may be necessary to arrange a well in two reinforced concrete rings at the end of the sewer line. The rings are placed on top of each other on the solution, a bracket is fixed between them to facilitate penetration into the well. The joints between the rings are plastered. The top plate is also placed on the mortar, and then sprinkled, trying to fill all the voids with sand.


