The raft is the most simple form water transport, and it is much easier to build than a canoe or boat. There are many ways to build a raft. You can build a traditional raft entirely from logs. You can build a wooden raft that uses barrels or PVC pipes to keep it afloat. You could even build a raft entirely out of soft drinks - it's true! This has already been done. Wide electrical tape is used to glue all the bottles together. But here you will find instructions on how to build a raft... with foam inserts for buoyancy.
What do we need to build a raft?
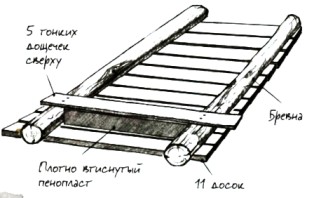
- Two logs 7-8 cm thick and 1.5 m long
- Eleven wooden planks about 2.5 cm thick, 13 cm wide and 91 cm long
- Five thin planks 5 mm thick, 13 cm wide and 91 cm long
How will we build the raft?
- Place two logs parallel to each other at a distance of 85 cm.
- Place eleven planks across the logs to create a deck. They should protrude a few centimeters beyond the logs. The ends of the logs should protrude slightly from below the deck on each side. Nail the boards into place.
- Turn the raft upside down. Insert foam into the space between the logs. It’s good if TV can find polystyrene foam in one piece of a suitable size. But you can also use several smaller pieces if you can arrange them neatly and tightly.
- Place five across the logs to hold the foam in place. Nail the boards.
- Turn the raft over and launch it into the water. It should be able to support one average-sized adult on board.


Attention!
If you take your raft onto the lake, don't forget to wear a life jacket. Don't take the raft to the river. It is not stable enough and can be dangerous in moving water. Only an inflatable raft is suitable for the river. An inflatable raft is used in a sport such as rafting on stormy mountain rivers. It is safer, but costs a lot of money. But our hands are not for boredom, and we will build the raft ourselves. If the raft is on the lake, then get off it, or sunbathe...
Making a raft for river rafting with your own hands is quite simple, the main thing is to understand the basic principles. This floating craft has a fairly simple design; without special knowledge and skills, you can easily build a fishing raft with your own hands from wood and scrap materials.
Large raft with tent
Materials and components
To build a good raft from logs with your own hands, you need to make the following key components designs:
- Frame.
- Components for holding the structure on the water (pontoons).
- Control systems.
- Flooring and roofing.
- Safety details.
- Compartments for various things.
The frame is the basis of the structure on which all other components are fixed. It is necessary to achieve the highest possible strength of the frame in order to prevent destruction under sufficiently high loads to which the structure will necessarily be subjected during use. It is important to try to minimize its weight. This is important for the convenience of launching the structure into the water. At the same time, the frame must be rigid and resistant to deformation. Otherwise, the integrity of the structure may be damaged right on the water, which is fraught with the most negative consequences.
Typically, rafts are constructed in an inflatable or wooden configuration. In the case of wood, as frame base a log frame is used. In an inflatable structure, the base is constructed with lathing.
It is extremely important to maintain the correct proportions of the dimensions of the raft. The ratio of width to length should be 1:3. In case of a significant deviation from this norm, the stability and controllability of the boat will be impaired.
Pontoons are designed to hold the structure on the water. They can be made from a variety of available materials. Here you should build on what is at your disposal.
The most popular pontoon options:
- cameras;
- plastic bottles;
- barrels;
- tree;
- Styrofoam.
It is very easy to make a raft from chambers with your own hands; this is one of the most affordable and easy to implement options.
It must be equipped with properly equipped controls.
Most often used:
- The rows are shaped like large oars. As a rule, they are operated by two people; working alone is quite difficult. Sometimes very large rows are built, which can be controlled by 4 people at once. In terms of efficiency, this solution is very good. The structure not only turns easily, but can also move freely against the current. Such control is relevant for large rafts descending onto large, deep rivers with fairly fast currents.
- Poles are the optimal solution for small rivers. Using a pole, you need to push off from the bottom, thereby ensuring the movement of the structure. In terms of efficiency, this method is significantly inferior to the previous one.
- The movable keel is mounted on the aft part of the structure and is a steering mechanism.
It is not necessary to make a flooring, but it is advisable; this will make using the watercraft much more comfortable. The roof can be made in any form, based on the available materials.
The design must include safety elements. They must be responsible for the stability of people during movement and, which is extremely important, in any collisions. For this purpose, special footrests are equipped. Hands are usually protected by control elements. It is necessary to provide special posts on the sides to allow you to hold on in case of collisions or strong currents. And if possible, it is worth taking inflatable vests on the raft.
To conveniently store things and protect them from getting wet, raised platforms are equipped for folding everything you need. You can set up a kind of “greenhouse”, a structure that can be quickly covered with film if necessary. The crew can also hide in it during the rain. To store documents, you should use special hermetically sealed bags.
You can organize a special place for a fire to warm food. If you plan a long rafting, it is worth equipping comfortable places for sleep and relaxation.
How to build a raft with your own hands - video, drawings and photos
See how the finished raft, made by hand, looks like in the photo:

Wooden raft
This is one of the simplest and easiest structures to build. This raft is made entirely of wood.
And the video below demonstrates the process of launching a raft made from plastic kegs, made by yourself:
But, in this case, not only wood is used, but also large plastic containers that ensure its free retention on the water. Therefore, if you want to make a raft from 200 liter barrels with your own hands, the drawings and videos will definitely come in handy.
First, let's talk about simple wooden rafts. First of all, you need to be puzzled by the selection suitable wood. It is important to use only dry materials. Usually a thickness of 10 cm is sufficient; such a raft is easy to build and launch. It is very easy to check whether the tree is suitable. Just put the log in the water, if it sinks at most halfway, this is the right material.
The wood does not need any special treatment. Just remove unnecessary branches and try to achieve the maximum flat surface. If the logs differ slightly in thickness, thinner ones are placed in the middle of the structure. As you approach the edges, the logs should thicken. Thanks to this, the structure will be very durable.
Stack the logs side by side and place them on top cross beams. As connecting elements you can use nails or strong ropes. You can use wire and other available materials that will strengthen the structure. But, if you use a rope, you must first moisten it. This is necessary so that when wet in water the nodes do not relax, otherwise the structure may even collapse. It is better to make connections using U-shaped brackets.
After connecting the logs, the raft can already be used. But to make operation more comfortable, you can make a flooring. Plywood, boards, sheets of tin and other available materials are suitable for this.
You can use not only wood, but also combine it with various available materials that provide better buoyancy. You can use, for example, pieces of foam plastic and similar lightweight materials that do not get wet and do not sink in water.
For example, this solution is demonstrated in the following video:
How to make a raft from inner tubes with your own hands (video)
Very often, car inner tubes are used as pontoons on homemade rafts. They are easy enough to find. This solution is very effective. Compared to wooden version, such a raft has many advantages. Its weight is significantly lower, making it easy to carry on the shore or in shallow water. On the water, it is more stable and more responsive to control.
The photo below shows a raft with a sail, made by yourself. Its peculiarity lies precisely in the presence of a sail, due to which movement on water is ensured. Here the sail is of the most primitive type, but it completely fulfills the task. Since the raft is built on tubes, it is lightweight and glides well through the water, so even a small wind is enough for movement. Naturally, you should not rely only on a sail; you must also take oars or, at least, a pole on the raft.

Raft on tubes
So, we make a light raft with our own hands using inner tubes.
Main features of the construction process:
- The cameras need to be placed in 2 even rows and then connected. A rope is perfect for this, nylon rope is best, but any other rope will do. The advantage of nylon is that it does not stretch when exposed to moisture.
- Wood beams are placed on top of the chambers. To connect them to the cameras, also use ropes.
- The beams serve as a platform for installing the decking. It is advisable to use boards. If they are not available, use any available materials suitable for solving this problem. It is advisable to process the material in advance so that all parts are identical and even. Thanks to this, there will be no gaps on the deck. Make sure that the beams protrude somewhat beyond the chambers and flooring. This is necessary so that the beams absorb possible collisions with obstacles.
- Approximately in the middle, provide the simplest design in the form of a box covered with film. Things that should not get wet will be stored here. Even all kinds of wooden scraps are suitable for this.
- Arrange racks for oars on both sides.
Take 1-2 spare tubes on the raft, as there is a risk of them being damaged by all sorts of obstacles. Even if the chamber bursts, the raft, naturally, will not sink, but controllability will noticeably deteriorate.

Ready raft on tubes
How to make a raft of plastic bottles with your own hands (video, photo)
One of the most popular options is to use simple plastic bottles. You can use both small and 20-liter. Bottles are quite easy to find, so there shouldn’t be any difficulties with materials. The frame of the raft can be made from wood to which to tie a large number of bottles Make sure each bottle is tightly sealed.
It's easiest with big bottles. With little ones it’s a little more difficult, but still doable. But we need a lot more of these bottles. For example, a small raft requires about 100 bottles.

Bottle raft
The easiest way is to place the bottles horizontally. You can connect them using tape, and to increase strength, additionally tie them with ropes. Use special moisture-resistant adhesive tape. Point the bottle necks in one direction. Moreover, in rows the bottles should be connected as follows: necks to necks, bottoms to bottoms, so the design will be as compact and stable as possible on the water.
One of good options– pack bottles in bags. Depending on the size of the raft, prepare required amount bottles Such pontoons turn out to be very voluminous, which will ensure good stability and high carrying capacity of the raft. The bags must be tied tightly so that the bottles remain in the right place when floating on the water. The bags can be tied to the frame with ropes and tape. We invite you to watch the video “How I built a raft with my own hands,” which demonstrates the construction of a large raft from bottles in bags. The design turned out to be very large, stable and load-lifting.
The video also demonstrates the rafting of several people with a large number of things on such a raft:
Bottles can also be placed in a vertical position. Divide the bottles into blocks of 4, joined together. Then connect these blocks into rows. Any design can be used as a basis for a raft, including wooden frame.

Bottles are arranged vertically
One of the most successful and easy to implement solutions is to make a raft from 200 liter barrels with your own hands. You can also use barrels of other sizes. The difficulty lies in the availability of the material; it is not always possible to obtain the required number of such barrels. If you have unnecessary ones, it is best to make a raft out of them. Depending on the size of the structure, determine the required number of barrels. For a small raft, 6-8 pieces are enough. It is important to securely tighten the barrels, preferably using sealant, this will prevent leaks. You can use beams or boards as a frame. It is advisable to make the flooring from boards. Inside the frame you also need to provide several separate beams to which the barrels will be attached. Use ropes to secure the barrels.

Raft on barrels
Raft care
If you plan to use the raft more than once, it must be maintained to extend its service life. The structure must be well dried after each alloy. To do this, simply take it ashore and leave it in a dry place. With rafts on bottles, barrels or chambers, everything is simple, because they are light. In the case of a heavy wooden raft, it is better to equip special guides on the shore to facilitate landing.
It is advisable to move the raft indoors for the winter. If this is not possible, it is necessary to arrange suitable storage conditions right on the shore. At a minimum, it must be carefully covered with a tarp. It is advisable to impregnate the structure special means that repels moisture, this will significantly increase durability.
Rafts for rafting on rivers are different, I will tell you about my experience. Something could have been done better, but in general we succeeded good option, which in two weeks of water travel proved to be an excellent remedy movement.
I’ll make a reservation right away that we are talking about rafting on a calm flat river, without. Its average width was 150 meters, the speed of the current was 3 km/h. Shipping - only private boats. In a word, ideal conditions for a relaxing rafting without unnecessary problems.
And if you want to better understand the essence of the matter, read my story below.
Advantages of a raft on tubes
So, we thought about it and decided that the raft would be on inner tubes. Firstly, it glides through the water much easier than a log boat.
Secondly, everything needed to make it is easier to find in the city (I can’t imagine where we could get several dozen logs for free and store them before the start of the trip).
Thirdly, the log raft is almost entirely in the water, and at some point you may be drowned, especially if a wave rises. And here you are at a height of 20 cm above the water. It's much more comfortable.
Fourthly, a raft with tubes is much lighter, and you can drag it by hand over a small shoal that you may encounter along the way. By the way, we had to do this once. A log raft would have to end its route in such a place.
Load capacity calculation
Before we started making the raft, we created its model with the calculation of its carrying capacity. You can see this in the first picture. My partner did this, so it is difficult for me to add anything to what is shown in the picture. Then we simply had no idea how to make a raft and whether it would support 6 people, so we had to bother with this kind of design.

Although at the last moment three people fell away and for us, the three remaining, it was very spacious there.
Stages of building a raft
So, to make the raft, we took 8 tubes from trucks(6 from KAMAZ and 2 from MAZ, this was not on purpose, it just happened that way), they were laid out in two rows and tied with nylon rope at all points of contact (Fig. 2). No other rope is suitable, because... she will have to stay in the water for a long time. It shouldn't stretch out because of this.

Then the supporting beams were placed on top and they were also tied tightly to each chamber (Fig. 3). It would be good if they were square, it would just be more convenient. But we didn’t have those, we used rectangular ones.

Boards were nailed onto the beams on top, resulting in an excellent deck (Fig. 4). We prepared the boards in advance, took them from waste from the nearest sawmill (although they are very good for waste), and processed the uneven edges on circular saw so that there are no gaps in the deck.

Please note that two internal timber protrude half a meter on each side (Fig. 5). This is necessary to make “bumpers” with which the raft will rest against possible obstacles. Otherwise, he would push against the cameras and this could damage them.

In addition, the front bumper was also one of the support points for the mast cables, and at the rear there was a support for the steering wheel.
The final view of the raft immediately after construction is shown in Fig. 6.

The sail was our whim, we just wanted to try it. But for the entire two weeks of the journey the wind blew against us, and on the third day the sail along with the mast had to be removed, because... they slowed down a lot.
The mast is secured with three guy wires made of steel cable, and the sail itself is pre-sewn from sugar bags. It’s a perversion, of course, but we didn’t have any other opportunities to make such a painting at that time.
The raft must have a “greenhouse” - a box that is quickly covered with a film wound on picket fences. If it doesn’t happen, then in the first rain in the middle of the river you will wet all your things and your clothes.
Subsequently, we made special supports along the edges of the deck, which made it possible to open the film in the form gable roof, under which it is comfortable to sit (Fig. 7).

You still can't do without a place for a fire. It needs to be well thought out so that you can cook food without going ashore, warm up, and not burn the raft. We used a temporary stove for this purpose (Fig. 8), which we simply left on the shore after the end of the trip.

After setting sail, we realized that rowing with oars without support for our backs was extremely tiring. Therefore, on the second day, “benches” with comfortable inclined backs appeared on the left and right edges of the deck (Fig. 9).

A few tricks
The steering oar, already mentioned, was rarely used. But it is very convenient when you need to make the raft move straight forward, or when you need to quickly turn it to the desired side.
You can see the spare tube on the steering oar stand. It is also required, because if you puncture any of the chambers, the raft will begin to tilt to one side and it will become inconvenient to control. True, the fate of our spare tire was inglorious: on the last day of the journey the sun came out (it had been cloudy before), it overheated and burst.
Another one important thing when sailing on a raft - a ladder. If you are forced to moor to a swampy or simply dirty shore, then it will greatly help you get off your vessel onto a clean piece of land. We had a thick four-meter board for these purposes.
That's probably all. On this raft we covered 210 km in two weeks in bad weather. Didn't disappoint.
I think there are few people who choose such a unique one, but if you suddenly decide to build a raft and go “down the great river” on it, I hope my experience will help you in some way.
Have you read the story? Now you can play. I bet you won't win!
“...Oh, the white ship...” Who would refuse a romantic walk along the river or a cruise on a luxury liner? The wind in your hair, fresh river or sea air... Beauty, and that’s all!!! But not everyone can afford such pleasure. How else can you diversify your summer weekend if there is a body of water in the immediate vicinity? The answer is simple: build a raft and float down the river on it. Moreover building a raft does not require any special engineering knowledge and expensive material. It is enough to remember the basic rules and look around. There may be visible or invisible building materials around. What are we talking about? Let's explain now.
You can build a raft for rafting from plastic bottles
As is already becoming clear, building material Regular plastic bottles serve here. Their number is determined by how many people you expect to build your raft. The fewer people, the fewer bottles. But let's turn to the instructions directly. Let us immediately note that this is an option for building the simplest raft; You can always make your design fantasies come true.
How to build a raft with your own hands from plastic bottles
Adviсe:
- Firstly, plastic bottles need to be very meticulously and scrupulously examined for holes and openings. Why do this, I think, there is no need to explain.
- Secondly, screw the cap of the bottle tightly, which must be filled with air. This increases the raft's buoyancy.
Instructions:
- Using waterproof tape, we make a block of four bottles. This quantity plastic containers optimal because if damaged, the unit can be easily replaced.
- Wrap them with tape as tightly as possible to each other so that the raft does not fall apart. The number of blocks is again determined by the carrying capacity of the raft.
- Next, the blocks are tied into sections, which are formed along the width of the structure.
- The sections are already connected to each other to form the raft itself.
- Next we make the deck of the raft. There is no way without it; passengers with their belongings will be accommodated on it. We make the base from two wooden boards, the length of which should be equal to the length of the raft.
- We fasten the boards on top, across the first two. The distance between them is 40-50 cm. We attach some of the raft bottles to them using rope and waterproof tape. To make it even more comfortable to be on deck, cover the bottom of the raft with plywood and place a tarpaulin on top. This will help prevent things from getting wet.
You can build a raft for children. A homemade raft that can be launched in streams or a rubber pool is very easy to make from a piece of cardboard and two plastic bottles.
How to make a raft from barrels with your own hands
Another option that is not very labor intensive is a raft made of barrels. We are, of course, not talking about iron or metal tanks, but about light plastic barrels volume 200-250 liters The barrels will serve here air cushion for a raft, you will still need to attach a wooden frame on top. Where can I get them? If you know auto chemical dealers, I think they will be happy to get rid of useless containers.

Barrel raft
So let's get started.
- First of all, you should seal the seams and openings of the barrels with sealant so that air does not escape from them.
- While the sealant dries, we assemble the frame from the boards. It is usually rectangular in shape, with two additional longitudinal boards closer to the edges. The distance between the edges and these boards should be equal to the diameter of the barrels.
- Our barrels will be attached to these unique “corridors”.
- Next we install the flooring on the frame.
- Then we begin to adjust the barrels. It is best to secure them with a rope, tying them tightly to the deck along the entire length of the raft.
- That's all, the raft is ready.
How to make a raft with your own hands from inner tubes
The technique for making a raft from autocams is identical to the previous version with barrels, with the exception of only a couple of nuances. The length of the flooring or deck should be half a meter longer than the length of the pallet obtained from the auto cameras. This is necessary so that if an obstacle arises on the way during rafting, it does not ram the camera, but stumbles upon the boards. In addition, this will allow you to additionally install an awning or sail on the deck.

Raft of chambers
How to build a raft with your own hands from wood
The wooden raft is the most popular type of watercraft from this series. Dry coniferous wood is usually used for construction. Collecting material doesn’t really contain any tricks. Cut down trees, stack logs nearby.

- Place the logs close to each other on the shore.
- Next, place sticks or poles across the length of the expected width of the raft.
- Then tie the logs and cross sticks together with strong ropes.
- You can also use vines or other climbing plants for this purpose.
To make it easy to steer the raft, it is better to make an additional oar or rudder, or use a long pole.
Which tree is best for a raft?
As mentioned earlier, to build a raft it is better to use conifers, such as cedar, spruce, pine, larch. The tree must be dry and, when checked, be immersed in water no more than 5-6 cm.
What is the Kon-Tiki raft made of?
From the school history course, everyone knows about a traveler named Thor Heyerdahl, who went on a long sea voyage on a raft called Kon-Tiki, which in turn was named after the sun god of the ancient Incas.

It often happens that you have to fish somewhere in a remote reservoir. But there are no watercraft there. Or they are too bulky to be delivered there. The way out of this situation can be a simple design, very compact and fairly light. homemade raft. For example: from balloons...
Early in the morning I went to the forest lake, where the day before I set up the vents and scattered the mugs around the water area. While approaching the lake, I heard people talking somewhere very nearby. “Who brought this here so early?” I thought anxiously. After all, it was in the very place where the voices were heard that my homemade raft of car cameras was hidden. He quickened his pace and, rounding a pile of massive rocks, saw on the shore two guys and a girl sitting by a dying fire.
Approaching them, I greeted them and asked in surprise what brought them to this wilderness?
The word “raft” had a magical effect on me... I am very interested in any kind of watercraft, I have seen a great variety of them. I am especially attracted by the originality of the design and the method of movement on water. “What are they going to make the raft out of?” – I thought, looking around. But I didn’t see anything special... Two large backpacks, about a dozen different sticks and poles, several thin planks. That's probably all they had.
Meanwhile, the second guy, tall in jeans, a baseball cap, and the girl in shorts pulled out of their backpacks two plastic and one rubberized bags, a coil of thick rope and a small tightly stuffed bag. When they unwrapped the bags, they turned into bags, and in the bag there were... ordinary balloons. Having poured the balloons onto the ground, the three of them began to inflate them. Moreover, they filled it with air a little more than half.
Why bother if I have a car pump? – I suggested.
“No need,” the tall guy answered, and after inflating another balloon, he explained: “We have everything checked, it’s faster.”
Picture 1.
After inflating the balloons, they immediately stuffed them into bags and as a result they got three unique pontoons. Each of them is 60-70 centimeters in diameter and about two and a half meters long. Having finished filling the bags, the guys tied them and pulled them together with a piece of rope. (see Figure 1) Moreover, the rubberized bag ended up in the middle.
Then they laid five poles across the pontoons, fastening the entire structure around with a rope. After carefully checking all the components, we dragged the structure to the water. At the very edge, the tall guy tripped and fell to the ground along with the pontoon. And immediately a loud hissing of the pierced balls was heard.
The guys, not paying attention to the hiss, laughingly lowered the pontoons into the water, sat on them and began to swing. But the design behaved like a cork and was immersed in water by less than a quarter. Having clearly demonstrated the reliability of their watercraft, the company tied planks to the pontoons, and in full assembly, their raft looked like in Figure 2.
 Figure 2
1. Pontoon made of balls.
2. Crossbars.
3. Flooring boards.
4.Tightening rope
While they were getting settled, laying their belongings on the raft, I quickly brought my raft of two car tires, pumped it up, hoping they would appreciate it. However, this did not happen...
In your raft, it’s enough to pierce at least one chamber - and the seams are done,” concluded the guy in a bright orange T-shirt, looking skeptically at my raft. “But this will never happen to us.” Not only do we have a lot of balloons, but we also inflate them slightly, which gives additional plasticity. And the carrying capacity is much higher...
Oh, oh! – I couldn’t resist.
“Sit down with us and see for yourself,” the girl suggested.
I followed her advice... Under the weight of four people, the raft sank no more than a third of its height. My raft had great difficulty supporting two people. Moreover, he was very unstable. With that we said goodbye. Looking at the sailing raft, I thought that, in addition to fishing itself, it could well be used for an overnight stay for fishermen on cold land.
This raft design shows how inexhaustible the imagination of tourists and fishermen is. Each of them is able to build their own watercraft, which can easily replace a bulky standard boat.
Homemade anchor
Anglers who prefer to fish from a boat need an anchor. Usually for this purpose they use a stone, some suitable piece of iron, or simply stick a stake into the bottom.
However, there is a more “civilized” way of making an anchor. To do this, you just need an old, not very deep, aluminum bowl that you don’t need. It is necessary to drill or punch (with a core, a thick nail) a hole for the bolt and secure it on both sides with nuts (see Figure 3).
 Figure 3 - homemade anchor
The result is a collapsible anchor that fits well into soft soil and reliably clings to uneven bottoms. And at the same time it is easily removed from the most stubborn places.
Let me clarify: the bowl should be selected as large in diameter as possible.
Alexander Nosov


