Ideas for making clothes hangers with your own hands: photos and drawings of a hanger for the hallway. A variety of options for making a homemade clothes hanger.
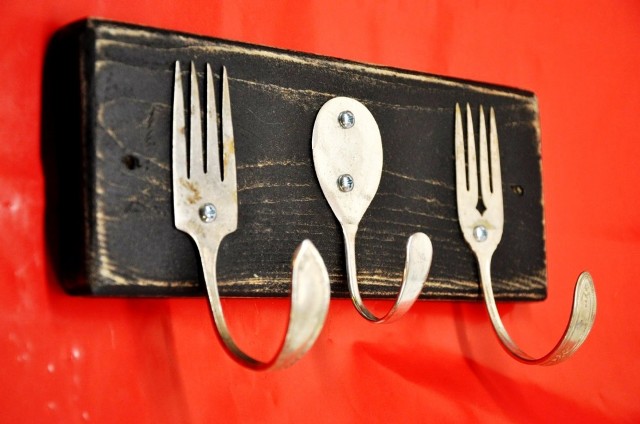
You can make a clothes hanger with your own hands from scrap materials that are lying around idle at home. Craftsmen never cease to amaze with their ingenuity; a homemade clothes hanger made from ordinary forks is a clear example of this.
A similar version of a hanger made of metal spoons.
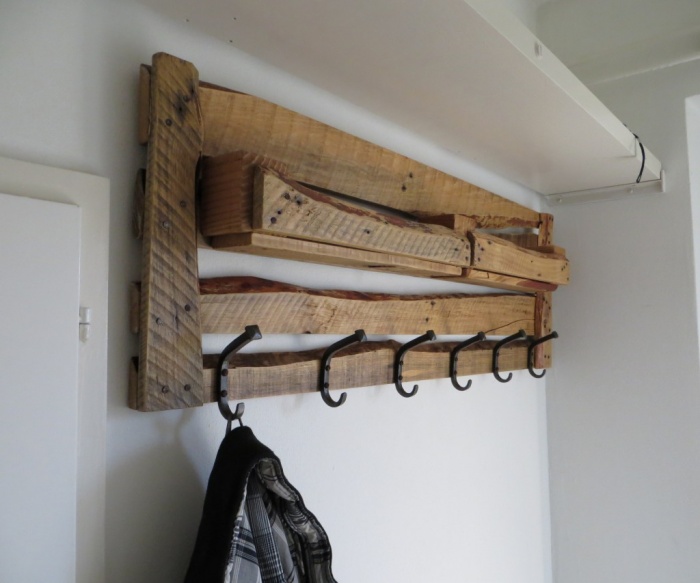
Clothes hanger made from a pallet.
Here is a clothes hanger made from a pallet, and again the old pallet has a use. A wooden pallet is sawn into two parts, from each half of the pallet you can make a hanger, just paint the workpiece and attach the hooks to the boards with screws.
Another option for a hanger made from a pallet, here we use a whole wooden pallet, it is sanded with sandpaper, the boards are painted in different colors and hooks are attached.
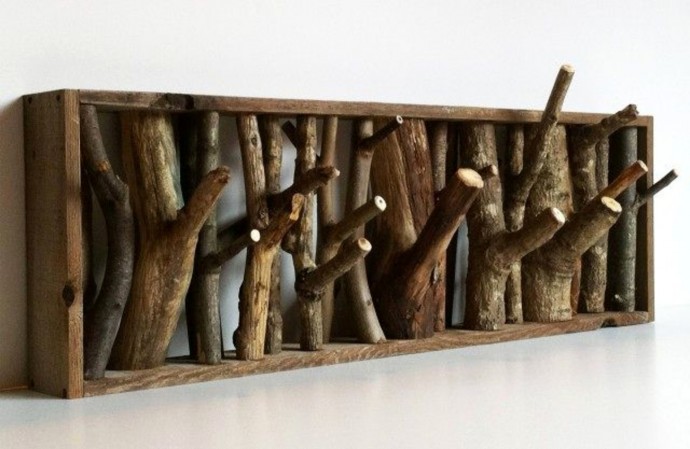
Clothes hanger made of wood.
This hanger is more suitable for a summer house or a bathhouse; wooden knots fixed in a wooden structure are used as hooks.
Hanger made of metal profile and bars.
The structure consists of several bars and metal profiles fastened together.
Wooden hanger with your own hands.
Used here wide board with an imitation of a piece of old wood, coat hooks are made of bars and secured with screws screwed into reverse side boards.
The wood is fired blowtorch, which is how the original texture of the product is achieved, The final stage coat the hanger with clear varnish.
In this version, there was some carving work.
And in this design, instead of hooks for clothes, door handles, which can also be coated with paint.
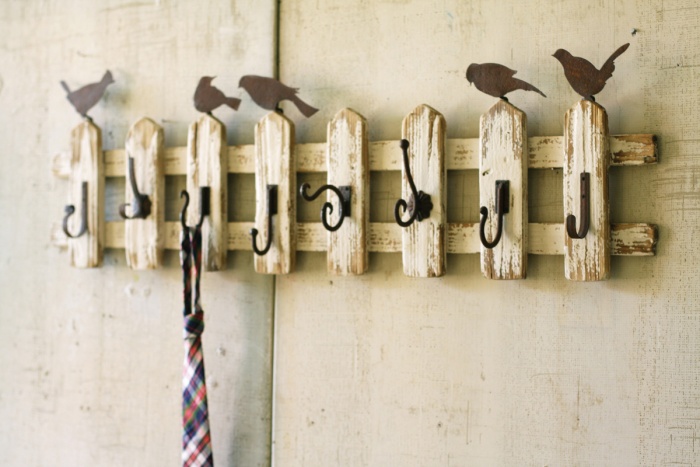
An interesting option for a hanger made from boards.
An original homemade hanger in the shape of a tree.
To make it, thick plywood is used, the outline of the wood pattern is drawn and cut out electric jigsaw. The structure is painted and attached to the wall with dowels.
Hangers for children's clothes.
The hanger parts are cut out of plywood with a jigsaw and painted. bright colors, in this way you can make a hanger in the form of animal figures.
floor hanger for DIY clothes.
The simplest version of a floor-mounted clothes hanger made from pipes; to make it you will need a thin aluminum pipe 2 - 2.5 m long. The pipe needs to be bent as shown in the figure and the clothes hanger is ready.
Wall hanger made of pipes.
And this hanger consists of a pattern on the wall, coat hooks are attached with dowels directly to the wall.

Today I want to tell you about how you can make homemade hangers for your home wardrobe at home. I have been practicing this technology for a long time. I hope that someone this option will be interesting.
I usually make hangers in batches of 15-20 pieces. In this case, they can be manufactured step by step, which greatly simplifies the entire process.
Materials and tools
To make it you will need:- A piece of plywood or fiberboard for making a template;
- Cutting boards 15-20 mm thick without cracks;
- Wire 4 mm thick;
- Nut M4;
- A cap from a felt-tip pen or a soft plastic tube.
- Tools and hands.
DIY making
First from fiberboard sheet I made a template by cutting it out with a jigsaw. I took the template size from a standard plastic hanger.
Then I transferred this template onto the boards with a pencil in such a way as to avoid getting into the cracks, and the existing knots were inside. They can then be cut out.

I drilled two holes from the inside using a Forstner drill with a diameter of 22 mm.

I cut out the contour of my future hanger with a jigsaw and cleaned it with a sander.

I marked the future hole for the hook and drilled it with a drill with a diameter of 5 mm. To drill the hole evenly, I used a vice when drilling.


From the inside drilled hole I used a rasp to make a groove into which the nut that will hold the hook will be placed. This is necessary so that the hook does not cling to clothing.

He clamped it in a vice and sawed off a 20 cm long wire with a hacksaw, rounded one end with a file, and chamfered the other. I used sandpaper to remove the rust from the wire.

From the outside chamfered I cut an M4 thread with a die, approximately 5 mm long.

To bend the hook, I made a special mandrel from a birch block. I drilled a hole in it with a diameter of 6 mm, clamped the mandrel in a vice, and then inserted the end of the wire into the hole and bent the hook.

To prevent the hook in the hanger from falling through, I made a stopper from a cap from an old dry felt-tip pen. I sawed off the top part of the cap and inserted the cap into the hook.

I then inserted the hook into the hanger and secured it with an M4 nut.
That's the whole structure.
Production video
You can see more details about the manufacturing process of this hanger in my video:A hanger in the hallway is a must-have element. This is especially noticeable when the hallway is small in size and it is not possible to install a closet in it. Now there are a lot of options for different hangers that you can choose from, but the most popular are wooden ones. wall models hangers in the hallway.
Criteria for choosing a hanger
If you decide to purchase a clothes hanger for the hallway, and not make it yourself, you should find out about the criteria according to which you choose this item furniture:

First of all, a wall hanger should be as functional and practical as possible. To do this, all its components must be coated with special solutions that are designed to protect it from moisture and other influences.
Assortment of wall hangers
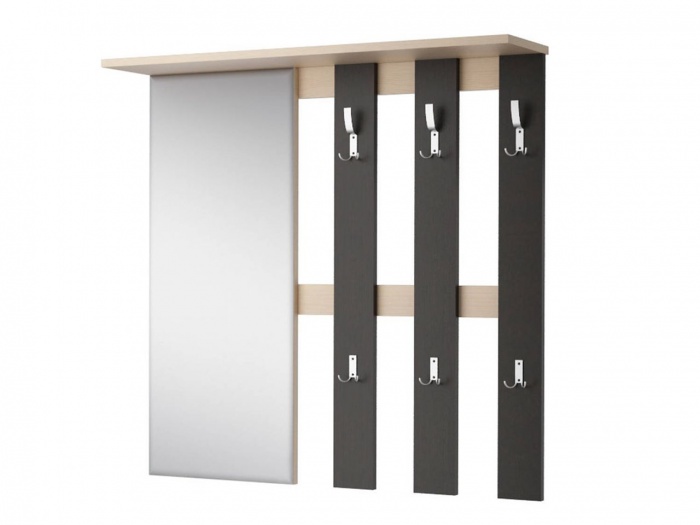
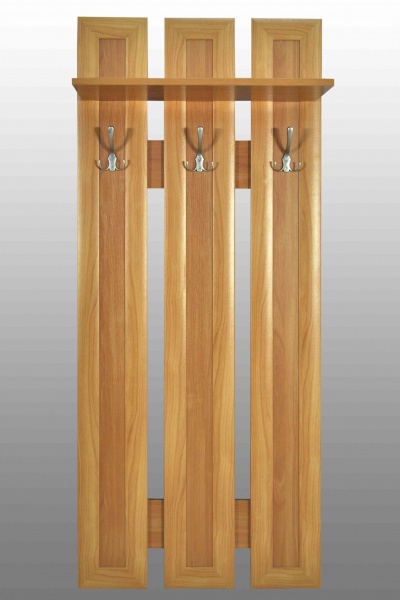
If we talk about the types of hangers that are mounted on the wall, then you can get confused in the models offered. In the traditional version this piece of furniture It is a bar on which hooks are attached. It can be located vertically or horizontally. The first option allows you to visually raise the ceilings in the hallway, so it is more in demand among buyers. And horizontal models are compact, and it will not be difficult to place them even in a small corridor.
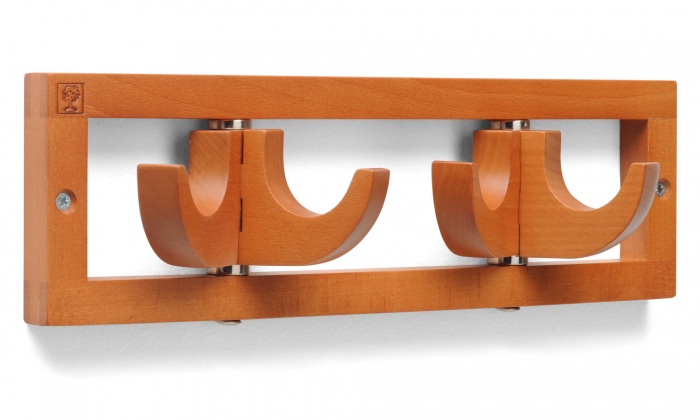
Vertical hangers
This type of structure is made from laminated chipboard or wood, maintaining a length of 40 cm to 2 meters, depending on the model. The shape of this object can be any, for example, round, rectangular or curved.
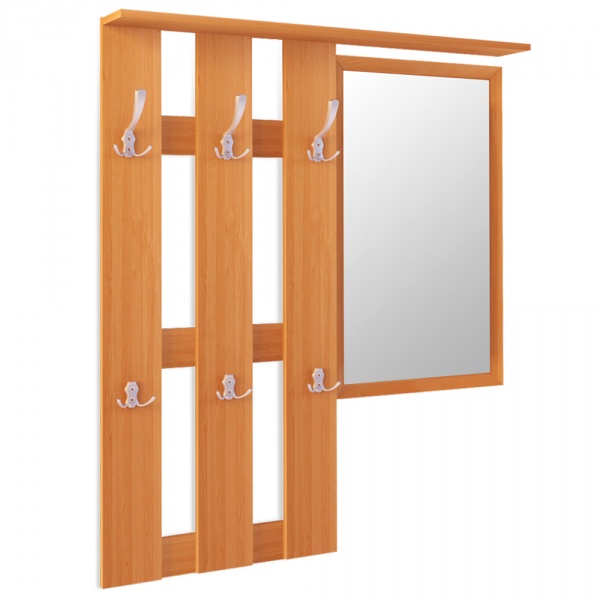
It is made from a single piece of wood, or from several lamellas, which can be equal to each other, or can be asymmetrical elements. You can choose an option with a built-in mirror, and its location can be right or left. For classic interiors designs upholstered in leatherette and having a quilted pattern are often used.
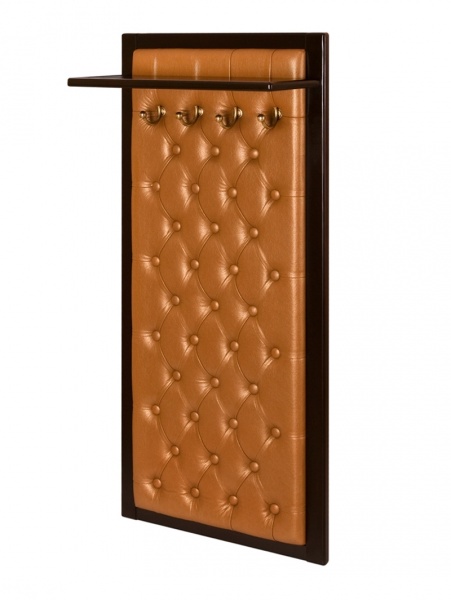
From a functionality point of view, it is very important to have a shelf at the top of the hanger so that you can put hats. When choosing, be sure to pay attention to the number of hooks. There should be enough of them to accommodate all the necessary clothes. If you like the model, but there are not enough hooks on it, then it is possible to install additional ones.
Advice! Before purchasing, you need to carefully measure the free space that is intended for the hanger, so as not to buy a model that is not suitable in size.
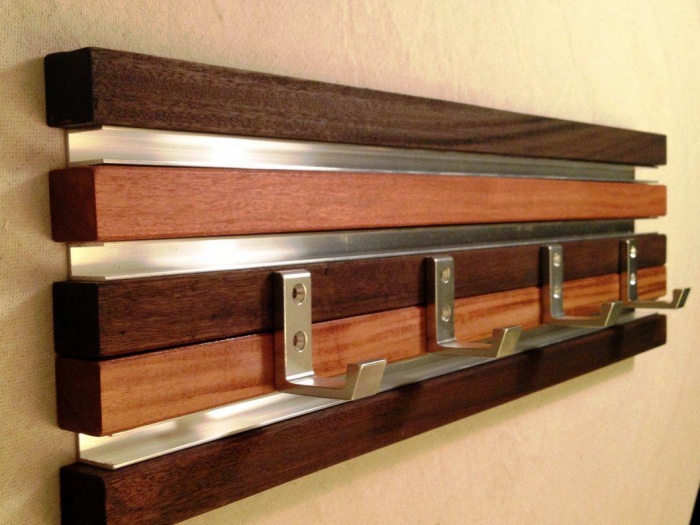
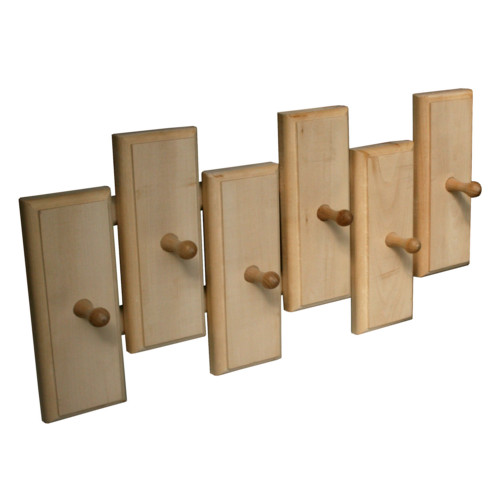
Horizontal and designer hangers
Such designs can visually increase the width of the wall. In addition, they are more compact and can be installed on a small wall. basis horizontal hanger is a board with wooden or metal elements. IN modern models A combination of wood and plastic is used.
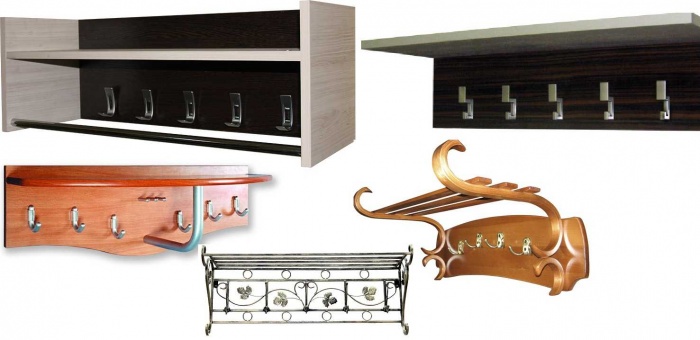
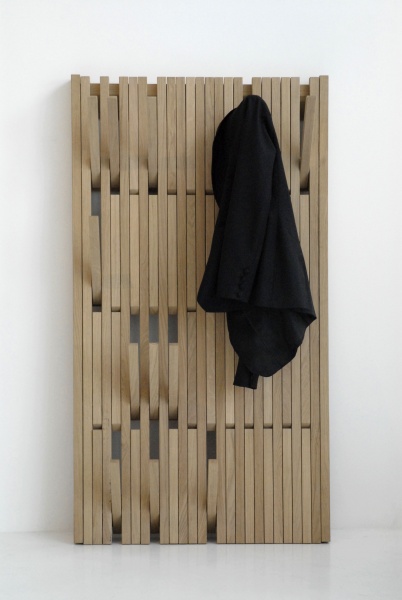
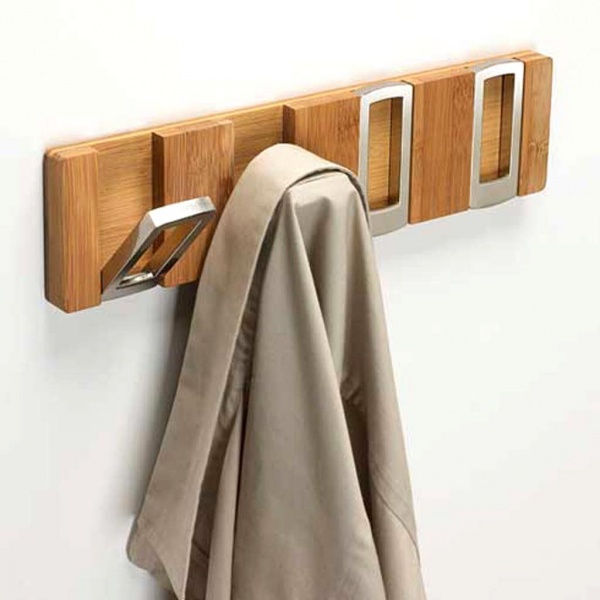
The imagination of designers knows no bounds, which is why hanger designs are now being created that were never imagined before. The idea with folding hooks is very interesting. Such hangers are made of wood, and can also be made of metal. The highlight of them is that the panel consists of many elements that, if desired, can be bent and turned into a functional hook.
For modern interiors minimalist hangers that do not contain any unnecessary elements in their design are ideal decorative elements and can complement a simple room.

You don't have to buy expensive design solution for the hallway, you can create a unique hanger with your own hands, the analogue of which will no longer be found.
Making a wooden hanger with your own hands
If you have some materials and time, you can create a wooden hanger according to your own ideas about this element of hallway decor. We will look at several options for making hangers with your own hands.
Simple model
To perform the simplest design wall hanger we will need:
- Material. This can be a processed board and hooks. You can use something else as hooks, for example, button handles.
- Hacksaw
- Hammer
- Fastening tool
- Measuring instruments such as tape measure, angle and level.
- Pencil.
The simplest design is a bar with hooks. To do this you need to take a board the right size. The length depends on how much free space is available on the wall, and the width can be as desired by the master.
Important! The board must be free of defects and as dry as possible.
The surface of the board can be coated with varnish or stain to make it more decorative. After drying, you can screw it to the bar required amount hooks
After the hanger is ready, several holes are drilled in the wall, their number depends on how long the board itself is. There must be 5 cm indentations from the outer hole on one side and the other. The holes are equipped with dowels, and the finished hanger structure is attached to the wall.
Regarding hooks, we can say that whatever is at hand will do. For example, unnecessary ones will look original spanners, which are first cleaned and polished. After this, they need to be bent and several holes drilled into the part into which self-tapping screws are inserted for screwing to the bar. Instead of keys, ordinary forks also look interesting, but they must be steel, since aluminum ones are very fragile.
If possible, instead of hooks you can use tree branches that are screwed to the plank. This does not have to be done in one plane - you can arrange the hooks in a chaotic manner. This arrangement will give originality to the hanger.
More complex designs
To prevent things from staining the wall and getting dirty themselves, the design of the wall hanger is being improved with your own hands. To do this, take two planks, which are parallel in width to each other so that one is at the top point and the second at the bottom.
Several strips are fixed between them using self-tapping screws, which are twice as long, so that it is possible to efficiently tighten the elements together. The width of the vertical parts can match the width of the horizontal ones, or maybe a little less.
Additionally, it is possible to make a shelf for hats. To do this, a board with a width of 25 cm is mounted on top. general design it is attached using metal corners.
Making another variety of more complex design hangers:
- Take 7 pieces of bars with a cross section of 5*5 cm. They should be about 30 cm in length.
- The boards are being processed grinder, the corners are smoothed on them.
- The treated elements are coated with several layers of varnish.
- The bars are arranged in the shape of the letter “P” and fixed to the wall in holes prepared in advance.
- In every plank feather drill 2 holes are made. They are equipped with cylindrical dowels, painted to match the color of the hanger.
Important! The dowels are attached with PVA glue.
An interesting model of a wooden hanger is the design in the form of a tree. It is made from a large sheet of plywood, MDF or chipboard, on which the necessary outlines are applied with a marker and the part is cut out with a jigsaw. The ends must be processed and painted or edged. The product is attached to the wall with self-tapping screws. The branches of such a hanger become like hooks.

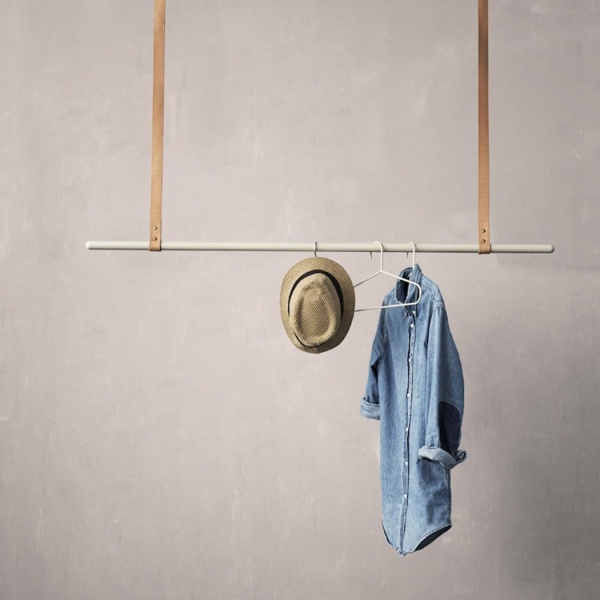
It is not always possible and willing to install hooks on a hanger. In this case, you can mount a metal or wooden rod. It is important to remember that if the bar is too long, then it is necessary to install a jumper in the center.

You can also not spoil the wall with fastenings, but create a minimalist chrome ceiling-type hanger. To do this, 2 flanges are fixed on the shelf, into which pipe sections 90 cm long are inserted. Using angles, we mount a horizontal pipe between the previously installed sections. Thus it turns out perfect option hangers for trampolines.
Conclusion
A hanger in the hallway is a mandatory attribute and functional element. What it will be like depends only on the style and preferences of the owner. You can buy a ready-made design, or you can make it yourself. In any case, this piece of furniture will appeal to all family members.
As you know, not only the theater begins with a hanger, but also a visit to other less pretentious institutions. Every housewife, of course, wants her house to be remembered by guests not just for its rich treats, but for its unique furniture.
More than just a decorative element
Making an interior item both beautiful and multifunctional is not easy. But with regard to a clothes hanger, these two points are fundamental, because the limited number square meters in the hallway obliges you to save not only free space, but also “working” space.
For small rooms should only be considered floor options hangers. Why?
Firstly, the things that should be in the hallway belong to the demi-season period or the cold season. Jackets, fur coats, and down jackets weigh a lot, which is why ordinary hangers rarely support their weight. And when not only parents’ coats are hung on one hanger, but also children’s jackets, guests’ raincoats, grandmothers’ umbrellas, even the most persistent “fighters” cannot withstand this load. The “correct” floor hanger allows you to place all the necessary things, and can also easily support their weight!
Secondly, winter and demi-season coats often differ radically in weight. As you know, it is impossible to put fighters of different weight categories into the ring. The same case: if a September raincoat hangs on one side of the scale, and a fox fur coat is piled on the other, the mechanism will crack. The stains from dirt stains will have to be removed from the beautiful fur of the fur coat, and the unstable hanger will need to be repaired.
Thirdly, things need space and air - without it they wither away. Lack of the required distance between several warm things gives rise to an unpleasant odor and infections. That is why it is important to leave some space between the fur of a fur coat and, for example, a sheepskin coat. Floor-standing ones with a strong rod allow you to correctly place almost all warm items into categories without the risk of mold, unpleasant deposits or suffocating odors.
Here she is, my only one...
Unfortunately, often already ready-made options floor hangers are designed for large apartments or private houses, and the inhabitants of modest “one-room apartments” or “two-room apartments” are allowed to be content only with wall-mounted fragile mechanisms: compact, but absolutely impractical.
In this case, you can develop the design yourself or entrust this task to a professional designer. He will take into account your wishes, the number of free meters in the hallway, the color scheme and the amount of warm clothing.
Which options to choose from?
Corner
The high ceilings of the hallway (in this part of the apartment the ceiling can reach a height of 3-3.5 meters) allow you to make a closet that reaches right up to the ceiling. This allows, in addition to the hanger itself, to fill the space inside the cabinet with various useful internals:
- open/closed shelves;
- retractable drawers/just drawers;
- boxes/hooks.
Your hanger turns from an ordinary rod into a multifunctional closet in which you can hide everything: from shoes and umbrellas to a butterfly net or fishing rods.
Mirror corner
One of the varieties is angular, appearance which brings it as close as possible to a wardrobe (including in terms of multifunctionality). A large number of It makes sense to install mirrors in a closet only if the lighting in your hallway is installed correctly. If desired, you can add wall lamps or mini floor lamps, but you must take into account that such a light source is still not enough if you want, for example, to apply makeup or try on a new skirt.
If you decide to install a mirror, then you need to choose the most convenient option for you: external or internal. The external mirror will have to be washed more often, but there will be no problems with light (if other lamps are present). The interior will be in constant twilight, but the surface will always remain clean. The choice is yours.
Hook hanger
The design of the hook hanger, known to us from the old Soviet times, has now been significantly improved. We are all accustomed to the fact that hooks are usually located on a crossbar, which is attached directly to the wall. This makes the structure entirely dependent on the strength of the wall and the strength of the material from which it is made. Typically, hangers of this design are left for the bathroom or pantry: these rooms do not require much physical effort from the furniture.
Meanwhile, correct design a floor hanger with a small number of hooks allows you to increase functionality and solve some problems associated with the short stature of the apartment’s inhabitants. Floor-standing usually imply the presence of an upper shelf on which they place:
- hats;
- scarves;
- gloves;
- umbrellas and other necessary items.
This is not always the right decision for families with children or for adults whose height is less than 170 cm: if, for example, a person comes to visit you who cannot reach the cherished line, this can put you in an awkward position.
The decision to put things on the lower shelves also poses some difficulties, since many apartments have pets: your beret may not be happy.
Panel hanger - for a classic style
In this case, the only the right decision There will be either a closed wardrobe or special hooks for small items. Of course, the entire hanger cannot consist of such hooks. But they will be an excellent addition to those elements that are already in the design.
Actually, a wardrobe
A sliding wardrobe is now one of the most common, most expensive and, unfortunately, most impractical options. What's the catch here?
- A standard wardrobe takes up too much space. This is a great option for a bedroom or living room, but there is too much free space in the hallway. Most wardrobes are designed according to the same principle: two doors + several shelves + several pencil cases + several hooks. Any additions are considered unnecessary, since this model has gone through fire and water.
- The assembly of sliding wardrobes makes them very fragile for such a conflict zone as the hallway. Agree, on this small area Anything can happen in space: soccer ball will break the outer glass of the cabinet, the cat will jump into the bottom pencil case, and the door will slam shut, the neighbor who came in to buy salt will accidentally hit the door with his shoulder, and she will jump out of the rut. Movable structures are always not The best decision for rooms in which there is active movement.
Open hanger bench
This is one of the most conservative and most acceptable solutions for small apartments. A hanger-bench usually consists of the following modules:
- several upper cabinets (options with open shelves or mezzanine models are possible);
- several lower pencil cases for shoes (open shelves or retractable shelf boxes are also possible);
- a base with attached various models of hooks and a crossbar (sometimes a mirror is added);
- shop.
These are rarely metal or plastic. The design of this somewhat old-fashioned, but very practical unit is carried out exclusively by people who know a lot about organizing space. Products are usually made of wood; hooks, base and crossbars in this case should be metal or also wooden.
In addition to strength, it is good for apartments where elderly or disabled people live. A stool next to the wardrobe takes up an unacceptable amount of space. The bench hanger is more compact. The option that, between you and me, you can think about...
Hanger bar
“Minimalism is our everything,” this phrase has practically become the motto of postmodern interior design. A small apartment with small rooms and small furniture needs a small hanger.
The hanger-bar can fit everything that a couple needs in a cozy “one-room apartment”:
- several warm coats;
- several down jackets;
- demi-season raincoats;
- sport jacket;
- vest;
- handkerchief;
- several hats.
The stand below can accommodate several (6-8) pairs of shoes (for one season). True, shoes will have to be removed from time to time (alternating summer and winter seasons), but the same problem arises in the case of a wardrobe.
Remember a simple truth: the more space there is for things, the more things try to fill that space.
Advice
When purchasing a crossbar, pay attention to the material from which the crossbar is made, the holders and the fastenings themselves. The rod must withstand the weight of coats and jackets, and also all the hangers that you will attach to this crossbar.
Below there may be an additional shelf for shoes, made of a material that will not be too easily soiled (pay attention to the color).
Have you chosen a type, but are still confused about the material from which it will be made? Both the appearance and its strength depend on the material.
What to choose from?
Plastic, wood, metal: which is more practical?
Plastic
Hangers made of plastic are the most impractical of all that the furniture market offers us. Weak strength, inability to attach heavy and strong fasteners, fragility. Things made of plastic are now becoming less and less common in rooms where a child may be.
Plastic furniture offers a wealth of design solutions:
- color mixing;
- the ability to melt and create original shapes;
- matte and glossy.
This is especially true for manufacturers of wardrobes: the more beautiful the furniture, the faster the owner will be found. Meanwhile, after just a few months, the same owner is forced to take the warranty card out of the box, since a cabinet or shelf made of plastic will show its real face after just a few weeks of use: a screw will fly off, the glossy surface will be scratched, or even worse: the door will fall off...
A sad prospect, isn't it?
Metal
Good strength, but not too much practicality - that's what metal cabinets are all about. Metal structures can withstand a giant's outerwear, a dozen of the heaviest sheepskin coats, and many pairs of boots... However, the obsessive shine and too sharp reaction to temperature changes may not be very pleasant for both floor covering, and wall cladding.
Often, due to too sharp a temperature change (condensation has formed on the hanger), excess moisture begins to have a decomposing effect on the space of the wall near the hanger: wallpaper peels off, plaster “flows,” and unpleasant streaks appear on the paint. Sometimes parquet or linoleum may become deformed. Moreover, the deformation is caused not so much by condensation as by the large weight of the hanger: metal constructions weigh up to several tens of kilograms.
The external strength is very attractive for a floor hanger. But is this characteristic worth it? cosmetic repairs hallway?
Tree
Last but not least, material.
1 First, quality. Wood furniture (made from real wood, not recycled sawdust) is known for its durability.
2 Secondly, good interaction with the external environment. Wood does not give in to internal deformation, and does not spoil the floor, walls, or ceiling. “Sweat”, “condensation” - these are words that are not known to wooden furniture. When you buy a coat rack made from durable wood, know that it won't ruin the color of your walls, warp your hardwood floors, or stain your ceiling.
3 Thirdly, wood is a “healthy” material. Trend towards improvement environment manifests itself most fully in the furniture industry: interior items began to be made from environmentally friendly materials. This is not the cheapest option. But, on the other hand, what could be safer for your health and the health of your child than wooden furniture. Natural material promises the absence of an unpleasant odor - a fairly important criterion for hangers closed type. Winter items that must be stored in this makeshift pantry during the long spring, autumn and summer months (even if they are packed in covers) absorb unpleasant odors which produces furniture. For environmentally friendly wood, this problem does not exist: you can forget about mothballs. The clothes will retain their presentation and “sales smell”.
4 Fourthly, wooden hangers look very advantageous, for example, with stands for keys or wooden baskets for umbrellas. It is very difficult to select appropriate color scheme and the design of little things for furniture made of plastic or, especially, metal. You have to buy them either as a set or make them individual elements to order after you have decided on the main accent (in the case of a small hallway, this accent will almost always be a hanger). Wood goes well not only with other wooden products, but also with furniture made of plastic and metal.
You can't do without a hanger in the hallway. Of course, outerwear can be hung directly in the closet, but this takes longer and is not so practical. The wall hanger is very convenient for narrow and small hallways; it is quite roomy and does not take up much space.
We offer you 5 master classes on making wall hangers with your own hands from available materials: wood, leather, branches or pipes, as well as inspiring photo ideas.
This hanger will display the phrase “I can also cross-stitch” in every sense, show your creativity and become good decoration Houses.

Materials
In order to create it, you will need the following materials:
- plastic or metal panel with perforation,
- multi-colored floss threads (in principle, knitting threads are also suitable),
- scissors,
- hooks (in this case 4 pieces with a ball at the end).
ADVICE: where can I get such a perforated sheet? In any hardware store or a furniture store - ask for perforated sheet. And they will cut you the size you need.
Work order:

- We buy a perforated sheet of the required size.
- You do regular cross stitch with threads, only the fabric is larger.
- You can choose any word you like, or a simple picture (a heart, for example), the main thing is to make sure that everything fits and the spaces between the letters are the same.
- When the inscription is ready, attach the hooks through the holes in the panel and hang the hanger on the wall (you don’t even need to drill holes for the fasteners, they are already there).

Wooden hanger
If you have a pallet lying around at your dacha, then this master class will help you find one for it. useful application. If there is none, then the hanger can be made from an ordinary wooden board.

Necessary materials:
- Pallet or wooden board
- Hooks
- Paint and paint container
- Brush or roller
- Protective gloves
- Drill
- Jigsaw
- Sander or sandpaper
- Measuring tape
- Pencil
- Wood cleaning cloth
Step-by-step instruction:
Step 1: Preparing the Wood

- Separate one board from the pallet (or take a regular wooden board), clean it of dirt. Trim to size if it is too big.
- By using grinder make the surface flat and smooth; if you don’t have a machine, you can use sandpaper manually, it will take more time, but the desired result can be achieved.
Step 2: Mark where the hooks will be

Use a measuring tape to mark the points where you will attach the hooks. They can be located along the same line at equal intervals, or above and below at intervals, as you prefer.
Step 3: Drill Holes for Hooks

- Make holes for the hooks with a drill (check first that the width corresponds to the desired size).
- Once completed, clean the board from dust.
Step 4: Paint the Boards

- Choose the color and type of paint depending on your preferences and interior. Used here acrylic paint on water based bright blue color.
- The paint can be applied with a roller or brush, along and across the board, evenly filling the entire space, the last ball should run lengthwise.
If you wish, you can use a wood preservative before painting to ensure its longevity.
Step 5: Insert Fasteners

- On the back of the board, insert the fasteners that will be used to hang the board from the wall. They should be located symmetrically to each other, relative to the middle of the board.
- Here we used hooks that are screwed into previously drilled holes. They are easy to attach, the main thing is that they have the appropriate diameter.

Create your own design - choose the color, paint with patterns, choose the location of the hooks, as well as their color and size. All is ready!


From copper pipe
This hanger is especially suitable for hat lovers. It is difficult to find a place for them where they can be stored and not wrinkled; it takes up too much space in the closet. Same great option and for direct use - for clothing, and for decorating a room. Of course, in addition to hats, a clothes hanger will also fit here.

Necessary materials:
- Copper pipe
- Scissors
- Clothespins
- Rope

Step-by-step instruction:
Step 1: Prepare the base
Cut the rope to a size large enough to hang the hanger. Pass the rope through the copper pipe.

Step 2: Attach Hat Hanging Strings
Cut a few more pieces of rope and tie them onto the pipe, leaving enough space between them so that the hats do not interfere with each other later.

Step 3: Hang the hanger
Attach the ends of the rope with copper pipe to the wall or ceiling (for this there must be hooks or a pipe). Attach clothespins to the ropes hanging from the pipe; now you can hang hats on them. You can also hang a clothes hanger on the pipe.


ADVICE: Choose the length of the pipe depending on the amount of free space on the wall, hats and clothing.

As you can see, it is done very quickly, even in half an hour you can do it, and it looks very original.
Leather belt hanger
This wall hanger is suitable for the hallway, kitchen, and bathroom. The type is similar to the hanger described in the previous master class, but its use is more universal. It will beautifully complement the interior of your apartment, while requiring very little effort and time to make.

Necessary materials:
- Leather belts (2 pieces of fairly soft leather)
- Two small pieces of leather (harder)
- Wooden stick (from a tree branch)
- S-hooks
- Scissors
- Thread and needle (suitable for leather)
- Leather punch
Step-by-step instruction:
Step 1: Preparing the belts

- Trim to required length two leather belts, they must be the same. Wrap the strap around the stick and mark how much you need to wrap around it.
- In the place where the belt meets after the girth, it needs to be sewn to fix the stick so that it does not fall out. Do the same with the second belt.
- To prevent the seam from being visible, make decorative leather straps: use a narrow strap to wrap the strap attached to the stick, at the seam, and sew it, connecting the ends (the same with the second strap).
Step 2: Attach the hanger

Using a leather punch, make holes on top of the straps (in the center of the width) for hanging this design on the wall or ceiling (on previously attached hooks).
Step 3: Hanging Hooks

Hang the required number of S-shaped hooks on the wooden stick and the hanger is ready for use.

From branches and cuts
Branches and cuttings are excellent material for wall hangers. First of all, it’s very affordable! And secondly, wood will never go out of style and will perfectly complement the style of any apartment!
You can make many crafts for your home from branches - more on that in the article .


From pallets
If you are going to make a wall hanger and choose a cheap and quick option, then a hanger from wooden planks or pallets - this is exactly what you need. If you think that it will look ordinary and unoriginal, look at the selection of photos below and make sure that from these materials you can create a truly unique thing that will decorate the interior of your apartment.

Select paint (or simply treat the wood with an antiseptic, preserving natural color), hooks, attach to the board the required form, come up with your own way to decorate the boards.


More complex hangers can be made from wood. More precisely, it’s not even a matter of complexity, they are labor-intensive, you need to spend more time on them.
Technology for making hangers from improvised materials
Having summed up all the master classes, I would like to derive a single formula for making and being creative with hangers. It can be roughly divided:
- The basis- can be any item from a finished board to old items.
- Hooks for hangers- you don’t have to buy them, you can remove them from coat hangers.

Basics from improvised means
You can also use things for making that, at first glance, are not at all suitable for this: skis, oars, rulers, etc. how much imagination is enough? A wonderful way to find a use for things lying around in the pantry.


Hooks for hangers
Hooks also do not have to be standard (although their range of choice is quite wide). Start looking at things with the thought “where else can you be used?” I'm sure that with a little training, interesting ideas they will start to come more and more often, and this applies not only to hangers, of course. 
Attach individual hooks to the wall; their design should look like a decorative element, even if there is nothing on them.


Wall Hangers Ideas
Designers are increasingly coming up with ideas for creative and functional clothes hangers. Sometimes their designs are quite elementary and not difficult to do at home.
Metal, of course, is more difficult to work with, but if you want to create such a hanger, it will not be difficult. Make branches in the shape of a tree or hang hangers on a pipe - the result will be durable and functional.


All these photos are a piece of what you can create with your own hands. Take the elements you like, combine them, and most importantly, have fun with it all!