If desired, the tracks can be made with your own hands, but this is suitable for this unusual material like cork off plastic bottles. Turn on your imagination and, using the tips, create a unique and practical art object in your country house. And you need quite a bit for this: diligence, free time and our advice.
When it comes to waste material, many believe that it is much easier to work with it with a construction one. This is not entirely true. If you want the garden path to become not only a practical element landscape design, but also his calling card, you need to follow some rules. They primarily concern the choice of material and its preparation.
Choosing plastic bottles and caps (corks)
They say that plastic decomposes after 100 years. It's wonderful! Indeed, in this case, it is ideal for garden paths (for the garden). Palette plastic caps quite extensive.
To create beauty, you can use:
- caps from plastic bottles of different sizes;
- lids from tetrapacks, eggplants, and cans;
- metal bottle caps;
- wine corks.
The main requirement for plastic lids is high density. After all, the tracks have a serious load. And it will be a pity for the spent effort if the coating does not last long.
For the track you will need a lot of this material. You can do the calculation yourself:
- measure the diameter of the cork, in 1–2 liter bottles it is 3 cm;
- 33.5 corks are placed in 1 meter;
- 1122.5 plugs will be needed for 1m 2;
- multiply this figure by the area of your track, and you will get the total number of caps.
One family cannot handle such a number of drinks, even if you collect all the caps from bottles and cans, including water, beer, yoghurts and even medicines. Connect everyone you can to the project:
- announce your decision to create an extraordinary element of garden design to friends, acquaintances and neighbors;
- give a call to collect caps on social networks;
- try to negotiate the supply of material with the employees of the nearest cafe.

How to do it yourself in the country
Corks can be laid in different ways:
- face up (resulting in a flat surface);
- ribs up (this track can be used instead of a massager);
- inside up (the coating is textured).
The latter option is only suitable for small areas under a canopy. Otherwise, during precipitation, water and dirt will accumulate in the recesses of the plugs. And for such uneven surface hard to care for.
With varieties of crafts from cans introduce .
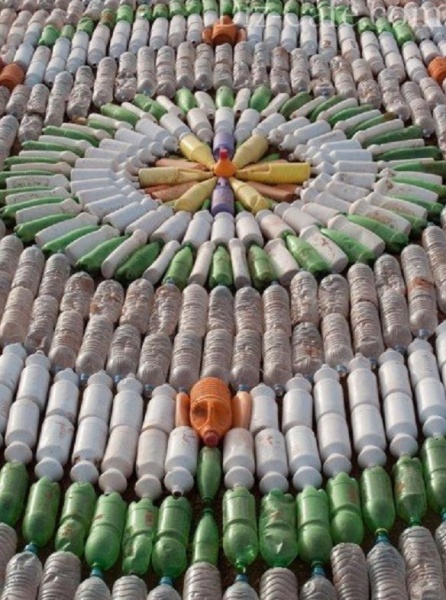
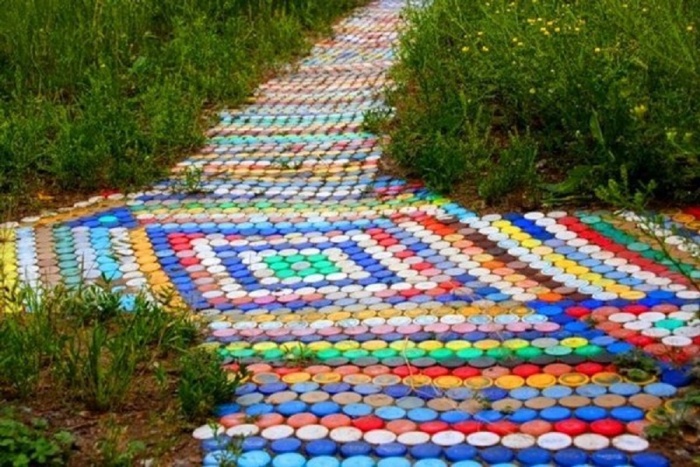
Mosaic laying scheme
This is the most creative part of the job. Before you start paving directly, you need to decide exactly how your path should look. You can lay out the covers in even rows, regardless of color. As a result, you will get a multi-colored scattering of colored highlights in your garden. Such a path attracts the eye and looks impressive.
But if you want something more extraordinary, choose a pattern for your track yourself. Cross stitch patterns will help you with this. Tracks with colored geometric patterns look good. If you are confident in your abilities, you can choose drawings more difficult. Some summer residents create real plot panels under their feet in their garden. It is in the country that such decorations are popular. 
Tools and materials
Despite the cheapness of the material, the approach to creating paths from traffic jams must be serious. Sometimes it is advised to simply level the ground before laying the cork mosaic and start creating by sticking the caps directly into the ground or a layer of sand.
This carpet will not last long. Not only will the covers not hold out for a long time and will begin to fly out one after another, but also the grass will hasten to sprout between them. It is better to spend more time, but do everything soundly.
You will need:
- covers of different colors;
- cement;
- sand;
- construction adhesive or ceramic tiles;
- wooden blocks and boards for formwork.

For the construction of the track you need:
- determine the area of \u200b\u200bthe track and make markings;
- remove the sod and upper layer soil;
- dig a trench 10 cm deep;
- drive supports along the edge of the recess;
- make a wooden formwork, and nails need to be hammered with inside constructions;
- install spacers for reliability (the optimal distance between them is 1 m);
- fill up a layer of rubble, gravel, broken bricks;
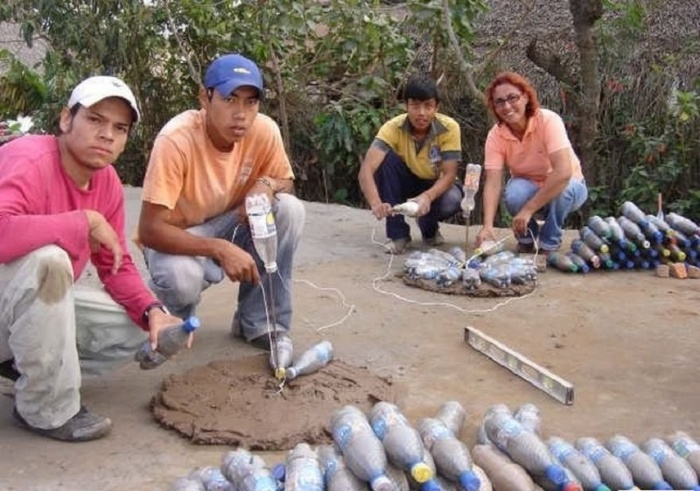
- prepare a solution of cement and sand (4: 1) and add one part of the glue to it, the mass should be of medium consistency;
- pour a small amount of solution onto the prepared site;
- quickly lay the covers, according to the chosen scheme, slightly press them into the cement;
- the solution should almost completely cover the lids;
- after the cement has hardened, go over the top layer with a stiff brush in order to remove excess cement.
The mortar hardens quickly, especially in hot weather, and laying mosaics is time consuming. Do not fill the entire track with cement. Work in sectors. Break your drawing into parts or conditional squares and fill in small areas.
Advantages of garden paths
- The coating performs an aesthetic function not to the detriment of the practical one.
- The material does not require material investments.
- Plastic handles temperature fluctuations well.
- Such paths do not lose their aesthetic appearance for a long time.
- Paths made of unusual mosaics are easy to repair: any cover can always be replaced.

Disadvantages and methods of dealing with them
But such tracks are not ideal, they have serious drawbacks. But knowing in advance what difficulties can arise with them, you can easily avoid them.
- The plastic paths from the lids become very slippery after rain. Such coatings should not be arranged on the central paths. Their place is in the garden and near recreation areas.
- The icy path becomes dangerous. If you need to walk on it in winter, it is better to combine plastic cover mosaics with cement, ceramic or wood designs.
Other options
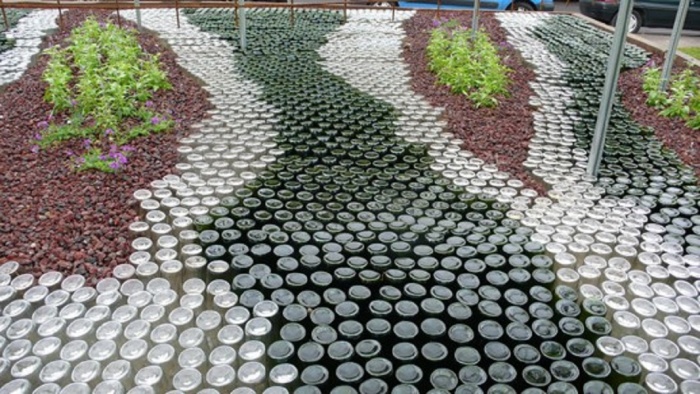
Covers from combinations of plastic caps with a bat look good ceramic tiles. small size elements allow you to lay out bizarre and extraordinary patterns. The result is an original track from bright elements. Such a garden patchwork will decorate the garden and place accents on the site.
Drawings can also be varied with metal covers. And adherents of ecodesign will like the paths from wine corks. Cork wood is a noble material with unique properties. 
Health track from different covers
Homemade massage paths in the garden have become quite popular. They are loved by children and adults. After all, walking barefoot on a textured surface is not only pleasant, but also useful. For such paths, you will need a cement base on which different materials are laid.
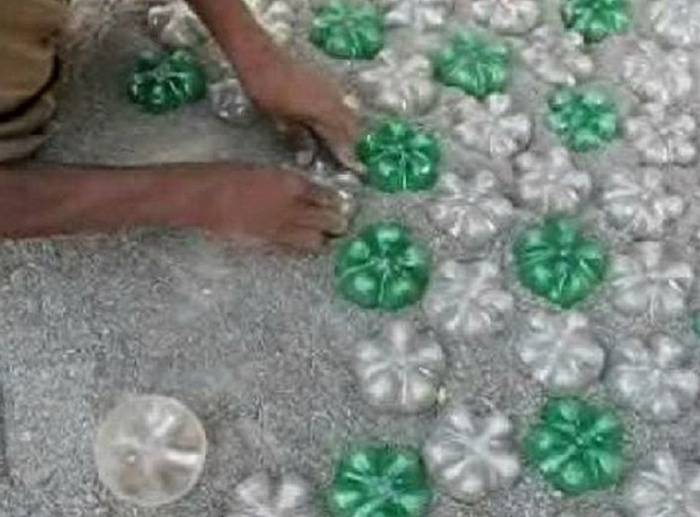
Suitable juice lids glass jars, corks, buttons, sticks. All this stuff is sorted by color and size. Then a sketch is developed. Here you can play not only with color and texture, but also with the way of laying. Covers laid on the end will create a convex surface, and glued with a notch down will give a smoother plane.
From bottles
This material can serve as a wonderful material not only for manufacturing, but also for arranging exclusive paths in the garden. For this, whole bottles or their parts are used.
How to make from plastic bottles
Empty bottles do not withstand serious loads. Therefore, before building a path, they need to be filled with sand, fine gravel or dry soil. If you want to make a color path, then put colored paper, foil or pour a little dye inside the bottle, and only then fill in the sand. When the material is ready, start laying it. 
In this case, you can not do without a cement cushion. Only the hole for it needs to be dug deeper - by 1.5 bayonet spades.
- Gravel is poured at the bottom, formwork is being built.
- The bottles are laid sideways in a trench and poured with cement mortar.
- Seal the masonry. To do this, put a board on the track and walk along it.
- After drying, the formwork is removed.
- Decorate the edges. Any mosaic is suitable for this.
You can make interesting paths from the bottom of the bottle. To do this, prepare a trench about 15 cm deep.
- Cut off the bottom of the bottles (leave 1/5 of the height).
- Make formwork and concrete pad.
- Put the bottom into the wet solution.
From the remains of bottles you can build interesting garden sculptures or greenhouses for seedlings.

Greenhouse for seedlings from a plastic bottle.
About how to put paving slabs told.
How to make glass bottles
The technology is largely similar to the previous one. Only glass bottles it is not necessary to fill them with sand, although the sand will give them extra strength. It is better to take bottles of champagne or wine, but beer ones are also suitable.
They are usually installed upside down. For such a path, a fairly deep trench is needed. Therefore, lane bottles are often cut and only the bottom is used. The laying technology is the same as that of plastic.
The backlit track looks great. To do this, you need to mount small bulbs under the bottles. It is better to take LEDs - they are durable and economical. Bottles are also suitable for building walls, fences and borders.
Video
On the video: do-it-yourself traffic jam paths.
Ordinary caps are a cheap and practical material. They are well suited for paving paths of varying degrees of sinuosity. Surfaces decorated in this way look cozy and colorful. And so that they do not get out of general style plot, complement the garden with bright mosaic sculptures and panels in the same color scheme.
One of the indicators of the well-being of any cottage is the presence of paths. They connect garden buildings, lead to a recreation area, separate beds.
To make such a path, you will need plastic bottle caps, cement, sand, boards and tile adhesive.
Country paths, in addition to their direct purpose, ease of movement in any weather, play a very important decorative role.
Such paths become the main element of the surrounding landscape.
Absolutely any material is chosen for their manufacture, but in order for the path in the country to become truly unique and original, it can be made from the most ordinary traffic jams. This is an easy and very interesting task, which even a child will be able to cope with. But before you make country paths from traffic jams yourself, you need to draw rough sketches on paper. The house, the fence, the flower garden, the rest of the decor - everything should be in harmony with each other. The dacha should become a single entity. Next, you need to decide whether the paths will be monochrome or not, whether to make a pattern or ornament on them, whether they need a small fence. If it is decided to make an image or lay out an inscription, then this must first be depicted on paper, calculating how many traffic jams will be in each row. You also need to collect a sufficient amount of material used and only then get to work.
Construction of paths from traffic jams in the country
Before you start laying the plugs, you need to level the area and fill it with liquid from weeds, and after laying, tamp it down with a mallet.
Required tools:
- Shovel.
- Cord.
- Roulette.
- Hammer.
- Watering can.
Step by step work:
- Wash the corks well and dry.
- Make markup. To do this, you need to decide on the place of the track, drive pegs around the perimeter and pull the cord along them. If the path in the country house is with a bend, then on the turns the stakes are driven in at a small distance from each other so as not to disturb the smoothness of the line. Measure the width of the tracks with a tape measure. If the path is intended simply for walking, then its minimum width is 50 cm, if a wheelbarrow will pass through it or it will be used for other household needs, then it will be 80 cm.
- Sod is removed along the marked area, stones and plant roots are removed. Dig a small trench with a shovel and tamp the soil.
- If the path has a fence, then it can also be made using plastic bottles. Their necks down should be placed next to each other at the edges. decorative fence can be made from any other improvised materials.
- Pour rubble into the trench. Smooth it out.
- Pour sand on top, tamp and lightly pour water.
- Covers bottoms up to be pressed into the sand. As the sand dries, it must be moistened.
Thus, you can lay out the usual straight path in the country house, enclose a flower bed, make a labyrinth, or simply lay out a small area on which flowers in pots will then stand.
If it is necessary to make a more durable coating, then it is better to lay the corks on a concrete solution. The technology is the same, but the sand is replaced by cement. You need to make such a path quickly, and it is better to spread the cement in small portions. When mixing the solution, special dyes can be added to it, then between the covers they will be visible bright colors, not gray dull color. Except plastic stoppers metal ones can also be used. They are also well suited for laying and decorating a summer cottage.

The practicality of plastic bottles is actively used by craftsmen in the arrangement summer cottages. The presence and regular replenishment of plastic containers allows you to decorate not only small decor items, but also take on fundamental structures, such as garden paths. There are several options for arranging a path from plastic bottles, the choice of method depends entirely on the preferences of the owner of the site.
Characteristics of an extraordinary structure
Plastic bottles are a versatile material that is actively involved in budget option landscape design. But, before embarking on the arrangement of paths on the site, it is worthwhile to carefully study all the features of the future structure. The advantages of the path from plastic bottles are as follows:
- financial costs at a minimum level;
- stability under the influence of external factors;
- easy installation, you can involve children to help;
- with small additions to the creative process, the track can take on a bright and extraordinary look.

But any arrangement method also has negative features. Regarding the plastic garden path, these are the negative points:
- The presence of containers of the same volume and color in in large numbers, it is especially problematic to collect traffic jams if the track is made out of them.
- Strong temperature drops can cause deformation of the plastic bottles themselves or the entire structure as a whole.
- Over time, the material fades, and the path will become faded, despite the initial bright decor.
Attention! The most dangerous moment is the operation of the tracks after rain or in frosty weather. An excessively slippery surface may cause injury. Therefore, it is better to exclude movement under adverse weather conditions.

Preparatory stage
Regardless of the scope of the construction process, the work is preceded by preparatory stage. The garden path, where plastic containers act as the main element, can be of several types:
- directly from the whole bottle;
- only the bottoms of the container are involved in the construction process;
- a beautiful ornament is obtained from plastic corks.
First, choose the appropriate type of path and collect the right amount of material. All the immediate environment will be happy to join the process, since everyone has an abundance of bottles in everyday life.

Then on the site it is necessary to make markings and dig a trench. The depth varies from the material that is taken as the basis:
- for whole plastic containers, a deepening of one and a half shovels will be required;
- if bottle bottoms are involved in the process, 15cm is enough;
- the cork path needs an even smaller recess, you can remove about 10 cm of the top layer.
Formwork is installed along the edges of the trench. wooden elements. The bottom is recommended to fall asleep broken brick or other household garbage, in order to subsequently exclude subsidence of the path, for the arrangement of which whole bottles were used.

In each of the three methods, a drainage cushion is formed from sand. After spreading the material, it is carefully compacted, if possible it is recommended to use a roller.
Application of whole bottles
We turn to the main action on the design of the path from plastic bottles with our own hands.
Advice! Plastic containers for the track are selected the same according to four parameters: volume, shape, color and degree of rigidity.
All containers are thoroughly washed, the remnants of the adhesive solution and labels are removed. The containers are dry. The rigidity of the track will give sand, which tightly fill all the bottles. To speed up the process, younger family members are involved in the procedure. Children are always happy to tinker with sand, and helping adults in arranging the site is a double benefit.
Before filling, it is worth considering the design of the track. There are several decoration options:
- use a combination plastic containers two or three colors;
- cover the bottles with resistant paint;
- during filling, add candy wrappers, foil or paper to create bright fragments;
- the original replacement for bright paper will be a shell or sea pebbles.
Well-dried plastic containers are filled with dry sand and screwed tightly with corks. Then the containers are sequentially laid in a trench in a horizontal position. To make the track as smooth as possible, put bottles on top wooden shield and rammed. Here again, the help of descendants is useful. Ask the children to jump on the shield - they will have fun, and you can take a break before the next stage of arranging the track.
To make the track strong and reliable, plastic bottles need additional fixation. To do this, a liquid cement solution is diluted and the gaps between the plastic containers are filled, bypassing the very top of the bottles. When the solution has completely hardened, the remains of the mixture are removed from the surface of the containers with a stiff brush to give it an aesthetic appearance.
There is another way to fix the track. high-quality dry cement is poured between plastic bottles, after which the path is carefully watered from a watering can. After the mixture has dried, final stage remove the elements of the wooden formwork.
Formation of paths from the bottoms
The use of only the bottoms of plastic containers for arranging a garden path is characterized by lower labor costs. The initial steps are identical to the design of the path from whole bottles:
- digging a trench;
- formwork is installed;
- plastic containers are washed and dried.
The bottoms for the track are cut off the same size, the approximate height is 7-10 cm. The trench is covered with a mixture of sand and cement, and compacted tightly. Then the base is carefully watered in parts from a watering can so that the water does not wash away the litter. Start building a path. It is also appropriate to apply a combination of colors. A sketch of the ornament is drawn in advance. When the fixing composition hardens, the formwork is removed.

Comment! The resulting surface is more suitable for decorative purposes and will perfectly cope with the task of massaging the feet. Therefore, it is better to arrange such a path from plastic containers in a small area of \u200b\u200bthe garden away from places of intensive walking.

Organically looks decorative from the bottoms of plastic containers. The order of its arrangement is not much different from the construction of the track. The trench is formed to the width of one bottle. To make the lines even, they initially make markings with pegs, between which they stretch a dense thread, which later serves as a guide. Do-it-yourself path from plastic bottles in the photo below:

Cork ornaments
Patience and perseverance will require a path lined with plastic plugs. So that the material assembly stage does not stretch for a long period, involve the whole circle of acquaintances in the process. When the right amount of plastic stoppers is available, they should be sorted by color. An important stage in the arrangement of the future path is the drawing of an ornament or some kind of picture. It all depends on the ability of the master.
The main steps in the process of constructing a decorative path:

Attention! It is important to achieve when laying flat surface. A wooden shield placed on top, which is pressed down, will help to correct the shortcomings.
How to make paths for giving with your own hands
Do-it-yourself garden path made of covers for children. Master class with photo
Efimova Alla Ivanovna, educator of GBDOU No. 43, Kolpino St. PetersburgDescription: work can be done with children from 8 years old, with the help and guidance of an adult. The material can be useful to everyone who is fond of creativity, loves gardening.
Purpose: work will serve as an excellent decoration garden plot will create a great mood.
Target: creating a beautiful and unusual track.
Tasks:
-teach children how to create paths using cement mortar;
- introduce the process of mixing cement mortar;
- develop imagination and fantasy;
- to cultivate love and interest in nature, creativity in all its manifestations.
Hello dear guests! Today I want to talk about how on the site you can create a beautiful and unique path from improvised means. For a long time we hatched a plan for building a track, as it was necessary to accumulate material, from which we decided to cook. They hoarded all winter. We all drink a lot of water, lemonades, juices, and we save or throw away bottle caps. But in our case, we saved up.
We accumulated covers and decided to lay out a path to our small pond in the country with them. This is our first work in this technique, but I think not the last. There are many ideas and I really want to bring them to life.
Materials and tools:
- sand, eurocement, water;
- a bucket for mixing cement mortar;
- Master OK;
-2 buckets of mayonnaise (capacity for measuring cement, sand and water);
- perforator and mixer for concrete;
- caps from bottles;
-shovel.

cement mortar: For 1 bucket (from under mayonnaise) of eurocement, we need 4 buckets of sand, 1.25 buckets of water .. The sand should be sifted, or just by hand, which is exactly what I did, remove the large stones, sift the sand through your fingers. When all the ingredients are poured into the container, they must be mixed using a perforator with a concrete mixer screwed into it, literally 7-10 minutes, until a homogeneous mass. My solution was mixed in a concrete mixer, as my husband poured the foundation for the fence, and my son and I decided to lay out the path under the guise.
Master class progress:
We already had a pond on the site, and there was a path to it, but the usual one was made of rubble. First of all, we need to decide on the place where we will place our path, draw or dig (as I did) the place of the path, remove the rubble to the side and get to work.

First, let's break down our caps by color.

The path has been drawn, you can proceed. We decided to lay out the edges of our path with red covers. We need to first lay out some cement and quickly, before the cement has hardened, we begin to lay out the path.


Then we decided to lay out three rows next to the red row in green This is our weed.

The son suggested laying out a couple of trees, the trunks were laid out with brown corks
(also first a little cement and lay out the covers).

Then the idea was born to lay out the house, since summer is in the yard, they decided to lay out the sun to warm the path. They decided to lay out the frame of the house from red caps, windows and a yellow roof. yellow color. The sky was lined with blue covers.


Then we start filling empty place between the rays of the sun, we decided to lay out white covers on one side, the other side is blue. Of course, you can leave it like that, but we wanted to continue.

Let's start filling the space between the trees. We tried to lay out the flowers and this is what happened.


We fill all the remaining space as the soul desires.

Our path is ready, I think it turned out not bad. Thank you all for your attention.


You can post any drawing, for which there is enough material and imagination. We wish you to continue our work, summer mood, beautiful summer ideas and, most importantly, bring these ideas to life.
We wish you all summer, warmth and comfort.
I draw summer
P. Pranuza
I draw summer
And what color?
Red paint -
Sun,
Roses on the lawns
And green is the field,
Mowing in the meadows.
Blue paint - the sky
And a melodious stream.
And what kind of paint
Will I leave the cloud?
I draw summer
It's very difficult…


