Painting options wooden house there are different in terms of dye. But the paint itself is almost the same. There are some points on the structure of the application of the dye. But the principle remains the same.
Today we'll show you how professional painting wooden houses and everything connected with it. On the video in this article you will be able to see the progress of this work and will be offered complete instructions according to the rules to be followed.
The first thing we will try to understand is why wooden houses are so prone to destruction. There are several reasons for this. Everything living in this world changes, grows old, dies. The same thing happens with trees, because they are living organisms living their lives.
And only a person can change this process, either for the better or for the worse. After all, caring for our appearance, we are trying to become younger, more beautiful, and caring for a tree makes it stronger, healthier and more durable, relieving it of diseases and all sorts of bugs and insects that harm the tree.
So:
- Affect construction wood and natural factors such as rain, snow, solar radiation. At a humid temperature, the tree is saturated with moisture and expands in its structure, and when it is hot outside, the reverse process occurs. All these cataclysms lead to the fact that the wood cracks, cracks appear, and this is an excellent housing for all kinds of insects, especially pests.
- Also, during rain or snow, moisture gets into the cracks, which provokes the appearance of mold. It comes in several varieties. For example, blue mold and fungal mold, the most harmless, they will not destroy, but only distort appearance Houses. But the rot fungus is a formidable enemy for a tree, because it begins to develop inside, and it is almost impossible to detect it at the initial stage, and when you see it, it will no longer be a tree, but dust.
- Unnecessary neighbors you will have bark beetles, they may not make themselves felt for several years, just sleep off, and as soon as a favorable environment appears, they wake up. Then even the most malicious neighbor will not envy you, this is a big problem for wood and, accordingly, for the house.
- There is another reason for the aging of the house, it is atmospheric, depending on the area in which the house is built., in a wetter one, it has a greater chance of aging than houses located in the southern part, drier, as well as in a blown area, or for houses protected by forest from winds and bad weather.
Attention: As you have already noticed, there are a lot of reasons for aging and damage to a tree, but if you take care of it properly, covering the surface with high-quality paint, you can save the day.
Proper house painting
The cost of painting a wooden house will not be quite small. But if you do everything yourself, then the whole price will come down to the cost of materials. It's not like that and hard work, you just need to follow a certain sequence and use high-quality material.
Attention: When painting any plane, its preparation is done at the beginning. And this is important for both the old and the new surface. Be sure to prime it, this will strengthen the bonding of materials and extend the life of the coating.
Preparing for painting
But you can't paint right away. It is necessary to pre-prepare the surface for painting.
As you already know, this is a living and breathing organism that needs a certain approach. And if you properly prepare the surface for painting, then this will make it possible to significantly increase the vitality and youth of the wooden base.
So:
- In order to clean the wood from dirt and dust, we take an ordinary sprayer, wet the surface, and then clean it from dust and dirt with a not very coarse brush.
- If you find mold in some places, then thoroughly clean the surface and cover with a special primer (see) against mold, clean or cut knots that fall on the surface to level the surface, and then cover these places with a special varnish.
- All cloves or others hardware found on the surface, remove rust and cover special means for metal.
After completing all these procedures, cover the room with a film and let it stand for two or three weeks, be sure to leave it for airing open spaces, and in warm sunny weather, you can open it completely so that the tree dries. Before painting, the tree must stand, rest and dry.
If the house is not dry, it is advisable to pre-dry it, and then cover it with an antiseptic, but if it is not possible to dry it completely, then you can cover it in this form, and then wait for the opportunity when you can completely dry it.
What is better to use for painting a wooden house
First of all, paint is selected for painting a wooden house. After all, it not only gives the appearance, but also serves as protection from environmental influences.

Here we have several options:
| Antiseptics | Used to protect surfaces from damage and fading. These are protective paints that penetrate deep into the wood, up to seven millimeters, and protect the surface from mold, insects, and all atmospheric factors. They are used both to cover and to preserve the texture of the wood, giving the home a beautiful and well-maintained look. |
| Acrylic | Acrylic paints are frost-resistant, heat-resistant, resistant to temperature and humidity changes.
|
| Oil paints | They also have an excellent weather protection property, are well absorbed and have good view. Their only drawback is that they do not dry well, it takes at least two days to dry completely. |
Which paint is better for painting a wooden house is up to you, depending on the region where the room is located. The cost of painting a wooden house will be much lower if you do all the work yourself.
But after a certain amount of time, any paint must be changed, it will either change its color or begin to peel off. There is nothing eternal. So what is the service life of our paints?
- The average life of the paint is about five years, but depending on the quality and choice of paint, it can be three or ten years. For example, antiseptics have an average service life of up to 7 years, oil paints up to 6 years, acrylate most durable - up to ten years.
- But, as you understand, everything in this world is relative, because when you repaint a house or repair damaged areas, you can determine for yourself by the condition of the house, the color of the paint and its quality. After all, if the paint has lost its original color or started to peel off, then you need to think about repair.
Attention: How much paint is needed to paint a wooden house will determine the number of layers. Here everything will depend on you.
First house painting
Before painting starts preparatory work, First stage all work - primer.

So:
- We apply a primer layer as the first layer, which will give your house strength and durability. It is impossible without antiseptics, this is the basis of your paint and its durability. Of course, you can skip this stage, but you will regret it very quickly, in a year, a maximum of two, your painting will become unusable.
- The first rule is that the surface must be completely dry, and the paint must be applied to it at least two or three layers. After each application, it must be allowed to dry, and then only apply the next layer.
- Apply the paint evenly and preferably with a brush, stirring occasionally. For a brighter and at the same time saturated color, you can use a dye for acrylate paints, then the house will turn out to be very even and beautiful. Do not paint under the scorching sun, as the paint dries very quickly, which can affect the quality of work. This is best done in warm, calm weather.
- Paint on wood is applied only in the longitudinal direction. The most vulnerable places where rain and moisture get the fastest are the end parts, they must be treated more carefully. Such places are treated several times only with an antiseptic to close all holes and places of possible penetration of moisture, and then three more times with paint so that not a single gap or gap remains when painting.
Repainting or repainting the house
If you notice that the paint is starting to lose color, peeling has appeared in some places, or even noticed mold, then this is your signal that you need to urgently change the color and protect your home from destruction.

- The first thing to do before repainting is to clean all damaged places from old paint (see), get rid of mold and other imperfections, cover them with protective primers, and only then proceed directly to painting.
- Now you can experiment a little, choose an interesting color, choose a better paint. But maybe you just decide to touch up worn places affected by weather conditions.
Attention: But the most important thing is to use exactly the type of paint with which the house was painted. If it was acrylate paint, then only it needs to be repainted, and if it was oil, then only oil.
- But you may not know how it is painted, because your parents could paint it or you bought it in this form. Then try to determine the type of paint yourself, if it is acrylate, then it will look like thin skin when removed, oily is rougher, cracks across and can hurt your hand if it is not removed correctly or it will crumble if rubbed.
- Having determined what paint the house was painted with, you can start updating or repainting it, while always using the same type of paint. But if you still decide to change the paint and paint with acrylate instead of oil, then you will have to work hard and completely clean the house of old paint. To do this, take an iron brush and clean the wood to the ground. Only then cover it with a primer, and then repaint the house thoroughly.
- If you do not change the type of paint, then you still need to do preparatory work. Clean up peeled paint everywhere, cover these places with an antiseptic, wash the house with a hose and let it dry thoroughly. And only then paint it in a new color, painting over the previously processed places, and only then give the main tone.
Attention: When repainting, it is advisable to remove all unnecessary paint very carefully, cleaning the surface must be complete. After all, the quality of the new painting will directly depend on the preliminary preparation.
There are a lot of ways to get rid of old paint:
- You can remove it with an iron brush, you can use a scraper for a more thorough treatment. Now appeared chemical methods paint removal, they are faster and the surface after their use becomes more even and beautiful.
- There is an option to use any method convenient for you, it all depends on the time you can spend on it and the result you need. Of course, you can also polish the surfaces, everything will depend on your abilities and imagination. And then move on to painting. The work must be performed in the sequence that was described earlier. Then your house will be the most beautiful, young and unique.
Attention: Painting the wooden pediment of the house is done with the same dyes and in the same sequence. The combination of colors when painting a wooden house in this case is best done in one color, but in different tones.
The cost of painting 1 square meter of a wooden house is generally cheap, but in general, this is a large volume. And to do this work, it is better to purchase a spray gun.
Then the application layer will be uniform and without smudges. So take a look at the photos and make your choice.
We want to paint the gables country house. What is the best paint to use for this: oil or acrylic?
In order for the pediments to last in good condition for as long as possible, you need to
Before painting, first use the base. This is a primer that penetrates deeply, has antibacterial effects.
And then use paint. We used Belinka. Lasted over three years. Maybe it would still stand, but we decided to sew up the house with siding. by the way, it’s also a good option. And it doesn’t cause trouble at all. These recommendations apply to wooden gables.
We chose the paint according to the instructions in the store) They also learned about the base there.
Good luck with the repair!
You did not specify the material from which the gables are made. So if you have aerated concrete gables, then it is strictly forbidden to paint them with oil, since this type of paintwork material forms a hermetic film that does not allow the wall to breathe. Most builders consider this drawback to be decisive and that is why they use this type of coating less and less.
Acrylic paints today (if you choose reputable manufacturers, of course) are an environmentally friendly, easy-to-use product that does not harm the surface to be treated.
More questions about your topic:
- How is the pediment of a frame house made correctly according to technology?
The exterior design of the house is the visiting card of the owners. The aesthetic perception of the cottage is greatly influenced by the correct combination of colors of the walls, roof and pediment.
The gable is called the end part of the roof, framed from below by the ceiling, and along the top - by the slopes of the roof structure. The structural element found on gable, broken, single and Danish hipped roofs. The pediment is always oriented strictly vertically. May have a triangular, polygonal or trapezoidal configuration. This section in the construction of the house occupies an intermediate position between the walls and roofing, which affects its color design.
Gable of the house
When choosing a tint solution for the pediment, you have to focus on the following points:
- Manufacturing material. Some materials (for example, brick) have a limited color palette, so there is no need to choose in such cases.

- Geography of the area. There are certain national and historical trends in the exterior design of buildings. This aspect is also important to consider, because the desire to radically differ from others does not always look wise.
- Compliance with the architectural design of the building. Classical architectural style It harmonizes well with light pastel colors. Using a high-tech exterior makes it possible to apply gray, orange or black.

Another important criterion is the climatic conditions of the region. For the exterior design of buildings in the northern regions, it is not recommended to use light and white shades. The fact is that against the background of snow (and it often lies there for 8-10 months a year), the facade surface will look blurry. The exception is those cases when the roof and walls are painted in dark colors, then the pediment can be light.
Most often used for finishing pediments the following materials, which renders direct influence for color scheme:


Combinations of facade shades can be different. Can also be applied smooth transitions one color scheme to another, and sharp contrasting solutions. Heavy shades include dark, olive and brown, medium and light - cold, light, unsaturated.
- Cold tones are called shades of blue.
- Neutral - shades of green.
- Warm - colors between yellow and scarlet.

Color compatibility
There are the following options for combining the color of the pediment with the color of the walls and roof:
- One color with walls(maybe a difference in a few tones). The most popular solution, where the selection of a specific shade is carried out with a focus on the color of the roof (or vice versa).

- One color with roof. This option is less common. The walls in this case mostly have a contrasting color.

- One color with roof and walls. This combination is often used in wooden houses, or if a light finish is used. They try to choose different tone of surfaces. One-color exterior design in dark colors looks too gloomy and is generally not used in private housing construction.


Decisive when choosing a color for the pediment is played by the individual preferences of the owners of the house. It is also necessary to achieve maximum harmony of all buildings on personal plot. In addition to the facade and roof of the main building, you also need to focus on whether there are green spaces in the backyard, how intensely the area is illuminated, in what style other buildings and the fence are built.


Most Popular color solutions for the pediment:


The combination of a “warm” facade and a “cold” roof looks ugly. Classic variant combinations - this is when light walls and a pediment are complemented by dark roofing material.
Do you love artificial flowers? They are beautiful, multi-colored, stored for a long time and perhaps pleasing to the eye, but they are inanimate. For some reason, it is precisely such associations that siding evokes in me: yes, smart, but practical, but for a long time. But the soul does not lie, even if you crack ... I also noticed that the siding still "burns out" in the sun, and it is no longer possible to paint it like a piece of wood. Here in Finland, the bulk of the houses are finished with wood, and they are the same, and very pretty. Why are we worse? After talking with friends and acquaintances, we found out that people whose houses were painted with Finnish paint (Tikkurila) already 8-9 years ago are still delighted and strongly advised us not to reinvent the wheel. As a result, after weighing all the pros and cons, we decided that the pediment of our house would be made of wood and painted with Tikkurila. After walking around the store and comparing colors and varieties, we settled on the Vinha series in dark brown (2665). She is on water based, smells good, and if it has not had time to dry, then it is washed off with water without problems. The brush after work is also easy to clean simply under running water.
From all kinds of pieces of wood, we decided to use an imitation of a bar. They were fastened with self-tapping screws in the upper part of the timber, so that the self-tapping screws from below would not catch the eye. In principle, the technology is simple: you must first make a crate, and then from the bottom up, board by board, screw an imitation with a screwdriver.
First, they used the longest 6-meter boards, screwing them in the middle of the pediment (see the photo), and then sawed off from 6 meters as needed. It is difficult to cope with this work alone, so I asked my friend Denis to help.


At the very top you feel quite uncomfortable, so it is better to use insurance. It’s not on the photo, but I used it in general)))) It’s especially scary when you screw the last plank on and there’s nothing to hold on to, so everyone be careful!!!

Thus, both gables were closed, and it turned out that this was not a matter of a couple of days, and even in the pictures it can be seen that the central part had already darkened in the sun compared to the side ones.

At some point, there was not enough material. Initially, however, it was conceived so as not to buy an extra one, and as needed, they bought more, having reached the store by car. In principle, it is not difficult to calculate the pediment. You need to find its area by multiplying the base of the triangle by its height and do not forget to lay the standard extra 10%.

I really like it when the end of the roof slope looks massive. I thought for a long time how to do this, as a result I came to such a design. As a basis, I took two such bars with a section of 5x10. I mounted them alone, so these clamps came to my aid.
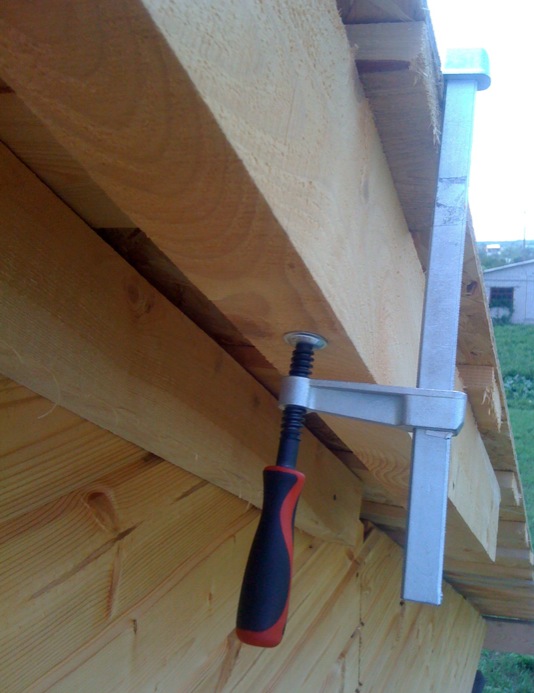
I attached one bar directly to the gable, with healthy self-tapping screws (about 80 mm long), the second at a distance of 2.5 cm from the edge of the roof. Why 2.5? It's just the approximate thickness of the imitation timber, which subsequently closed all this economy. At the imitation, I removed the “thorn” (the one that is inserted into the groove) with an electric planer and it turned out to be a pretty flat board. Here you need to act carefully so as not to screw up with the corners. I acted as follows: First, I put this imitation of mine with a planed thorn in place, then attached building level, in the place where I need to saw off the corner and, in fact, already outlined and sawed off. That is, all the corners were sawn already in place. Sawed with a small hacksaw specially bought for all these purposes.

This is how I made all the gables of the house.


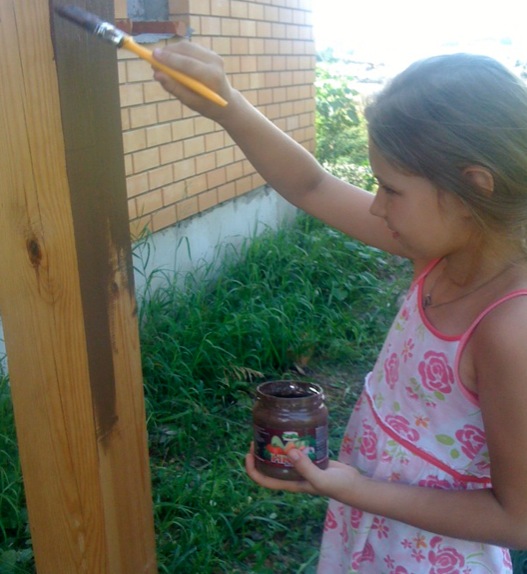
After that, we treated with special oil, as recommended by the paint manufacturer.

And painted, not neglecting child labor)))
Learned something like this. And all with my own hands))

How to choose shingles...
With the help of scaffolding on "envelopes" it is easy to perform any work at height.
With the help of a removable scaffold, you can solve many tasks in the construction and maintenance of a house - and do without bulky traditional scaffolding.
To paint a pediment or nail a board somewhere at a height, you have to puzzle over how to make it easier and safer. It is not profitable to fence forests for the sake of a little work.
One of the solutions to the problem is scaffolding on "envelopes". With their help, you can easily and quickly perform any work at a height - tint or repair a window, install platbands, finish the overhangs of the sheathing boards.
To make such scaffolding is not difficult. More importantly, the usual rigid connection with the structure is not required, which means that installing or removing them is a matter of a few minutes. When the work is completed, the structural elements will find a place in the barn or in the underground of the house.
The main elements of the scaffolding are "envelopes" - triangular support platforms. You can make them from edged lumber (Fig. 1). First, L-shaped brackets are knocked down from scraps of a fifty-fifty board, and then they are sheathed on the sides with thinner jibs, cut, for example, from boards with a section of 25 * 100 mm.
When choosing the size of the "envelopes" you need to proceed from security considerations. So, on too small support platforms with excessively large consoles, the separation of the “envelopes” from the wall is not ruled out with all the ensuing consequences. Optimal size horizontal bracket shelf - 350-400 mm, which allows you to stand on the floor with a full foot.
To arrange the flooring at the desired height, you will need two more support-slides from boards with a section of 50 * 150 mm. Before installing the support platforms, the upper ends are slightly cut along the contour of the “envelope” corner, and the lower ones are sharpened to ensure a reliable stop of the boards into the ground (Fig. 2).

When the "envelopes" are raised to desired level, the vertical arm of the brackets is attached to the wall with nails, without sinking their hats to the end - it will be easier to dismantle the structure later.
The floor boards are alternately lifted up and nailed to the horizontal shoulder of the "envelopes". Here, the nails must be drowned completely, otherwise the design will be unsteady. In order not to suffer when disassembling the scaffold, it is advisable to drive nails through thin rails 8-10 mm thick - these gaskets can simply be split, freeing the nail heads for the nail puller.
Another version of the removable scaffold (Fig. 3) is just as simple and convenient when performing high-altitude work near the wall of the building. For example, if you need to cover the roof of the house with slate, things will go much faster with the help of a structure that can be built from improvised materials - a thick board or even from a circle-laka-deadwood.
Attention!
Do not forget that there are no handrails here, which means that you cannot relax even for a second. It is necessary to prepare scaffolding very carefully, inspect and check each node, and start work only after making sure of the reliability and strength of the entire structure.
When installing the racks, their lower, slightly pointed parts are dug into the ground, and the upper ones are attached to the wall of the house with nails to avoid tipping the structure. Then, just as in the first case, the flooring boards are alternately lifted up and nailed to the lintels of the supports. From my own experience, I can say that a flooring up to 3 m long can be built from a tongue-and-groove board - the shield will be quite rigid. At roofing works on a roof with a slope width of 6 m, such a structure will have to be rearranged only once. It is more convenient and safer than jumping on ladders.


