(18
ratings, average: 4,25
out of 5)
 Neatly laid sidewalk paths, gracefully intertwined between green spaces, are an essential attribute in any garden. If you want your summer cottage to be really complete and well-groomed, in no case should you neglect the paths. Fortunately, for their device you do not need to attract professional designers and spend a lot of money, as you can make beautiful paths in the garden with your own hands.
Walkway made of wood
Wooden saw cuts
Wooden round logs are a fairly simple material for garden paths. The raw materials for this can be found in any garden - for sure, old trees grow everywhere, which it is high time to replace with new seedlings. Wooden paths are made according to the following scheme:
- Cut round logs 20-50 cm in diameter and 20-30 cm high from the wood you have. The blanks should be the same.
- Remove the bark from them and dry them in the sun for several days.
- Cover the blanks with antiseptic and primer to protect them from moisture and insects. Leave the rounds to dry for one day.
- Remove the soil along the entire length of the future path to a depth of 4-6 cm. Pour a small sand cushion and compact it well.
- Start laying saw cuts, alternating small and large workpieces so that there are small seams between them.
When choosing wood, it is necessary to proceed from how healthy and durable it is. This will determine how long the path made of saw cuts in the garden will last. It is advisable to give preference to solid types of wood. Eg, oak will last about 10 years, pine - no more than 7. Round logs of old trees can be eaten by insects or rotten.
As practice shows, you don’t have to choose much - they use what is at hand. And if it turned out that after some time some saw cuts collapsed more than the rest, then they can always be replaced with new ones.
For pavement it is advisable to choose dry logs. If the path is not made with decorative purpose, and in order to walk on it, you do not need to cut the wood into thin rings.
Advantages and disadvantages
Garden paths made of wood have their own advantages:

The main disadvantage is fragility of wood. Over time, it rots, especially in a humid climate or in places where groundwater is high.
Boards
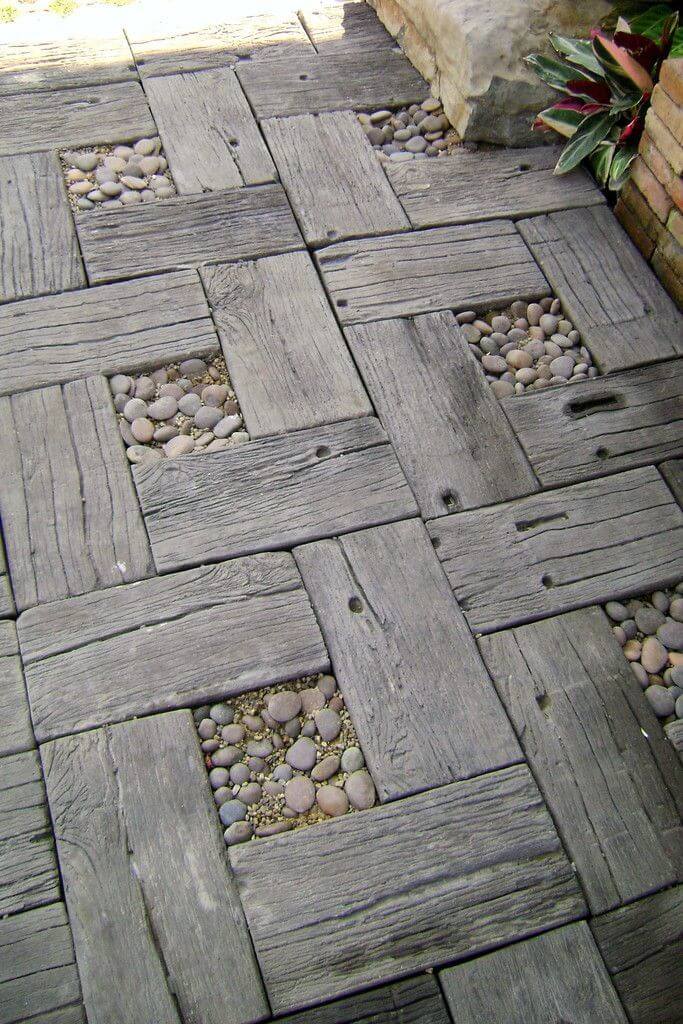
 As a material for paths in the garden, you can choose wooden planks. As a rule, such a path is laid in the form of a continuous flooring. This can be done both in the longitudinal and in the transverse direction. To make the path winding, the edges of the boards are cut or placed in a special way. Using this approach, you can model different options - for example, a pattern similar to parquet.
If the boards are placed at a certain distance from each other and the space between them is filled with gravel or backfill, then the path will resemble railway rails.
You can make a path from the boards, which are laid out with solid flooring. This design is made raised from the ground by about 15 cm. Thus, the boards will not have contact with the ground, and the air space will allow the wood to dry faster after rain, which greatly contributes to the long-term use of the material.
It will take a lot of effort and effort to make a garden path out of wooden elements, but in the end it might turn out real masterpiece . This path will be an extraordinary and beautiful addition to the design of the garden.
Masonry
One of the most reliable options is natural stone paths. In this case, you can choose a boot or cobblestone - they are equally durable. Laying stone on paths produced in this way:
- Make a marking of the future path.
- From the site where the paving of the path is planned, remove the top layer of earth. The depth of the layer is required by 8-12 cm more than the size of the largest stone that is prepared for the path.
- Fill the resulting trench with a layer of sand of 12-15 cm, level it well and carefully compact it.
- Lay the stones alternately on the sand cushion, pressing them tightly into the base. The step between small stones should be no more than 3-4 cm, and between large ones - 7-8 cm.
- Fill in the rest of the space carefully. concrete mortar. When the concrete is dry, backfill the joints with fine sand or earth to make them look more natural.
Advantages of a stone path
 Paving stone garden paths makes it possible to save the builder money and makes you feel like a real landscape designer. Moreover, this process is not so complicated and responsible.
The most important thing before you start choose the design of garden paths and decide on the scheme of their paving, highlighting the main sections where these paths will lead. These can be gazebos and outbuildings, flower beds and lawns, children's sandboxes, technical facilities and barbecue areas, alpine slides and artificial ponds.
As a rule, the width of the tracks is chosen so that it is easy to pass garden cart. Depending on the type of path, it is constructed with or without a curb. The track can be level with the ground or rise above it. IN Everyday life the first option is more convenient, the second is better in terms of cleaning - less sand or earth is applied this way.
The path in the garden can be paved on a concrete or cement base. In addition to natural stone, you can choose paving stones, paving slabs, decking, clinker brick, composite board, concrete poured into special forms, artificial stone.
The modern design solution is a geogrid, that is planting small lawn grass between parts of the structure.
pouring concrete
Concrete is traditional material for the construction, which is always popular due to its ease of operation and its low cost. Build a cast path anyone can definitely:
- Mark the boundaries of the path, drive in pegs along its contour and pull the rope.
- Dig a small trench within the marked contours. Depth approximately 25 cm.
- At the bottom of the trench, pour a layer of gravel and sand 10 cm. Tamp this pillow.
- Cover the pillow with a "chain-link" or any available metal mesh.
- Build formwork around the perimeter of the path.
- Mix the mortar: 1.5 parts sand, 1 part cement, 1 part water and 2 parts gravel.
- Pour the cement composition and with vibrating movements, evenly, with a spatula, distribute the mixture over the entire area of \u200b\u200bthe path. During pouring, pierce the mixture with a rod to release the remaining air.
- Using the rule, make a final alignment and cover the track with a film.
- In 4-5 days the path will be ready. All this time, it is necessary to moisten it slightly with water so that the concrete gains maximum strength and does not crack.
Car tires
Tires from cars have long been widely used in summer cottages: swings, ponds, flower beds are being built from them, and now they are also laying paths. This trend is quite understandable, given the performance of this material: tires are easy to care for, resistant to temperature extremes and moisture, are durable and non-slip. You can make a garden path out of them in this way:

brick paths
Best to apply clinker products because they are highly resistant to various kinds of mechanical and chemical influences. The most important thing is that the bricks should be intact and without chips, otherwise the path will come out not only unattractive, but also unsafe.
Laying the path goes like this:
- Mark the path: drive a peg around the perimeter and stretch the rope.
- Dig a trench along the contour - a depth of 20-30 cm.
- Along this trench, install limiters from boards or bars.
- Pour a 15 cm layer of gravel into the space between the limiters and compact it well. Pour a layer of sand on top of about 6-7 cm.
- Remove the limiters and make curbs instead: on both sides of the path, lay a row of bricks set "on edge".
- Form the inner space of the path from bricks: laying takes place in the usual position with the help of gentle tapping rubber mallet or wooden spatula.
Recommendation: bricks do not have to be laid out close - to give the path originality, you can leave small gaps and fill them with pebbles. In addition, you don’t even need to fill up the seams - after a certain time, grass will sprout here and decorate your path.
paving slabs
Although tile can hardly be called a very cheap material, it is still used quite often for the construction of garden paths. There are several reasons for this: ease of work with the material, excellent performance and aesthetic appearance. But the most important thing is the ease of installation.
- Mark the boundaries of the future track with stakes and rope.

A path is an indispensable element of any suburban or summer cottage, which, in addition to practical benefits, can also deliver Aesthetic pleasure. Observing simple instructions, you can implement any of the options described above on your site, so feel free to start working, discovering new possibilities for ennoblement personal plot.
Paths on a personal plot are not only protecting shoes from dirt and peat dust. Hard surfacing sets an interesting game of balance between the man-made and natural components of landscape design. Making garden paths in the country with your own hands is more than realistic. Learn how to plan them correctly, compare the advantages of paving materials, get acquainted with the technology of laying paving slabs on a sand cushion, evaluate the options for decorating a paved canvas with borders and flowers.
Layout of paths in the summer cottage and in the garden
To break down the functional system of movement in their garden, they take a site plan or draw it on a scale and mark two groups of objects on it:
- goals - significant places, which you need to easily approach: a gate, a garage, outbuildings, a gazebo, alpine slide, recreation area, greenhouse, beds open ground;
- obstacles - objects that will have to go around: trees, mounds, relief depressions.
Fantasy terracotta with small bushes and leaf pattern
Further on the plan, observing the scale, paths are outlined, trying to get by with a minimum number of them, since each one takes up the useful area of \u200b\u200bthe garden and the entire plot. It is recommended that you work on multiple projects so you can compare drawings and designs.

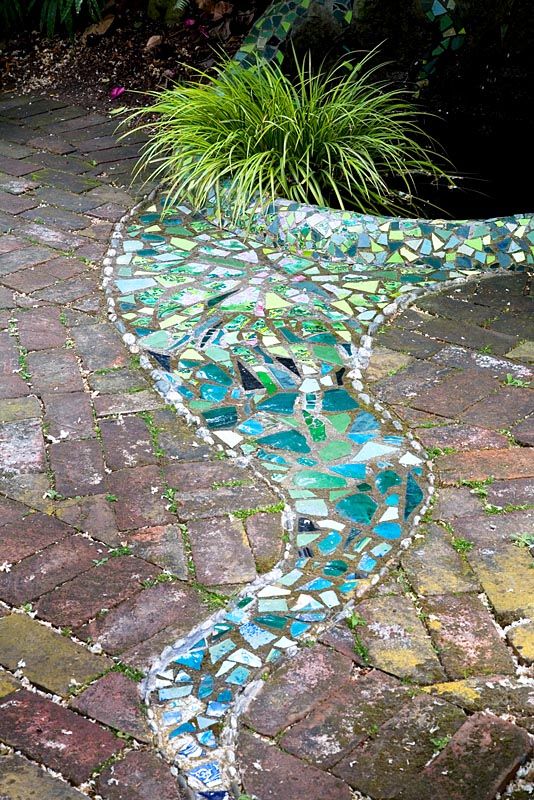
A small mosaic among uneven slabs will not let the eye get tired
What are the nuances to consider when planning tracks
The ergonomics, durability and impeccable appearance of these garden objects are influenced by a number of factors:
- tracing. When laying the route, the main paths are first marked: from the gate to the porch, from the house to the garage, utility block, vegetable garden, garden. They are made as straight as possible, since they are designed for the quick walking of a working person. The remaining passages - side ones - branch off from the main ones and run around the entire site. They serve for relaxation and therefore can be of any length and degree of sinuosity.
- Width. No one wears crinolines anymore, so the need for Versailles avenues has disappeared, but the dimensions of the paths should still allow people walking towards them to disperse or walk arm in arm. 80 cm is taken as the minimum width. The main garden path is made even more free, 120-150 cm, so that a wheelbarrow or bulky furniture can be transported along it.
- Cross slope. Accumulating rain and melt water erodes some types of coatings and creates dirt. The smaller the gaps between the paving elements, the more important that the water goes to the sides, for which the middle of the coating should rise slightly above the edges.

Elevation design
Any kind of garden paths can be hopelessly mutilated by the roots of closely growing trees. It is desirable that at least 2 m of space remain between the tree trunks and the edge of the canvas.
Visual effects of paving
Any line in the landscape creates a certain visual sensation. You can achieve interesting visual effects using design methods:
- Curvature. Straight as arrows, paths are typical for regular parks, their task is to organize order, symmetry, discipline and even pomposity. Winding, on the contrary, turn the garden into a fairy-tale world, promise a surprise around every turn.
- Color. The coincidence of the coating material with the finish of the basement of the house creates a stylistic unity on the site, but, in order to avoid boring monotony, it is worth choosing for construction and paths different shades one color scheme.
- Paving pattern. Longitudinal laying of elongated tiles creates the illusion of movement, calls forward and visually lengthens the garden path. Cross paving shortens and expands it, makes you slow down and look around.

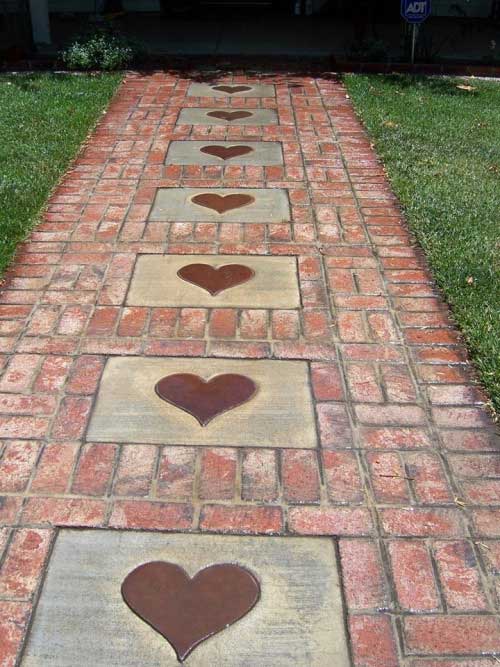
Square plates unfolded in rhombuses will create the impression of a diamond bracelet
Interesting effects that draw attention to the pattern underfoot can be achieved by combining materials and adding unexpected elements: shells, mosaics, leaf prints, low flowering grasses.
What can paths be made from?
A set of requirements is imposed on the material for paths in the garden, which is common for elements of landscape design:
- availability and adequate cost;
- elegant appearance and durability;
- compatibility with common style buildings and gardens;
- reliable performance;
- safety for children and pets;
- the possibility of combining in the process of work and repair in the future;
- no insurmountable difficulties during installation.

Fantastic patterns can be made from ordinary pebbles
To determine how to lay out the tracks inexpensively and beautifully, consider the most different ways their paving.
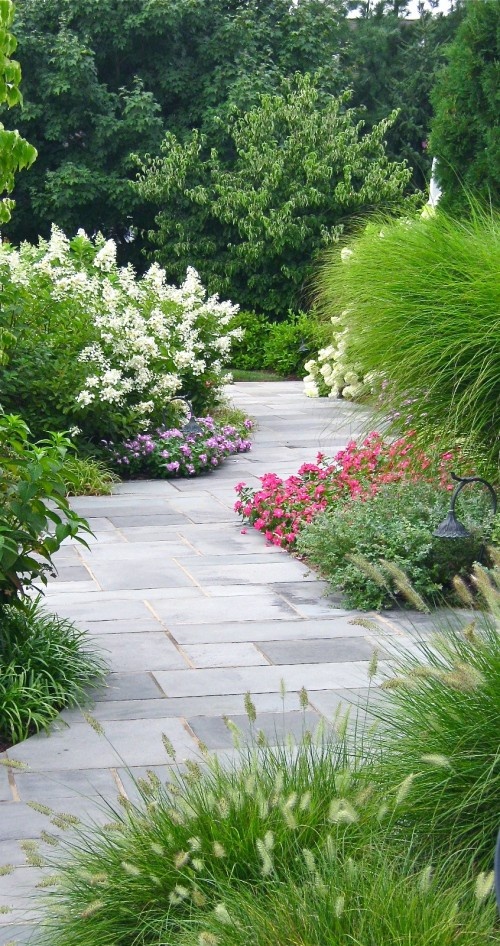
Paths in the country from paving slabs
The popularity of paving slabs is due to its durability and resistance to seasonal temperature changes in middle lane Russia and north. Tiles are relatively easy to install and replace. Manufacturers offer samples of different shapes for paving paths: brick, square, wave, rhombus, hexagon, coil - which avoids monotony.
Paving slabs do not wear out, do not soften under the scorching sun, do not crack from frost, do not emit volatile substances. To clean the garden from fallen leaves and wind-blown earth, you can simply walk on it with a broom.

The more varied the shape of the tile, the more interesting the result.
Eco-friendly wooden walkways
Under the condition of a dry climate, you can lay out a cheap path in the country with your own hands from wood. Suitable for this purpose:
- cross cuts of trees, half dug into the ground;
- boards, timber and pallets;
- bamboo stems;
- garden parquet.

Boards seem to be laid directly on the grass
The disadvantage of such materials is their low resistance to moisture, so any wood is treated with antiseptics and bituminous mastic, and drainage is carefully prepared before laying. It is better to raise the wooden flooring above the ground, laying it on metal supports, then it will be blown from below and will not start to rot. For additional protection flooring is painted or varnished.
Shredded bark and shells of coconuts can be conditionally attributed to the tree. They look original, but require a mandatory border and periodic backfilling. Another disadvantage of soft paths is that in wet weather, pieces of bark stick to shoes and are carried around the site.

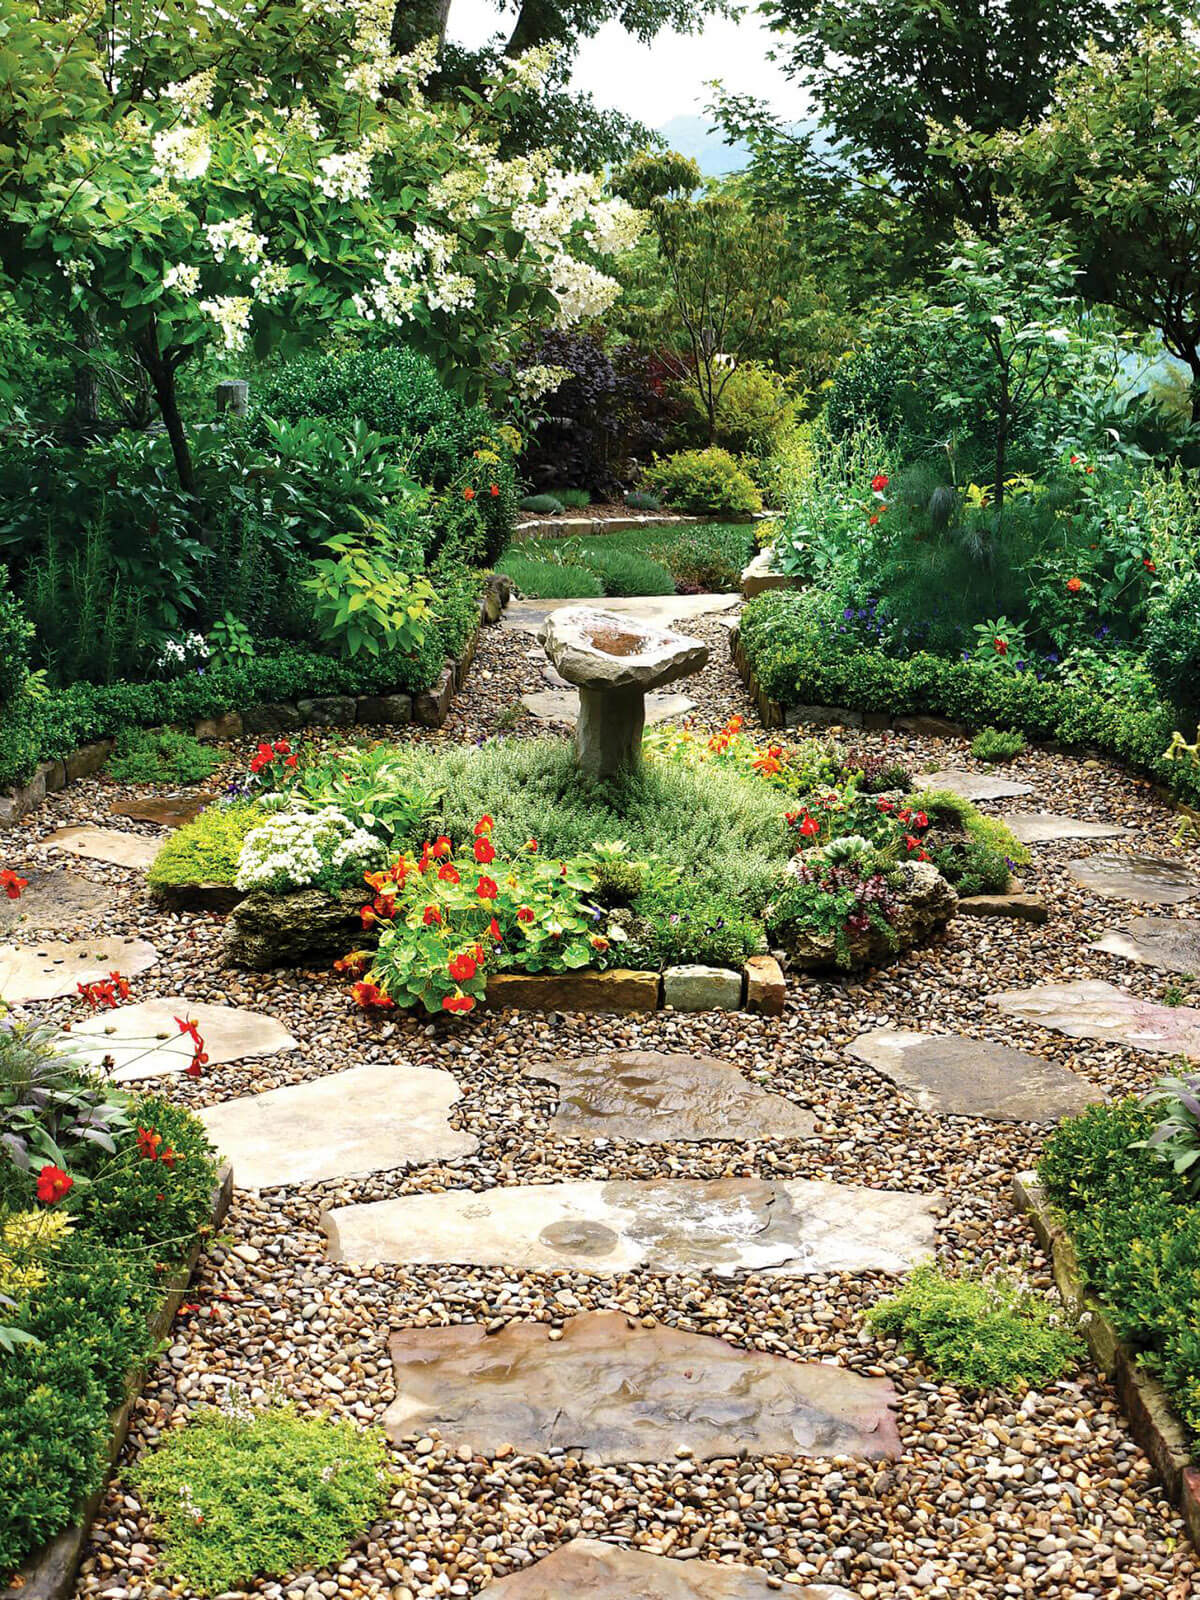
Stone in the landscape - noble and natural
Walkways made of natural stone
The most durable, beautiful, aesthetic, but also the most expensive paving material in the garden is natural and artificial stone. It looks elegant, allows you to imitate the streets of ancient cities and mountain paths, goes well with rock gardens, fountains, waterfalls, lamps, flower beds and stone plinths of buildings.
stabbed natural stone, for example, flagstone, suggests special shape and the shade of each piece, so the paving is interesting and not fatiguing for the eye. The result of laying multi-colored pebbles or shell rock slabs with your own hands is always a unique work of art.

"Herringbone" brick resembles antique parquet
Walkways made of bricks for practical
This is an excellent budget solution if after the construction of a cottage or garage there is a lot of unused brick left. It can be used whole or broken into crumbs that will be nice to crunch when walking. The combination of different brands allows you to create a geometric mosaic, and use the darkest or lightest bricks as a border.
The disadvantage of the usual silicate brick is its low frost resistance. Repeated freezing and thawing for several years make it unusable. In regions with cold snowy winters, it is better to use a paving variety of clinker bricks in the garden. A special firing technology protects it from changes in temperature and humidity.

Using stencils on concrete creates the illusion of stone
Concrete walkways in different versions
Concrete is one of the cheapest materials for decorating a garden, but the long gray ribbons that the curing mortar turns into look dull and unpresentable. Concrete requires a fantasy approach:
- application of special forms to create artificial stone imitating different breeds;
- inclusions of pebbles, shells, broken tiles, colored glass;
- mixing pigments;
- gravel inserts and grass islands.

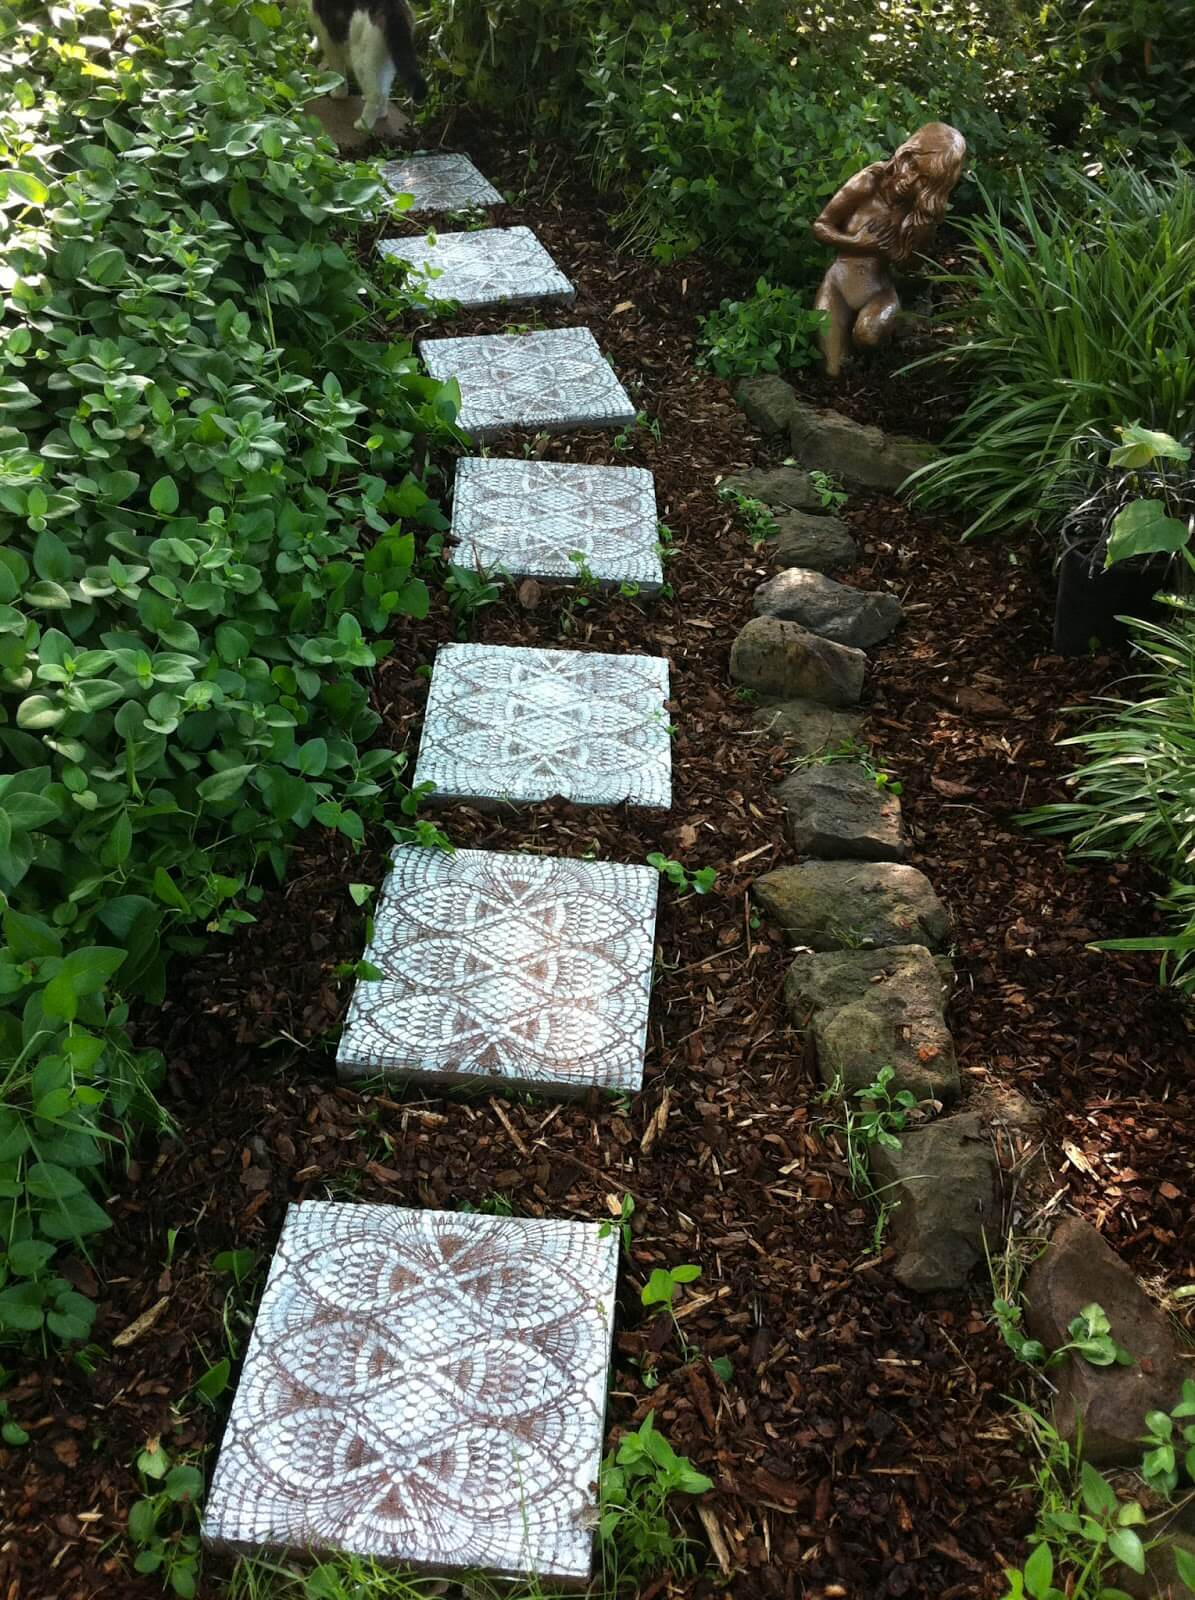
Leaf prints on concrete
Beautiful concrete alleys are obtained if large leaves are imprinted into a semi-liquid solution, additionally scratching the veins with a sharp knitting needle.
Gravel paths
As an alternative to stone, gravel is quite cheap, especially if there is a quarry or a company selling such material nearby. If desired, it can be removed and replaced with a different combination of colors and fractions. Gravel is ideal as a path to rockeries with flowers or classic Japanese garden stones, but requires periodic backfilling.
Looks great against the gravel garden benches, lanterns and pergolas. It emphasizes the carved structure of ferns, the freshness of roses and the heaviness of metal. However, as a road surface, gravel is somewhat unstable: individual pebbles move out underfoot, and sharp edges prick through thin summer shoes.

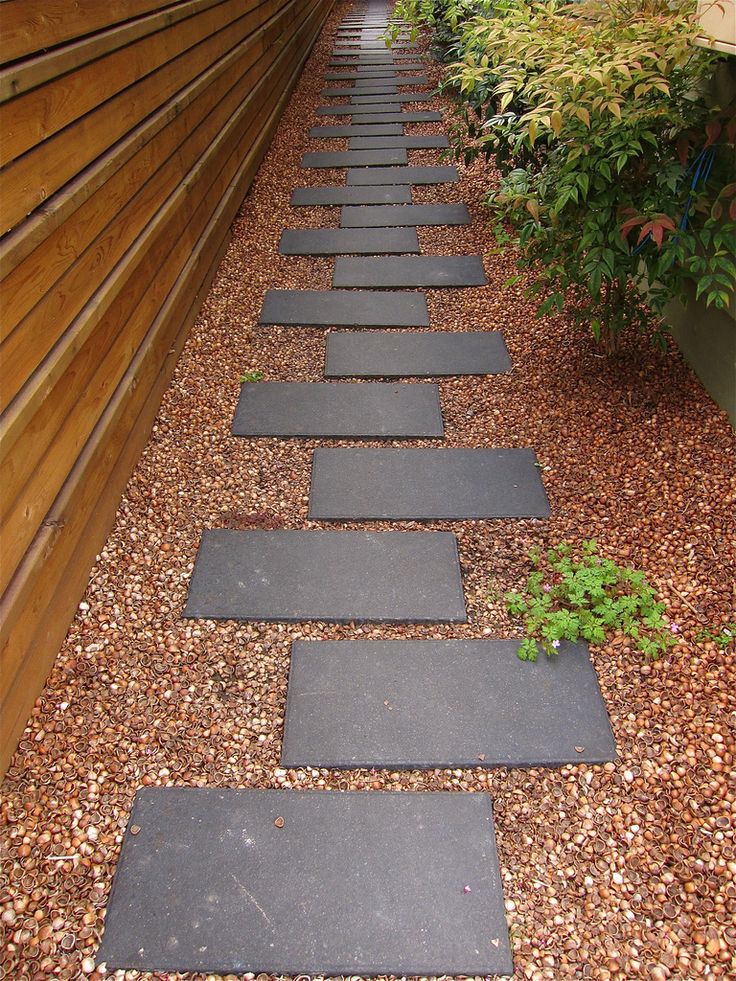
A chain of concrete circles in a river of gravel
We make tracks with our own hands
In order to properly make paths in the country with your own hands and at the same time get a really beautiful economy option, you need to calculate the total coverage area, multiply by the cost of 1 sq. m various materials and compare the numbers. For some, the remaining concrete from the construction will come out cheaper, and for someone "from the neighbor's shoulder" it will fall a natural stone for a third of the price. Below is step-by-step instruction, which can be used for laying most materials, since the most milestone- soil preparation - almost the same in all cases.

The pegs are hammered deeper so that they do not roll.
Step one - marking the area
For marking, you will need as many sharp pegs as possible, a skein of twine and a tape measure. On straight segments, pegs are placed less often - one per 8-10 m, on turns - more often. Steep bends in the garden are outlined with pegs every 15-20 cm. The width of the path is controlled with a tape measure.
At this stage, the site layout can be corrected, the functionality of the “transport network” under construction can be checked. To do this, you need to walk around the entire territory of the garden inside a stretched twine and understand how convenient the path to each significant object is and how effectively the flower beds and other decorations on the site are visible.

When working on a hard surface, be sure to protect your knees
Step two - preparing the bed
In regions with negative winter temperatures, soils swell. In autumn, the clay is saturated with water, in winter ice forms in the garden, pushing the soil particles apart, in spring the melt water goes down, as a result, the coating elements lie unevenly. The classic way to prevent such a problem is to create a gravel-sand cushion that performs the function of drainage:
- Inside the twine contour, the earth is taken out to a depth of 20-25 cm, at the same time removing stones, roots and debris.
- The bottom of the resulting recesses is carefully compacted, especially on soft, for example, chernozem, soils. Given the amount of work, they use a gasoline vibrorammer, while the toes are protected by shoes with steel capes, and the ears are protected by tight headphones.
- In the absence of such a tool, a manual rammer is made. She is a heavy log large diameter to which handles are attached from the ends.
- The compacted bottom of the recesses is covered with geotextile to protect against the germination of weeds, the seeds of which remained below.

To organize the slope, the height of the pegs is checked with a level
At this stage, it is necessary to determine the slope of the paths, which will ensure the rolling of rainwater: will it be longitudinal (at least 3-5 mm for every 10 running meters canvas) or transverse. If the path in the garden, according to the plan, is crossed by communications (electric cable, pipes drainage system), they are being installed now.
Step three - installing the border
Edge banding will make it difficult to mow the grass later, but it is often used because it achieves several goals:
- give the canvas a neat finished look and keep it for decades;
- highlight the track visually;
- do not allow the earth to crumble from nearby flower beds.

Installing a curb on concrete
As a border, you can use paving elements in a contrasting color, which are laid using the same technology as the rest. Roof tiles, even stumps, willow braids are simply dug into the ground so that they can be replaced.
The most difficult base is created for the curb stone. Under it, they dig grooves below the bottom level and fill them with 5 cm of sand. Then a small layer of concrete is poured and a stone is installed, checking the quality of work with a level.

Pavement for paving slabs
Step four - backfilling the gravel-sand cushion
Operating procedure:
- Half the depth of the excavation is covered with gravel or crushed stone, the size of the fraction does not matter.
- Gravel is covered with lightly moistened sand and carefully rammed.
- The sand is watered until puddles form and left for 3-4 hours in sunny weather and for a day in cloudy weather.
- When the water is completely absorbed, the sand is leveled immediately before paving. For this, a board is prepared, the length of which exceeds the width of the track. The board will move along the "beacons", which can be a previously installed curb stone.
- If the level of the canvas is supposed to be below the edges of the curb, cutouts are made along the edges of the board.
- In the absence of a curb, two pipes are placed in its place, one on each side, a board is placed on them with an edge and led along the path until the sand surface is completely leveled.

Alignment sets the quality of the future track
Step five - paving over the pillow
The arrangement of garden paths is directly related to the future load on them. Under the passage of wheelbarrows and other equipment, as well as under intensive walks of a large number of people, it is recommended to pave on a sand-cement mixture (1: 6). It is poured over a leveled pillow and re-leveled with a board along the “beacons”. In other cases, the coating elements are simply placed on the sand.
If a complex ornament is conceived, for example, from pebbles, its full rapport is first laid out nearby on the ground to get an idea of \u200b\u200bhow it will look in ready-made. The same applies to the alternation of multi-colored bricks or tiles, stripes, various inserts and combinations of materials.
The first row of elements is laid along the twine stretched across the pillow and carefully rammed with a mallet. The presence and width of the seams between the elements depend on the selected material and pattern. Brick and tile are usually fitted closely. Rounded wood cuts in any case will leave significant gaps.

Using a hand rammer
When laying any material, do not forget about the transverse slope: the center of the web should be somewhat convex.
At the end of the laying, the self-made garden path is sprinkled with a sand-cement mixture and the seams are swept with a brush. To harden the mixture, it is moistened with light sprinkling.
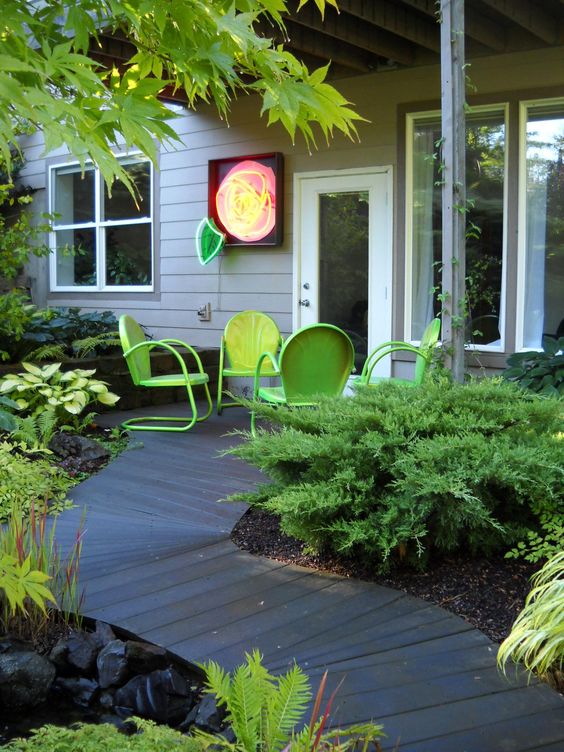
Making tracks in different styles
Paths in the country house are not just a way to get to the greenhouse without getting covered in mud, they are a full-fledged design element of the site that can emphasize the beauty of the landscape and enhance the impact on the viewer's senses. Therefore, the general style of the garden determines how, for example, to decorate the path with flowers, lawn grass, backlit.
Dacha in rustic style they ennoble with paths made of uneven blocks of limestone or shell rock, between which ground covers are allowed. Astilba, rudbeckia, lavender, small lilies and sedge are planted on both sides. Reed grass, lobelia or a bright blue delphinium are placed in the background. Garden paths made of rare stones, framed by curtains of cereals, often complement wooden benches and compact rose bushes.
Garden paths in a summer cottage, backyard or in the courtyard of a private household are not only an important element of landscape design that is necessary for comfortable movement between the objects of the territory, but also a way of zoning and decoration. Correct location garden paths will allow you to spend as little time and energy as possible on moving between elements of landscape design, and a beautiful, practical and durable design will allow you to decorate a yard or summer cottage, create creative design to the envy of the neighbors and the pride of the guests of your urban or suburban household with a local area. Even in a small private courtyard, paths are necessary for safe and comfortable movement between the main and secondary objects of the territory - the building of a country or city house, a garage, a gazebo, outbuildings, a children's corner or playground, a swing, a barbecue area, a pool or a pond.

Requirements for garden paths
If we talk about physical parameters, then the main requirement for tracks adjoining territory And garden plot, is the smallest distance from one object to another. But often this criterion goes against the aesthetics of landscape design - winding paths look beautiful, romantic and even mysterious, but at the same time they make a longer path than their counterparts with clear straight lines and turns.


Conventionally, all the tracks of the site are divided into main and secondary. The requirement for the width of the track also depends on the functionality of the path - the main ones are usually made with parameters of 1-1.5 m, and the secondary ones can have a width of at least half a meter. But a lot depends on the material used to make the garden path - if a standard size blank is used (bricks, concrete or stone slabs, "garden parquet" or any other products with non-variable sizes), then the width of the path is formed by their number.


If we talk about the aesthetic qualities of garden paths, then they must outwardly correspond to the general concept of decorating a yard or plot. If natural stone is involved in the design of the facade of a house or other buildings, facing areas and patios, then it would be logical to use this material or its combination with other raw materials for laying out paths.


In addition to their main function - providing the opportunity to move freely between the objects of the local area and dividing the site into segments, otherwise - zoning, garden paths also play the role of decorative elements. With the help of an original choice of material or method of making country paths, you can not only create an exclusive landscape design for your site, but also bring your creative abilities and design ideas to life.


Types of garden paths
According to the type of material used, all tracks can be divided into the following groups:
- concrete;
- stone (in turn, they are divided into those made of plastushka stone, pebbles, paving stones and other types);
- brick;
- wooden;
- from waste material (plastic lids, parts of glass bottles, corks, etc.).


The material for the execution of the paths is selected based on the design of the main building (its facade), other large-scale buildings in the yard or on the site, the style of execution, the size of the paths themselves and the capabilities of the owners (a stone path will require financial investments, and a path made of bottle caps will only take time to collect them ).


In addition to the material, the criterion for separating the tracks is the method of execution - they are divided into solid and non-solid. The name speaks for itself. The type of paths will depend on their length and purpose - whether the paths play an exclusively practical role or also carry a decorative load.

Also, all country and garden paths can be divided into two types - temporary and permanent. Most of the tracks involved in landscape design are permanent. But in some cases there is a need to lay tracks, for example, only for a period holiday season. Finished tracks are most often made of rubber or plastic and are sold by the meter or in blocks (sections, products) that are interconnected like puzzles.


Preparatory work
Regardless of how long your tracks will be, what material they will be made of and in what particular way, any performance will require preparatory work. First of all, you need to draw up a plan for the location of the tracks on the site. This can be done both on a regular sheet of paper and in a special program, which is not difficult to find on the Internet. Designate on your plan all the elements of landscape design - not only the main buildings and sites, but also the location of flower beds, beds, household objects.


While laying the still drawn paths from the main objects to the secondary ones, you can optimize the arrangement of flower beds, beds and temporary plantings, in order to reduce the distance between objects or connect some elements into zones. In the course of drawing up the plan, it will become clear which segments can be connected by a path leading to them, and for which sections of the yard you will have to use branchings or pave the platforms. Only on paper it may seem that a rarely visited corner of the garden or yard can do without a path - imagine your reluctance to walk on the ground after rain, and you will find resources for making even a very narrow path.


Next comes the markings on the ground. This stage should not be neglected, especially in cases where not only the length, but also the width of the tracks will be clearly regulated by the parameters of the material - slabs, bricks or any other standard blanks. The easiest way to markup is with pegs with a stretched rope or cord. In order to make the outlines of future paths more obvious, the boundaries can be outlined with lime.

The ideal option can turn out if, together with the marking of the paths, it is possible to place marks on the planting of trees and shrubs, plants that will frame these same paths. On the ground, everything looks a little different than in the program or on a piece of paper. You can lay out stones with inscriptions of the names of trees and shrubs or designate the layout of future flower beds with them.


The pit for any path should be somewhat wider than the laid out path itself. In order for garden paths to last as long as possible, it is necessary to lay out a curb of stones or concrete around the edges.


Foundation for a garden path
Do not neglect this stage of work if you want the path you laid out to last for many years, and not begin to crumble or grow grass after the first season of operation. When preparing the base for your garden droshky, it is important to remember that it should have a slight slope to drain rainwater. The presence of a small drainage trench on the side of the slope of the paths will be an excellent help for the entire landscaping of the yard or plot during rainy weather.


So, it is necessary to carry out the following manipulations to prepare the foundation for the garden path:
- remove the upper fertile layer from 2 to 20 cm in size (it all depends on the quality of the soil, the length, the tire and the material for laying out the tracks);
- along the entire length of the walls of the resulting pit, wooden planks, having previously poured a little sand under it;
- if the width of the track will be limited by concrete curbs, then they are leveled and fixed with reinforcing bars (to prevent shifts), which are driven inside the pit;
- if the soil in your area is very loose and the walls of the trench turned out to be uneven, you will have to drive in reinforcing pins along the edges of the walls, and then install curbs;
- then fine gravel or gravel, pre-mixed with cement or sand, is poured to the bottom of the trench, leveled and compacted (layer thickness from 5 to 10 cm);
- for a more thorough compaction of the gravel layer, it is necessary to moisten it periodically.

An example of the design of a beautiful and practical garden path
Consider the option of arranging brick garden paths, as the most affordable and easy-to-use material (in case you have the opportunity to use a used brick, and not buy material).


A brick garden path is a fairly durable, durable and aesthetic surface that even a homeowner without special skills and experience can make on their own. The brick path is laid out according to the same principle as paving slabs or paving stones. In order for the trail to last as long as possible, choose high-quality clinker bricks and carry out all work with high level accuracy.


So, you need to go through the following algorithm of actions:
- the prepared base with a compacted top layer of sand must be carefully leveled using the rule ( makeshift fixture from a board with a perfectly equal surface);
- this is followed by the installation of side bricks (in relation to the width of the track), they are mounted with an edge and driven into the sand at half their width with a rubber mallet;
- if your path does not have a curb, then the side bricks must be fastened with a mortar (use the formwork, after removing which it is necessary to arrange crushed stone, compact it at the end of this work item);
- then the brick track pattern is directly laid out (it can be placed edgewise or laid wide);
- usually, to create the most rigid and durable masonry, one row of bricks is laid along the path, and the second - across. Also, to increase the strength of the masonry, cement-based street glue is used (it will help not only fasten the bricks together, but also prevent grass from growing through the products).
- a little solution is required, tk. it is necessary that it does not protrude to the surface between the bricks, but is inside the masonry;
- upon completion of the installation of bricks, the gaps between them are filled with sand using a large brush;
- in order to give brightness to the resulting brickwork and extend its service life, the surface must be covered with a penetrating primer, and after it has completely dried, with varnish for outdoor stone.


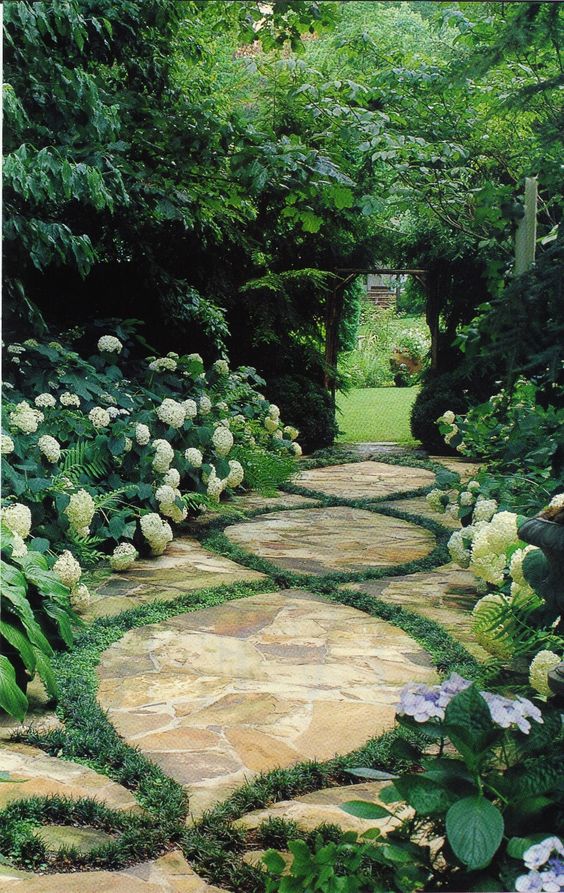
And finally: some original ideas
In modern landscape design projects for areas of various shapes and sizes, design styles, you can often find garden paths laid out in the manner of steppingstones. It is as if you are moving along the elements of the path in the form of individual slabs, flat stones or log cuts that arise directly from the lawn or bulk material trail foundations. It is easy to make a beautiful, modern and at the same time functional walkway with your own hands if you use the so-called “steps” made of concrete of various shapes.


In this case, the combination of material looks original. For example, clear edges and sharp corners of concrete square or rectangular slabs or plastushka stone against the background of rounded shapes of river stone - pebbles. Together, these two types of materials form an organic and attractive alliance for creating creative yet practical surfaces.


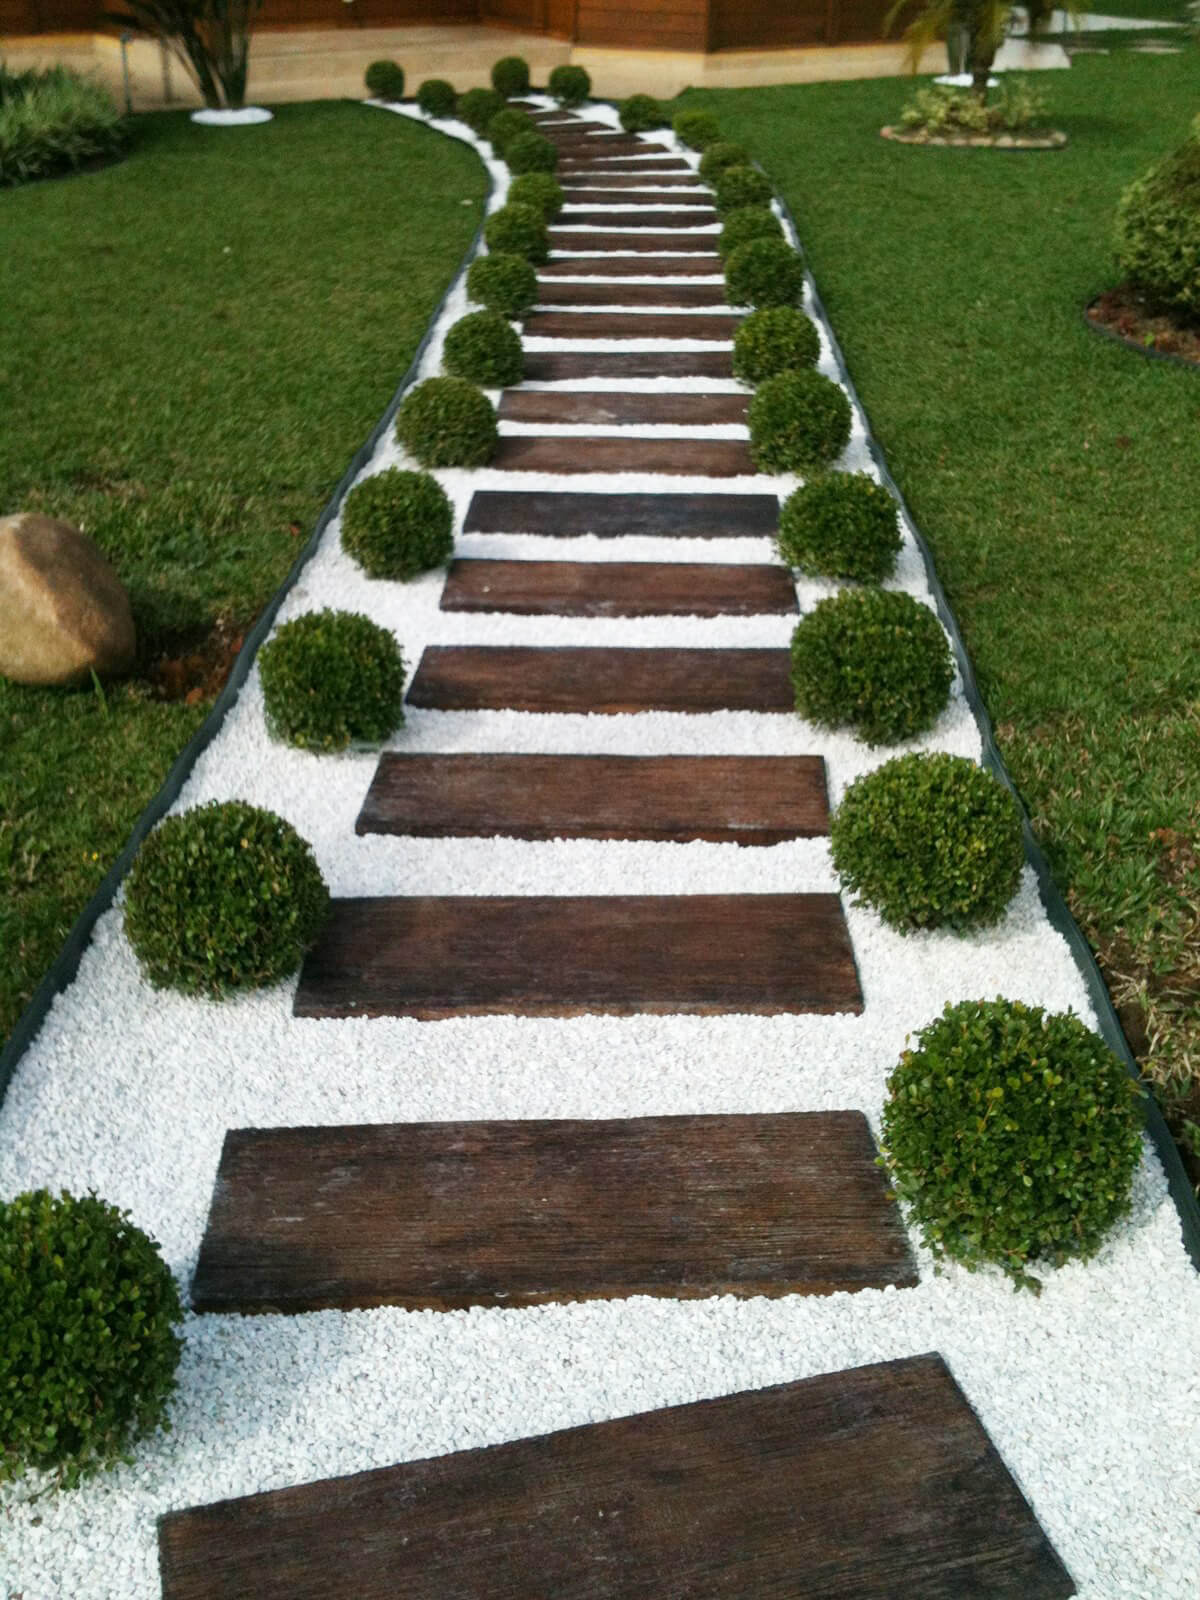
And the "steppes" from wooden boards look luxurious on small decorative gravel of snow-white shades. Against the backdrop of bright green lawns, such paths will look especially impressive ...
Wooden garden paths are not uncommon. Only in Lately For modern projects Landscape design is increasingly using the so-called "garden parquet". The material is standard sizes workpieces that are very easy to connect to each other to create not only strong and wear-resistant, but also incredibly beautiful coverage. "Garden parquet" is used not only to create paths, but also spread on open verandas, platforms, terraces and patio or barbecue areas. The wood in such products is processed in a special way - it is not affected by the usual "natural irritants" - moisture, temperature changes, direct sunlight.


Laying out drawings from a round river stone (mainly Altai blue) allows you to create uneasy original paths, but bring the beauty of the creative process to the design of your yard or summer cottage. Round river stones different sizes from very light gray-blue to dark, like anthracite, can be laid out in fancy abstract patterns or prints that are quite clear in geometry. The creation of such a track will require not only financial, but also time, incredible accuracy and a large number free time. But all efforts will be more than compensated by the incredible aesthetics of the paths, their uniqueness.


No less original effect can be achieved when laying out a pattern from the remains of porcelain tiles (products for floor covering, street use). The advantage of this method is not only in the originality of the result and the freedom of your imagination, but also in saving the family budget, because it’s not just leftovers that are used, but fragments from tiles of different shapes, sizes and colors.


A walkway created entirely with bulk gravel may not surprise your guests or neighbors, but it will help save the family budget. It is only important to install strong, solid curbs that will keep small fractions of stone inside the trench.


The cottage is used for gardening and recreation. For the convenience of moving around the site, transitions are necessary that connect the outbuildings, serve to divide the infield into functional areas, facilitate the care of the garden, transportation on a wheelbarrow garden tools and harvest, allow you to walk around the territory of the cottage in any weather.
Beautifully arranged paths are perceived as an aesthetic accent. in landscape design. This part of the exterior is not difficult to do by yourself, knowing the styling features and using improvised materials. Consider the basic rules for arranging paths and try to be inspired by various design ideas in order to embody those that you especially like in your local area.


What to consider when laying?
Tracks differ in purpose and material requirements. The location of footpaths is taken into account at the site planning stage. We draw functional zones on the plan: garden, vegetable garden, yard, economic block, entrance area, main house, buildings for pets and birds. We connect them with the most convenient transitions. We choose either the shortest distance to the land use object, or the most aesthetic one, if it is a walking path. Often they use this technique: one season they walk on bare ground and where the paths are trodden, and there is the most convenient location.
Paths are already being built along the paths.


The landscape of the site must be taken into account. You may have to add soil somewhere, and cut off an unnecessary hill in other places. Paths for walking should be laid using uneven terrain. It is pleasant, having risen on a hill, to see a sprawling garden or park. Designers prefer the effect of a turn: a straight section is replaced by a sharp turn, behind which there is either a beautiful gazebo, or a specially decorated corner of the garden, or a waterfall surrounded by a pond.

Straight paths are recommended to be equipped in utility areas for the efficiency of work in the garden or the convenience of bird care. In the garden or park area, winding natural lines are better perceived. elongated narrow section can be visually expanded by placing the path along a sinusoid or zigzag across the territory. Straight paths that go into the distance will visually lengthen the space of the dacha.

The path should not rest against the fence. It is better if it ends with the entrance to the building or gate. It is possible to equip a false gate with an arch entwined with flowers, it is good to place a bench in this arch, then the path will be logically justified and completed.


To the list compulsory works according to technical requirements when arranging the paths, it includes digging a trench, tamping the foundation with a bed of sand or gravel. Such a litter protects the track from subsidence of individual sections of the material and prevents overgrowing with grass.


The track device assumes the presence of drainage so that puddles do not form on the canvas. It is usually enough to make the edges a little lower than the middle part. In cross section, it looks like an arc. So the water will drain from the center and the path will always be dry.


It is important that the track width is sufficient. The minimum width of the country path must be at least 80 centimeters so that a loaded wheelbarrow for necessary work move freely around the site.


The height of the path without a curb should be flush with the ground, so it is more convenient to mow the grass and the path will always look neat.
The path protruding from the ground will not allow this, and the grass will have to be cut with special hand tool separately, it is not always convenient.

Popular materials
The material chosen for the tracks is not slippery and resistant to temperature changes in winter and summer. In the front area and in places of frequent visits, it is better to choose a more wear-resistant stone or tile; in the park area, you can give preference to sand, wood saw cuts, and chopped bark.

Concrete
The most inexpensive and durable tracks are made on concrete base. To do this, a trench 15-20 centimeters deep is dug, a layer of crushed stone about 5 centimeters high is poured to the bottom, a reinforcing mesh is laid, a layer of sand 5-7 cm is poured, a formwork is made from the lath and installed along the edges of the trench. Instead of formwork, if you wish, you can immediately install borders if they are planned initially, but such a path is strong enough even without borders.

getting ready cement mortar in the following proportions: 1.5 parts of sand and 3 parts of gravel are needed for 1 part of cement, slightly less than 1 part of water is added until a semi-liquid mass is formed. This mass is poured into the formwork, observing the slope from the center of the track to the edges for drainage. Level to ground level. The path can also be used in this form, but for 3-4 days it is better to cover it with a film to evenly set the cement.

These tracks are highly durable., they are good to use in the economic zone and in the zone of access roads. This material is practically resistant to corrosion, withstands heavy loads, but from an aesthetic point of view it looks somewhat monotonous.
For decoration, it is worth purchasing a form for casting cement parts and laying out the canvas of the track with these elements.

Pebble
If desired, decorate the surface of the track with various natural finishing materials that are available in your area, for example, pebbles or shell rock. They can be pre-painted with different colors of exterior paint.


You can leave the stones in their natural form. You can buy pebbles, or you can collect them in the area, although this will take time, but this way you will spend time in nature with benefit. Spread the decor either randomly, or in the form of a pattern.

It is worth making a beautiful and utilitarian path in the country from fragments of unnecessary ceramic or faience tiles. Well, if this tile is of a different color. After repair, many have the remains of tiles that are a pity to throw away, perhaps acquaintances have a couple of tiles or cracked specimens. Everything is assembled and formed like a mosaic. It's good if the pieces are different sizes. The base is prepared, as in the first case, but fragments of tiles are pressed into the cement that has not yet hardened.

Such garden paths made from improvised material are durable, well insulated from moisture, are not destroyed by frost, are bright accent in cottage design.
Plastic bottles
On a concrete base decorative trim made from the most different materials. If your family loves carbonated drinks, then do not throw away the bottles or collect the caps from them, you can also ask at the nearest catering point plastic container for drinks. For decoration use various parts of plastic bottles.


The brightest and most beautiful tracks can be made from colorful lids. It will take a long time to collect on a long country path, but everyone can do some sections with their own hands. In the prepared concrete surface press the lids in, arranging them harmoniously by color.


Another way to decorate is as follows: cut off the bottom of the bottle to a height of 5 - 8 centimeters and bury these glasses in concrete screed. Even if the plastic breaks off over time, a beautiful flower of hardened cement will remain on the surface.


A whole plastic container is sometimes used to arrange the track. The bottle is filled with sand, placed in a dug trench with a sand cushion, the gaps between the bottles are filled with very fine gravel or sand. Glass bottles are also suitable for such purposes. Glass or plastic create multi-colored highlights in the sun and have a very picturesque look.
The coating turns out to be unusual and elegant, children really like it. The plastic surface is always warm, but the payload can withstand a small one and the material easily deteriorates from mechanical damage. The decor of the caps fits well with the borders of bottles installed upside down.


Brick
Remains of bricks may be found in the country house, they can also be used to build approaches to the house, barn, bathhouse.

The manufacturing technology of such a trail is somewhat simpler than that of concrete. A trench is dug for a bed 15 centimeters deep, a pillow of sand 5 centimeters thick is filled up, tamped, bricks are laid on the sand, not forgetting to make a slope to the edges. They fill it with sand from above, spill it with water from a hose, after the sand settles, they fill it up again, spill it again. This procedure is done until the sand fills all the cracks to the top of the bricks. The coating turns out to be very durable, frost-resistant, warms up well in summer, it is pleasant to walk on it barefoot. An important role here is played by sufficient tamping of the bricks so that a flat surface is maintained and the edges of the bricks do not stick out of the canvas.
If there is a whole brick, it is laid out according to the type of type-setting parquet.


A budget option- use broken bricks. This may remain after repair work or be construction waste. Pieces of brick are carefully picked up along the chips and laid like a mosaic.


An option using bricks of different colors will look even more interesting: white and red. The cover is aesthetically pleasing. Brick is one of the most durable materials, but for driveways, of course, this is a fragile coating. But for pedestrian and bike paths, it will serve for many years.

Tree
Wooden walkways are one of the most popular summer cottages. It is an affordable and beautiful natural material. Natural wooden surface attracts with natural color and interweaving of wood fibers, it can be tinted in different shades. IN summer heat such a coating cools the feet, and in the cold has a pleasant surface temperature. On wooden walkways it is useful for children to play, they will not get dirty and will not catch a cold. Aesthetics wood flooring corresponds to the aesthetics of the site, decorated in a natural style.


Such tracks are made of boards. A frame is built on supports made of wooden or metal posts, boards are sewn onto it. The space between the ground and the coating is ventilated and prevents the tree from rotting. All wooden parts must be treated with an antiseptic.

In another variant wooden sleepers laid on a pillow of rubble. A shallow trench is dug, covered with a layer of sand, the space between the boards is filled with stone. Here you can not make a clear boundary between gravel and forbs. It is not bad to walk along such a path to a pond overgrown with sedge, to touch the branches of apple trees, bent under the weight of bulk apples.

The tree is usually the main element of the landscape composition.

However, the processed board is a rather expensive material, therefore, tree cuts are used much more often for arranging tracks. They can be of different sizes and height from 8 to 15 centimeters. The installation technology is quite simple: a trench 20 centimeters deep is dug, a sand cushion is compacted, stumps are installed and the gaps between them are covered with rubble, pebbles, sand. Wood cuts give an intricate pattern of tree rings, are environmentally friendly, inexpensive, and are easily replaced when destroyed.
Wood of any tree can be used, but it requires treatment with moisture protection agents.


Car tires
Virtually unaffected environment rubber coating from car tires. The simplest and most practical tracks are made from tires cut off at the edges, the straight part is straightened and laid directly on the ground. Such paths, if necessary, can be moved to another place, they are indispensable in the garden for passage between beds or in areas intended for keeping pets.


Other means
In some areas there is an overabundance of any natural material, which can become the basis for garden paths. If there is a coniferous forest near you, you can probably pick up bark there. This material, poured in a thick layer, is quite durable, has a beautiful texture, passes moisture well, remaining dry, and if the coating area fails, it can be easily replaced with fresh bark. The manufacturing technology of such a path is very simple - a trench is made with a depth of 10-15 centimeters, a layer of sand is poured and compacted, and the rest of the space is filled with bark with a layer of about 10 centimeters.

More resistant to moisture and bearing a large payload is a coating of crushed stone or sand. The arrangement technology is the same as in the first case, only fine gravel, gravel or sand is poured instead of bark. With the right pillow equipment, such paths serve for many years, but it is better to protect them with curbs.

Perhaps there are deposits of cobblestones nearby. The paths of them have a fabulous look, are durable and decorate the landscape of the site. For the construction of such paths, stones are laid in a trench on a pillow of sand with the flat side up so that the surface is as even as possible. Gaps are filled with sand or small gravel.


