I offer you make a flowering meadow using quilling technique, which will certainly become a decoration of your room or any exhibition.
Do it better with friends. Agree, making a clearing is more fun, and much faster!
Therefore, go ahead!
In order to make a flowering meadow, You will need:
colorful paper,
Quilling tool, awl or needle,
Quilling board (optional)...
...and:
PVA glue,
Tracing paper (transparent paper),
Watercolor paints,
Balloon,
Green cardboard.

We make flowers
Take strips of paper Pink colour long 58 cm, width 1cm and twist them into tight rolls on a quilling board. These are blanks for our flowers. We give the roll a little unwind and glue the ends of the strips to the very rolls.

Then we make petals from them, squeezing them on one side with our fingers.
Glue the flower petals together. We make the middle from acrylic droplets, or paper. You can, for example, take a strip of 1.5 x10 cm and make small transverse cuts on it - a fringe.
Then roll it into a roll, straighten the fringe and glue it inside the flower.

From strips of green paper 28 cm long, 1 cm wide, we make the same rolls as for the petals, but we squeeze them on both sides - these are leaflets.

We make a butterfly
What is a flower meadow without a butterfly? So let's make this cute beauty.

We will need strips of paper of different colors (purple, pink and white) 3 mm wide. Choose the length at your discretion, in accordance with the size of the butterfly.
Glue individual strips into one and make a roll out of it. Squeeze on one side and glue as shown in the picture. Repeat the same steps three more times. This future butterfly wings. But remember that two front should be a little larger rear.

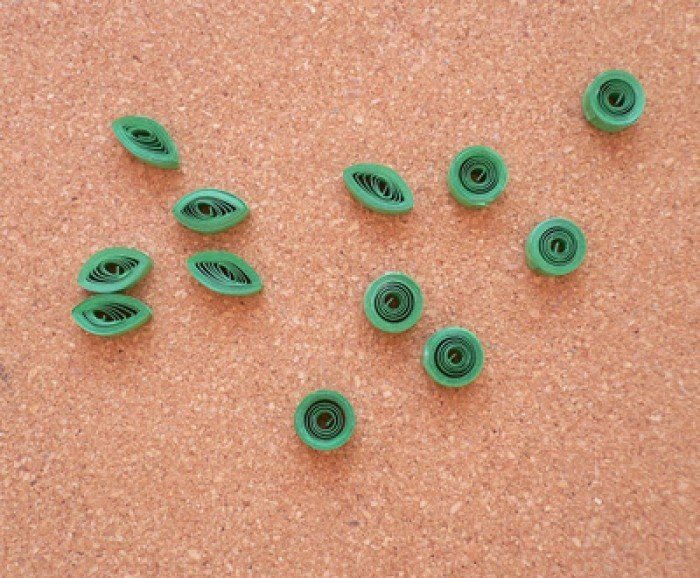
Let's take care of the butterfly's body. We take strips of pink color and twist them into rolls using a special quilling tool, an awl or a needle. We make spiral cones of the same diameter from them. Glue the ends of the figure on the inside.

We glue the cones with stripes of pink.

This is how the details should look like.

It remains to make only the antennae. We make them from a strip 1.5 mm wide, to which we glue rolls of the same width.

We insert the antennae into the cone. We glue the details of the butterfly together.

Congratulations! Butterfly is ready!
“Where, in fact, is the glade?”- You ask. Right now we are going to make it.
Making a flower field
Inflate the balloon to the right sizes. We tear the tracing paper into pieces and stick it on the balloon, skipping the place of its binding. We are waiting for the paper to dry well, burst the ball and take it out.
It turned out like this transparent ball.

We paint the ball in green color using watercolors. Glue flowers and leaves.

From a wide strip of green cardboard we make a stand-cylinder for the ball. To do this, you just need to glue the opposite ends of the strip together.
Don't forget the butterfly. It can be pasted directly onto flower or at kapron insert- then it will seem to fly over the clearing. Often, such inserts can be found under the collar of packaged men's shirts, which your dad will definitely have.

What a beautiful flowering meadow you and I have turned out to be!
Master Class. Making flowers on a skewer of sparkling paper "Merry girlfriends"
teacher additional education Novichkova Tamara Alexandrovna MBOU DOD Lesnovsky House of children's creativity.Description of work. The master class is designed for younger children school age, teachers, parents. The craft is made of colored sparkling paper. The process of making multi-colored flowers on skewers will not take much time, but I am sure it will bring great pleasure to children.
Appointment. The work as a whole can be used to decorate a room for the holiday, and one such cheerful flower will serve as a gift.
Target. Education of a creatively active person.
Tasks:
- to consolidate knowledge and skills to work with paper, to use scissors correctly;
- develop creative abilities, aesthetic taste;
- educate diligence, accuracy.
Materials and tools necessary for work.
- paper colored sparkling;
- yellow paper;
- green corrugated paper;
- black marker;
- a simple pencil;
- long wooden skewers;
- colored yogurt jars;
- multi-colored satin ribbons;
- green woolen threads;
- pieces of foam;
- scissors;
- glue "Titan";

Step by step crafts
We draw flowers of different shapes on cardboard and cut them out. Templates are ready.

We take colored paper and circle the flowers according to the template.

Each flower will be double-sided, so cut out two of the same color at once.
It turned out ten of these different colors.

We glue the flowers of the same color, after inserting a long wooden skewer between them. Press well on top of a sheet of paper.

On yellow paper, we circle five circles with a diameter of 5 cm. I used an icon - a smiley face, which I bought the day before in the store. This is where the idea to make funny flowers came up.

We draw cute funny faces with a black felt-tip pen and cut them out.

We glue the finished faces on the flowers.

Wrap the skewers with narrow strips of corrugated green paper. We fix the paper with glue. Can be wrapped with thread.

We take multi-colored cups from yogurt, insert pieces of polystyrene into them. For stability, you can put plasticine on the bottom.

We put our flowers in cups.

We cut green woolen threads and glue them onto the foam. This is weed. Instead of threads, you can use green corrugated paper.

We decorate our flowers. We tie bows of satin ribbons to the stem. You can glue the bow to the flower. Add leaves. Here are such elegant spring flowers - we got funny ones. Each child can please his mother, grandmother, sister with such a gift on March 8 or on his birthday.
Mom, dear mom!
Happy birthday!
And today on this day
Take a souvenir from me!


Similarly, you can make the spring sun. It will perfectly complement our flower arrangement.

The sun shines brightly in the sky.
What for?
And the earth is hot from the light
At the same time.
I want to know soon
What is what.
Sunshine, shine brighter!
And I understand!
Materials and tools.
- yellow velvet paper;
- skewer;
- vase;
- satin ribbon;
- black and red felt-tip pens, simple and orange pencils,
- scissors, glue "Titanium".

Step by step craft.
Take a sheet of velvet yellow paper.
Fold it in half, yellow side up. Let's draw a circle with a diameter of 9 cm with an orange pencil. I used plastic cup. You can take a circle. Arbitrarily, with a simple pencil draw the rays of the sun, arms and legs. Do it without pressure. It will be difficult to erase defects on velvet paper.

Carefully draw arms and legs with a black felt-tip pen. We circle the rays with an orange pencil, giving them brightness.

Cut out. We have two such details.

We glue these details of the sun by inserting a wooden skewer.
Glue on the eyes. If there are no ready-made eyes, draw them with a black felt-tip pen. We paint on a smiling mouth. First, we outline with a simple pencil, and then draw lips with a red felt-tip pen. We put two points - the nose. The sun is smiling down on us!


And now it all depends on your imagination and fantasy. We decorate our sun with flowers, bows. It can be like this.


We select a vase and set the sun, fixing it well with foam and glue. We decorate a vase with flowers.

The place of honor was taken by the sun among the spring flowers.

The cloud hides behind the forest,
The sun is watching from heaven.
And so pure
Good, radiant.
If we got him
We would kiss him.
Such fun and easy-to-make souvenirs can be made for Valentine's Day, Easter and other holidays.
Smooth surface of emerald green, adorning country cottage area brings joy not only to the owner, but also to everyone around. A perfectly manicured lawn enhances the decorative component of the landscape: it beautifully frames the flower beds and alpine slides, ties together various design elements. However, not only in beauty are hidden beneficial features lawn.
Half a hectare of green grass can absorb up to 40 tons of dust per year, allowing us to breathe fresh air. An undoubted advantage of the lawn is the increase in humidity, which helps to feel more comfortable in summer heat. Involuntarily, you will think about how to make a lawn in the country with your own hands, that is, without extra expenses, but according to the rules. This is our story.
A beautiful lawn requires a lot of care and attention.We choose the timing of the arrangement of the green carpet
Spring-summer sowing works are carried out from early May to mid-August. If grass seeds are sown in the spring, plant 10-15 percent more seeds per square meter area. The increase leads to active growth plants and helps to strengthen the lawn in the winter. By artificially creating competition between sprouts, we get the law of the jungle, where the strongest survive, and our lawn becomes beautiful and strong.
Positive aspects of planting in the fall
Autumn sowing of seeds has a number of advantages. If you are planning to arrange a lawn with your own hands, do it in the fall so that in spring and summer you will not be distracted from the main work in the country. In autumn, the sun reduces its activity and does not threaten planting, but high humidity creates good conditions for successful grass germination. If you live in the south of Russia, plant seeds in September. Warm rain will saturate them with moisture, the root system will strengthen and the grass will grow.
Residents middle lane it is worth postponing the planting of the lawn in the fall until November. Seeds that have fallen into frozen soil will calmly overwinter and sprout. in early spring, then, when planted in September, they would get wet or, having hatched, would not withstand the first frost. The advantage of November sowing is cold hardening of seeds. The snow that melts in the spring will bring moisture to them, the rested earth will support them, the pests are still sleeping, and you will get a magnificent lawn.
 You can plant a lawn in spring and autumn
 Negative circumstances of autumn planting
Considering the cons autumn planting, be aware of the vagaries of the weather. If November turns out to be abnormally warm, the grass will begin to grow, then frosts will hit, and, unable to withstand the unexpected drop in temperature, it will die. Besides, a large number of melt water in the spring can wash away the crops, which will lead to the formation of annoying bald spots in the smooth surface of the green carpet. Given these factors, the number seed need to be increased. It is a mistake to plant seeds in winter on a site with a slope, where there is a high risk of losing them after the melt water melts.
Choosing lawn seeds
For parterre lawn pertaining to elite class and requiring special care, use bluegrass and fescue. Plants of these species have a rich in green and dense undergrowth. If you assume walking on a green carpet, it is better not to sow the named representatives of the flora, they do not perceive walking well and quickly die. Ordinary lawns are sown different varieties poles, which tolerate loads quite well. The choice of lawn grass is wide, and we have prepared a special article on this topic.

 Lawn seeds are a mixture of herbs for various purposes
 Lawns are different
Types of flowering lawns
The family of flowering lawns is represented by three types: meadow, Mauritanian and non-grass. The basis of all three types is cereals, but not only they are used in the design. To ensure flowering for the entire growing season, cereals are supplemented with annual and perennial flowering plants. The names of the species are related to the composition of the vegetation that will cover them.
meadow flowers
This type of lawn is a version of a cultivated meadow, harvested from plants measured in a strictly defined ratio. Cereals coexist in it with clover, daisy, chamomile, yarrow, loosestrife and a number of other decorative deciduous and flowering plants. No matter how many flowering plants are included, the main role is given to grass. Different periods of flowering plants enhance the decorative qualities of the meadow carpet, each time changing its palette.
It is often impractical to mow the ennobled meadow, 1-2 times for the whole season is enough to renew the growth. With proper watering, perennials quickly grow back and restore their decorative qualities.
Moorish ornament

 Moorish lawn does not require mowing
 For the Mauritanian look take annual plants that do not involve a haircut. The dominant role is assigned to flowers, cereals are represented by a smaller composition and undersized species. It is desirable that flowering plants had a long flowering period. You can plant species such as matiola, cornflower, large-flowered flax, self-seed poppy, calendula, escholcia. Moorish style in landscape design always distinguished by lush flowers, it does not change itself even when creating a lawn.
Growing a non-grass type of lawn with your own hands is a complex and long-term matter. It consists of ground cover plants, whose seedlings are expensive, to grow by ourselves for a long time, but simply sow in open ground- a waste of time. A non-grass lawn is cultivated for several years, starting with a small amount of planting. Then they wait until the plants grow, and only then they begin to form a beautiful green meadow. For a summer residence, where every meter of area is in demand, a non-grass look is wasteful and impractical.

 Non-grass lawn requires long growing time
 Types of grass lawns
When evaluating a grassy lawn, a non-specialist is unlikely to notice the differences between one species and another. The grass is green everywhere, somewhere there are differences in shades, nothing more. However, a professional will unambiguously determine which green “carpet” can be safely walked on, and which one will not tolerate such an attitude. In addition, the types of grassy lawns are divided according to sowing rates and care features.
garden meadow
If you first thought about how to make a lawn in the country with your own hands, stop at the landscape gardening variety. Consisting of unpretentious varieties cereals with tough stems, it is resistant to shade and to sunbeams, without problems grows on poor soils.
Landscape gardening lawns are used for arranging the territory near the house, swimming pools, patios, recreation areas, since they are very resistant to trampling. The view is easy to care for, does not require frequent weeding, easily covers defects made during the device.
Sports track
The main requirement for sporty look- resistance to mechanical stress. For sowing, a mixture of ordinary cereals is used, which includes special varieties of herbs. The decorative qualities of this option are not the best, since its purpose is a playground. Application special types plants increases the cost of such a mixture of herbs, complicates care, but it is best suited for arranging the territory of a playground, a place near a swing.
 The lawn for the playground must be resistant to trampling
 Parterre lawn or English velvet
The most expensive and capricious look to create. Herbs for him choose growing only on fertile soils. Parterre lawn vegetation is demanding for care, does not tolerate shading, likes to be in sight, under the sun. Created for enthusiastic contemplation, it does not tolerate walking on it and belongs to exclusively decorative objects. Luxurious, well-groomed, noble, with a real English character, it inspires admiration and respect for the owners who can afford such decoration of the landscape.
If there is a place in your garden where the grass grows by itself, then you already have a pretty pretty and low-maintenance lawn. It is called natural because the owners are only required to cut what nature has grown. The only thing to do is to remove the plants that are too tall. Such a look does not carry much decorativeness, but a nice green lawn will turn out of it. If desired, you can sometimes cut and sow. Perhaps in the speed you will have a desire to make adjustments to the creativity of nature, but then you will not natural look, but something else.

 Forbs from wild plants can be considered a lawn
 Stops on the way to a beautiful lawn
Having decided on the type of natural carpet, we will deal with the question of how to properly make a lawn. Step by step guide to create a green lawn consists of several stages. Consider their list:
- Soil preparation, including improving soil fertility, adjusting for acidity, removing weeds.
- Sowing certain varieties of grass, observing the irrigation regime.
- First haircut. After the vegetation reaches the required height, it should be cut.
- Activities for permanent care and performing periodic haircuts.
Carrying out all these activities will help to have on personal plot beautiful and well maintained green carpet. Of course, you will need to monitor soil moisture, destroy weeds, feed cultivated vegetation, and sow bald spots if they appear. Purposefully engaged in your creation, you will provide it with a proper look.
Preparing the soil for our lawn
The basis of the lawn, on which the whole “structure” rests, is the soil. Step by step verification start with determining its fertility. If you got loam or clay, grass will not grow on them. What to do? We remove 15-20 cm of the upper layer and fill the resulting pit with fertile soil. Irregularities in the relief are eliminated by carefully leveling the surface.
How to carry out alignment is described in the article. It is desirable to give a decorative object a slope of 1 cm so that storm water does not stagnate on it.
We wait until the weeds hatch, remove them manually or apply herbicides. At the same time, we clean the surface of small pebbles, remnants of roots, debris so that they do not interfere with the development of the root system of our plants.
If pesticides were used against weeds, it is necessary to wait a few weeks during which the grass cannot be sown. When all the preliminary work with the soil is completed, we sow the vegetation.
Checking the soil for acidity
Lawn grasses love neutral soils and grow well in them. To check the acidity of your soil, buy a special kit from the store. It includes litmus paper, which is placed on the ground and waiting for it to change color. The acidity index is determined on the scale indicated on the package. High acidity at home is reduced by adding lime to the soil, if the soil is alkaline, crushed peat is used, which is scattered over the surface. To install a grass carpet in a lowland, you should take care of a drainage system, otherwise the lawn will turn into a swamp.

 Simple devices for checking the acidity of the soil
 Compacting the soil for seeds
Compacting the soil is done before planting the seeds. The operation prepares the soil for planting grass and helps to detect remaining defects before the final completion of the work on the ground. The tamping rink can be made by yourself from a piece of pipe - asbestos or metal. A rod is threaded inside the impromptu rink, a rope is tied to its ends. If pits and humps appear during tamping, they should be leveled manually, then walked again with a skating rink. For getting perfect surface you can level the area with the edge of a flat board, dragging it along the surface of the put on.
The right fertilizer solution
If, when laying the lawn, they brought new land, then additional soil fertilization is not required. In other cases, if you want to get a luxurious, perfectly green and even lawn, take care of plant nutrition. Fertilizers can be applied to different stages lawn improvement.
For the rapid growth of grass, fertilizers are applied:
- after you have filled the place under the lawn with new earth, but have not yet walked on it with a rake;
- dry fertilizers can be mixed with seeds;
- when watering the soil, fertilizers are diluted in water.
It is easy to find out what fertilizers you need. Knowing the composition of the soil and the type of grass planted, you can find information in the instructions for ready-made fertilizers.

 Using special fertilizers, you can improve the quality of the grass on the lawn
 planting grass
All work with the land and place is over, the long-awaited moment comes when it's time to plant lawn grasses. The top layer must be slightly loosened with a rake and only then sow the grass. For the convenience of work, the seeds are poured into a bucket, grab a handful and spill them through the fingers on the prepared soil, trying to guide the hand evenly. If grandfather method Does not suit you, build homemade seeder. Take plastic bottle, make a lot of holes in it, here is the seeder for you.

Calculation of the number of seeds and sowing fineness
You don’t have to calculate the consumption of seeds on your own, as a rule, all the information is written on the package. However, you need to know the area of the area allocated for the lawn in order to correctly measure their total number. To evenly distribute the seed, split the seeds into two parts and first go through the area in one direction, and then perpendicular to the first. After sowing, the seeds are covered with earth or sand:
- They pass over the surface with a rake, trying to ensure that the earth covers the seeds. There is a risk that not everything will be covered, and the birds will peck at them, and bald spots will appear on the lawn.
- Sprinkle the crops with the remnants of the brought earth or sand. The thickness of the new layer is 3-5mm.

 Seeds can be sprinkled with earth
 For sowing a large-scale object, hydroseeding is used, when the entire sowing mixture is poured into special equipment. The device evenly sprays the seeds under strong pressure. A small lawn can be seeded with a hand sprayer. After this sowing upper layer after 2 hours, the soil is covered with a frozen crust, preventing the wind from blowing the seed and preventing the birds from pecking it.
Watering and waiting
The earth was covered, compacted, the grass was sown, now everything needs to be watered. Watering should be moderate so as not to overmoisten the soil and prevent it from drying out. The flow of water during irrigation should come out in thin streams. If you work manually, install a nozzle on the hose. Sprinklers are used for automatic irrigation. The first shoots should be expected in a week. Do not expect continuous growth, because the herbal mixture consists of grass with different periods of germination.

 This is what the result of all the work looks like
 It will take about 25 days, and the grass will rise to 20cm. It's time to mow. At the first mowing, the grass is cut in such a way that a shoot 5 cm high remains. Experience shows that this height is optimal for rapid development. When the plants grow back to 10-12 cm, they should be cut back to 3-3.5 cm, forming the final look of the lawn. Now it remains only to monitor growth, cut and water on time.
The video content titled "" was posted by the author of "Handiki" for 3 years. ago, it was already viewed 18, 128 times. 71 liked the video and 9 disliked it.
Description:
simple crafts from paper. Children's DIY crafts, we share ideas every day! Let's try growing paper flowers today! We will even make a whole meadow with flowers. It's very simple and all we need for this is colored paper and glue! See how Ksyusha and Frosya cope with such a beautiful and very easy craft. Let your paper clearing bring joy to the house, because the flowers made with your own hands will surely bring smiles to your loved ones!
********************************************************************
We make a spinner with our own hands:
What is Barbie saving money for?!
Beautiful photo frame for Chelsea! Decorate the room:
We are on VKontakte:
We are in Odnoklassniki:
We are on Facebook:
Subscribe to the most creative children's channel HENDIKI -
Video source youtube.com/watch?v=NK8r5wRuTEI
This video material about modeling can be watched online, as well as downloaded absolutely free of charge and without registration in almost any video format: mp4, x-flv, 3gpp and so on. You just need to click on the "Download" button at the top of the site and move the slider to the right. In addition, you can see other educational video about molding from plasticine, salt dough, clay and so on from the author of Handika, which are also posted on our website, as well as other similar educational videos about modeling, crafts, materials, art and the like. If you need a mobile version of this video, then our site has a modern responsive design and is suitable for any mobile device: tablets, smartphones, phones, and so on.
Author: Grishina Margarita Aleksandrovna teacher of additional education of the Central Children's Gallery Globus, Ufa, Bashkortostan
Target: Making a flower meadow from paper for a gift
Tasks:
Educational: Learn how to make paper craft gifts,
learn to work with glossy cardboard and corrugated paper
Educational: Cultivate creative thinking, imagination to compose flower arrangements, artistic taste of choice colors, motor skills of small muscles in the process of making a flower arrangement
educators: To cultivate interest in the holiday of March 8, a kind and polite attitude towards mother, grandmother, sisters, encouragement to make gifts, careful patient fulfillment of gifts, friendly relations during class, mutual assistance to each other, responsiveness.
purpose: Recommended for teachers of additional education, educators, primary school teachers, parents and fans of creative imagination.
Lesson recommended carried out with primary school children, a simplified composition can be used in a lesson with children of the preparatory group.
Purpose: The made craft can serve as an interior decoration at home, in a kindergarten, at school, and also as a gift for March 8.
A very joyful and pleasant day is approaching us, this is the holiday of March 8, the holiday of all women. First of all, we congratulate our close and dear mothers, grandmothers and sisters. With a hand-made gift, we give our attention, love and devotion, which It is impossible to convey in words. With a special feeling, we give our gifts to our mothers, for whom we will be her beloved children for the rest of her life and always children, no matter how old we are. Awareness of the word mother comes with age, this is a very touching feeling.
Let's make her happy from the heart, as best we can.
Making a flower field
For work we need:
Scissors, glue stick, red, yellow and light green printer paper, glossy dark green cardboard, orange and red corrugated paper.

Templates for making:

We circle a large grass det 2 1 piece on a dark green cardboard and cut it out

We circle on light green paper a small grass det 1 1 pc, a sheet det 3 4 pcs and cut it out

We circle the stem det 6 5 pieces on dark green cardboard, on yellow paper the flower det7 2 pieces, on orange corrugated paper
circle det 10 4 pcs and cut out

We circle on red paper a large red flower det 2 2 pcs, small flower det 5 1 pc, on red corrugated paper petal side and central det 9 4 pcs and det 8 2 pcs and cut out

We roll a large grass into a tube and glue it, bending a little the edges of the grass

Glue small grass along the bottom of the large grass, but do not glue the blades of grass.

Paste sheets inside

We slightly crush the circles of corrugated orange paper, crumple and glue two at a time to the center of the yellow flowers, on each large red flower we glue 2 side petals of red corrugated paper on the sides and the central leaf from the top in the center, slightly stretching the edges and the center and bending

We glue a green cardboard stem to each flower. It turns out 5
flowers

We glue the stems with flowers: two yellow to the back leaves, and two large
red to the front leaves with the inside, and one small flower
on a stalk sticks in front under a small grass obliquely.


For those who liked the gift and have a desire to repeat
i put proportional patterns for enlargement and repetition


Do as many pleasant things as possible for your mothers, life is so fleeting, do not put it off for later, then it may be too late. Call her now, go to visit her, do not miss the moment of joy of communicating with your mother. She is always waiting for us, waiting and worrying about us.
Creative success to you, dear colleagues and lovers of beauty.


