The chandelier can become the main element of the interior, make it special and unique. And it is not at all necessary to give huge amounts of money to purchase exclusive interior items; if desired, beauty can be created with your own hands.
Imagine how interesting the manufacturedDIY chandelier made of wood.
In contact with
What is required for this
What can you make a chandelier with your own hands. Main The advantage of a homemade lampshade is that you can use any materials at hand to create it. In this case, the new design of the room will not be associated with material costs, and space will be freed up in the pantry.
Beautiful chandelier with your own handscan be made from almost any improvised materials. For creative work slats, boards, planks, branches, plywood, wood glue, varnish or paint, tools will come in handy. The exact set of materials depends on the selected product model.
Advantages
Main advantagehomemade wooden chandeliers- material. Today, when plastic has become widespread throughout the world, everything natural and environmentally friendly is especially appreciated. What advantages will it havechandelier from wooden slats ?
- guaranteed environmental friendliness - wood is a clean material that does not harm health;
- ease of execution, which is ensured by the pliability of the material;
- no restrictions regarding the appearance of the product - working with your own hands, you can create a chandelier that is ideal for the chosen design of the room;
- a positive effect on the emotional state - it has been proven that objects made of wood have a calming effect.
Important!Homemade chandelierssoftwood not only have a wonderful appearance but also help to get rid of respiratory diseases. Pine and spruce are especially healing.
Product design
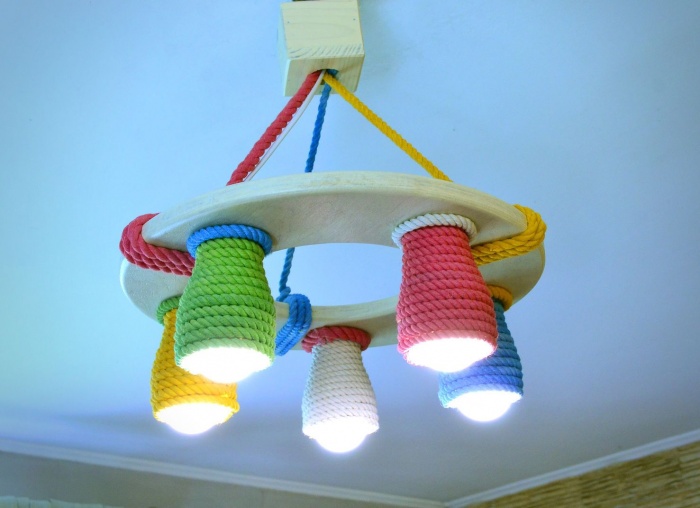
A chandelier in the form of a wheel will certainly appeal to connoisseurs of ethnic style. Such a lampshade will become an integral part of the interior in the style of the wild West.This idea will especially appeal to those who have a wheel from a cart lying idle in their country house.If main element missing, andwooden chandelier wheel needed and there is a desire to needlework, then this component can be bought at any "flea market" or ordered via the Internet.
Necessary tools and materials
For work we need:
- wooden wheel;
- electric drill and a set of drills for it;
- woodcarving tools;
- mounting adhesive;
- foil;
- electrical component - lamps, cartridges, wires;
- varnish or paint to cover finished product;
- decorative elements - optional;
- chains for fastening.
Not sure which bulbs to choose for homemade chandelier? Give preference to LED or fluorescent, such a lamp will have high level fire safety.
Manufacturing instructions
 Clean the wheel, sand it - the surface should be smooth and clean. Decide which part will be the top and which part will be the bottom. Drill holes for the cartridges in the upper part. It is most convenient to perform this procedure using a Forster drill.
Now you need to make holes for the wires with a drill of a suitable diameter, make holes from inside wheels to each place where the electric chuck will be installed.
We make “moves” for the wires in the upper part of the wheel, where the ceiling mount will be located.
You can put the wires on top, then you do not have to spend time masking them, but this will make the chandelier less attractive. Through holes in the upper part are best done at an angle, from top to bottom.
Decorate DIY chandelier frame. You can simply varnish the wood or give it the effect of "old times" by covering the base with "stain" and the iron elements with black paint. As a decor, you can use any elements that are at hand.
Important!Pay attention to the central hole below: you can insert an additional lamp into it or cover it with a decorative element.
We assemble the chandelier: it is recommended to lay a layer of foil on the bottom of the recesses for cartridges - this will increase the fire safety of the lamp. Insert cartridges, connect wires. If desired, the wires that are in sight can be coated with paint to match the base.
For fastening to the ceiling, use chains - three pieces attached at equal distances from each other.
Antiques are always valuable
DIY antique wooden chandeliersusually made fromnatural materials. You can, of course, use artificial chemical compositions, but then the lampshade will no longer be environmentally friendly.
Antique wood chandeliersdiffer from their "brothers" in appearance. The tree is artificially aged using various means.
For work you will need:
- finished wooden chandelier;
- mint oil;
- beeswax;
- potassium permanganate;
- gloves;
- rags for work.
Advice!Peppermint oil is easy to prepare yourself - for this, a glass of chopped mint leaves should be poured with a liter of purified linseed oil. Can be used after 14 days.
Product processing
 Mix mint oil with beeswax in a ratio of 1:3. Heat the mixture in a water bath until a homogeneous mass is obtained.
Using soft tissue, treat everything evenly wooden surfaces lamp with a mixture of oil and wax.
Make a concentrated aqueous solution of potassium permanganate. With a cotton swab, arbitrarily make wide strokes with a solution on a tree: they will look like darkening from time to time.
Let the chandelier dry.
We use a rail
The chandelier in the hall with your own hands from the rails looks original. The slats remaining after repair or construction, through simple manipulations, turn into an exquisite lamp that will become the highlight of any interior.
To the question how to make a chandelier at homefrom wooden slats, there is a fairly simple answer.
Prepare the following set:
- wooden lath 2 m long 20x30 - 5 pcs;
- electric chucks - 3 pcs;
- wires;
- corners - 1 pc;
- hairpin m6 - 1 pc;
- linen impregnation;
- paint or varnish;
- glass;
- washers and nuts;
- woodworking tools.
Sequencing
- We cut all the slats in half, cutting the length in half.
- Apply a layer of paint or varnish.
- From all the rails we build a kind of well, on the bottom of which we install glass. We fix the structure with clamps.
- With help electric drill we make holes and strengthen the well with bolts and nuts.
- We choose a means for attaching the lamp to the ceiling - it can be a chain or a strong thread.
- To give the chandelier aesthetics, with visible side blind nuts should be used. We hide the edges of the glass behind a plastic corner.
- We insert cartridges, we conduct wires.
- We mount the chandelier.
Create a frame
 What should an exquisite wooden lamp look like? It doesn't have to becarved wood chandelier.
The mold and the manufacturing process could be much easier.
You don’t even need to buy something for the base: you can use an ordinary snag found during a walk through the forest as a frame.
The advantage of such a lamp is unsurpassed natural beauty. How to create a masterpiece based on driftwood:
- Clean the workpiece from the bark, dry and sand.
- Make holes for the wires along the branches. It is almost impossible to make solid ones - choose the option when the wires will evenly wrap around the frame.
- In places where the wiring is outside, you can make recesses, and then hide the wires with putty of the desired shade.
- Cover the lampshade with several coats of varnish and let dry completely.
- Install a cartridge at the end of each branch.
- For fastening, it is best to use a metal chain.
Advice!Wood is a flammable material, it is advisable to immediately treat it with a protective compound.
original solutions
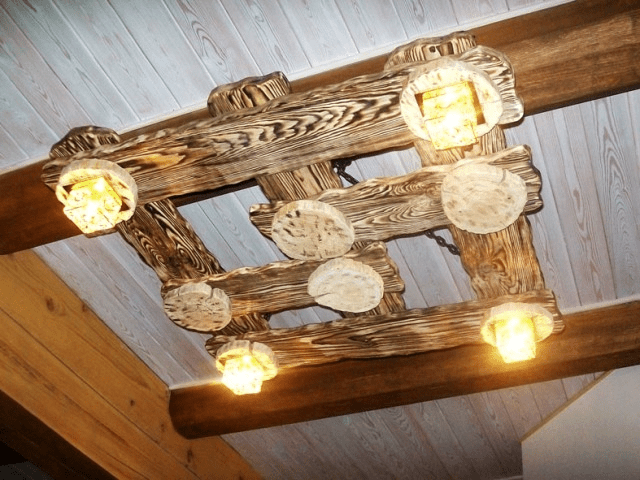
Interesting DIY chandeliersyou can make any shape, style from the most unexpected materials - snags, logs, timber or twigs. There are no restrictions and limits in this matter, any author's decision is guaranteed to find its fans, give a lot of positive emotions to the owner.
The easiest way
Making the interior of your home truly unique is not as difficult as it seems at first glance. A little imagination, artistic creativity and faith in the result - and you can achieve your goal.
For those who completely doubt their own abilities, there is an easy option for turning an ordinary wall lamp into an interesting lamp. It will look especially interesting in the bedroom, the interior of which includes elements of wood. To bring the idea to life wooden board process and varnish. Attach it to the wall vertically, and fix the sconce on it - the lamp will look completely different.
Advice!If you use PVA glue when making a wooden chandelier, carefully wipe it off all visible areas. Over time, it turns yellow, which spoils the appearance of the product.
As you can see, the questionhow to make a wooden chandelier with your own handsthere are a lot of answers. Having certain talents and skills, showing a little imagination, you can create a chandelier worthy of admiration. The options described above are just a small fraction of what you can think of.
All photos from the article
Over the past few decades, there has been practically no design trend left that would not use wood products to one degree or another. The lamp in general and the chandelier in particular are objectively one of the most noticeable interior items, therefore hanging chandeliers made of wood, are deservedly considered perhaps the most popular trend at the moment.

Features of ceiling lamps made of wood
Any wooden object in the interior of the room on a subconscious level is associated with warmth and comfort. Traditionally, home-made wooden chandeliers are used in all directions of oriental themes, where the geometric correctness of the lines and at the same time warmth natural wood contribute to a relaxing holiday.
Such a direction as country is generally impossible without the use of natural materials. The rural style at all times was characterized by the use of slightly rough unusual shapes. The massive appearance of such lamps creates a feeling of reliability.

Antique wooden chandelier is associated with medieval romance and knightly tournaments. Inclusions of forged metal elements give this design an exquisite lightness and unique flavor.
Advantages of wooden lamps
- The first thing that catches your eye is the naturalness of such a chandelier.. It is difficult to find a more environmentally friendly material. Moreover, being constantly near a heat source, wood releases essential oils and microelements that are beneficial for health into the atmosphere.
- Processing technology this material, as a rule, is not very complex. The assembly of relatively simple wooden structures is available even to children.

- Chandeliers for summer cottages made of wood are deservedly considered almost the most best solution . After all, the cottage itself is intended for country rest closer to nature.
- Not the last role is played by the price of the structure.. Even if you use, the total cost of a homemade chandelier will be affordable for almost any budget. But as a rule, all costs end with the purchase of cartridges, light bulbs and wires, and a few boards or twigs can always be found in any country house.

What are the disadvantages of such lamps
- Opponents will immediately point out to you the fire hazard of such a chandelier. These statements, of course, have some truth, but with proper installation and use of LED or other slightly heated light sources, you are practically in no danger. In addition, on sale there are a lot of natural impregnations that prevent ignition.
Important: these homemade lamps, no matter how you impregnate them and no matter how competently you collect them, it is highly undesirable to place them near sources of open fire. For example, next to the fireplace or in the barbecue area.

- Like it or not, wood is a living material and very hygroscopic. Wooden chandeliers for a bath look great, but it is better to mount them away from showers and steam rooms. Constant changes in temperature and high humidity are far from conducive to the preservation of the massif. In this case, a chandelier under a tree is more suitable.
- Another serious problem of this material is the high probability of damage to the array. different kind pests. But as mentioned above, no one bothers you to impregnate your chandelier with natural protective compounds.
A few words about self-assembly
Do-it-yourself antique chandelier made of wood, the thing is quite real. In essence, all you need is a great desire and a standard set of carpentry tools, which is in almost every home.
The topic of our article is wooden ceiling lamps. We will analyze the advantages and disadvantages of this material both from the point of view of design and from all other sides; we will find out where these lamps can be used, and where it is better to do with other materials.
Finally, we will learn how to make a wooden lamp with our own hands with little effort and time.
What is associated with the tree in the design of the room? First of all, with antiquity, with the Middle Ages. Over time, when people woke up to the singing of birds, and not the noise of cars outside the window; when men were courageous, women did not know the word "emancipation", they were punched in the face for meanness, and life was much simpler and clearer.
That is why wooden lamps most often have deliberately ancient forms. For example, chandeliers in the shape of a cart wheel are very popular.
After all, this is what real, let's say, indoor lighting systems looked like several centuries ago: an old wheel on chains or ropes was hung from the ceiling, and candles were placed on it.
Why is it convenient to use a wheel with spokes as a stand?
Why did the ancestors stop at this form?
- With a uniform placement of candles, it gave the same illumination to all parts of the room;
- The spokes created a minimum of obstruction to light, in contrast to the solid rim.
Modern stylizations have the same advantages; of course, lamps are used instead of wax candles or torches. Most often, of course, also in the form of a candle.

However, we digress. What are the advantages and disadvantages of wooden ceiling chandeliers?
Material Features
Advantages
- Wood is not only environmentally friendly. Wood not only does not emit harmful substances; on the contrary, for a long time it saturates the air with aromatic resins, which facilitate breathing in asthma patients, relieve inflammation of the respiratory tract ...
But what can I say - you probably remember how easy it is to breathe in a recently cut down wooden house! - Wood is easy to work with which opens up a wide scope for creativity. If for the manufacture of a lamp made of plastic or chrome-plated metal, fixtures that are absent in a standard city apartment are needed, then wooden lamps for manufacturing require a minimum set of hand tools.
However, alas, not all the features of wood as a material for a lamp are as pleasant:
Flaws
- The tree is still combustible material . dispose wooden elements close to outdated incandescent lamps - a bad idea in the extreme; a burnt contact in the lamp socket can also lead to a fire.

- Wooden chandeliers are attacked by bloodthirsty bugs- woodworms, fungus and other evil spirits.
Note: conifers wood suffer from insects and rot to a much lesser extent.
In addition, for hardwood there are antiseptic impregnations, which at the same time reduce the combustibility of wood.
- Wood is a hygroscopic material. It absorbs moisture from the air; when dried, it can change volume, deform and crack.
If we want our lamp to retain its appearance for a long time, we will have to provide it with a more or less constant temperature and humidity.
conclusions
The negative features of the tree are not given to dissuade you from buying or making wooden lamp, not at all. Again, this is a wonderful, very beautiful and easy to process material.
However, it must be used wisely:
- Wooden fixtures should be shaped so that all heating elements (cartridges and the lamps themselves) are as far away from the wooden structural elements as possible.
It is better that the lamps look up: then the upward flow of heated air will not cause deformation of the wood.
Lamps stand apart, the very style of manufacturing of which involves the use of natural cracks in dried wood. For example, a log hanging on chains with lamps looks great both dry and cracked.

- For reasons of fire safety, it is undesirable to have wooden chandeliers under combustible elements of the ceiling.
Yes, the same log on chains will look amazing under an equally old-looking one; however, if it catches fire, the fire will spread very quickly. - Wooden lamps are perfect for a bedroom or living room.. But in the kitchen with its abundance of steam when cooking or in a damp bathroom, wood is out of place.
It cracks quickly; besides, raw wood is no longer a dielectric at all.
When the phase is shorted to the wooden elements of the lamp, it is quite possible to get an electric shock. If at this moment you hold on to a grounded pipe or bathtub, troubles can be very serious ...
Homemade
Do I need to say that a thing made by one's own hands pleases much more than a bought one? Yes, your lamp may not be as neatly made as the purchased one; but the joy of creativity is worth it for the sake of it to come to terms with the small flaws of the product.
In addition, you will know for sure that your lamp is made in one copy. Not a single guest, coming to you, will see exactly the same chandelier as at home. Homemade ceiling chandeliers are always exclusive.
coffee service

We will need:
- Dry board from any wood. The texture of ash is very beautiful; oak can not be stained and varnished. But an ordinary pine, spruce or birch is also suitable.
- Three translucent coffee cups and three saucers.
- Three cartridges for a small base with mounts for them.
- Three matching light bulbs. Preferably - LED: remember the fire safety recommendations outlined just above.
- Three or six rubber pads. The quantity depends on the method of fastening the cartridges.
- Meter - two two-core copper wires of minimum cross section. 0.75 mm is enough for the eyes.
- A thin chain or twisted cord in order to hang the structure from, for example.
- Four screws to a ringlet instead of a hat. It is for them that our lamp will be suspended.
In addition, you need to stock up on a drill with wood and tile drills, pliers and a screwdriver.

Let's get to work:
- We process the planed board with sandpaper - at first coarse, then finer.
- We drill three holes where the cartridges will be located.
- If noble types of wood are used, then the processing of the board ends here. If the tree is simpler, we cover it with stain and after drying we varnish it twice.
Nitro-lacquer dries in the air in just a couple of hours, so you won’t have to wait long. - Then comes the most dangerous step: we need to drill holes in the coffee cups and saucers without breaking them.
We use only and exclusively a drill for glass and tiles. Great efforts are unacceptable; we drill slowly, without distortions. Key moment- when the tip of the drill passes through: a slightly stronger pressure on the drill at this moment will crack the cup or saucer.

- We cling to each cartridge of the wire. Until we fasten them together.
- We screw the entire future lamp into a single whole. If our cartridges use platforms with holes for screws, we attract them to the board directly through the holes in the saucer and cup.
If there is a hollow threaded tube and a nut at the end of the cartridge, again we pass them through the cup, saucer and board. A rubber gasket is placed between metal and glass.
You can cut it yourself from an unnecessary bike or car camera; you can use a ready-made gasket of a suitable size from any plumbing repair kit. - We screw the screws with rings into the back of the board.
- We connect the cartridges in parallel. You should not leave twists wrapped with electrical tape: we will carefully make even the side of the lamp that no one will see. Use a block to connect the wires.

- The block is fixed on the back side of the board in any way - with a drop of glue or a screw. A piece of wire is clamped in it, which will be connected to the wiring.
- We cling to the rings on the back of the chain or cords; their other end is attached to a hook in the ceiling. The wire is started along one of the chains. Light bulbs turn on.
Press the switch and enjoy.
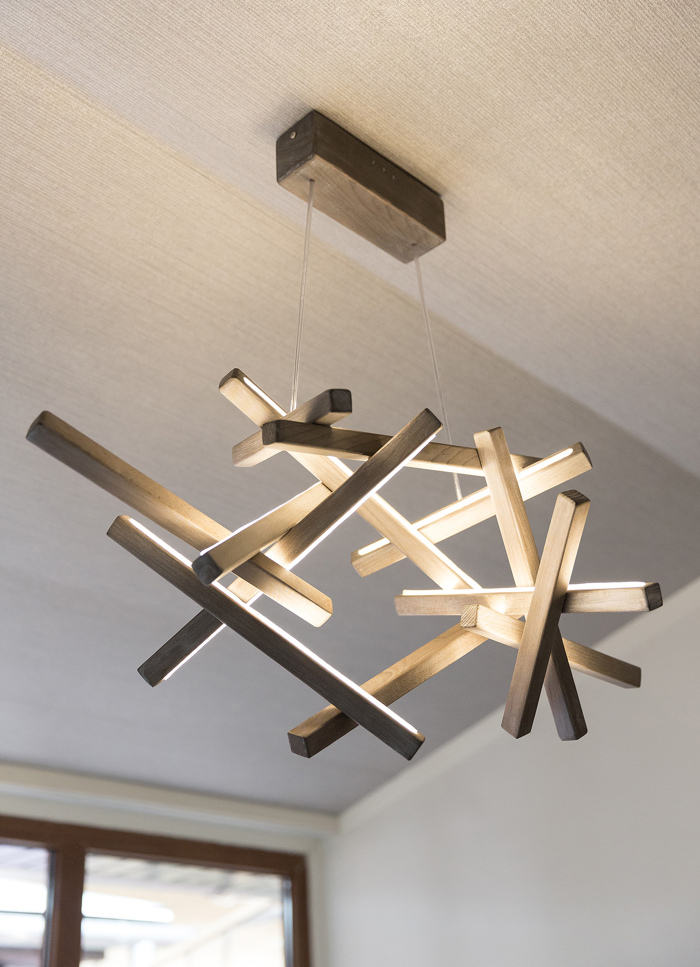
As you understand, the forms that wood chandeliers can take are limited only by your imagination. Let's show some more original designs.
Sailboat made of driftwood and TV packaging

This original lamp made from driftwood of a bizarre shape picked up in the forest. The author kindly posted a photo of his creation to the network.
The design, of course, is not a monument to fire safety. However, remember that LED lamps are extremely economical and practically do not heat up. If so, the risk of fire is reduced to nothing.
Chandelier from dry boards and rope

Here, two ready-made matte shades are used as light sources. The most simple and inexpensive. Everything else is the author's improvisation.
What is most striking is not that the lamp is made by hand: as you can see, there is nothing structurally complex in it. It is amazing that the author of the work managed to see beauty in such a seemingly worthless thing as old board. And show this beauty to others.
Please note: in this design, it is also worth using only and exclusively energy-saving or LED bulbs.
Incandescent lamps, especially high power pose a very real fire hazard.
Beam with pots

And such ceiling lights are not mass-produced. Looks very original. To drill the bottoms of the pots, you also need to use only and exclusively tile drills. In addition, incandescent lamps should not be used here either. Even the weak ones.
Hollowed out log with soffits

Another living nightmare of a fire inspector. However, here, too, the use of light sources with minimal heat release reduces the risk of fire to nothing.
Despite the exaggeratedly simple appearance of the lamp, it is difficult to call it made in five minutes on the knee: it was certainly difficult to hollow out a log inside.
Conclusion
If you like the wooden ceiling lights described and shown, great. Even better, if you have your own, original ideas. As you can see, they can be the most unexpected. Good luck in creativity!
Wooden chandeliers are increasingly seen in the interior of country mansions. What is the reason for such popularity of such lighting devices? Of course, first of all, it is important to note environmental safety natural wood. This useful and quality material perfect for DIY wood chandelier making.
Wooden chandeliers made of wood fill the room with pleasant and soft light, allow the owner of an apartment or house to completely relax after a busy day.
Wooden chandeliers have excellent technical and operational characteristics. Professional interior stylists note their unique wear resistance, as well as the possibility of making such lighting fixtures with their own hands.
Attention! A high-quality wooden chandelier has a fairly high cost.
It is not necessary to spend money on buying ready-made lighting device, because it is quite possible to make it with your own hands, turning your creative ideas and original ideas into reality.
In addition, a do-it-yourself wooden chandelier is a guarantee of uniqueness and individuality.

Reasons for choosing wood for making a lamp
In our age of scientific and technological progress and innovative technologies, polymeric materials have become widespread, which pushed natural wood into the background. Despite the variety of finishing and decorative materials offered by lighting manufacturers on the modern market, interior designers do not stop using natural wood in their work.

Original wooden chandelier with your own hands, step-by-step instruction, as well as photos can be found in the video:
Natural wood has certain advantages. For example, this natural material retains its original characteristics during mechanical processing.
Advice! For relaxation, professionals recommend choosing spruce or pine for the manufacture of a wooden ceiling chandelier. Doctors recommend choosing such chandeliers made of wood for people with chronic diseases respiratory organs, as well as asthmatics.

Also among the advantages of natural wood, we highlight the ease of processing. If desired, you can make semi-antique wooden chandeliers, a modern version, and of any degree of complexity.
When choosing a tree for decorating the interior of a living space, you can make it cozy and harmonious.
Wooden ceiling chandeliers will help to bring an accent to the room, emphasize the main idea chosen for decoration.
Advice! In order to put into practice creative fantasies, you can experiment with the selection of wood species.
For example, antique wooden chandeliers can be made from oak or larch, and modern options lighting fixtures made of pine.
Among the advantages of choosing a tree to create ceiling chandeliers, professional stylists also note the excellent combination of this decorative material with other decor options: glass, plastic, metal, fabric.
Disadvantages of wooden ceiling lights
It would seem that with such a huge number of positive characteristics, the tree should become ideal option for the manufacture of ceiling lighting fixtures. But unfortunately, even wood has some significant drawbacks that should be mentioned.
Wooden chandeliers are highly flammable as wood is not resistant to high temperatures.

Attention! It is strictly forbidden to use light bulbs in such chandeliers that will heat up during operation.
For safety reasons, professionals working with this natural material prefer to choose fluorescent or LED lamps that cannot create a fire hazard.
Among the disadvantages of ceiling wooden chandeliers used in rooms with high humidity, we single out the instability of the tree to negative influences environment: moisture, temperature fluctuations.
Ceiling lights made of wood are exposed to insects.
Advice! To provide your ceiling lamp reliable protection From these factors, it is important to cover the finished product with a special protective impregnation.
Also among the disadvantages of choosing lighting fixtures made by hand from wood, we note their high cost. As it dries, in some cases, the original appearance of the ceiling chandelier may also change.
Given all these shortcomings inherent in wooden products, you can make an original and functional lighting device that will become the pride of the owner of an apartment or house.

Work materials
To assemble a ceiling wooden chandelier with your own hands, you will need tools and materials:
- roulette;
- screwdriver and hammer;
- pencil;
- electric drill;
- hammer and pliers;
- antiseptic for processing a wooden product;
- base, light bulb, electric wire;
- decorative elements
Depending on which particular model of the lighting device will be created, this list can be supplemented with other materials and tools.
There are certain rules that must be observed when starting work related to the creation of wooden ceiling chandeliers.
First of all, you need to take care of the full processing of the material with a special antiseptic composition.

In addition, due attention should be paid to the system for attaching the finished product to the ceiling surface. For example, you can pick up the original metal chain so as not to be afraid that the chandelier will fall from the ceiling.
In the process of connecting a wooden lamp, it is better to use the services of a professional electrician in order to prevent emergencies.
Wooden products are widely used in the design of premises different styles. Lamps are one of the main interior items. Therefore, lighting fixtures made of wood are considered one of the most fashionable today. Let's talk about how a chandelier is made of wood with your own hands.
Peculiarities
Wood is a practical, beautiful and “warm” material that is associated with comfort and exquisite taste among the owners. Particularly relevant wooden crafts in interiors oriental style, because the warmth of the material and the strict geometry of the product contribute to relaxation and tranquility.
Important! Country style is generally unthinkable without the use of natural materials. Characteristic style - straight, deliberately rough forms. Massive wooden chandeliers give the impression of a reliable and stable wealth.
An antique do-it-yourself chandelier creates the atmosphere of a medieval castle with beautiful ladies and jousting tournaments. Such a product, decorated with metal elements, looks especially beautiful.
Advantages of wood products:
- Naturalness. In terms of environmental cleanliness, wood is perhaps unrivaled. In addition, the material saturates the air in the room. essential oils and other health benefits.
- Ease of processing. Assemble the simplest wooden structure even a child can.
- DIY wooden chandelier for country house is a great solution. In itself, summer vacation involves unity with nature.
- Product cost. Even if you use expensive wood, the product will turn out to be very budgetary. You can always find boards and twigs in the country. Buying wires, cartridges and light bulbs also does not entail large costs.
Are there any downsides?
Naturally, there are also disadvantages:
- Fire hazard. There is some truth in this. However, with proper manufacture and use of highly heated lamps (for example, LEDs), this problem disappears. In addition, there are a huge number of wood impregnations that precede ignition.
Important! Impregnation is a good thing, but a lamp made of wood should be placed as far as possible from an open flame source. For example, an absolute taboo is a barbecue or fireplace area.
- Wood is highly hygroscopic. Do-it-yourself lamps made of semi-antique wood look just great in the bath. But they should be placed away from the steam room or shower room. Excessive humidity and sudden temperature changes lead to the destruction of solid wood. Therefore, a product made of a material that imitates wood is more suitable for placing a bath.
- Damage to wood by pests. This problem is quickly solved after impregnation of the material with a special protective compound.
So, how to make a wooden chandelier with your own hands? It's not difficult at all. All you need is a desire, an elementary skill in owning carpentry tools that are available in every home.
DIY wooden chandelier “wheel”
This is one of the most common options. If the product is made carefully and carefully, it will fit into many interiors.
Important! This is a great solution if, for example, you want to create an Italian trattoria setting on own kitchen or a 17th-century French tavern (a la The Three Musketeers).
Making a wheel
Most important point- production of a wheel of a given diameter. Of course, you are unlikely to be able to find a finished cart wheel, so you will have to make it yourself. For this you will need plywood or furniture board 1.2 cm thick.
It is desirable to make a design in 2 or 3 layers.
Everything is extremely simple:
- Pull off 2 plywood sheet corners with self-tapping screws.
- Then mark out the center section and rim.
- First, using electric jigsaw, cut out the core of the round shape, and then the rim.
Important! "Spokes" for the wheel, it is desirable to purchase in hardware store. To make them you need lathe and not everyone knows how to use it. Wooden planks of rectangular section will look very primitive.

Chandelier assembly
After all the parts are in stock, you can assemble the product. You will need for this:
- Copper flexible wire with a cross section of 0.75 mm.
- Ceramic lamp sockets.
- Repair bolts.
- Metal chains for hanging.
Important! It is advisable to choose a wire with a fiberglass braid, as it does not ignite.
You can attach the wiring at the top of the rim. It is advisable to use parallel connection according to schemes:
Important! A do-it-yourself chandelier made of timber, which will look great over a long table, is made even easier. The beam can be replaced with a natural round log with a cross section of 20 cm or more. through holes, mount lamp sockets in them. Place the wiring at the top of the homemade lighting fixture. You will get a beautiful chandelier in a gazebo made of wood with your own hands.
How to process wood?
According to experts, only natural compounds should be used, since they evaporate under the influence of heat. The simplest option- the use of mint homemade oil.
The ingredients are as follows:
- Flaxseed oil purified - 1 liter.
- Mint - 1 cup.
Application:
- Mix the ingredients and infuse for 14 days in a dark place, shaking every day.
- Add natural beeswax to the resulting mixture (proportions of 1:3, 1:4 or 1:5 are possible) and you will get an excellent mastic for wood from natural materials.
Important! A less time-consuming and cheaper option is to use a solution of potassium permanganate as a stain.


