Fasteners for installing doors depend on what materials the door structure is made of. Regardless of what type of box it is, you need to think in advance about what installation methods will be used. Preferably temporarily secure the door in the doorway. As a preliminary mounting option there will be special metal plates. Such fasteners are used for installing metal structures made of plasterboard. About four such fasteners are needed.
Fixation with plates occurs only after the door is determined by the level. Once the size of the door is fixed and adjusted, you can proceed with direct installation.
What fastenings are needed for a wooden box?
The methods of fastening for a wooden box largely depend on whether the product has been additionally processed paint and varnish materials or not. The tree is ideal option for those who do not have sufficient experience in fastening structures. This is due to the fact that in the case of a wooden door, all mistakes will be easy to correct.
The choice of fasteners depends on the following conditions:
- If the door has not yet been painted, then installation is done on plates. Their use is relevant when the door has not yet been painted.
- In the case where the standing door has a curved part towards the opening, the curved place must be wedged with special fasteners. It creates the required gap.
- For the most reliable fixation, fasteners such as self-tapping screws and anchors are used www.rusbolt.ru/catalog/248/. They have different lengths, so they can easily pull the box to the desired distance. You don’t have to worry about the fasteners being visible, since after the work is completed, all fasteners are hidden using putty or acrylic sealant. Painting allows you to hide all fasteners.
- The use of an anchor is also relevant when the wooden door is already painted. But in this case, you need to make sure that you can hide the location of the element. To do this, use paint or sealant that matches the color of the door.
What fasteners should I use for an MDF box?
In the case of using solid MDF, the fasteners can be the same as during installation wooden door. To hide anchors in the form of self-tapping screws, they are used special loops and bar. This option is suitable for professionals, since the work must be done perfectly carefully to avoid chipping. More in a simple way the structure will be installed using wedges and hanging strips.
If the MDF box has overhead flaps, then anchors can be safely used for fastening. A cover strip is used to hide the product. This option is the most practical, since even after installation it allows you to adjust the gaps in door design. Adjustment is done using anchors.
The choice of fasteners largely depends on the situation and materials of use. It will be possible to determine which options are used in a particular case. experienced master. Also, you should not rely on using polyurethane foam, since if there are too large gaps, the foam will create an unattractive appearance.
Installation door frame carried out only after completion finishing works on the ceiling and walls. The renovation of the room should be completely completed, but the baseboards should not be installed yet.
Doors can have the following types of configuration:
- door block– all the parts are connected, the hinges are cut in, and the doors are hung. This is the easiest type of interior door assembly for installation, since everything is already assembled and all that remains is to install the door yourself;
- door leaf and frame. This set consists of all the parts that fit each other perfectly in size, but have not yet been assembled. The owner needs to correctly assemble everything into a single whole and then insert the door;
- door leaf. All materials and components in this situation are purchased separately. Next, assemble the door frame and install the door in doorway.
The more complete the doors are, the more they will cost you. This must be taken into account when choosing the most suitable configuration.
Door frame dimensions
The door frame consists of many elements and to assemble it you need to clearly know all the parameters of the components. Their dimensions are directly dependent on the height and width of the wall for which the door was selected correctly.
Experienced craftsmen advise adhering to the following ratios of component sizes:
- For interior wall made of brick, about 70 mm thick, you need to choose a door frame with a width of 108 mm;
- for a wooden block wall with a thickness of about 100 mm, the best option will wooden box, having a width of 120 mm.
These parameters of wooden door frames absolutely comply with the standards in our country. Foreign manufacturers can produce boxes with sizes from 80 to 205 mm.

If the dimensions of the door frame do not correspond to the width of the doorway and the thickness of the wall, then you can replace it with a special “draft version”. In this case, the door frame is made of boards or special beams and correctly adjusted to the thickness of the wall.
Required Tools
Installing a door frame with your own hands does not require significant effort, you need to know how to do it installation work, and also have the necessary tools on hand:

- hammer;
- drill or screwdriver;
- nails (for interior box installed in a wooden wall);
- screws;
- milling cutter;
- hacksaw;
- wooden slats;
- chisels;
- building level;
- template for installing door frames;
- a set of bars, which are usually sold together with the door frame.
If you do not have such a tool, then you can rent it for a nominal fee.
Removing the door frame
Before you install new door, it is necessary to properly dismantle the door frame. First you need to remove the platbands, and then carefully disassemble the wooden door frame. Old bolts and fasteners can be removed by cutting them down with a grinder or a hacksaw; they will not be useful in the future. After complete dismantling door structure, you need to check the strength of the interior wall and properly strengthen it, if necessary.

Sometimes, when a wall requires fastening, it is necessary to use a special reinforced structure or carry out concrete work. Thanks to such methods, you can significantly strengthen a wooden or brick wall and increase the service life of the door frame.
Door frame assembly
To assemble the door frame, you need to perform a number of these sequential steps:

Installing a door frame
After installing the door frame to the wall with your own hands, you need to place it exactly in the center and once again check how accurately all the elements are located. This can be done using a level, plumb line or square.
If there are gaps at the joints, they are sealed using any heat-insulating materials.

Next, the verticality of the sidewalls is re-checked, after which they need to be secured in the required places. If in your home wooden walls, then you can put the box in its place using nails, with brick walls use screws.
A template for installing door frames will help to significantly simplify the work of installing a door. You can make it yourself or buy it ready-made.
Methods for attaching a door frame to a wall
There are four main methods to secure a door frame:

How difficult do you think it is to install interior doors? with my own hands? For many, even the very thought of such work inspires horror. In fact, doing this is not at all as difficult as it might seem. We will try to convince you of this in one article. If you want to save a little on repairs without compromising its quality, go for it! And we will help you with several valuable advice. But first, let's talk a little about which door material is best to buy and why.
Interior door material
The quality of the material from which the door is made depends not only appearance, but also durability, operational properties, as well as how quick and easy the installation of interior doors will be. The most common are doors made of fiberboard, MDF, and solid wood.
Doors made of fiberboard are a wooden frame covered fiberboard sheets. Such doors are popular among buyers for only one reason: low price (about 800 rubles). The advantages include ease. The low weight allows you to transport and install the product alone. Otherwise, the quality of fiberboard doors corresponds to their price category - low strength, poor sound insulation. And one more thing: installing interior doors made of fiberboard is contraindicated where the humidity level is high.
They cost an order of magnitude more, but by purchasing them, you will be sure that you will not have to change the doors soon. MDF material appeared with the improvement of fiberboard production technology, so it is obvious that its strength, sound insulation and moisture resistance indicators are much higher. Moreover, when MDF production harmful ones are not used epoxy resins, phenol. The price of MDF doors is about 3 thousand rubles.

Solid wood doors- the most expensive option. There is no need to list all the benefits natural wood before other materials. Let's just say that the price of solid wood doors depends on the type of wood. Pine is one of the inexpensive materials, because a door made from it is inferior in performance characteristics to doors made of ash, oak, etc. The average price of a door made of natural wood is about 12 thousand rubles.

Solid wood doors
We have described only the most popular types of doors, but there are many more options that may be more suitable for your interior: steel, glass, plastic. However, their review simply does not fit into the scope of this article.
Choosing a door frame
You need to be as careful when purchasing a door frame as you are when choosing doors. This element must support the weight of the door.
So, the three most common types of materials for door frames are:
- Fiberboard. We have already mentioned the features of this material above. A product made of fiberboard is easily damaged even when interior doors are installed; it will not withstand increased loads and high humidity. The price of the box corresponds to the quality - low (about 400 rubles)
- Wood without treatment. The cost of a product made from profiled timber is not much different from the cost of fiberboard. This can be explained by the fact that the timber requires finishing, and the fiberboard product is completely ready for installation and operation. But in terms of performance characteristics, fiberboard is much inferior to natural wood.
- Laminated wood. Differs from the second option in the presence finishing in the form of a laminated coating. The question is how high quality the coating is. This determines what your door frame will look like in a few years. Plastic coating is considered the best.
For comparison, below are illustrations of door frames made of untreated (a) and laminated (b) wood.


What else will you need to purchase? Perhaps, to complete the design of the opening, you will need platbands and an additional strip. We recommend not to buy them in advance - you may not need them.
Required Tools
Saw;
Drill;
Drill ø4 mm (for wood);
Drill ø6 and 4 mm (for concrete);
Drill attachment for screws;
Roulette;
Level;
Screws 60x3.5 mm, dowels 75 mm long;
Polyurethane foam.
Step-by-step installation of interior doors
Below is a diagram of attaching the door frame to the wall. From it you can see that the box is secured with self-tapping screws, then the gap between the beams and the wall is filled with foam.

1 – door frame;
2- door;
3 – self-tapping screws;
4 – polyurethane foam.
Let's see how the installation of interior doors with a frame made of fiberboard occurs.
Stage 1. Assembling the box
As a rule, the length of the door frame beams is made 5–6 cm longer, so your task is to make sure that the dimensions of the frame and the door opening match. It will be better if you assemble it on the floor. Consider which way the door will open.
a) Fasten the beams with self-tapping screws. Due to the low strength of the material, it would be better to drill holes first and then screw in the screws. We measure the height of the doorway.


b) Use a hacksaw to cut off the excess along the length of the box. Because there is a high probability of damaging the product, this should be done carefully. When measuring the required size of the box, be careful: the gap between it and the wall (for sealing with foam) should be 1-2 cm.


Stage 2. Preparing for installation
a) We insert the door frame into the opening and secure the door. If the frame is installed correctly and level, the door will open and close easily.
b) Remove the decorative strip from the end and drill 7 holes on all sides (approximately every 30 cm). Check the vertical position of the box again with a level.
c) Mark the necessary places on the wall with a ø4 mm drill and drill the wall with a ø6 mm drill. If there is a brick in the opening, try to drill the body of the brick, not the seam - the dowels will be secured there much better.
d) Install the dowels.


Wood drill bit 4mm. Drilling the box


Drilling a brick wall using a concrete drill


Self-tapping screws for installing the door. The bag contains self-tapping screws for quick installation, on the right are wood screws
Stage 3. Attaching the box to the wall
It is better to use wood screws and a screwdriver. Do not tighten the screws all the way, because the box is fragile and will easily bend. Make sure that the surface is strictly vertical. After you have screwed the frame on, you can put the door on the hinges.

Place wedges to prevent the box from bending


Check clearances before foaming

After securing the frame with self-tapping screws, the door should close and open freely
Stage 4. Fill the seam with foam
We place some material (for example, cardboard) into the gap formed between the box beams and the wall, then fill it with polyurethane foam. It is important that the door is already in place. Otherwise, the box will simply bend in an arc, because the foam, as it hardens, increases in volume and can tear the screws out of the dowels.
Sealing seams
Fill the seams from bottom to top. Remember that foam expands in volume as it hardens, so avoid overspending - only fill the gap one-third.
It remains to wait a day until the foam completely hardens. In this case, the door must remain motionless.

Seal the gaps with dense material

Fill one third of the foam

Finishing doorways
When the installation of interior doors is completed, all that remains is to hide the seam of the polyurethane foam with platbands (in diagram 1 - item 1).
If the platbands are untreated, fasten them with self-tapping screws. For laminated products, it is better to use self-tapping screws with decorative plugs.


If the frame is narrower than your doorway, you can attach an additional strip to the wall or make slopes.
The last option is only suitable for a wooden door frame, since the wet solution can warp the fiberboard.
As you can see, installing interior doors is not as difficult as it might seem. Try it and you will definitely succeed. The main thing is to follow our recommendations and follow the principle of “measure twice, cut once.”
Fastening the door frame is one of the important points in installation interior door. The prosperous life of the door block as a whole depends on how it is secured.
Since door frames can be made of different materials, then the methods of attaching them may be different, let's look at them.
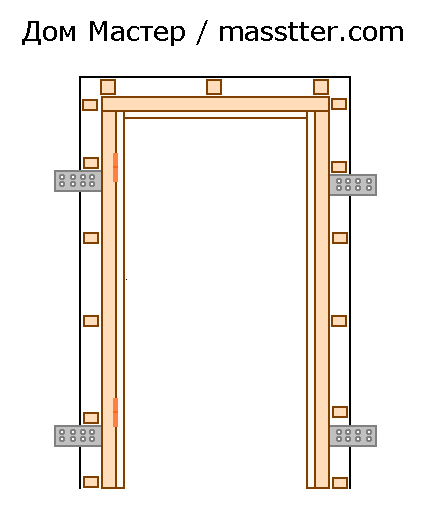
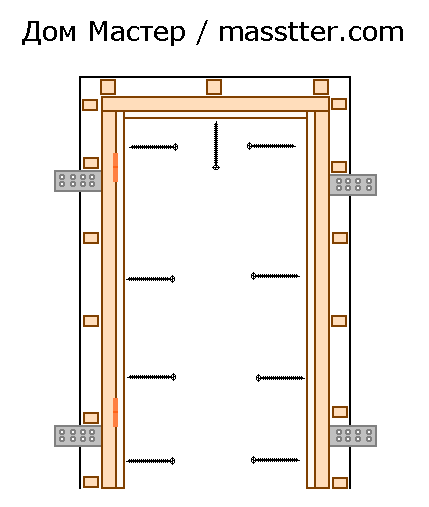
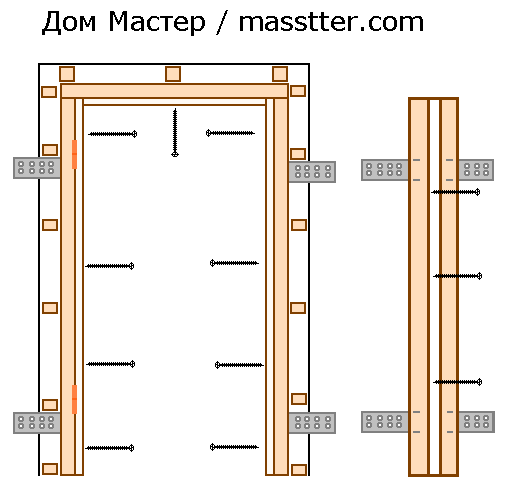
There is a certain general condition, which is used for all types of boxes, since it is often installed by one person, the box should first be temporarily secured in the opening, and then the main fasteners should be done.
For preliminary fastening (installation), metal plates - hangers, which are used for fastening metal structures for drywall, are excellent.

At least four of them are required, and we will use them for fastening (installing) any types of door frames. They are fastened one at the top and one at the bottom of the frame frame on the side facing the doorway.
Then the box is leveled and fixed with plates, and adjusted, and wedged with bars - wedges (adjustment is made with the door leaf hung).
Please note that if you are going to leave the plates after installing the box, then the part of them where they will go to outer wall, (the place where the platbands are subsequently installed), you will need to make a groove under them in order to then hide them under the plaster.
Fastening the door frame. Video explanation
Wooden door frame
A wooden box may or may not already be coated with paint. Depending on this, we choose methods for attaching the frame to the doorway.
Let me say right away that a tree can forgive you many mistakes, or rather, it (the tree) will allow you to easily correct them.
If the box is to be painted, that is, it has not been painted yet, we install it and first fasten it with plates, then wedge the top crossbar on both edges, then the pillars, hang the door and check the slam.
If the crossbar or pillar of the door is curved towards the opening, this can be solved by wedging the curved area to the side door leaf until the gap we need is formed (3 mm).
If the bend is towards the canvas, then we can install another hanging plate in this place and use it to pull the pillar or crossbar towards the opening.
Or we can drill the base of the box and, using a self-tapping screw of the length we need, as an anchor, and pull the box to the distance we need, not forgetting to drill out a countersunk hole to recess the head of the self-tapping screw into the box, and then hide it with putty or acrylic sealant that best matches the color.
When painted, all this will be hidden, without giving away the place of our anchor.
In principle, even if the box is already painted, we can also use the method described above, but only if we are confident that we can then well hide the anchor landing site. To do this, the same colored putty for our type of wood or colored sealant will be used, and paintwork that matches the color will complete the job.
MDF box
MDF boxes have different profiles, and the method of additional fastening in the form of an anchor depends on the design of the box.

If the elements MDF boxes have a solid structure, then the fastening is done in the same way as for a painted wooden box.
The only difference is that anchors in the form of self-tapping screws can be installed there only in three places, namely, in places and, there they are also placed in a hidden place and closed with hinges and a bar.
Well, that's only in theory. I personally have never done this myself, since such fasteners are located close to the edge of the opening and there is a risk of it chipping, and then everything will be in vain. But there is such information on the Internet, and maybe this method will suit you, it’s up to you to decide.
Therefore, with such a box (solid), the only option left is with hanging strips and wedges.
Allows free use of anchors for fastening in the doorway. The anchors are sunk into a secret place and closed with a false strip.


In this regard, such a box is very convenient, because even after installation, if you need to adjust the gaps, you can carefully remove the cover strip and use the anchors to make the adjustment.
Here, in principle, are the main methods for attaching an interior door frame. Naturally, as you work, you will eventually develop your own algorithms for this process. Therefore, the purpose of this article is to show the basics of this action.
The only thing I want to add in conclusion is, do not neglect installing wedges, since even professional foam Lately(at least, I came across one like this) not only expands, pressing the frame towards the door leaf, but at the last moment of solidification it begins to shrink, pulling the box along with it towards the doorway.
So, ideally, the door block should be positioned and configured as if you are not going to use foam, then the foam will be your ally, and not vice versa.


As usual, I wish you a successful installation.
To the wall is an important task. Its reliable performance should not be neglected. It should be done as well and efficiently as possible.
Please note that if you install the door correctly, you will forget about many problems. It will open and close freely. The effect will last not for a couple of months, but for several years.
The most important thing is the correct adjustment of the gaps that are located between the door frame and the leaf itself. They should be the same both on top and on the side.
You may say: “What’s the big deal if the box bends a couple of millimeters? It will be completely unnoticeable!” Yes, we agree with you. The appearance will not deteriorate. But after a while the door will stop closing. And if he doesn’t stop, then it will be very difficult to do so. That is why fastenings must be made at the highest level.
Neglecting our advice means subsequently changing the entire unit. And this is both troublesome and expensive. And in general – it’s not necessary.
Why jambs bend: all the reasons
You know that door frames are made of wood. And, as you know, wood perfectly absorbs moisture. Of course, the outside of the jambs is varnished. And this, in theory, should protect the material from water. But the fact is that the varnish perfectly allows moisture to pass through.
The result is the following diagram. By absorbing moisture, the tree increases in size. And when it gives it away, its size decreases. The process is natural - but unpleasant.
Installation of jambs
Since wood has a non-uniform structure, it both increases and decreases non-uniformly. As a result, the jambs bend.
This is the main, only and main cause of the problem. How to solve it? Yes Easy! The jambs should be properly secured. Then they will remain in their place in any case, even when exposed to external factors.
Experts offer a number of tips:
- first step: insert the frame into the opening. It must be made of metal. And then foam it;
- Mechanical fastening of the jamb must be done at five points. If you neglect at least one of them, then the door will subsequently become difficult to close. Or other, not the best consequences will arise;
- if the door is double-leaf, then it should be secured at six points;
- if flexible plates are inserted into the opening, they should grip the wall.
Errors that prevent you from performing high-quality fastening
There are errors that lead to poor fastening. Take them into account and try not to do:
- you cannot attach the block only to polyurethane foam because it's unreliable. Foam is an elastic substance and cannot prevent bending;
- foam itself can be a problem. This may cause bending. Everything is very simple - if it lies unevenly somewhere, this provides a bend.
Even professional installers often attach blocks to three points, and not to five, as we advise. This is bad because then the entire lower part of the jamb will be loose, which is why the fasteners bend. So listen to us and don't make mistakes.
Double doors often lack fastenings between the hinges. This is a mistake that should not be made. Be sure to add another fastener between the loops.
The flexible plate must be fixed to two walls. If it is attached only on one side, nothing good will come of it. There is no reliability with such a door. Not only will the jamb bend, it can also turn like a screw.
Four main mounting methods
We have already described the methods of fastening the door frame above. Now let's select them as expected:
- on polyurethane foam. You shouldn’t do this - in the end, the door may simply fall out of the opening;
- at three points. The most common technique. It's fast and easy way, which is relatively reliable. Suitable for those passages where there is not much traffic;
- at six points. Even GOST recommends this technique. It is considered optimal. The only negative is the plugs because they can ruin the appearance of the door;
- using plates. Ideal for expensive doors that you don’t want to spoil with plugs. The plates are attached from the back.
Now let's look at mounting options at six points and using plates in more detail.
Traditional way
The algorithm of actions is as follows:

Installation according to GOST: accessible method and important recommendations
We will not argue about how to properly attach the blocks. There are 4 ways to do this, and everyone has the right to choose what they like best. We will just tell you how to work using the most proven techniques. We have already outlined one in detail above.
Now let's talk about something else. So, instructions:

Now we'll give you a little advice. If you need to put it later flooring, place a gasket underneath the jamb that will be equal in thickness to the floor covering. Afterwards you just need to remove the gasket and lay down the flooring. And that's it - no problems.
- the next step is to insert the box into the opening. Be sure to use the level! We secure it with good self-tapping screws;
- We hang the canvas in place. Checking the gaps. Next you need to adjust the gaps. We have already written about this above, in a different way. This is done by tightening the screws or, conversely, loosening them;
- then the second rack is attached. There is no need to install spacers here, which means there is no need to wait for the foam to dry. The door in this case is ready for use immediately after the foam is applied;
- We install plastic plugs. They will cover the fastenings;
- The last step is to foam the entire box.
That's all! The work is done. Judging by people's reviews, this method is really good, and GOST was not mistaken.
The main signs of a well-installed jamb:

Door frame in place
- the lock, fences and other fittings must be carefully and accurately inserted into the canvas. The main thing is that nothing is skewed;
- All elements of the door frame must be carefully joined together. You can do the docking yourself, it’s not difficult;
- The loop jamb should be made vertical. It is very important! Then the door, no matter how it is opened, will not go down;
- The gaps should be the same everywhere, from top to bottom. For a single door, the gaps on the handle side should be slightly smaller than the gaps on the hinge side;
- Great attention should be paid to the doorway of the canvas, because it must be precisely and precisely adjusted. When this is done, then closed door, from the side door handle, not a single gap or gap will be visible, regardless of whether there is a seal on that side of the jamb or not.
What should the result be?
Please note that the handle on the door should turn without the slightest effort when opening. At the same time, she must return to her place as soon as she is released.
The door should close very easily. It happens that when closing, the hinges pull slightly, this should not happen.
The lock on the door should close easily. And at the same time it must be tight and reliable, otherwise it will be very easy to open the door.
Mounting to the wall is important, no matter how you look at it. We have already said that this is important so that the door does not become deformed; no one wants to see an ugly door in their home. Moreover, from an aesthetic point of view this is unacceptable.
Any bend in the frame can cause the door to be difficult to open or close. Moreover, the door may eventually stop opening and closing at all! And then you will have to change the entire block at once. And this is expensive, troublesome, and will take a lot of time. Therefore, it is better to do the job correctly right away than to redo it later.
But that's not all! The fact is that due to the bend, the door may simply fall out. But this is not the worst thing. The worst thing is that a poorly installed jamb can lead to the door being simply opened. It is enough to give such a door a good push with your hand or foot to knock it out along with the jamb. And then - complete freedom of action. You can simply take and remove all property from the apartment. Thieves and robbers use this method very often.
Therefore, we strongly encourage everyone to listen to us. Do not install the joint only on the foam, but use the techniques and methods that we have already described above. Then the jambs will be secure, the door will become impenetrable. And you, the owners of the apartment, will be calm.