3 67 018
Handmade is gaining more and more popularity. Extravagant jewelry, paintings, toys, decorative elements, gifts - this is just a small part of what passionate craftsmen and amateurs create with their own hands. Today we will talk about how to make a candle at home.
This process does not require special skills or equipment. After reading our recommendations and detailed master classes, get started on this exciting process even beginners can.
Creating a candle: where to start
Making your own candles is much easier than you might think. And the main advantage of such an activity is necessary materials easy to get. If you look hard enough, you can even find them in your home.Materials for a homemade candle

Wax, stearin or paraffin are best suited for the job. Moreover, it is better for beginners to start getting acquainted with the latter; it is the least demanding to use. You can buy paraffin at the store or use leftover old white candles.
Wick
It is best to use natural threads as a wick, ideally thick cotton ones. Do not try to use synthetics: such a wick will quickly burn and leave behind bad smell. To check if the thread is natural, simply set fire to its tip. If it melts, forming a hard ball at the end, you have synthetics.
If you have an unusual candle in mind and are thinking about how to make an original wick for it, then use colored floss threads. This is an excellent and natural material.
Remember important rule: the thicker the candle, the thicker the wick should be.
It's easy to make it yourself. To do this, prepare a solution: in a glass of water, dissolve 1 tablespoon of salt and 2 tablespoons boric acid. Soak cotton thread or floss in it for 12 hours. Then dry them and twist them into a rope or braid them.
If this process seems tedious to you, carefully remove the wick from the finished household candle and use it.
Candle mold
First of all, decide on the configuration of the desired candle, and then try to find a hollow object of the same shape. You may find it useful:- cardboard bags for milk and juices;
- plastic cups for yoghurts and desserts;
- egg shells;
- silicone baking molds;
- glass goblets, wine glasses, glasses and glasses;
- baby beads;
- shaped ice cream molds;
- tin and glass jars from coffee;
- empty tin cans.
Another interesting option- pour candles into beautiful transparent glasses. You won’t be able to get them, but they will look very stylish and unusual.
Sometimes scented candles are made in tangerine or orange peel. The fruit is first cut in half and the pulp is carefully removed. You can also use large shells or coconut shells.

Dyes
A white candle is elegant but boring. Naturally, the question arises of how to color paraffin in order to obtain bright interior decorations.For lovers of candle making, the best and cheapest option is to take wax crayons for children's creativity. Want to get a special candle? Look for pearlescent crayons - your creation will be unique.

Do not try to use water-soluble gouache or watercolor - you will fail. The dye will inevitably settle to the bottom or fall out in flakes. Ready product will look very unpresentable.
Paraffin melting utensils
In order to melt the paraffin, you will need a small saucepan for a steam bath and an iron bowl. Experienced craftsmen It is recommended to heat paraffin in a steam bath, considering other methods, including the microwave, to be fire hazardous.To begin with, we recommend that you also use this method, proven over the years: place a bowl of paraffin in a container of boiling water. If you plan to have a colored candle, add the chalk immediately and stir the melted mass several times to obtain a uniform color.
Flavors and decor
Any available materials are suitable for decorating candles. First, decide on the topic of your work. Pebbles and shells will effectively complement candles in nautical style. For New Year theme use beads, small cones, small decorative balls, ribbons and bows. Decorate Valentine's Day candles with hearts, sparkles, bows, dried flowers, coffee beans, etc.It is best to scent homemade candles with essential oils, which can be purchased at your nearest pharmacy. Another option is to find vanilla cinnamon in your kitchen. You should add flavors to the melted paraffin at the very end, after coloring.
Step-by-step master classes
We bring to your attention a selection of accessible master classes that will help beginners learn basic techniques and techniques. If you already know how to create candles with your own hands, you can draw interesting ideas from them to implement in your creativity.Coffee candle
Want to create a romantic mood? Light a coffee candle - its divine aroma will take away all worries, leaving only a good mood and peace. This is especially pleasant in rainy autumn or cold winter. This is also a great gift for any occasion or even no occasion.
To work you will need:
- paraffin;
- solid coffee beans;
- two plastic cups or boxes of different sizes;
- wick holder - teaspoon, wooden stick or a plastic coffee stirrer.
If you don't find paraffin, take household candles, you can also get a wick from them.

Crush the paraffin into small pieces with a knife to speed up the melting process. If you took store-bought candles, carefully crush them blunt side of the knife so as not to damage the wick.
Place paraffin in glass jar and place it in a pan of warm water. Heat the water over low heat until the paraffin is completely melted in the jar - it should become transparent.

At this time, prepare the mold for pouring. To a larger a plastic cup(or whatever mold you have) place the smaller one after filling it with water. There should be a fairly wide space between the walls of the cups. Pour coffee beans up to half the height between the walls.
Pour the melted paraffin into the mold to the level of the grains, wait about 10 minutes. Then pour the paraffin to the edge of the mold and let it harden completely. This will take about an hour.
Carefully pour the water out of the inner glass and remove it from the paraffin ring. Lower the wick into the workpiece so that it reaches the bottom of the glass. Tie its upper end to the holder and place it on top of the glass, centering the wick.

Pour melted paraffin into the middle of the candle. Place a few grains on top for decoration. Now you will have to wait 4-6 hours until the candle hardens completely.
Carefully remove the frozen candle from the glass. At the same time, it can be cut with scissors to facilitate manipulation.

If you want the grain to be better visible, blow the sides of the product with hot air from a hairdryer. The paraffin will melt and the surface will become embossed.
It turned out to be an excellent aroma candle, isn’t it? Do you want to make it even more romantic? We invite you to use the same technology to create heart-shaped candles that will become an unforgettable gift for your significant other for Valentine's Day or a birthday.

Still have questions? Watch a detailed video of creating a fragrant coffee candle and you will see that everything is even simpler than it seems at first glance.
Rainbow candles
Want to add to your home bright colors? Interior rainbow candles will help you with this self made.To make them you will need the following ingredients:
- paraffin;
- stearin;
- cylindrical shape;
- dyes corresponding to the colors of the rainbow.
Multi-colored candles in layers
Spectacular multi-colored candles in a transparent glass will become the highlight of your interior. How to make them, see our master class, illustrated with step-by-step photos.Another one interesting idea- square multicolor candle. Wax pencils are also used to color it. If you are a beginner, be sure to check out the clear video tutorial, with its help you can easily make such a cool craft as a gift for friends and family.
Openwork candles
Decorative candles can be of the most varied designs, because talented craftsmen never tire of amaze with their imagination and creative experiments. To confirm these words, we invite you to familiarize yourself with the method of making an unusual openwork candle.
To work you will need:
- paraffin;
- optional coloring and flavoring;
- wick and holder for it;
- cylindrical shape;
- small ice cubes.
Place the wick in the mold so that it reaches the bottom. Don't forget to secure it on top with an improvised holder. Fill with crushed ice, not reaching a couple of centimeters from the edges.
Pour the melted candle mixture into the mold. Leave the workpiece until the paraffin has cooled completely. In this case, naturally, the ice will melt, and cavities will form inside the candle.

Carefully drain the water and remove the product by pulling the wick.

Be careful, this beauty is quite fragile and requires careful handling. This unusual openwork candle will be a wonderful gift for your family and friends. If you use paraffin from old candles for your work, you will get this beauty completely free.

You will receive visual instructions for action from detailed videos creating openwork candles. After viewing them, you can make such beauty yourself at home.
Video #1:
Video #2:
Option #3: And if you are thinking about it, surprise them with a handmade red openwork candle. It will be an unforgettable gift and will bring a holiday feeling and Christmas mood to your home. Watch the master's work and be inspired by your own masterpieces.
Massage candles
The main ingredient for creating a massage candle is soy wax. By adding useful components to it, you can get a product that has healing properties. It no longer acts as decor, but as home cosmetic product, which makes the skin soft and well-groomed.
Healing properties essential oils:
- Essential oil will help rejuvenate the skin and cleanse pores lemon.
- Orange the oil has an anti-cellulite effect.
- Rose oil stimulates the regeneration of skin cells and promotes skin elasticity.
- Can clear the skin of pigment spots and make it smooth rosemary oil.
- Oil does a great job of moisturizing patchouli.
- Lavender the oil will delight you with its healing effect.
Solids are also added to massage candles. vegetable oils. For example, cacao butter used to moisturize and tone the skin. And with its regular use, cosmetologists promise you smooth and soft skin.
Exotic foods can save dry skin from flaking Shea Butter. Smooth out skin maybe coconut oil, rich in natural antioxidants.
General algorithm for creating a massage candle:
- melt the wax with solid oils in a water bath;
- let the mixture cool slightly and add liquid oils;
- Cool the mixture a little more and add essential oils, extracts and vitamins;
- pour the resulting candle mass into the mold, after inserting the wick into it;
- wait until the candle has completely hardened and remove it from the mold;
- The hardened candle is ready for use.
Recipe No. 1
- soy wax - 85%;
- avocado and shea butter (aka shea butter) - 5% each;
- patchouli essential oil - 2.8%;
- ylang-ylang essential oil - 2%;
- vitamin E - 0.2% (a few drops).
Recipe No. 2 “Massage candle with a calming effect”
- soy wax - 80g;
- shea butter - 40g;
- almond oil - 40g;
- cocoa butter - 20g;
- essential oils of sage and lavender - 2 g each.
Recipe No. 3 “Massage candle with anti-cellulite effect”
- beeswax - 100g;
- cocoa butter - 60g;
- ground chili pepper - 5-10g;
- essential oils of orange and grapefruit - 3 g each.
Regular massage will help get rid of the hated “orange peel” and make the skin soft and elastic.
Decorating candles using decoupage technique
If you don’t have dye, but want to create something bright and memorable, don’t worry. The simplest candle made from cinders can be turned into a work of art. To do this, you need to have a little patience and decorate the product to your liking.Candle decorated with dried flowers
Dried leaves, stems and flowers will help you create an exclusive candle that will be almost impossible to repeat. Usage natural materials limited only by the local flora and your imagination. That's when the skill will come in handy.
To work you will need:
- any dried flowers;
- 2 candles - for decoration and regular;
- tea spoon;
- tweezers;
- nail scissors;
- paraffin for final coating.
Heat a teaspoon over a regular burning candle ( internal side above the fire, because the spoon will turn a little black, and in order not to stain the candle, then we will carry out all manipulations with the other side of the spoon).

Place a dry flower on the candle to be decorated and gently stroke its petals external side of the spoon so that they melt to the paraffin and do not stick out. Thick stems may need to be ironed several times while heating the spoon.

Carefully trim off any excess stems that extend beyond the candle with scissors.
Glue the remaining elements in the same way, choosing the desired location for them. Make sure that the edges of the leaves and petals do not stick out.

All that remains is to consolidate the result. Melt the paraffin in a water bath and pour it into a container into which you can completely dip the decorated candle.
Holding the candle by the wick, immerse it in melted paraffin and place it on flat surface and let cool. If the petals were not smoothed well and protruding ends remain visible, repeat this procedure again.

Such an elegant candle will conquer any heart and will not go unnoticed. Complement it with a beautiful candlestick and it will become a unique decoration for your home.
Decoupage candles with paper napkins
The desire to decorate a candle could come instantly, but there are no dried flowers at hand. In this case, you can get by with paper napkins. With their help you can easily decorate a candle for any holiday.
Choose a napkin with the pattern you want. Cut out the necessary elements from a napkin. Carefully remove the bottom two layers of paper from the resulting blanks. Further, the principle of operation is similar to decorating with dried flowers.

Place the prepared element on the candle and iron it with a hot spoon. Sand the cooled surface with the rough side of a regular kitchen sponge. There is no need to immerse the candle in melted paraffin with this method.

Your masterpiece is ready. Compose beautiful composition from candles in New Year's style, spruce branches and colored balls. It will bring a good mood and a festive atmosphere to your home.
Photo design ideas
Do you want more more ideas for inspiration. Browse our selection decorative candles. You will definitely find one that you want to repeat immediately.


We were able to convince you that it is possible to create unique masterpieces even from scrap materials? That is why candle making has become a favorite pastime for many, beginners and not only masters.

Original form templates:


Now you know what and how candles are made from, you can get to work. Don't try to use the photo you like as a template and an unconditional ideal. Get inspired finished works to create your own unique candles. A little effort and perseverance - and your masterpieces will become a standard to follow.
Every person is a child at heart. What do children like? That's right, everything flapping and sparkling! After all, no holiday can be imagined without fireworks, and some people manage to make them at home.
Fortunately, this rarely happens. Much more often we buy pyrotechnics on the eve of the New Year holidays. Unfortunately, the quality of their production often leaves much to be desired. This is especially true for cheap pyrotechnics, the wicks of which are sometimes indecently short.
How to make a wick from scrap materials? Is this even real? There is practically nothing complicated about this.
The simplest option
Surely everyone in childhood dabbled with matches at least once. Do you remember how beautifully saltpeter, cleaned from them, burns? Before you make the wick, you will need to scrape it from a couple of boxes. You tamp the resulting saltpeter into juice sticks or something similar. Dense compaction is a guarantee of long burning.
Despite their primitiveness, such wicks burn very stably, and with proper sealing they are practically not afraid of getting wet. Perfect option For safe use dubious pyrotechnics!
If there is such an opportunity, then before making a wick, try to get them. They burn excellently, easily withstand even wetness, so you can make simply excellent ones from them.

There is also a method that involves using regular tape. Again, you will have to grind the sulfur from a couple of boxes of matches, and then cut a narrow strip of adhesive tape to the required length. Place it with the sticky side up and sprinkle a thin strip of match nitrate on it.
Press down this entire structure on top with the same strip of tape. The resulting ignition cord can be used even in winter conditions, since it is slightly susceptible to moisture. Since it is extremely easy to make a firecracker wick this way, it can be recommended for fireworks enthusiasts of all ages.
Attention! Strictly follow all fire safety rules, otherwise you can easily start a fire.
For city residents
If you have some poplar fluff lying around on your balcony since spring, great! All you have to do is stuff dry fluff into a rolled-up newspaper to make a pretty good wick. Needless to say, all material must be absolutely dry.
Method for young chemists
To make a reliable wick according to this recipe, you will need ordinary potassium permanganate, Moment glue or similar, and matches. A small amount of potassium permanganate and glue are taken, and then these two components are mixed until a homogeneous mass is obtained.

Attention! We should not forget that Moment is not only extremely flammable, but also contains many substances harmful to your health. Be sure to ensure normal ventilation of the room when performing this type of work.
There is no need to rush; it will take at least ten minutes to completely mix the components. Since the resulting mixture is too liquid, you should wait a few minutes until the hardening process takes place.
After this time, the resulting puddle must be carefully shaped, giving it a more compact appearance. When the composition acquires the consistency of plasticine, it needs to be rolled out, giving the appearance of a sausage. Thickness doesn't matter.
How to make a wick from matches and the composition we described? It's simple: if you need a wick that burns quickly and very reliably, then a certain amount of ground match nitrate should be added to the composition before it hardens.
How it works?
Have you ever wondered why such difficulties? The fact is that the wick resulting from our actions not only burns perfectly (and at an acceptable speed), but also easily withstands the ingress of water and snow. With its help, you can easily launch fireworks from a safe distance, even installing it right in a snowdrift.
Potassium nitrate is our choice!

If you ask representatives of the older generation, they will probably tell you about all the methods of obtaining wick that were used by children in the USSR. Among the main components, it always occupied a place of honor. In those years, it was sold in all agricultural stores, so there were no problems with obtaining it.
How to use it? To begin with, saltpeter must be dissolved in ordinary water, taking one part of the active substance and three parts of liquid. The easiest way to make a wick is to soak ordinary newspaper in the resulting mixture. More precisely, you can simply dip it into the jar and immediately take it out.
After this, the paper should be thoroughly dried. Attention! Since the products from the evaporation of the working composition are not very beneficial for human health, it is advisable to do this outdoors.
How to make a wick for a firecracker from the resulting material? We roll the dried newspaper into a thin tube, tying it with thread if necessary. Only bringing it into “combat readiness” requires a certain skill.
To do this, light the very tip of the “sausage” and then knock out the flame. A smoldering flame is the goal of all ours. It can easily withstand even light moisture, and the burning speed is such that it will reliably protect you from premature activation of pyrotechnics.
By the way, before making a homemade wick, be sure to familiarize yourself with the characteristics of modern products of this kind. Almost certainly, what you see will impress you so much that you definitely won’t risk approaching the extinguished firecracker.
A more serious way
The disadvantage of the method described above is the fact that a thin newspaper is in no way suitable for the role of a fuse cord. It can quickly go out, and then suddenly burn out right before your amazed eyes. The consequences can be very sad.
Therefore, it is advisable to get high-quality cotton rope. It is also soaked in the above-described aqueous solution of saltpeter and dried thoroughly. To make the structure as reliable as possible, you can lubricate it with a mixture of potassium permanganate and Moment glue. We have already given the recipe for the “hellish composition” above.
This ignition cord will withstand even significant moisture, which will not have any effect on its ability to burn. By the way, what can you make a wick from, if you do not take into account the above methods?
And again potassium nitrate
Unfortunately, it will not be possible to abandon this substance, since only with its help can one create fairly reliable wicks. So, we take about two parts of saltpeter and one part of regular granulated sugar.

Grind all this in a porcelain mortar until a fine and homogeneous powder is formed. The resulting composition can be hammered into juice tubes (as in the method with match saltpeter).
Important Note
Before you make a wick with your own hands, do not forget about responsibility for all your subsequent actions. It is possible to launch pyrotechnics only in conditions where there is no strong side wind, outside dense urban areas. Inadmissible use similar products in hot and dry weather conditions, as well as their use by minor children.
Here's how to make a wick without using expensive tools.
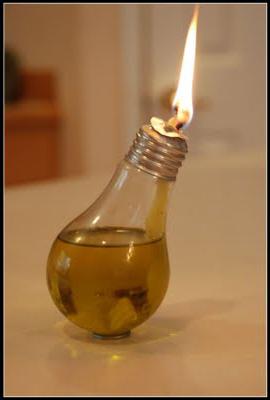
The candle is one of the great inventions of mankind. For many millennia, it was necessary to somehow feed the burning lamps, pour melted fat or oil into them. Such a lamp had to be re-installed each time. It smoked strongly, and the smoke had a persistent unpleasant odor. The invention of the candle eliminated all these inconveniences. Nowadays, candle making is more of a wonderful hobby - a way to realize your creative potential. One of the difficulties on the way to mastering this revived craft is precisely the manufacture of wicks.

What is it and what is it for?
Traditionally, a wick is a piece of fabric or thread of varying thickness and weave density. Its material absorbs flammable liquid and helps it rise up. From the molten liquid, even more flammable vapors spread between the fibers of the wick fabric and around it. The wick is easy to set on fire, the vapors and flammable liquid burn, illuminating the area around. But setting fire to the mass (oil or fat) in which the wick is lowered can be difficult, and sometimes impossible.
Thanks to the special design of the wick, kerosene or other highly flammable liquid (for example, alcohol) does not ignite immediately, and their combustion in more advanced burners can be controlled.
In a candle, the wick is impregnated with wax or paraffin. Thanks to the correct wick (material, density, thickness), the flame is even and illuminates the room without soot or flares. Paraffin or wax gradually melts into a liquid state, is absorbed into the fabric and feeds the flame with flammable vapors. This way the candle gradually burns out, remaining stable enough not to completely melt.


Thanks to correct selection The diameter of the candle and the thickness of the wick, as well as its exact position in the middle of the candle, result in a device for long-term and reusable use.
What are they made of?
Wicks for oil lamps were made from any absorbent fabric of plant origin. The oil or fat was placed in a shallow vessel. A twisted piece of fabric pre-soaked in the same flammable liquid was placed at its edge. For lack of anything better, these were, in general, passable lamps. However, they still had quite a lot of shortcomings. Firstly, such a bowl with a burning wick is difficult to move - it is easy to spill melted fat, and even more so oil. Secondly, the flame of such a lamp constantly smoked. And the fat also gave off a very noticeable unpleasant odor. However, just like that lighting fixtures often used by whalers in distress or Arctic explorers at the beginning of the 20th century.
For candles, wicks began to be made from specially prepared thread or twine, also having vegetable origin. Unlike oil lamp flammable material now I began to act gradually, the opportunity arose to pick up correct diameter and wick structure. In addition, the candle could now be moved, although quite carefully so as not to extinguish the flame with the flow of air.
For candles, a wooden wick is made from foundation (specially processed wax)- a splinter, simply a dried sliver. Of course, it must be prepared in a special way. The splinter must be taken well dried, then it must be impregnated with wax and only then rolled into foundation. Such a candle, if all the parameters are selected correctly, burns evenly and for quite a long time.


Modern candles can be equipped with a reusable wick. The candle and fuel material are burned, but the wick remains and can be used to make a new candle. The material for such, one might say, eternal wick is fiberglass. In this case, the spark plug has to be replaced. This approach can be justified for decorative candles with complex shapes.
Sometimes the wick of a purchased candle also needs to be replaced. One of the reasons for the emergence of such a need may be non-compliance with the wick preparation technology, first of all, its insufficient drying. It happens that this element does not quite correspond to the candle for which it was used. For example, a thread that is too thick can form a carbon ball at the end and will smoke heavily. Or it turned out to be thin, and the flame is filled with melt.


To replace the wick you need to prepare a small set of tools:
- needle nose pliers;
- paper napkins;
- wire;
- You may need a soldering iron.
Most often, you can remove the wick quite easily; you just need to hook the edge of the metal cup, which is found in many candles, or pull the protruding end of the wick. But difficulties may also arise. In this case you can use heated wire, it must be held with pliers. And heat over a flame, for example from gas stove. The wire must be immersed in the candle at the place where the wick comes out, and then pulled out. Turn the cooling wire and remove it too. A new thread can be inserted into the resulting hole. To do this, you can again use a piece of wire. The new wick needs to be glued to it. The end free from the thread must be heated again and pulled through the candle, so that the glued thread takes the desired position. Next, all that remains is to trim off the protruding ends. The wick should protrude 6–8 mm.


How to choose the thickness?
Still, the main material for wicks for centuries has been cotton or linen thread. Selection of its parameters, as practice shows, is not as simple as it might seem at first glance.
- It is important to consider the thickness and structure of the thread. If it turns out to be too thin, the flame will be weak, and such a candle will give little light. A thread that is too thick will contribute to the formation of large soot and, in addition to light, will also create a lot of smoke, and the candle will burn out much faster.
- The density of the material also matters. During combustion, the space between the fibers must be filled with flammable vapors; they are the ones that support the flame. So, for a wax candle you need a thread that is thicker, but less dense, compared to the wick for a paraffin or stearin candle.
- The diameter of the candle can also be a significant parameter influencing the selection of the wick. It would seem that a thicker candle should be equipped with a thicker wick. However, this is not at all true. A strong flame will cause intense melting of the top layer of combustible material of the candle mass, the wick will be flooded with melt and the flame will go out.


It is, of course, possible to correctly maintain the ratio of the material and diameter of the candle with the indicators of the wick. In an industrial environment, where everything is standardized, errors are virtually eliminated. For various candles, specially prepared thread of various knitting, thickness and density is supplied. But in the case self-made you will have to go through the thorny path of trial and error.
How to make it yourself at home?
The most commonly used material for candle wicks is cotton thread. It can be twisted, braided or crocheted, thus expanding the application options for different candle masses and candle diameters. Moreover, threads can be woven with different densities, and this, as mentioned above, is very important, since the molten masses from which candles are made behave differently.
For a candle with a diameter of 2 to 7 cm, a wick of 10–15 threads is usually used. If the diameter of the candle is close to 10 cm, 25 threads will be required. A product exceeding 10 cm in diameter must be equipped with a wick of 30 threads.
When making a wick at home, of course, you will have to rely on your experience, which does not develop immediately. Like any hobby, candle making (and especially wick making) requires patience.
When making a candle, it is important to place the wick clearly in the middle, otherwise the product will float unevenly and burn faster than required. It is convenient to use a plastic glass or any other hollow plastic product as a casting mold. In this case, you need to make a hole in the lower part and, after tying a knot on the wick, insert its second end into this hole from below. Pull it into the upper part of the future candle, secure it by tying it to some kind of spacer, for example from a toothpick or pencil. You should pour the molten candle mass carefully, being careful not to dislodge the wick.
The finished candle should be removed from the mold after the candle mass has completely hardened; this can be determined quite simply by the temperature of the surface of the mold. While it is hot, it is better not to touch the candle.


Required impregnation
Creating a wick is not only about making a thread of the required density and thickness. In order for her to become a candle wick, she must be prepared for this. So that the wick does not burn out immediately, but performs its function, the thread must be soaked.
In the case of a wax candle, sometimes impregnation with the same molten wax is sufficient. The wax is melted over a fire in an enamel plate. The thread is placed in a plate and allowed to soak. The procedure must be repeated three to four times until air bubbles no longer appear in the liquid wax. Then it must be hung until the wax has completely hardened. The thread for storage can be loosely wound on a bobbin, laying layers of paper. It is better to store in a cool place so that the wax does not spread. When necessary, you can use scissors to cut the pieces to the required length.
Since ancient times, candles have been a wonderful interior decoration. Warm light, the pleasant aroma of burning candles gave and continues to give the rooms coziness and comfort. Although the time of candles as the main source of light has sunk into oblivion, nevertheless, candles still find their use in our time. And mainly they are used in decorative purposes. At the same time, you are amazed at the imagination of the candle makers. If earlier candles were rectangular or conical, now designers make them incredibly attractive, so you don’t even want to light them, so as not to spoil such beauty. But not only professional designers can create beautiful candles. This can be done by anyone with imagination and love for beauty. And we will give some tips on how to make candles with your own hands in this article.
And we'll start with something simple.
Wick for a handmade candle
A few words about candle wicks. This is one of the most important elements of a candle, on which high-quality combustion depends. Firstly, the wick must be made of natural fibers (linen, cotton, hemp, etc.) This is usually checked by setting the thread on fire. If after burning a hard melted ball remains on the thread, then it is synthetic. If ash forms and crumbles when touched, then it is a natural thread.
Secondly, it is necessary to correctly calculate the thickness of the thread. Selecting the thickness of the wick is a responsible task. The size of the candle's fire will depend on the thickness of the wick; with a thick wick, the fire will be strong, with a thin one, the fire will be weak. The size of the wick when selecting will depend on the size of the candle (diameter). A strong flame from a thick wick will produce a lot of heat and will ultimately melt a small diameter candle much faster, while reducing its burning time. A weak flame from a thin wick will not melt the edges of the candle. The wick in the center of the candle may be filled with wax and it will go out. In addition, if the wick is thin, it may not hold up.
DIY conical wax candle
To create such a candle you will need wax, a few drops of dye, fragrance, sticks for stirring the wax, wicks, and two saucepans. Ordinary paper cups will serve as a mold for candles.
Paper cups are placed on a flat surface, for example, on a baking sheet.
Take cocktail tubes and attach a wick to them. We arrange the tubes so that the wick is in the middle of the glass.

Then we melt the wax using the water bath principle.

Wax is placed in a smaller pan, then it is placed in a larger pan with water. And then all this is put on fire.
After the wax melts, a few drops of dye are added to it...

and flavoring.

Everything is thoroughly mixed and sent to the stove. After the wax has heated to 80 degrees, the saucepan is removed from the stove and the wax is carefully poured into cups.

To make the top plane of the candle even, you can blow it with hot air from a hairdryer.
After the wax has completely hardened (at room temperature) remove the tubes, leaving 0.5-1 cm of wick. The candles are ready.

You can use candles as is, or you can decorate them with sparkles or other decorations.
Go ahead. Transparent ones look very impressive gel candles.

How to make them? To do this you will need glycerin, colorless gelatin and tannin. The candle mass is prepared as follows. 5 parts of gelatin are diluted in 20 parts of water and 25 parts of glycerin are added. This mass is placed in a water bath and slowly heated until it becomes transparent. At the same time, a mixture of two parts tannin and 10 parts glycerin is heated and carefully added to the first mixture. Heating continues until it becomes transparent again. While the candle mass is heating up, the molds into which it will be poured are being prepared. The molds must be transparent and can withstand the temperature of the hot gel. Then the shapes are decorated by placing, for example, small shells or other decorations on the bottom. We cut off the wick and, using a cocktail straw, secure it to the mold. The wick should not reach 0.5 cm up to the decorations. Then carefully pour the candle mass into the molds. After solidification, we get original candles. Gel candles burn longer than wax and paraffin candles, while the gel does not melt, but evaporates. In addition, the gel perfectly dissolves various dyes, and therefore it can be not only transparent, but also have other colors and shades.


The technology for making such candles is as follows. A mold for a candle is being prepared. Wax or paraffin is melted and poured into the mold. We do not add any dyes or flavors yet.
After some time, when the wax hardens 5-7 mm from the edge, pour the unfrozen mass back into the container where the wax was melted. Now add dyes and flavors, heat it up, and pour it back into the mold. Don't forget about the wick.
How to make decorative candles?
For example, such as in the photo.

The technology, in this case, looks like this. Two forms are made, one bigger size, another smaller one. It is not necessary that they have the same geometric shape. Forms are inserted into one another.

The gap between the forms is filled with various objects - dried flowers, various decorations, trinkets, etc. The candle mass is being prepared. It is then poured into the gap between the molds.

After the wax begins to set, remove the inner mold. After the intermediate layer has hardened, the candle mass is heated and poured into the remaining space of the candle. Install the wick.

The candles are ready.
You can also use a hairdryer to heat the surfaces of a ready-made candle and melt any objects into it. For originality of candles, you can also install several wicks.

How to make a striped decorative candle with your own hands?
In this case, the wax must be poured in layers. A layer of one color, a layer of another.

Pour layer after layer only after the previous one has hardened.

As a result, we get the following combination

Fill the empty center and get a candle with a stripe. Depending on the number of operations with alternating pouring wax of different colors, we obtain the corresponding number of strips. It is very easy to remove the candle from the cup if you heat it in a water bath.

You can also pour wax on the top of the candle in some form. In this case, an asterisk, but this pattern will only be on the surface and will quickly disappear when the candle burns.
DIY candles in sand molds
Candles made in sand molds are primarily interesting because they can be made into almost any shape. First take a container with sand, and it must be moistened. Its consistency should be similar to that suitable for making children's Easter cakes in the sandbox.
We squeeze out shapes that interest us in the sand...

And then we fill them with melted wax. To prevent the walls of the sand mold from being washed away, pour the wax into a spoon.

The wax is poured into the mold, wait for it to harden.


We install them in a box with sand. Candles can be used.

The candle is made using natural ingredients, in particular orange. The service life of such a candle is limited, it is more likely that it should be made for a specific occasion, but the aroma and its originality will live in your memory for a long time. So, let's take an orange.

Cut into two equal halves.

Remove the pulp from the halves.

The edges of the halves can be decorated with carvings. We put the wick on.

Fill the cavity of the half with wax. We are waiting for the wax to harden.

When burning, the flame will heat up the orange peel, while the aroma of the overseas fruit will emanate from it.

Perhaps it was worth starting with this example, many will think, since this method of making a candle will seem easy to you. This option for making a candle will not require you to use a wax mass and a water bath, but in reality, everything is more complicated here. In this case, it is necessary to feel the material, at what stage it is just bending, and where it is already melting. To make a candle, wax is used, which is widely used in beekeeping (the basis for honeycombs). In addition, you will need a candle, scissors, and thread for the wick.

First of all, measure the length of the wick and cut it to the height of the candle with a margin.

We warm the edge of the foundation and wrap it around the wick.

Perhaps this is the most crucial and difficult moment.

The wax should evenly wrap around the wick along the entire length of the wick.


Roll the foundation into a roll. If necessary, heat the foundation while twisting it.

Your DIY wax candle is ready.

We hope that the given examples and techniques for creating candles will help you decorate your home.
Someone is trying to acquire skills that will help them survive in a global catastrophe. Someone just found a new hobby. And someone managed to turn this hobby into a profitable business, creating real works of art. What is it about? About DIY From this article you will learn how to make a wick from threads.
Required part
If you can still achieve some variations in the material for creating a candle, then you will not be able to exclude one of its components. We are talking about the wick. We will talk about how to do it at home later. Now let’s just look at what this important thread is.
Origin of the wick
It may seem logical that the wick should be contemporary with the candle, but this is not the case. Candles appeared a little later. About fifteen centuries later. At first, wood chips were used as a wick. Later we decided to use pieces of fabric. This was in those days when candles had not yet been invented, and for lighting they used small bowls with a liquid flammable substance (mostly fat), which mercilessly smoked and smelled disgusting.
However, if you think that a wick is the simplest particle that can be made from anything, then you are deeply mistaken. It is not as simple as it might seem. In order to know how to make a wick with your own hands, you must understand how and why it burns.
Processes in the wick
For a wick to be of high quality, it must consist of several interconnected fibers. This is important so that capillary forces come into play, which lift the liquid fuel to the combustion source. At the molecular level, a candle wick serves as a kind of pumping substation, which allows, among other things, to better saturate the liquid with gas. As a result, the vapor pressure increases and the flash point decreases. All these processes, of course, take place at the microscopic level, but this does not make them any less interesting. And understanding them will help you make a high-quality wick that is most suitable for a particular product.

What can a wick be made from?
Throughout history, people have tried to make a wick with their own hands from everything that burns. Thin wood chips, pieces of fabric, woven threads and even compressed poplar fluff - this is an incomplete list of materials.
Today, the most reasonable option seems to be to use cotton thread or fiberglass. The fundamental difference between these materials is that cotton burns completely, while the fiberglass wick remains. If suddenly you have a legitimate question about who needs this and why, then perhaps you are not aware of a new fashion trend - making figured candles with a frame. For example, you bought a candle in the shape of a cute cat, and when it burned down, you find a frame in the shape of the skeleton of this very animal. Some connoisseurs are simply delighted with such ideas.

When considering how to do it, pay attention to the fact that its size and diameter must be selected in accordance with the size of the candle itself. If it is too thin, it will simply fade. And if it’s too thick, it will smoke mercilessly. In automated production these parameters were calculated long ago. But when you make a wick for candles with your own hands, most often you have to achieve the desired proportion through trial and error.
Another trick is that a long wick also produces smoke. And as the fat, wax or paraffin burns, it inevitably lengthens. This problem had to be dealt with manually. Houses always had scissors to cut off the ends of the wicks. That's what they were called - wick scissors.
Nowadays, this problem has been solved in a very original way. A candle wick (which in the vast majority of cases is a thread woven from thin fibers) began to be made using an asymmetric weaving technique. As a result, the tip bends to the side and completely burns out completely on its own.

How to make a wick at home
If your candle will be made from wax, you will need a thick wick with a loose (not tight) weave. If the starting material is paraffin or various fats, the diameter of the wick should be small, and the individual threads should be twisted quite tightly.
This is done because these substances have different viscosities. In order for the wax to successfully rise through the capillaries of the wick, fairly wide passages will be required. If the same ones are left for less liquid paraffin, then it will simply lack the necessary traction, and the candle will burn dimly, unevenly, or even go out altogether.
Required impregnation
When you make your own candle wick, remember to soak it before direct use. This process is not particularly labor intensive. However, it will take time, since the soaked wick must be thoroughly dried.
Impregnation is carried out so that the wick burns better and less wax or paraffin deposits are formed.

Various solutions can be used. Here are a few options.
- For 500 ml of water: 5 grams of ammonium chloride, 10 grams of borax, 5 grams and 5 grams of calcium chloride.
- For 550 ml of water: 30 grams of slaked lime and 8.5 grams of sodium nitrate.
- For 700 ml of water: 1 gram and 1 gram of sodium nitrate.
The wick is immersed in the solution for at least 15 minutes. And then they hang it out to dry. It is recommended to dry the workpieces for at least five days.
Among home craftsmen, a solution that requires fewer specialized tools is popular. chemical substances. And although it is somewhat inferior in quality to the mixtures described above, since we are still talking about how to make a wick at home (trying, as far as possible, not to turn the house into a branch of a chemistry room), we will consider this option.
It is done as follows: take 2 tablespoons of regular table salt (not iodized), add 4 tablespoons of borax and stir it all in one and a half liters warm water. When the solution becomes homogeneous, you can send the wick blanks there for soaking.
For better preservation of the wicks, after complete drying, you can additionally impregnate them with molten wax. To do this, you need to dip them in pre-melted wax three to four times. After this procedure, the wicks must be dried again. However, wax impregnation is only needed if you want to prepare the material for future use. The wick will be able to perform its direct function in the candle you have made without this final touch.

Wide field of activity
Once you have already figured out how to make a wick at home, think about where you can use it. In truth, working with candles is a very exciting activity. And from a cute hobby, it may well transform into a decent source of income.
There are candles different types. The simplest ones are household ones. Their only function is very mundane - to provide light in case of a power outage. They have the simplest cylindrical shape and a boring translucent white color.
Table candles are already more attractive. Various dyes are used in their production. Their shape varies from cylindrical to twisted. Such candles may well serve as an important element in creating the atmosphere for a romantic dinner.
Made with the addition of substances that have a pleasant odor. In some cases, they can also be used in aromatherapy. This way you can not only lift your mood, but also improve your health.

Gel candles are also very popular these days. Firstly, because they are unusual, secondly, because they are beautiful and, thirdly, because they burn absolutely without any odor. They are easy to make. All you need is a transparent container (preferably in the shape of a bowl), some colored sand, beads or decorative figurines (this depends on your imagination), a wick and a melted gel mass, which is used to fill the composition.
So go for it! All in your hands.