Suspension systems are becoming increasingly popular. This is not surprising, since a wall-hung toilet takes less space, compared with floor systems. In addition, they simplify the cleaning process, since there are no hard to reach places. Considering that a wall-hung toilet looks much more aesthetically pleasing, such a high interest in wall-hung systems becomes understandable. But the process of installing a wall-hung toilet often raises questions, so it is necessary to consider this process.
- Preparatory work.
- Installation installation
- Toilet installation.
Each stage does not cause any difficulties for a person who has experience working with the tool.
Preparatory work
First you need to determine the place where the toilet will stand. If redevelopment is not planned. If only the equipment is replaced, it is natural that the location will not change. Otherwise, everything depends on the future interior of the room. It is important to know which wall is located behind the future location of the toilet. This is due to the fact that it is attached only to the main wall. A plasterboard partition will not work, as it simply will not support the weight of the system and will break. 
When the place is determined, it is necessary to lead to it cold water and a sewer outlet for waste disposal. This must be done before installing the installation system, since after it the work will be difficult. 
When the location is determined and prepared, you can proceed to install the installation.
Installation of an installation system under a wall-hung toilet
In order to install the installation correctly, it is important to carefully approach the marking process. This stage is very important, since an incorrectly marked system will not fit correctly and, as a result, everything will have to be redone. 
Therefore, before installation, you need to carefully measure everything and determine the height of the future toilet. Experts recommend that it does not exceed one meter, but if the family is tall, this number can be increased. When the location and height are determined, markings are applied for fastenings and holes are drilled. It is preferable to use special anchor bolts rather than ordinary dowels, since the load will be static and constant and quite large. Dowels will not be able to provide sufficient reliability of fastening, so distortions of the system are possible in the future. 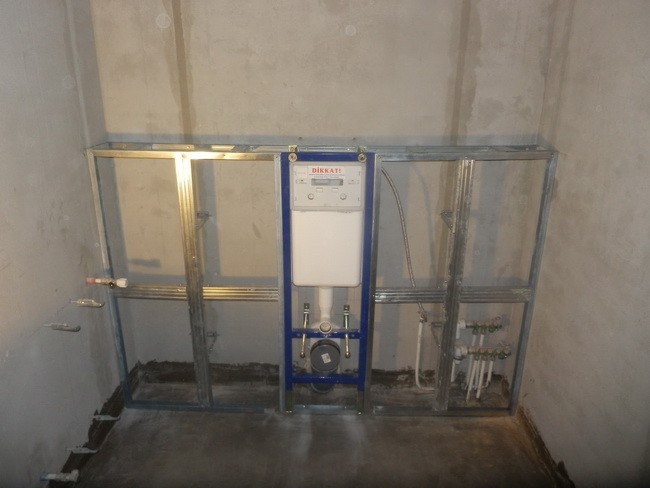
Special attention should be paid to the reliability of fastening and immovability of the structure, since the system will function for many years and must be properly secured. If desired, it can be further strengthened to achieve complete immobility. 
When the installation system is installed, it must be vertically aligned in the front plane, the top plane must be horizontal, and the supporting frame itself must be securely fastened and motionless. This is the only way to ensure good view and normal operation of the system in the future. 
Bowl installation
After all the installation work has been completed, the niche is sealed with plasterboard. It is advisable to use moisture-resistant material so that it does not swell from moisture. At the same time, we must not forget about the need for access to the drain tank, so it is necessary to provide a hatch in the finishing.
After finishing is completed, the toilet bowl is installed. This stage of work is carried out in accordance with the manufacturer’s instructions, since different models may require different actions. But the differences are not significant; the actions differ only in small details. 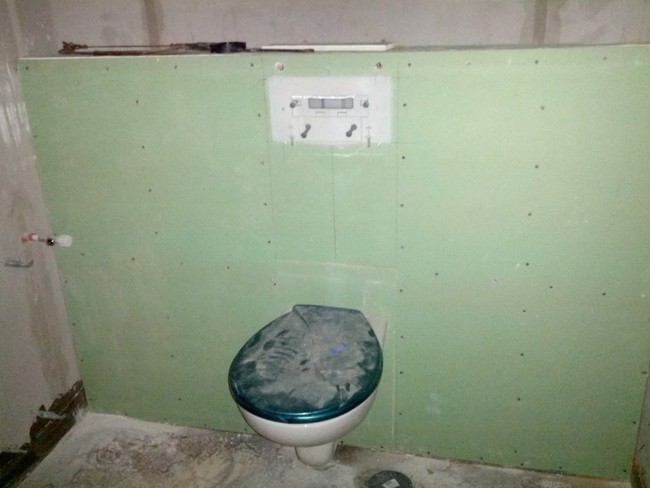
If preliminary calculations and the measurements were made correctly, then the height of the bowl will be about 40 centimeters from the floor. This value is considered optimal and most convenient for ordinary people.
If you follow the instructions and carry out the work carefully and carefully, the process of installing a wall-hung toilet will not cause any difficulties. As could be seen, complex work no, so almost anyone can install a toilet with their own hands.
Video How to install a wall-hung toilet
Setting up a GROHE installation
Installing a toilet installation allows you to hide the piping block, consisting of a flush cistern, supply pipes and a sewer outlet, from visual viewing. In addition to the aesthetic component, this approach greatly simplifies cleaning and frees up extra bed in the bathroom room.
Varieties
Modern installation of a toilet installation involves the use of one of two installation schemes. Each option has a personal set of positive characteristics. When choosing, you need to focus on the material of the walls and the direction of the load on the structure.
Block diagram
This method of installing a wall-hung toilet is convenient and simple.
To apply this inexpensive scheme, certain conditions are needed:
- Only a solid wall is suitable for fastening the structure. It is pre-equipped with a mounting niche for the tank and other fittings. You can also use an additional partition made of brick, plasterboard or other materials. Decorative works carried out upon completion of system installation.
- As fastening elements, it is allowed to use only strong anchors that take on the entire operational load.
The strengths of the block installation of a DIY toilet installation are its low cost and the possibility of use in combination with wall-hung and stationary floor-mounted toilets.
Framework diagram
The framework method of how to install a toilet installation is more difficult to implement. On the other hand, it is the only option for mounting on thin hollow partitions or plasterboard walls. The frame is very reliable. The installation site of the structure is the surface of the floor or foundation.

Several options can be used to install a wall-hung toilet:
- On special fasteners to four points on the wall.
- Two points on the wall, two on the floor.
- On stable floor feet.
The main force is taken by the lower part of the base. Strength Frame-type installations have the ability to adjust the racks. They are positioned at any level convenient for use. Fasteners of this type are very convenient in cases where the room has a non-standard shape or original design. Using the frame, it becomes possible to place the toilet in the corner area of the bathroom, which saves usable space.

As for the dimensions, for block systems they are always fixed: width - 50 cm, depth - 10-15 cm, and height - up to 100 cm. Frame structures have a width of 50-60 cm, depth - 15-30 cm, height 80- 140 cm (such a large span is ensured by the adjustment of the racks). If the toilet is located in a wooden house or a non-permanent building, it is better to give preference to low structures with a large width. This way it is possible to reduce the load on walls and partitions. The plumbing unit is able to operate for a long time without the threat of collapse.
Strengths and weaknesses of the solution
Like any other technology, installing a wall-hung toilet with installation has a set of advantages and disadvantages.
Among the strengths of the design are the following characteristics:
- An excellent way to disguise from visual observation of the components and parts included in the toilet trim. This also applies to inlet and outlet pipes.
- Free space is freed up. This is very valuable for such a small room as a bathroom. This explains the enormous demand for installation of toilet installations in small bathrooms or those with a non-standard layout.
- Excellent sound insulation parameters. Allows you to get rid of the familiar noise when draining and filling the tank.
- The room becomes more hygienic. It is easier to clean, especially in the dead zone under and around the toilet.
- good and convenient fastening. After installing a plumbing fixture, you do not need to worry about its reliability. In addition, the placement height can be changed depending on the anthropometric data of family members.

The disadvantages of installing a toilet installation, as a rule, include the high cost of the installation structure, the specifics of the installation and the need for mandatory removal of external decorative trim during repairs or replacements. individual elements. However, the advantages of the installation significantly outweigh its disadvantages, which explains the widespread popularity of such modules.
Equipment
Before installing the toilet installation correctly, check the complete set of the structure.
It includes the following components:
- Steel frame. It is the basis of the device, so it is made durable and reliable.
- Retractable brackets. They make it possible to place the toilet at the desired height, placing it on the floor surface or a special podium.
- Flush button. Main element the entire system, which looks like a plastic panel. Along with its main purpose, the button serves as an inspection hatch. Single fixtures only flush water. Double keys are equipped with the ability to control water pressure. As a result, it is spent more economically. Innovative developments include other additional functions. This can be a double flush mode (economical and normal), or a stop flush (the ability to block flowing water).

A number of well-known companies have begun producing more modern contactless control modules. They work thanks to sensitive infrared sensors, tuned to movement or obstacles. This makes it possible to transfer the functioning of the system to a fully automated mode.

Leading installation manufacturers usually provide a 10-year warranty. This applies not only to the unit itself, but also to all the parts included in the package. This refers to oil seals, seals, connecting pipes and a tank. Branded service centers are able to provide spare parts even for their models that have already been discontinued.
Advantage of large brands is that they have widespread networks of service centers with qualified personnel. The specialists working there can always give advice on how to install a wall-hung toilet with installation.
Required tools for installation
To solve the problem of how to properly install the installation, you will need a certain set of tools and devices. It is better to install block or frame modules before carrying out finishing in the bathroom. The installation procedure itself is not complicated. Its implementation does not require deep knowledge or extensive experience in plumbing work. The product kit includes fairly detailed and understandable instructions and a disc with a video tutorial. When installing a toilet installation with your own hands, do not use specific equipment or expensive tools.

As a rule, all the necessary equipment for this purpose is available in the home of a self-respecting man:
- Pencil, construction tape, ruler, level.
- A hammer drill or impact drill with a set of drill bits for concrete of different diameters.
- Screwdriver, hammer, glue, sealant, foam pad.
- Open-end wrenches in several sizes.
This simple set of tools and accessories will allow you to easily install the installation yourself.
Where to place
When preparing to install a toilet with a DIY installation, you need to decide on its location. Inside small combined bathrooms, this could be a corner of the room. In any case, the toilet should not block the passage. According to experts, it is most convenient to install new system in the area where he stood old toilet. As a rule, there are already outlets for sewer and water pipes, which significantly speeds up installation procedures.

Markup rules
To make the markings, you will need a simple pencil or marker, a tape measure and a level. When taking measurements, they are based on the dimensions of the installation module. A correctly drawn up toilet installation diagram significantly facilitates subsequent installation work.
The procedure for applying markings:
- Find the central axis of the structure and transfer it to the wall using a ruler and pencil.
- Determine the size of the gap between the edge of the installation and the wall. Acceptable values are not less than 13.5 mm.
- Mark on the wall the location of the cistern and the fixation points on the floor and walls. This is where the fastening elements of the structure will be placed.
If everything is done correctly, it will be very simple to assemble the installation, as required by the instructions. The finished module will not clutter up the space or create obstacles to movement inside the bathroom.
Installation of block system
For installation of a block-type installation, only a solid, load-bearing wall is suitable. You can start working after choosing right place and carrying out marking procedures.
Description of how to install a toilet:
- Determine the overall height of the module. As a rule, they are guided by the specific design of the installation. Most often this parameter does not exceed 100 cm.
- Mark the places for the dowels that act as equipment fixings. In this case, it is necessary to ensure that the holes are located at the same distance from the central axis. A hammer drill or impact drill is useful for making holes. The dowels are driven in with a hammer or by hand.
- Equip the installed dowels with anchors. This makes it possible to fix the main fragments of the module. Screws and nuts are used as fasteners. The frame is aligned vertically and horizontally using height adjusters, clamps and plugs.
- Bring the drain tank to the frame and fasten it to special connectors (they are included in the device kit). When fixing with bolts, carefully monitor the distance between the frame and the wall. The permissible value is no more than 21 cm. If this requirement is not met, problems arise with fixing the toilet bowl through the decorative partition. In this case, the bolts are too short.
- Connect the module to the pipelines. The water pipe is connected to the tank, and the sewer pipe is connected to the installation. To do this you will need plastic clamps. To achieve complete sealing of the joint areas, silicone sealant is additionally applied to them.
- Screw the pins into the pre-drilled holes. Couplings are placed on the studs and the pipes are adjusted to size. Sufficient shock absorption is provided by silicone or rubber gaskets.
- Install the toilet bowl. Attaching the wall-hung toilet to the installation ensures good tightness at all joining points.
- The last step of the procedure for attaching the toilet to the installation is to attach drain hose. Clamps are usually used to secure it.

When all the installation work is left behind, you need to check the operation of the plumbing unit and move on to the final design of the false wall. It will cover all the unsightly components of the structure.
Floor installation
Installation of the installation under the toilet, located on the floor surface, can be done with your own hands. It won't take a large number of time and effort. And implementation is within the power of a person without special knowledge in the field of plumbing. Using a ready-made design, you can disguise all communication elements. The area of the room receives additional space, making it more attractive, neat and modern.

How to install a toilet installation on the floor:
- To secure the position of the knee, reliable metal fasteners are used. To treat the outlet of a plumbing fixture, technical ointment is used. Only after this is the toilet allowed to be moved to its future installation location. Marking the drilling points through the niches in the heel of the device is carried out with a pencil or marker.
- The toilet bowl is removable, which allows you to set the mounting angles. The applied marking serves as a guide. After this, the plumbing module is installed back so that the drain pipe falls into the drain pipe.
- Installation of the drain tank is carried out according to the instructions from the manufacturer. To connect the installation to the sewer, as required by the rules, a connecting collar is used. It fixes the toilet outlet location. The bolts must be screwed tightly and the decorative trims must be on.
- To remove the drain panel, a technical hole is made in the partition. The assembled system is tested for leaks. All detected leaks are eliminated.
After a successful check, you can proceed to rigidly fixing the heel of the toilet and installing a decorative partition on top of the installation.
How to assemble a frame structure
Before correctly installing a wall-hung toilet using a frame installation, you need to decide on its location. Next, the necessary markings are applied to the selected area. The advantage of fastening frames is that they are able to provide reliable fixation of plumbing fixtures to both solid and hollow foundations. This list also includes popular plasterboard partitions and light walls. Thanks to the frame kit, the toilet can be placed in a corner and under a window.

How to make an installation in a toilet based on a frame:
- Mark the area where the frame and fasteners will be located. Most often, this installation scheme for installing an installation under a toilet implies the presence of two floor and two wall fixation points. Alignment of the structure in space is carried out using a level and plumb line.
- In the places of the marks, drilling is carried out with a hammer drill or electric drill. Drill diameter is selected depending on the cross-section of the dowels. To increase the reliability of fastening the frame, in addition to dowels, it is recommended to use anchor bolts.
- Examine the drain tank for the location of the outlet openings. Most often they are located on the bottom or side surface of the case. This point affects how to connect the installation to the water supply. It is most convenient to use plastic pipes. As for flexible hoses, their use is not recommended due to their limited service life. When the time comes for replacement, you have to spend a lot of time and effort dismantling the exterior finish.
- Using a pipe or corrugation, the module is connected to the sewer system. The bowl is connected temporarily at this stage until the appropriate tests are carried out. The drain panel should operate as smoothly as possible.
- If testing of the design was successful, you can proceed to the final fixation of the position of the bowl and finishing of the structure. At the same time, it is important to prevent construction waste from getting inside the sewer outlet and the niche under the button. It is covered with a special cover.

Having completed the installation for the toilet, as required by the instructions, proceed to the construction of the external false panel. It is placed around the perimeter of the entire complex, using a metal profile. These strips are convenient for subsequent fastening of any sheathing (fibreboard or plasterboard).
How to check system functionality
Upon completion of the installation procedures and connection of the installation nodes, the unit is checked to ensure its operability. The first step is to completely turn off the water supply tap and watch how the tank fills. If no malfunctions are observed during the operation of the system, and there are no leaks in the connecting areas, you can proceed to the final design.
If even the slightest traces of moisture are detected at pipe joints, every effort must be made to achieve complete tightness. If communications in this state are closed with a partition, this can lead to serious problems, including flooding of the neighbors below. Most often, problems of this type are eliminated by additional tightening of connecting couplings or linings. To be sure, it is inserted into the thread silicone sealant.

During the installation of a wall-hung toilet, the following defects are usually encountered:
- Water leaking from the tank. The reason is usually the misalignment of the sealing gaskets during the joining of individual modules. To eliminate the malfunction, turn off the water supply, remove the connecting screws and inspect the gaskets to ensure their correct location. All observed inconsistencies must be corrected. It is better to replace overly chewed products with new ones.
- Toilet bowl play. To eliminate this defect, it is necessary to check the rigidity of the plumbing fixture and the installation fasteners. Weak elements are carefully tightened: this will make it possible to clearly fix the position of the toilet in space. It is important not to overdo it, so as not to break the threads on the plastic fittings and connectors. The same applies to metal screws; if they are over-tightened, the ceramic can simply crack.
- Stagnation of water in the bowl. This indicates a positioning error drain pipe. To fix the problem, carry out complete dismantling plumbing fixture. This is the only way to get free access to the drain pipe: it is positioned exactly 45 degrees to the floor surface. After this, the toilet bowl returns to its place.
- Damp spots in the immediate vicinity of the toilet. In most cases, the reason lies in the insufficient tightness of the corrugated pipe. To eliminate leakage, an additional layer of sealant is applied over the joint area. After the solution has dried, the structure can be assembled.

All of the listed malfunctions are simple and can be eliminated by the homeowners. In those cases when they cannot or do not want to do this, there is always the opportunity to turn to a professional plumber for help. The specialist will do everything quickly and reliably.
Before independent implementation installation work It is recommended to study the following instructions for installing a toilet installation, compiled on the basis of many years of experience:
- The installation diagram for the toilet must contain an inspection hatch under the drain panel. This will greatly facilitate scheduled maintenance of the tank and repair activities. A concealed hole provides quick access to the interior of the structure.
- When choosing a decorative wall that blocks the installation system from prying eyes, it is recommended to choose structures no thicker than 70 mm.
- The use of innovative flush buttons has not only an aesthetic effect, but also an economic one. It was estimated that toilets equipped in this way reduced the level of water consumption for flushing by an order of magnitude. As a result, this affects utility bills.
- It is most convenient to install the drain control button in the central area of the tile or on the seam between two tiles.
- The optimal height of the toilet bowl above the floor is 40-45 cm. This will prevent water from stagnating inside the bowl and ensure desired angle discharge through the sewer outlet.
- The standard distance between mounting holes depends on the type of structure. For compact models, the fastening pitch is recommended within 18 cm. For large toilets, the distance can be increased to 23 cm.
Wall-hung toilet differs from a classic floor-standing toilet only in that the communications are hidden inside the wall. Only the toilet itself is visible from the outside. The entire rest of the water supply and drainage system is hidden behind the wall. This is what is called an installation.
It consists of a rectangular metal frame with threaded holes for fastening, and a flat plastic drain tank. The system also comes with a drain key, which costs almost more than the installation itself (TW bronze key 16,920 rubles).
Recently, it was impossible to install a wall-hung toilet in a bathroom, but now, thanks to the huge selection on the plumbing market, you can install a wall-hung toilet yourself. Although many are afraid to install a suspended structure, because there are some outdated myths regarding it.
Myths about wall-hung toilets
Myth 1. A wall-hung toilet, if a heavy person sits on it, will fall and break.
The toilet itself, if it is made with high quality, without cracks, can withstand weight up to 400 kg. The only thing that can fail is a poorly installed installation. It is a welded metal frame of square section. The installation is attached to the floor with two bolts of 12 mm in diameter, and also to the wall at a height of 1.2 m above the floor with bolts of the same diameter.
The toilet itself is hung at a height of 35-40 cm above the floor. One such bolt can support a person, and there are two such bolts, and a pair at the bottom. If you find a 12 mm drill, then screwing in such bolts will not be a problem, and the installation will not collapse during daily use of plumbing fixtures.
Conventional floor-mounted toilets have been replaced by wall-hung structures that do not take up floor space and look more modern. It is not surprising that wall-mounted models have begun to push traditional products out of the market. Installation suspended structure It’s more complicated, takes more time and costs more, but you can save money if you consider an option such as installing a wall-hung toilet yourself.
Internal structure and principle of operation of the design
If you look into design features products, it becomes clear how to install wall-mounted toilet.

The design of the wall-mounted product is such that the only visible element is the toilet bowl
The first element is a strong steel frame, which is the base to which the visible part of the structure is attached - the toilet bowl. It is with its installation that the installation of a wall-hung toilet begins. The frame is securely fixed to the wall and also fixed to the floor - as a result, it must withstand the weight of a heavy person.
Accordingly, to weak walls (for example, made of plasterboard) this design installation is unacceptable, since the wall simply will not hold up. The frame is equipped with a device that allows you to adjust the height (400-430 mm) at which the product bowl is mounted. It is suspended from the frame using special pins - this is the main fastening of the wall-hung toilet.

Often two installations are installed simultaneously - for the toilet and for the bidet
The second element is a plastic cistern hidden in the wall. Its shape differs from the traditional one, since the container must fit into a narrow structure. It is mounted in a steel frame and insulated with a special material that prevents condensation - styrofoam. The front wall of the tank is equipped with a cutout for mounting a release button device. In case of repair, this cutout is also used. Almost all modern tanks require dosing of drainage: for example, the volume of water discharged can be 3 liters or 6 liters, depending on the purpose.

Flush tanks of a flat configuration are fixed inside the installation
The third element is the toilet bowl, the only visible and actively used structural part. Its shape is traditional, oval, although designer models come in both round and rectangular configurations.

There should be no problems with fasteners, since the product comes with a set of necessary details and tools and installation instructions. Sometimes it is necessary to additionally purchase Teflon tape, a polyethylene outlet, a flexible hose, and studs.
Installation technology
Installing a wall-hung toilet using a special frame installed in the wall is more expensive, but more reliable and faster.

The installation must be mounted to the floor and main wall
- Installation of a steel frame - through special holes it is attached to the main wall and floor using dowels. Sewer and water pipes are installed at the installation site. The frame (installation) should be checked for evenness using a level. It must be clearly parallel to the wall to which it is attached. At this stage, the installation height of the wall-hung toilet is also set - 40-43 cm. It depends on the height of the apartment owners.

The height of the toilet bowl is adjustable during installation
- Water supply to the tank. It can be flexible or rigid. Experts insist on the hard version, as it lasts much longer. While the liner is being installed, the valve in the tank is closed.

During work, the water drain from the tank should be shut off.
- Connecting the toilet to the sewerage system. The toilet outlet is inserted into sewer outlet, secure the connection using corrugations. After installation, it is necessary to test the system - do a test drain. To do this, the toilet bowl is temporarily completely screwed to the frame. It is then removed again, as it is usually installed at the final stage.

Many installation kits are connected to a sewer pipe without the use of corrugations
- Covering the work area with sheets of plasterboard. For the plumbing unit, choose sheets of waterproof double plasterboard, which is stronger than regular plasterboard. The panels are mounted to a frame and a metal profile, which is mounted on the wall. The instructions included with the product include detailed diagram cutting the material with places to cut out the necessary holes. There can be two options for covering: for the entire wall area or just to cover the installation. In the second case, an improvised shelf will appear above the toilet bowl.

An improvised shelf above the toilet and bidet can be used for decoration or necessary things
- Partition cladding ceramic tiles or panels similar to the finishing material of the bathroom.

The wall cladding behind the toilet should be in harmony with the rest of the room’s decoration
- The final stage is the installation of a wall-mounted toilet, specifically its bowl. It is hung on a designated part of the steel frame using two pins.

Sheets of plasterboard with lining cover the installation and the flush cistern, leaving the toilet bowl and flush button
Particular attention should be paid correct installation installation, since the correct execution of subsequent work depends on it.
Installation of a toilet without installation, on a concrete base
Sometimes people are interested in how to install a wall-hung toilet without installation. Of course, installing a toilet on a frame can be replaced with a cheaper option - installing it on something you made yourself concrete base.
The flush cistern is installed in two ways: either mounted in the wall with flush buttons, or placed in a standard manner above the toilet bowl in a manufactured base.

Wall-mounted toilet mounting diagram: 1 - 2 rods mounted in the wall; 2 - monolithic concrete base; 3 - drain pipe
Let's consider the most economical option.
To install you need to prepare:
- about 40 liters of M200 concrete;
- boards for formwork;
- nuts, washers, wood screws;
- 2 threaded rods 2 cm thick (length from 50 to 80 cm);
- piece plastic pipe(length – 8 cm or more, diameter – 11 cm);
- drain coupling;
- silicone sealant.
They start by securing the rods in the main wall. In the future, the toilet bowl will be “planted” on the outlets of the rods. The result is a fairly stable structure that can withstand a weight of 400-500 kg.

The dimensions of the concrete base are calculated taking into account further dismantling of the formwork
Install the formwork. Calculate the distance between the holes for fasteners and mark the fastening points on the formwork.
Calculate the length of the rods: sum up the thickness of the recess (about 15 cm), the distance from the toilet bowl to the wall. To fix the rods in the wall, a chemical anchor is used - a special glue for concrete.
After installing the pins and installing the formwork, try on the toilet bowl. The holes for fastening must coincide with the outlets, the outlet hole must coincide with the outlet of the coupling.

The concrete base will finally harden only after 2-3 weeks.
Concreting begins, supporting the drain hole with foam. The result is a monolithic block with a fixed open coupling and protruding pins.

The concrete base should include pins for the toilet bowl, a coupling outlet for the flush and space at the top for mounting a cistern.
There is no need to think about how to install a wall-mounted toilet on a prepared base - the subsequent steps are no different from installing a regular floor-standing toilet: connect the drain, seal the connections, install the bowl on the pins, tighten the nuts. The flush cistern is fixed above the toilet bowl.

The concrete base and drain pipe can be covered with sheets of plasterboard, leaving an opening for access to the drain tank
Installing a wall-hung toilet like this yourself will save the family budget, since expensive installation is not required.
DIY installation and fastening of a wall-hung toilet
Self-installation of a wall-hung toilet. Features of the stages of installation on the installation and concrete base. Video instruction.
Instructions and tips for installing a wall-hung toilet with installation
 Hanging plumbing fixtures are gradually gaining popularity, especially among owners small bathrooms. However, not everyone likes wall-hung toilets - outwardly they seem unstable and unreliable. This impression is deceptive, because the installation of a wall-hung toilet is carried out using an installation system that is hidden behind finishing material walls. Let's take a closer look at the advantages of hanging plumbing fixtures and read the instructions for installing them.
Advantages of wall-hung toilets
- Compactness . The bathroom space is freed up due to the absence of a cistern - it is hidden in the wall along with other communications. Thanks to the resulting void under the toilet, the plumbing seems weightless; this technique visually lightens the interior and makes it visually more spacious.
- Modern style . Wall-hung plumbing is a relatively new invention; its installation immediately indicates that the owner of the house follows the development of technology and keeps up with fashion trends.

- Versatility . It doesn’t matter whether you are just replacing the toilet or completely updating the bathroom furniture and equipment - a wall-hung toilet will always be appropriate and will make the bathroom interior elegant and laconic.
- Practicality . Cleaning the room is now much easier. It also makes installation of the “warm floor” system easier. Floor tiles placed without violating the integrity of the ornament.
Selecting and purchasing a toilet with installation
The main condition for purchasing the installation is that it must match the model of the toilet you have chosen. Often, wall-hung toilets are equipped with an installation system initially; it is best to prefer this option.

The installation must match the size of the niche in which it will be placed.
There are two types of installations
Block – is attached to the wall using conventional anchor bolts, which are the main support of the entire structure.

Framework – is a frame on legs, thanks to which the height of the toilet is adjusted. The frame is attached in four places. An option is possible when all four fasteners are fixed on the wall - this installation method can only be used in the case of solid walls.

If the wall is not stable enough, choose an installation with two fastenings on the wall and two on the floor. The last two fasteners bear the main load.

Pay attention to the equipment included with the device. If the situation is favorable, you will receive the main part (blocks or frames), fasteners, flush keys, sound insulation, flush tank and adapter.
Stages of installing a toilet with installation
- We mark the walls. We draw a line - the central axis of the future system. We calculate the distance between the installation and the wall, which will accommodate the sewerage and water supply. We mark the mounting points of the installation and the location of the tank.


- Provide a service hatch just below the drain button. This will greatly facilitate the maintenance of the tank and its repair if necessary.
- Use modern flush buttons that save water. These can be two separate buttons, one of which drains the full volume of water in the tank, and the other half. Another option is to have Start and Stop buttons.
- Consider the location of the drain button relative to the tile elements. Design the button either strictly between two tiles, or in the center of one of them.
- The top edge of the toilet should be no higher than 45 cm from the floor and no lower than 40 cm.
- The thickness of the wall hiding the installation system should not be more than 7 cm.
- The standard distance between the mounting holes of the toilet is 18 or 23 cm.
- Monitor the correct installation at all stages of work. This will help to avoid gross errors during installation and problems during the operation of plumbing equipment.
A toilet installed in accordance with all the rules can withstand a load of up to 400 kg! If you doubt that you can carry out all the work correctly and efficiently, we advise you to seek the help of qualified specialists. Well, it will certainly help you save your budget. self-installation installation systems. Feel free to use technological and design know-how to create an original and practical interior.
Installing a toilet with installation: detailed instructions and tips
We offer detailed instructions And useful tips for installation of a wall-hung toilet with installation.
Installation of a wall-hung toilet with installation: installation details
Toilets with installation are real aristocrats in the world of plumbing. These are convenient and compact devices, usually distinguished by an excellent design and a price that is not at all sparing to its owner. In addition, installing a wall-hung toilet is a rather complicated task and requires very careful execution.
And yet, the ranks of supporters of toilets with installation are steadily growing. Many home craftsmen, after studying the recommendations and instructions, successfully cope with installing this complex structure on their own.
It is only important to perform each stage of installation work correctly.
How does a wall-hung toilet work?
A wall-hung toilet is much more complex than a regular compact or monolith. The installation is called a durable metal frame. This frame is installed inside a wall niche and securely fixed to the wall and floor.

The flat plastic tank is already attached to the frame. Then the necessary communications are brought to the niche, finishing is done and the toilet itself is hung.
The toilet remains outside, and the rest of the contents remain hidden in the wall. The flush button, which is usually located on the wall above the bowl, is also displayed on the wall. Even from this condensed description it can be understood that installing such a device is a labor-intensive process.
But still, the model with installation has many advantages:
- aesthetic appearance and attractive design - the bowl seems to float above the floor;
- compact dimensions, leaving wide space for placing the toilet in both small and large bathrooms;
- the absence of a leg makes cleaning the room much easier;
- The design of the installation is universal, it is possible to choose some elements to suit your taste and budget;
- Frame and tank breakdowns are extremely rare, and repairing or replacing the drain button is usually not difficult.

Among the disadvantages, the high price should be noted. Taking into account installation costs, the cost of such a toilet can be twice that of a standard floor-standing model.
However, manufacturers take into account the growing popularity of wall-hung plumbing, so relatively inexpensive models have appeared on sale. Another drawback is that the tank and frame, hidden in the wall, are not very accessible for repair.
In case of serious damage, you may have to turn the entire wall around and re-do it. Finishing work in this area.
Materials and tools
To install a toilet with the installation of a built-in toilet, you must purchase the following items:
- installation frame with a plastic tank;
- cup wall hung toilet;
- flush button;
- studs for attaching the toilet;
- a set of pipes for connecting the bowl to the tank, etc.
The installation is usually supplied complete with a flat plastic tank, as well as adapters, pipes, fasteners and a flush button. The kit usually includes a special material that protects the structure inside the wall from the effects of condensation, and also reduces the noise level from the operating tank.
When purchasing, you should carefully check the kit in order to immediately purchase the missing elements. The toilet bowl is also purchased separately. The dimensions and configuration of the installation, like other parts, are standardized, so they can be changed if desired.
For example, you can choose the new double flush button, which saves water.

To complete the installation, you will also need a number of tools, first of all, a hammer drill and concrete drills that match the fasteners. Need also building level, spanner wrenches, tape measure, pencil for marking, knife for cutting drywall, etc.
Installation procedure for a wall-hung toilet
Schematically, the procedure for installing a toilet with an installation can be represented in the form of a number of basic steps:
- Make a niche of a suitable size in the wall.
- Bring sewerage to the niche.
- Install the installation frame.
- Bring cold water supply pipes to the installation site.
- Connect the toilet cistern.
- Close the niche, install the flush button and finish.
- Hang the toilet, connecting it to the tank, as well as to the sewer.
You will also need a certain amount of drywall, both for installation and finishing work.
Each stage of the installation of a wall-hung toilet requires close attention. The service life of the device, the number and nature of breakdowns largely depend on the quality of installation work.
The results of even minor errors made during the installation process may not become obvious immediately, but only during operation. Repairs can be very costly and time-consuming, so it is better to correctly install all the elements of this device right away than to redo it later.
Niche for installation
To create a niche and install the installation, only walls with the appropriate load-bearing capacity are suitable. The installation can withstand a weight of about 400 kg, and part of this load falls on the wall. Therefore, it would be unwise to install a wall-hung toilet on a plasterboard wall; it might simply collapse.
So, to install the installation, you need to hollow out a niche in the wall with the following parameters:
Sometimes depth requirements are not easy to meet. In this case, a niche is made to the possible depth, and its deficiency is hidden with the help of drywall and finishing.
Thus, there is space for experimentation in the field of interior design. For example, you can make a built-in closet in the space between the ledge that appears and the wall, or hang open shelves there.
But the idea of simply placing a frame along the wall and then completely covering it with plasterboard does not make much sense. In this case, it is easier and cheaper to put a regular compact in the same place, which will take up the same amount of space or even less.

Residents of the upper floors apartment buildings sometimes installed in the niche of the fan riser. In this case, part of the vent riser is cut off and an air valve is installed where the outlet to the attic is located.
In some bathrooms, a niche for communications is provided for by the project. It can also be used for installation, but some modifications may be necessary, for example, changing the position of water pipes and moving the sewer riser.
If a home craftsman has no experience in performing such operations, it is better to consult with a specialist or even entrust him with performing this part of the installation work.
Sewage supply
Before installing the frame, it is necessary to take care of the correct supply sewer pipe to the installation site. You will need a pipe with a diameter of 100 mm. It should be laid as close to the floor as possible, and it is imperative to maintain the correct slope.
The connection point should be 250 mm from the center of the wall niche. An oblique outlet with an angle of 45 degrees is put on the horizontal part of the pipe. After completing these operations, you can begin installing the installation.
Installation of frame with tank
There are four points for mounting the toilet installation. In two places the legs of the frame are attached to the floor, and in two more places the frame is secured to the wall using brackets. In this case, you should definitely use a building level so that the structure stands perfectly level both vertically and horizontally.
If the installation is installed even with a slight misalignment, interruptions may occur in the operation of the internal mechanism, which will lead to rapid failure of the structure. To level the frame vertically, use adjustable legs.
The horizontal position is set using wall fasteners, the position of which can also be changed as needed. Once the position of the installation is precisely set and fixed, you can screw it to the wall. To give the frame greater stability, the legs can be additionally cemented.
A layer of screed 20 cm high will be sufficient, but this measure is not mandatory.

At the bottom of the installation there are several holes intended for further installation of the hanging bowl. The distance between the floor and these holes should be approximately 300-400 mm so that the toilet bowl can be hung high enough from the floor. Special pins should be installed in these holes.
They are inserted all the way into the wall and secured with special nuts. The studs are designed for later hanging the toilet.

Connecting communications
You should start by connecting the sewer system. Typically, the installation is equipped with a special black outlet designed for this connection. It should be adjusted to the sewer pipe. The second side of the outlet is secured to the installation with special clips.
Connection to the water supply is made on the right or left side of the installation. The water pipe is connected using a threaded connection already installed in the structure.
To supply water to the tank, you can also use ordinary flexible hoses. This is an easy-to-install and inexpensive option, but the hoses have a shorter lifespan than pipes, so you have to consider the need for complex repairs to replace them.
At this stage, it is necessary to check the reliability of the connection of the tank to the water supply system. To do this, you need to open the water supply tap, which is located inside the tank, and fill the container. All connections are then checked for leaks and repaired if necessary. It is not necessary to drain the water.
The sewer connection can be checked as follows: place a bowl on the studs and perform a test flush without securing the structure.
After this, the bowl should be removed from the mount, checked for the presence or absence of leaks, and then continue installation.
Finishing work
If the installation is installed correctly and the tank does not leak, you need to sew up the niche with a sheet of plasterboard and perform finishing work. It is recommended to take a double sheet of special moisture-resistant drywall. Ordinary drywall will soon be damaged due to contact with condensate.
To cut everything correctly mounting holes in the sheet and not spoil the material, use a template for cutting. Typically, such a template is supplied with the installation.

In the bathroom, the walls are most often tiled with ceramic tiles. Further work on installing a wall-hung toilet can only begin after this stage is completed.
It would not be a mistake to even completely complete the renovation of the bathroom, and only then continue with the installation of a wall-hung toilet with installation.
Installation of a wall hung toilet
This stage can be called the simplest, since the bulk of the work has already been completed. But first it is recommended to wait until the layer of tile adhesive has completely dried. Install the toilet bowl as follows:
- Adjust the dimensions of the drain pipe, which should protrude 50 mm beyond the wall.
- The pipe intended for sewer drainage is cut in the same way.
- Install the pipes in their designated places.
- A special large gasket is placed on the previously installed studs and pipes; its configuration is similar to a truncated pyramid.
- Place the toilet bowl on the studs, connecting it securely to the pipes.
- Install plastic inserts and rubber gaskets.
- Place and tighten the mounting nuts.
- Cut off the protruding part of the rubber gasket.

After this, you can check the operation of the sewer system by flushing water from the tank into the toilet bowl. To adjust the height of the toilet bowl above the floor, you can change the position of the retractable pins and studs designed to hang the bowl. In this case, they usually focus on the height of the visitor.
The universal height is considered to be a distance of 40 cm from the edge of the bowl to the floor level.
Installation of the flush button
All that remains is to install the flush button. It can be pneumatic or mechanical. This is not a complicated operation, since all connections are already provided on the installation and should already be connected to the corresponding hole on the wall.
To install a mechanical button, you will need to install special pins and then adjust their position. The pneumatic model only needs to be connected to the tedious tubes on the installation, and it will be ready for use.
Installation of a wall-hung toilet with installation: step by step installation do it yourself (video)
Features of the toilet with installation. Recommendations for the correct installation of a wall-hung toilet. Step-by-step instruction. Photo and video.
Before you begin installing the toilet with your own hands, you need to make preliminary markings on the wall and floor.
First, determine the vertical, which must coincide with the axis of the frame. There are three options:
- Separate bathroom without washbasin and bidet. In this case, the vertical runs through the center of the wall on or near which the installation is installed.
- Bathroom with toilet and bidet. Both installations are lined up. And the vertical axes for each frame should be positioned so that they fall in the center of the selected location, taking into account the ergonomics of the bathroom. Under standard conditions, both axes should “divide” the wall into three equal parts.
- Combined bathroom. The vertical line on the wall should pass through the geometric center of the selected location.
The next step is to mark the vertical center of the drain key. For a block system, this is the only reference point, and it is usually located at a height of 1 m above the finished floor level. Therefore, you need to take into account the thickness:
- leveling screed;
- heated floors with insulation and their own screed (if provided);
- finishing layer (tile adhesive plus tiles).
At the frame installation standard height this size (1 m) is specified in the diagram, and it is short, then they are guided by the installation height of a particular model.
Further marking is carried out as follows:
- A horizontal line is struck level in the center of the key or the top of the frame and the installation width is marked on it.
- From these points, vertical lines are drawn down. They continue on the floor parallel to each other and perpendicular to the plane of the wall.
- Mark on each line a distance greater than the installation depth indicated in the passport. The actual size must also take into account the gap from the tank to the wall of 1.5 cm, the method of laying the sewer pipe and its maximum outer diameter at the joints. So, with an installation depth of 12 cm, the minimum distance from the wall to the front surface of the installation is 13.5 cm - if the pipe “goes” under the ceiling, 15.5 cm - if the sewer pipe runs along the wall. And this does not take into account irregularities.
- Connect the marks - this will be the line along which the places where the legs are attached to the floor are located.
- Check the perpendicularity of this line relative to the side wall. If necessary, adjust it, making sure that the shortest distance to the wall is no less than the actual depth.
Marking on the wall for a block installation is much simpler and consists only of marking the attachment points to the wall. In accordance with the diagram and focusing on the recommended height of the flush button, a parallel line is struck from the vertical axis on each side at a distance equal to half the installation width. And on these lines the points of attachment of the frame to the main wall are marked.
Materials and tools
Even when purchasing the installation, you need to check the completeness. In addition to the frame itself, the tank, the inlet valve and the flush elbow must be:
- drain elbow;
- key;
- fastenings and fastening elements;
- plugs for flush and drain pipes (to prevent debris from getting in during operation);
- gasket for mounting a wall-mounted toilet (sound insulation).
In the case when you are installing plumbing fixtures yourself for the first time, it would be good to find out if the seller has spare parts for installation (if something goes wrong). All leading manufacturers produce spare parts and repair kits for installations - pipes, elbows, inlet and flush valves, membranes, seals and transitions. In addition, there should be an assortment different kinds fasteners and fasteners, which can be purchased separately.

You also need to purchase a set of pipes for connecting the wall-mounted toilet to the installation, silicone sealant for the joints of sewer pipes and fum tape for installing a stop valve on a water pipe.
To install a wall-hung toilet with installation, you will need the following tools:
- level, tape measure, ruler, construction corner, pencil or marker;
- hammer drill and concrete drills;
- hammer;
- set wrenches(as well as an adjustable or gas wrench);
- screwdrivers;
- pliers.
If you immediately install a frame from a profile for subsequent sheathing with plasterboard, then you also need a tool for this work:
- metal scissors;
- drill;
- knife or hacksaw;
- screwdriver
Features of installation and toilets installation
As mentioned above, there are three options for “installation and toilet” combinations.
Wall-hung toilet with block design
Easiest for self-installation An option for mounting the system is to install the frame on the surface of the main wall and lay a quarter-brick partition below the structure to provide a reliable support for the wall-mounted toilet. The butt size of a single brick is 12.5 cm plus 1 cm of a vertical joint made of masonry mortar, and the resulting 13.5 cm is just right for most models whose installation depth lies within these limits.
Another option is to purchase a block installation, which includes two special floor supports to “support” the wall-mounted toilet bowl. These supports are placed on the sanitary ware fastening pins, and they do not allow the bowl to “fall” back. Such models include Geberit Kombifix (110.340.00.5). If such accessories are not included in the kit, they can be purchased separately, for example Geberit Kombifix stops (457.888.26.1) or Alcaplast mounting kit (M90).
Do-it-yourself installation of a block installation proceeds according to the following algorithm:
- At the marked fastening points on the wall, holes are made with a puncher, to which the frame is screwed with dowels.
- Drive in dowels or anchors and screw the frame to them.
- Insert the tank into the frame and connect it to water pipe(a water supply tube may be included in the delivery package) and to the flush elbow.
- Screw in the mounting studs to secure the bowl.
- Connect the drain elbow to the sewer through an adapter pipe (from the kit or purchased additionally).
Wall-hung toilet with frame installation
This is the most common version of the hidden installation design - it is suitable for installation near any wall or partition, regardless of its load-bearing capacity.
Installation of the toilet installation takes place in the following sequence:
- Holes for dowels are drilled at the marked attachment points to the floor and wall.
- A cistern with a flush mechanism and a flush elbow is attached to the frame.
- Install the frame and attach the legs to the subfloor.
- It is adjusted in height and horizontal level using retractable support elements. The structure is secured with bolts in the required position.
- Using metal fasteners, the structure is fixed to the wall. Typically these are studs with an adjusting head on the frame side and mounting angles or plates on the wall side.
- Screw in the pins and lock. Install the mounting angles in place and screw them to the wall.
- Adjust the position of the frame vertically by tightening or unscrewing the studs using a head (adjustment depth up to 45 mm). The position of the structure is secured with a lock nut.
- Attach the cuff for the drain elbow to the frame. The elbow is installed, connected to the sewer pipe through an adapter, and fixed to the frame with a clamp.
- Connect the tank inlet valve to the water pipe using the supplied or purchased adapter.
- Attach the studs for the hanging bowl.
- A button and a toilet are temporarily installed. They open the water, test the system for operability, check the tightness of connections and connections.
- If no problems are found, the button and toilet are removed. Close the holes of both elbows with plugs and begin covering the installation.
Note. One of the features of installing a frame installation is the ability to install it on a finished floor surface. In this case, marking and installation are carried out without adjustments for the thickness of the finishing coating layers.
Floor-standing toilet with block installation
One of the low-budget options for using a block installation system is a concealed-mounted cistern without a frame with a front flush button. Moreover, this option can be used for walls made of any materials. The load from a 6-liter tank can be withstood by a half-brick wall or a frame made of metal profile or wooden beam(if the tank is attached to the frame itself or embedded elements).
The only problem that may arise during installation is the alignment of the flush hole of the floor-standing toilet with the flush elbow of the cistern.
Attaching a floor-standing toilet to the installation
Correct installation of a floor-standing toilet on an installation is only possible if the tiles on the floor have already been laid or there is an exact level of the finished surface. In this case, markings are made on the wall by selecting the center of the flush hole in the toilet as the reference point rather than the flush key. And the installation takes place in the following order:
- Select a location for installing plumbing fixtures.
- They mark a vertical axis on the wall. Mark on it the point of connection of the floor-standing toilet to the flush elbow of the cistern.
- The dimensions of the block installation and attachment points are noted relative to this point.
- The tank is secured (in a niche, on the wall, in a frame partition).
- Connect to a water pipe.
- Install the flush elbow.
- They make a sewer line (along the wall, in a grooved channel, inside a frame partition.
- The system and toilet are temporarily connected. Check the operation and tightness of the system.
- Close the flush and drain pipes with plugs, and the studs with tubes.
- The installation is covered with plasterboard (with holes for flushing and draining). Or they seal the niche and grooves with mortar.
- The wall is being finished.
- Connect and secure the floor-mounted toilet.
Installation procedure for a wall-hung toilet
The hanging bowl is installed after the installation for the toilet has been installed and the finishing work has been completed. And depending on the type of installation, installation method and wall materials, there are the following options for preparation for finishing:
- install a block or frame system and cover the entire surface from floor to ceiling with a double layer of plasterboard;
- install a frame or block system and make a box from plasterboard;
- install a frame system in a frame wall;
- install a frame or block system in a niche and or cover it with a layer of plaster.
After the installation and communications are “hidden” under the rough surface of the walls and floor, finishing is carried out with selected materials (tiles or decorative plaster). Then they begin to install the wall-hung toilet.
Note. It is believed that the maximum benefit from the hidden installation of the tank and communications is achieved if the installation for the toilet is installed in a niche.
Niche for installation
A niche is made in the wall for installation if the installation depth of the frame, materials and wall thickness allow such work to be performed. And in addition to the niche in the wall, they also cut channels for water and sewer pipes, which, like the installation, must be installed secretly.
Important. For load-bearing brick walls, this method is not suitable (it is technically impossible to make a niche with your own hands for reinforced concrete walls). And if the vault of a niche can be reinforced with an insert from a metal profile (standard practice for an opening), then this option is not suitable for hidden pipe laying - the chasing of horizontal channels in a load-bearing wall is prohibited at the regulatory level.
And without horizontal strobes, it is extremely difficult to make a hidden wiring - only if the pipes approach the niche from below, and before it are laid in a screed or between a log of a wooden floor.
For a niche in the wall, there is the only option provided by the manufacturer - for a block installation with an attached toilet bowl.
In addition to this option, a bathroom niche is also used, in which there are water and sewer risers. In this case, a frame made of a metal profile is installed in a niche, and a frame installation for a wall-hung toilet is attached to it.
Installation of a frame with a tank in a niche
The complexity of this method is that the installation of the frame in the niche is “non-standard”. The installation instructions of GEBERIT and GROHE do not cover this option, and there are no fasteners for this in the kit.
Installation of the frame in a niche proceeds according to the following algorithm:
- Mark on the floor the installation line of the legs, taking into account the installation depth, the location of the water and sewer risers. The marking should be perpendicular to the walls of the niche or be in the plane of the adjacent surface.
- The verticals on the walls of the niches are set off from this line.
- Reinforced UA50 profile guides are mounted on the floor, niche side walls and ceiling.
- Install the frame in the profile and fasten it to the floor, having previously drilled holes for the dowels.
- Set the height of the legs and the horizontal level of the frame.
- Fasteners (studs or other type of fastening) are made to a specific size for rigid fixing of the installation to the “far” wall of the niche. Drill holes for these fasteners and attach the frame.
- Cut a section of the UA profile to the width of the niche. Attach it to the side profiles and frame.
- Install flush and drain fittings for a wall-hung toilet. Install studs to secure the bowl. Connect the tank to the water supply and the drain elbow to the sewer. Temporarily hang the toilet and connect it to the installation. Check the system for leaks and operability.
- Remove the tank, close the flush and drain holes with plugs, and the toilet studs with protective tubes. Attach plasterboard cut to size to the profiles in two layers.
Sewage supply
Supplying water to the toilet installation does not cause any difficulties. And with any tank connection (side or top), it is always possible to lay a half-inch rigid or flexible pipe. With connection to the sewerage system the situation is more complicated. The diagram for the installation shows two types of connections:
- the knee goes down at a right angle;
- the knee is rotated 45° in the plane of the frame.
Based on these options, in most cases, the connection of the installation to the sewer was built.

The first option, for example, is used for direct connection to the drain, when the frame is in the same niche with it. The second option is used when laying a drain pipe to the riser along the wall.
But there are cases when both options are not suitable due to the limited space and the peculiarity of the geometry of the bathroom - large diameter Rigid pipes and fixed elbow angles make it difficult to do this correctly. And in order to solve the problem of how to turn the sewer elbow from the installation and provide the required angle of inclination, for example, corrugation D 90/110 MM FLEXI from ALCAPLAST is used. But in this case, it is necessary to check the slope of the corrugation.
Connecting communications
For connection to the water supply, the installation kit includes an inlet valve with an external outlet for a ½ inch pipe and an angle shut-off valve inside the installation.

Installations of toilet bowls with a bidet function provide for the supply of an additional tube to the fitting for intimate hygiene. And to ensure comfortable temperature, such models are also connected to the electrical network to heat water, which is used for washing. And for this purpose, fastenings are provided for mounting the protective tube of the electrical wiring.
How to check the system for functionality
After connecting to communications, before sewing up the installation, it is necessary to check the operation and the system for leaks. To do this, pre-install the toilet with the following installation:
- adapters with cuffs and sealing rings are inserted into the flush and drain holes of the installation;
- “put” the toilet on the studs and move it as close as possible to the installation so that the adapters fit more tightly into the toilet (it won’t be possible to push it in tightly - the pipes are too long);
- open the shut-off valve on the inlet valve;
- when the tank is full, drain the water (for pneumatics, you need to connect the button and flush valve with tubes, for mechanics, activate the flush valve rod by hand).
After checking and fixing possible malfunctions The toilet bowl, adapters and button are removed.
How to install a wall-hung toilet to an installation
Even when choosing a location and marking, it is ensured that the height of the wall-hung toilet from the floor without a lid is 40 cm. But if after laying the tiles it turns out that it will hang 2 cm higher or lower, this is acceptable.
The wall-hung toilet is mounted on studs after adjusting the size of the adapter pipes for connecting the toilet drain and flush to the installation:
- Remove the protective plugs and tubes.
- Insert the adapters into the elbows and mark the level “0” on them - the plane of the surface of the installation cladding.
- Then insert the adapters with the other side into the toilet (put a sealing cuff on the flush bowl). Mark level “0” on the toilet.
- The adapters are shortened by the difference between the two marks.
Place a gasket on the studs (it serves to protect the finish and dampen structural noise during flush operation) and begin installing the wall-hung toilet on the installation:
- Rubber bushings are inserted into the holes for mounting the wall-hung toilet.
- Insert adapter pipes into the drain and flush holes of the bowl.
- Place the wall-mounted toilet on the studs so that the transition pipes fit exactly into their holes on the installation, and the bowl fits tightly to the wall.
- Place elastic washers and steel washers on the studs and tighten the nuts.
- Before finally tightening the fasteners, you can slightly adjust the horizontal level relative to the height of the toilet from the floor.
Installation of the flush button
According to the principle of operation, there are two types of toilet flush button: mechanical and pneumatic.
Even at the installation assembly stage, a flush valve is installed. Each company has its own design, but the principle of operation is common:
- a mechanical button activates the flush using a pull rod, separate for each key - economy mode and full flush;
- For a pneumatic flush, two tubes go from the valve to the button - for each mode there is one.
Installation of the flush button begins with its connection to the flush valve. For a mechanical drive, the rods (pins) must be “adjusted” in length and each connected to its own key, while for a pneumatic drive, the tubes must be connected.
Then the button is “snapped” into the socket.
Common Difficulties
The main problems arise due to the limited size of most bathrooms. This is especially true for strictly residential buildings, when in addition to the small “dimensions” there is added poor geometry of the room - the absence of right angles and parallels in the enclosing surfaces. In this case, even the slope of the wall is checked before installation. And leveling the walls further reduces the room for “maneuver” when installing the installation under the toilet.
Helps you avoid mistakes and rework right choice type and model of installation, as well as accuracy of marking, frame location and compliance with the installation diagram.
And the main condition is careful handling of mechanisms and sanitary ware. Even “tightening” the fastenings of the intake and exhaust valves or the hinged bowl can lead to a violation of the tightness of the connections or damage to the device itself.
What is important to know. It is necessary to buy installations and plumbing from reputable brands. It is better to do this with dealers or trading companies that have appropriate agreements with service centers and provide a guarantee for the purchased product. In addition, if necessary, you can buy additional accessories or a repair kit for the selected installation model from such sellers.


