Everyone knows that a drill in the household is very useful and universal tool. If you have a drill at home, you can hang a picture on the wall, fix furniture, fix a row necessary items. But what if there is no drill at home, and constantly asking neighbors is already somehow inconvenient?
You can buy it in the store, but the device is very expensive. And you can assemble a mini-drill with your own hands based on improvised materials that are in almost every home. How to do this, we will tell in this material, presenting to your attention several simple ways assembling a mini-drill with your own hands at home.
Mini drill from electric chuck
 The first version of assembling this device with your own hands is based on using an electric chuck. which can be purchased separately, or taken from the light bulb. If you buy it, then it is very inexpensive, but this cost will be justified.
Also, to assemble a mini-drill with your own hands from a cartridge, you will need the following things:
- motor;
- jar from soap bubbles;
- construction knife;
- insulating tape;
- hot glue;
- soldering lamp;
- household switch.
Body and core of mini drill
Work must begin with the preparation of the body of the mini-drill, which will serve soap bubble jar. This is done like this:
- Get the lid off the jar. For this purpose, we heat the soldering iron and use it to make a small hole in the lid of the jar.
- The diameter of this hole should be slightly larger than the diameter of the drill base.
- The bottom of the jar must be completely cut out.
Let's start working with the core:
- We connect the cartridge with the motor. Most often, motors are taken from already used different tools.
- Before the bonding process, the motor must be completely degreased with acetone.
- The cartridge can also be degreased, but it is not necessary to water it like a motor with acetone. A normal wipe will suffice.
The bonding method is through cold welding . If this method does not suit you, you can also use hot glue. Remember that the more complex your future mini-drill is, the more seriously you will need materials to assemble it yourself.
During landing for welding or glue, you need to work very carefully so that everything turns out as smooth as possible. Redoing the work later will not work, keep this in mind.
You also need to consider the following:
- at the attachment point on the cartridge there is a hole that must be covered before connecting the parts;
- putty is carried out using simple plasticine;
- only holes need to be filled with plasticine; it should not remain on top of the cartridge.
Manufacturing process
When you have prepared the body and core, you can proceed directly to assembling the drill with your own hands:

A ready-made mini-drill is good in that it can work both on batteries and on electric power. We considered the assembly option universal model .
Naturally, without having the skills to work with electricity, it will be extremely difficult to assemble such a drill with your own hands. Below we suggest that you consider assembly options for simpler drills for small household needs.
How to assemble a drill based on the handle body with your own hands
 One of the options the simplest drill- This makeshift fixture based on a regular ballpoint pen.
To make it, you will need the following materials: automatic ballpoint pen; drill with the required diameter; hot glue; a strong stick with handles on the end, with which it can be rotated.
Pay special attention to the choice of a handle for the manufacture of a future drill, and specifically, its body, since during operation the main load will fall on the body.
The requirements for the body of the pen are as follows:
- it must be as strong as possible to withstand the load;
- the best option is a case based on high-quality metals;
- if you don't have a pen with a metal body, choose a pen based on thick plastic.
The build process looks like this:
- Dismantle the handle until only one body remains of it.
- The lower part of the case, where the writing rod usually sticks out, needs to be unscrewed.
- Instead of this part, insert the drill into the body in such a way that its working part sticks out from under the bottom part, and the second part is inserted into the hole that is in the stick.
- The stick is inserted into the body at the same time as the drill.
- In order for the drill to be integral, it is fixed to the body wall with hot glue.
- When you turn the mechanism for special handles, the drill will rotate, providing the right job by pressing on the handle.
Making a drill based on a toothbrush
 Electric toothbrushes are very convenient to use, but impractical in the sense that the bristles cannot be changed after use, this expensive device, like a simple brush, has to be thrown away.
But you can not do this by using electric brush body for making a drill with your own hands.
We take an old electric brush and cut everything on it to the body. Next, you need to connect the motor shaft to the drill using a collet clamp, which must be purchased separately.
When buying a collet clamp (or chuck), be sure to find out in advance what shaft the motor has in the brush in diameter. Motors differ from each other in the diameter of the mounted shaft.
The collet clamp is inexpensive and can be purchased at the radio market or in a specialized online store. It includes chuck and replaceable drill bits nozzles with different diameters that are inserted into the cartridge.
The most difficult thing in this case is to put on the brush engine Collet clamp. The cartridge is designed for a shaft of 2 mm, and the motor here has less. To do this, each screw for fasteners must first be turned before giving it cone-shaped. so that you can adjust the minimum diameter of the chuck mount to the diameter of the motor shaft.
Of course, a mini-drill with your own hands can be assembled not only based on brushes or old pens. but also other devices, folk craftsmen daily come up with new ways to homemade assembly. However, the options discussed above are suitable even for those who have never encountered such a thing and are assembling such devices for the first time in their lives.
What is wrong with collet chucks made of brass, with which many radio amateurs drill printed circuit boards? Of course, beats. This root of evil has two branches: the beating of the shaft and the beating of the collet. The first is due to the poor centering accuracy of the cartridge itself, the second is due to a crooked cut for drills. Of course, you can put up with this until you get bored.
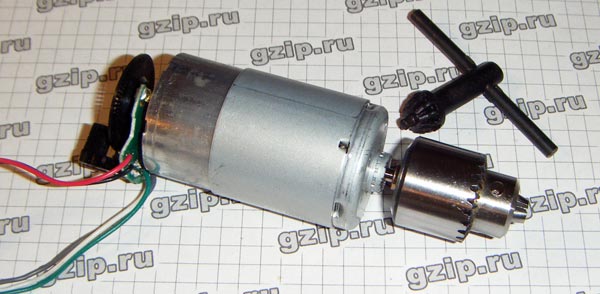
Friends of radio amateurs, the Chinese, offer very good things on Aliexpress. For example - a chuck for a mini drill. Its difference from the collet is that it is not a collet. Made of steel, it is arranged like cartridges on conventional drills. And yes, it comes with a key.
The manufacturer writes that the chuck can clamp drills from 0.3 to 4 mm and sits on an axis with a diameter of 3.17 mm. How so? The answer is simple. A brass cone is mounted on the axis of the motor. He sits down, of course, with the help of heating: heated, installed, beaten - ready. The cartridge itself sits on this cone, also not without the help of a hammer. No alignment adjustments with bolts, everything is strictly coaxial, clamp the drills and drill the printed circuit boards.
“Where can I find a motor with a 3.17mm shaft?” you ask? It turns out that this is one of the standard diameters of "their American" shafts, 1/8 inch. You can find one in any office equipment - printers, scanners, copiers, bill readers.
They send the cartridge in an oiled form, while it is put in a bag. The key is also oiled and is also in the bag. This whole set is in a plastic container, which, of course, inspires. The quality of workmanship is excellent. The cone after heating easily sits on the axis, the cartridge on the cone too. You can't do without a hammer, yes. When rotating, there are no beats - except that the drill is crooked. A small key for working with a cartridge causes tenderness and joy for Chinese turners. This miracle costs 250. Take it and drill. The difference with the collet chuck is felt immediately. In addition, there is no need to change these very collets for different drills.
For motors with thicker shafts, there is another cone adapter.
Auto homemade Homemade products for summer cottages For a fisherman, a hunter, a tourist Construction, repair Homemade products from unnecessary things For a radio amateur Communications for home homemade furniture DIY light DIY craft Home crafts for business DIY crafts for the holidays DIY crafts for women Origami Origami Paper crafts DIY crafts for children Computer DIY crafts DIY crafts for animals Home doctor Food and recipes Experiments and experiments Useful tips

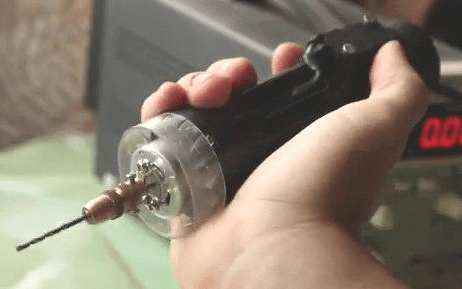
It will take no more than 15 minutes to manufacture such a holder for small diameter drills, replacing the micro chuck. Despite its simplicity, it securely fixes the tools, and most importantly, ensures the complete absence of beats at any speed.
The material of the only element of the ultra-simple "cartridge" is plastic (plexiglass, ebonite, textolite).
In a cylindrical workpiece, a hole is drilled from the end with a diameter 0.5 mm smaller than the shaft of the electric motor microdrill selected as the drive. Then, with a drill of the exact size, clamped in a vise, the channel is, as it were, deployed.
Rice. 1. Mini drill chuck from 1 part: (1,2,3 - the sequence of operations, 4 - an adapter with a Morse taper for the chuck.)
Having put the workpiece on the motor shaft, voltage is applied to it (all further work is carried out with the electric motor turned on) and with the help of a scalpel and files, the part is turned from the outside. After the centering recess is formed, a hole is drilled for the tool shank. With a stationary drill and a rotating workpiece, the alignment of both channels is ideal.
In the finished holder, the tool is mounted on glue. Useful for each small drills equip your own "cartridge". It is not difficult to carve an adapter with a Morse taper for cartridge No. 1a.
A. Marievich, Voronezh
Assembling a mini drill
Mini drill - indispensable tool when working with printed circuit boards. The store has a wide range of these devices, but they are easy to make yourself, because everything you need for this can be found in any home. You will need:
- Motor from the car radio (suitable for a hair dryer or a child's toy);
- Chuck or collet (clamp for drills);
- Power supply or battery;
- Housing made of plastic or metal;
- Hot melt or cold welding;
- Drill;
- Wires.

Build Mini Drill + (Video)
First of all, it is necessary to attach a cartridge or collet to the motor shaft. To do this, before buying a collet, measure the motor shaft, they come in two sizes - 1.5 and 2.3 mm, and buy the appropriate part. Secure the chuck with hot glue to prevent excessive vibration. When using cold welding, work very quickly, it freezes almost instantly.
In the prepared case (for example, a plastic cylinder with a lid), cut off the bottom, you will need to insert a motor here. Poke holes in the cap for the wires to come out. If this is a case from a lantern, then this perfect option with ready-made output points.
 When you put the motor with the cartridge into the housing, check whether it sits tightly there, because during operation the slightest vibration will affect the quality. If necessary, put on glue or cold welding.
Solder the output wires to the power supply or battery, be sure to isolate the connection points. For convenience in work, a button for turning off can be soldered into one of the wires. On this side, the case from the flashlight has another advantage - there is a ready-made hole for the button.
If the drill turns in the wrong direction, reverse the polarity of the wires. In case of strong vibration, check the tightness of the collet or chuck.
Mechanical Mini Drill + (Video)
If you, in addition to electronics, are also fond of fishing, then in your house there will certainly be  old fishing rod with spinning reel. It will serve as the basis for a mechanical mini-drill.
First, remove the spool from the reel, it is fastened with a screw on the shaft. Next, measure the length of the shaft and compare it with the length of the chuck bore. If the shaft is longer, cut it to fit the chuck bore. Place the chuck (or collet) onto the shaft using hot melt adhesive or cold welding.
For the convenience of work, it remains to redo the coil handle, it is long enough and will interfere with the speed of drilling. Saw off part of the long knee of the handle, and fasten the handle directly to the remaining segment. It is fastened with a rather easily riveted metal pin.
Your power drill is ready to go.
Another modification of the mini drill
Consider the version of creating a mini-drill with your own hands using an antiperspirant container as a body. To get started, choose a motor that is suitable in size, a cassette from a tape recorder is the best option.
 Cut a hole in the case for a button (use the switch from an old carrier as a button), cut off the bottom and make a suitable outlet for a chuck or collet in the lid.
Insert a motor with a fixed cartridge into the body with wires to the cut bottom. If you have chosen the dimensions of the motor for the dimensions of the body, no glue is needed. Put on and screw on the lid.
It remains to connect the button and the power supply. After all the circuits are closed, fix the button in the hole made.
DIY materials for a mini drill
There are many alternatives using your inventive skills to create a mini drill with your own hands. The reasons for creating such tools can be: 
- DVD drive;
- Motor from an old electric razor;
- Tooth electric brush;
- Glue gun handle with suitable motor;
- Non-working screwdriver;
- washing machine motor;
- Old hair dryer;
- Plastic pipe.
All these seemingly unnecessary little things can do a good job and become the main detail for creating the necessary tool.
Important! When working with a homemade mini drill, try to keep the drill perpendicular working surface. This will protect the drill from breakage and prolong the life of your device.
How to make a mini drill chuck + (Video)
For homemade cartridge You will need a piece of metal or textolite pipe, the diameter of which is suitable for the motor shaft. The length of the homemade sleeve should be at least 2 times the length of the shaft and allow the drill to be securely fastened.
You can fix the sleeve with screws or hot glue. As a rule, the motor shaft has a diameter of 2-5 mm, and the drills for making boards have a smaller diameter. This means that it is necessary to fill the resulting space with filler and achieve alignment of the drill and shaft.
Take rosin as a filler and pour it into the hole of the sleeve. Melt the rosin with a soldering iron and insert the drill. The rosin will harden and hold it securely.
To achieve perfect alignment, melt the rosin again and turn on the power. While the rosin is not frozen, try using tweezers to correct the position of the drill. If necessary, repeat the operation again.
(1 ratings, average: 5,00 out of 5)
Assembling a mini drill with your own hands
The main purpose of a mini drill is drilling printed circuit boards, plastic, wood and some other non-hard materials. Compactness and efficiency have allowed this tool to become one of the main assistants for the home master. And it is not necessary to buy finished tool- a home-made mini drill does its job just as well as its factory counterpart.
What can be made
You can make a mini drill with your own hands using engines from various improvised means.

Device manufacturing algorithm
The collection takes place in 3 stages. Let's take a closer look at each of them.
Making a mini cartridge
In order to assemble a mini drill chuck, you need to purchase a collet - a special mechanism designed to clamp cylindrical objects. Next, you need to connect the motor to the contacts of the future battery, which will power the device during operation.

If your drill spins in the wrong direction, swap the location of the wire contacts.
Finding a drill of the right size is not difficult. Insert the drill bit into the collet body and clamp firmly. Next, the finished nozzle must be installed on the motor housing. The collet must fit snugly on the motor shaft. Otherwise, you cannot avoid vibration. The cartridge for a homemade mini drill is ready.

Nozzles for a homemade mini drill can be purchased at any hardware store. Before buying, make sure that they fit the diameter of the collet.
Hull preparation
As a housing for the future device, you can use both an antiperspirant container and an ordinary hollow tube of a suitable size. If you are using a simple hollow tube. it is necessary to cut off the bottom and insert a rubber or other plug in its place. If you are making a device from antiperspirant housings. a hole must be drilled in the cover for the drill to exit.

Connecting elements
WITH reverse side engine needs to be installed. If your motor does not fit in size - pick up another tube. The fit must be very tight to avoid vibration during shaft rotation. After that, it is enough to tighten the bolts on the collet and connect the resulting device to the mains.

One of the main disadvantages of collecting a drill with your own hands from a motor is less power compared to a standard device, and low drill strength.
If your job requires a cutter, you can easily make your own from an old lighter. To do this, remove the rotating drum from the lighter and put it on a bolt of a suitable size. Secure this with a nut and insert into the collet hole. The surface cutter is ready!

If for any reason cartridge does not fit to the cylindrical shaft of the motor or coil, it is necessary to degrease it well and then put it on hot glue. This will help to obtain a stable and durable structure.
Such a mini drill with purchased attachments can do the job of minor repairs technical means, drilling plastic, thin metal and making crafts.
The main advantage that a self-assembled mini-drill differs from standard products is its compact size and the ability to obtain electrical equipment without significant costs, effort and time. It is easy to make such a homemade tool at home, because it does not require special skills or super-complex devices. To get a high-speed drill or other devices for making crafts, House master should only be "friends" with and pliers, be able to perform simple technical operations.
Drill Making Instructions
In the manufacture of small things, decorative and other products, a compact drill, engraver, etc. hand tool very convenient, so it remains indispensable in the home workshop. With the help of such equipment, it is possible to drill and process products made of wood, plastic, textolite and other durable materials. You will also need a microdrill when drilling printed circuit boards.
For the manufacture of drilling equipment, a suitable chuck and a housing of suitable sizes (plastic container) are selected. To rotate the work surfaces, you need to pick up an electric motor and a power supply, for which you can disassemble an old hair dryer or other electrical equipment.

To learn how to make a mini drill, just read the following list of recommendations:
- First you need to fix the cartridge on the shaft of the electric motor, for which you will need adhesive materials ("cold welding"), which ensure the reliability of the connection of metals.
- You will have to work very carefully, since the adhesive materials quickly set, which eliminates the possibility of eliminating errors and correcting the connection.
- After fixing the cartridge, it is better to cover its surface with a special heat-resistant adhesive, which will ensure the tightness and strength of the connection.
- On the case, you must first make a hole for the switch (better push-button).
- The drill will be more functional with a reverse mechanism, which is implemented using a six-pin switch.
- When connected to a power supply, you will need a 12 V power supply or a battery (2-3 pieces) for a similar voltage.
Having assembled a mini-drill with your own hands into a single structure from individual parts, you can turn on the power and make test drilling.
Collet assembly
 To fix the drills in the drill, you will need a special collet or chuck in the form of an adapter with clamps for drilling tool. Attach this mini drill chuck directly to the motor shaft. A self-made collet clamp allows you to work with drills with a diameter of 0.7 to 3 mm. The more carefully and accurately this element is assembled, the more accurate the drilling will be.
It is important to choose the right cartridge, so if you cannot find suitable option better take it independent production. This does not require lathe, because it is enough just to pick up a screw and a closed nut with an M8 thread. When assembling the cartridge, proceed in the following order:
- Drill a 2mm hole in the screw head and nut.
- Make axial cuts with a hacksaw for metal.
- Expand the holes with a 3.5 mm drill.
- Turn the nut to a tapered shape.
Having thus assembled a mini-chuck for a drill with your own hands, you can proceed to install it on a drill. If necessary, then select similar cartridges for drills of any diameter.
DIY mini drill
 Drills are used by modelers, home craftsmen and lovers of making small parts or decorative elements. The presence of a flexible shaft in such a device allows you to work with the most small details and process surfaces of complex shapes (grinding, polishing, cutting, applying patterns). Assembling such a machine is as simple as making a drill with a mini-chuck for drills up to 3 mm in diameter. To do this, you need to find the main component - an 18 V electric motor, which can be taken in a screwdriver or blender.
The procedure will be as follows:
- Disassemble blender by removing top cover and cover by unscrewing the fixing bolts.
- Remove the wiring diagram, power cable and the part that is above the rotator from the housing.
- Remove the tip on the motor shaft, remove dirt from the housing and shaft.
- Choose a cartridge according to the size of the shaft (you can most accurately measure the diameter with a caliper).
- Fix the chip and the on / off mechanism.
The assembled tool can be connected using a cable to a regular outlet. Rechargeable batteries or regular batteries, which will have to be replaced periodically, are also suitable as a power source.
Flexible shaft for dremel or micro drill
You can transfer rotation to interchangeable nozzles using a device such as a flexible shaft made of durable twisted wire with a protective metal coated. For self assembly This device will need a few simple things:
- brass or copper tube;
- bushings with metric thread M4 (2 pcs.);
- metal shaft from a 5 mm electrode (M5 thread);
- adapter for thread 0.75;
- mini-chuck for quick fixation of the cutting tool;
- metal clamp (M12 bolt with a hole along the axis);
- protective coating of the junction.
To assemble the flexible shaft, an electrode is placed in the tube and fixed with bushings. On one of the bushings, you need to fix the adapter with the cartridge, and on the other, install a clamping device for connecting to the flexible part. After all these operations, brass or copper protection is fixed. Installed on the cartridge plastic handle on a collar that simplifies work with the tool.
Dynamo from printer drive
 You can make a micro-dynamo yourself if you disassemble your old printer. Such a portable device will be able to convert mechanical rotation into electrical energy, which occurs under the action of magnetic induction in a closed circuit. This homemade product allows you to get the simplest generator at home direct current, which is useful for powering small electrical appliances, charging mobile phones, tablets and other equipment. You can use a small dynamo to led lighting, bicycle light with connection to a single-phase circuit.
Like a do-it-yourself bur or a microdrill, a dynamo is assembled from improvised means that can be found at home. An example set looks like this:
- electric motor;
- belt drive;
- non-slip handle;
- base made of wood or other durable material;
- capacitors with a capacity of 10,000 microfarads (4 pcs.) and a diode (1 pc.);
- wires, fasteners, metal corner.
 The only condition for a successful assembly of a dynamo is the selection of appropriately sized and fully functional components. All the parts you need for this can be found in any home printer. Before assembling the dynamo, it is better to make a drawing in advance and get a clear idea of the location of each element.
The device is assembled in the following order:
- Connect the capacitors in parallel.
- Bring the phases through the diode to the electric motor, and connect the zero to the zero of the motor.
- Attach the device to the base.
- Install gear with handle.
- Pull on the drive belt.
When assembling the structure and connecting the contacts, polarity must be taken into account.
Micro motor at home
Compact electric motors are used by modelers and fans of various small handicrafts with an electric drive. Such a device is the most common DC motor with a brushless circuit. For the manufacture of this device, a vibration platform from a mobile phone is suitable, and as a shaft, you can choose a thin drill (up to 0.29 mm), which is wound in two layers copper wire.
The procedure for manufacturing an electric motor is as follows:
- Coat the winding with epoxy.
- Fix the electromagnet.
- Fix the PTFE bushings on the electromagnet.
- Install the entire structure under the winding.
For complete readiness, you need to mount the valves and connect using a five-input microchip.
A description of what can be made from a drill or an old printer will help you assemble quite complex devices at home that are needed by craftsmen, modelers and just lovers of crafts. Knowing how to make a do-it-yourself collet clamp or make an electric motor, you can save a lot, because all these products are made from end-of-life devices and parts. All costs are reduced only to the time allocated for assembly.
The question of how to make a do-it-yourself collet is relevant for those who are engaged in jewelry, engraving or printed circuit board manufacturing and use such equipment. It is the specialists of these categories who most often encounter a breakdown of the collet clamp, which can be replaced with a new serial model or made by hand.
There are several manufacturing options collet chuck with their own hands, each of which differs in certain nuances. However, no matter what method was used homemade clamp, its price will compare favorably with the cost of the serial model.
Homemade collet-coupling of the simplest design
The simplest collet, working on the principle coupling, can be made of steel wire with a diameter of 1 mm. It should be borne in mind that the collet of the proposed design is not a universal clamping device and can only be used for drills of the same diameter. At the same time, it is important that the transverse dimension of the drills used correspond as closely as possible to the diameter of the output shaft of the drive motor. In addition, it is important to consider that such a collet can only be used when drilling materials with low viscosity.

For the manufacture of a collet coupling of the proposed design, the following will be required: Consumables, fixtures and tools:
- a cylindrical blank made of metal, the diameter of which corresponds to the diameters of the output shaft of the electric motor and the drill;
- steel wire;
- electric soldering iron;
- flux for soldering.
The very process of manufacturing a collet chuck for a microdrill is performed according to the following algorithm:
- The wire is wound around the blank in such a way that a rigid spring is formed. It is important that the coils of the spring are as close to each other as possible.
- The finished spring, without removing it from the blank, is carefully soldered.
At one end, such a collet-coupling is put on the drive motor shaft, and the drill used is inserted into the hole in its free end.
The simplest collet can be made by hand and in a different design. The design of such a cartridge, the cost of manufacturing which will be very low, consists of two halves fastened with a screw. On inner surface each of these halves is machined with cylindrical grooves, which, when the screw is tightened, provide fixation of both the clamp on the drive motor shaft and the tool used. Having decided to make such a collet clamp with your own hands, keep in mind: in order for it to work correctly, you must always balance it before using it.

Cam chuck for micro drills as an alternative to collet chucks
In order not to think about how to make a collet chuck or a clamp with your own hands, you can purchase a cam chuck to equip your microdrill. Such a clamp is an analogue of the cam chucks used to complete conventional electric drills, and works on a similar principle. When the movable cage rotates on the body of such a device, the cams with which it is equipped move and thereby ensure a secure fixation of the tool.

To equip the microdrill today, a wide variety of inexpensive cam clamps are offered. The overwhelming majority of their models are fixed on the drive motor shaft using a threaded hole on the side of the landing part, into which a screw is screwed. Rotation of the cam clamp holder depending on specific model can be carried out both manually and with the help of a special key, which is necessarily present in the factory kit of this device.
Purchasing a chuck is good opportunity for little money, equip your power tool with a universal clamping device that is convenient to use and provides reliable fixation of working nozzles. The main thing to pay attention to when choosing is the material from which the main working elements of the clamp are made. If you choose a chuck whose jaws are made of durable high-carbon steel, then it will last much longer and will provide accurate fixation of the tool used.
In order to save money and have no doubts about the efficiency and reliability of electrical equipment, modern craftsmen have gotten the hang of making power tools at home. With your own hands, today, you can assemble a hand-held micro-electric drill, a high-frequency drill, and more. How to make rotary tools and accessories for them - read below.
DIY hand drill: instructions for making
A small electric drill is needed for anyone who makes electronic crafts or does fine decorative work. This machine is ideal for small jobs for wood, plastic and metal, PCB drilling.
You can assemble a mini-drill at home from a cartridge, a jar of soap bubbles, a motor for rotating the cartridge, and a battery.
The motor can be taken from a hair dryer or a grinder. Suitable for making crafts and an electric motor from a VCR, an engine from an old cassette recorder.
To make an electric mini drill you need:
- Connect the chuck to the motor. This is best done with cold welding. But you need to work quickly and accurately: welding quickly hardens and becomes as strong as iron. To remake the connection, in case of failure, will not work.
- Place cartridge in jar. For better fixation, the cartridge must be treated with hot glue.
- Make a hole in the second base for the switch. It is better if the turn off will be small, keyboard.

The hand drill is ready! It remains only to solder the wires from the motor and power to the switch, observing the polarity. To power a mini drill, 9-12v batteries will be enough. Additionally, you can make a reverse on the six-pin switch.
DIY collet chuck
A collet (or clamping) chuck for a mini drill is an adapter device used to clamp drills that is attached to the output shaft of the motor. The mini-chuck allows the use of drills with a diameter of up to 3 mm. The smallest homemade drill can work with drills with a diameter of 0.7 mm.
The quality of the drill depends on the quality of the chuck and the fastening of the drill to the motor.
Therefore, the choice of clamp should be approached with all responsibility. And if a quality device cannot be found, it can be easily made. In this case, it will not be necessary to use a lathe. In order to make a clamp, you only need an M8 screw and an M8 closed nut.
We make a collet clamp for a mini drill:
- We drill a hole with a diameter of 2 mm in the head of the screw;
- We take a hacksaw saw and apply two axial saws to the screw body;
- In the closed nut, we drill a hole with a diameter of 2 mm strictly in the middle;
- Using a larger drill, we expand the hole in the closed nut to 3.5 mm;
- We make a cone from the nut by connecting it to conventional drill and sanding with sandpaper.
The collet is ready! Now you can insert a drill of a suitable size into the bolt and screw on the nut. In order to make it convenient to use a drill, you can make such a collet for each micro-drill. It will help to do high-quality work and a special bed for a drill.
Do-it-yourself drill for small jobs
The drill has long ceased to be an exclusively professional dental tool. Today, a drill with a flexible shaft is actively used to perform small decorative works, grinding, polishing, cutting various products.
You can make a rotary drill with your own hands like a mini drill.
At the same time, it should be noted that for high-quality homemade work, you will need a sufficiently powerful motor. So, for powering drills, an 18V motor from a screwdriver is perfect. The easiest way is to make an engraver from an old blender.
To make a drill you will need:
- Disconnect the top of the blender from the working;
- Using a clerical knife, remove the rubber pad on the button, and unscrew the bolts located under it with a screwdriver;
- Using a screwdriver, from the side of the power cable, pry off the top cover of the case, and carefully remove it;
- Remove the circuit connected to the power cable from the blender body;
- Remove the plastic part located above the rotator from the housing;
- Remove the plastic tip from the motor shaft;
- Measure the diameter of the shaft with a caliper (if not, then a stationery ruler is also suitable for this purpose);
- Clean the motor housing from oil and degrease its surface with an alcohol wipe;
- Slide a collet of the appropriate size onto the shaft;
- Replace the power buttons with a push mechanism that controls both turning on and off the device;
- Assemble the blender.

Hand boron is ready! The power supply of such an instrument will be carried out through power cable with a fork. You can also power the tool with batteries, but then the batteries, from time to time, will have to be changed or charged.
DIY flexible shaft for a drill
If you need to transfer the rotation of the motor of an engraver, drill or bur to a nozzle, then you will need a flexible shaft. This device consists of a wire enclosed in flexible armor, twisted in several layers, and
can significantly expand the functionality of the rotary tool. You can assemble the flexible shaft yourself.
For this you will need:
- brass tube;
- Two threaded M4 bushings;
- Electrode shaft (diameter 5 mm) with M5 thread;
- adapter with internal thread M5 and outer M8 by 0.75;
- Keyless mini chuck;
- Clamp from an M12 bolt drilled along the axis;
- Protection for the connection.
We assemble the flexible shaft. To do this, we insert the shaft from the electrode into the brass tube and put the M4 bushings on both sides of the tube. On one side of the tube, we wind the adapter onto the sleeve, and onto it - a mini-cartridge. On the reverse side of the tube we have a clamp with which we connect the shaft from the electrode to the flexible one. For convenience, you can grind off the heads of the screws on the clip on the emery. We put a special brass protection on the clamp, and fix it with fasteners. Isolate the connection. The flexible shaft is ready! For convenience, a clamp with a plastic handle can be placed on the side of the cartridge.
How to make a dynamo out of an old printer motor
A dynamo is a device that converts mechanical energy into electrical energy. The operation of the dynamo is based on the principle of electromagnetic induction. That is electricity occurs in a closed circuit of the device when the flux of the magnetic induction vector penetrating the circuit changes with time.
In other words, a dynamo is a simple DC generator.
In everyday life, a dynamo can be used to charge audio and video equipment, a smartphone and other low-power gadgets (for example, fitness bracelets, tablets, a toy robot, etc.). In addition, the device is perfect for powering bicycle headlights, LED strips, flashlights and other devices powered by single-phase networks.
To assemble a homemade product you will need:
- Motor (electric motor) from an inkjet printer;
- Belt and gear from the same device;
- Handle with comfortable, non-slip handle;
- Two small wooden bases;
- Four 10,000 uF capacitors;
- Diode;
- Metal corners and fasteners;
- Wires and solder.

Making a dynamo is pretty easy. To do this, you need to connect the capacitors in parallel, output the phase from the capacitors through the diode to the electric motor, and connect the zero of the capacitor through a jumper to the zero of the electric motor. Wires for connecting electrical appliances should be removed from the capacitor connected to the diode, observing the polarity. After that, you should put the entire structure on the base, fastening the electric motor to the second wooden plank so that the pulley sticks out of it. On the side of the pulley, place the gear with the handle, and fit them with a belt.
DIY micromotor
Micromotors are widely used in the construction of small flying objects (for example, models of microhelicopters and airplanes). The micromotor itself is a brushless DC micromotor.
You can make a micromotor from an electromagnet from the vibration platform of an old mobile phone.
For the rotor axis, you can use a drill with a diameter of 0.29 mm. To make a motor, you need to carefully wind copper wire around the drill in two passes. The length of the winding must be several mm longer than the length of the electromagnet.
After that you need:
- Apply to the winding in a thin layer epoxy resin for bonding metals, and put an electromagnet on it;
- Make two bushings from PTFE, and put them on the electromagnet from both sides;
- Put the structure on the guides under the winding, and wrap it with copper wire.
The micromotor is ready! It remains to install valves on it, and connect it to power through a microchip for 5 inputs. Crafting Instructions interesting crafts from motors offers Roman Yursi on his channel.
Do-it-yourself drill (video)
Household electric homemade products are a guarantee of reliability and durability of power tools. In addition, this is a good opportunity to save money, because, often, for assembly household tool requires a minimum of parts that are easily found in everyday life or the nearest store. Use the instructions presented in the article, assemble rotary household electrical appliances with your own hands, and enjoy their quality and affordability!
A collet chuck is a type of lathe chuck. They hold the part during its processing at high speed. There are several views for different part shapes, types of processing and purpose. A collet chuck, unlike keyless chucks (BZP), does not require accessories: studs, screws or stoppers. Therefore, its second name is self-clamping. This simple and reliable device is widely used in lathe equipment. The most common type of collet is ER.
Types of chucks
In turning, drilling and milling machines for metal, chucks with a mechanical or manual clamping of 2, 3 or 4 jaws are used. Self-centering 2-jaws are used in the manufacture of shaped castings. In 3-jaw, hexagonal and round blanks with a Morse taper are attached. And when processing asymmetrical, rectangular or bars, 4-jaw sets are more convenient.
All clamps are divided into the following categories:
- lever;
- collet;
- drilling (quick-clamping, BZP);
- wedge;
- hydraulic cartridges;
- membrane;
- thermochucks;
- 3-cam;
- 4-jaw.
The self-clamping drill chuck is used on universal or special lathes. Their device allows you to transfer the clamping force more strongly with a torque much less than spiral cartridges. The structure is made of hardened steel and the set of cams is made of the same metal.
The scope of delivery includes a set of fixing bolts and cams. Often, the cartridges that come with the set for drilling or milling machine, break quickly enough, as they are made of low-quality metal. A qualified do-it-yourself turner can make a new one.
The principle of operation of the collet chuck
Chucks with a set of interchangeable collets are used for mounting axial workpieces and cutters on milling, turning, drilling machines, equipment with numerical control (CNC). There are many sizes and types of collet chucks that work on the same principle. The self-tightening nut applies pressure to the end of the collet, which moves into the cone opening, its diameter is reduced by squeezing, firmly holding the tail end of the Morse cutter. To remove the cutter or part, the nut is screwed on, the pressure is reduced and the collet is unclenched.
The advantage of collet chucks over others is in the small radial runout of the workpiece installed in such a clamping device. Clamped in a self-locking chuck, the part is perfectly centered. Unlike quick-clamping (BZP) used in drills, self-clamping ones work without keys, which are often lost.
Typically, such fasteners are used for processing bushings, cylindrical parts with a Morse shank, and bars. They are very convenient for secondary fastening of an already processed part. If the profile of the part does not match the shape of the cartridge inlet, replaceable cartridges from the set are used.
Collet chuck design

The chuck consists of a clamping nut and a set of collets. Available with retractable, retractable or fixed collets. By appointment, the collet can be clamping or feeding.
The feed collet is a hardened steel sleeve with 3 notches that form a kind of petals with ends directed to the center and springy. The opening of the feed collet must be such that the workpiece is tightly clamped. The feed collet is wound onto a rotating feed rod that feeds the workpiece using a hydromechanical or cam mechanism. During the installation of the workpiece in the cartridge, its Morse end slides between the petals, spreading them apart. Under the influence of elasticity, the petals are tightly pressed against the workpiece. The grip increases during processing due to frictional forces.
The one-piece collet is a sleeve with tabs that spring back when impacted. To work parts with a diameter of less than 3 mm, three-blade collets are used, from 3 to 80 mm - four-blade, more than 80 mm - six-blade. Grip is increased by reducing the clearance of the slots while the collet is being retracted into the chuck.
Split clamping collet - used for clamping parts of the smallest diameter. The cams of such a cartridge are moved apart with the help of springs. Split collets can be equipped with replacement inserts, their type and dimensions depend on the characteristics of the workpiece.
In collet chucks, metalworking tools (drills, taps, milling cutters) with a small Morse shank diameter are also fastened. The cutter is fixed with a replaceable collet, additionally reinforced with a nut. While screwing the nut, the collet sinks inward, and being elastic, firmly clamps the Morse shank. The downside of this type of cartridge is that each cutter diameter requires its own collet.
In longitudinal turning machines, a self-tightening chuck is used to hold a mini workpiece being machined. The device of such collets is somewhat different from the usual ones. Together with them, for fastening the workpiece can be used and conventional tools for clamping the Morse taper.
How to choose a collet chuck
The first condition when choosing a self-tightening chuck is fastening to the spindle. The clamp can be mounted directly on the spindle, through an adapter or screwed onto the thread.
Flange size: flange diameter for connection or Morse taper parameters. Without knowing the parameters of the end of the flange, you cannot pick up a cartridge.
Number of cams: in a set there can be two, four, six. The price of the product depends on the quantity, shape and metal. Depending on the type of work, you can purchase fasteners made of hard metal or soft alloy.
How to make a cartridge yourself

For woodworking, soft metals and plastics, homemade printed circuit boards, a do-it-yourself mini-drill of small power is suitable. The easiest way is to equip it with a ready-made mini self-clamping mount from a pen or pencil. But if there are none at hand, it’s not difficult to make a mini-collet with your own hands. Required: soldering iron, steel wire 1 mm thick, solder.
Work progress:
- a spiral is rolled from the wire with a diameter equal to the diameter of the motor shaft and the drill with which to work;
- the spiral is soldered, high quality connections are provided by soldering flux or KFET;
- the spiral is put on the shaft and the mini collet is ready.
A video about how a qualified metal turner made a self-tightening chuck with his own hands.


