Using an additional pump in the heating system
Owners of private houses often face some problems regarding heating their homes. Installing an additional pump in the heating system will help solve issues with uneven heat distribution in the pipeline.
This device is mounted on heating structures that operate at the most various types fuels (coal, fuel oil, diesel fuel, gas, electricity, firewood).
Advantages
Using a pump of this type has many advantages:
- increasing system efficiency;
- rapid warming of the air in the rooms and an increase in the heated area;
- equalization of temperature indicators in the pipeline;
- elimination of airiness in pipes;
- reduced fuel consumption;
- possibility of installing heated towel rails, thermostats;
- use of small diameter pipes;
- affordable cost of equipment.
A circulation pump is an opportunity to quickly improve the quality of home heating without dismantling the entire system and large financial expenses.
Installation of this equipment requires taking into account its parameters, pipe diameter, pressure and water temperature, and coolant density.
N - designation of pressure, the ability of the device to raise liquid to a certain level. The parameter is measured in meters.
Q – fluid flow in the heating system for a certain period of time, calculated in m3.
This value is equal to the boiler power parameter. The coolant flow depends on the diameter of the pipes.
Circulation equipment is not designed to lift water, therefore, when purchasing it, you need to pay attention specifically to parameter Q. If the boiler is not equipped with a pump, then the liquid flow must be calculated. A similar unit is already built into modern heating devices.
Additional pumping equipment is installed if the boiler is of an old modification, the heating design has been increased due to the expansion of the area of the house.
Buy a unit high power does not make any sense: they will not use it in full force anyway. In addition, such a device is too noisy. The length of the pipeline determines the power of the injection equipment: for every 10 m of pipeline, 0.6 m of pressure is required from it. A ring 100 m long will work efficiently and productively at a pump head of 6 m.
When purchasing pumping equipment, you need to remember that its power should be 10% more than the calculated value.
Types of pumps
To ensure that the energy carrier circulates efficiently, dry and wet pumps are used.
In equipment of the first type, contact of the rotor with the coolant is not provided. The seal used in such a device hermetically separates the pump itself from the motor. The efficiency of this equipment is 80%, so it is advisable to use it for constant pumping large quantity liquids.
Scope of application of dry pumps – shopping centers, factories, factories. In private houses, such structures are not used due to high level noise generation.
The rotor of wet pumps is located in the coolant, which they pump. Water cools the engine. The stator included in the design serves to supply electricity. Pumps with a “wet” rotor have a lot of advantages: long term exploitation, rare Maintenance, low noise generation, small sizes, ease of block replacement.
Disadvantages - low efficiency (about 30-50%), limited scope of application (private houses and city apartments), inability to use pumps for drinking water and for anything related to food.
Installation technology
Installing a circulation unit is a process that requires compliance with a certain sequence of work.
Preparation
Before installation, prepare a check valve: this normalizes the operation of the heating system.
You will also need special keys, fittings, a small pipe with a diameter equal to the diameter of the riser.
Modern circulation pumps can be installed both on the water supply pipe and on the return pipe.
Installation carried out on the bypass (a jumper or a piece of pipe installed between the direct and return wiring of the heating radiator) requires preliminary verification of the device’s ability to withstand strong pressure hot water.
In houses equipped with a “warm floor” system, the pumping device is installed at the point of hot water supply: this will eliminate airiness in the pipeline.
If there is a membrane tank, the bypass with the pump is placed on the return pipeline, closer to the expansion tank.
The heating system can be made of metal or ecoplastic. There is no difference for the installation of pumping equipment. It is inserted by going around it. If the pipeline is made of metal, then you can purchase a ready-made structure to bypass the main line.
First you need to drain the water and clean it heating structure, washing it several times.
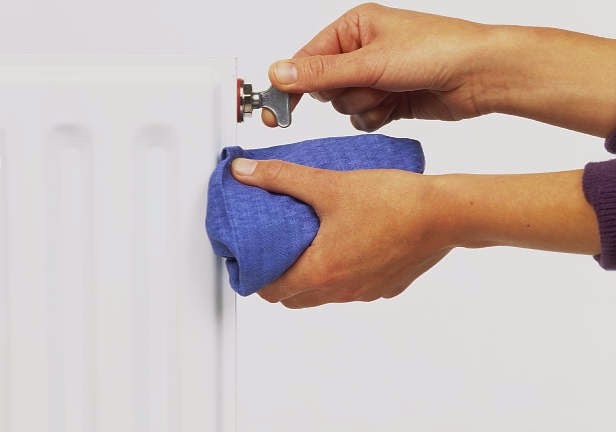
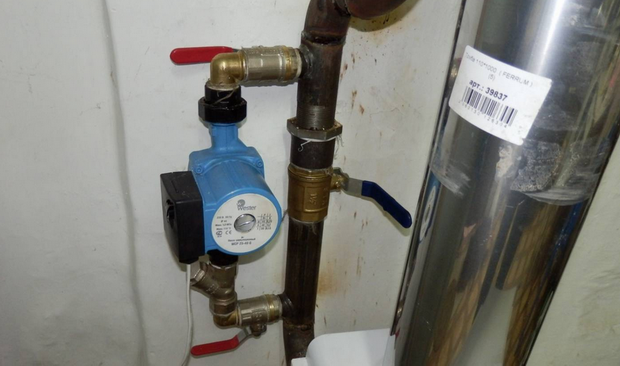
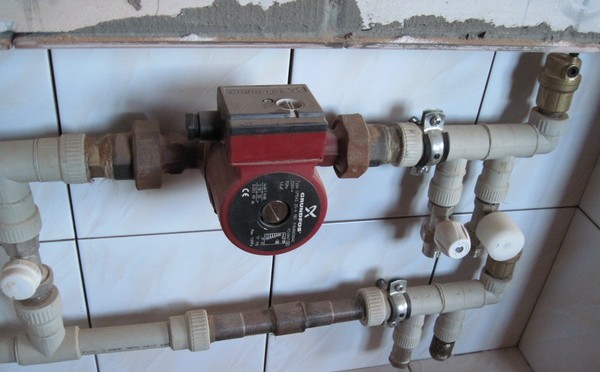
Then, according to the diagram, a U-shaped piece of pipe is mounted on the side of the main pipe, in the middle of which a pump is built. On both sides of this unit you need to install Ball Valves. What is it for?
Firstly, the natural circulation of the coolant will be restored if one of them is closed. Secondly, you can repair or replace the circulating equipment if you turn off both taps, without needing to drain the water from the system.
During installation, you need to pay attention to the direction of water movement (marked by an arrow on the body of the pump unit).
After this, the system is filled with coolant and checked for functionality. Any errors must be corrected by at this stage.
Then, unnecessary air is removed from the pipeline using a central screw. If everything is done correctly, liquid will begin to leak out of the special hole.
Controlled pumping equipment manual type requires removal of air before starting work: turn it on for a few minutes and open the valve, this is repeated several times.

After the pipes are filled with water, the pumping device will turn on. The presence of air in the pipeline is excluded.
Connection features
When connected to the electrical network in systems with natural circulation, an automatic fuse (with a flag) is used; it can be used to switch off. It must be installed at a distance of at least 0.5 m from the boiler.
Pumping device in designs with forced circulation begins to function when the thermal relay is turned on. In order for the additional and built-in units to work simultaneously, the first one must also be connected to a relay or to the second in parallel.
In electric boilers, the circulation equipment is connected directly to the boiler, which gives it the opportunity to operate only at the moment when the water is heated.
The cleaning filter is usually installed in front of the pump.
A special valve (automatic or manual) installed at the top of the bypass will make it possible to remove air accumulated in the heating system.
Installation of “wet” type equipment is carried out horizontally. Its terminals should be located at the top.
All threads of the heating system must have gaskets treated with sealant in advance.
To safely use pumping equipment, you must use a grounded outlet.
Installation of a pump unit in a heating system requires taking into account all the nuances. Only then will homeowners forget about problems with heat distribution and the formation of air pockets in the pipeline.
Additional pump in the home heating system
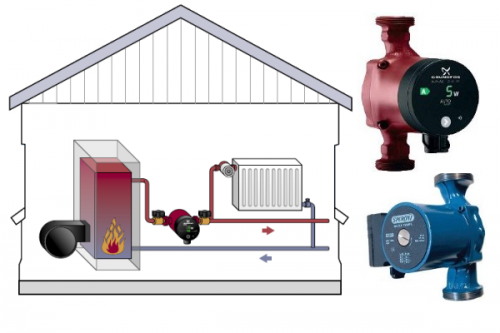
Water heating is a fairly common option for arranging private homes. Firstly, this type of heating is economically beneficial both in terms of installation and operation, and secondly, its installation is a fairly simple and not labor-intensive process. One of the main components of the thermal circuit is the pump for the heating boiler, which creates artificial pressure in the system, “forcing 9raquo; the coolant constantly circulates through the circuit. You will learn how a boiler pump works in this article.
Purpose of centrifugal pumps
Heating systems with natural coolant circulation were popular several decades ago. Today, such designs are quite rare. The principle of operation is simple: due to the difference in density of hot and cold water fluid moves through the pipeline and radiators. In addition, to improve water circulation along the circuit, a slight slope of the pipeline is required.
However, such systems are not ideal and even minor errors during installation can lead to a decrease in the efficiency of the heating unit as a whole. Thus, in the last few years, people have increasingly begun to equip heating lines with centrifugal hydraulic pump units, which easily eliminate all the shortcomings of blocks with natural movement of hot water through the pipeline.
Among the main advantages of an additional pump it is worth highlighting:
- there is no need to slope the pipes to improve the movement of the coolant along the circuit;
- no restrictions on consumables, namely by the diametrical size of the pipes (for natural circulation, pipes of large cross-section are recommended to increase throughput);
- Due to temperature changes, air pockets are not created in the heating main, which prevent full circulation of the liquid;
- ensuring uniform heating of the room, since hot water moves at a certain, always the same speed;
- Due to the high speed of movement of the coolant, the temperature difference at the outlet and inlet of the boiler is minimal, which does not require large fuel consumption to warm it up.
In addition, a stably maintained temperature regime allows not only to save on thermal resources, but also significantly extends the operating life of the heating boiler.
VIDEO: Installation and installation circulation pump for heating with automatic equipment with your own hands
Types of pumping units
So, we have already figured out what a circulation pump is for. And the name of the device itself answers this question. Let's go further. The correct functioning of this unit is ensured by a special element - a rotor, the ends of which are equipped with blades. Through the latter, hot water is forced to move (namely, in most cases it acts as a coolant) along the main line.
Most modern models, such as, for example, a 12-watt heating circulation pump, are equipped with one hydraulic rotor. However, manufacturers also build two such elements into some devices. Here we are talking about very powerful units, which are used in industrial purposes, but not in household ones either.
Regardless of the number of rotor units, pumps for heating boilers will function effectively only if the thermal circuit does not contain air masses inside.
Currently, manufacturers of such functional technology can offer potential buyers two device options:
- with wet rotor;
- with dry rotor.
And to understand how these two types differ, let’s talk in more detail about each of them.
With wet rotor
This type of blower is characterized by complete immersion of the rotor assembly in the heat source, that is, in water. A pump with a wet rotor is assembled according to a special design, and its design allows the moving liquid to come into contact with the blades, thereby ensuring lubrication and cooling of the components of this device.
Clear advantage similar devices The problem is that such a circulation pump for the boiler operates very quietly, which cannot be said about the second model with a dry hydraulic rotor. This is due to the fact that vibration and sound waves of a functioning rotor unit are completely absorbed by the liquid itself.
Mini water pumps of identical functionality and configuration can be used both as the main device (if the heated room has a small area) and in addition to the domestic hot water supply. In addition, such household hydraulic pumps are suitable for heating a private home, and they can also be used for industrial purposes. True, then you need to pay attention to the power of the device, since household appliances are not able to ensure full circulation of the coolant along a long circuit.
With dry rotor
This option involves complete isolation of all components of the pumping apparatus from the liquid, which ensures higher power than the previous model. And this, in turn, makes it possible to pump fairly large volumes of coolant, which leads to the use of such devices to create a thermal circuit in rooms with a large area.
If we compare the two options, the obvious difference between this type is that in addition to the location of the functioning elements relative to the liquid, in hydraulic pumps with a dry rotor it is possible to replace the engine with a more powerful one, which makes it universal. But at the same time, vibrations and sound waves will be heard clearly, so it is better to place such devices in separate boiler rooms.
Installation location in the general system
The pump is connected to the heating system, as a rule, on the return line, that is, in the place where the cooled coolant returns to the heating boiler for further heating. However, modern models can be easily placed in any other place, regardless of the location of the boiler.
It is very important that the connection diagram for the heating circulation pump that is chosen as the main one allows access to the equipment. Each element of the system needs preventive maintenance and regular maintenance, so a free approach is very necessary.
For the installation to work effectively, you must adhere to several rules:
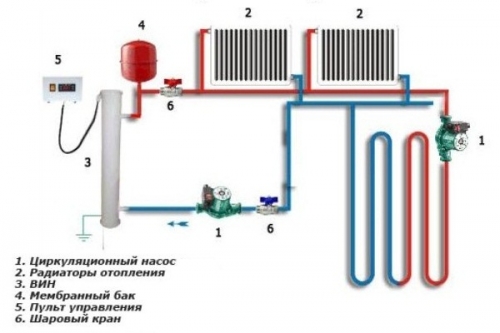
- Accommodation expansion tank should be carried out above the level of the extreme point of the thermal circuit by at least 80 cm. If your system does not have a pumping unit, and water circulates through the main line by natural movement, then expansion tank installed in the attic. This device can also be installed in highest place location of the pipeline and radiators.
- The heating unit is equipped with a bypass for bypass compulsory system circulation. This is relevant if the pumping device malfunctions or if there are problems with the power supply.
To prevent the accumulation of air masses in the heating main, a Mayevsky valve or special automatic valves should be installed in the bypass or the highest points of the heating circuit to release excess air.
You can buy a pump for a heating boiler in any specialized store; it is only important to choose the right one in terms of power, with which sales consultants can help. By giving preference to centrifugal pumping devices, you equip your heating system a unit that will provide comfortable temperature living conditions in your home. And lastly, be sure to issue a guarantee. Any complex equipment, including a circulation pump, can fail for objective reasons and without the fault of the consumer.
VIDEO: Circulation pump for heating with automation to aid natural circulation
Installing a pump in a heating system
Gone are the days when water heating systems operated without pumps. And today, the efficiency of the heating system increases precisely thanks to the installation of a pump. In addition, the room warms up much faster and fuel consumption is reduced. Connecting the pump to the heating system makes it possible to install towel dryers, thermostats and use smaller diameter pipes.
Advantages of connecting a pump to a heating system
Hosts country houses with a decentralized water supply system they are faced with the problem of uniform heat distribution across all heating circuits. For example, if water boils in the boiler, but radiators in distant rooms remain barely warm. In this case, it is recommended to look for optimal means to solve the problem.
To improve circulation there are two suggestions: installing pipes large diameter or updating the system by installing, or rather cutting into the pipe, a pressure pump. There are few people willing to dismantle pipes if they are still walled up inside the premises. And the cost of the system itself, which includes pipes with large diameter, not always liked by the owners because of their high cost. And the price of a pump for a heating system is much lower.
Therefore, there is a need to install a pressure pump. Circulation pumping devices are installed on heating systems operating on all types of fuel - wood, coal, fuel oil. Updating the heating system by inserting a pump into the heating system will help you:
- Equalize the temperature in the pipes;
- Eliminate the appearance of air pockets that prevent the coolant from circulating normally;
- Increase the operating area of your heating system.
Rules for choosing a pump for a heating system
For installation in a heating system, there is no point in purchasing quite powerful pump, because you will not use it on full power. It will also make increased noise. The owner buying a pump is advised to remember that the power of the device should be 10% higher than the value obtained as a result of your calculations.
The ability of pumping equipment to meet the needs of the heating system depends on many parameters. For example, on the diameter of the pipes, maximum pressure, water temperature, coolant density:
- The coolant flow Q, which passes through any section of the thermal system, is calculated in the same way as the liquid flow for boiler equipment. That is, equate the coolant flow rate to the boiler power parameters. With a boiler power of 20 kW per minute, about 20 liters pass through it.
- Radiators with a power of 10 kW will flow 10 liters per minute. When calculating the water flow in each ring of the heating system, take into account the power of the batteries.
- The fluid flow in the pipes is determined by the diameter of the pipelines. The smaller the diameter, the greater the resistance will appear along the path of coolant movement.
The longer the pipeline, the more powerful the injection pump for the heating system must be. This means that for every 10 meters of the heating system, 0.6 meters of pressure is needed from the pump. To ensure productive operation of a 100 m ring, a pump head of 6 m is required.
Classification of pumps for heating systems
To move energy in the heating system, two types of pumps are used:
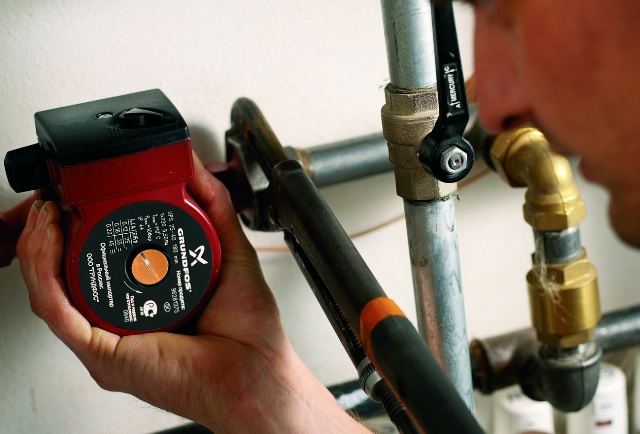
- Dry pumps. The rotor in such equipment does not come into direct contact with the energy carrier. When considering such equipment for installation in a heating system, pay attention to some of its features. The power plant of the pump with the so-called “dry9raquo; the rotor does not come into contact with the energy carrier during operation. The seal located in the unit is necessary for hermetically sealing the pump from the motor. The main advantage of such pumps is their high efficiency - about 80%. Therefore, their use is advisable when constantly pumping large volumes of water. The equipment is used primarily for large retail premises, factories, factories and multi-storey buildings. Due to the rather strong noise that is created during operation, such pumps are not suitable for private homes.
- Wet pumps. Their working part is in the water they pump. Using water, the engine is cooled and all its components are lubricated. Electricity flows through the stator. Thus, it is well protected from the influence of the coolant by a stainless non-magnetic glass. The main advantages characteristic of injection pumps with a rotor located in water: long operating time, infrequent maintenance, low noise, compactness and light weight, easily replaceable units, installation of the pump in the heating system is carried out directly on the pipes. Of course, among all the advantages there is also a disadvantage. Such devices demonstrate a rather low efficiency, which is 30-50%. A pressure pump with such a rotor is usually used in heating systems of houses and city apartments. It is also necessary to remember that pumps should not be used for drinking water supply or food-related tasks.

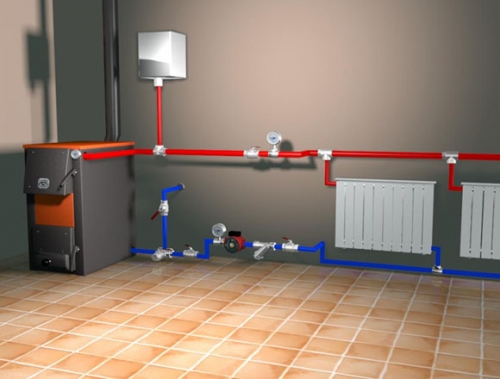
Technology for installing a pump in a heating system
Preparatory work
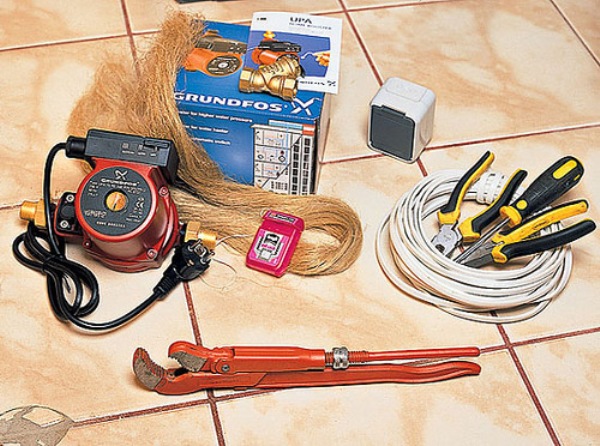
For installation in a heating system, it is recommended to purchase pumping equipment that includes detachable threads. If there are no such parts, you need to buy them yourself. Don't forget the filter deep cleaning. You should also prepare a check valve to ensure normal operation of the heating system.
![]()
After selecting a pump for the heating system, it is recommended to purchase a set of special keys for its installation, shut-off valves, and a small piece of pipe. Its diameter should be similar to the diameter of the riser.
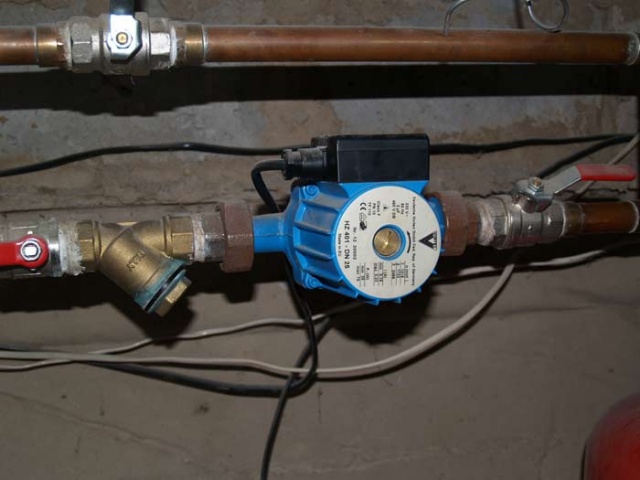
Choosing a location for the pump
When connecting a heating pump, choose a circuit so that you can periodically service the system. It is advisable that you have an approach to it. If in earlier models “wet9raquo; pumps, some spare parts could fail due to contact with water, but now the systems are produced in such a way that water is not at all scary for them. Even at various high and low temperatures. This makes it possible to install pumping equipment on the return or supply pipeline.
To increase the pressure in the discharge section, it is necessary to install a pump near the place where the tank is connected in the section of the falling pipeline. This scheme makes it possible to create high temperatures in this heating area. Before installing a pump in a heating system on a bypass pipe, check that the unit can withstand strong pressure of high-temperature water.
For more efficient work“warm floor” equipment, the pumping unit is placed in the heated water supply area. Thanks to this, such a problem as the occurrence of air jams will be eliminated. To restore a heating system with a membrane tank, place a bypass with a pumping unit on the return line. It is advisable to bring it closer to the expansion tank.
Pump installation rules
Correct installation of the pump in the heating system requires compliance with several rules:
- Install ball valves on both sides of the pumping equipment. They are required to ensure dismantling of the pump if there is a need for its maintenance or repair work.
- In a heating system, a filter is usually installed in front of the pump, which purifies the water from mechanical debris that comes with the coolant.
- To remove accumulated air, install at the top of the bypass special valve, which comes in automatic and manual types.
- When installing a pump for flushing the heating system, you must follow the direction shown by the arrow on the pump. Remember that the direction must coincide with the direction of movement of the liquid.
- In order not to damage the “wet9raquo; pump, if suddenly the motor is not completely immersed in water, the device is mounted horizontally.
- The pump unit terminals must be at the top.
- In the heating system for everything threaded connections You need to install gaskets and pre-treat them with sealant.
- For safe use connect the pump for the heating system to a grounded outlet. Before installing the pump, do not forget to carry out actions related to ensuring grounding.
Pump installation principles
When installing a pump into a heating system, pay attention to the following principles:
- First, drain the water and clean the system. Rinse a heating system that has been in use for a long time several times, filling it with water and emptying it to successfully clean it of contamination.
- Next, install the pump in a specially designated place according to the plan. In this case, you need to look at the direction in which the energy carrier is moving. It is usually shown with an arrow on the pump.
- After complete installation, they are filled with energy.
- Check the system to ensure it is working properly. If there are still any errors, then at this stage they need to be corrected.
- Next, unnecessary air is removed from the system using the central screw. The correctness of the actions is signaled by the escaping water, which appears from a special hole.
- Remove from the pump with manual control air every time before turning it on. Turn on the pump for 5 minutes and open the valve. This procedure is carried out several times.
- The pump turns on after the pipes are filled with water. The system must be running. Remember that there should be no air left in the pipes.
- In order to automate the operation of the pump and protect equipment from improper operation, buy an automatic pump. When connecting the pump to the electrical network, it is recommended to use an automatic fuse with a flag. It will perform two functions - a switch and a fuse. The fuse is installed at a distance of 50 centimeters or more from the boiler.
- To install an additional pump in a heating system that already has one, keep in mind that it turns on after the thermal relay is activated. In order for both devices to work synchronously, you need to connect a second pump, also connect it to the thermal relay. Also, the additional one can be connected to the main pump through a parallel connection.
Now you know how to install a circulation pump and how to set up a heating system with two pumps. By taking into account all the rules and features when performing such work, you can forget about the problems of uneven heat distribution in the system and the formation of air gaps.
Articles on the topic
Additional pump in the heating system: installation features and connection process
 Finalization existing system heating will be necessary in the following cases:
- The coolant moves naturally.
- Expansion of heated area.
- The existing pump in the boiler does not ensure uniform distribution of the coolant.
In any of these situations, installing an additional device can provide high-quality heating of every room in the house.
Take note: incorrect calculations of the future heating system can lead to its ineffective functioning.
One way to eliminate this drawback is to install an additional circulation pump. This solution will be much more profitable than completely replacing the main equipment with suitable characteristics.
Correct position is the key to reliable operation
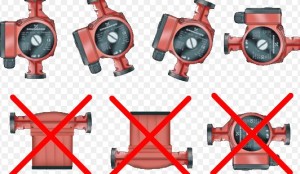
 Most often, wet rotor pumps are installed in private homes.
A design feature of the equipment is the absence of special lubricants.
The heating fluid acts as a coolant and lubricates the rotating elements.
Taking this feature into account, there are following rules which must be complied with:
- the pump shaft is strictly horizontal relative to the floor;
- the direction of movement of the coolant must coincide with a special mark on the equipment;
- installation on the system site with minimum temperature coolant.
 You might like the article on how to choose a circulation pump.
You can read about how to repair the pump here.
You may also find this article useful on how to make a heat pump with your own hands from a refrigerator and air conditioner.
Electrical installation features
Correct pump installation diagram
Connection of additional equipment for the heating system is carried out through a centralized electrical panel, which has control capabilities.
New models of circulation pumps have built-in protection and resistance to blocking currents, so a normal ground connection can be made.
Direct contact of liquid with the terminal box must also be prevented. Accordingly, when installing, the placement should be on the side or on top.
Features of piping
 Besides correct installation the circulation pump itself, it is necessary to correctly place a number of other elements and comply with technological requirements. Namely:
- in the direction of movement of the coolant, but a mesh filter is installed in front of the pump;
- shut-off valves are installed on both sides;
- for models of significant power, it is necessary to install anti-vibration inserts (for low-power pumps - optional);
- if there are two or more circulation pumps, each pressure pipe is equipped with a check valve, and it is also necessary mandatory installation similar backup device;
- absence of compression and pressure loads, as well as torsion from the ends of the pipelines.
Installation method
 There are two ways to install equipment for efficient coolant circulation in the system:
- a separate unit;
- direct connection to the heating system.
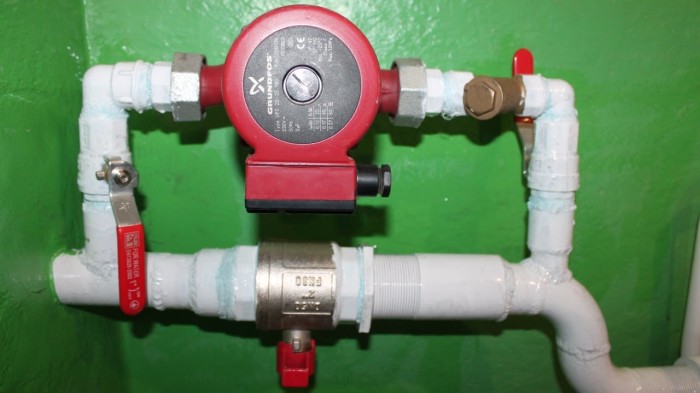
Most often, preference is given to the second option. There are two approaches to its implementation. The first is to simply insert a circulation pump into the supply pipe.
The second involves the use of a U-shaped element, which is attached in two places to the main pipe. A circulation pump is installed in the middle of this structure. This installation implementation is characterized by the presence of a bypass.
Good to know: in systems with natural circulation, it is possible to disconnect the pump from the circuit.
In case of frequent power outages with centralized system, this design will ensure the functionality of the system. Although with less efficiency.
Connection
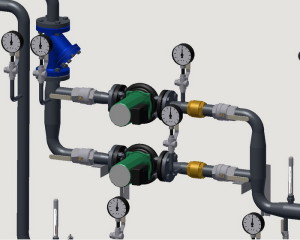
Pump connection diagram (click to enlarge)
The process of connecting an additional circulation pump consists of several stages:
- Determining the installation location. Based on the requirements, it must be installed as close as possible to the heating boiler. Temperature will be optimal, which will ensure long term services.
- Turning off the boiler and shutting off the coolant supply using the existing shut-off valves. If there are no controls, drain the water from the system.
- Design and implementation of the bypass. With its help, the system will function in the event of a pump failure or temporary power outage.
- Installation check valve and filter.
- Installation of shut-off valves. Allows you to carry out maintenance, repair or replacement of the circulation pump by closing only the shut-off elements.
- Bleeding air through a special valve and starting.
If the circulation pump is idle, it is necessary to bleed the air before starting, as it accumulates over time.
 You may be interested in an article about various heat pump manufacturers.
About the features heat pump“ground-water” you can read here.
Installing an additional circulation pump in a heating system with liquid coolant will provide the following advantages:
- increase efficiency;
- ensure uniform heat distribution;
- reduce fuel consumption;
- use pipes of smaller diameter;
- significantly speed up the warming up process, even in the most remote room.
The pump design is reliable and has a long service life. correct installation and connection. It is better to entrust the choice of a suitable model in terms of power and other characteristics to specialists.
How to install an additional pump in the heating system, see the following video:
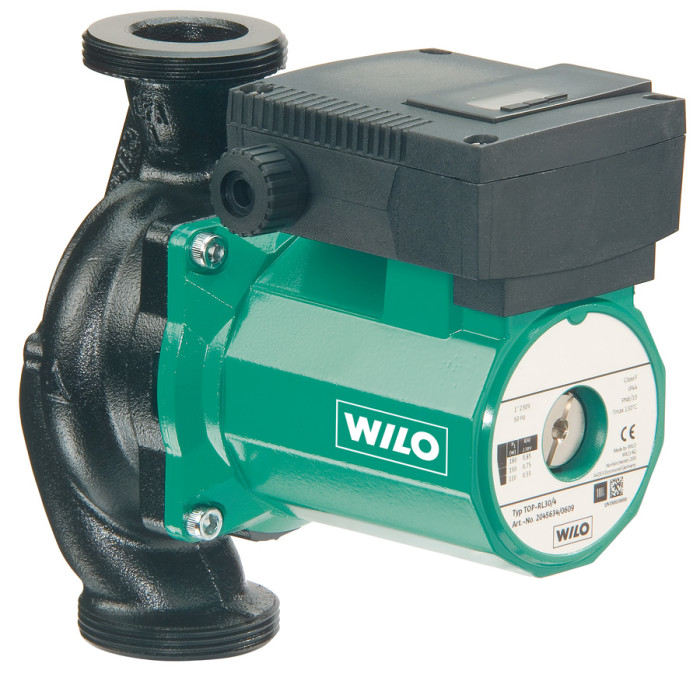
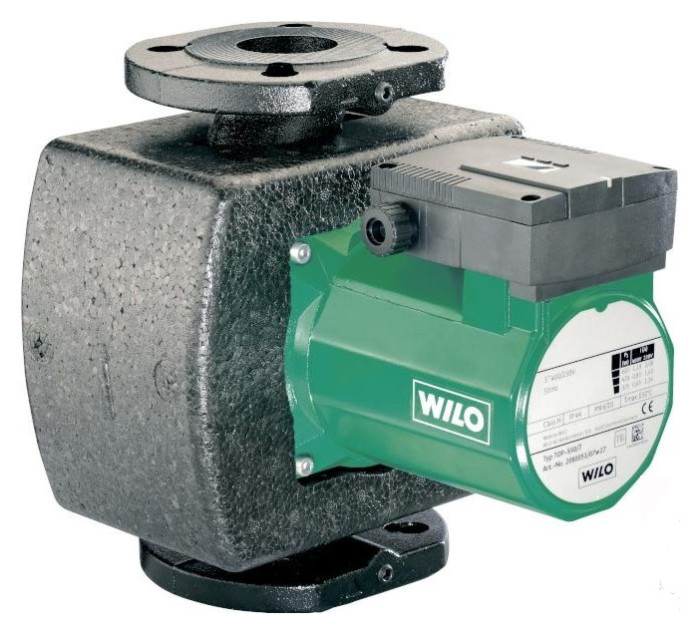
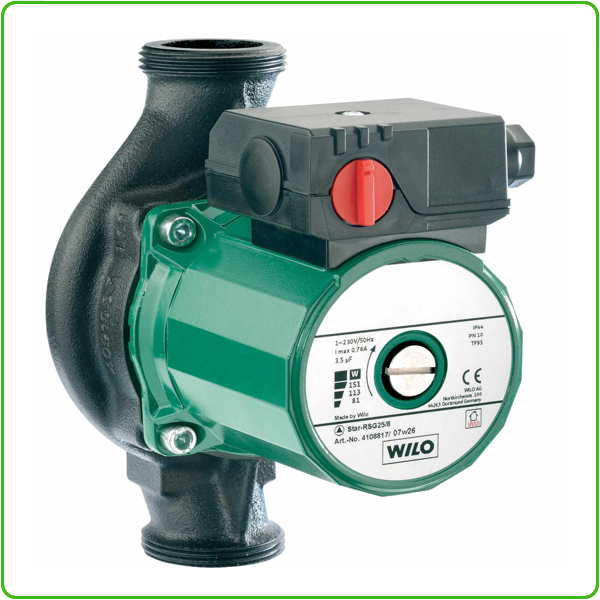
 Circulation pump for heating systems of the Wilo brand: specifications and review different series
 How to choose a circulation pump for heating: types of pumps, design and principle of operation
 Installing a circulation pump in the heating system of a private house: selection of equipment and installation rules
 Air-to-water heat pump for heating a house: principle of operation and video with owner’s review
Additional pump in the heating system
 You've probably noticed this effect: when the engine speed drops below 2000 per second, the stove begins to blow cool air. Someone notices this all the time. This is especially felt when the car is warming up in the morning, when the engine has already gained enough heat and cool air enters the cabin.
If you increase the speed while using the gas pedal, hot air immediately begins to flow into the cabin. This indicates poor circulation of coolant passing through the heating radiator. When the revolutions are high enough, that is, above 2000 revolutions, then the coolant pump rotates more strongly and moves the liquid through the system better.
Sometimes it happens that while moving along the highway, setting comfortable temperature salon, you find yourself, for example, in a traffic jam, and the salon begins to receive cold air. This, in the end, begins to bother you and prompts you to look for a way out of this situation. The best solution an additional pump will be installed to stabilize the circulation flow of liquid through the radiator.
Benefits of an additional pump
 An additional electric pump is necessary for a significant circulation of coolant in a small and large circle when the thermostat is opened. It becomes especially relevant good heat dissipation stove radiator, and on hot summer days a wonderful addition will be the improved output of the main radiator. Simply put, in winter the car will be much warmer, and in summer the fan will turn on much less, providing the most even thermal regime of the power unit.
When the engine is warm, the heater blows out hot air even at maximum fan speed. The presence of an additional pump in the heating system provides the following advantages:
1. Much higher performance.
2. Creation high pressure coolant
3. Reduced energy consumption.
4. Low noise level.
5. High reliability and efficiency.
The nuances of installing an additional pump
 Installation of additional electric pump Vehicle heating systems are often recommended as a means of increasing the efficiency of coolant circulation through the furnace radiator, which consequently improves the operation of the heating unit. Note that this tuning must be carried out only after all measures to eliminate weak points have been taken, namely:
1. The 16-gauge radiator hoses have been replaced with 18-gauge hoses.
2. The coolant intake fitting from the cylinder head was replaced with a fitting from a Gazelle of 18 diameter.
3. You replaced the stove tap with a suitable one, only with a larger cross-section, for example, a water ball valve.
4. The stove radiator is three-row copper.
5. An additional pump with an 18 mm fitting was installed.
6. A bushing is installed in the small throttling circle of the coolant flow and larger extraction.
7. The air ducts and stove are free of cracks and irregularities.
8. The thermostat installed on the car works properly and without failures.
 After completing all of the above points, the final stage may be the installation of an additional electric pump from Gazelle or manufactured by Bosch. This procedure is not extremely difficult, but for beginners some points may not be entirely obvious. Next, we will tell you how to independently install an additional pump on a heating element in a car.
Required parts and tools
1. Additional pump with 18 mm diameter pipes.
2. Hoses with a diameter of 16 mm and a length of half a meter. They must be exclusively straight and reinforced.
3. Four clamps of the required diameter.
4. A five-contact relay, but four contacts are quite sufficient.
5. Block for a five-pin 30 A relay.
6. Blade guard holder.
7. 10 A blade fuse.
9. Single-pin female connector.
 10.
Three meters of ordinary two-core wire. Can be used from a non-working vacuum cleaner, for example.
10.
Three meters of ordinary two-core wire. Can be used from a non-working vacuum cleaner, for example.
11. Three meters of protective corrugation for the above wire
12. Illuminated button.
13. LED matte red 3 mm.
14. 690 ohm resistor.
15. A pair of rubber washers with an internal diameter of 6-7mm.
16. A bundle of wires can be useful if necessary.
Additional pump installation technology
Preparatory work. If you use a pump from a Gazelle, then you will need to open the lid, remove the rubber band and degrease it. Assemble by applying heat-resistant adhesive sealant to the rubber band and lid. Tighten the cover screws as tightly as possible. Now everything is secure.
1. Drain the coolant from the power unit.
2. Unscrew the coolant supply clamp to the radiator from the pipe and remove the hose.
 3.
It may happen that the condition of the hose leaves much to be desired. In this case, you will need to dismantle the frill, standard upholstery, and open the motor housing heating element. This way you will have access to the stove radiator.
3.
It may happen that the condition of the hose leaves much to be desired. In this case, you will need to dismantle the frill, standard upholstery, and open the motor housing heating element. This way you will have access to the stove radiator.
4. Unscrew the clamp from the radiator side and remove the old hose. In its place, install a new half-meter hose, tighten the hose and assemble the stove body and frill in the reverse order.
5. If the hose is in in perfect order, then it is necessary to extend it using a connector to the required length.
6. Install a new hose on the engine pipe to the stove radiator.
7. Under the hood, determine a place to install an additional pump.
8. Unscrew the nuts from the bolts, install two rubber washers, and mount a new pump on top, tighten with nuts
9. Cut the heater radiator hose in place and connect it to the side outlet of the pump and secure with a clamp.
10. Cut the hose from the engine in place and connect it to the upper pipe of the pump. Make sure that the hose does not bend anywhere and secure it with a clamp.
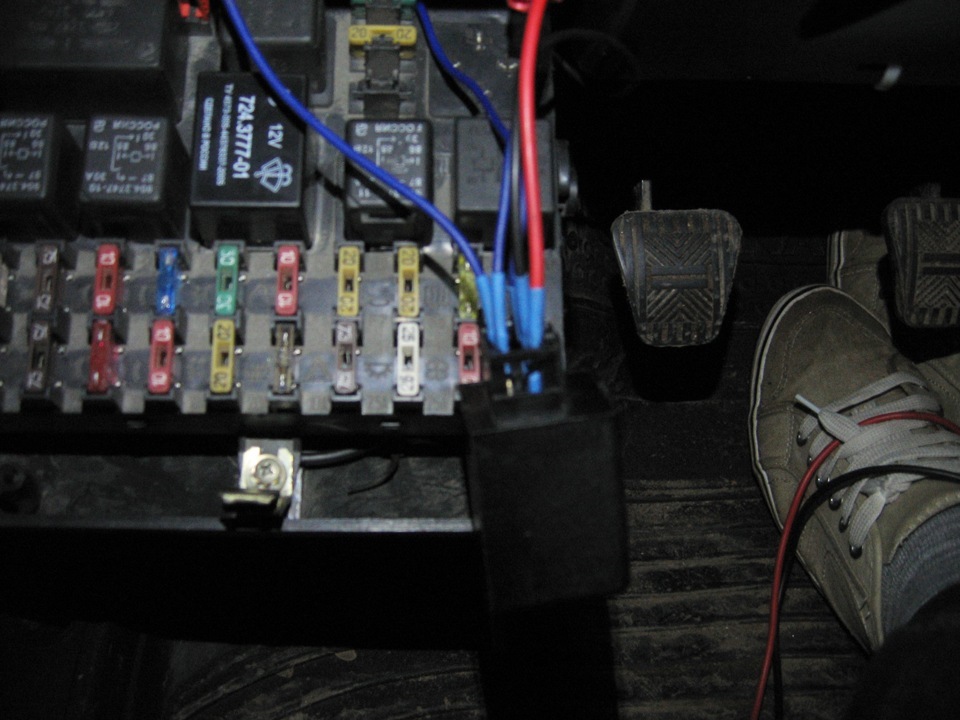
11. Prepare the first part of the electrics; to do this, place a “ring” type terminal on the wire of the 86th contact.
12. Attach a second ring terminal to one wire of the fuse holder. Attach it to the positive terminal of the battery.
13. Connect the second wire of the fuse holder to the 30th contact of the relay block.
14. Attach a female terminal to contact number 87 and connect it to the wire supplying the pump.
15. Place the negative terminal on the hydraulic corrector tube holder bolt, put on the relay holder, secure with a nut and make sure that the terminal connections to ground are reliable.
16. Install a 10 A fuse in the holder.
 17.
Lightly touch the 85th contact of the relay to the positive terminal of the battery. The relay will turn on and the pump will start working. If it doesn't work, then look for the reason.
17.
Lightly touch the 85th contact of the relay to the positive terminal of the battery. The relay will turn on and the pump will start working. If it doesn't work, then look for the reason.
18. Stretch the corrugated wire from the engine compartment to the interior mounting block. Connect one end of the wire to pin 85 of the relay block.
19. Remove the protective plastic wall on the driver's foot side and pull out the heater control unit.
20. Stretch another piece of corrugated wire from the mounting block to the heater control unit. Attach clamps to the standard wiring above the pedals so that they do not dangle.
21. Take the positive from the ignition in the mounting block and connect it to one of the wires. Look specifically at the car wiring diagram.
22. Connect the second wire from point 20 in the engine compartment with the wire from point 16.
23. Referring to the diagram, connect the button block. It is most convenient to connect the button illumination using two “guillotine” connectors from the air recirculation button illumination. If your car does not have such a button, then you can take the damper control knobs from the illumination.
24. A convenient “feature” will be a visual indication of the pump activation control. Not everyone will need this, but it wouldn’t hurt to mention correct connection of this element.
According to the electrical diagram, attach the LED with a resistor to electrical circuit. Drill a 3 mm hole in the button in the corner and secure the LED with superglue. The wires are flexible, thin, multi-core, so you can safely press the button, they are prepared for bending.
25. Turn on the side lights to make sure the button is illuminated.
26. Turn on the ignition, press the button and make sure that the electric pump is working.
27. Insert the button into its designated place and mount the heater control unit.
28. Pour coolant into the expansion tank.
29. Start the engine and warm it up completely. Make sure that the hoses are connected firmly and that fluid does not leak out. Turn on the pump button and make sure it works correctly.
Subscribe to our Facebook feeds. VKontakte and Instagram. all the most interesting automotive events in one place.
Was this article helpful?
Not really
An additional pump for the stove is one of the options for solving the problem of low cooling system performance on domestic cars.
Functioning normally under average operating conditions, it malfunctions at high or low temperatures environment. In the first case, the engine overheats, in the second, the heater works poorly and is unable to provide an acceptable air temperature in the cabin.
In what cases should you consider installing an additional pump?
It is recommended to install an additional pump in the cooling system if:
- At air temperatures above 28-30°C, the engine reaches critical high temperature(provided that the cooling system is working);
- In the frost on Idling the stove blows cool air at normal operating temperature engine.
Most often, the problems described above occur on the VAZ-2109, VAZ-2114, VAZ-2110, rear-wheel drive “classics”, all GAZ Volga models, except for the GAZ-31105. In the latter case, the malfunction may also appear in normal temperature conditions. This is due to the large volume of coolant in the system and an insufficiently powerful pump.
It is worth noting that there is no need to install an additional pump if overheating of the power unit or stove failure occurs during normal conditions. middle zone Russian temperatures (-25 - 25°C). The corrected standard system operates successfully in this thermal mode. Therefore, if it malfunctions, you should look for a malfunction.
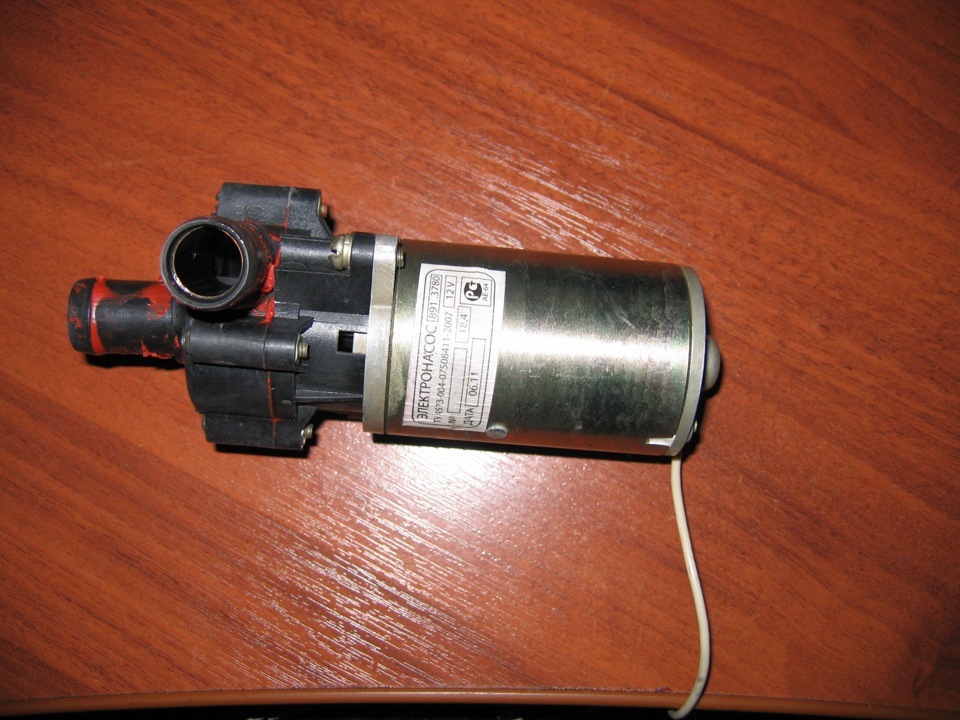
Unlike the standard VAZ and GAZ pump, which has a mechanical belt or chain drive, an electric pump is used as an additional driving force. Most often, motorists use an electric pump, which is standard equipment on the Gazelle car. 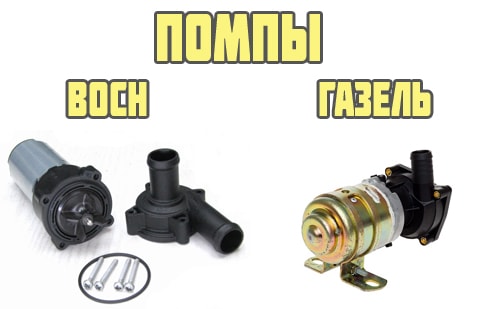
The unit has high performance, however, the quality of its manufacture leaves much to be desired. Therefore, before installing such a pump, it is recommended to disassemble it, coat all seals with automotive sealant, reassemble it and let it dry for 24 hours.
Note: the above applies to old-style pumps. New GAZ pumps have good build quality. However, over time, they also begin to leak.
An alternative to GAZ products is to install an additional pump manufactured by Bosh. These units have high build quality and a different operating principle. The blade rotates under the action of a magnetic coupling, and not an electric motor, as in the first case.
By using such a scheme, the manufacturer was able to abandon sealing connections and almost completely eliminate the possibility of leakage. The disadvantages of the imported unit include its high cost and relatively low productivity (700 liters versus 1200 liters per hour for the GAZ unit).
How to install an additional pump
Installation of an additional pump on a VAZ stove can be done in the engine compartment or under the interior panel. The first option is preferable, since in this case the sound of the pump does not enter the interior, and there is also no risk of flooding the interior with antifreeze if it leaks. Depending on the installation location, the unit can be mounted at the mounting location of the standard engine compartment sound insulation or on additional brackets. 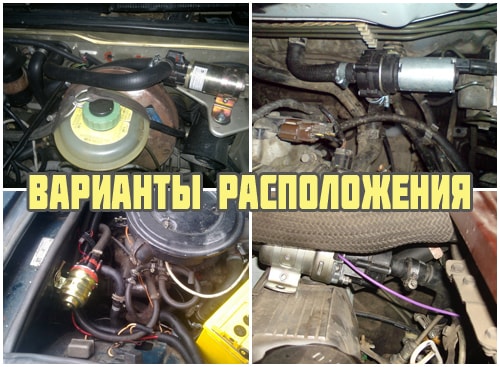
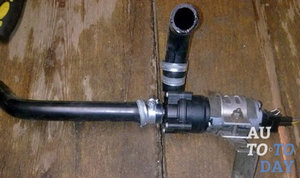
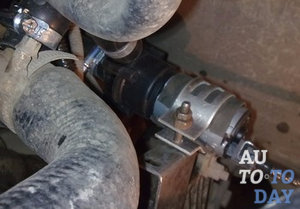
The installation of an additional water pump on the VAZ-2110 and other models of the domestic automobile industry is carried out on the heater supply pipe. In this way, it is possible to achieve a more active injection of coolant into the “furnace” radiator and increase heat transfer.
Note: increased pressure in the cooling system can lead to failure of poorly secured pipes or breakdown of the radiator. Therefore, before installing additional equipment, it is recommended to conduct a complete diagnostics of the CO.
Before installing an additional pump, the antifreeze is drained. After this, the pipe at the intended installation site is cut in half using a sharp blade, and the resulting ends are put on the pump outlets. It is important to ensure that the arrow drawn on one of the outlets, indicating the direction of fluid circulation, is directed towards the radiator. The pipes placed on the outlets are secured with clamps. It is better to use Norma brand screw clamps, since products from lesser-known brands often have sharp edges and cut the pipe.
The connection diagram to the on-board electrical network may vary depending on what goals the car owner sets for himself. If the pump is installed for more efficient cooling, it makes sense to connect it in such a way that it runs constantly when the ignition is on. The unit can be connected directly from the battery, but the circuit must be closed using a relay, which is activated after turning the start key. 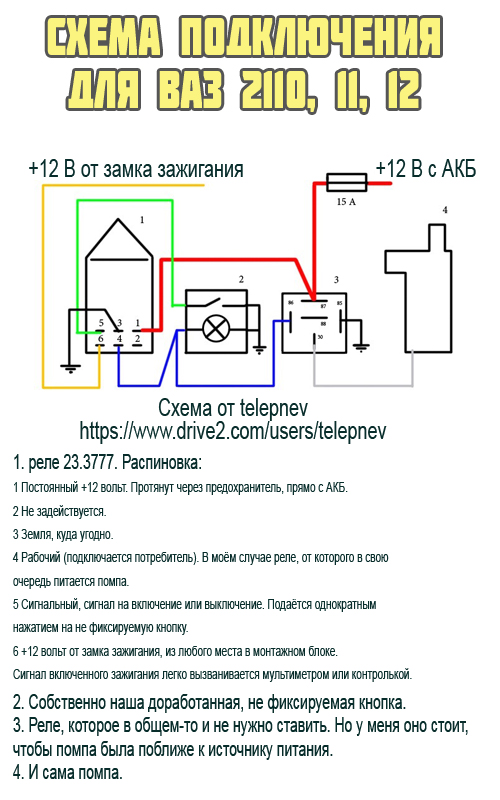
If you plan to install an additional pump in the heating system to improve the operation of the stove at XX, it is better to connect it through a button. In this case, the power circuit will include a relay, a fuse, a pump button and a battery. Electricity is supplied via a single-wire circuit. The “minus” in this case is the car body. Using this scheme, the car owner gets the opportunity to turn on the pump only when there is a need for it.
Note: it is better to install an additional pump using a second power supply connection scheme, since in extreme cold it long work can lead to underheating of the motor and related malfunctions.
Expected results
After everything necessary elements will be installed and connected, a road test should be carried out, during which the pump must run continuously for at least an hour. During this, it is necessary to carefully inspect all its connections to the cooling system to eliminate leaks.
After the inspection, you should check the car while driving. It may happen that a unit functioning properly at idle speed will fail when the pressure in the pipes increases.
If everything was done correctly, the heater begins to supply warmer air, and the engine is effectively cooled even under heavy loads.
Is poor heater performance a problem? which occurs every year among owners of thousands of cars. Many drivers, in order to get the desired warmth, install an additional pump that pumps antifreeze through the heater radiator. And sometimes there is an additional stove. Is this necessary? Many foreign cars have an additional pump as standard. First of all, these are German cars, including Volkswagen Golf.
Remember how warm it was in the car in its first winter. The only standard heater was enough for you normal temperature in the cabin. This means that installing an additional stove is an unjustified idea. It is necessary to ensure normal operation of the standard stove.
Even if you live in a cold northern region, installing an additional antifreeze heater will not help you. At approximately 35...40 degrees below zero, the heater radiator will take all the excess heat from the engine. There will be no circulation through the cooling radiator at all. Only a heater that operates by burning additional fuel will help. But before installing an additional, autonomous heater, it is worth adjusting the operation of the standard stove.
The most common reason poor stove operation, lack of circulation. There may be other reasons. But more often than not, air gets into the system and impedes the flow of antifreeze through the heater.
If you have recently overheated your engine, open the expansion tank and take a sniff. The smell of exhaust fumes will indicate that your car's engine needs serious repairs. Due to overheating, the cylinder head was warped and now gases from the cylinder are entering the cooling jacket. Signs of the same malfunction are antifreeze in the oil and different colors of the cross-section insulators. If you see that one of the candles seems to be washed, and the rest are more dirty. If the head warps and the gasket breaks, the flow of gases may be such that even the cooling system pump gets into a gas bubble and does not pump. This is a threat to the engine itself.
More often than not, air gets in through loose hose connections. The stove turns out to be a trap in which air accumulates, and antifreeze circulates only through a small circuit hose. Such a malfunction does not threaten the engine, but is uncomfortable for the driver and passengers.
This is where an additional pump can help. A strong flow of coolant can remove air from the stove. Even if antifreeze with gas bubbles circulates, the stove will work. A nice bonus is that with a warm engine, you can turn on the heater without starting the engine. This is if you are waiting for someone in winter.
Which pump to choose?
There are two options: a pump from Gazelle and Bosch. The Gazelle pump is made according to a traditional layout. This is an electric motor connected to a pump. Of course, there are seals in the design, and they are bound to leak. For some, such a pump works for less than a year, although it could be five years. The pump is powerful and productive. Consumes a current of 4 amperes and pumps 1440 liters per hour. Modifications from different manufacturers are available, with different pipe diameters. In addition to the 12 volt pump, there is a 24 V option for trucks. Such a pump costs a thousand rubles or so.
The BOSCH pump is a real work of engineering art. The pump has no seals. No one. Because there is no shaft connecting the motor and the pump rotor. moment, through solid wall transmitted by a magnetic coupling. Such a pump cannot leak, but its productivity is less than 500...750 liters per hour for various modifications. The price can be calculated from 2400 rubles.
How to connect.
The pump is connected to the cut in the hose in the return of the stove. That is, the coolant goes through a tube to the heater radiator, then again through a tube, an additional pump, a tube and again into the cooling system. You can cut the pressure hose; if there are no leaks, it doesn’t matter. But increased pressure in the stove radiator can cause its final breakthrough. And a clearly visible trickle will indicate its place.
The electrical connection must meet the following requirements:
Connection to a circuit protected by a fuse and operating when the ignition is turned on.
The circuit can provide the necessary current (4 A, for a gazelle pump).
The pump runs when the fan is on.
In a Kalina car, the heater fan is protected by a 25-amp fuse F5. Considering that the maximum fan current is 18 amperes, and in addition to it there is also a washer and an electric power steering control unit, it is impossible to add another 4 ampere load. Even connecting the Bosch pump is questionable. You don't want to be left without power steering at the most inopportune moment, do you?
I suggest this connection option. The pump connects directly to the battery or other suitable connector under the hood. The circuit must be protected by a 5 amp fuse. To turn it on you need a relay. Here it will be connected to the fan. Thus, the circuit will be de-energized when the ignition is turned off. The gazelle pump is connected using a single-wire circuit. The second wire is the car body. But if in doubt, you can stretch the wire from the minus terminal to the pump body.
What cars is it suitable for?
For cars that have a small circle hose that bypasses the heater. Due to the fact that the stove is regulated by the heater tap, these are all VAZ cars from Kopeika to Kalina and Priora. The design of the cooling system of the latter is justified rather by tradition rather than by necessity. The cooling system of Grant, Largus, Kalina 2 and Priora 2 cars is designed so that all antifreeze flows through the stove in a small circle. Adding another pump is useless.
It’s getting warmer here, I decided to start improving the stove, the first person who got the idea from me was iStariy, but either I misunderstood a little, or he didn’t write it down in such detail, in general, I surfed the Internet on this topic, from which I learned the following -
1. An additional pump is needed to improve the circulation of coolant in the cooling/heating system,
2. The principle of operation of the system with additional a simple pump: An additional pump is installed in a section of the hose that goes to the heater radiator after the thermostat, thus “accelerating” the rate of passage of hot coolant through the heater radiator, which directly “warms” the interior.
3. Pumps are usually bought in two types - a) a pump for Gazelle, its cost is around 500-800 rubles depending on the season) and b) a Bosch pump from 1300 to 2500 depending on the performance of the pump.
A bad feature of the Gazelle pump is that due to its poor design, after a while it begins to leak through the gasket; the solution to this problem is to first disassemble the pump and lubricate the gasket silicone sealant, or “muff” with hot glue or other sealant, the lid with a gasket is secured. The Bosh pump is devoid of this drawback due to the fact that the design is designed in such a way that there are no gaskets, and there is no place to leak from.
4. We are not pioneers, add. pumps are installed not only on the Lance, but on all cars in general, the sensitive owners of which struggle with the problem of poor operation of the stove in cold times. Moreover, this solution does not require replacing the heater radiator, the replacement of which is often very labor-intensive; at least in our Lances, we will have to remove the entire front panel in the cabin. By the way, on some German cars an additional pump is installed in the system directly from the factory, and is intended for exactly the same purposes as what we are trying to achieve.
I think there is enough text to understand what is what, then there will be a description of how I did it, plus a little pictures.
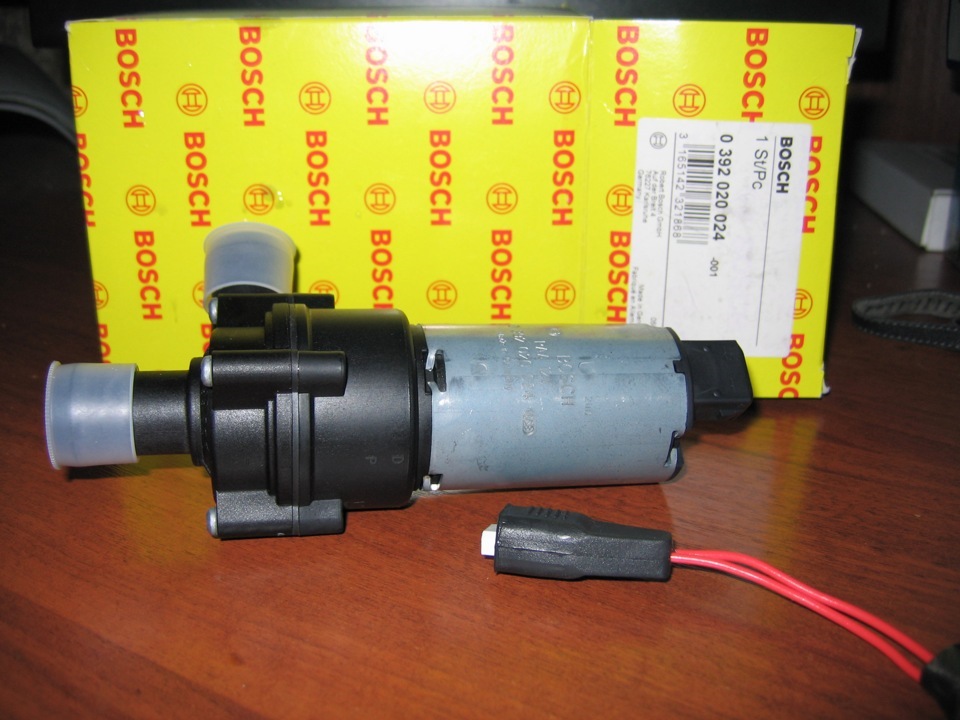
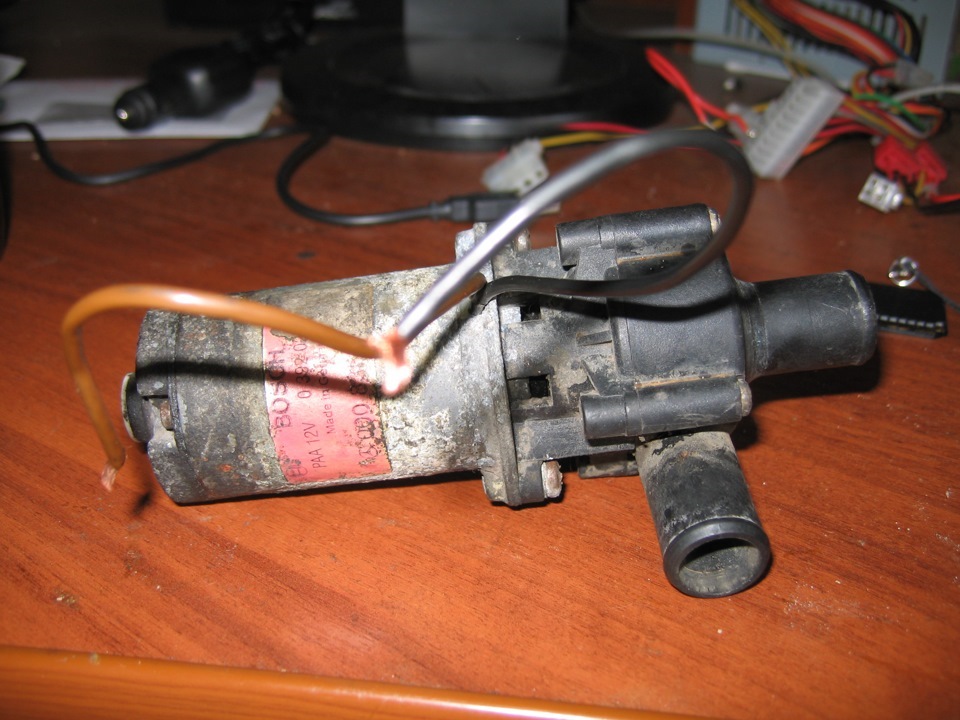
I bought a Bosch pump, article number 0 392 020 02, it cost me 1300 rubles, in terms of power it is the most basic one from Bosch, but I think it will be enough.
Additional pump pump Bosch 0 392 020 024
It just shows that coolant is supplied into it from the top, and then after “acceleration” it comes out through a hole on the side.
To operate the pump, I bought a terminal chip for connecting to the car's electrical network.
The chip is bought at the VAZ store, and it seems to fit the fuel injectors, alas, I don’t remember which model, it came with a pump and was selected on the spot. Price tag 50 rubles.
Chip from fuel injectors from VAZ
Together it looks like this
Citric acid from Auchan, packaged, 8.5 rubles per bag, bought seven of them. The tire is red, either turbo or professional, in general there were two types for cleaning pipes, I took the more expensive one, judging by the label it works faster.
We started analyzing the system.
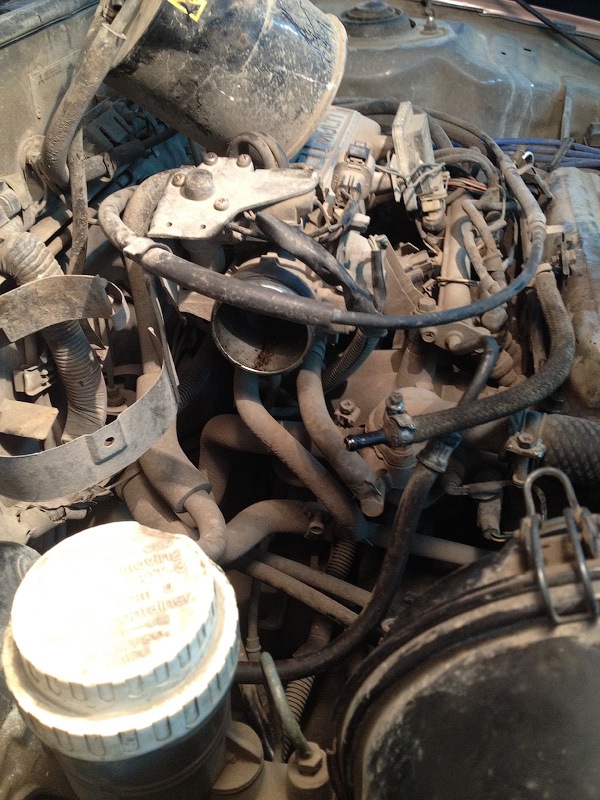
For ease of access, we removed the “air line” running from the air filter to the throttle valve, and moved the absorber to the valve cover so as not to interfere. Nothing complicated, everything is on clamps.
The result is something like this workspace:
Next, disconnect the two hoses coming from the fuel rail and from the thermostat.
ATTENTION, the antifreeze (or whatever you have in there) is under pressure in the system, and besides, it is still hot for some time after the engine is turned off. Therefore, either drain it by preparing a container in advance and placing it under the car or under the hoses. I don’t know what’s best, I did it simply, I got scalded a little, and then all the antifreeze leaked out through the gearbox under the car)
I put hoses on the freed tubes from the heater radiator through aluminum tubes to extend it, since it is still better to flush the system not above the engine.
It turned out something like this:
Hoses for supplying and discharging liquid outside the machine during washing
The essence of flushing is simple, from a bucket, an acid solution is poured on top, a pump connected to a 12V power source gives it speed and then through a hose drives the mixture through the heater radiator, from where it, along with dirt and other radiator deposits, exits through the second hose back into the bucket, and so in a circle until complete satisfaction.
The whole system, together with a pump to speed up cleaning, a bucket and hoses, looks like this in the end.
While I was running the system citric acid, it was not cleaned so clearly, some small black dots got into the bucket, but I thought that everything would be much worse. Then I decided to pour Tiret into the system, filled the entire jar, left it for a couple of minutes, then hot water with citric acid I decided to run it all through a few more times, as a result, a bunch of dirt poured out of the radiator into the bucket along with a bunch of foam, which firstly stank terribly, and secondly looked disgusting, i.e. like this:
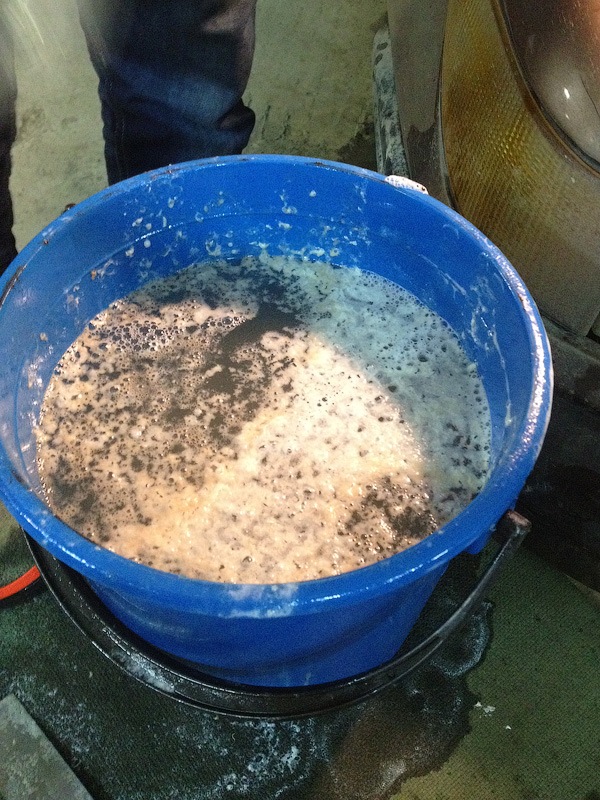
heater radiator bonuses
After this, having passed the hot liquid in a circle 15 times, the output stream of water was gradually cleared of dirt. At this point, it was decided to finish flushing the system. Luckily it took two hours.
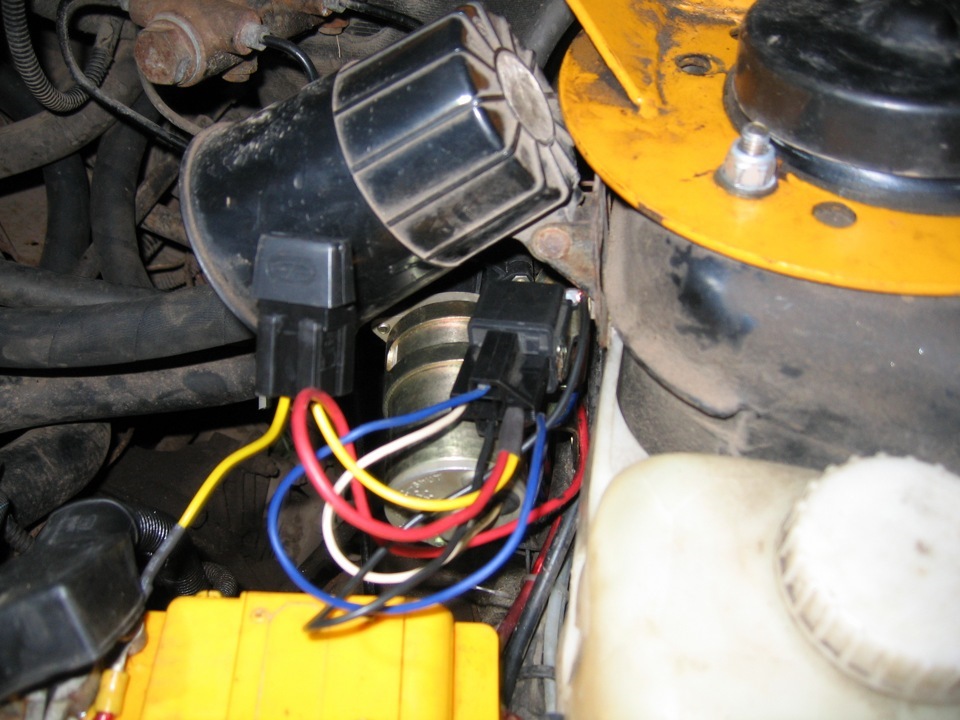
Next, I installed the pump, in view of the fact that hemorrhoids are still a problem, because there is not enough space, and the factory hoses are very conveniently bent for the original design - I do not have photos of this process. But I will say this, the pump was placed under air filter. close to the thermostat itself and its original connections. I made do with one hose, from the thermostat to the pump, but the original hose was directly attached to the additional one. The pump is the right size. I just had to look for clamps in the garage. You can estimate their size in advance based on your own hoses.
I decided to control the inclusion of the pump in the following way: I threw the minus directly onto the battery, plus I led it into the cabin through the throttle cable, it seems, hooked it to the button, the button was placed under the steering wheel above the air duct impeller, it’s quite convenient, unnoticeable and doesn’t hurt the eyes. The control plus from the button has so far been thrown directly onto the fuse in the block which is above the driver’s left foot, the tester found which one has a plus only after the ignition is turned on (since if the plus was constant even when the car is turned off, then I would risk leaving the car with it on a pump that would drive my battery until it was completely empty). Something like that.
Of course, the BOTTOM LINE is that the car is noticeably warmer as with the extra switch on. with or without a pump, plus, in the morning, when it’s cold, you can turn on the pump and within a couple of minutes warm air will be blowing from the stove.
VERDICT: A must have for every owner old typewriter with problems with the stove in winter.
p.s. Meanwhile, the odometer counter has exceeded 320,000 km.)
It would seem that it’s not the season to talk about the pump. But, as they say, prepare your sleigh in the summer. Moreover, there is a difference between poking around under the hood in the sun in the summer and draining the coolant, or during the first frosts. By the way, I managed to dig deeper in the cold, but first things first.
There are a whole bunch of descriptions of installing an additional pump, there is something to compare with, if anything. Plus there is always a choice of what to follow. I will not make a holivar about the need or not need for this modification. We will assume that the person reading this entry himself came to the conclusion that he would install a pump in his car. I will describe my experience, the difficulties I encountered and their solutions.
1. Selecting a pump.
Standard pump from GAZelle. Well, where should we put such a fool?
Photo from the Internet, below GAZelevskaya, above something closer to Bosch.
I took it, installed it, skated it for a month and started filming it in the cold. Firstly, it’s not without an omentum. There is a rubber ring there and there is a ceramic ring there, which for some reason burst. Antifreeze ran, flooded the pump motor, it closed, not pleasantly, in short.

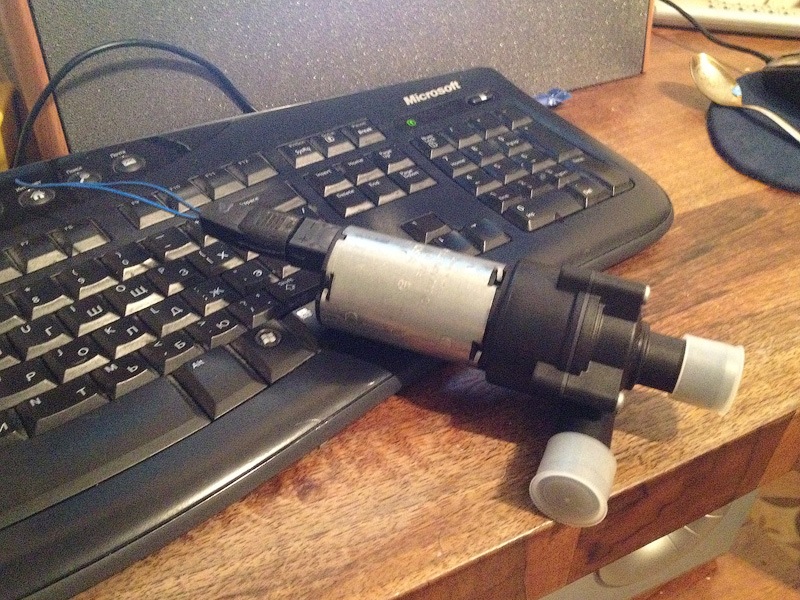
What should I do? Those who like to save always pay twice. Actually, I went for a new pump, but I had already decided to take a good, branded, imported one. Well-known manufacturer.
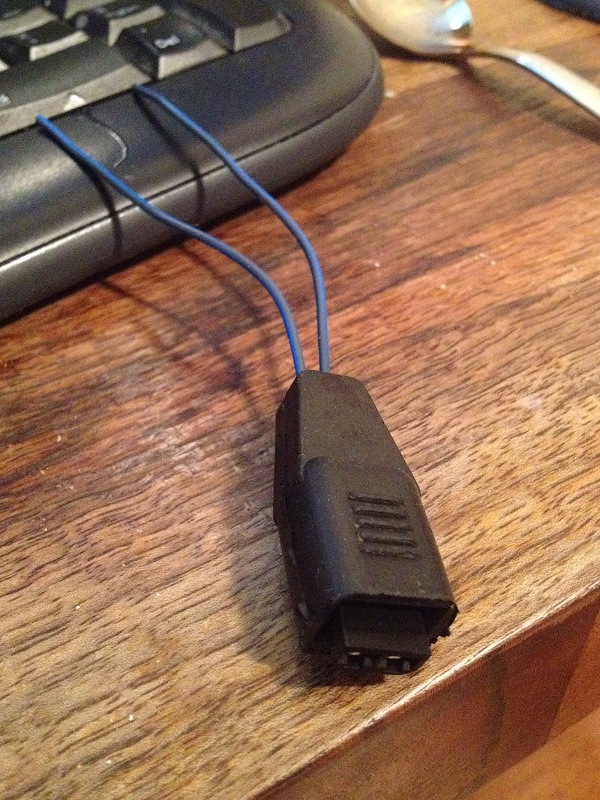
And now I already have this device on my table. The connectors, by the way, fit them or are original to certain brands auto (for foreign cars, of course) or standard. As a connection connector, I simply took a connector from a VAZ brake fluid level sensor, etc. It could have been done simpler and better, by buying a native connector. It is the same as on the knock sensor or on VAZ injectors, etc. But it wasn’t in the store. So I still drive with this connector. In principle, this pump cannot leak. It has no seals, no impeller drive shaft, the system is magnetic.
The new Bosch pump was slightly more expensive than the so-called GAZel pump. But you can save money. Everyone in the cities has showdowns. We go there and buy a used one from some Mercedes or Boomer, from some minivan. My brother-in-law, for example, got it from the 124th Mercedes. It was taken from a car that was growing into the ground. I brought it home, tried to connect it, but it didn’t start. Disassembled, cleaned, lubricated with Teflon grease. And that’s it, it started working and has been working for two seasons now, without any complaints.

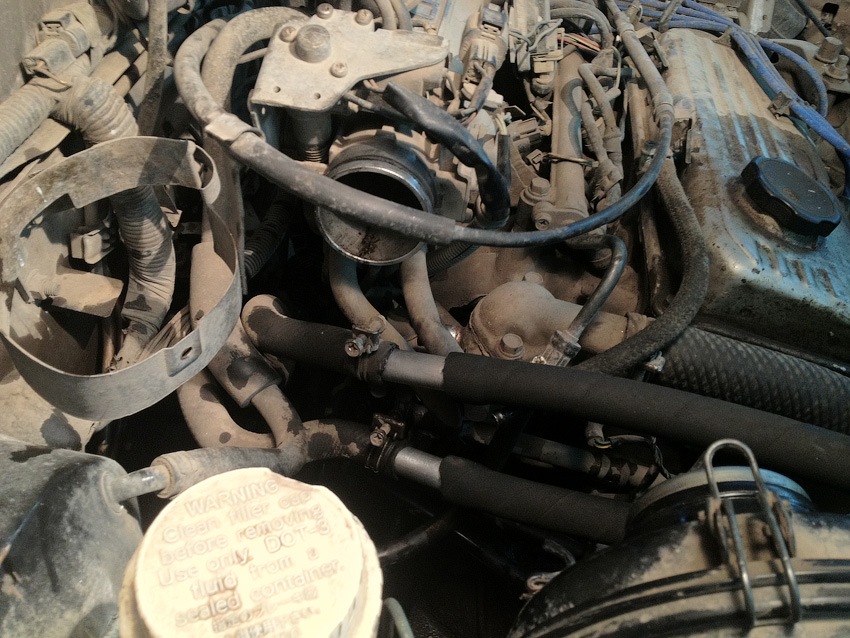
2. The choice has been made, now installation. There is nothing special to tell or describe here. Everyone has their own imagination, everyone has their own preferences regarding the condition of the engine compartment. I placed mine on the left cup, on the washer reservoir mounting pin. She settled in perfectly there. My brother-in-law has it hanging right on the hoses. The funny thing is that it is very light, unlike the bandura we made. And my brother-in-law didn’t even have to extend the hose. Just cut the hose convenient location and spliced it right together with a pump. I changed the hose, bought a piece of hose with an internal diameter of 18 mm. I connected the whole thing to the heater radiator supply hose. The photo below shows where it stands and you can even see how it is connected.
I agree, it's not very nice. But this was a temporary option, a quick fix.
3. Electrical connection. I talked about the connector, in addition, the following components were purchased.
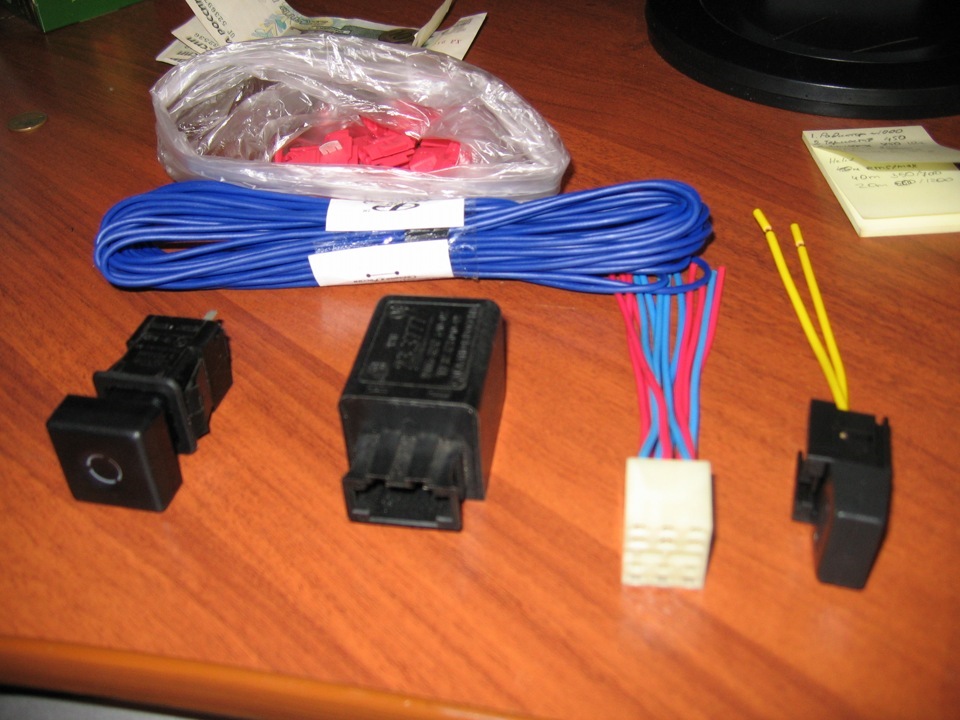
Recirculation button.
Relay ZPTF 23.3777 (self-locking). Expensive, but again, the showdown has everything.
Button connector.
Fuse box.
Unfortunately, I didn’t find the ZPTF relay connector in the store, and I didn’t go to disassemble it. I had to improvise.
You can also see clips in the background. I never advise anyone to use them. Only twisting (quality, according to science) or soldering.
Well, wires, terminals, heat shrink.
Remove excess tails from the button connector. I completely tore everything out. I crimped new terminals.
We are finalizing the button. It needs to be unfixed. Remove the marked bracket.
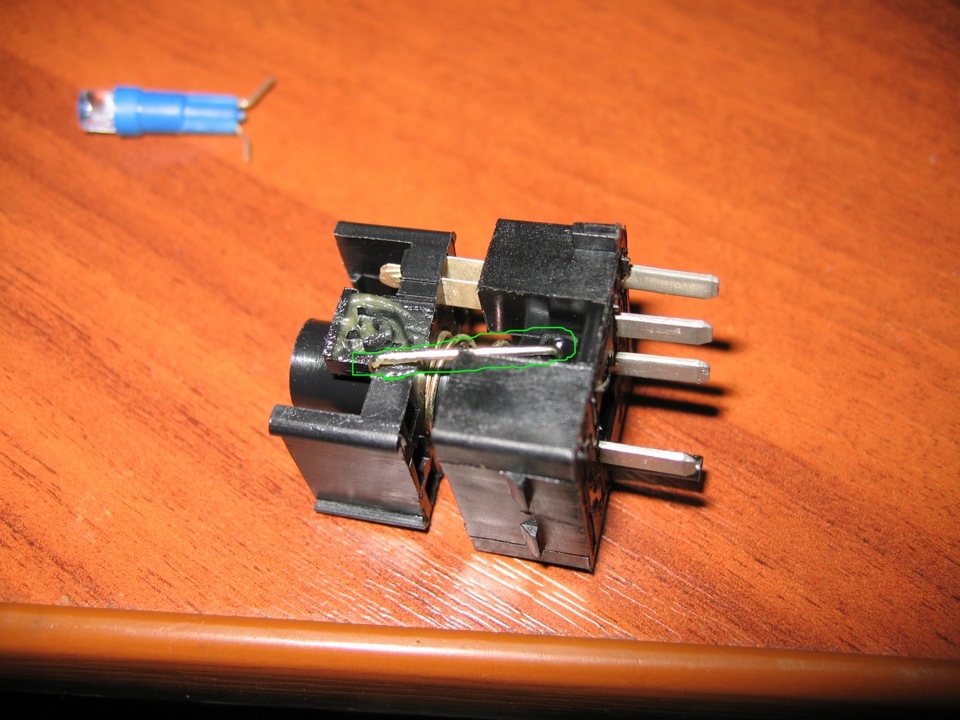
I also quickly connected to the ZPTF relay. Subsequently, I remade the connector for the window lifter buttons, which unfortunately I did not photograph.
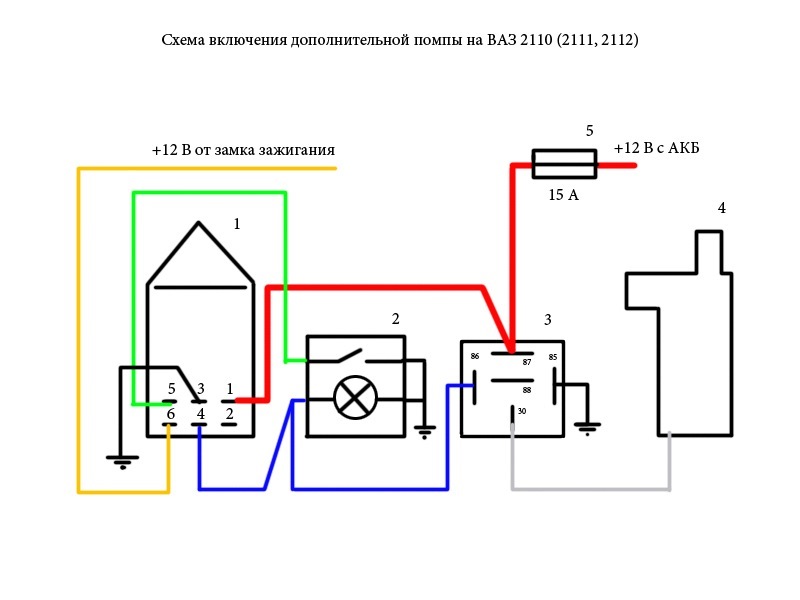
1.
relay 23.3777. Pinout:
1 Constant +12 volts. I have it pulled through a fuse, directly from the battery.
2 Not activated.
3 Land, wherever your heart desires, a lot in the cabin, I think anyone can find it.
4 Working (consumer is connected). In my case, a relay, which in turn powers the pump.
5 Signal, signal to turn on or off. It is served by pressing a non-fixed button once.
6 +12 volts from the ignition switch, from anywhere in the mounting block. The ignition on signal is easily caused by a multimeter or control.
2.
Actually our modified, non-fixed button.
3.
A relay that, in general, does not need to be installed. But I have it so that the pump is closer to the power source.
4.
And the pump itself.
5.
Fuse. 15 Amps is enough. Tested when “our” leaking pump shorted out.
Well, in the end, you need to put all these connections, the snot from the wires in order and you can use it. The scheme is suitable for any car.
How does it all work? The ignition is on, it becomes possible to use the pump. By pressing the button once, we turn it on. Tired of heating up, turn it off with a single press. In addition, when the ignition is turned off, it will also turn off. And the next time you turn on the ignition it will not turn on. Comfortable.
Observations: The Bosch pump operates completely silently, unlike ours. Ours buzzes like mad, because of it you can’t hear the engine (well, figuratively, of course).
The system has been working for me for three seasons now. No cons were noticed. Only advantages: at idle, the stove fries as if it were running, the glass begins to thaw earlier. It's already 40 degrees warm air, at 80 it’s already starting to burn your hand at the heater terminals.