Even the most refined interior over time, it begins to bother, and I want novelty. No matter how expensive finishing materials were used earlier, they all have their own “age”, that is, they begin to deteriorate, lose their attractiveness, decorative and operational qualities. Other unforeseen circumstances can also bring their own “negative adjustments” - leakage of the roof or from the upper neighbors, walls torn off or painted by children, indelible stains accidentally placed on surfaces, mold, etc. That is, there can be a great many reasons to think about interior renovation.
This is said to prove that the redecoration in the apartment complete instructions which will be presented in this publication, sooner or later every owner has to carry out. Therefore, most owners have a fair question about what activities are included in this process, where to start putting the rooms in order and in what sequence to perform finishing operations.
What is cosmetic repair and its features
What is the difference between cosmetic repairs and when it is carried out, what work does it include, and what are its features? In this section of the article, we will look for answers to these questions.

Cosmetic transformation of the premises is carried out after a certain period after the overhaul. Of course, there are no set deadlines for its implementation, and there cannot be. It is usually planned in cases, one of which is faced by every owner of any housing:
- If you want to change the design of the interior.
- During the period of operation, the rooms were damaged, flooring, outdated design lighting fixtures, sockets, furniture and other interior elements.
- It is required to put the apartment in order before selling it, in order to give the premises a more respectable appearance.
- Decorating surfaces after a major overhaul.

For comparison, it is worth mentioning the work that is included in the overhaul of the apartment - this is the need to make their heat or sound insulation of surfaces, cleaning the walls of old plaster, leveling the walls and ceiling, with plastering and arranging the floor screed, with preliminary cleaning them from old coatings, replacement of electrical wiring, sewer and water pipes And much more.
It is quite obvious that there are stages that can be included in the list of both major and cosmetic repairs. For example, this is the dismantling of old ones and the installation modern doors and windows that match the design of the new interior and create more comfortable conditions residence.
Features of the repair work:
- Works can be divided into preparatory and finishing. Each of these two stages must start from the top, gradually moving down.
- First, all dirty and labor-intensive work is performed, that is, the principle of their implementation is from dirty to clean processes.
- If cosmetic repairs are carried out in a multi-room apartment, then it should be started from the room that is farthest from front door. The final step is. It is advisable to follow this sequence in order not to damage the lined surfaces in the rooms where the repair has already been completed, when building materials are carried through them, and not to spread dirt through the already finished premises.
- It is recommended to hang the doors of the room in which the repair has already been completed when working in other rooms of the apartment plastic wrap or an old wet sheet.
To know where to start putting the apartment in order, you need to figure out what stages the cosmetic repairs consist of, and in what sequence they are carried out:
- Drawing up a work plan, that is, a complete list of what is planned to be done.
- Development of sketches of the desired interior.
- Taking measurements and preparing estimates.
- Purchase of materials.
- Clearing the room of furniture.
- Removal of old windows interior doors and installation of new ones.

- Cleaning walls, floors, if necessary - and ceilings from old coatings.
- Surface priming.
- Ceiling finish.

- Puttying and re-priming the walls.
- Wall decoration with selected decorative material.
- Installation of sockets and switches, as well as lighting fixtures.
- Flooring floor covering.
Of course, this order is not a dogma at all - there may be certain changes in the sequence in it. But they still try to maintain the general “direction” of works approximately the same.
Instructions for cosmetic repairs - step by step
Above, the main stages of work on carrying out cosmetic update rooms. But in each case there are nuances associated with the characteristics of a particular room. Some of them will be described in the instructions presented in the table below.
| Illustration | Brief description of the stages of work |
|---|---|
 | The first thing to do when starting repairs is to draw up a general plan, including everything that needs to be done. If at this stage the design direction has not yet been finally determined, it is advisable to make several sketches for the design of each of the rooms. This will help to personally assess the appearance of the premises after completion of work. It is best to think over even two or three similar “mini-projects” and execute them in different color scheme and with possible options furniture arrangements. |
 | Next, measurements are taken of the areas to be updated. The linear dimensions of each of the walls, ceiling and floor are determined. Separately calculated the area of the door and window openings so that, if necessary, it can be subtracted from the total area of \u200b\u200bthe wall. In addition, it is necessary to count the number of electrical outlets, lighting fixtures, switches, taps, door handles, locks and other elements requiring replacement. |
 | Based on the data obtained, as well as after studying the average prices for materials in local stores, an approximate estimate of future repairs is drawn up. The resulting amount should be increased by another 15÷20%, since usually, even with marginal savings, the costs exceed expectations. The estimate includes the name and quantity of materials, as well as their approximate cost. It is best to perform it in the form of a table, so it will be easier to make calculations. If some or even most of the operations are planned to be carried out with the involvement of craftsmen, you will have to take into account the payment for the work, which usually happens not at all. less cost for materials. So it is more profitable to focus initially on your own capabilities. |
 | The next step is to free the room from everything that will interfere with the repair or can be damaged by building materials. Items that cannot be removed from the room should be covered with plastic wrap. If it is not planned to replace the flooring, then it is recommended to cover the floors with cardboard, and then with a film that can be fixed around the perimeter with masking tape. |
 | After the space is vacated and prepared, the old window frames are dismantled and new window frames are installed, if this is included in the redecoration plan. a special article of our portal will help the reader. Usually such work is carried out by teams of the window manufacturer. But the owners need to prepare for a sufficiently large amount of garbage, which will also have to be immediately removed from the premises. |
 | When the windows are installed, the exterior and interior slopes are finished. Technological gaps between window frame and the wall is filled mounting foam which is sensitive to ultraviolet radiation. Therefore, finishing the external slopes is no less important than putting in order. internal walls around the window. It should be noted that finishing slopes, especially external ones, is not an easy task, therefore, if there is no experience in carrying out this process, then it is better to entrust it to professionals. The outer slopes of the windows of high-rise buildings are finished with plaster mortar for external work. Interior walls can be decorated different ways- this is leveling with plaster, and then with putty, plastic panels or, for example, pasting with cork sheets. |
 | If it is planned to ennoble the slopes with a plaster mortar, with further painting, it is recommended to purchase fiberglass "spider line" for reinforcing the surfaces, and for the outer corners of the openings - a metal or plastic perforated corner, it is possible with "wings" fixed on it from a sickle mesh. First, at the outer corners of the opening, using finishing putty metal corners are fixed. Like the corners themselves, so perforated or mesh "wings" should be hidden under the plaster. |
 | After the final alignment of the slopes and the drying of the putty, fiberglass is fixed to the slopes with special glue. After impregnating it with glue, it will not only hide minor flaws in the putty layer and strengthen the surface, but also give it a pleasant roughness. When the glue dries, the slopes can be painted with paint on water based. But painting is usually postponed until later - when the walls of the room are brought into the final form. |
 | Drywall is also an excellent choice for finishing slopes, as it performs several two functions at once - this is surface leveling and additional thermal insulation. The sheets are easily cut and fixed to the wall with a plaster-based adhesive. On the primed drywall, it will be possible to subsequently stick wallpaper or cork, paint the slopes with water-based paint. |
 | Another option that is becoming increasingly popular in Lately- this is a facing of slopes with plastic panels. The convenience of this material is that its installation is quick, since there is no need to wait for the solution or glue to dry. But, in addition to the panels, for their accurate installation it will be necessary to purchase special profiles - starting, fixed on window frame and a corner decorating outer corner opening. Since the panels are fixed to the crate, and free space is formed between the wall and the panels, it becomes possible to insulate the slopes. But before choosing this cladding method, it is imperative to check whether the window will fully open after installing the panels. Much more detailed is considered in the special article of our portal. |
 | Further, the interior doors are dismantled - this process can be done independently. The first step is to remove the hinges door leaf. For convenience, you can use a nail crowbar as a lever. This tool will also be required when removing door frame, which is dismantled after removing the canvas from it. If you do not plan to reuse the door frame, then the easiest way to remove it is by sawing vertical racks in the middle part. |
 | You can also install a new door yourself if this service is not provided by the manufacturer of the product. The door frame, together with the door, is placed in the wall opening above the threshold height by 3 ÷ 5 mm and aligned with building level. To fix the structure in the required position, in the gaps between the wall and the box, in two places on each side, linings are installed - pieces of timber or boards, depending on the width of the resulting space. These additional details must be prepared in advance. Wooden inserts must have sufficient width so that a fixing screw passes through each of them when fixing the box to the wall in a given position. After the box is securely fixed in the opening, the gaps around it are filled with mounting foam, the excess of which will need to be cut flush with the wall surface, after it expands and dries. The gaps around the door frame are masked by decorative overlays - platbands. For safety, it is best to immediately cover the hinged door with plastic wrap for the rest of the repair. If planned, then the instruction article to which the link leads will help. |
 | Now you can proceed to work on the preparation of the ceiling surface. If a decision is made to install a drywall construction or system " stretch ceiling”, and the surface is not damaged by mold or fungus, and there are no unstable fragments of the finish or ceiling visible on it, then it is not necessary to clean the old coating from it. But when wallpaper, paint or ceiling tiles, then the old coating will have to be removed. Whitewash can be scraped dry or wet with a spatula, depending on the thickness of its layer and the strength of its adhesion to the surface. The wallpaper will also need to be removed, since the ceiling must be absolutely clean to finish with all the above coatings. |
 | In order to finish the most dirty work as soon as possible, after cleaning the ceiling, it makes sense to immediately move on to and to free the walls from the old finish. There are several ways to carry out this process, the one that is more suitable for a particular case is selected from them. Sometimes it is enough to pick up the wallpaper with a spatula, and it is completely separated from the wall. In other cases, you have to impregnate them warm water, moreover, applying it several times, after which the wallpaper is also cleaned off with a spatula. Another commonly used way to separate the canvases from the wall is to treat them with wet hot steam. For this purpose, a special steamer or an iron with a steam supply function is used. The process of removing old wallpaper is quite tedious, but even a small piece of material should not remain on the walls, otherwise it may show through the new finish. |
 | Harder to get rid of old paint, which still covers the walls in some kitchens and bathrooms. It is especially difficult if it is oily. But for this purpose, there are also several ways. The simplest, but at the same time dirty and time-consuming method of cleaning is abrasive, that is, using metal brushes, manual or in the form of attachments for power tools. You can use a chemical wash - applying a special compound to the wall that softens the paint, after which it can be easily cleaned off with a spatula. |
 | Another way is to heat the coating with a building hair dryer. P under the influence high temperatures the paint also softens and separates from the surface, so it can be easily cleaned off with a regular spatula or the nozzle included in the dryer kit. |
 | Now that the entire room has been cleared of the old finishes, it remains to remove the flooring, if, of course, it is planned to replace it as well. The first step is to dismantle the skirting boards that hold the material around the perimeter. A mount is also suitable for this purpose. If linoleum is laid on the floors, it will be easier to remove it than any other coating, even if it is fixed with special glue. The flooring must be separated from the floor on one of the narrow sides of the room, and then, peeling it off the surface, immediately rolled up. |
 | Dismantling the parquet will take more time, but it is also easy to remove it - just hook on one of the lamellas. For this work, the mount is also suitable. If the parquet is in good condition, then it should be removed more carefully, as it can be reused for flooring. |
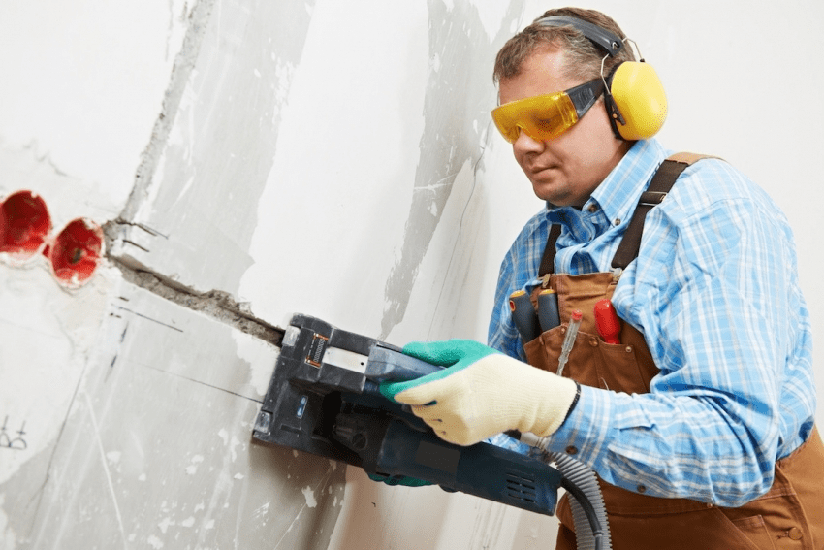
 | More challenging is removal from floors or walls ceramic tiles, especially if it was laid on high-quality glue. This work can be done manually, using a hammer and a special chisel for this, or using a puncher, on which a similar nozzle is also installed. After the decorative coating is removed, the floor surface must be thoroughly cleaned of glue and debris, as the surface must be clean. |
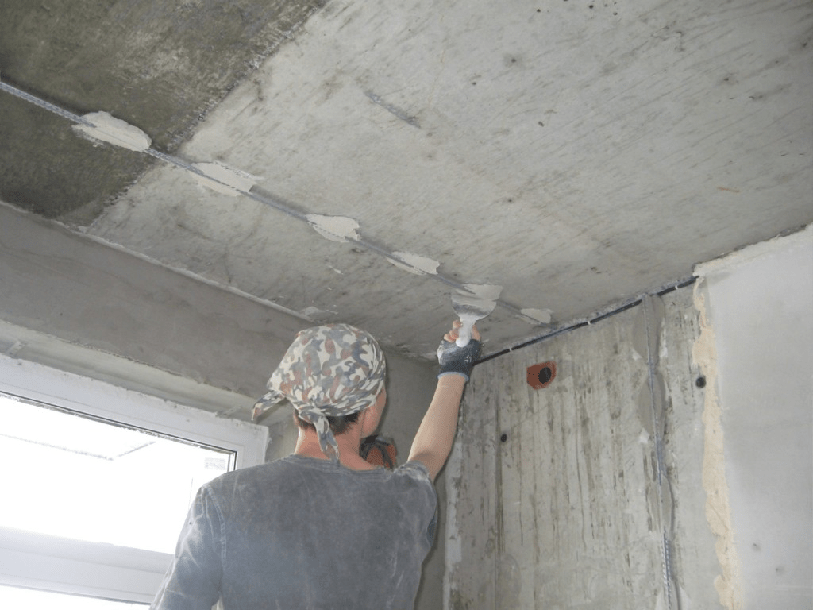
 | When the surfaces are cleaned, they should be inspected for cracks that need to be repaired, otherwise they will definitely appear through the new finish. Cracks widen and deepen as far as possible. Then they should be cleaned and treated with a primer - it is better to do this with a spray gun, so the primer will penetrate the damage on the wall to the full depth. After waiting for the soil to dry, narrow cracks are filled with concrete or putty mortar, and wide ones, more than 15 mm, can be filled with mounting foam with an average expansion coefficient. When the foam expands and dries, its excess must be cut to the level of the wall. The process is very messy and tedious, but should not be ignored or simplified. Read more about this in the article to which the recommended link leads. |
 | Before proceeding to the next stage of work, it is necessary to de-energize the room and remove sockets and switches. The empty sockets remaining from them are best sealed with masking tape. Now that the room is ready for pre-treatment for decorative coating, a deep penetration primer is applied to the ceiling, walls and floors. It is able to bind the surface of the base material and penetrate to a depth of 10 mm. If you apply two or three layers of soil, then the quality of processing will only increase. Each subsequent layer is applied after the previous one has completely dried. |
 | If the ceiling is even and needs to be prepared for painting, wallpapering or foam tiles, then it is covered with a thin layer of putty, which will hide minor flaws. The work is done with a wide spatula. Further, the surface prepared for wallpaper is polished using a construction grater with an abrasive nozzle (mesh or sandpaper), which has a medium grain, approximately P160. We will not describe the details here - a separate article of the portal is devoted to this. |
 | If the ceiling is planned to be painted, then it is recommended to stick a fiberglass “spider web” on it. This will greatly simplify the process and improve the quality of the finish. |
 | Then, after painting, the ceiling will have a pleasant texture, uniform matte surface, which is quite difficult to achieve by applying putty, especially in the absence of experience in this work. We advise you to pay close attention to this interesting stuff- . He will help out more than once! More about it - in a separate publication. |
 | The next step is to putty the walls. The number of applied layers and the quality of processing depends on the selected decorative coating. Before painting, the surface of the walls should be perfectly smooth, but if something went wrong, then the same “spider line” can save, which will disguise small errors. For wallpapering, the wall should be even, but perfect smoothness can not be achieved. |
 | To ensure that shortcomings are clearly visible during puttying, experienced painters use backlighting. Properly set light will reveal even the smallest unevenness, as it will cast a shadow. |
 | After the putty layer has dried, it is sanded with a construction float. The process is carried out in a circular motion, counterclockwise, without strong pressure on the surface. Sanders are also used, belt, vibration or eccentric. But since they give a huge amount of dust, such an operation should be carried out only if it is possible to connect the equipment to a construction vacuum cleaner. It is written simply, but in fact subtle is a very difficult task. To deal with it - read the recommended article-instruction. |
 | Finished puttied and sanded surfaces are recommended to be primed again. This layer will increase the adhesive ability of materials, so the paint on the coating will lie more evenly, and the wallpaper will be easy to stick to the wall. |
 | Further, if it is provided for by the plan, a stretch ceiling is mounted. The process is complex and unsafe, and it requires special equipment, so this stage of work is best left to specialists. |
 | If it is planned to paint the ceiling or paste over it with wallpaper or tiles, then a ceiling plinth is marked and glued along its perimeter. To fix it, one of the polymer adhesives is used, and many craftsmen even use a diluted solution of finishing putty. Framing will limit the areas that will be applied decorative cladding. So that by chance, paint or wallpaper paste does not get on the plinth, it must be decorative materials should be covered with masking tape. |
 | The ceiling surface is painted using a roller with a fur nozzle. The ceiling is painted in two layers - the first of them is applied from the window to the door, parallel to more long walls rooms, the second is perpendicular to the first, that is, parallel to the wall with a window opening. |
 | If it is planned to use wallpaper with a certain embossed or color pattern for facing the ceiling, then it must be taken into account that it is much more difficult to combine it on the ceiling. Canvases can be glued both along and across the room - this choice depends on the preference of homeowners for the location of the wallpaper decor. But still, it is recommended that the connecting seams be located from the window to the entrance - this way they will become less noticeable. |
 | When cutting wallpaper, they must be made longer by 50 ÷ 100 mm, and they are glued with a small allowance on the baseboards, combining the pattern if necessary. After gluing the canvas, it is easy to trim it - press it with a spatula exactly along the plinth line, like a ruler, and then cut off the excess with a knife. |
 | Expanded polystyrene tiles are all mounted differently. Some people think that the skirting board is better to stick on top of the tiles. This is wrong, since sometimes the glue is not able to withstand such a load, and both the baseboard and the tile can immediately move away from the ceiling. Therefore, the plinth should only be glued to the ceiling, and the tiled flooring is already adjusted to it. To ensure that the tiles are evenly distributed on the ceiling, before installing them, the surface must be marked. Usually, two perpendicular lines are beaten off on the ceiling, which intersect at the point where it is planned to place the chandelier. Focusing on them, and stick the tiles - on glue or on the finishing putty. If necessary, the side plates glued along the plinth line are trimmed. |
 | Next, you should finally finish with the dirty work, which includes leveling the floor for a new coating. The surface of the floor must be primed again and dried. A damper tape is glued around the perimeter of the entire room along the plinth zone, which is designed to compensate for the expansion of the screed or self-leveling floor when temperatures change. |
 | To quickly level the surface of the floor, which has minor errors, special bulk self-leveling solutions are used - they are commercially available in a wide range. The prepared composition is poured into puddles on the floor and spread over the surface first with a wide spatula or doctor blade. After that, the master puts on spiked paint shoes, takes a needle roller on a long rod and finally evenly distributes the mortar over the floor. The composition tends to occupy all free spaces, that is, cracks and dents, and its surface independently occupy a perfectly horizontal position, as it should be for a liquid. Now it remains to wait until the updated floor hardens - and you can proceed to the next stage of work. How to choose and how - in a separate publication of our portal. |
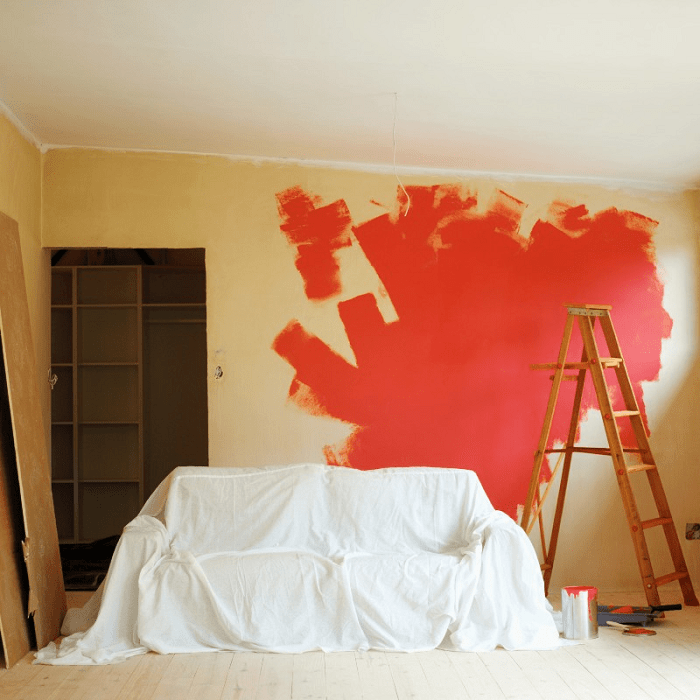
 | The walls are painted using a roller with a fur or foam nozzle, depending on the desired effect. The paint is applied to the surfaces starting from the ceiling plinth with up and down movements, gradually covering the unpainted areas. To get an evenly painted wall, at least two layers of the paint composition must be applied to its surface. |
 | Wallpaper is pasted starting from the corner of the room. At the beginning of the wall, stepping back from the angle of 20 ÷ 30 mm, a perfectly even vertical line is beaten off, the first sheet of wallpaper will be aligned along it, and the first sheet of wallpaper will be glued. The upper side of the canvas should be 20 ÷ 25 mm on the skirting boards, so that it is possible to align the drawings or patterns, and at the same time not leave an unglued strip on top. |
 | In order for the top edge of the wallpaper to be even, it should be pressed against the plinth with a spatula and carefully cut off the excess part with a sharp clerical knife. For work, it is best to use a spatula with a width of 250 ÷ 400 mm with a smooth edge of the blade. The process is not as simple as it might seem. The nuances of this finishing stage are in a separate article. |
 | When the wallpaper is dry, sockets, switches, and wall lighting fixtures are installed in place. |
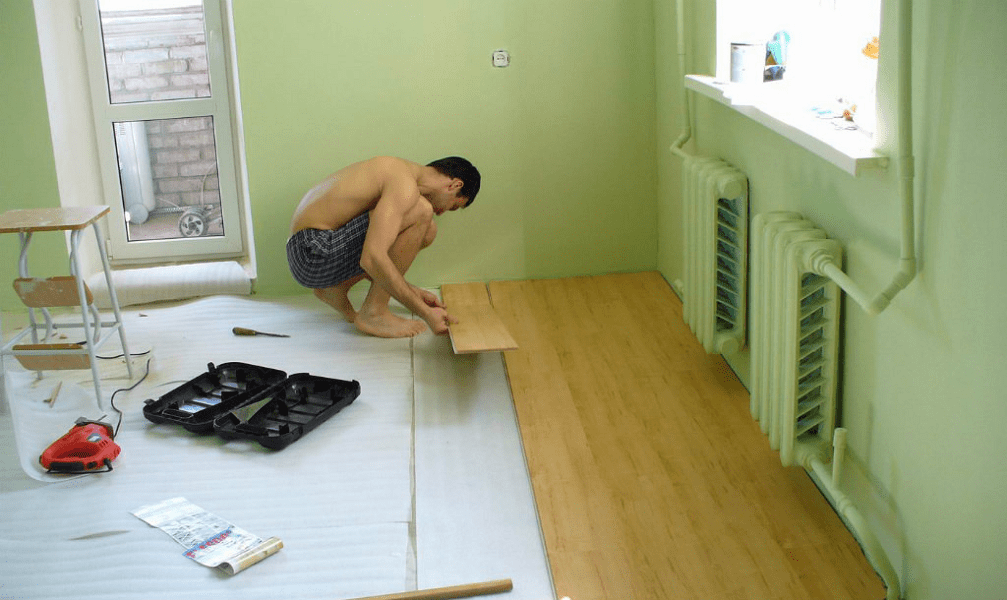
 | The last stage of work is the arrangement of the floor covering. It is started when the self-leveling floor curing time recommended by the manufacturer is fully met. If for finishing a laminate is selected, then it is mounted on a special substrate, which will reduce the noise from steps on the coating, and will give the necessary level of depreciation. A special article-instruction posted on the pages of our portal will help to carry out qualitatively. |
 | Unlike laminate, linoleum must lie down and straighten out before fixing it on the floor, this takes about a day. The coating is spread in the room for which it is intended and left for the above time. After that, the evenness of the laying is additionally checked, then the linoleum is pressed against the junction of the horizontal and vertical planes and extra strips are carefully cut off from it. There should be a gap of 5 ÷ 7 mm between the wall and the coating, which is necessary to compensate for the thermal expansion of the material. Previously, linoleum was certainly glued to the base, but today this installation technology is rarely resorted to. More often quality material fit as described above. About the technology with all the details - a special publication at the link. |
 | Another material option that is becoming increasingly popular is cork tile or rolled flooring. Tiles are laid on the principle of laminate, and roll material fixed on a special glue applied to the prepared base. |
 | The coating will not look properly if it is not framed with a plinth. Similar trim details may have different design And Various types fasteners. It is important that the skirting boards fit well into the overall interior design according to color solution and harmonized with the flooring. At the same stage, the threshold is fixed in doorway, which also presses the edges of floor coverings in adjoining rooms. |
The result of cosmetic repairs should be neat, ready for furniture arrangement and further operation.
Agree that most operations, except for some specific ones (which, by the way, may not be at all in the general plan of work), can be performed independently.
* * * * * * *
In this article, only short description stages of work replenishment of cosmetic repairs. But on the pages of our portal, in the section, each of the mentioned processes is given a lot of attention. In this array of information, the reader will find not only detailed instructions for conducting repair and finishing works, but also recommendations for choosing necessary materials, with a comprehensive consideration of their characteristics, advantages and disadvantages.
And in conclusion, for an example, watch a video on redecorating an apartment.
Video - Quick and not very expensive cosmetic repairs in the apartment
The issue of repairing a room almost always rests on the budget for future work. Most often, the owners of an apartment or house are faced with a choice - to do a cosmetic renovation of the room with their own hands, without putting it off indefinitely, or to plan a major restructuring with redevelopment and a major design update for an indefinite future. Most masters in such a situation recommend a redecoration of the room, during which the vast majority of problems with the interior of the room can be solved.
How to approach the organization of repairs in one room
Starting repairs in a room is always inconvenient and even scary, especially if there is not enough experience, and of the assistants at hand, there is only a cheat sheet on doing a do-it-yourself room renovation for beginners. But, as a rule, uncertainty and doubts pass when the scope of future work becomes clear and the question is resolved in what sequence to make repairs in the room.
Therefore, the first step is to draw up a master plan for cosmetic repairs, and most importantly, before trying to make repairs in the room, it is necessary to draw up a detailed estimate for the purchased materials and consumables. This is a prerequisite, even for repairs in a small room you will need to make a list of several dozen items.

Where to start repairs in the room is not important, you can carry out repairs in the sequence that seems more convenient in these specific conditions. Traditionally, do-it-yourself room repairs begin with the most “dirty” or rough work and end with fine finishing procedures.
A typical list of work or a sequence of repairs in a room is as follows:
- The old finish is removed from the walls, ceiling and floor. Removing the floor covering gives the largest percentage of dust and dirt, so it is removed first;
- A rough preparation of the floor is being carried out for further laying of a new floor covering;
- Wiring is being repaired, lamps, switches are being moved and hung, corrugations are laid out for television and Internet cables;
- Walls and ceilings are cleaned and plastered. If the plans for redecoration involve changing the wallpaper to a more modern type finishing, you will need to align the walls gypsum plaster;
- The ceiling surface is leveled in a similar way. For whitewashing or painting with a water-based emulsion, the ceiling is overwritten, plastered with a lime-gypsum mixture and a decorative coating is laid;
- Performed decorative trim walls, glued ceiling plinths, the lining of interior doors is changing;
- A new floor covering is laid, skirting boards are installed, lamps are hung, switches are being installed.
Of course, at each stage of repairing a room, a photo, a large amount of debris and dust will be generated. Not only will you have to regularly clean the room and take out rubbish blockages, you will need to try to cover areas with already completed repairs with a protective plastic film to avoid dusting the surface.

What not to include in a room remodel
Master finishers often call redecoration work "for three days", in order to update the interior in a room, more, as a rule, is not required. The list of repair measures does not include the most expensive work:
- Redevelopment of premises with the transfer of interior partitions;
- Replacement of the heating system;
- Installation of expensive multi-tiered suspended ceilings;
- Balcony glazing and replacement of windows with double-glazed windows;
- Underfloor heating equipment in the room.
It is clear that all of the listed components of the repair require serious financial costs and the involvement of qualified specialists in the work. It will take more than a day or two to carry out such serious events. In addition, such is the specificity of the repair in the room that, willy-nilly, dust and construction debris spread throughout the apartment. Therefore, the situation is regulated in this way - either cosmetic repairs are made in a single room, or the entire apartment “gets up” for major repairs.
In general, the redecoration plan includes everything that can be done in a couple of days. with my own hands for relatively little money.

The main task of cosmetic repair
The main goal of the repair work is to refresh the interior of the room, remove minor defects and damage accumulated over the years, which are insanely annoying and interfere with everyday life.
In rare cases, cosmetic repairs are the result of force majeure, for example, the flooding of the room by the neighbors on the floor above or the preparation of the premises for rent. There can be many reasons, but the main thing is still maintaining the premises in a comfortable condition for living.

Properly performed cosmetic repairs make it possible to save on the volume of future overhauls. For example, performing a floor base screed and leveling the walls will at least reduce the time and effort spent on preparing for a major overhaul, of course, provided that the repair of the room with your own hands is done as conscientiously and efficiently as possible. .

The next stage of repair, distribution of costs and loads
One of the most difficult stages of redecoration is fairly considered to be budget planning and material procurement. Especially if you are planning most repair procedures do it yourself. The reason is simple - amateurs and novice craftsmen have no idea at all how much specific material is required for a particular area of work.
In this case, the problem is solved in two ways:
- Compiled List works and estimates can be shown experienced master, which will help calculate the flow rate by squaring the room;
- Calculate flow on the basis of standard recommendations of building materials manufacturers, increasing the stock of glue, plaster mixtures, wallpaper, flooring by 10% of the calculated indicators.
In the latter case, the cost of acquiring materials will increase significantly, but in the end, the remains of cement, dry plaster and glue can be used to redecorate other rooms in the apartment. In addition, having a list often helps to get a volume discount, so there are significant gaps in the budget of a future cosmetic update of a room when competent organization there should be no purchase.

Preparatory stages of repair in the room
The first, most time-consuming stage has always been and remains the rough peeling of the walls and ceiling. Usually, repairs in a room begin with the removal of furniture and sealing the front door with a protective awning. You can use thick plastic wrap or an old blanket. An impromptu curtain will protect the rest of the apartment from noise and dust, which, even with very careful work, the use of a vacuum cleaner and wet cleaning of floors, always accumulates in considerable quantities in the room.
Before repair, lamps must be removed, instead of a chandelier, a cartridge with a light bulb is left in the room. If double-glazed windows are installed in the room, then it will be useful to tighten the window opening with foil before repair. It is clear that the floor covering is also covered with a film, it is easier to roll up the laid polyethylene than to wash out the dirt in the room every evening.
Removing old finishes from walls
It takes about a third of the planned time to prepare for cosmetic repairs. During this time, you will need to remove the whitewash and wallpaper from the walls of the room. If there are areas with damaged plaster, it will take another day to knock the plaster off the walls.

Old wallpaper is removed either with one panel or scraped off in small pieces for a long time, it all depends on the glue used. Before removing the wallpaper, the surface is moistened with a spray bottle with a small amount of water. After 20-30 minutes, the tapestries can be removed in patches. For especially strong adhesives use boiling water and steam. In any case, after peeling off the old trellises, you will need to go through with a vacuum cleaner and a stiff brush to remove dust and glue residue.
Stripping and restoration of the ceiling surface
The ceiling is freed from the decorative coating much faster and easier than the walls. If the plans for cosmetic repairs include the sticker of polystyrene plates or laying plastic panels, it will suffice to remove upper layer whitewashing.
The situation is more complicated if the ceiling in the room is painted with water-based paint or whitewashed with lime. In this case, it will take at least a day to remove the durable layer of the old finish.
The most common option for restoring the ceiling during cosmetic repairs involves leveling the plane of the ceiling. In any room of any apartment, floor slabs lie with a trim of several degrees, which leads to a difference in ceiling height near the opposing walls of the room from 2 to 5 cm.
If the time and budget for cosmetic repairs allow, then it is best to level the ceiling with high-quality gypsum plaster.
To do this, plastic slats are sewn onto the ceiling and the plane is tightened with a plaster mesh. Reiki-lighthouses are glued with alabaster, guided by pre-stretched marking horizontal cords. The mesh is sewn on dowels. The total time required for the final leveling of the ceiling in the room is 5-6 hours of work.
Can be done in one business day complete renovation ceiling. The next day, you can rub, prime and paint the surface.

Cosmetic repairs to the walls of the room
During cosmetic repairs, the walls are leveled and plastered only in exceptional situations when the situation requires it, for example, the appearance a large number cracks or chipping of plaster. In addition, the total area of the walls of the room, as a rule, is three times the area of \u200b\u200bthe ceiling, which in itself requires a lot of time and materials.
Therefore, during cosmetic repairs, the preparation process is limited to cutting small cracks, followed by puttying and grinding the surface. Sometimes, in order to level the plane of a single wall, especially problematic areas are subjected to grinding with an electric grinder.

In addition, at this stage of the repair work, it is not difficult to change the profile and configuration of the electrical wiring in the room. It is enough to drill channels in the lower part of the walls to the installation site of new electrical outlets, break through the "glasses" for the undercuts and install the outlets themselves. Corrugations with wiring laid in channels can be rubbed with gypsum or alabaster mass. All work will take a maximum of 2-3 hours. At the end of the preparation for finishing, the surface is vacuumed and primed.
Rough floor preparation
After the completion of the most time-consuming work with the preparation of the ceiling and walls, you can proceed to cleaning and preparing the floor. If the floors are concrete, with laminate-based flooring, then cosmetic repairs may be limited to re-laying laminate boards, with or without replacement of the lining material. Most often, damaged plates are changed in the room, after which the coating is polished using wax mastic.
During cosmetic repairs, linoleum coatings are cut out, the base is cleaned to concrete, primed and covered with a heat-insulating lining based on polyethylene foam.

If the room has wooden floors, then first of all the floorboards themselves are cleaned and repaired, then the joints are clogged and minted, after which the surface is polished and prepared for painting.
Don't forget about debris and dust
Any repair work, even the most simple and superficial, is always accompanied by the formation of a large amount of debris and dust. Before repair, you need to prepare two or three polypropylene bags, in which all the garbage from the room will be collected daily. At the end of the day, after each finishing operation, the walls and floor are cleaned of crumbling crumbs and plaster residues, and before finishing, the walls are vacuumed or wet brushed.
If it is supposed to level the walls of the room with gypsum plaster, then the amount of garbage will increase by five to six times. It will be necessary to think in advance and find a way to collect and remove from the premises 150-200 kg of cement-sand garbage screenings. You cannot send it to the garbage chute or garbage cans, you will need to order a special service for the removal of construction waste.
Fine cosmetic repairs in the room
First run fine finish ceilings. Usually, the repaired and sanded surface is primed and painted with light-colored acrylic paint.

If wallpaper is used in the interior of the room, the ceilings can be decorated with non-woven or vinyl wallpaper to match the future wall decoration. A common practice for decorating lamps and chandeliers is the use of imitation styrofoam moldings and decorative ceiling plinths.
The fine finishing of the walls in the room is considered one of the most responsible and at the same time time-consuming cosmetic operations. Even taking into account the fact that half of the walls in the room will be covered with furniture, a certain part of the walls will still be clearly visible to everyone in the room. If during the cosmetic repairs it was not possible to qualitatively level the surface of the walls, you can hide the flaws only under the wallpaper. Best trellis on fabric basis or with a pronounced embossed textured surface. It will take 7-8 hours or a full day to paste over the room.

Repair of doors and floor in a small room
The wooden plank floor of the old layout often has to be hidden under linoleum or laminate. In this case, the surface of the floorboards is polished with a sander, and the joints are sewn together with nails hammered at an angle to the board. At the next stage of the repair, the floor surface is sewn up OSB boards, after which you can lay linoleum or any other type of flooring in the room.

The situation becomes more complicated if the concrete floors are aligned with the level of the screed throughout the apartment. In this case, any floor covering in the room will lead to the appearance of a threshold, so the laying of laminate or parquet must be planned simultaneously in all rooms.
The final stage is the restoration of interior doors. The hatch and the door itself, if they are in good condition, can not be changed, but restored with cleaning and polishing of the surface. External cladding the door frame during the repair is traditionally replaced with a new one. The replacement of doors with a carrier frame is planned for a major overhaul, usually so that the entire apartment or house has doors of the same style and design.

Conclusion
Repair of a room, even in a cosmetic version, requires careful preparation, first of all, in the details of the future interior of the room, the method of decorating walls and floors. Any attempt to postpone the decision to the future, to do it randomly, as it happens, will lead to a significant increase in costs and increase the time required to restore the room by two to three times.
Every apartment owner wants to carry out cosmetic repairs inexpensively, but with high quality. This can be done realistically if professionals are involved in this process. Most often inexpensive minor repairs of premises involves only changing the lining - wallpapering, painting walls and ceilings, installing laminate, etc. To perform these works, budget materials are purchased, which may be slightly inferior in quality and appearance their expensive counterparts. Despite this, the tiled surfaces will look great, and their service life will reach several years or even more.
Cheap repairs at San Sanych
If you want to renovate housing in Moscow, please contact us. The company is engaged in all types of repairs - cosmetic, capital, euro, budgetary and others. In each case, we will choose best method solving the tasks set, taking into account the optimal cost. Our masters are distinguished by high professionalism and extensive experience in this field. The customer can expect that the employees of the company will adhere to the technology when performing all the necessary operations. This reduces the likelihood of defects, which subsequently need to be eliminated, which entails additional material costs.
What work is done during an inexpensive cosmetic repair?
If you decide to order a redecoration of an apartment, please note that the company can perform the following operations:
- replacement of wall cladding - painting with water-based paints or wallpapering (most often);
- puttying and painting the ceiling, sometimes wallpapering;
- installation of ceramic tiles, laminate or linoleum on the floor - the most budget options;
- replacement of plumbing fixtures and water pipes;
- laying electrical wiring and other operations.
How are the repairs going?
Most often, any repair, including cosmetic, begins with the preparation of the foundation. They remove old wallpaper, paint, close up small cracks and eliminate other defects. As a result, you need to get a solid, even foundation, which is a guarantee long term finishing services. Surface priming is equally important. It helps to prevent the appearance of fungus and improve surface adhesion. It is this base that is used for further cladding in the chosen way.
The usual everyday business: the apartment clearly needs repair, but there is not enough money. How to do inexpensive repair do-it-yourself apartments It seems to be the simplest, obvious way: surface cosmetic repairs. That is, plywood wallpaper, whitewashing the ceiling, painting, fixing the creaky floor; Possibly window replacement.
However, if you calculate the labor costs and consumption of materials, it turns out that by increasing labor costs by half, and spending money by a quarter, you can give the apartment a completely different look, and for a long time. How much you need to invest specifically depends on prices in the region, but common methods, with which you can make an apartment cozy and elegant inexpensively, are the same.
Saving Money when repairing an apartment with his own hands, he stands, like the Earth in ancient legends, on three whales and a slowly hurrying turtle under them:
- We are not afraid of work. Nothing comes from nothing. Either money or labor.
- Wherever possible, we do not change the capital, but the old one that has lost its appearance, but renew it.
- We attribute the maximum savings to where it will not affect the quality of work and will not be visible.
- We spread the costs of labor and money over time: having conceived repairs in the summer or autumn, we spend a year on preparation, and then we pile on and quickly do everything. To lay out 200-300 thousand rubles at once is a problem, but it is quite possible to break them up in parts for a year. In addition, there will be time to measure seven times - cut once.
Where it's hard to save
The only area where you have to invite a specialist is the alteration and strengthening of electrical wiring if it is old and weak. Here, the only way to save money is to negotiate with the DEZ electrician. He will do the work in pieces, in his spare time, but the likelihood of hack work will be even less than that of “branded” specialists: after all, he will then serve all this.

It is better not to save on electrics and wiring, however, some points, such as installing sockets, can be done independently.
Tool
A good specialized tool makes the job much easier and cheaper. But it's hard to buy. Therefore, it is better to rent a tool as needed. In terms of costs, it will come out a little if you decide in advance on the design and draw up an approximate work plan for yourself.
Season
Plumbing
A sore point with independent cheap repairs is the replacement of plumbing. If it is still “alive”, only filthy, then it can be cleaned and painted. How to do this will be described below. But if there are chips and cracks, then, if you like it or not, you need to change it.
For such a case, here is some information for you: new settlers, especially in houses above the budget category, often start overhaul, and great, brand-new faience and cast-iron plumbing ends up in a landfill. Landfill operators (simply - landfill scavengers) have long turned this circumstance into a profitable business.
They do not make direct contact by office phone with strangers, but it is quite possible to get through to them using word of mouth methods. The rate is from a third to a half of the factory price for a household item. And do not think that they will take you to the dump and show you where it lies. In the back room you will be offered a choice of clean, carefully washed products, which you can sit down on at least immediately.
Construction garbage
The next sore point is the removal of construction waste. The operation is not cheap, and requires paperwork. Exit: a basement, a barn, a summer house or a closet and a few used bags of plastic sackcloth, bought for a penny. Construction debris does not sour and does not rot, it can then be poured into a container in a garbage dump in a bucket. There is nothing illegal in this.
Cosmetic repair is one of the most affordable and simple ways in the shortest possible time to ennoble housing, give the surrounding space of the house or apartment new colors and decoration. The financial costs of cosmetic repairs, as a rule, are not large, but effect achieved cleanliness, freshness and novelty of the interior can exceed all expectations, give a feeling of joy and comfort. In the article we will tell you how to make cosmetic repairs with your own hands in the apartment.

Cosmetic repairs are done independently with minimal redevelopment of housing, with low costs for repairing walls, floors, plumbing, windows and doors. This type of apartment renovation can be characterized as a partial or complete restoration of the condition of the walls, repair and installation of floors, ceilings without performing a complex replacement of structural elements (reconstruction of floors, replacement of partitions). These works usually include puttying and painting ceilings and walls, replacing wallpaper and skirting boards, painting windows and doors, minor repairs to floors, for old parquet, scraping, and repeated varnishing.
Currently, the concept of cosmetic repairs with the advent of many new finishing materials and technology has expanded a bit. For example, today it is quite possible to transform the room on your own within a few days by making decorative plaster on the walls, which does not require careful preparation and laying a laminate in the room.
Another small nuance - in the process of cosmetic repairs, flaws in structural elements apartments or engineering systems which will entail unforeseen work and cost overruns. It all depends on the ability to independently evaluate the initial data of the premises before carrying out repair work and the actual wear of the object.
Immediately make a reservation that the capital redevelopment of the apartment (demolition and relocation bearing walls, changes in the purpose of the premises, reconstruction of floors) are not included in the definition of cosmetic repairs, since these activities require the preparation of redevelopment and reconstruction projects and their coordination in the relevant authorities.
Main types of repair:
- Ceiling painting
- Repair and painting wooden doors and windows (although it is currently cheaper and more technologically efficient to replace old windows and doors)
- Linoleum or laminate flooring
- Leveling and scraping of parquet floors, and their repeated varnishing
- Laying ceramic tiles on walls or floors
- Plumbing installation
- Partial replacement of sockets and switches
- Replacement of lighting fixtures.

If you have minimal skills, desire and time, you can perform a simple apartment renovation on your own, however, before starting work, you need to draw up a clear procedure for carrying out all the stages for yourself.
Preparatory work
Before starting the repair, it is necessary to free the room from furniture. If it is impossible to take out large-sized furniture, it must be moved to the center of the room, to ensure a free approach to the walls. The remaining furniture must be carefully covered with old rags and plastic wrap.
If the floor covering is not planned to be replaced, it must be protected (except tiles). To do this, you can use hardboard, sheets of packaging cardboard, on top of which the room is carefully covered with plastic wrap in an overlap, and the joints are glued with a film. Remove decorative frames from sockets and switches or paste over with tape. Before working with electrical wiring, it must be de-energized (!)
Dismantling of old coatings
- Old coatings are removed from the ceiling. Currently, the most common ceiling coatings are water-dispersion paints, which are practically impossible to wash off, unlike traditional whitewashing. It is enough to remove the exfoliated sections of the ceiling with a metal spatula, obvious cracks need to be embroidered and puttied.
- If you are repairing a ceiling with old whitewash, it must be washed off with warm water to the ground. To do this, take a container with warm water, rub it a little laundry soap and add two tablespoons of baking soda. With a roller or brush, carefully apply water to the ceiling and wash off the old whitewash. It must be removed completely.
- Old wallpaper. If old paper wallpapers are pasted on the walls, they hold tightly, and it is planned to apply a dense coating in their place (non-woven wallpaper or for painting), then you can old surface save. old vinyl wallpapers hard to remove. You can use a hair dryer or a heat gun. The rest of the coatings are simply thoroughly wetted with warm water or a special wallpaper remover is used.
- Old coverings of doors, windows, platbands and skirting boards are carefully cleaned with sandpaper and a small spatula. Then primed, puttied with a special compound, sanded and primed again. Oil paint is removed using a building hair dryer or mortar.
Ceilings
- Ceiling painting. When choosing materials for painting, it is necessary to focus on the intended purpose of the rooms. If the premises are residential, then it is better to choose acrylic paint. Non-residential rooms (bath, corridor, kitchen, hallway) with high-quality moisture resistant water-based paints. You can pick up color additives in the paint and make different shades in the rooms. The ceiling is primed before painting. The paint is applied to the surface of the ceiling with special rollers, carefully observing the joints and the occurrence of streaks.
- Wallpapering. For finishing the ceiling with your own hands, you can use special wallpaper for the ceiling, which is characterized by increased density and light color. The procedure is time-consuming and requires certain skills.
- Ceilings are glued. Square or rectangular panels (special polystyrene foam ceiling tiles) are glued onto the ceiling surface. The main thing is to thoroughly clean and prepare the ceiling, and then carefully primed. The plates are fixed to the ceiling with the help of special adhesives.
Wall decoration with wallpaper
Now there is a huge selection in stores various wallpapers: silk-screen printing, with embossing, for painting and photo wallpapers. Almost all wallpapers come with application instructions, sold special adhesives. The main thing is to observe the specified technology, to prevent temperature drops, humidity and drafts in the room.
Using free time, a little financial resources and a little diligence, you can transform your apartment into a new and cozy space in a short time.


