decorative wood painting not only gives the product of this material a more attractive appearance, but also increases the service life. A well-chosen varnish can give ordinary pine furniture a touch of noble wood, and paint can hide all the flaws of the old material.
Wood staining - what to choose?
All types of coatings are divided into two categories. The first one includes opaque paintwork, or, in other words, enamels and paints. Until recently, craftsmen had to be content with oil paint, which took a long time to dry and was quite toxic. Today it has been replaced by a variety of enamels and paints - polyurethane, acrylic and alkyd. They are not as toxic, and their drying time is not so long. In addition, unlike oil paints, which will begin to crack and peel off after a few years, they are more durable.
Paints of the first group have some advantages and disadvantages:
- Alkyd paints it is better to use it for processing wood inside the house, since the weather-resistant film that forms on their surface after application is not very durable.
- Acrylic paint, which is slightly more expensive, creates a much more weatherproof coating, so it is worth choosing if it is, for example, on the outside. One of the varieties of acrylic paint is water-dispersion. It is suitable for both indoor and outdoor work. Such paint is non-toxic (water is used as a solvent in this composition) and is very durable.
Another category is transparent paints and varnishes. It includes impregnations, stains and varnishes. A component that protects against ultraviolet radiation is necessarily introduced into the composition of such coatings, since under its influence the tree quickly ages and loses its original color. Here the choice depends on whether the painted surface will be inside or outside the house. So, varnishing a tree is appropriate even when processing. Lacquer can be either colorless or tinted. Also, under a layer of colorless varnish, you can apply a stain that will give the wood the desired shade. If we are talking about or furniture indoors, then we can limit ourselves exclusively to wood stain. intended only for decorative finishes and is not able to protect against atmospheric phenomena.


Wood painting technology - surface preparation
Regardless of which coating will be used, the material must be carefully prepared before processing. If the surface has been previously painted, then the old paint must be removed. This can be done using a special wash (you need to work with it carefully, as it is very toxic) or using a grinder with a special nozzle. Apply a new coating over the old one only if it holds well and does not peel off. In addition, it is imperative to know what exactly the tree was treated with earlier, since some compositions may be incompatible. This means that during operation, the new coating may lie unevenly, bubble or even peel off.
After removing the old paint, the material is cleaned of dust and dirt, and allowed to dry. Fallen knots and various cracks must be covered with a special putty, and then sanded to smoothness and once again cleaned of dust.
If the wood is painted with varnishes or enamels, it must be dried properly, as in the process of drying on a wet surface, such coatings will bubble and peel off.
Painting wooden surfaces - we take up brushes and rollers
Depending on which coating was chosen for the tree, the staining process will be slightly different, so it is worth considering each of them in more detail.
Let's start with the stain. Experienced craftsmen before application recommend it lightly warm up, and if powder stain diluted in water is used, then strain through several layers of gauze. It can be applied with a swab or brush. Usually it is applied in two or three layers, allowing each of them to dry well. If an alcohol-based stain is used for painting, the wood should be slightly moistened before applying it. This will allow the composition to lie as evenly as possible.
Which tool to choose for working with varnish depends on the composition of the paintwork. To apply oil or other solvent-based varnish, use a brush with soft bristles. It is necessary to apply varnish with smooth and uniform movements along the fibers of the tree, making sure that there are no streaks. Lay such a varnish in several layers, and each of them should dry well. Alcohol-based varnishes are not intended for outdoor use - they are used when processing furniture used in the interior. It is best to apply this composition with a swab. This is done in four layers, and the first two of them are considered primers and need to be processed very finely. sandpaper. The third layer is applied to a dust-free surface and left to dry for several days. After that, they put the fourth layer, before applying which the varnish can be tinted if desired.
And, finally, work with impregnations and enamels, the processing technology of which is very similar. To apply them, you can choose any handy tool. The most convenient way, of course, is to use an airbrush, but brushes with rollers will do just fine. They must be applied in accordance with the manufacturer's recommendations, not forgetting that the work on painting the outer surfaces should be carried out on a dry and, if possible, calm day.
After the wooden surfaces are painted, it is desirable to protect them from any impact. Otherwise, the coating may be damaged and then all work will have to be started anew.
Although the natural look of wood is the most beautiful and interesting for most, however, it often becomes necessary to paint it. The reasons are different, but most often it is the desire to protect it from the effects of harmful factors, for aesthetic reasons, or the need to restore, for example, old buildings. In many cases, you can successfully do this and paint the house yourself. You just need to familiarize yourself with the basic rules.
Causes of wood aging
Wood continues to age, as does living wood. At the same time, similar processes in a felled tree are much faster and more transient than in a growing one. If the material is not treated with special antiseptics, then after four months it will look unpresentable and turn gray. Therefore, the tree must be regularly processed and painted.
Weather conditions in the form of precipitation and even minor temperature changes affect the rock, making it more rigid and changing its shade from natural to nondescript ash. Due to the high humidity, the pores of the wood are constantly expanding and narrowing, which leads to cracks and aging.
Mold appears in places where moisture accumulates. Then they spread over the entire surface. You can easily notice traces of mold, they have a characteristic light gray, and sometimes black, color. Although they do not bring any harm to the house, they can negatively affect the health of the people living in it. Subsequent decay requires processing and painting of timber and wooden house.
Bark beetles are found even in new buildings, when wane was not removed during the construction of the house or contaminated material was used. These insects have been imperceptibly undermining the tree for many years, and it is very difficult to get rid of them.
Advice! Careful processing and painting wooden products necessary if they are constantly exposed to moisture.
Types of paints for painting the house
Paints for painting a wooden house differ by venue finishing works. For external staining, a material is needed that will protect the breed from the effects of the following factors:
- scorching sun rays;
- gusts of wind;
- impact of atmospheric precipitation;
- pressure drops;
- high humidity;
- low
- fluctuations in low and high temperatures.
Important! When choosing a paint for a log building, all these points must be taken into account.
Interior paint
Paints for internal works produced in a wide range. They are:
Oily
The advantage of such materials are:
- deep degree of penetration into the rock structure;
- low price;
- resistance to atmospheric changes.
The disadvantages of such materials are few:
- wood painting is required regularly, depending on weather conditions and climate;
- the oil coating dries for a long time, about 12 hours;
- paint peels off quickly, especially when exposed to direct sunlight.
Acrylic
This the best option to solve the problem of how to paint a tree. Their advantages:
- they allow air to freely penetrate the rock structure;
- after drying, the layer remains elastic, which prevents the formation of cracks;
- may not be painted country house up to eight years, which corresponds to the terms of scheduled repairs in all buildings.
Covering antiseptic material
Its basis is an alkyd-acrylate composition. With this rather new type of paint, you can even give an aesthetic appearance cheap wood for more than ten years.
Advice! All kinds of paints will hide natural structure rocks, so no need to stain quality wood. Only planed boards that have been pre-treated should be coated.
For calibrated logs and glued beams, it is recommended to use a colorless varnish or azure. Thus, the painted layer will give the building a beautiful gloss. And colored varnishes will help to paint the wood antique, changing its shade.
Important! At the first painting of buildings made of timber or logs, everyone chooses the paint based on their tastes and preferences. And then, when repainting is needed, oil materials are applied only to oil, and acrylate paints only to acrylic.

To figure out what paint to paint wooden house or how to cover the lining in the bath, a simple analysis of the existing painted layer should be carried out. To do this, cut off a small piece and break it. If this is easy to do, then it means oil paint. And acrylic can be easily rolled into a tube.
The service life of a tree will not be extended by any paintwork if it has not been treated with antiseptics, flame retardants and primed. Therefore, all these products should be applied before coating.
When choosing suitable coverage you need to pay attention to its approximate consumption and resistance to sunlight.
Preparing wood for painting
Not everyone knows that the tree must be prepared before painting by following certain preliminary procedures. All wood, both inside and outside the building, must be properly dried (moisture content not higher than 10%), cleaned and sanded. The answer to the question of how to properly paint a wooden house depends on the condition of a particular building.
All flat surfaces needs to be sanded or trimmed. Places from complex structure it is best to treat with special preparations for removing paint and varnish coatings, and then only sand it with sandpaper or a grinder.
Sometimes holes appear in the tree. If they are small, it is enough to fill them with putty (usually acrylic). Large damage is masked with precisely matched inserts from wood fragments.
Advice! Painting a house from a log is not carried out under the influence of direct sun, since the layer will dry unevenly and stains will form. You should wait for cloudy weather and carry out facade painting.
After preparatory work the tree is allowed to rest under the film, leaving holes for ventilation. In hot weather, it is not necessary to cover the surface with polyethylene.
If the tree cannot be dried in any way, then a primer with an antiseptic is applied directly to the wet material and allowed to dry.

How to paint a tree?
Now a few practical advice concerning the question of how to paint wood and house paint. When performing work, you should not stop at just one layer of paint. For a satisfactory and lasting effect, it is necessary to apply the paint several times.
Cleaned and sanded surfaces must first be varnished and then subsequent coats, depending on the desired effect, applied with a brush, roller or spray gun.
When using brushes or a roller for painting, it should be borne in mind that you need to make a layer along the wood fibers, evenly distributing the paint (varnish). When painting vertical surfaces, it is better to use materials with non-sag properties, and therefore prevent fresh paint from running and less aesthetic stains.
Wooden elements located in the premises do not need increased security. They are not threatened either by atmospheric influences, or the possibility of destruction from dampness, or fungus, or other pests. Therefore, it is enough to clean such a surface, then apply a layer of colorless or colored varnish, and when it dries, cover it with a colorless finishing material.
For everyone who decides to professional painting, you need to consider that it will create a dense, durable shell. Therefore, it will be difficult to recognize under it natural wood, and in the future, more effort will be required if the need arises to remove the paint.
Wood is quite an attractive and beloved material, so it is preferred to renew and paint it rather than throw it away or destroy it. But, however, this process should be carried out correctly, so that later you do not have to deal with falling layers of old paint.

Therefore, before reconstruction, you should first check what kind of varnish or paint the wood was coated with. All this is necessary in order to use materials based on the same resin. Before that, you need to grind the surface, thus improving adhesion with the new coating. If it is decided to completely remove the previous layer (old floors, parquet floor), then any paint can be used.
Raw wood must be pre-impregnated with special means. This is done so that it is not exposed to fungi and pests, because this often ends in irreversible destruction. It is best to apply two coloring layers of such a primer.
You can protect wood from the harmful effects of atmospheric factors with the help of protective and decorative impregnation or colorless varnish. Layers should be applied with a brush in the direction of the wood grain.
Attention! The instructions for the paint should contain the time of its release.
If you want to repaint an already used tree on which lies old layer paint, you must first remove the lagging fragments of the shell with a wire brush. Then, using sandpaper, you need to treat the surface to improve adhesion. Before recoating wood, it must be vacuumed and degreased. Only then can new paint be applied to the old tree.
As you can see, the question of how to paint wood cannot be approached schematically. There are a few essential points to be taken into account and proper manufacturing procedure to be followed.
When it comes to finishing oak, cherry or maple furniture, the word "paint" sounds blasphemous. But inexpensive and less spectacular wood, such as pine, poplar or alder, paint can transform fabulously. Colorful coatings provide great opportunities for decorating your home. They are easy to restore and repair, and better than transparent coatings, they protect wood from impact. sunlight. However, to give furniture beautiful view, you will have to work more carefully than when painting walls, ceilings or sheathing. We will demonstrate a simple method, including the actual coloring and application decorative coating antique.
The key is surface preparation.
This old rule of painters has not become obsolete in our days. The paint reveals all the defects in the wood surface, so be prepared to spend a fair amount of time removing defects and preparing the surface for painting.
To make wood smooth, sand it with 150 grit abrasive using different sanding pads for flat and embossed surfaces. The primer that you then apply will fill in the small scratches from the sandpaper. When you've finished sanding the flat surfaces, lightly go over the edges with sandpaper (150 grit) to soften the sharp edges. (Paint does not adhere to sharp edges, and they wear out quickly.) Fill in any depressions and cracks with acrylic putty, sand smooth when dry, and then carefully remove all dust with a vacuum cleaner or a cloth swab lightly dampened with the mixture. linseed oil and white spirit (the swab should be almost dry and slightly sticky to the touch).
Sanding tools must match the surfaces.
Priming before painting
We choose a primer depending on the type of surface to be painted. For the kitchen cabinet, they took a pigmented shellac-based primer, which reliably clogs resinous pine knots. With a synthetic or natural bristle brush, first apply one coat of primer to all surfaces and edges of the product, and then a couple more coats at intervals of 5-10 minutes on areas with exposed end grains.
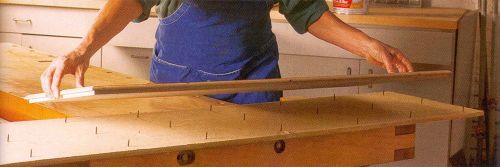
The nailed board supports the primed kitchen cabinet door, allowing both sides and all four edges to be processed in one go. Sharp nail tips provide secure and even support, leaving almost imperceptible marks
To save time when painting the door, a board was placed with sharp tips of nails sticking out of it, on which the door rests on the already treated side while priming the second side and edges. After 24 hours, when the primer is completely dry, sand large flat surfaces with 220 grit abrasive using an orbital (eccentric) sander or sanding pad. Sand small areas by hand with an abrasive sponge or profile sanding pads.
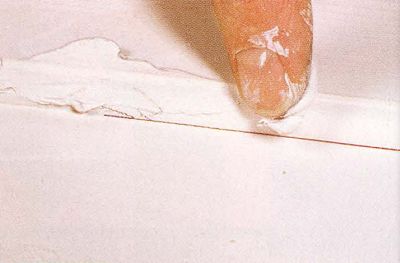
To reveal all the imperfections of the primed surface, use the backlight. Unlike surfaces primed for a clear coat, nothing permanent will happen if you remove the primer coat to bare wood. Simply apply the primer again, let it dry and sand smooth. Then carefully clean the surface from dust.
By directing the light from the lamp parallel to the primed surface, you can see shadows that signal coating defects. Sand these areas and re-primer
Fill with acrylic putty all the recesses that need to be hidden, and level the surface with grinding. Apply another coat of primer and sand it with 220 grit. When sanding a putty surface, a lot of dust is generated, so clean the product with a vacuum cleaner before wiping it with a damp cloth (for latex paint) or a sticky swab (for oil-based paints).
|
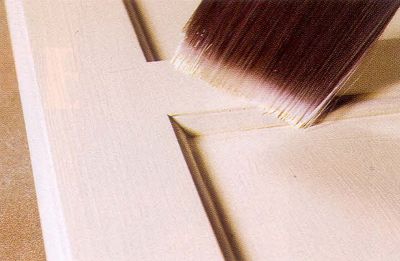
Rough areas and knots show through the primer, so they are easy to identify and smooth out with latex putty |
On profile areas, we use the simplest and most available tool- own finger |
You can restore the clarity of profile parts using a small bar with sandpaper on two faces |


How to choose the right primer
| Compound | Recommended use | Note | Drying time |
| acrylic primer(water based) | Suitable for all bare woods except pine and other knotty and resinous woods. Apply before painting acrylic paints water based. | Advantages: Low odour, dries quickly and sands easily without clogging the abrasive. Due to the water content, it raises the pile on the wood more than other primers. May adhere poorly to impregnated or previously painted surfaces. Use a brush with synthetic bristles to apply. | Drying time - no more than 1 hour; paint can be applied after 4 hours. |
| Alkyd primer(oil based) | Suitable for fresh and slightly weathered wood. Deeper than a latex primer, it penetrates the surface. Topically applied to isolate resinous pine knots. | It is used before painting with oil compositions. Check the instructions on the label to see if the primer is suitable for blocking contaminants showing through the paint. Applied with a natural bristle brush. | Drying time "to touch" - 45 minutes; staining after 8 hours (or more at low temperature and high humidity). |
| Shellac primer(with added pigment) | Blocks resinous substances that can penetrate through latex and oil primers. When updating coatings, shellac promotes good adhesion new paint with old coating and weathered wood. | Alcohol-based shellac dries in minutes and the smell may be less offensive than some oil based primers. Shellac can be used before painting and oil, and water-based paints. Applied with natural bristle brushes or universal brushes. | Dries in 15 minutes; the next layer is applied after 45 minutes. |
Paint like the pros
For latex paint, two synthetic bristle brushes are needed: a 65 mm wide flat brush (flute) for large flat areas and a small 40 mm wide angled brush for narrow profile areas. Practice applying paint on scraps or in an inconspicuous area of your project to get a feel for how the paint flows off the bristles of the brush.

If the brush seems too hard, dip its bristles in water and, while twisting, knead them against the walls of the vessel. This will make the brush more obedient and make it easier to wash it after work. Finally, dip your brush into the paint until it's half the length of the bristles and squeeze it lightly against the rim of the can to remove any excess paint. Hold the brush at an angle of about 75° to the surface so that the paint flows better. Before it starts to dry, smooth (shade) it over the surface, lightly touching it with the tip of the brush. In this case, brush marks almost completely disappear.
Between the application of the first and second coats, sand the surfaces with 320 or 400 grit abrasive. Then remove the dust with a vacuum cleaner and a damp cloth. Let the second coat of paint dry overnight. You can stop there if you want the product to look new and fresh. And if you want to give it a look of noble antiquity, then this can be done with the help of patina.
1. Having collected a new portion of paint, never start applying it in a corner, otherwise puddles or streaks will inevitably form there. When painting a plane, first apply the paint a few centimeters from the edge and move the brush towards the edge to prevent drips and streaks. Then go back to the beginning and continue working with long strokes.
2. If the paint has formed puddles in the corners or depressions, remove the excess with a brush, after squeezing it out.
3. Work with long strokes with even pressure. Then lightly run the tip of the brush over the freshly applied layer to even it out.
4. Divide the area to be treated into separate parts to always maintain a wet border of the painted surface, avoiding the formation of a film.
5. It is better to work on a horizontal surface, even if this requires the product to be laid on its side.
6. Two thin coats of paint are better than one thick coat that may bleed or wrinkle when dry.
How to choose paint
If you paint ordinary furniture latex paint, which we use for painting walls, peeling may occur. This usually happens when the item sticks to a painted surface, such as a shelf, because the paint remains soft and supple even after it dries. Therefore, it is better to use furniture acrylic enamel. To make the coating smooth and the paint flow well, add modifiers that slow down drying and help the brush marks disappear.
Usually add one part modifier to 10 parts paint. Mix it with paint in a separate container rather than adding it to a paint can.
How to age paint with a patina
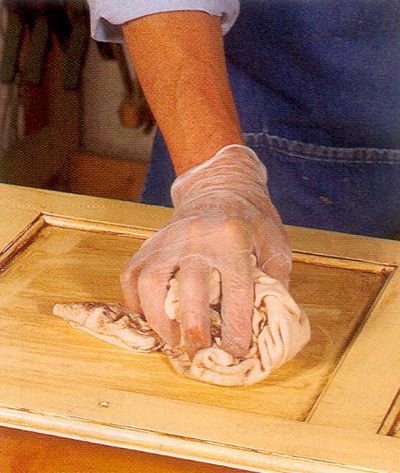
To give kitchen cabinet antique furniture, apply a water-based patina to the painted surface. Lightly go over the dried paint with 600 grit sandpaper first, and on raised surfaces use a gray abrasive sponge to remove the smallest roughness.
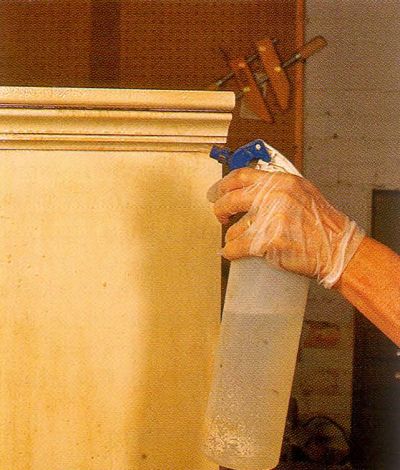
Apply the patina room temperature and avoid drafts so that the composition does not dry out too quickly. If you have never used patinating compounds, practice applying it on scraps. Get started on back wall and inside the cabinet to roughly determine how long it will take to apply and level the compound. After applying the patinating composition, let it dry for 24-48 hours. Then protect it with a layer of colorless acrylic lacquer water based.
|
Apply the patina with the same narrow brush as the paint. Rub the composition into all recesses and corners |
Apply with a brush to flat surfaces where it will reveal brush marks and minor paint imperfections. |
|
Wipe off excess composition and evenly, without strong pressure, blend the strips with a clean soft cloth. Avoid completely removing the patina from flat areas |
In relief areas, emphasize the contours of the details by lightly tapping the surface with a dry bristle brush. |
|
If you make a mistake or the composition starts to dry, lightly moisten it with water from a spray bottle or wipe it off with a wet cloth. |
|


Hi all. Helpful information for blog readers. In this article you will learn how to paint a tree and consider what technology is used wood coloring.
Wood coloring
Wood coloring most popular processing method wooden surfaces and since wood products and materials are widely used in interior decoration and construction, you need to understand how to paint a tree and what paint to choose for wood. Paints for painting wood are divided, according to their composition, into synthetic and natural. So synthetic paints are made from petroleum products, and natural paints are made from natural vegetable oils, resins and mineral components. When painting wood, natural paints do not close the pores of wood and do not interfere with natural air exchange.
So enamel paints for painting wood can be divided into oil and alcohol enamels, such paints add shine to wooden surfaces and there is no need to apply varnish. Also, acrylic paints are most often used to protect wooden surfaces from moisture, they also have significant wear resistance and durability, but contain toxic substances and should not be used in living rooms. Such paints perfectly repel water, so it is successfully used for painting wood on the facades of buildings. However, such paints do not penetrate deep into the wood structure, but only form protective film on its surface. Painting wood with oil and acrylic paints maximizes the life of wooden surfaces.
Also resistant to aggressive influences are alkyd paints for painting wood, they penetrate deep into the structure of the tree and get the most durable protective covering. IN alkyd paints the binder is alkyd resin, and they are diluted with drying oil or white spirit. The main composition of alkyd paint contains special antifungal additives. Such paints for painting wood are less toxic, frost-resistant, do not turn yellow and do not fade in the sun.
Popular and widely used are polyurethane paints For wood coloring, they are easily applied to wooden surfaces and are not inferior in quality natural paints. Before painting wood, especially fresh wood, it is necessary to treat the knots and cover its surface with drying oil or a primer, this will give stability and adhesion of the paint to the base, so the paint will not peel off, and the wood will be reliably protected from various aggressive influences.
There is currently a wide variety of paintwork materials For wood coloring and the question arises than to steal a tree. Experience shows that acrylic and oil paints Tikkurila companies are able not only to reliably protect wooden surfaces, but also to give them an attractive appearance.
It all depends on the correct selection of protective paints for certain wooden surfaces, depending on the effects on them. environment. So, for example, properly processed and painted wooden facade at home will retain its protective functions and beauty for many years. Watch a video about painting the wood of the facade of a house trimmed with wood:
Before you start painting the wood, you need to clean it of dirt or old paint, as well as clean the surface. sandpaper. After that, irregularities and defects in the surface of the wood must be puttyed with wood putty and sanded again with emery cloth. Further, after the wooden surface has dried, it must be primed with drying oil, universal primer or diluted paint, after which you can proceed to coloration tree. For more high-quality coloring wood requires several thin coats of paint, as wood absorbs paint well.
Good luck and success in your repair!


